key CITROEN BERLINGO VAN 2019 Handbook (in English)
[x] Cancel search | Manufacturer: CITROEN, Model Year: 2019, Model line: BERLINGO VAN, Model: CITROEN BERLINGO VAN 2019Pages: 320, PDF Size: 8.91 MB
Page 46 of 320
44
Changing the battery
If the battery is flat, you will be
informed by lighting of this warning
lamp in the instrument panel, an
audible signal and a message in the
screen.
The replacement battery is available from a
CITROËN dealer or a qualified workshop.
With remote control key
Battery type: CR 1620/3 volts.
With Keyless Entry and Starting
Battery type: CR 2032/3 volts.
The remote control must be reinitialised after
replacing the battery.
For more information on Reinitialising the
remote control, refer to the corresponding
section.
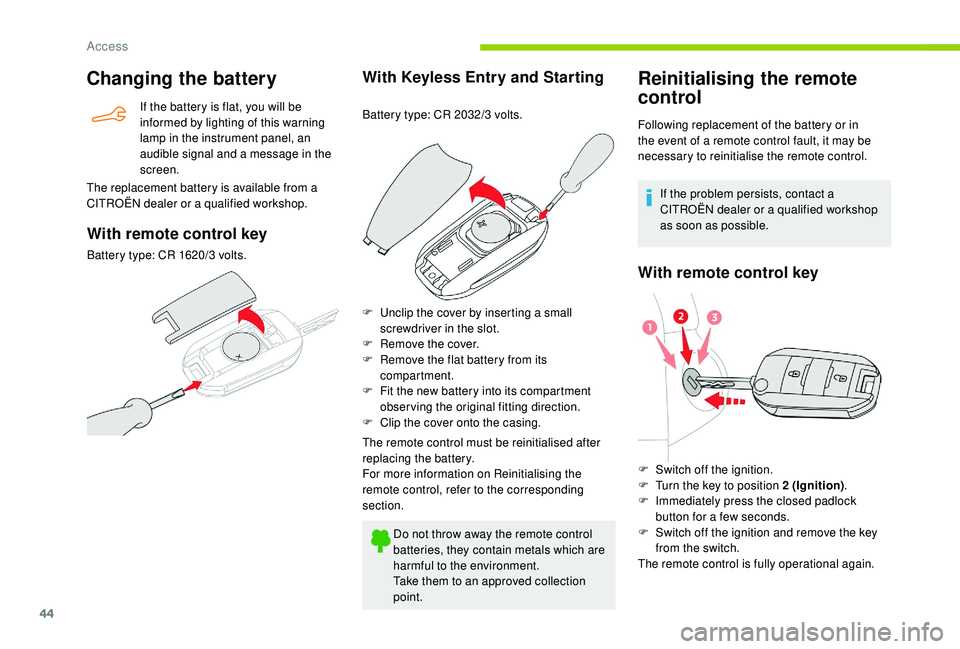
F
U
nclip the cover by inserting a small
screwdriver in the slot.
F
R
emove the cover.
F
R
emove the flat battery from its
compartment.
F
F
it the new battery into its compartment
observing the original fitting direction.
F
C
lip the cover onto the casing.Do not throw away the remote control
batteries, they contain metals which are
harmful to the environment.
Take them to an approved collection
point.
Reinitialising the remote
control
Following replacement of the battery or in
the event of a remote control fault, it may be
necessary to reinitialise the remote control. If the problem persists, contact a
CITROËN dealer or a qualified workshop
as soon as possible.
With remote control key
F Switch off the ignition.
F T urn the key to position 2 (Ignition) .
F
I
mmediately press the closed padlock
button for a few seconds.
F
S
witch off the ignition and remove the key
from the switch.
The remote control is fully operational again.
Access
Page 47 of 320
45
With Keyless Entry and Starting
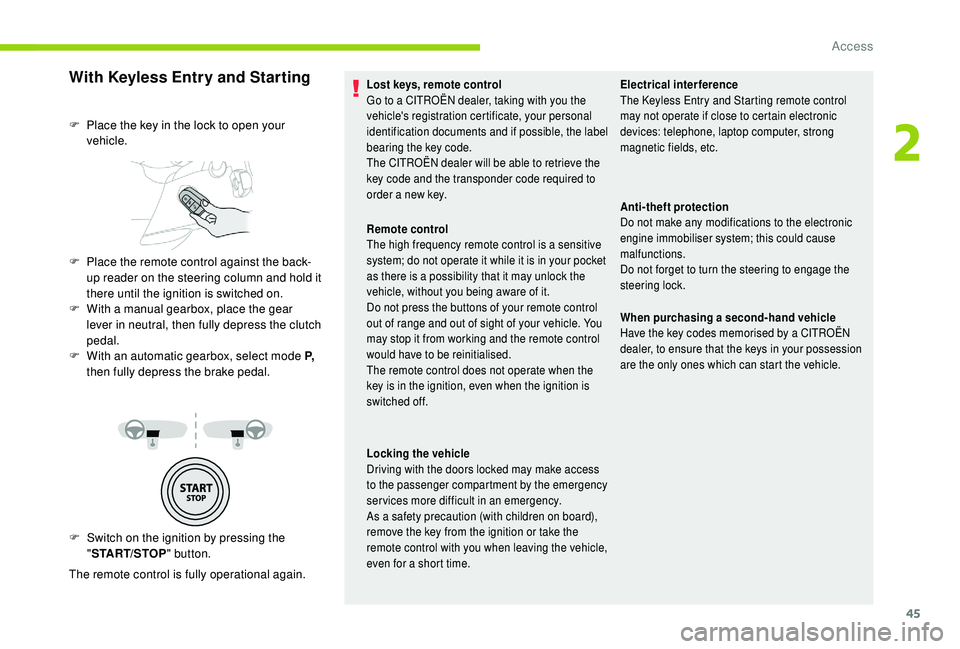
F Switch on the ignition by pressing the "START/STOP " button.
The remote control is fully operational again. F
P
lace the key in the lock to open your
vehicle.
F
P
lace the remote control against the back-
up reader on the steering column and hold it
there until the ignition is switched on.
F
W
ith a manual gearbox, place the gear
lever in neutral, then fully depress the clutch
pedal.
F
W
ith an automatic gearbox, select mode P,
then fully depress the brake pedal.
Lost keys, remote control
Go to a CITROËN dealer, taking with you the
vehicle's registration certificate, your personal
identification documents and if possible, the label
bearing the key code.
The CITROËN dealer will be able to retrieve the
key code and the transponder code required to
order a new key. Electrical interference
The
K eyless Entry and Starting remote control
may not operate if close to certain electronic
devices: telephone, laptop computer, strong
magnetic fields, etc.
Remote control
The high frequency remote control is a sensitive
system; do not operate it while it is in your pocket
as there is a possibility that it may unlock the
vehicle, without you being aware of it.
Do not press the buttons of your remote control
out of range and out of sight of your vehicle. You
may stop it from working and the remote control
would have to be reinitialised.
The remote control does not operate when the
key is in the ignition, even when the ignition is
switched off.
Locking the vehicle
Driving with the doors locked may make access
to the passenger compartment by the emergency
services more difficult in an emergency.
As a safety precaution (with children on board),
remove the key from the ignition or take the
remote control with you when leaving the vehicle,
even for a short time. Anti-theft protection
Do not make any modifications to the electronic
engine immobiliser system; this could cause
malfunctions.
Do not forget to turn the steering to engage the
steering lock.
When purchasing a second-hand vehicle
Have the key codes memorised by a CITROËN
dealer, to ensure that the keys in your possession
are the only ones which can start the vehicle.
2
Access
Page 48 of 320
46
Accumulations (water, dust, grime, salt,
etc.) on the inner sur face of the door
handle may affect detection.
If cleaning the inner sur face of the door
handle using a cloth does not restore
detection, contact a CITROËN dealer or a
qualified workshop.
A sudden splash of water (stream of water,
high pressure jet washer, etc.) may be
identified by the system as the desire to
open the vehicle.
Central locking/unlocking
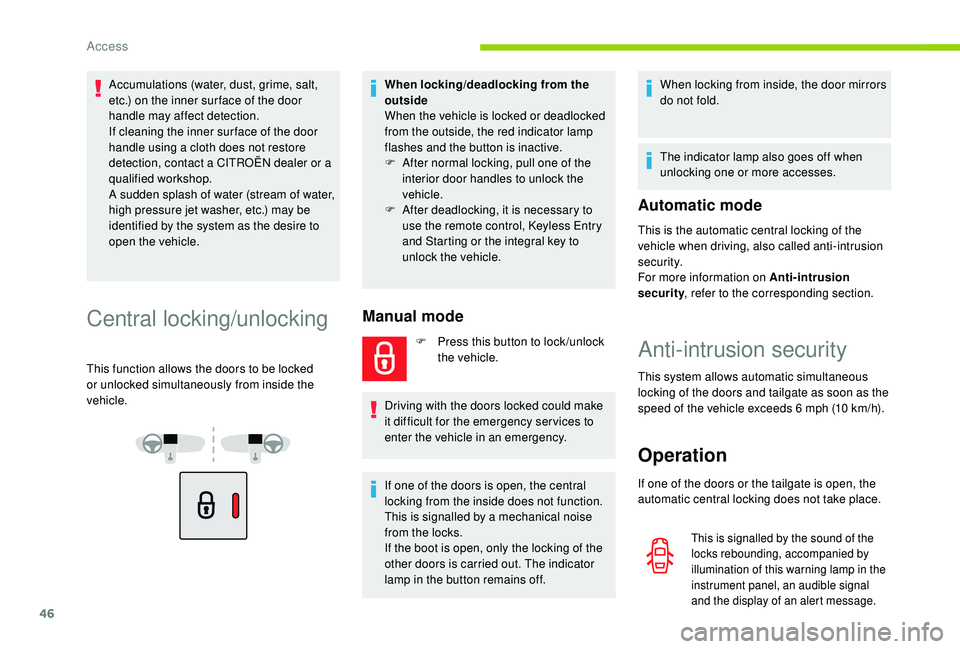
This function allows the doors to be locked
or unlocked simultaneously from inside the
vehicle.When locking/deadlocking from the
outside
When the vehicle is locked or deadlocked
from the outside, the red indicator lamp
flashes and the button is inactive.
F
A
fter normal locking, pull one of the
interior door handles to unlock the
vehicle.
F
A
fter deadlocking, it is necessary to
use the remote control,
K
eyless Entry
and Starting or the integral key to
unlock the vehicle.
Manual mode
F Press this button to lock /unlock the vehicle.
Driving with the doors locked could make
it difficult for the emergency ser vices to
enter the vehicle in an emergency.
If one of the doors is open, the central
locking from the inside does not function.
This is signalled by a mechanical noise
from the locks.
If the boot is open, only the locking of the
other doors is carried out. The indicator
lamp in the button remains off. When locking from inside, the door mirrors
do not fold.
The indicator lamp also goes off when
unlocking one or more accesses.
Automatic mode
This is the automatic central locking of the
vehicle when driving, also called anti-intrusion
s e c u r i t y.
For more information on Anti-intrusion
security
, refer to the corresponding section.
Anti-intrusion security
This system allows automatic simultaneous
locking of the doors and tailgate as soon as the
speed of the vehicle exceeds 6
mph (10 km/h).
Operation
If one of the doors or the tailgate is open, the
automatic central locking does not take place.
This is signalled by the sound of the
locks rebounding, accompanied by
illumination of this warning lamp in the
instrument panel, an audible signal
and the display of an alert message.
Access
Page 52 of 320
50
Locking the vehicle
with exterior perimeter
monitoring only
Deactivate the interior volumetric and anti-tilt
monitoring to avoid unwanted triggering of the
alarm in certain cases such as:
-
l
eaving a pet in the vehicle,
-
l
eaving a window or sunroof partially open,
-
w
ashing your vehicle,
-
c
hanging a wheel,
-
h
aving your vehicle towed,
-
t
ransport by ship.
Triggering of the alarm
This is indicated by sounding of the siren
and flashing of the direction indicators for
30
seconds.
Depending on the country of sale, certain
monitoring functions remain active until the alarm
has been triggered eleven times consecutively.
When the vehicle is unlocked using the remote
control or the "
K
eyless Entry and Starting"
system, rapid flashing of the red indicator lamp
in the button informs you that the alarm was
triggered during your absence. When the ignition
is switched on, the flashing stops immediately.
Failure of the remote control
To deactivate the monitoring functions:
F u nlock the vehicle using the key (integral to
the remote control) in the driver's door lock,
F
o
pen the door; the alarm is triggered,
F
s
witch on the ignition; the alarm stops; the
indicator lamp in the button goes off.
Deactivation
F Press the unlocking button on the remote control.
or
F
U
nlock the vehicle with the "Keyless Entry
and Starting" system.
The monitoring system is deactivated: the
indicator lamp in the button goes off and the
direction indicators flash for about 2
seconds.
When the vehicle automatically locks
itself again (as happens if a door or the
boot is not opened within 30
seconds of
unlocking), the monitoring system is also
reactivated automatically.
Deactivating the interior
volumetric and anti-tilt monitoring
F Switch off the ignition and within 10 s econds
press the alarm button until its red indicator
lamp is on fixed.
F
G
et out of the vehicle.
F
I
mmediately lock the vehicle using the
remote control or the "Keyless Entry and
Starting" system.
Only the exterior perimeter monitoring is
activated; the red indicator lamp in the button
flashes every second.
To be taken into account, the deactivation
must be carried out after every time the
ignition is switched off.
Reactivating the interior
volumetric and anti-tilt monitoring
F Deactivate the perimeter monitoring by unlocking the vehicle with the remote
control or the "Keyless Entry and Starting"
system.
The indicator lamp in the button goes off.
F
R
eactivate all monitoring by locking the
vehicle with the remote control or the
"Keyless Entry and Starting" system.
The red indicator lamp in the button once again
flashes every second.
Locking the vehicle without
activating the alarm
F Lock or deadlock the vehicle using the key (integral to the remote control) in the driver's
door lock.
Access
Page 54 of 320
52
Deactivating the rear
controls for the rear electric
windows
The red indicator lamp in the button comes
on, accompanied by a message confirming
activation of the system. It remains on for as
long as the deactivation is maintained.
Use of the rear electric windows from the
driver's controls remains possible. For your children's safety, press control 5 to
deactivate the switches at the rear electric
windows, irrespective of their positions.
Reinitialising the electric
windows
Following reconnection of the battery, the
safety anti-pinch function must be reinitialised.
The safety anti-pinch function is not active
during these operations.
For each window:
-
b
ring the window down completely,
then bring it back up. It will go up by a
few centimetres each time. Per form the
operation until the window is fully closed,
-
c
ontinue to pull the switch for at least one
second after reaching the window closed
position. In the event of contact (pinching) during
operation of the windows, you must
reverse the movement of the window. To
do this, press the switch concerned.
When operating the passenger electric
window switches, the driver must ensure
that nothing is preventing correct closing
of the windows.
The driver must ensure that the
passengers use the electric windows
c o r r e c t l y.
Be particularly aware of children when
operating the windows.
Be aware of passengers or other persons
present when closing the windows using
the electronic key or the "Keyless Entry
and Starting" system.
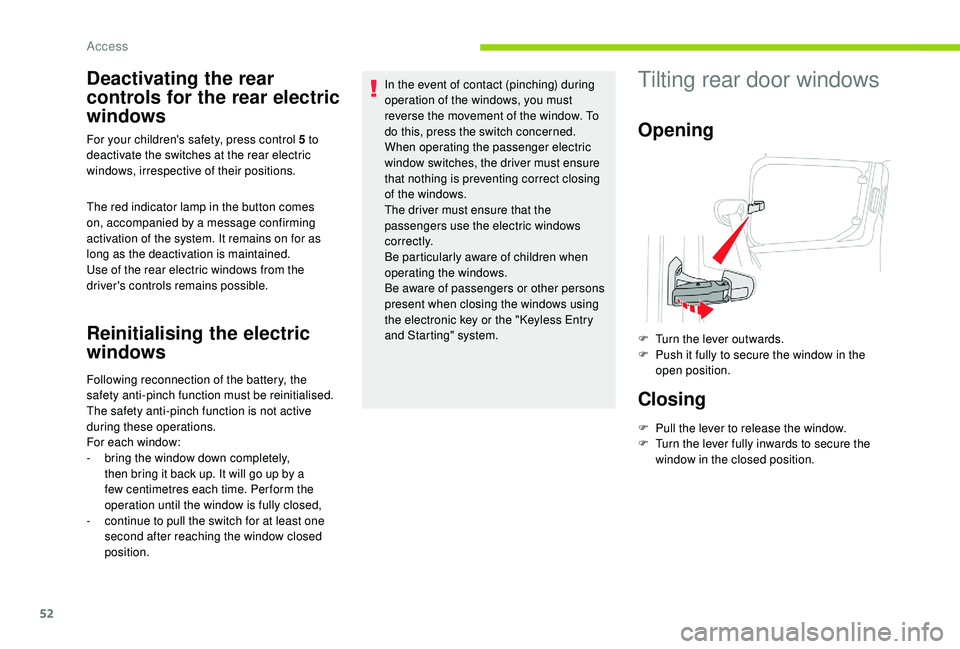
Tilting rear door windows
Opening
F Turn the lever outwards.
F
P ush it fully to secure the window in the
open position.
Closing
F Pull the lever to release the window.
F T urn the lever fully inwards to secure the
window in the closed position.
Access
Page 55 of 320
53
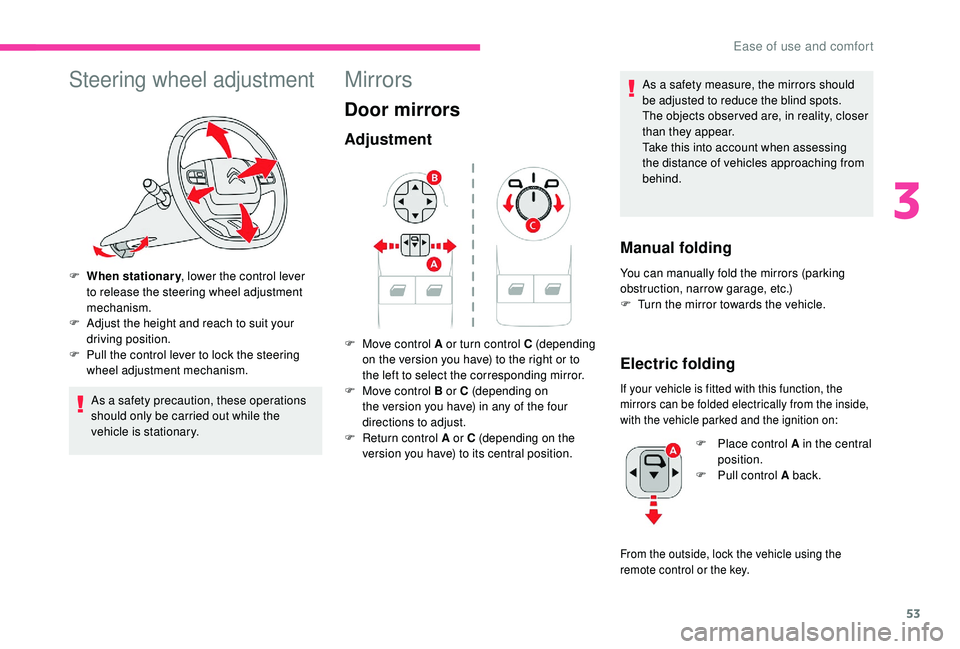
Steering wheel adjustment
F When stationary, lower the control lever
to release the steering wheel adjustment
mechanism.
F
A
djust the height and reach to suit your
driving position.
F
P
ull the control lever to lock the steering
wheel adjustment mechanism.
As a safety precaution, these operations
should only be carried out while the
vehicle is stationary.
Mirrors
Door mirrors
Adjustment
As a safety measure, the mirrors should
be adjusted to reduce the blind spots.
The objects obser ved are, in reality, closer
than they appear.
Take this into account when assessing
the distance of vehicles approaching from
behind.
Manual folding
You can manually fold the mirrors (parking
obstruction, narrow garage, etc.)
F
T
urn the mirror towards the vehicle.
Electric folding
If your vehicle is fitted with this function, the
mirrors can be folded electrically from the inside,
with the vehicle parked and the ignition on:
F Move control A or turn control C (depending on the version you have) to the right or to
the left to select the corresponding mirror.
F
M
ove control B or C (depending on
the version you have) in any of the four
directions to adjust.
F
R
eturn control A or C (depending on the
version you have) to its central position. F
P
lace control A in the central
position.
F
P
ull control A back.
From the outside, lock the vehicle using the
remote control or the key.
3
Ease of use and comfort
Page 56 of 320
54
Electric unfolding
The electric unfolding of the mirrors is via
the remote control or the key when unlocking
the vehicle. Unless folding was selected with
control A, pull the control back again to the
central position.
The folding/unfolding on locking/unlocking
can be deactivated. Contact a CITROËN
dealer or a qualified workshop.
If necessary, it is possible to fold the
mirrors manually.
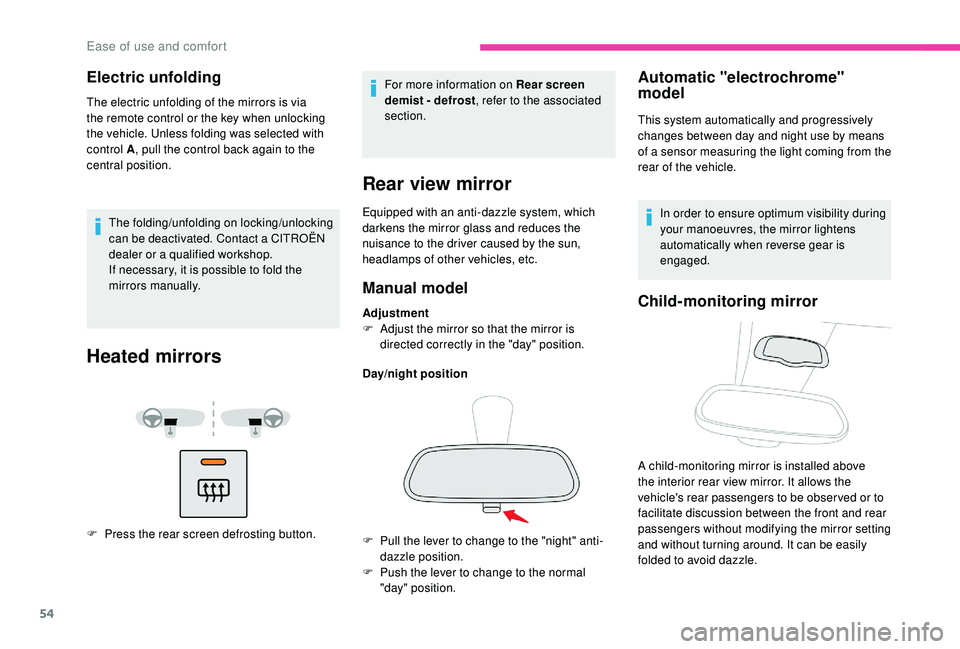
Heated mirrors
F Press the rear screen defrosting button. For more information on Rear screen
demist - defrost
, refer to the associated
section.
Rear view mirror
Equipped with an anti-dazzle system, which
darkens the mirror glass and reduces the
nuisance to the driver caused by the sun,
headlamps of other vehicles, etc.
Manual model
Adjustment
F A djust the mirror so that the mirror is
directed correctly in the "day" position.
Day/night position
Automatic "electrochrome"
model
F Pull the lever to change to the "night" anti- dazzle position.
F
P
ush the lever to change to the normal
"day" position. This system automatically and progressively
changes between day and night use by means
of a sensor measuring the light coming from the
rear of the vehicle.
In order to ensure optimum visibility during
your manoeuvres, the mirror lightens
automatically when reverse gear is
engaged.
Child-monitoring mirror
A child-monitoring mirror is installed above
the interior rear view mirror. It allows the
vehicle's rear passengers to be obser ved or to
facilitate discussion between the front and rear
passengers without modifying the mirror setting
and without turning around. It can be easily
folded to avoid dazzle.
Ease of use and comfort
Page 68 of 320
66
Wireless smartphone
charger
It allows the wireless charging of a portable
device, such as a smartphone, using the
principle of magnetic induction, based on the Qi
1.1 standard.
The portable device to be charged must be
compatible with the Qi standard, either by
design or by using a compatible holder or shell.
The charging zone is identified by the Qi
symbol.
Operation
The charger works with the engine running and
in STOP mode of Stop & Start.
Charging is managed by the smartphone.
For versions with
K
eyless Entry and Starting,
operation of the charger may be interrupted
when opening a door or switching off the
ignition.
Charging
F First ensure that the charging zone is clear of other articles.
F
P
lace a portable device in the middle of the
charging zone.
The system only supports charging one
portable device at a time.
F
O
nce the portable device is detected, the
charge indicator lamp comes on in green.
F
C
harging of the portable device's battery
then starts.
F
O
nce the portable device's battery is fully
charged, the charge indicator lamp goes off.
Do not leave any metal objects (coins,
keys, vehicle remote control, etc.) in
the charging area while a device is
being charged – Risk of overheating or
interrupting the charging process!
Checking operation
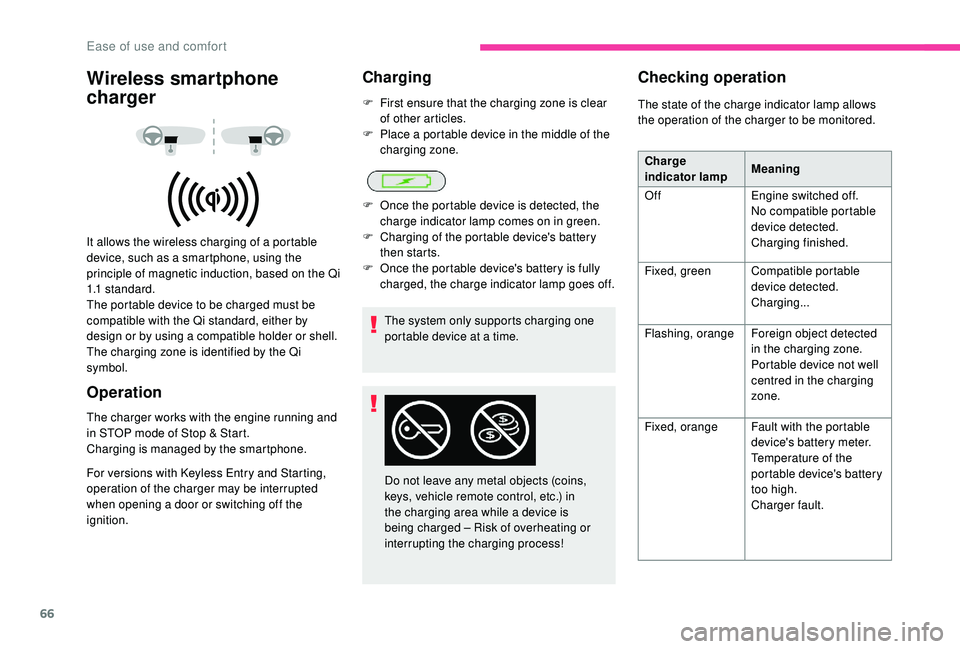
The state of the charge indicator lamp allows
the operation of the charger to be monitored. Charge
indicator lamp Meaning
Off Engine switched off.
No compatible portable
device detected.
Charging finished.
Fixed, green Compatible portable
device detected.
Charging...
Flashing, orange Foreign object detected
in the charging zone.
Portable device not well
centred in the charging
zone.
Fixed, orange Fault with the portable
device's battery meter.
Temperature of the
portable device's battery
too high.
Charger fault.
Ease of use and comfort
Page 82 of 320
80
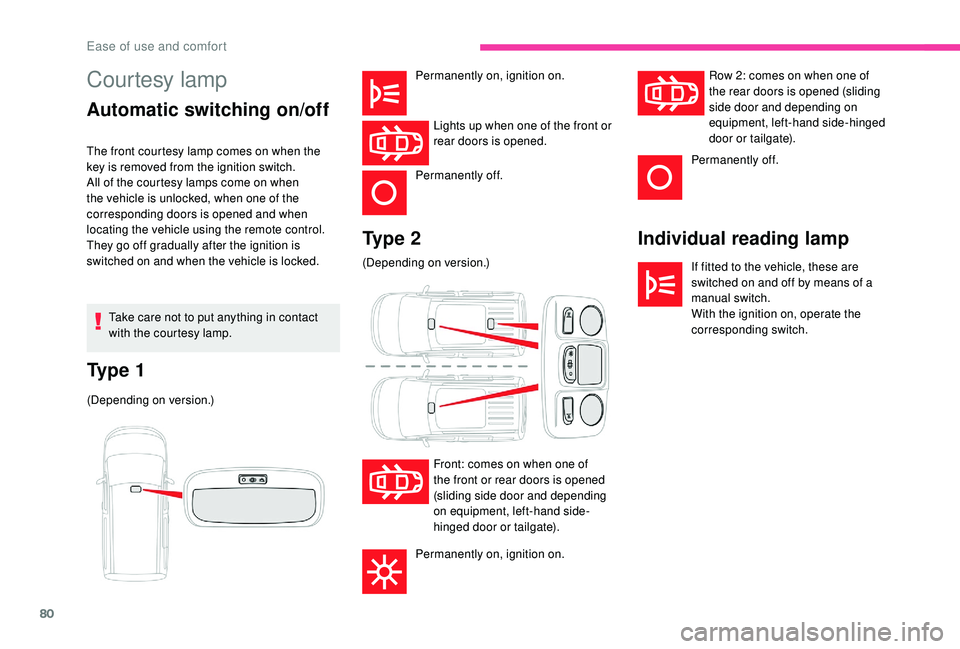
Courtesy lamp
Automatic switching on/offIndividual reading lamp
If fitted to the vehicle, these are
switched on and off by means of a
manual switch.
With the ignition on, operate the
corresponding switch.
Ty p e 2
Ty p e 1
(Depending on version.) Permanently on, ignition on.
Lights up when one of the front or
rear doors is opened.
Permanently off.
The front courtesy lamp comes on when the
key is removed from the ignition switch.
All of the courtesy lamps come on when
the vehicle is unlocked, when one of the
corresponding doors is opened and when
locating the vehicle using the remote control.
They go off gradually after the ignition is
switched on and when the vehicle is locked.
Take care not to put anything in contact
with the courtesy lamp. (Depending on version.)
Front: comes on when one of
the front or rear doors is opened
(sliding side door and depending
on equipment, left-hand side-
hinged door or tailgate).
Permanently on, ignition on.
Row 2: comes on when one of
the rear doors is opened (sliding
side door and depending on
equipment, left-hand side-hinged
door or tailgate).
Permanently off.
Ease of use and comfort
Page 109 of 320
107
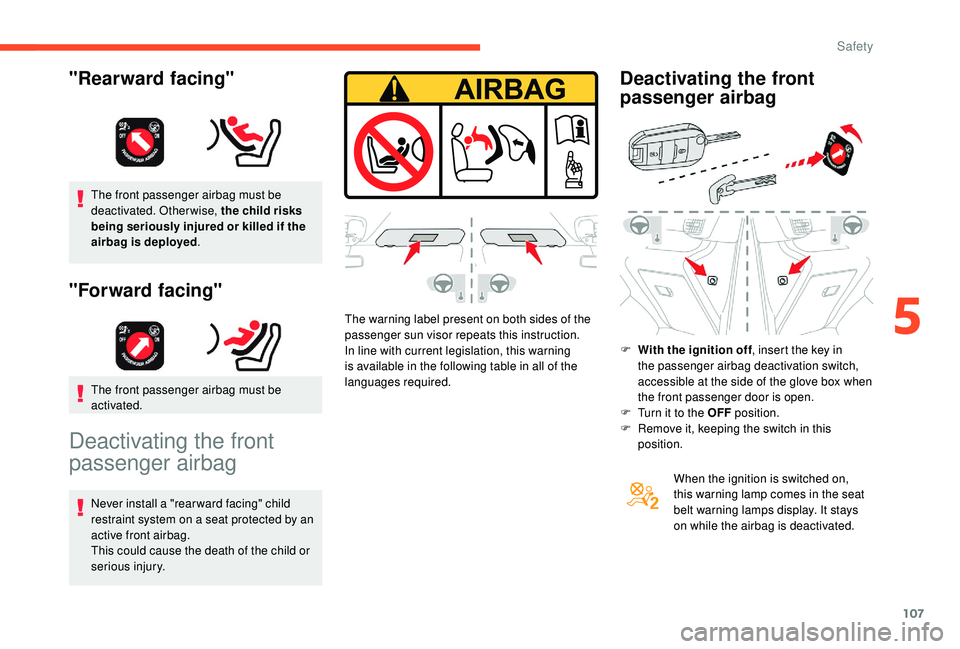
The front passenger airbag must be
deactivated. Otherwise, the child risks
being seriously injured or killed if the
airbag is deployed.
"Forward facing"
The front passenger airbag must be
activated.
Deactivating the front
passenger airbag
Never install a "rear ward facing" child
restraint system on a seat protected by an
active front airbag.
This could cause the death of the child or
serious injury. The warning label present on both sides of the
passenger sun visor repeats this instruction.
In line with current legislation, this warning
is available in the following table in all of the
languages required.
Deactivating the front
passenger airbag
F With the ignition off
, insert the key in
the passenger airbag deactivation switch,
accessible at the side of the glove box when
the front passenger door is open.
F
T
urn it to the OFF position.
F
R
emove it, keeping the switch in this
position.
When the ignition is switched on,
this warning lamp comes in the seat
belt warning lamps display. It stays
on while the airbag is deactivated.
"Rearward facing"
5
Safety