ECO mode CITROEN BERLINGO VAN 2019 Handbook (in English)
[x] Cancel search | Manufacturer: CITROEN, Model Year: 2019, Model line: BERLINGO VAN, Model: CITROEN BERLINGO VAN 2019Pages: 320, PDF Size: 8.91 MB
Page 136 of 320
134
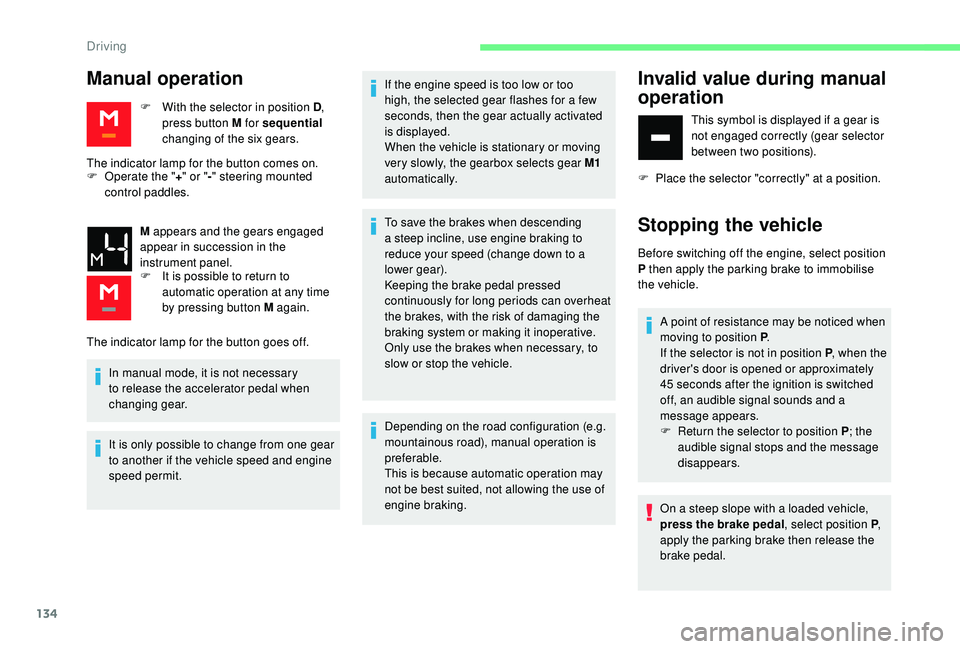
Manual operation
F With the selector in position D,
press button M for sequential
changing of the six gears.
The indicator lamp for the button comes on.
F
O
perate the " +" or " -" steering mounted
control paddles.
M appears and the gears engaged
appear in succession in the
instrument panel.
F
I
t is possible to return to
automatic operation at any time
by pressing button M again.
Invalid value during manual
operation
This symbol is displayed if a gear is
not engaged correctly (gear selector
between two positions).
F
P
lace the selector "correctly" at a position.
Stopping the vehicle
Before switching off the engine, select position
P then apply the parking brake to immobilise
the vehicle. A point of resistance may be noticed when
moving to position P .
If the selector is not in position P , when the
driver's door is opened or approximately
45
seconds after the ignition is switched
off, an audible signal sounds and a
message appears.
F
R
eturn the selector to position P ; the
audible signal stops and the message
disappears.
On a steep slope with a loaded vehicle,
press the brake pedal , select position P,
apply the parking brake then release the
brake pedal.
The indicator lamp for the button goes off.
In manual mode, it is not necessary
to release the accelerator pedal when
changing gear.
It is only possible to change from one gear
to another if the vehicle speed and engine
speed permit. If the engine speed is too low or too
high, the selected gear flashes for a few
seconds, then the gear actually activated
is displayed.
When the vehicle is stationary or moving
very slowly, the gearbox selects gear M1
automatically.
To save the brakes when descending
a steep incline, use engine braking to
reduce your speed (change down to a
lower gear).
Keeping the brake pedal pressed
continuously for long periods can overheat
the brakes, with the risk of damaging the
braking system or making it inoperative.
Only use the brakes when necessary, to
slow or stop the vehicle.
Depending on the road configuration (e.g.
mountainous road), manual operation is
preferable.
This is because automatic operation may
not be best suited, not allowing the use of
engine braking.
Driving
Page 137 of 320
135
In all circumstances, ensure that the
selector is in position P before leaving
your vehicle.
Operating fault
When the ignition is on, a message appears
in the instrument panel screen to indicate a
gearbox fault.
In this case, the gearbox switches to back-up
mode and is locked in 3
rd gear. You may feel
a substantial knock when changing from P
to R and from N to R. This will not cause any
damage to the gearbox.
Do not exceed 62
mph (100 km/h), local speed
restrictions permitting.
Have it checked by a CITROËN dealer or a
qualified workshop.
There is a risk of damage to the gearbox:
-
i
f you press the accelerator and brake
pedals at the same time (braking or
acceleration must be done only with
the right foot),
-
i
f you force the selector from position P
to another position when the battery is
flat. To reduce fuel consumption when
stationary for long periods with the
engine running (traffic jam, etc.), position
the selector on N and apply the parking
brake.
Gear efficiency indicator
(Depending on engine.)
This system reduces fuel consumption by
recommending the most appropriate gear.
Operation
Depending on the driving situation and your
vehicle's equipment, the system may advise
you to skip one or more gears. You can
follow this indication without engaging the
intermediate gears.
Gear shift recommendations must not be
considered as compulsory. In fact, the road
layout, the traffic density and safety remain the
deciding factors when choosing the best gear.
The driver therefore remains responsible for
deciding whether or not to follow the indications
issued by the system.
This function cannot be deactivated. With an automatic gearbox, the system is
only active in manual operation.
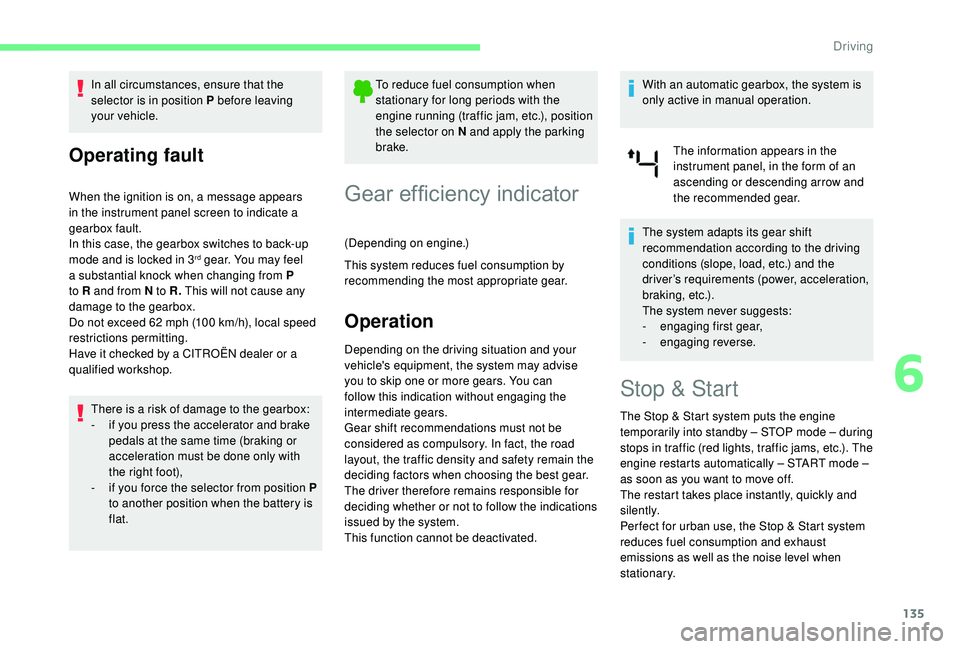
The information appears in the
instrument panel, in the form of an
ascending or descending arrow and
the recommended gear.
The system adapts its gear shift
recommendation according to the driving
conditions (slope, load, etc.) and the
driver’s requirements (power, acceleration,
b r a k i n g , e t c .) .
The system never suggests:
-
e
ngaging first gear,
- enga ging reverse.
Stop & Start
The Stop & Start system puts the engine
t emporarily into standby – STOP mode – during
stops in traffic (red lights, traffic jams, etc.). The
engine restarts automatically – START mode –
as soon as you want to move off.
The restart takes place instantly, quickly and
silently.
Per fect for urban use, the Stop & Start system
reduces fuel consumption and exhaust
emissions as well as the noise level when
stationary.
6
Driving
Page 138 of 320
136
Going into engine STOP
mode
For your convenience during parking
manoeuvres, STOP mode is not available
for a few seconds after coming out of
reverse gear.
Stop & Start does not affect the
functionality of the vehicle, such as for
example, braking, power steering, etc.
A slight delay between the vehicle
stopping and the engine cutting out may
be noticed.
Never refuel with the engine in STOP
mode; you must switch off the ignition.
Special cases: STOP mode
not available
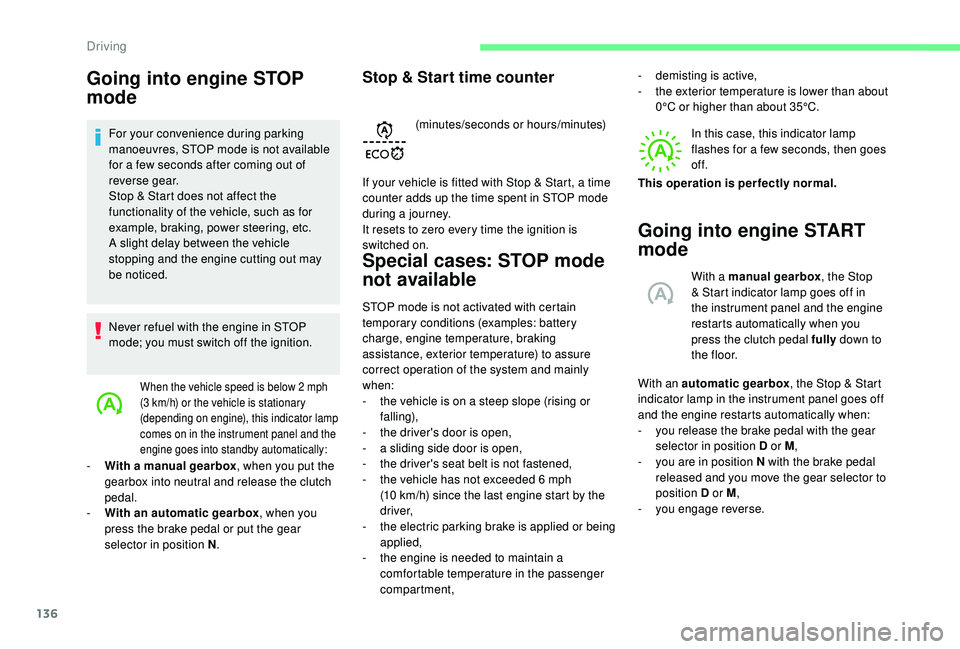
In this case, this indicator lamp
flashes for a few seconds, then goes
of f.
Going into engine START
mode
With a manual gearbox, the Stop
& Start indicator lamp goes off in
the instrument panel and the engine
restarts automatically when you
press the clutch pedal fully down to
t h e f l o o r.
With an automatic gearbox , the Stop & Start
indicator lamp in the instrument panel goes off
and the engine restarts automatically when:
-
y
ou release the brake pedal with the gear
selector in position D or M ,
-
y
ou are in position N with the brake pedal
released and you move the gear selector to
position D or M,
-
y
ou engage reverse.
STOP mode is not activated with certain
temporary conditions (examples: battery
charge, engine temperature, braking
assistance, exterior temperature) to assure
correct operation of the system and mainly
when:
-
t
he vehicle is on a steep slope (rising or
falling),
-
t
he driver's door is open,
-
a s
liding side door is open,
-
t
he driver's seat belt is not fastened,
-
t
he vehicle has not exceeded 6
mph
(10
km/h) since the last engine start by the
driver,
-
t
he electric parking brake is applied or being
applied,
-
t
he engine is needed to maintain a
comfortable temperature in the passenger
compartment, This operation is perfectly normal. -
d
emisting is active,
-
t
he exterior temperature is lower than about
0°C or higher than about 35°C.
When the vehicle speed is below 2 mph
( 3 km/h) or the vehicle is stationary
(depending on engine), this indicator lamp
comes on in the instrument panel and the
engine goes into standby automatically:
- With a manual gearbox , when you put the
gearbox into neutral and release the clutch
pedal.
-
W
ith an automatic gearbox , when you
press the brake pedal or put the gear
selector in position N . (minutes/seconds or hours/minutes)
If your vehicle is fitted with Stop & Start, a time
counter adds up the time spent in STOP mode
during a journey.
It resets to zero every time the ignition is
switched on.
Stop & Start time counter
Driving
Page 139 of 320
137
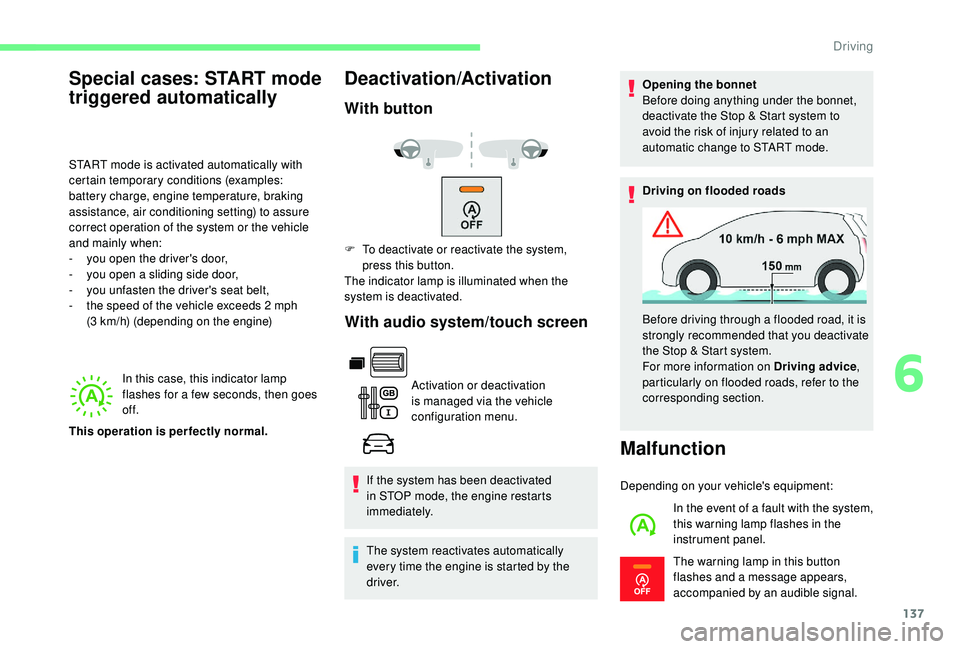
In this case, this indicator lamp
flashes for a few seconds, then goes
of f.
Deactivation/Activation
With buttonWith audio system/touch screen
Activation or deactivation
is managed via the vehicle
configuration menu.
If the system has been deactivated
in STOP mode, the engine restarts
immediately.
The system reactivates automatically
every time the engine is started by the
driver. Opening the bonnet
Before doing anything under the bonnet,
deactivate the Stop & Start system to
avoid the risk of injury related to an
automatic change to START mode.
Driving on flooded roads
Malfunction
Depending on your vehicle's equipment:
In the event of a fault with the system,
this warning lamp flashes in the
instrument panel.
The warning lamp in this button
flashes and a message appears,
accompanied by an audible signal.
Special cases: START mode
triggered automatically
START mode is activated automatically with
certain temporary conditions (examples:
battery charge, engine temperature, braking
assistance, air conditioning setting) to assure
correct operation of the system or the vehicle
and mainly when:
-
y
ou open the driver's door,
-
y
ou open a sliding side door,
-
y
ou unfasten the driver's seat belt,
-
t
he speed of the vehicle exceeds 2 mph
(3
km/h) (depending on the engine)
This operation is perfectly normal. F
T
o deactivate or reactivate the system,
press this button.
The indicator lamp is illuminated when the
system is deactivated.
Before driving through a flooded road, it is
strongly recommended that you deactivate
the Stop & Start system.
For more information on Driving advice,
particularly on flooded roads, refer to the
corresponding section.
6
Driving
Page 144 of 320
142
- obsolete or incorrect mapping,
- h idden road signs (other vehicles,
vegetation, snow),
-
s
peed limit signs that do not conform to the
standard, are damaged or distorted.
Recommendation
For more information on the Speed
limiter , Cruise control or Adaptive
cruise control , refer to the corresponding
sections.
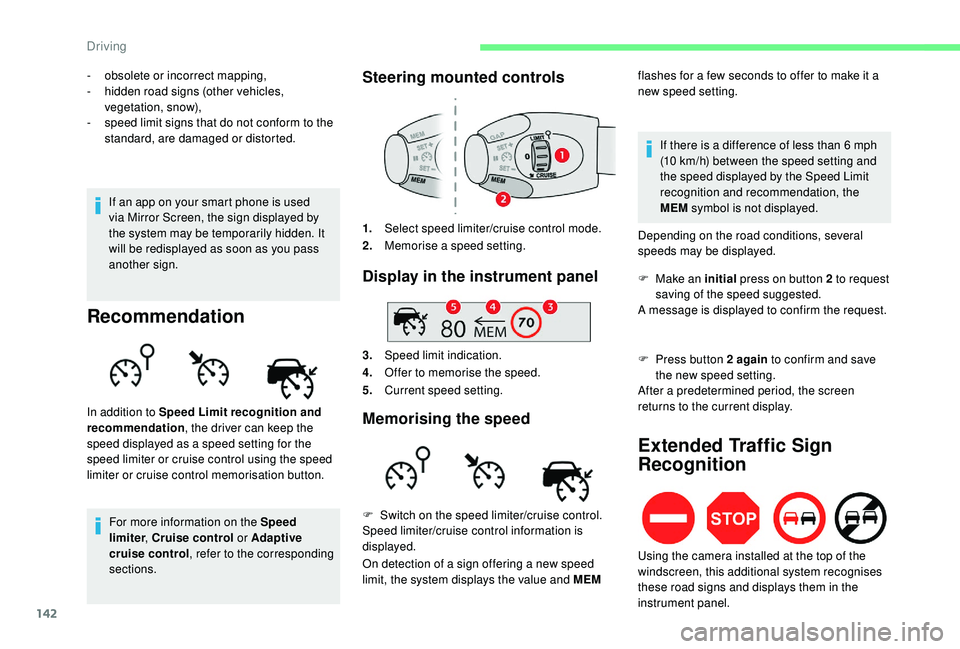
Steering mounted controls
1. Select speed limiter/cruise control mode.
2. Memorise a speed setting.
Display in the instrument panel
3.Speed limit indication.
4. Offer to memorise the speed.
5. Current speed setting.
Memorising the speedIn addition to Speed Limit recognition and
recommendation , the driver can keep the
speed displayed as a speed setting for the
speed limiter or cruise control using the speed
limiter or cruise control memorisation button.
F
S
witch on the speed limiter/cruise control.
Speed limiter/cruise control information is
displayed.
On detection of a sign offering a new speed
limit, the system displays the value and MEM
If an app on your smart phone is used
via Mirror Screen, the sign displayed by
the system may be temporarily hidden. It
will be redisplayed as soon as you pass
another sign.
flashes for a few seconds to offer to make it a
new speed setting.
If there is a difference of less than 6 mph
(10 km/h) between the speed setting and
the speed displayed by the Speed Limit
recognition and recommendation, the
MEM symbol is not displayed.
Depending on the road conditions, several
speeds may be displayed.
F
M
ake an initial
press on button 2 to request
saving of the speed suggested.
A message is displayed to confirm the request.
F
P
ress button 2 again
to confirm and save
the new speed setting.
After a predetermined period, the screen
returns to the current display.
Extended Traffic Sign
Recognition
Using the camera installed at the top of the
windscreen, this additional system recognises
these road signs and displays them in the
instrument panel.
Driving
Page 145 of 320
143
Speed limiter
This system prevents the vehicle
from exceeding the speed
programmed by the driver.
The speed limiter is switched on manually.
The minimum programmed speed is 19
mph
(30
km/h).
The programmed speed value remains in the
system memory when the ignition is switched
of f. The speed limiter is a driving aid that
cannot, in any circumstances, replace the
need to obser ve speed limits or the need
for vigilance on the part of the driver.
This function is a driving aid that cannot,
in any circumstances, replace the driver’s
own vigilance nor compliance with the
highway code.
The actual signs always take priority over
the display by the system.
The signs must comply with the Vienna
Convention on road signs.
One-way street: if you start driving down a one-
way street the wrong way, an alert message,
including the sign's symbol, is displayed in the
instrument panel (request to check the traffic
direction).
Other signs: when approaching one of these
signs, the sign’s symbol is displayed in the
instrument panel.
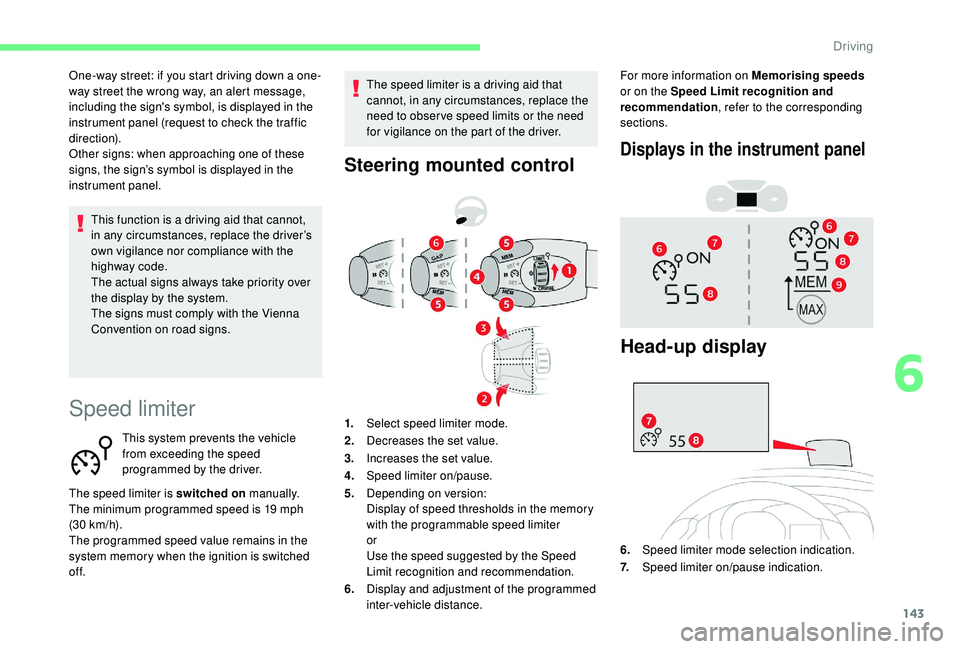
Steering mounted control
1.
Select speed limiter mode.
2. Decreases the set value.
3. Increases the set value.
4. Speed limiter on/pause.
5. Depending on version:
Display of speed thresholds in the memory
with the programmable speed limiter
or
Use the speed suggested by the Speed
Limit recognition and recommendation.
6. Display and adjustment of the programmed
inter-vehicle distance. For more information on Memorising speeds
or on the Speed Limit recognition and
recommendation , refer to the corresponding
sections.
Displays in the instrument panel
Head-up display
6. Speed limiter mode selection indication.
7. Speed limiter on/pause indication.
6
Driving
Page 147 of 320
145
Switching off
F Turn thumbwheel 1 to position "0". The
display of information related to the speed
limiter disappears.
Malfunction
The use of mats not approved by
CITROËN may inter fere with the operation
of the speed limiter.
To avoid any risk of jamming the pedals:
-
e
nsure that the mat is positioned
c o r r e c t l y,
-
n
ever fit one mat on top of another.
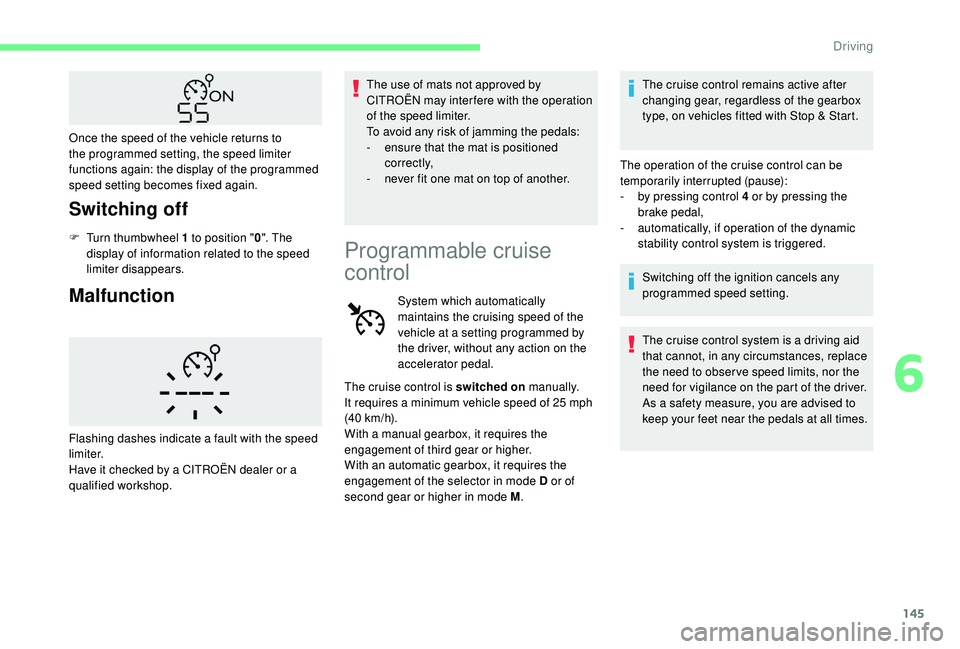
Flashing dashes indicate a fault with the speed
limiter.
Have it checked by a CITROËN dealer or a
qualified workshop.
Programmable cruise
control
System which automatically
maintains the cruising speed of the
vehicle at a setting programmed by
the driver, without any action on the
accelerator pedal. The cruise control remains active after
changing gear, regardless of the gearbox
type, on vehicles fitted with Stop & Start.
The operation of the cruise control can be
temporarily interrupted (pause):
-
b
y pressing control 4 or by pressing the
brake pedal,
-
a
utomatically, if operation of the dynamic
stability control system is triggered.
Switching off the ignition cancels any
programmed speed setting.
The cruise control system is a driving aid
that cannot, in any circumstances, replace
the need to obser ve speed limits, nor the
need for vigilance on the part of the driver.
As a safety measure, you are advised to
keep your feet near the pedals at all times.
The cruise control is switched on
manually.
It requires a minimum vehicle speed of 25
mph
(40
km/h).
With a manual gearbox, it requires the
engagement of third gear or higher.
With an automatic gearbox, it requires the
engagement of the selector in mode D or of
second gear or higher in mode M .
Once the speed of the vehicle returns to
the programmed setting, the speed limiter
functions again: the display of the programmed
speed setting becomes fixed again.
6
Driving
Page 148 of 320
146
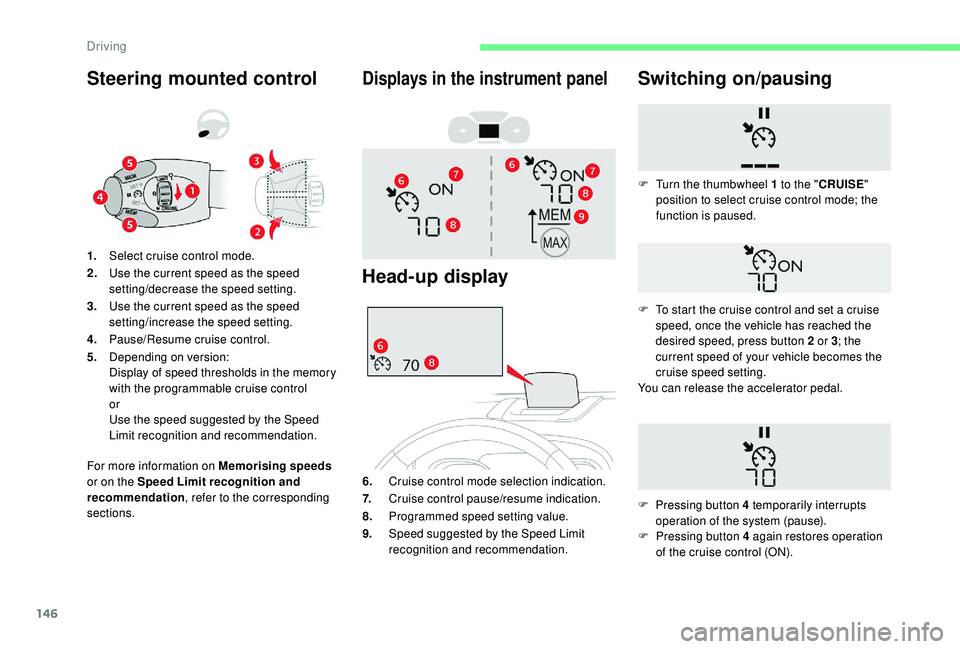
Steering mounted control
For more information on Memorising speeds
or on the Speed Limit recognition and
recommendation , refer to the corresponding
sections. 1. Select cruise control mode.
2. Use the current speed as the speed
setting/decrease the speed setting.
3. Use the current speed as the speed
setting/increase the speed setting.
4. Pause/Resume cruise control.
5. Depending on version:
Display of speed thresholds in the memory
with the programmable cruise control
or
Use the speed suggested by the Speed
Limit recognition and recommendation.
Displays in the instrument panel
Head-up display
6. Cruise control mode selection indication.
7. Cruise control pause/resume indication.
8. Programmed speed setting value.
9. Speed suggested by the Speed Limit
recognition and recommendation.
Switching on/pausing
F Pressing button 4 again restores operation
of the cruise control (ON).
F
T
urn the thumbwheel 1 to the "
CRUISE"
position to select cruise control mode; the
function is paused.
F
T
o start the cruise control and set a cruise
speed, once the vehicle has reached the
desired speed, press button 2 or 3 ; the
current speed of your vehicle becomes the
cruise speed setting.
You can release the accelerator pedal.
F
P
ressing button 4 temporarily interrupts
operation of the system (pause).
Driving
Page 151 of 320
149
The brake lamps illuminate as soon as
the braking system is activated with
deceleration of the vehicle.This system is a driving aid that cannot,
in any circumstances, replace the need to
obser ve speed limits and safety distances,
nor the need for vigilance on the part of
the driver.
Some vehicles present on the road may
not be properly seen or may be poorly
interpreted by the camera (e.g. a lorry),
which may lead to a poor assessment
of the distances and lead to the vehicle
inappropriately accelerating or braking.
The driver must be ready at all times to
retake control of their vehicle by keeping
both hands on the steering wheel and
keeping the feet near the brake and
accelerator pedals.
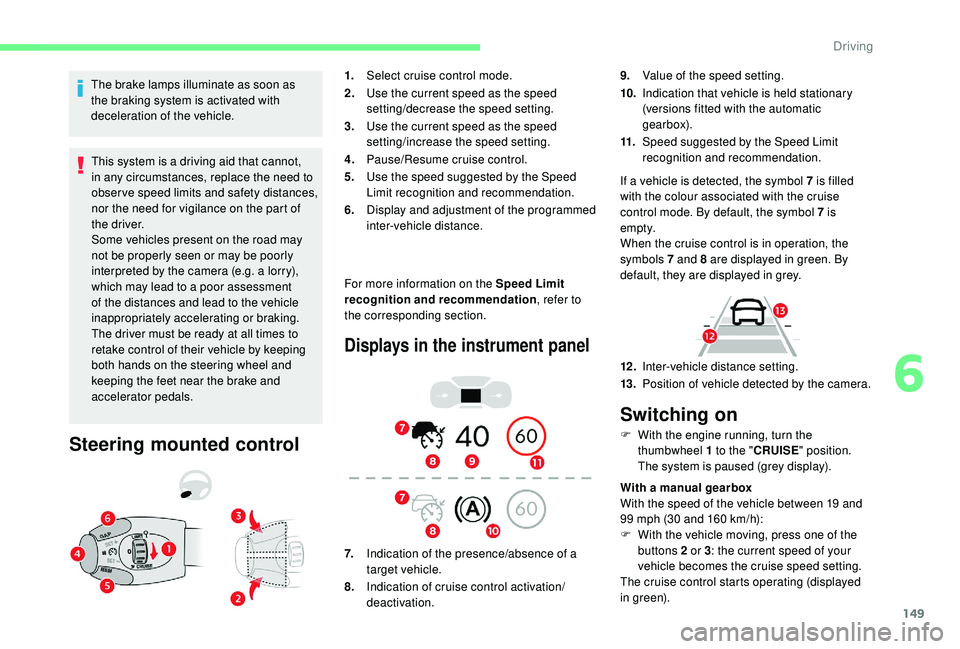
Steering mounted control
1. Select cruise control mode.
2. Use the current speed as the speed
setting/decrease the speed setting.
3. Use the current speed as the speed
setting/increase the speed setting.
4. Pause/Resume cruise control.
5. Use the speed suggested by the Speed
Limit recognition and recommendation.
6. Display and adjustment of the programmed
inter-vehicle distance.
For more information on the Speed Limit
recognition and recommendation , refer to
the corresponding section.
Displays in the instrument panel
7. Indication of the presence/absence of a
target vehicle.
8. Indication of cruise control activation/
deactivation. 9.
Value of the speed setting.
10. Indication that vehicle is held stationary
(versions fitted with the automatic
gearbox).
11. Speed suggested by the Speed Limit
recognition and recommendation.
If a vehicle is detected, the symbol 7 is filled
with the colour associated with the cruise
control mode. By default, the symbol 7 is
e m pt y.
When the cruise control is in operation, the
symbols 7 and 8 are displayed in green. By
default, they are displayed in grey.
12 . Inter-vehicle distance setting.
13. Position of vehicle detected by the camera.
Switching on
F With the engine running, turn the
thumbwheel 1 to the "CRUISE" position.
The system is paused (grey display).
With a manual gearbox
With the speed of the vehicle between 19 and
99
mph (30 and 160 km/h):
F
W
ith the vehicle moving, press one of the
buttons 2 or 3 : the current speed of your
vehicle becomes the cruise speed setting.
The cruise control starts operating (displayed
in green).
6
Driving
Page 152 of 320
150
With an automatic gearboxMode D or M must be selected.
With the speed of the vehicle between 19 and
112 mph (30 km/h and 180 km/h):
F Accelerate slightly and press one of the buttons
2 or 3: the system starts (green display).
The cruise speed setting then becomes equal to:
-
t he current speed of your vehicle, if it is over
19
mph (30 km/h),
-
1
9 mph (30 km/h), if it is below 19 mph (30 km/h).
Remembering the settings
Switching off the ignition cancels any speed
setting value chosen by the driver.
By default, the inter-vehicle distance is set
at "Normal " (2 dashes). Other wise, the last
setting made will be used when switching on
the system.
Pause
The cruise control can be paused manually:
- e ither by action by the driver:
•
O
n the button 4 (Pause).
•
O
n the brake pedal.
•
O
n the electric parking brake control.
•
O
n the clutch pedal, by pressing for
approximately 10
seconds or more.
•
W
hen changing from mode D to N with an
automatic gearbox. When the cruise control is paused, it can
only be reactivated when all of the safety
conditions are met again. The message
"Activation not possible, conditions
unsuitable" is displayed while reactivation
is not possible.
Reactivating the function
With manual gearbox
To reactivate the function, the driver must
accelerate to reach at least 19
mph (30 km/h),
then press one of the buttons 2 , 3 or 4.
-
o
r automatically:
•
I
f the ESC system is activated, for safety
reasons.
•
W
hen the speed of the vehicle goes
below 19 mph (30 km/h) with a manual
gearbox.
With automatic gearbox
Following braking of the vehicle bringing it to
a complete stop, the system holds the vehicle
stationary; the cruise control is paused.
The driver should press the accelerator pedal
to move off, then reactivate the system above
19 mph (30 km/h) by pressing one of the
buttons 2 , 3 or 4.
If the driver takes no action following this
immobilisation, the electric parking brake
is applied automatically after a while
(approximately 5
minutes). As a safety measure, wait until the current
speed approaches the speed setting to
reactivate the function by pressing button
4
.
Modification of the speed
setting
With the engine running and cruise control on
(green), you can modify the speed setting.
From the current speed
F By successive short presses on button 2 or
3, to lower or raise the setting in steps of +
or -1
mph (km/h).
F
B
y a maintained press on button 2 or 3 , to
lower or raise the setting in steps of + or
-5
mph (km/h).
Take care: pressing and holding button 2
or 3
results in a rapid change in the speed
of your vehicle.
Driving