Reverse light CITROEN BERLINGO VAN 2021 User Guide
[x] Cancel search | Manufacturer: CITROEN, Model Year: 2021, Model line: BERLINGO VAN, Model: CITROEN BERLINGO VAN 2021Pages: 324, PDF Size: 9.41 MB
Page 167 of 324
165
Driving
6
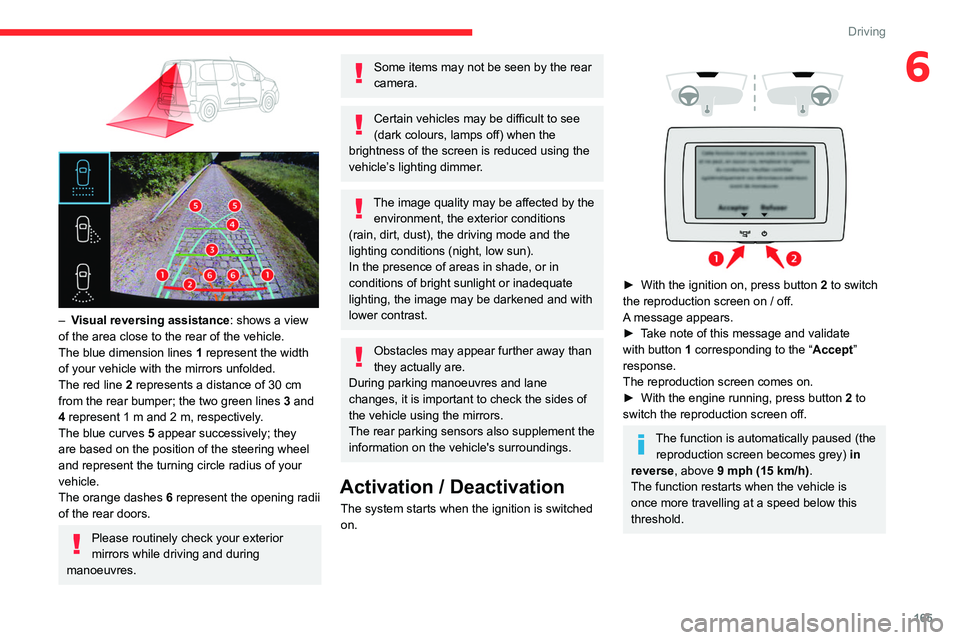
– Visual reversing assistance : shows a view
of the area close to the rear of the vehicle.
The blue dimension lines 1 represent the width
of your vehicle with the mirrors unfolded.
The red line 2 represents a distance of 30
cm
from the rear bumper; the two green lines 3 and
4 represent 1
m and 2 m, respectively.
The blue curves 5 appear successively; they
are based on the position of the steering wheel
and represent the turning circle radius of your
vehicle.
The orange dashes 6 represent the opening radii
of the rear doors.
Please routinely check your exterior
mirrors while driving and during
manoeuvres.
Some items may not be seen by the rear
camera.
Certain vehicles may be difficult to see
(dark colours, lamps off) when the
brightness of the screen is reduced using the
vehicle’s lighting dimmer.
The image quality may be affected by the environment, the exterior conditions
(rain, dirt, dust), the driving mode and the
lighting conditions (night, low sun).
In the presence of areas in shade, or in
conditions of bright sunlight or inadequate
lighting, the image may be darkened and with
lower contrast.
Obstacles may appear further away than
they actually are.
During parking manoeuvres and lane
changes, it is important to check the sides of
the vehicle using the mirrors.
The rear parking sensors also supplement the
information on the vehicle's surroundings.
Activation / Deactivation
The system starts when the ignition is switched
on.
► With the ignition on, press button 2 to switch
the reproduction screen on / off.
A message appears.
►
T
ake note of this message and validate
with button 1 corresponding to the “ Accept”
response.
The reproduction screen comes on.
►
With the engine running, press button 2
to
switch the reproduction screen off.
The function is automatically paused (the reproduction screen becomes grey) in
reverse , above 9 mph (15
km/h).
The function restarts when the vehicle is
once more travelling at a speed below this
threshold.
Page 168 of 324
166
Driving
Operation
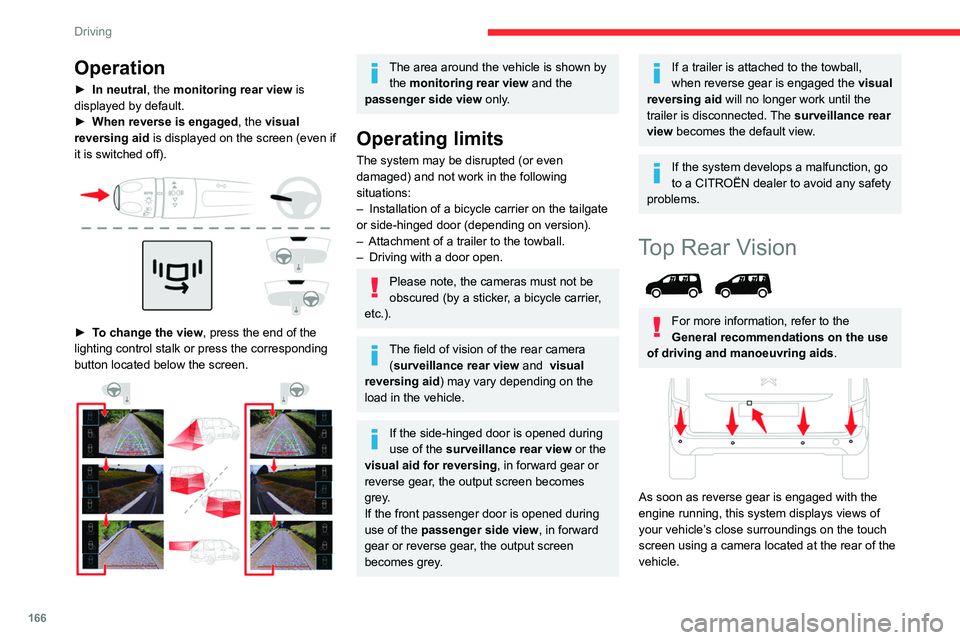
► In neutral, the monitoring rear view is
displayed by default.
►
When reverse is engaged
, the visual
reversing aid is displayed on the screen (even if
it is switched off).
► To change the view , press the end of the
lighting control stalk or press the corresponding
button located below the screen.
The area around the vehicle is shown by the monitoring rear view and the
passenger side view only.
Operating limits
The system may be disrupted (or even
damaged) and not work in the following
situations:
–
Installation of a bicycle carrier on the tailgate
or side-hinged door (depending on version).
–
Attachment of a trailer to the towball.
–
Driving with a door open.
Please note, the cameras must not be
obscured (by a sticker, a bicycle carrier,
etc.).
The field of vision of the rear camera (surveillance rear view and visual
reversing aid) may vary depending on the
load in the vehicle.
If the side-hinged door is opened during
use of the surveillance rear view or the
visual aid for reversing, in forward gear or
reverse gear, the output screen becomes
grey.
If the front passenger door is opened during
use of the passenger side view, in forward
gear or reverse gear, the output screen
becomes grey.
If a trailer is attached to the towball,
when reverse gear is engaged the visual
reversing aid will no longer work until the
trailer is disconnected. The surveillance rear
view becomes the default view.
If the system develops a malfunction, go
to a CITROËN dealer to avoid any safety
problems.
Top Rear Vision
For more information, refer to the
General recommendations on the use
of driving and manoeuvring aids .
As soon as reverse gear is engaged with the
engine running, this system displays views of
your vehicle’s close surroundings on the touch
screen using a camera located at the rear of the
vehicle.
Page 172 of 324
170
Driving
deactivated if the vehicle speed exceeds 31 mph
(50 km/h).
For ''parallel'' parking, the space must at
a minimum be equal to the length of your
vehicle plus 0.60 m.
For ''bay'' parking, the width of the space
must be equal to the width of your vehicle
plus 0.70 m.
If the parking sensors function has been
deactivated in the Driving/Vehicle touch
screen menu, it will be automatically
reactivated when the system is activated.
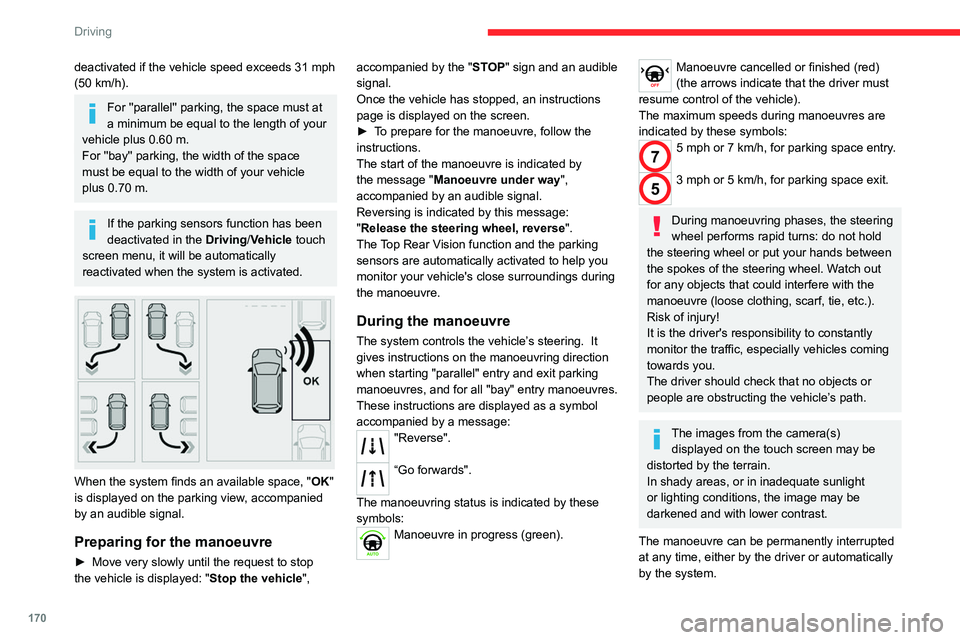
When the system finds an available space, " OK"
is displayed on the parking view, accompanied
by an audible signal.
Preparing for the manoeuvre
► Move very slowly until the request to stop
the vehicle is displayed: " Stop the vehicle", accompanied by the "
ST OP" sign and an audible
signal.
Once the vehicle has stopped, an instructions
page is displayed on the screen.
►
T
o prepare for the manoeuvre, follow the
instructions.
The start of the manoeuvre is indicated by
the message "Manoeuvre under way",
accompanied by an audible signal.
Reversing is indicated by this message:
"Release the steering wheel, reverse ".
The Top Rear Vision function and the parking
sensors are automatically activated to help you
monitor your vehicle's close surroundings during
the manoeuvre.
During the manoeuvre
The system controls the vehicle’s steering. It
gives instructions on the manoeuvring direction
when starting "parallel" entry and exit parking
manoeuvres, and for all "bay" entry manoeuvres.
These instructions are displayed as a symbol
accompanied by a message:
"Reverse".
“Go forwards".
The manoeuvring status is indicated by these
symbols:
Manoeuvre in progress (green).
Manoeuvre cancelled or finished (red)
(the arrows indicate that the driver must
resume control of the vehicle).
The maximum speeds during manoeuvres are
indicated by these symbols:
75 mph or 7 km/h, for parking space entry.
53 mph or 5 km/h, for parking space exit.
During manoeuvring phases, the steering
wheel performs rapid turns: do not hold
the steering wheel or put your hands between
the spokes of the steering wheel. Watch out
for any objects that could interfere with the
manoeuvre (loose clothing, scarf, tie, etc.).
Risk of injury!
It is the driver's responsibility to constantly
monitor the traffic, especially vehicles coming
towards you.
The driver should check that no objects or
people are obstructing the vehicle’s path.
The images from the camera(s) displayed on the touch screen may be
distorted by the terrain.
In shady areas, or in inadequate sunlight
or lighting conditions, the image may be
darkened and with lower contrast.
The manoeuvre can be permanently interrupted
at any time, either by the driver or automatically
by the system.
Page 212 of 324
210
In the event of a breakdown
Always replace a failed bulb with a new bulb
of the same type and specification. To avoid
lighting imbalance, replace the bulbs in pairs.
Opening the bonnet/Accessing the
bulbs
Proceed with caution when the engine is hot -
risk of burns!
Take care with objects or clothing that could
be caught in the blades of the cooling fan -
risk of strangulation!
Halogen bulbs (Hx)
To ensure good quality lighting, check
that the bulb is correctly positioned in its
housing.
After changing a bulb
To refit, carry out the operations in
reverse order to removal.
Close the protective cover very carefully to
guarantee the sealing of the lamps.
Light-emitting diode (LED)
headlamps and lamps
Depending on version, the affected types of
headlamps/lamps are:
–
Daytime running lamps/sidelamps.
If you need to replace this type of bulb,
you must contact a CITROËN dealer or a
qualified workshop.
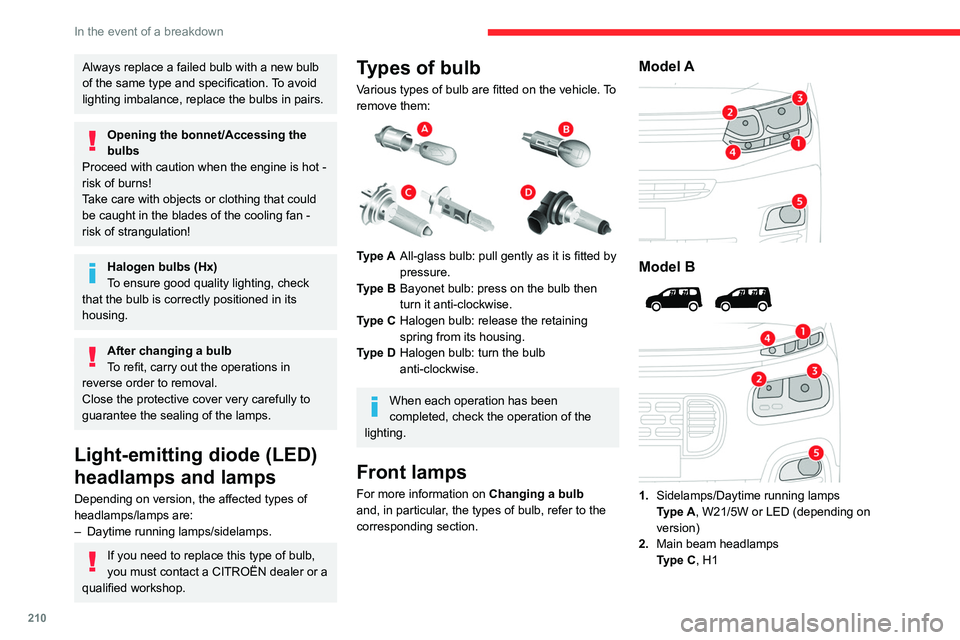
Types of bulb
Various types of bulb are fitted on the vehicle. To
remove them:
Type A All-glass bulb: pull gently as it is fitted by
pressure.
Type B Bayonet bulb: press on the bulb then
turn it anti-clockwise.
Type C Halogen bulb: release the retaining
spring from its housing.
Type D Halogen bulb: turn the bulb
anti-clockwise.
When each operation has been
completed, check the operation of the
lighting.
Front lamps
For more information on Changing a bulb
and, in particular, the types of bulb, refer to the
corresponding section.
Model A
Model B
1. Sidelamps/Daytime running lamps
Type
A, W21/5W or LED (depending on
version)
2. Main beam headlamps
Type
C, H1
Page 218 of 324
216
In the event of a breakdown
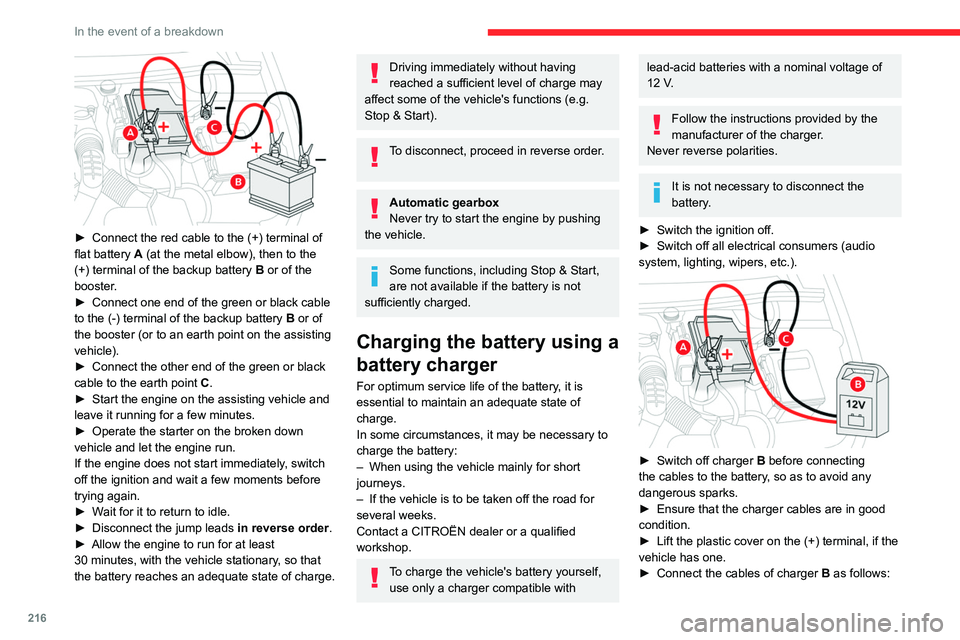
► Connect the red cable to the (+) terminal of
flat battery A (at the metal elbow), then to the
(+) terminal of the backup battery
B or of the
booster.
►
Connect one end of the green or black cable
to the (-) terminal of the backup battery
B or of
the booster (or to an earth point on the assisting
vehicle).
►
Connect the other end of the green or black
cable to the earth point
C
.
►
Start the engine on the assisting vehicle and
leave it running for a few minutes.
►
Operate the starter on the broken down
vehicle and let the engine run.
If the engine does not start immediately
, switch
off the ignition and wait a few moments before
trying again.
►
W
ait for it to return to idle.
►
Disconnect the jump leads in reverse order.
►
Allow the engine to run for at least
30
minutes, with the vehicle stationary, so that
the battery reaches an adequate state of charge.
Driving immediately without having
reached a sufficient level of charge may
affect some of the vehicle's functions (e.g.
Stop & Start).
To disconnect, proceed in reverse order.
Automatic gearbox
Never try to start the engine by pushing
the vehicle.
Some functions, including Stop & Start,
are not available if the battery is not
sufficiently charged.
Charging the battery using a
battery charger
For optimum service life of the battery, it is
essential to maintain an adequate state of
charge.
In some circumstances, it may be necessary to
charge the battery:
–
When using the vehicle mainly for short
journeys.
–
If the vehicle is to be taken off the road for
several weeks.
Contact a CITROËN dealer or a qualified
workshop.
To charge the vehicle's battery yourself, use only a charger compatible with
lead-acid batteries with a nominal voltage of
12 V.
Follow the instructions provided by the
manufacturer of the charger.
Never reverse polarities.
It is not necessary to disconnect the
battery.
►
Switch the ignition off.
►
Switch off all electrical consumers (audio
system, lighting, wipers, etc.).
► Switch off charger B before connecting
the cables to the battery, so as to avoid any
dangerous sparks.
►
Ensure that the charger cables are in good
condition.
►
Lift the plastic cover on the (+) terminal, if the
vehicle has one.
►
Connect the cables of charger B
as follows: