Citroen C4 2014.5 2.G Owners Manual
Manufacturer: CITROEN, Model Year: 2014.5, Model line: C4, Model: Citroen C4 2014.5 2.GPages: 494, PDF Size: 21.47 MB
Page 91 of 494
89
Front demist - defrost
These markings on the control panel indicate the control positions for rapid demisting or defrosting of the windscreen and side windows.
With manual air
conditioning
F Put the temperature, air flow and distribution c
ontrols to the dedicated marked position.
F
P
ut the air intake control to the "Exterior air
i
ntake" position
(
indicator lamp on the control off).
F
S
witch on the air conditioning by pressing
t
he "A /C "
button; the warning lamp in the
b
utton comes on.
With digital dual-zone air
conditioning
Automatic visibility programme
F Select this programme to demist or defrost the windscreen and side windows as quickly as p
ossible.
The
system automatically manages the air
c
onditioning, air flow and air intake, and provides
o
ptimum distribution towards the windscreen and
si
de
w
indows.
F To stop the programme, press either the "
visibility" button again or "AUTO", the
warning
lamp on the button goes off and the
w
arning lamp on the "AUTO" button
comes
on.
The
system starts again with the values in use
b
efore
i
t
w
as
ov
erridden
b
y
t
he
v
isibility
p
rogramme.
With Stop & Start, when demisting has been activated, the STOP mode is not
a
vailable.
With
Stop
&
Start,
when
the
demisting,
a
ir
conditioning
and
air
flow
functions
a
re
activated,
STOP
mode
is
not
a
vailable.
4
Comfort
Page 92 of 494
90
Rear screen demist - defrost
The control button is located on the air conditioning system control panel.
Switching on
The rear screen demisting/defrosting can only operate when the engine is running.
F
P
ress this button to demist /defrost the
r
ear screen and (depending on version)
t
he door mirrors. The indicator lamp
a
ssociated with the button comes on.
Switching off
The demisting/defrosting switches off automatically to prevent an excessive consumption of current.
F It is possible to stop the demisting/defrosting o
peration before it is switched off automatically b
y pressing the button again. The indicator
l
amp associated with the button goes off.
F Switch off the demisting/defrosting o
f the rear screen and door mirrors
a
s soon as appropriate, as lower
current
consumption results in
r
educed
f
uel
c
onsumption.
Comfort
Page 93 of 494
91
Front seats
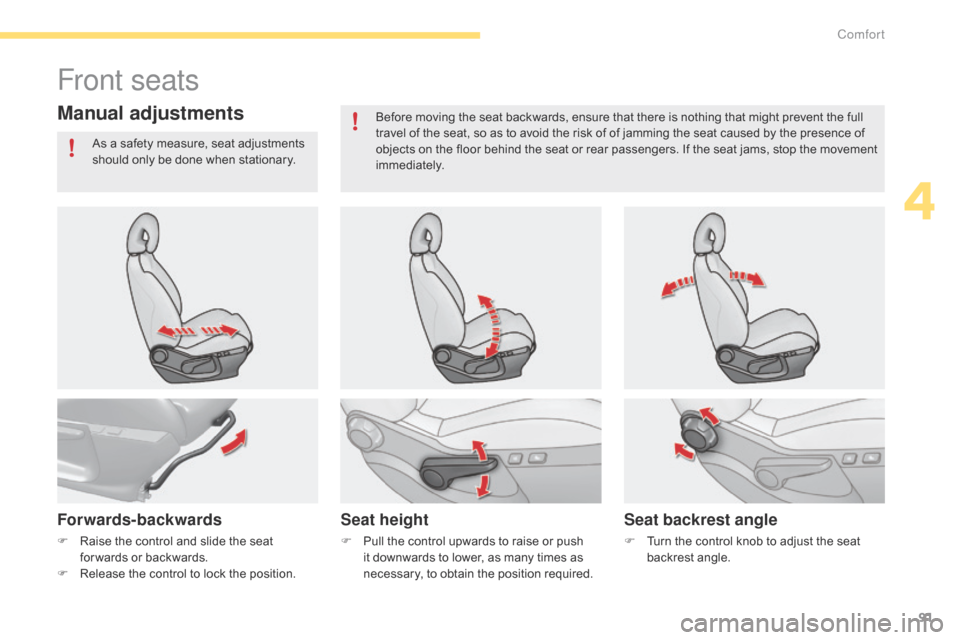
Manual adjustments
Forwards-backwardsSeat heightSeat backrest angle
F Raise the control and slide the seat f
or wards or backwards.
F
R
elease the control to lock the position.F
P ull the control upwards to raise or push i
t downwards to lower, as many times as
n
ecessary, to obtain the position required.F
T urn the control knob to adjust the seat b
ackrest angle.
As
a safety measure, seat adjustments
s
hould only be done when stationary.
Before moving the seat backwards, ensure that there is nothing that might prevent the full
t
ravel of the seat, so as to avoid the risk of of jamming the seat caused by the presence of
o
bjects on the floor behind the seat or rear passengers. If the seat jams, stop the movement
i
mmediately.
4
Comfort
Page 94 of 494
92
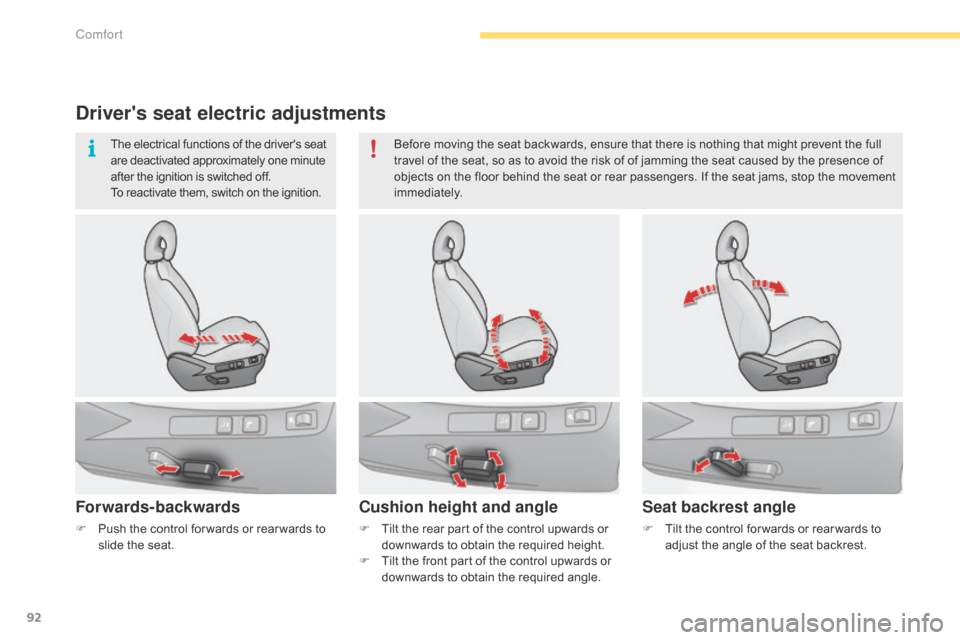
Driver's seat electric adjustments
Forwards-backwards
F Tilt the rear part of the control upwards or d
ownwards to obtain the required height.
F
T
ilt the front part of the control upwards or
d
ownwards to obtain the required angle.
Cushion height and angle
F Tilt the control for wards or rear wards to a
djust the angle of the seat backrest.
Seat backrest angle
F Push the control for wards or rear wards to s
lide the seat. Before
moving the seat backwards, ensure that there is nothing that might prevent the full
t
ravel of the seat, so as to avoid the risk of of jamming the seat caused by the presence of
o
bjects on the floor behind the seat or rear passengers. If the seat jams, stop the movement
i
mmediately.
The electrical functions of the driver's seat
a
re deactivated approximately one minute
a
fter the ignition is switched off.
To reactivate them, switch on the ignition.
Comfort
Page 95 of 494
93
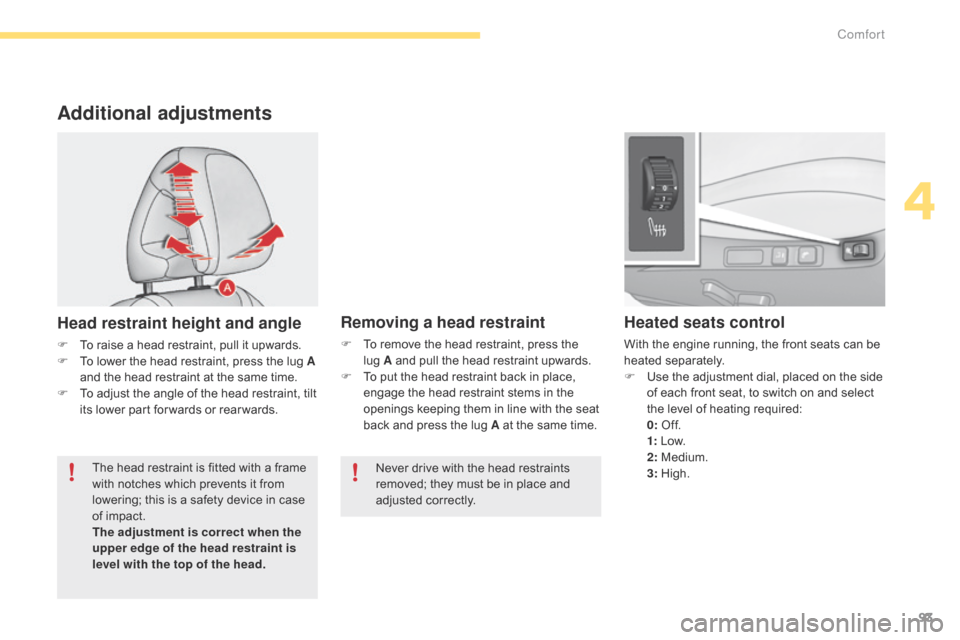
Additional adjustments
Head restraint height and angle
F To raise a head restraint, pull it upwards.
F T o lower the head restraint, press the lug A
and
the head restraint at the same time.
F
T
o adjust the angle of the head restraint, tilt
i
ts lower part for wards or rear wards.
Heated seats control
With the engine running, the front seats can be heated s eparately.
F
U
se the adjustment dial, placed on the side
o
f each front seat, to switch on and select
t
he level of heating required:
0: O
f f.
1:
L
ow.
2:
Medium.
3:
Hig
h.
Removing a head restraint
F To remove the head restraint, press the l
ug A and pull the head restraint upwards.
F
T
o put the head restraint back in place,
e
ngage the head restraint stems in the
o
penings keeping them in line with the seat
b
ack and press the lug A at the same time.
The
head
restraint
is
fitted
with
a
frame
w
ith
notches
which
prevents
it
from
l
owering;
this
is
a
safety
device
in
case
o
f
impact.
The adjustment is correct when the
upper edge of the head restraint is
level with the top of the head. Never
drive with the head restraints
r
emoved; they must be in place and
adj
usted
c
orrectly.
4
Comfort
Page 96 of 494
94
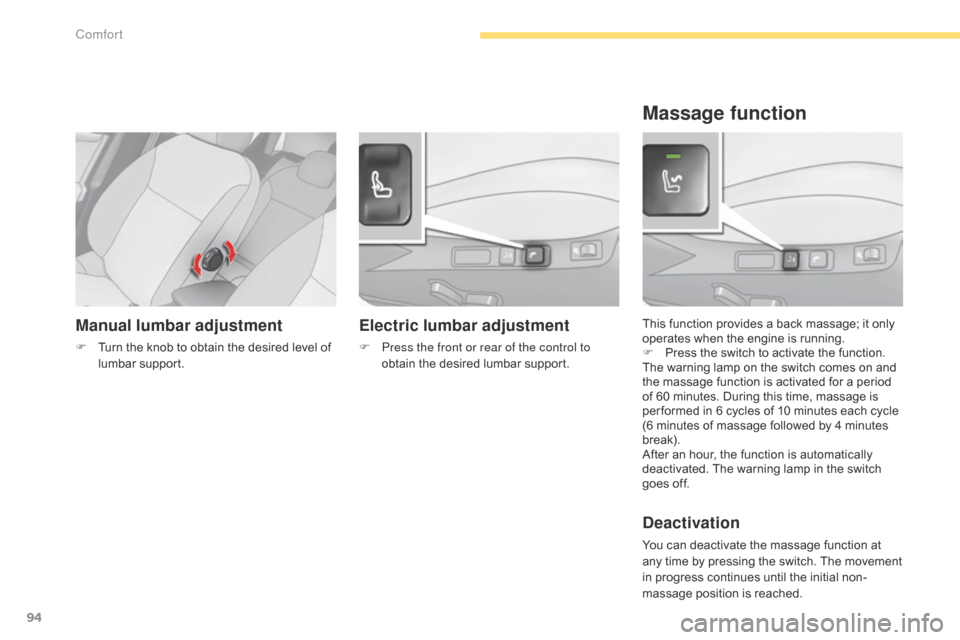
Manual lumbar adjustment
F Turn the knob to obtain the desired level of l
umbar sup port. This
function provides a back massage; it only o
perates when the engine is running.
F P ress the switch to activate the function.
The
warning lamp on the switch comes on and
t
he massage function is activated for a period
o
f 60 minutes. During this time, massage is
p
er formed in 6 cycles of 10 minutes each cycle
(
6 minutes of massage followed by 4 minutes
b
reak).
After
an hour, the function is automatically
d
eactivated. The warning lamp in the switch
g
oes off.
Deactivation
You can deactivate the massage function at any time by pressing the switch. The movement
i
n progress continues until the initial non-
massage
position is reached.
Massage function
Electric lumbar adjustment
F Press the front or rear of the control to obtain the desired lumbar support.
Comfort
Page 97 of 494
95
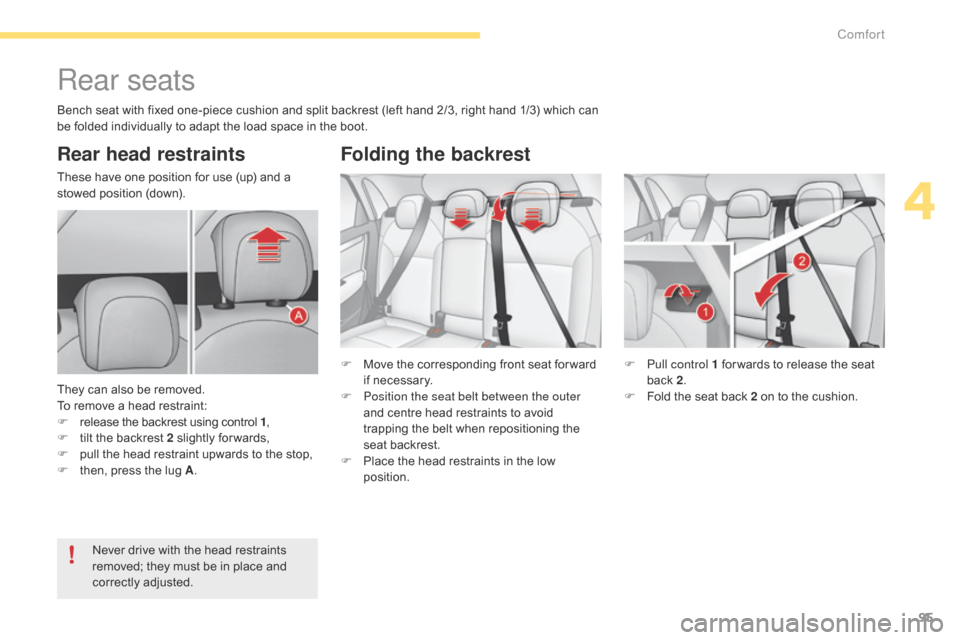
Rear seats
Rear head restraints
These have one position for use (up) and a stowed position (down).
They
can also be removed.
To
remove a head restraint:
F
r
elease the backrest using control 1,
F
t
ilt the backrest 2 slightly for wards,
F
p
ull the head restraint upwards to the stop,
F
t
hen, press the lug A. F
M
ove the corresponding front seat for ward
i
f necessary.
F
P
osition the seat belt between the outer
and
centre head restraints to avoid
t
rapping the belt when repositioning the
s
eat backrest.
F
P
lace the head restraints in the low
p
osition.F
P
ull control 1 for wards to release the seat
b
ack 2.
F
F
old the seat back 2 on to the cushion.
Never
drive with the head restraints
r
emoved; they must be in place and
c
orrectly
adj
usted.
Folding the backrest
Bench seat with fixed one-piece cushion and split backrest (left hand 2/3, right hand 1/3) which can be folded individually to adapt the load space in the boot.
4
Comfort
Page 98 of 494
96
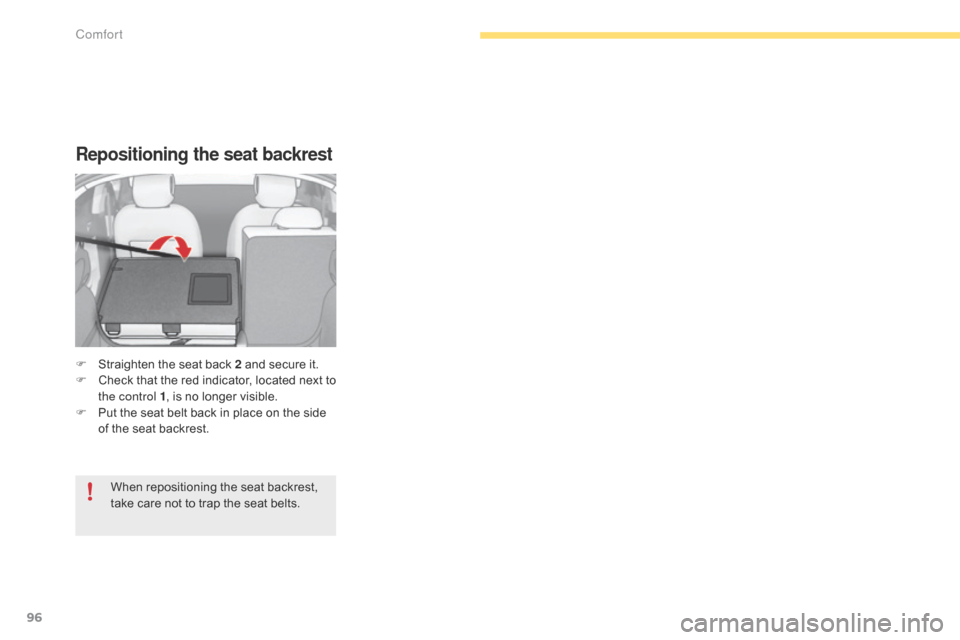
Repositioning the seat backrest
F Straighten the seat back 2 and secure it.
F C heck t hat t he r ed i ndicator, l ocated n ext t o
t
he control 1 ,
is no longer visible.
F
P
ut the seat belt back in place on the side
o
f the seat backrest.
When
repositioning the seat backrest,
t
ake care not to trap the seat belts.
Comfort
Page 99 of 494
97
Mirrors
Each fitted with an adjustable mirror glass permitting t he la teral r earward v ision n ecessary f
or overtaking or parking. They can also be
f
olded for parking in confined spaces.
Demisting - Defrosting Adjustment
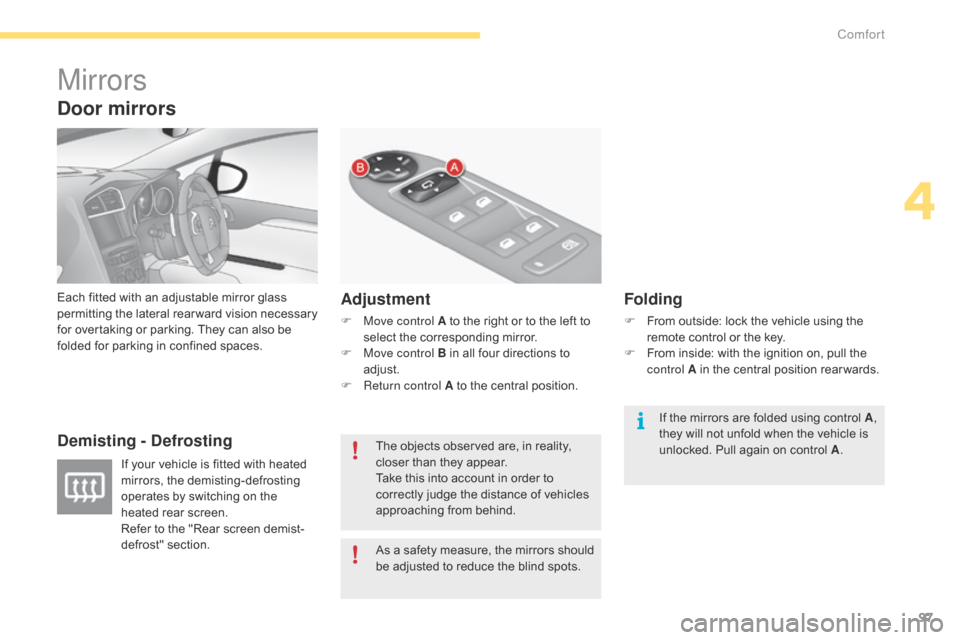
F Move control A
to the right or to the left to s
elect the corresponding mirror.
F
M
ove control B in all four directions to
adj
ust.
F
R
eturn control A to the central position.
Folding
F From outside: lock the vehicle using the r
emote control or the key.
F
F
rom inside: with the ignition on, pull the
c
ontrol A in the central position rear wards.
If
your
vehicle
is
fitted
with
heated
m
irrors,
the
demisting-defrosting
o
perates
by
switching
on
the
h
eated
rear
screen.
Refer
to
the
"Rear
screen
demist-
defrost"
s
ection. As
a
safety
measure,
the
mirrors
should
b
e
adjusted
to
reduce
the
blind
spots.
The
objects
observed
are,
in
reality,
c
loser
than
they
appear.
Take
this
into
account
in
order
to
c
orrectly
judge
the
distance
of
vehicles
a
pproaching
from
behind. If
the mirrors are folded using control A,
they
will not unfold when the vehicle is
u
nlocked. Pull again on control A.
Door mirrors
4
Comfort
Page 100 of 494
98
Automatic tilting in reverse gear
System which provides a view of the ground during parking manoeuvres in reverse gear.
Programming
F With the engine running, engage reverse g
e a r.
F
S
elect and adjust the left-hand and right-
hand
mirrors in succession.
The
adjustment is stored immediately.
Switching on
F With the engine running, engage reverse g
e a r.
F
M
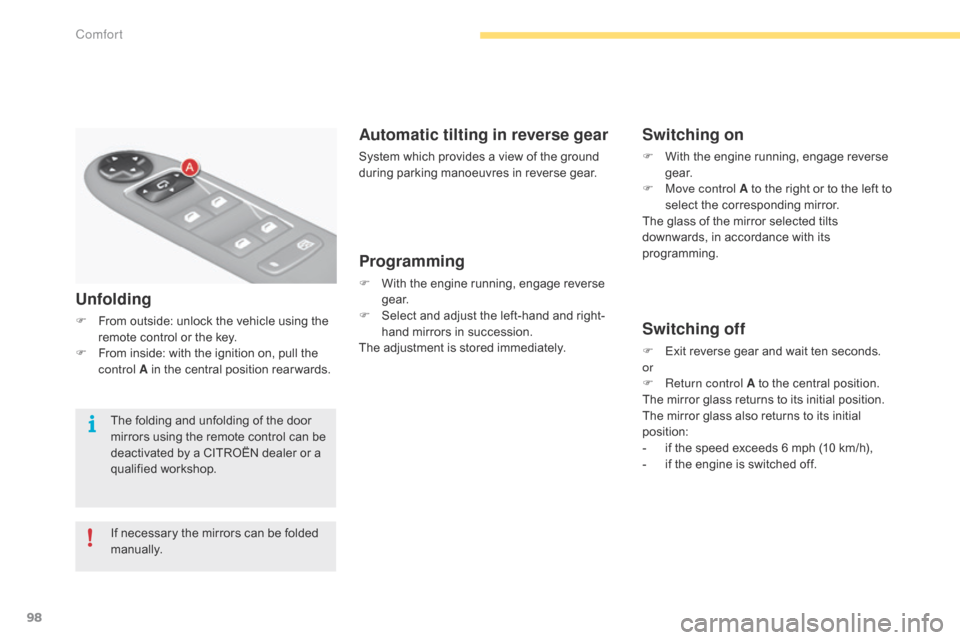
ove control A to the right or to the left to
s
elect the corresponding mirror.
The
glass of the mirror selected tilts
d
ownwards, in accordance with its
p
rogramming.
Switching off
F Exit reverse gear and wait ten seconds.
or
F
R
eturn control A to the central position.
The
mirror glass returns to its initial position.
The
mirror glass also returns to its initial
p
osition:
-
i
f the speed exceeds 6 mph (10 km/h),
-
i
f the engine is switched off.
Unfolding
F From outside: unlock the vehicle using the r
emote control or the key.
F
F
rom inside: with the ignition on, pull the
c
ontrol A in the central position rear wards.
If
necessary the mirrors can be folded
m
anually.
The
folding and unfolding of the door
m
irrors using the remote control can be
d
eactivated by a CITROËN dealer or a
q
ualified
w
orkshop.
Comfort