tow Citroen C4 2015 2.G User Guide
[x] Cancel search | Manufacturer: CITROEN, Model Year: 2015, Model line: C4, Model: Citroen C4 2015 2.GPages: 494, PDF Size: 20.49 MB
Page 88 of 494
86
C4-2_en_Chap04_confort_ed01-2015
C4-2_en_Chap04_confort_ed01-2015
7. Air flow adjustment
F Turn this control to the left to decrease the air flow or to the
right
to increase the air flow.
The
air
flow
indicator lamps, between the two
f
ans,
come
on progressively in relation to the
v
alue
re
quested.
5. Air conditioning On / Off
F Press this button to switch off the air conditioning.
Switching
the system off could result in
d
iscomfort
(
humidity,
c
ondensation).
F
P
ress
this button again to return to
a
utomatic operation of the air conditioning.
T
he
indicator lamp on the "A /C " button
comes
on. F
P ress one or more buttons to d
irect the air flow towards:
6. Air distribution adjustment
- the windscreen and side windows
(demisting or defrosting),
-
t
he outer and centre air vents,
-
t
he footwells.
You
can combine the three orientations to
o
btain the desired air distribution.
Comfort
Page 91 of 494
89
C4-2_en_Chap04_confort_ed01-2015
C4-2_en_Chap04_confort_ed01-2015
Front demist - defrost
These markings on the control panel indicate the control positions for rapid demisting or defrosting of the windscreen and side windows.
With manual air
conditioning
F Put the temperature, air flow and distribution c
ontrols to the dedicated marked position.
F
P
ut the air intake control to the "Exterior air
i
ntake" position
(
indicator lamp on the control off).
F
S
witch on the air conditioning by pressing
t
he "A /C "
button; the warning lamp in the
b
utton comes on.
With digital dual-zone air
conditioning
Automatic visibility programme
F Select this programme to demist or defrost the windscreen and side windows as quickly as p
ossible.
The
system automatically manages the air
c
onditioning, air flow and air intake, and provides
o
ptimum distribution towards the windscreen and
si
de
w
indows.
F To stop the programme, press either the "
visibility" button again or "AUTO", the
warning
lamp on the button goes off and the
w
arning lamp on the "AUTO" button
comes
on.
The
system starts again with the values in use
b
efore
i
t
w
as
ov
erridden
b
y
t
he
v
isibility
p
rogramme.
With Stop & Start, when demisting has been activated, the STOP mode is not
a
vailable.
With
Stop
&
Start,
when
the
demisting,
a
ir
conditioning
and
air
flow
functions
a
re
activated,
STOP
mode
is
not
a
vailable.
4
Comfort
Page 98 of 494
96
C4-2_en_Chap04_confort_ed01-2015
C4-2_en_Chap04_confort_ed01-2015
Rear seats
Rear head restraints
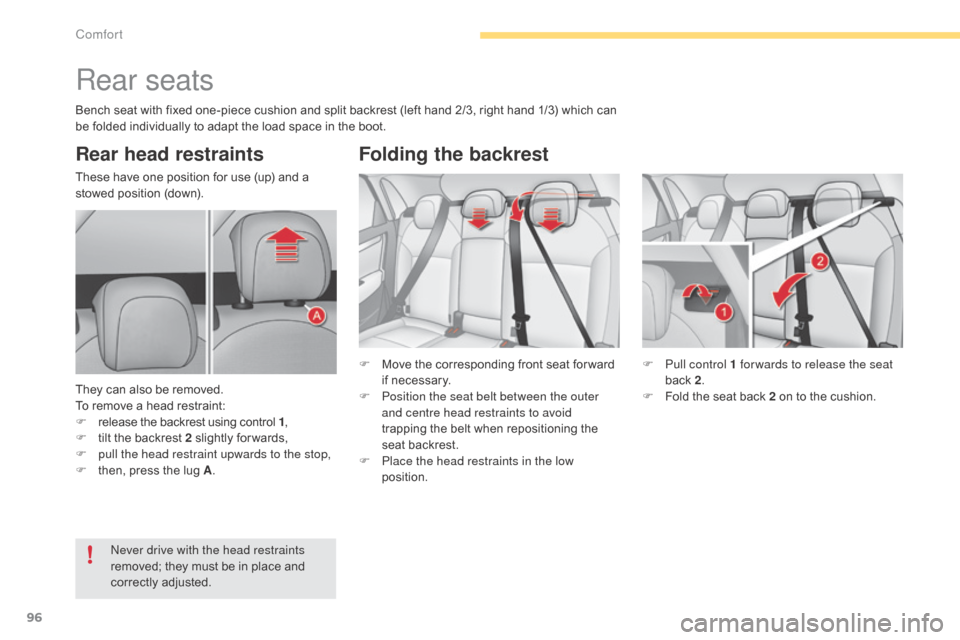
These have one position for use (up) and a stowed position (down).
They
can also be removed.
To
remove a head restraint:
F
r
elease the backrest using control 1,
F
t
ilt the backrest 2 slightly for wards,
F
p
ull the head restraint upwards to the stop,
F
t
hen, press the lug A. F
M
ove the corresponding front seat for ward
i
f necessary.
F
P
osition the seat belt between the outer
and centre head restraints to avoid
trapping
the belt when repositioning the
s
eat backrest.
F
P
lace the head restraints in the low
position. F
P
ull control 1 for wards to release the seat
back
2.
F
F
old the seat back 2 on to the cushion.
ne
ver drive with the head restraints
removed;
they must be in place and
c
orrectly
adj
usted.
Folding the backrest
Bench seat with fixed one-piece cushion and split backrest (left hand 2/3, right hand 1/3) which can be folded individually to adapt the load space in the boot.
Comfort
Page 110 of 494
108
C4-2_en_Chap05_amenagement_ed01-2015
C4-2_en_Chap05_amenagement_ed01-2015
Front armrest
Longitudinal adjustment
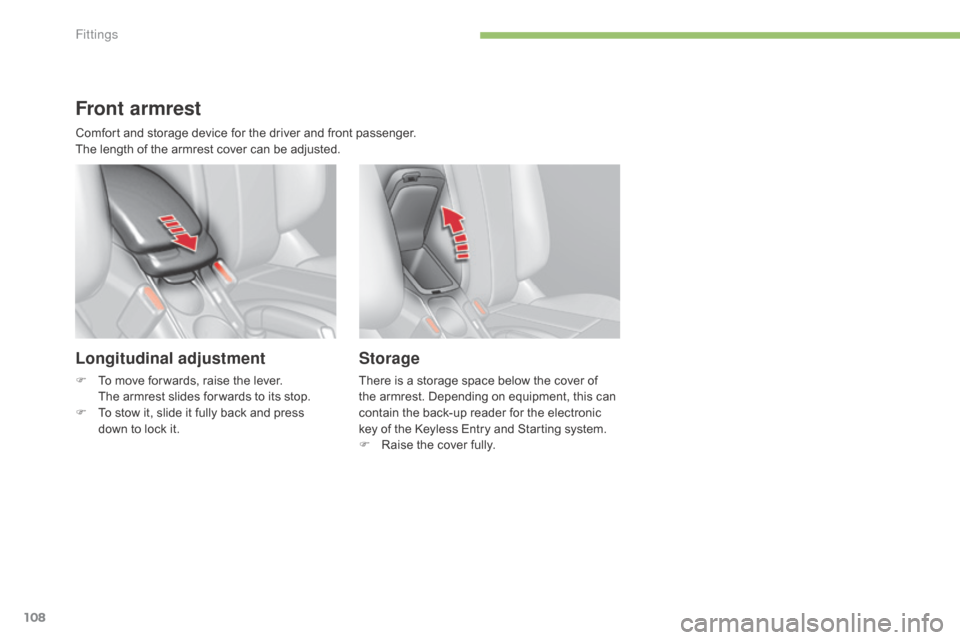
F To move for wards, raise the lever.
The armrest slides for wards to its stop.
F
T
o stow it, slide it fully back and press
d
own to lock it.
Storage
There is a storage space below the cover of the armrest. Depending on equipment, this can
c
ontain the back-up reader for the electronic
k
ey of the Keyless Entry and Starting system.
F
R
aise the cover fully.
Comfort
and
storage
device
for
the
driver
and
front
passenger.
The
length
of
the
armrest
cover
can
be
adjusted.
Fittings
Page 119 of 494
117
C4-2_en_Chap05_amenagement_ed01-2015
C4-2_en_Chap05_amenagement_ed01-2015
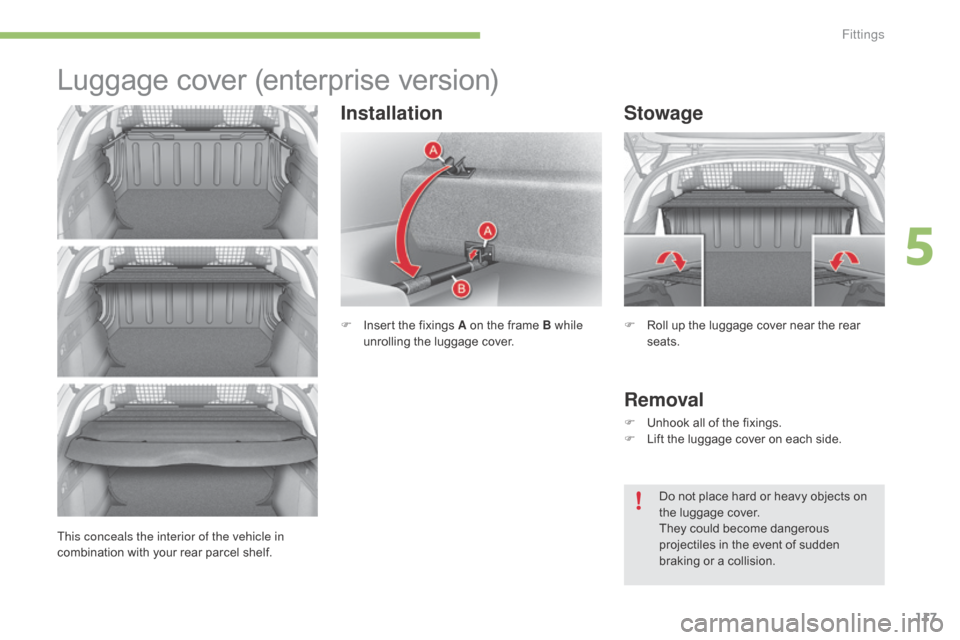
Luggage cover (enterprise v ersion)
F Insert the fixings A on the frame B while
unrolling the luggage cover.
Stowage
Removal
F Unhook all of the fixings.
F L ift the luggage cover on each side.
This conceals the interior of the vehicle in
combination
with
your
rear
parcel
shelf.
Installation
F Roll up the luggage cover near the rear sea
ts.
Do
not place hard or heavy objects on
t
he luggage cover.
They
could become dangerous
p
rojectiles in the event of sudden
b
raking or a collision.
5
Fittings
Page 121 of 494
119
C4-2_en_Chap06_visibilite_ed01-2015
C4-2_en_Chap06_visibilite_ed01-2015
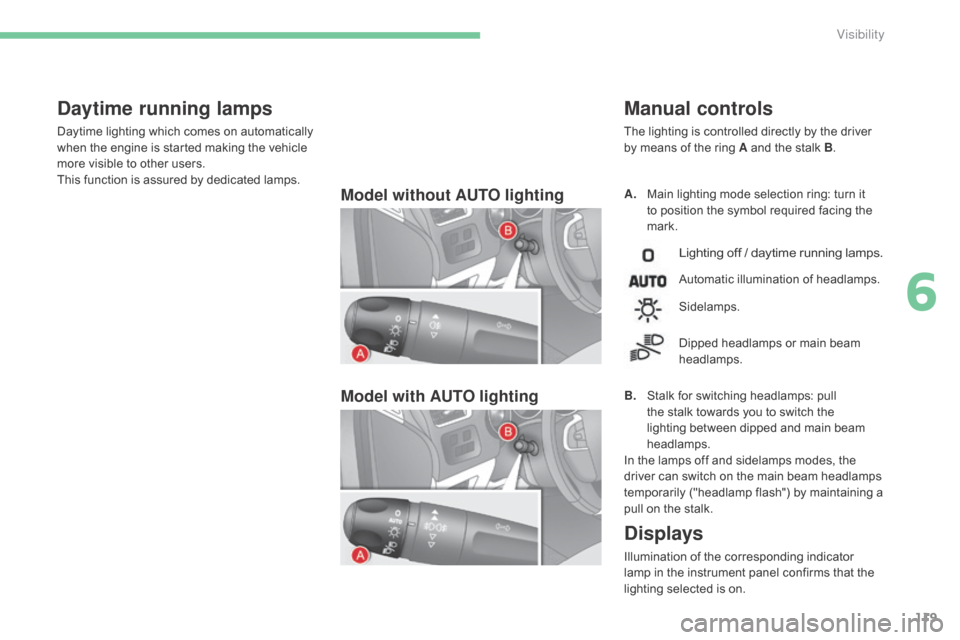
Model without AUTO lighting
Model with AUTO lightingA. Main lighting mode selection ring: turn it t
o position the symbol required facing the
ma
rk.
Manual controls
The lighting is controlled directly by the driver by means of the ring A and the stalk B.
Lighting off / daytime running lamps.
Automatic illumination of headlamps.
B.
S
talk
for switching headlamps: pull
t
he
stalk towards you to switch the
l
ighting between dipped and main beam
h
eadlamps.
In
the
lamps off and sidelamps modes, the
d
river
can
switch on the main beam headlamps
t
emporarily ("headlamp flash") by maintaining a
p
ull
on
the stalk.
Sidelamps.
Dipped
headlamps or main beam
h
eadlamps.
Displays
Illumination of the corresponding indicator lamp in the instrument panel confirms that the
l
ighting selected is on.
Daytime running lamps
Daytime lighting which comes on automatically when the engine is started making the vehicle
m
ore visible to other users.
This
function is assured by dedicated lamps.
6
Visibility
Page 130 of 494
128
C4-2_en_Chap06_visibilite_ed01-2015
C4-2_en_Chap06_visibilite_ed01-2015
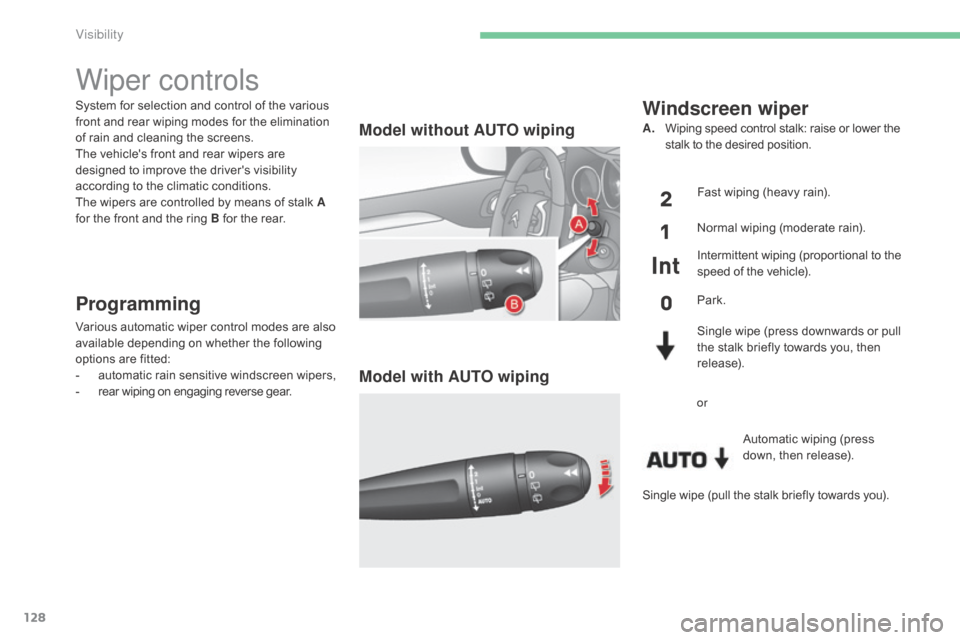
System for selection and control of the various front and rear wiping modes for the elimination
o
f rain and cleaning the screens.
The
vehicle's front and rear wipers are
d
esigned to improve the driver's visibility
a
ccording to the climatic conditions.
The
wipers are controlled by means of stalk A
for
the front and the ring B for the rear.
Programming
Various automatic wiper control modes are also available depending on whether the following
o
ptions are fitted:
-
a
utomatic
r
ain
sen
sitive
w
indscreen
w
ipers,
-
r
ear wiping on engaging reverse gear.
Model without AUTO wiping
Model with AUTO wiping
Windscreen wiper
A. Wiping speed control stalk: raise or lower the s
talk to the desired position.
Fast
wiping (heavy rain).
Normal
wiping (moderate rain).
Intermittent
wiping (proportional to the
s
peed of the vehicle).
Park.
Single
wipe (press downwards or pull
t
he stalk briefly towards you, then
r
elease).Automatic
wiping (press
do
wn,
t
hen
r
elease).
or
Wiper controls
Single wipe (pull the stalk briefly towards you).
Visibility
Page 132 of 494
130
C4-2_en_Chap06_visibilite_ed01-2015
C4-2_en_Chap06_visibilite_ed01-2015
Operating fault
If an automatic rain sensitive wiper malfunction occurs, the wipers will operate in intermittent
m
ode.
Contact
a CITROËN dealer or a qualified
w
orkshop.
Windscreen and headlamp
wash
Low screenwash / headlamp
wash fluid level
On vehicle fitted with headlamp washers, the low level of this fluid is indicated by gauge in
t
he reservoir filler neck under the bonnet.
Checking
and topping up this fluid can should
b
e done with the engine off.
The
level of this fluid should be checked
r
egularly,
par
ticularly
d
uring
w
inter.
Refer
to "Checks - Screenwash / headlamp
w
ash level" section for the procedure on
checking
the level.
F
P
ull
the
windscreen
wiper
stalk
towards
y
ou.
The
windscreen
wash
then
the
w
indscreen
wipers
operate
for
a
fixed
p
eriod.
The
headlamp
washers
only
operate
when
the
dipped or main beam headlamps are on, with
the vehicle moving .
Do
not
cover
the
rain
sensor,
linked
with
t
he sunshine sensor and located in the
centre of the windscreen behind the rear
view
mirror.
Switch
off
the
automatic
rain
sensitive
w
ipers
when
using
an
automatic
car
wash.
In winter, it is advisable to wait until the
windscreen
is
completely
clear
of
ice
b
efore
activating
the
automatic
rain
sen
sitive
w
ipers. To
reduce
the
consumption
of
the
fluid
b
y
the
headlamp
washers,
they
operate
o
nly with every seventh use of the
screenwash
or
every
25
miles
(40
km)
d
uring
a
given
journey.
Visibility
Page 145 of 494
143
C4-2_en_Chap07_securite-enfants_ed01-2015
C4-2_en_Chap07_securite-enfants_ed01-2015
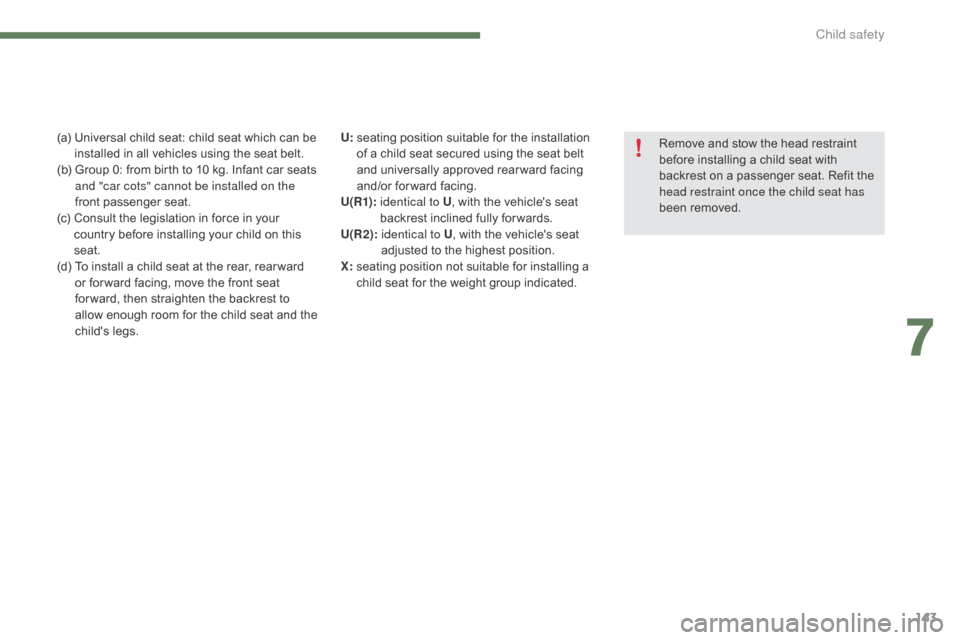
(a) Universal child seat: child seat which can be i
nstalled in all vehicles using the seat belt.
(b)
G
roup 0: from birth to 10 kg. Infant car seats
a
nd "car cots" cannot be installed on the
front
p
assenger
sea
t.
(c)
C
onsult the legislation in force in your
c
ountry before installing your child on this
sea
t.
(d)
T
o install a child seat at the rear, rear ward
o
r for ward facing, move the front seat
f
or ward, then straighten the backrest to
a
llow enough room for the child seat and the
c
hild's legs. U:
s eating position suitable for the installation o
f a child seat secured using the seat belt
a
nd universally approved rear ward facing
a
nd/or for ward facing.
U(R1) :
i
dentical to U,
with the vehicle's seat
b
ackrest inclined fully for wards.
U(R2) :
i
dentical to U,
with the vehicle's seat
a
djusted to the highest position.
X:
s
eating position not suitable for installing a
c
hild seat for the weight group indicated.Remove
and stow the head restraint
b
efore installing a child seat with
b
ackrest on a passenger seat. Refit the
h
ead restraint once the child seat has
been
removed.
7
Child safety
Page 146 of 494
144
C4-2_en_Chap07_securite-enfants_ed01-2015
C4-2_en_Chap07_securite-enfants_ed01-2015
"ISOFIX" mountings
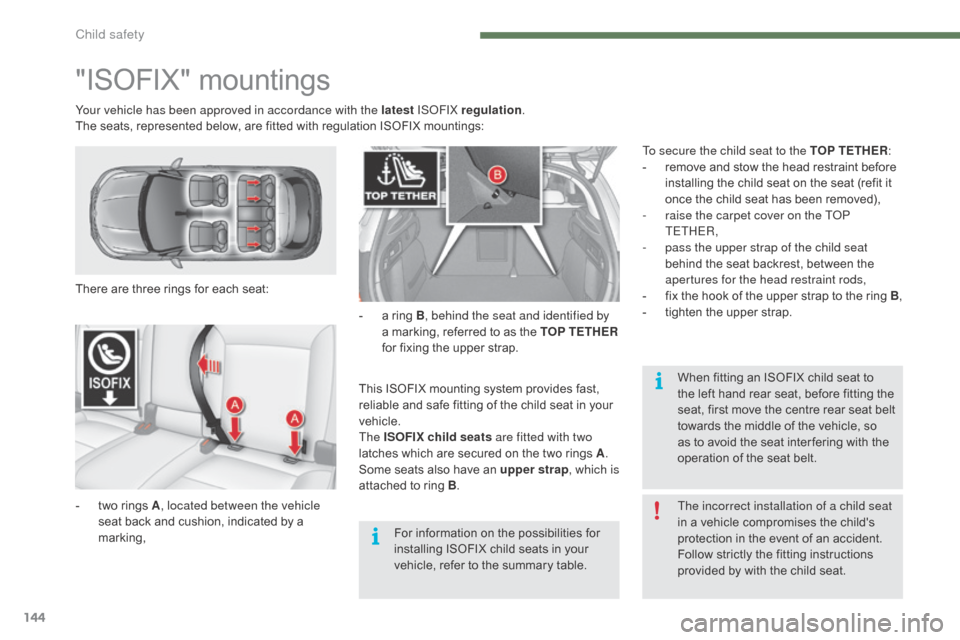
There are three rings for each seat:
-
t
wo rings A, located between the vehicle
seat
back and cushion, indicated by a
m
arking, This
ISOFIX mounting system provides fast,
r
eliable and safe fitting of the child seat in your
v
ehicle.
The ISOFIX child seats are fitted with two
latches
which are secured on the two rings A.
Some
seats also have an upper strap, which is
attached
to ring B.
Your vehicle has been approved in accordance with the latest
IS
oFI
X regulation
.
The seats, represented below, are fitted with regulation ISOFIX mountings:
To secure the child seat to the TOP TETHER :
-
r
emove and stow the head restraint before
i
nstalling the child seat on the seat (refit it
o
nce the child seat has been removed),
-
r
aise the carpet cover on the T
oP
T
ETHER,
-
p
ass the upper strap of the child seat
behind the seat backrest, between the a
pertures for the head restraint rods,
- f ix the hook of the upper strap to the ring B,
-
t
ighten the upper strap.
-
a
ring B, behind the seat and identified by
a
marking, referred to as the TOP TETHER
for
fixing the upper strap.
The incorrect installation of a child seat
in
a vehicle compromises the child's
p
rotection in the event of an accident.
Follow
strictly the fitting instructions
p
rovided by with the child seat.
When
fitting an ISOFIX child seat to
t
he left hand rear seat, before fitting the
s
eat, first move the centre rear seat belt
t
owards the middle of the vehicle, so
a
s to avoid the seat inter fering with the
o
peration of the seat belt.
For
information on the possibilities for
i
nstalling ISOFIX child seats in your
v
ehicle, refer to the summary table.
Child safety