tow Citroen C4 2015 2.G Owner's Guide
[x] Cancel search | Manufacturer: CITROEN, Model Year: 2015, Model line: C4, Model: Citroen C4 2015 2.GPages: 494, PDF Size: 20.49 MB
Page 206 of 494
204
C4-2_en_Chap09_conduite_ed01-2015
C4-2_en_Chap09_conduite_ed01-2015
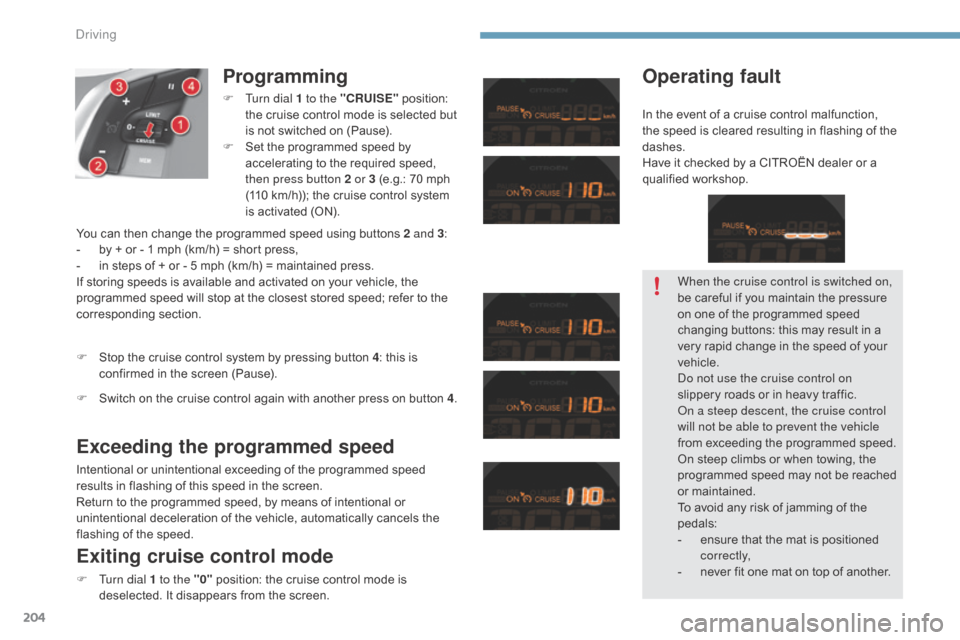
Programming
F Turn dial 1 to the "CRUISE" position: t
he cruise control mode is selected but
i
s not switched on (Pause).
F
S
et the programmed speed by
a
ccelerating to the required speed,
t
hen press button 2 or 3 (e.g.: 70 mph
(
110 km/h)); the cruise control system
i
s activated (ON).
Exceeding the programmed speed
Intentional or unintentional exceeding of the programmed speed results in flashing of this speed in the screen.
Return
to the programmed speed, by means of intentional or
u
nintentional deceleration of the vehicle, automatically cancels the
f
lashing of the speed.
Exiting cruise control mode
F Turn dial 1 to the "0" position: the cruise control mode is d
eselected. It disappears from the screen.
F
S
top the cruise control system by pressing button 4
: this is
c
onfirmed in the screen (Pause).
Operating fault
You can then change the programmed speed using buttons 2 and 3
:
- b y + or - 1 mph (km/h) = short press,
-
i
n steps of + or - 5 mph (km/h) = maintained press.
If
storing speeds is available and activated on your vehicle, the
p
rogrammed speed will stop at the closest stored speed; refer to the
c
orresponding
s
ection.
F
S
witch on the cruise control again with another press on button 4. When the cruise control is switched on,
be
careful if you maintain the pressure
o
n one of the programmed speed
c
hanging buttons: this may result in a
v
ery rapid change in the speed of your
v
ehicle.
do n
ot use the cruise control on
slippery
roads or in heavy traffic.
on a s
teep descent, the cruise control
will not be able to prevent the vehicle
from
exceeding the programmed speed.
On
steep climbs or when towing, the
p
rogrammed speed may not be reached
o
r maintained.
To
avoid any risk of jamming of the
ped
als:
-
e
nsure that the mat is positioned
c
o r r e c t l y,
-
n
ever fit one mat on top of another.
In
the event of a cruise control malfunction,
t
he speed is cleared resulting in flashing of the
das
hes.
Have it checked by a CITROËN dealer or a
q
ualified
w
orkshop.
Driving
Page 208 of 494
206
C4-2_en_Chap09_conduite_ed01-2015
C4-2_en_Chap09_conduite_ed01-2015
In addition to the rear parking sensors, the front parking sensors are triggered when an obstacle i
s detected in front and the speed of the vehicle is
still
below 6 mph (10 km/h).
The
front parking sensors are interrupted if the
v
ehicle stops for more than three seconds in
f
or ward gear, if no further obstacles are detected
o
r when the speed of the vehicle exceeds 6 mph
(
10 km/h).
Front parking sensors
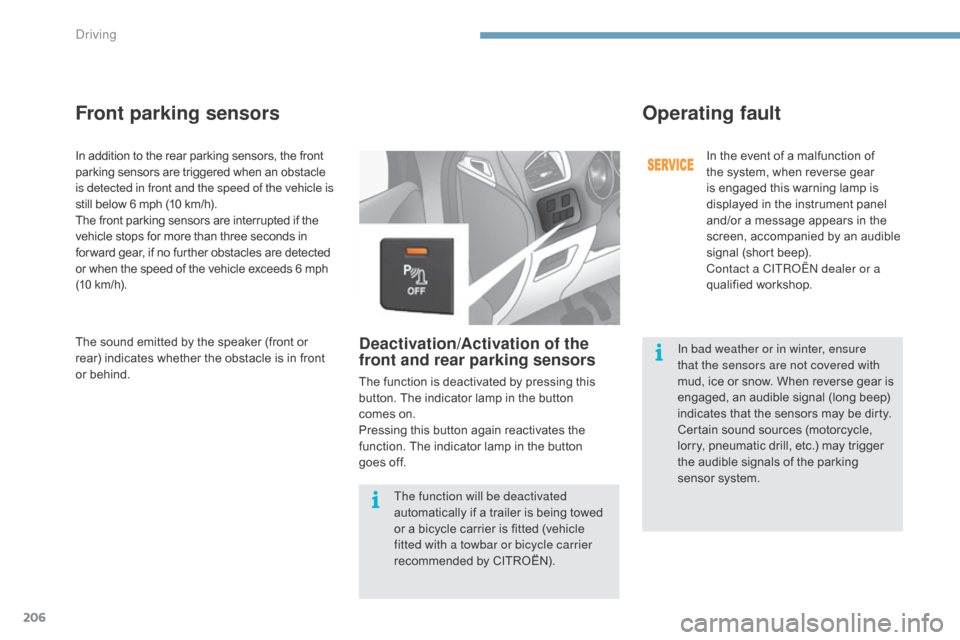
Deactivation/Activation of the
front and rear parking sensors
The function is deactivated by pressing this button. The indicator lamp in the button
comes
on.
Pressing
this button again reactivates the
f
unction. The indicator lamp in the button
goes
off.
Operating fault
In the event of a malfunction of the system, when reverse gear
i
s engaged this warning lamp is
d
isplayed in the instrument panel
a
nd/or a message appears in the
s
creen, accompanied by an audible
s
ignal (short beep).
Contact a CITR
oËn
dealer or a
qualified
w
orkshop.
The
sound
emitted
by
the
speaker
(front
or
r
ear)
indicates
whether
the
obstacle
is
in
front
o
r
behind. The function will be deactivated
automatically
if
a
trailer
is
being
towed
o
r
a
bicycle
carrier
is
fitted
(vehicle
f
itted with a towbar or bicycle carrier
recommended
by
CITROËN). In bad weather or in winter, ensure
that the sensors are not covered with
mud,
ice or snow. When reverse gear is
e
ngaged, an audible signal (long beep)
i
ndicates that the sensors may be dirty.
Certain
sound sources (motorcycle,
l
orry,
pneumatic drill, etc.) may trigger
t
he
audible signals of the parking
s
ensor system.
driving
Page 209 of 494
207
C4-2_en_Chap10_verification_ed01-2015
C4-2_en_Chap10_verification_ed01-2015
ToTaL & CITRoËn
Partners in performance and
protecting the environment
Innovation in the search for
performance
For over 40 year, the ToTaL Research and
Development departments have developed for
C
ITROËN, lubricants to match the latest technical
i
nnovations on CITR
oËn
vehicles, both for
competition
and for everyday motoring.
For you, this is an assurance that you will obtain of the
best
per formance for your engine.
Optimum protection for
your engine
By having your CITROËN vehicle serviced with ToTaL l ubricants, you are
contributing
towards improving the life and
p
er formances of your engine, while also
pro
tecting
t
he
e
nvironment.
prefers
10
Checks
Page 210 of 494
208
C4-2_en_Chap10_verification_ed01-2015
C4-2_en_Chap10_verification_ed01-2015
Fuel tank
Capacity of the tank: approximately 60 litres.When the low fuel level in the
tank
is reached, this warning lamp
c
omes on in the instrument panel,
a
ccompanied by an audible warning
a
nd the display of an alert message.
W
hen it first comes on, around
6
litres of fuel remain in the tank.
Low fuel level
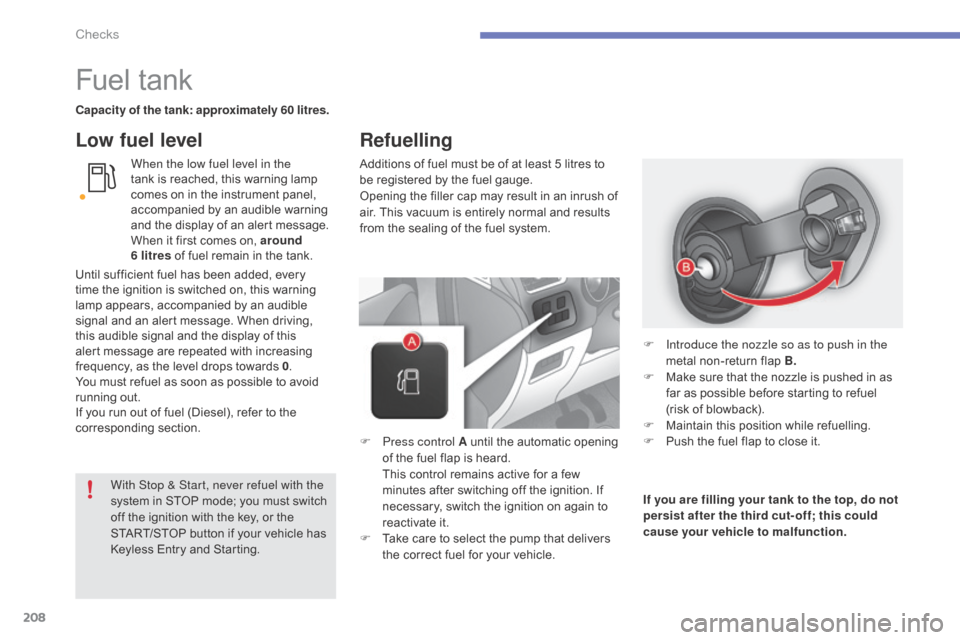
Additions of fuel must be of at least 5 litres to be registered by the fuel gauge.
Opening
the filler cap may result in an inrush of
a
ir. This vacuum is entirely normal and results
f
rom the sealing of the fuel system.
F
P
ress control A until the automatic opening
o
f the fuel flap is heard.
T
his control remains active for a few
m
inutes after switching off the ignition. If
n
ecessary, switch the ignition on again to
r
eactivate it.
F
T
ake care to select the pump that delivers
t
he correct fuel for your vehicle.If you are filling your tank to the top, do not
persist after the third cut- off; this could
cause your vehicle to malfunction. F
I
ntroduce the nozzle so as to push in the
metal
non-return flap B.
F
M
ake sure that the nozzle is pushed in as
f
ar as possible before starting to refuel
(
risk of blowback).
F
M
aintain this position while refuelling.
F
P
ush the fuel flap to close it.
With Stop & Start, never refuel with the
system
in
STOP
mode;
you
must
switch
o
ff
the
ignition
with
the
key,
or
the
S
TART/STOP
button
if
your
vehicle
has
K
eyless
Entry
and
Starting.
Until
sufficient
fuel
has
been
added,
every
t
ime
the
ignition
is
switched
on,
this
warning
l
amp
appears,
accompanied
by
an
audible
s
ignal
and
an
alert
message.
When
driving,
t
his
audible
signal
and
the
display
of
this
a
lert
message
are
repeated
with
increasing
f
requency,
as
the
level
drops
towards
0 .
You
must
refuel
as
soon
as
possible
to
avoid
r
unning
out.
If
you
run
out
of
fuel
(Diesel),
refer
to
the
c
orresponding
s
ection.
Refuelling
Checks
Page 222 of 494
220
C4-2_en_Chap10_verification_ed01-2015
C4-2_en_Chap10_verification_ed01-2015
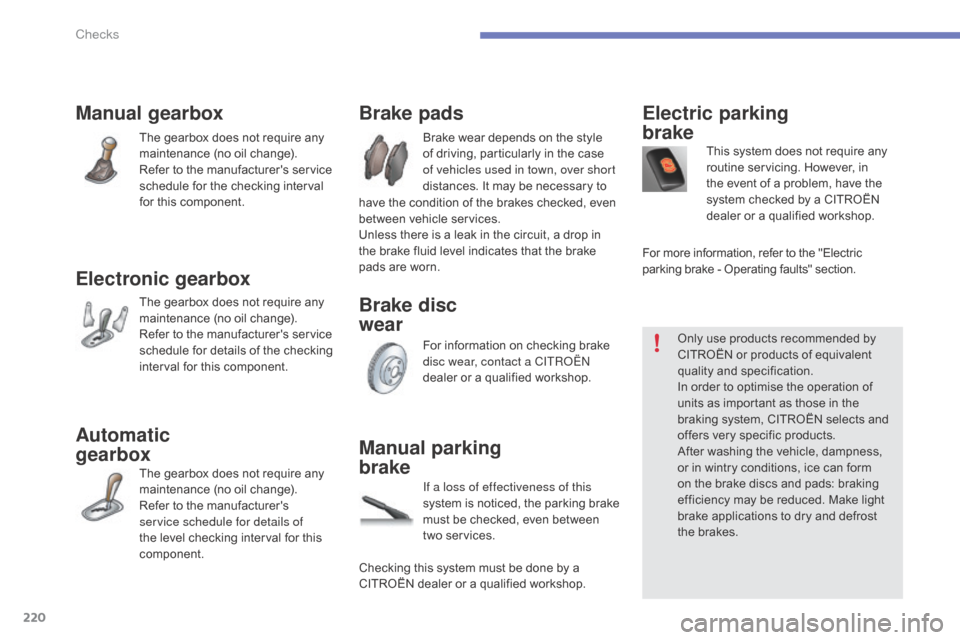
Automatic
gearbox
The gearbox does not require any maintenance (no oil change).
Refer
to the manufacturer's
s
ervice schedule for details of
the
level checking interval for this
c
omponent.
Electric parking
brake
This system does not require any routine servicing. However, in
t
he event of a problem, have the
s
ystem checked by a CITROËN
d
ealer or a qualified workshop.
Manual parking
brake
If a loss of effectiveness of this
system
i s n oticed, t he p arking b rake
m
ust be checked, even between
t
wo services.
Brake pads
Brake wear depends on the style of driving, particularly in the case
o
f vehicles used in town, over short
distances.
It may be necessary to
Brake disc
wear
For information on checking brake disc wear, contact a CITRoËn
dealer
or a qualified workshop.For
more information, refer to the "Electric
p
arking brake - Operating faults" section.
Manual gearbox
The gearbox does not require any m
aintenance (no oil change).
Refer
to the manufacturer's service
s
chedule for the checking interval
f
or this component.
Electronic gearbox
The gearbox does not require any maintenance (no oil change).
Refer
to the manufacturer's service
s
chedule for details of the checking
i
nterval for this component. Only
use products recommended by
C
ITROËN or products of equivalent
q
uality
an
d
sp
ecification.
In
order to optimise the operation of
u
nits as important as those in the
b
raking system, CITROËN selects and
o
ffers very specific products.
After
washing the vehicle, dampness,
o
r in wintry conditions, ice can form
o
n the brake discs and pads: braking
e
fficiency may be reduced. Make light
b
rake applications to dry and defrost
t
he brakes.
have
the condition of the brakes checked, even
b
etween
v
ehicle
s
ervices.
Unless there is a leak in the circuit, a drop in
t
he brake fluid level indicates that the brake
p
ads are worn.
Checking this system must be done by a
C
ITROËN dealer or a qualified workshop.
Checks
Page 234 of 494
232
C4-2_en_Chap11_info-pratique_ed01-2015
C4-2_en_Chap11_info-pratique_ed01-2015
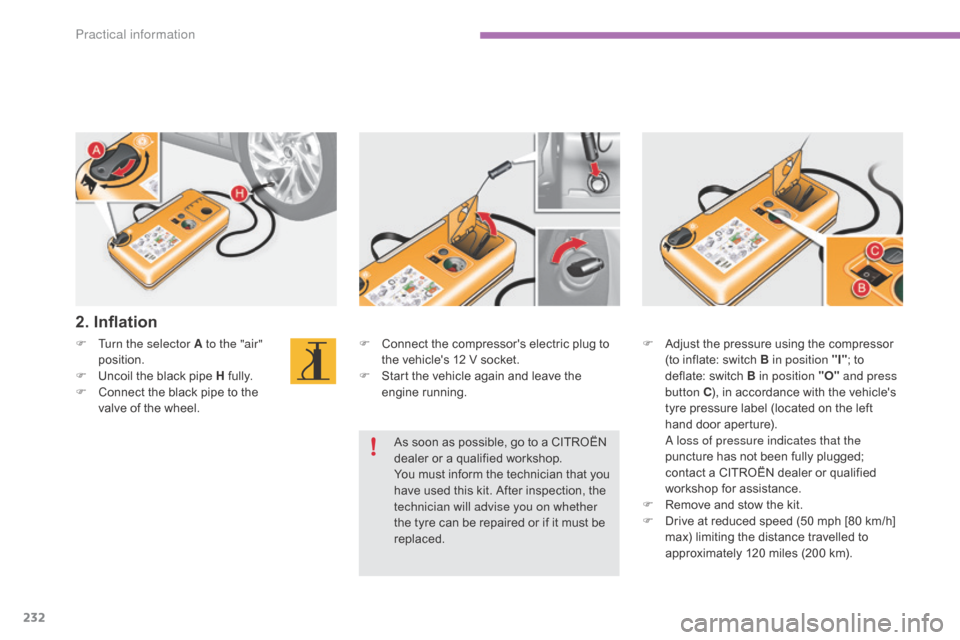
F Connect the compressor's electric plug to t
he vehicle's 12 V socket.
F
S
tart the vehicle again and leave the
e
ngine
r
unning.
F
T
urn the selector A to the "air"
position.
F
U
ncoil
the
black
pipe
H
f
ully.
F
C
onnect
the
black
pipe
to
the
v
alve
of
the
wheel.
2. Inflation
F Adjust the pressure using the compressor (
to inflate: switch B in position "I";
to
d
eflate: switch B in
p
osition "O" and press
button C ),
in accordance with the vehicle's
t
yre pressure label (located on the left
h
and door aperture).
a
loss of pressure indicates that the
puncture
has not been fully plugged;
c
ontact a CITROËN dealer or qualified
w
orkshop for assistance.
F
R
emove and stow the kit.
F
D
rive at reduced speed (50 mph [80 km/h]
m
ax) limiting the distance travelled to
a
pproximately 120 miles (200 km).
As
soon
as
possible,
go
to
a
CITROËN
d
ealer
or
a
qualified
workshop.
You
must
inform
the
technician
that
you
h
ave
used
this
kit.
After
inspection,
the
t
echnician will advise you on whether
the
tyre
can
be
repaired
or
if
it
must
be
r
eplaced.
Practical information
Page 235 of 494
233
C4-2_en_Chap11_info-pratique_ed01-2015
C4-2_en_Chap11_info-pratique_ed01-2015
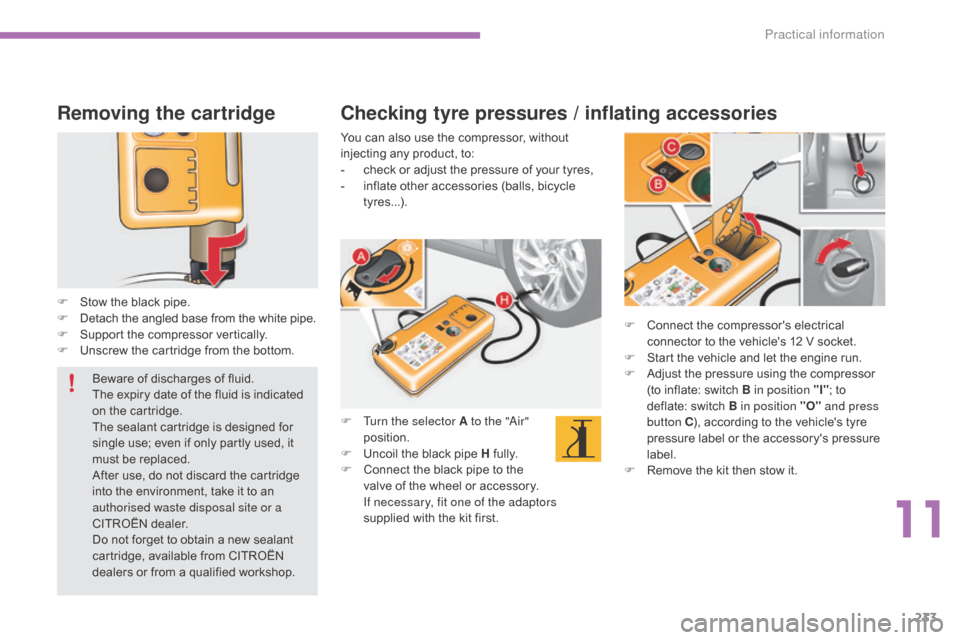
Removing the cartridge
F Stow the black pipe.
F D etach the angled base from the white pipe.
F
S
upport the compressor vertically.
F
U
nscrew the cartridge from the bottom. F
C
onnect the compressor's electrical
c
onnector to the vehicle's 12 V socket.
F
S
tart the vehicle and let the engine run.
F
A
djust the pressure using the compressor
(
to inflate: switch B in position "I";
to
d
eflate: switch B in position "O" and press
button C ),
according to the vehicle's tyre
p
ressure label or the accessory's pressure
lab
el.
F
R
emove the kit then stow it.
Checking tyre pressures / inflating accessories
You can also use the compressor, without injecting any product, to:
-
c
heck or adjust the pressure of your tyres,
-
i
nflate other accessories (balls, bicycle
t
yres...).
F
T
urn the selector A to the "
ai
r"
position.
F
U
ncoil the black pipe H
f
ully.
F
C
onnect the black pipe to the
v
alve of the wheel or accessory.
I
f necessary, fit one of the adaptors
supplied
with the kit first.
Beware
of
discharges
of
fluid.
The
expiry
date
of
the
fluid
is
indicated
o
n
the
cartridge.
The
sealant
cartridge
is
designed
for
s
ingle
use;
even
if
only
partly
used,
it
m
ust
be
replaced.
After
use,
do
not
discard
the
cartridge
i
nto
the
environment,
take
it
to
an
a
uthorised waste disposal site or a
CITROËN
dealer.
Do
not
forget
to
obtain
a
new
sealant
c
artridge,
available
from
CITROËN
d
ealers
or
from
a
qualified
workshop.
11
Practical information
Page 236 of 494
234
C4-2_en_Chap11_info-pratique_ed01-2015
C4-2_en_Chap11_info-pratique_ed01-2015
Changing a wheel
Access to the tools
The tools are installed in the boot under the
f l o o r.
To gain access to them:
F
o
pen the boot,
F
r
aise the floor,
F
s
ecure it by hooking its cord on the hook
o
n the rear shelf support,
F
w
ith a standard size spare wheel, unclip
and
remove the box in the middle of the
w
heel containing the tools,
or
F
w
ith a "space-saver" spare wheel; lift the
w
heel at the rear towards you for access to
the
storage box containing the tools.
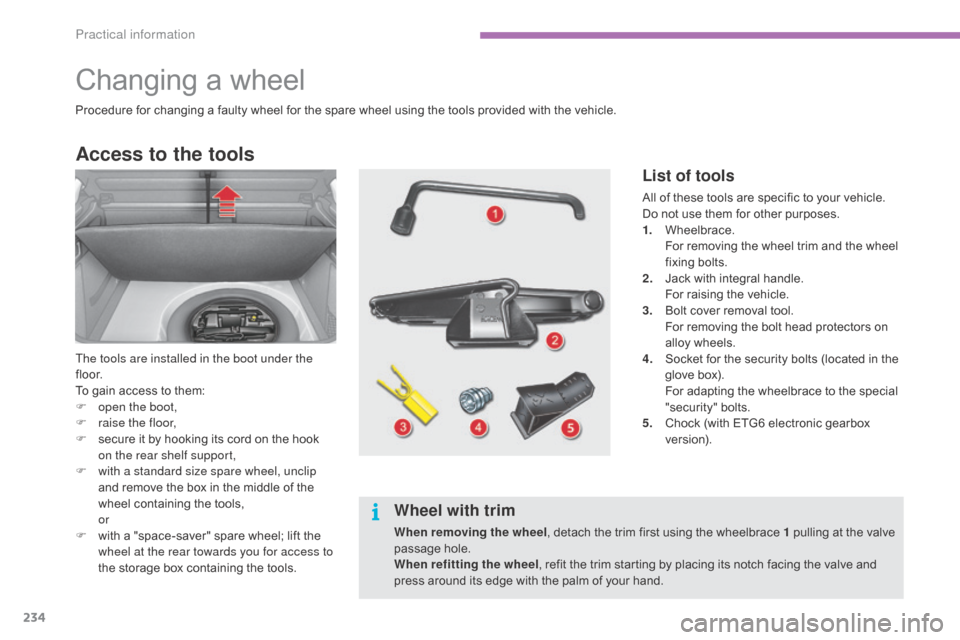
List of tools
All of these tools are specific to your vehicle. Do not use them for other purposes.
1.
W
heelbrace.
F
or removing the wheel trim and the wheel
f
ixing
bol
ts.
2.
J
ack with integral handle.
F
or raising the vehicle.
3.
B
olt cover removal tool.
F
or removing the bolt head protectors on
a
lloy wheels.
4.
S
ocket for the security bolts (located in the
g
love box).
F
or adapting the wheelbrace to the special
"s
ecurity"
b
olts.
5.
C
hock (with ETG6 electronic gearbox
v
e r s i o n).
Wheel with trim
When removing the wheel , detach the trim first using the wheelbrace 1 pulling at the valve p
assage hole.
When refitting the wheel ,
refit the trim starting by placing its notch facing the valve and
p
ress around its edge with the palm of your hand.
Procedure
for
changing
a
faulty
wheel
for
the
spare
wheel
using the tools provided with the vehicle.
Practical information
Page 237 of 494
235
C4-2_en_Chap11_info-pratique_ed01-2015
C4-2_en_Chap11_info-pratique_ed01-2015
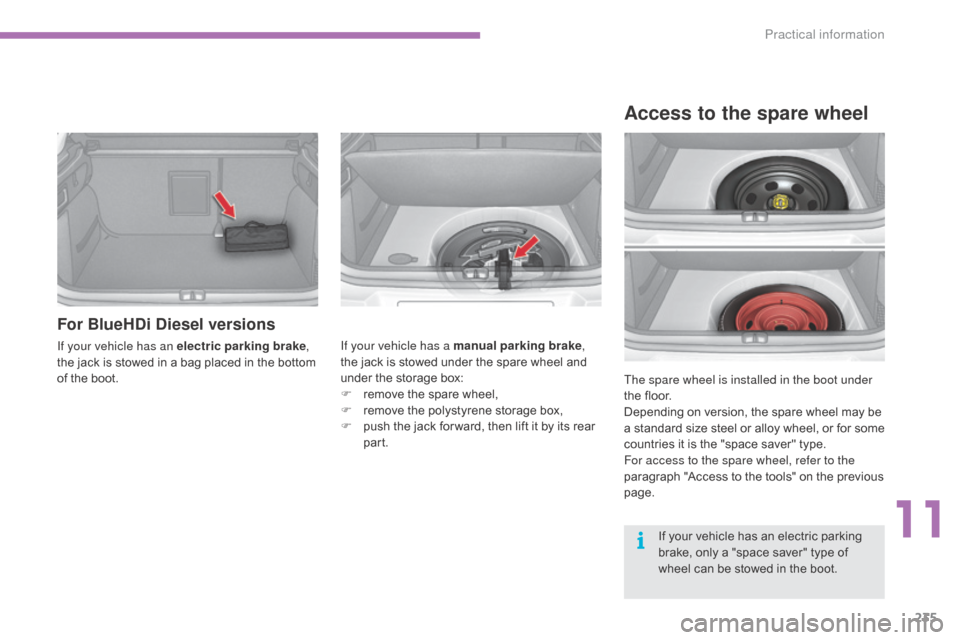
For BlueHDi Diesel versions
If your vehicle has an electric parking brake,
the jack is stowed in a bag placed in the bottom
o
f the boot. If your vehicle has a manual parking brake
,
the jack is stowed under the spare wheel and
u
nder the storage box:
F
r
emove the spare wheel,
F
r
emove the polystyrene storage box,
F
p
ush the jack for ward, then lift it by its rear
par
t.The spare wheel is installed in the boot under
the
floor.
Depending
on version, the spare wheel may be
a
standard
size
steel
or
alloy
wheel,
or
for
some
c
ountries it is the "space saver" type.
For access to the spare wheel, refer to the
paragraph
"Access to the tools" on the previous
pag
e.
Access to the spare wheel
If your vehicle has an electric parking brake, only a "space saver" type of
w
heel can be stowed in the boot.
11
Practical information
Page 238 of 494
236
C4-2_en_Chap11_info-pratique_ed01-2015
C4-2_en_Chap11_info-pratique_ed01-2015
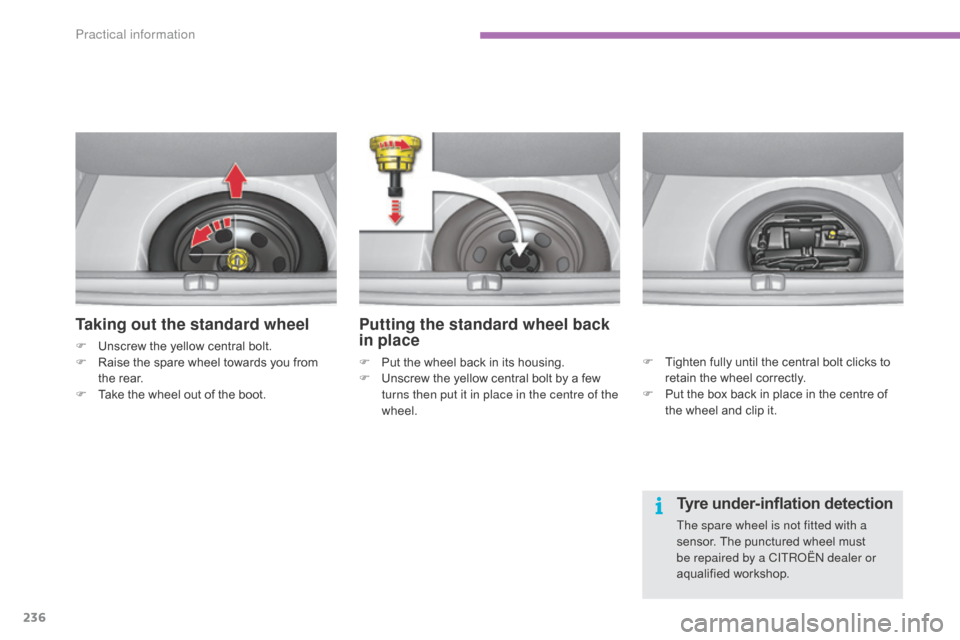
Taking out the standard wheel
F Unscrew the yellow central bolt.
F R aise the spare wheel towards you from
t
he rear.
F
T
ake the wheel out of the boot.
Putting the standard wheel back
in place
F Put the wheel back in its housing.
F U nscrew the yellow central bolt by a few
t
urns then put it in place in the centre of the
wheel.
Tyre under-inflation detection
The spare wheel is not fitted with a
sensor. The punctured wheel must
b
e repaired by a CITR
oËn
dealer or
aqualified
w
orkshop.
F
T
ighten fully until the central bolt clicks to
r
etain the wheel correctly.
F
P
ut the box back in place in the centre of
t
he wheel and clip it.
Practical information