change time Citroen C4 CACTUS RHD 2015 1.G User Guide
[x] Cancel search | Manufacturer: CITROEN, Model Year: 2015, Model line: C4 CACTUS RHD, Model: Citroen C4 CACTUS RHD 2015 1.GPages: 326, PDF Size: 8.56 MB
Page 221 of 326

219
Checking levels
Take care when working under the bonnet, as certain areas of the engine may be extremely hot (risk of burns) and the cooling fan could start at any time (even with the ignition off).
Engine oil level
The check is carried out either when the ignition is switched on using the
o
il level indicator in the instrument
p
anel for vehicles so equipped, or
u
sing the dipstick.Checking using the dipstick
Refer to the "Petrol engine" or "Diesel engine" section for the location of the dipstick in the
e
ngine compartment of your vehicle.
F
T
ake the dipstick by its coloured grip and
r
emove it completely.
F
W
ipe the end of the dipstick using a clean
n
on-fluffy cloth.
F
R
efit the dipstick and push fully down, then
p
ull it out again to make the visual check:
t
he correct level is between the marks A
and
B.
Check
all
of
these
levels
regularly,
in
line
with
the
manufacturer's service schedule. Top them up if necessary, unless other wise indicated.
If
a
level
drops
significantly,
have
the
corresponding system checked by a CITROËN dealer or a qualified workshop.
If you find that the level is above the A mark or
belo
w the B mark, do not star t the engine.
-
I
f the level is above the MAX
mark (risk
o
f damage to the engine), contact a
C
ITROËN dealer or a qualified workshop.
-
I
f the level is below the MIN
mark, you
m
ust top up the engine oil.
A = M
aX
B
= MI
nT
o
ensure
that
the
reading
is
correct,
y
our
vehicle
must
be
parked
on
a
level
s
ur face
with
the
engine
having
been
off
f
or
more
than
30
minutes.
It
is
normal
to
top
up
the
oil
level
between
t
wo
services
(or
oil
changes).
CITROËN
r
ecommends
that
you
check
the
level,
and
top
u
p
if
necessary,
every
3
000
miles
(5
000
kms).
10
Checks
Page 225 of 326
223
Checks
12 V battery
The battery does not require any maintenance.
H owever, check that the terminals are clean a
nd correctly tightened, particularly in summer
a
nd winter.Refer to the manufacturer's service schedule for details of the
r
eplacement intervals for these
c
omponents.
Air filter and passenger compartment filter
Replace the oil filter each time the e ngine oil is changed.
Refer
to the manufacturer's
s
ervice schedule for details of
t
he replacement interval for this
c
omponent.
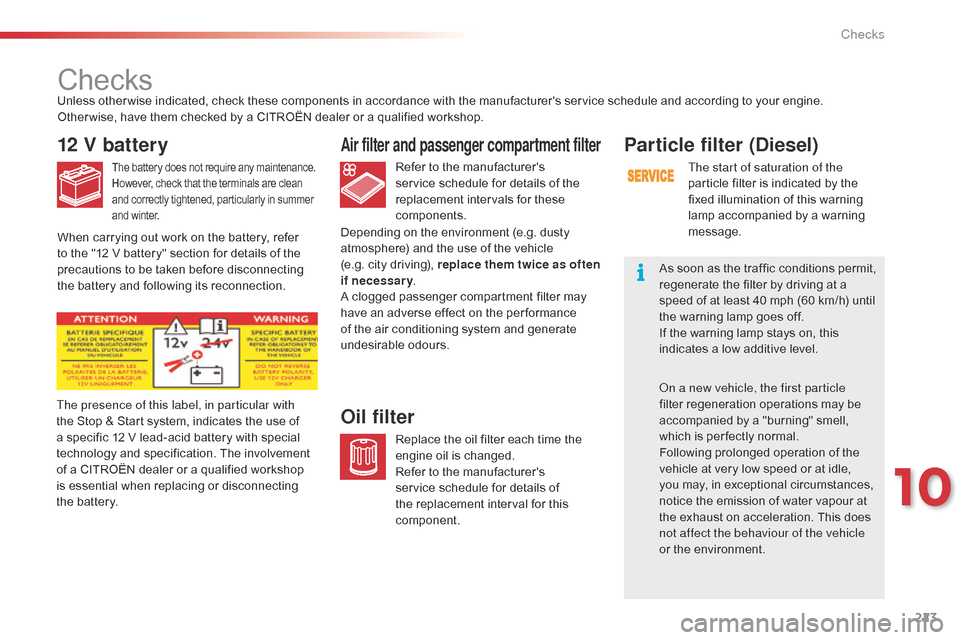
Oil filterThe presence of this label, in particular with
the Stop & Start system, indicates the use of
a
specific 12 V lead-acid battery with special
t
echnology and specification. The involvement
o
f a CITROËN dealer or a qualified workshop
i
s essential when replacing or disconnecting
t
he battery.
Unless
other wise indicated, check these components in accordance with the manufacturer's service schedule and according to your engine.
Other wise, have them checked by a CITROËN dealer or a qualified workshop.
Depending on the environment (e.g. dusty
a
tmosphere) and the use of the vehicle
(
e.g. city driving), replace them twice as often
if necessary .
A clogged passenger compartment filter may
h
ave an adverse effect on the per formance
o
f the air conditioning system and generate
u
ndesirable
o
dours.
Particle filter (Diesel)
The start of saturation of the
particle
filter is indicated by the
f
ixed illumination of this warning
l
amp accompanied by a warning
m
essage.
As
soon as the traffic conditions permit,
r
egenerate the filter by driving at a
s
peed of at least 40 mph (60 km/h) until
t
he
warning lamp goes off.
If
the
warning lamp stays on, this
i
ndicates a low additive level.
on a n
ew vehicle, the first particle
filter
regeneration operations may be
a
ccompanied by a "burning" smell,
w
hich is per fectly normal.
Following
prolonged operation of the
v
ehicle at very low speed or at idle,
y
ou
may, in exceptional circumstances,
n
otice the emission of water vapour at
t
he
exhaust on acceleration. This does
n
ot affect the behaviour of the vehicle
or
the environment.
When
carrying
out
work
on
the
battery,
refer
t
o
the
"12
V
battery"
section
for
details
of
the
p
recautions
to
be
taken
before
disconnecting
t
he
battery
and
following
its
reconnection.
10
Checks
Page 239 of 326
03
237
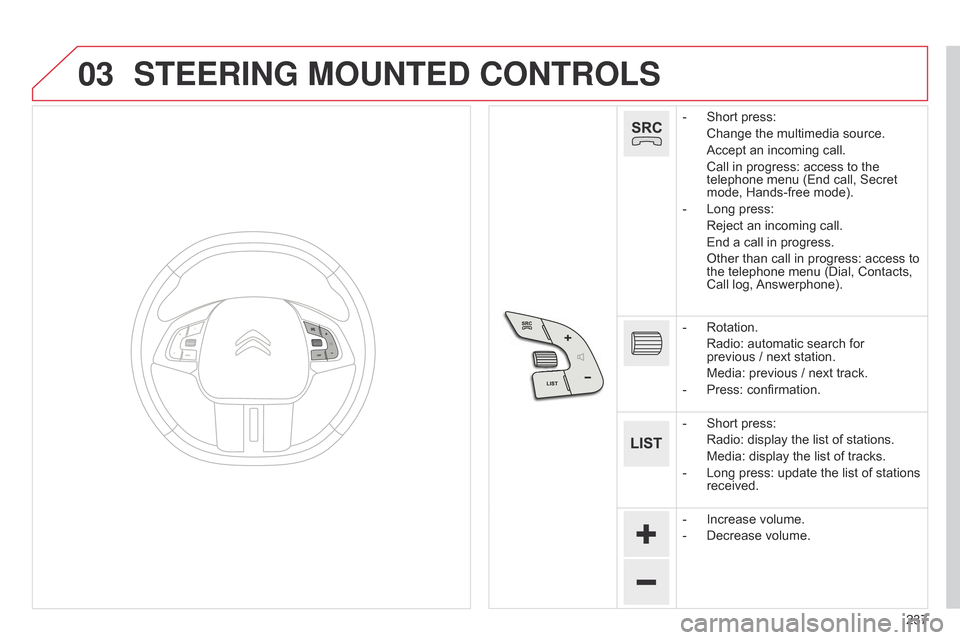
STEERING MOUNTED CONTROLS
- Short press:
Change
the multimedia source.
Accept
an incoming call.
Call
in progress: access to the
telephone
menu (End call, Secret
mode,
Hands-free mode).
-
Long
press:
Reject
an incoming call.
End
a call in progress.
Other
than call in progress: access to
the
telephone menu (Dial, Contacts,
Call
log,
Answerphone).
-
Rotation.
Radio:
automatic search for
previous /
next station.
Media:
previous / next track.
-
Press:
confirmation.
-
Short
press:
Radio:
display the list of stations.
Media:
display the list of tracks.
-
Long
press: update the list of stations
received.
-
Increase
volume.
-
Decrease
volume.
Page 251 of 326
04
249
RADIO
If "DAB / FM auto tracking" is activated, there is a difference of a few seconds when the system switches to "FM" analogue radio with
sometimes
a variation in volume.
When
the digital signal is restored, the system automatically
changes
back to "DAB".
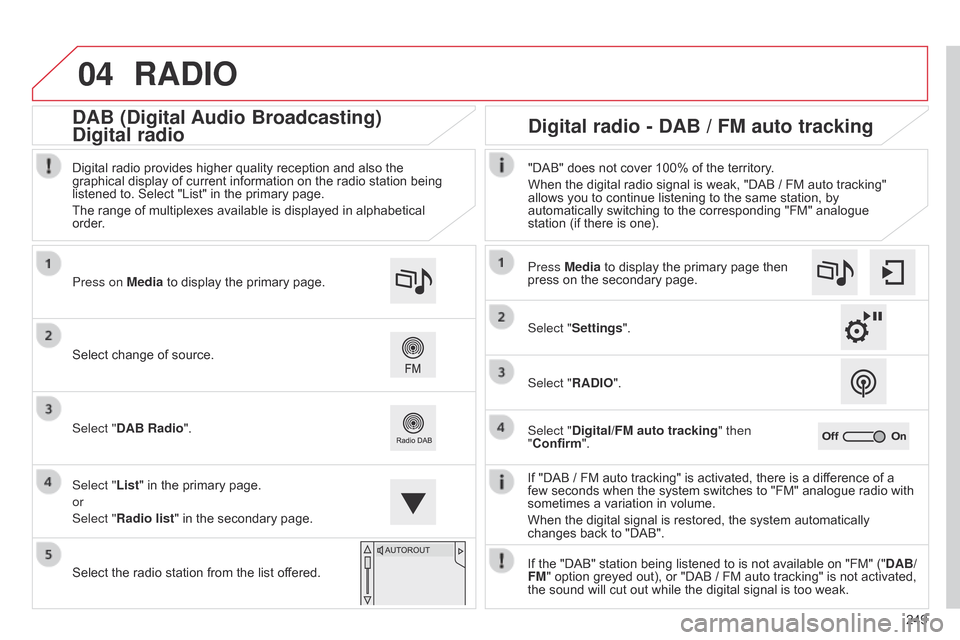
Select
change
of
source.
Press on Media
to
display
the
primary
page.
Select "DAB Radio".
Select "List"
in
the
primary
page.
or
Select "Radio list"
in
the
secondary
page.
Select
the
radio
station
from
the
list
offered.
Digital
radio
provides
higher
quality
reception
and
also
the
graphical
display
of
current
information
on
the
radio
station
being
listened
to.
Select
"List"
in
the
primary
page.
The
range
of
multiplexes
available
is
displayed
in
alphabetical
order
.
Press Media to display the primary page then
press
on the secondary page.
Select "Settings".
Select "RADIO".
Select "Digital/FM auto tracking " then
"Confirm". "DAB" does not cover 100% of the territory.
When the digital radio signal is weak, "DAB / FM auto tracking"
allows
you to continue listening to the same station, by
automatically
switching to the corresponding "FM" analogue
station
(if there is one).
If the "DAB" station being listened to is not available on "FM" ("DAB/
FM"
option greyed out), or "DAB / FM auto tracking" is not activated,
the
sound will cut out while the digital signal is too weak.
Digital radio - DAB / FM auto tracking
DAB (Digital Audio Broadcasting)
Digital radio
Page 252 of 326
04
250
USB player, auxiliary input
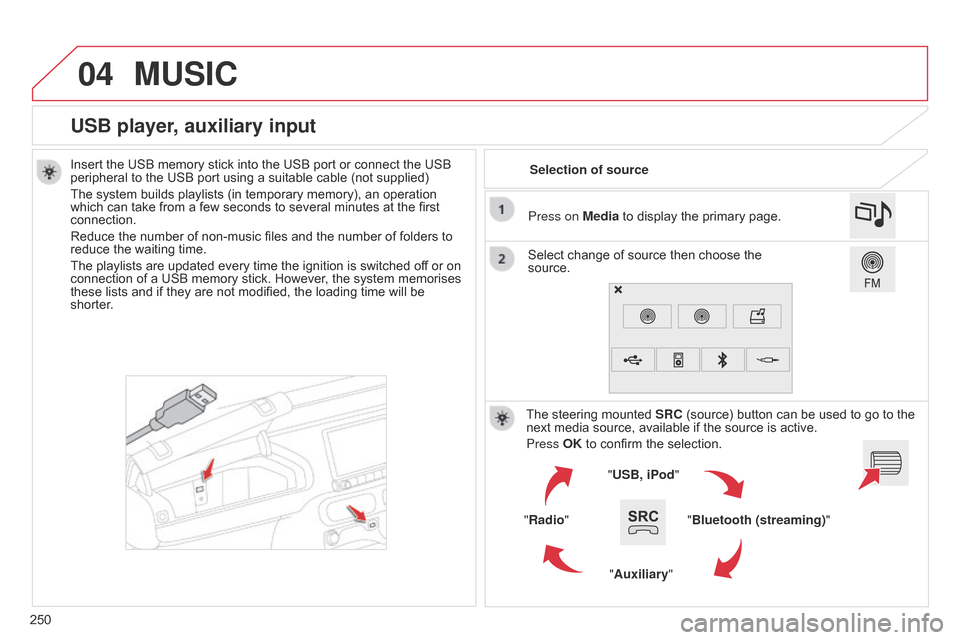
Insert the USB memory stick into the USB port or connect the USB peripheral to the USB port using a suitable cable (not supplied)
The
system builds playlists (in temporary memory), an operation
which
can take from a few seconds to several minutes at the first
connection.
Reduce
the number of non-music files and the number of folders to
reduce
the waiting time.
The
playlists are updated every time the ignition is switched off or on
connection
of a USB memory stick. However, the system memorises
these
lists and if they are not modified, the loading time will be
shorter
. Selection of source
The
steering mounted
SRC
(source) button can be used to go to the
next
media source, available if the source is active.
Press OK
to confirm the selection.
"USB, iPod "
"Bluetooth (streaming)"
"Auxiliary"
"Radio" Select
change of source then choose the
source. Press on
Media to display the primary page.
MUSIC
Page 270 of 326
05
268
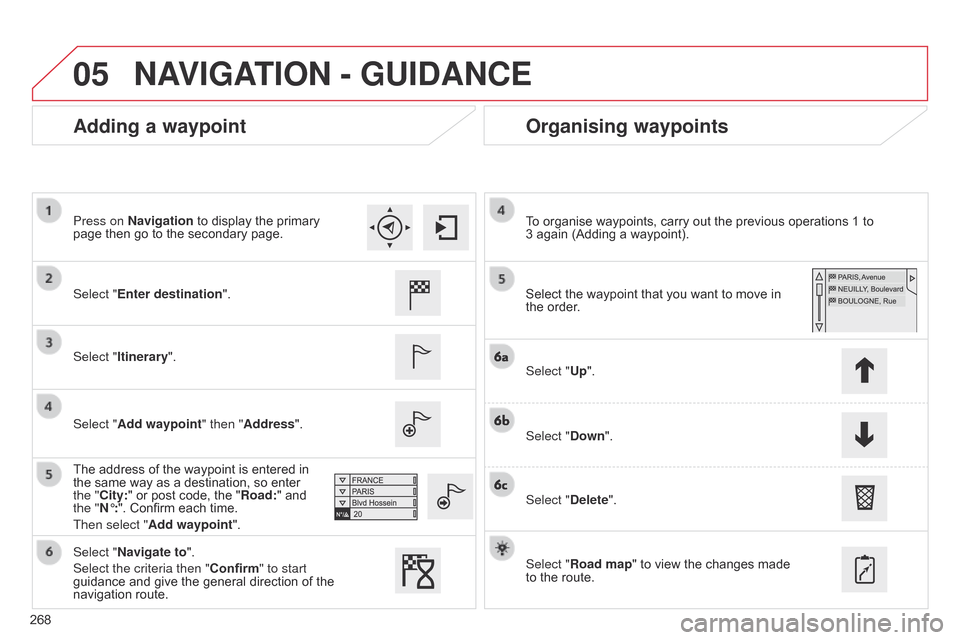
Adding a waypointOrganising waypoints
Select "Enter destination".
Select "Itinerary".
Select "Add waypoint" then "Address".
The
address of the waypoint is entered in
the
same way as a destination, so enter
the "
City:" or post code, the "Road:" and
the "
N°:". Confirm each time.
Then select "Add waypoint ". Select
the waypoint that you want to move in the
order.
To
organise waypoints, carry out the previous operations 1 to
3 again
(Adding a waypoint).
Select "Up".
Select "Down".
Select "Delete".
Select "Road map"
to view the changes made
to
the route.
Select "Navigate to".
Select the criteria then "Confirm" to start
guidance
and give the general direction of the
navigation
route.
Press on Navigation
to display the primary
page
then go to the secondary page.
NAVIGATION - GUIDANCE
Page 287 of 326
06
285
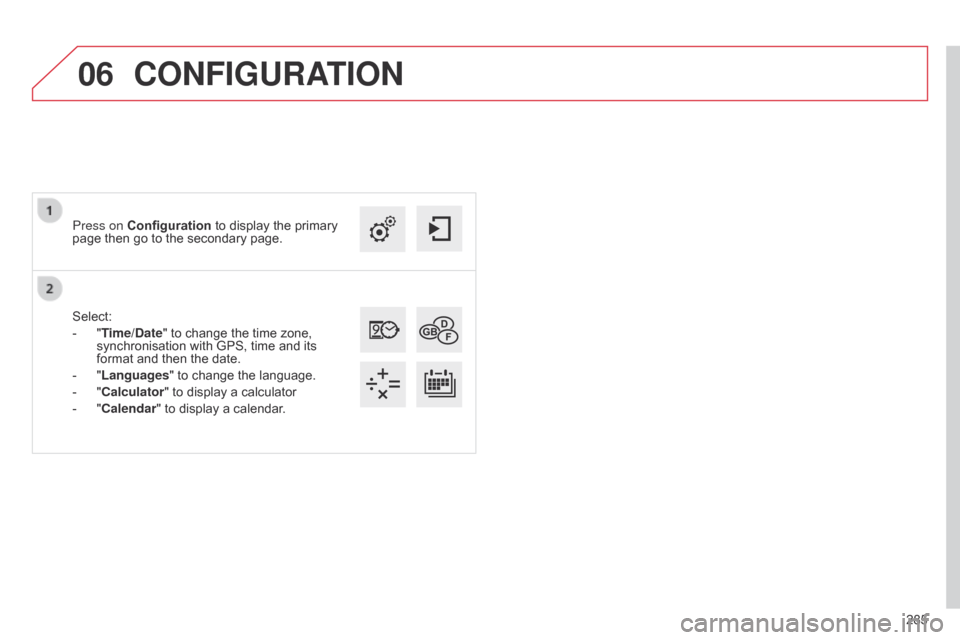
Select:
-
"
Time/Date"
to
change
the
time
zone,
synchronisation
with
GPS,
time
and
its
format
and
then
the
date.
-
"
Languages"
to
change
the
language.
-
"
Calculator"
to
display
a
calculator
-
"
Calendar"
to
display
a
calendar.
Press on Configuration
to
display
the
primary
page
then
go
to
the
secondary
page.
CONFIGURATION
Page 309 of 326
307
C4-cactus_ gb_Chap13_index-alpha_ed02-2014
M
N
L
Labels, identification .....................................23 0
Lamps, front .......................................... 1 83, 214
Lamps,
re
ar
...............................
............ 188, 214
Lamps,
warning and indicator
..................13
-23
Leather
(
care)
...............................
.................214
LED
daytime running lamps
.... 1
09, 113, 183, 184
Level,
AdBlue
® additive ................................. 16 1
Level,
brake
fluid ........................................... 2
21
Levels
and
checks
..............................
...217-2 24
Light-emitting
diodes - LEDs
................ 1
13, 190
Lighting
bulbs
(replacement)
...................................... 1
8 3 -19 0
Lighting
control stalk
..................... 1
08, 109, 114
Lighting
dimmer
..............................
..............123
Lighting,
guide-me home
.............................. 11
4
Lighting,
i
nterior
............................................ 12
2
Loading
..............................
............................... 9
Load
reduction mode
.................................... 2
02
Locating
your
vehicle
...................................... 40
L
ocking
from
the inside
................................... 44
L
ocking
the
doors
.............................. 4
0, 44, 46
Low fuel level
..............................
............ 21, 156
Main
beam
..............................
......108, 183, 185
Maintenance
(
advice)
........................ 9
, 211, 214
Map
reading
lamps
....................................... 12
2
Markings,
id
entification
................................. 23
0
Mat
.......
............................................... 69, 70, 74
Menus
(audio)
............. 2
38, 240, 242, 256, 258,
260, 276, 288, 290
Menus
(Touch
screen tablet)
........... 2
8, 29, 234
Mirror, rear view
.............................................. 55
M
irrors,
door.................................................... 54Misfuel prevention
...............................
..........
15 8
Mountings for ISOFIX seats
.........................
15
0
O
P
Navigation ...............................
......................255 N
umber plate lamps ...................................... 18
9
Oil
change
...............................
......................219
Oil
consumption
............................................ 2
19
oil
filter
...............
........................................... 223
oi
l level .................................................... 27,
219
Opening
the bonnet
...................................... 2
16
Opening
the boot
..............................
..............47
Opening
the doors
...............................
...........45
Operation
indicator lamps
........................ 1
3, 16
Paint
colour code
.......................................... 23
0
Panoramic
glass sunroof
..............................12
1
Parcel shelf, rear
............................................. 76
P
ark Assist
...............................
.....................103
Parking
brake
..........................................8
2, 224
Parking
lam
ps
............................................... 11
4
Parking
sensors, front
...................................10
1
Parking
sensors, rear.................................... 10 0
Particle filter
......................................... 2
22,
2
23
Passenger
c
ompartment
f
ilter
......................2
23
R
Radio ............................................................. 244
RdS ................ ............................................... 247
Rear
door windows
................................. 4
8, 214
Rear
fo
glamp......................................... 110,
188
Rear
s
creen
(
demisting)
.................................. 68
R
echarging the battery
.................................2
01
Reduction
of electrical load
..........................2
02
Regeneration
of the particle filter
.................2
23
Reinitialising
the remote control
.....................42
R
emote control
.......................................... 3
9-43
Removable
screen
(snow
s
hield)
...............................
................210
Removing
a wheel
..............................
..........178
Removing
the mat
...............................
............74
Repair
kit, puncture
....................................... 16
9
Replacing
bu
lbs
..............................
......18 3 -19 0
Replacing
f
uses
..............................
.......191-197
Replacing
the air filter
...................................2
23
Replacing
the oil filter
...................................2
23
Replacing
t
he
p
assenger
c
ompartment filter
...................................... 2
23
Replacing
wiper blades.........................120, 203
Resetting
the service
indicator
...............................
.........................26
Resetting
the trip recorder
..............................37
R
eversing
c
amera
...............................
..........102
Plip
..............................
.............................. 39 - 44
P
ort, US
b
........................... 6
9, 70, 72, 250, 254
Preheater, d
i
esel
..............................
..............
14
Priming the fuel system
................................
16
0
Protecting children
................. 1
34, 136, 141-155
Protectors
...................................................... 2
11
Puncture
................
........................................
169
.
alphabetical index