gearbox Citroen C4 PICASSO 2013 1.G Owner's Guide
[x] Cancel search | Manufacturer: CITROEN, Model Year: 2013, Model line: C4 PICASSO, Model: Citroen C4 PICASSO 2013 1.GPages: 420, PDF Size: 9.66 MB
Page 160 of 420

158
Driving
Before switching off the engine, you canchange to position P or Nto be in neutral.
In either case, appl
y the parking brake to
immobilise the vehicle, unless it is programmed
in automatic mode.
If the lever is not in position P, on opening the Pdriver's door or approximately 45 seconds after switching off the ignition there is an audible signal and a message appears: �)move the gear selector to position P; the audible signal stops and the message
disappears.
Operating fault
Whenever parking, you must apply the parking
brake to immobilise the vehicle, if automatic
operation has been deactivated.
Parking the vehicle
In all circumstances, ensure that thegear selector is in position Pbefore leaving your vehicle.In th
e event of a fault with the
gearbox, the ser vice warning lamp
comes on in the instrument panel, accompanied by a message and anaudible signal.
In this case the gearbox goes into back-up
mode and stays in 3rdgear. You may then feel
a noticeable jolt when going from P to Rand from N
to R
. This jolt does not present any risk
to the gearbox.
Do not exceed 60 mph (10 0 km/h) while also
observing legal speed limits.
Have it checked by a CITROËN dealer or aqualified workshop.
Page 161 of 420
159
4
Driving
Operation
Gear shift indicator
System which reduces fuel consumption by advising the driver to change up.
With an electronic gearbox, the system is only active in Manual mode.
The system adapts its gear change recommendation according to thedriving conditions (slope, load, ...) and the demands of the driver (power,acceleration, braking, ...).
The system never suggests:
- engaging first gear,
- engaging reverse gear,
- engaging a lower gear.
Example:
- You are in third gear.
- Yo u press the accelerator pedal.
- The s
ystem may suggest that you engage a
higher gear.
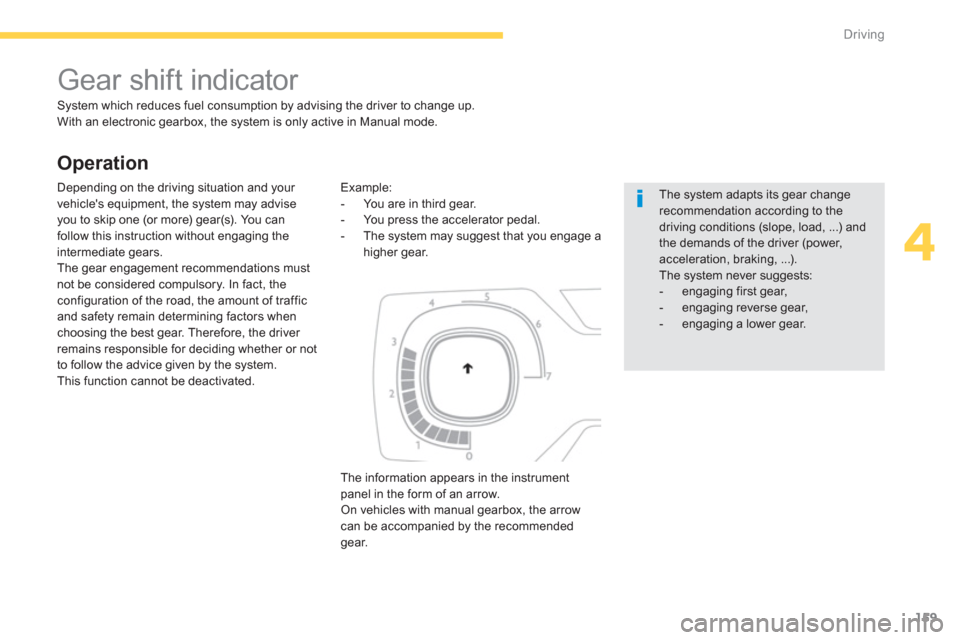
The in
formation appears in the instrumentpanel in the form of an arrow. On vehicles with manual gearbox, the arrowcan be accompanied by the recommended gear.
Depending on the driving situation and your
vehicle's equipment, the system may advise
you to skip one (or more) gear(s). You can
follow this instruction without engaging the
intermediate gears.
The gear engagement recommendations mustnot be considered compulsory. In fact, the configuration of the road, the amount of traffic
and safety remain determining factors whenchoosing the best gear. Therefore, the driver
remains responsible for deciding whether or not
to follow the advice given by the system.
This function cannot be deactivated.
Page 162 of 420
160
Driving
Stop & Start
Operation
Going into engine STOP mode
The "ECO"
warning lamp comes onin the instrument panel and the enginegoes into standby automatically:
-with a manual gearbox
, at speeds below
12 mph (20 km/h), when you place the gear lever in neutral, and you release the clutch pedal, - with an electronic gearbox,at speeds
below 5 mph (8 km/h), when you press the
brake pedal or place the gear selector lever in position N ,
- with an automatic gearbox,
with the
vehicle stationary, when you press the brake pedal or place the gear selector lever in position N.If your vehicle is fitted with the system, a timecounter calculates the sum of the periods in STOP mode during a journey. It resets itself to
zero every time the ignition is switched on with
the STA R T/STOP button.
Never refuel with the engine in STOPmode; you must switch off the ignition with the STA R T/STOP button.
For your comfor t, during parkingmanoeuvres, STOP mode is not available for a few seconds after coming out of reverse gear.STOP mode does not affect the functionality of the vehicle, such as for example, braking, power steering...
Special cases: STOP mode not
available
STOP mode is not invoked when:
- the driver's door is open,
- the driver's seat belt is not fastened,
- the vehicle has not exceeded
6 mph(10 km/h) since the last engine start usingthe START/STOP button,
- the electric parking brake is applied or being applied,
- the engine is needed to maintain acomfor table temperature in the passenger compartment,
- demistin
g is active,
- some special conditions (battery charge, engine temperature, braking assistance,ambient temperature...) where the engine isneeded to assure control of a system.
In this case, the "ECO"
warning lampflashes for a few seconds then goesoff.This operation is per fectly normal.
The Stop & Star t system puts the engine temporarily into standby - STOP mode - during stops in the traffic (red lights, traffic jams, or other...). The engine restar ts automatically - START mode - as soon as you want to move off. The restart takes place instantly, quickly and silently.
Per fect for urban use, the Stop & Star t system reduces fuel consumption and exhaust emissions as well as the noise level when stationary.
Page 163 of 420
161
4
Driving
Going into engine START mode
The "ECO"warning lamp goes off and the engine starts automatically:
-with a manual gearbox
, when you fullydepress the clutch pedal,
-
with an electronic gearbox
:
●
gear selector lever in position Aor M
,
when you release the brake pedal,
●
or gear selector lever in position Nand the brake pedal released, when you place the gear selector lever inposition A
or M,●
or when you engage reverse gear.
-
with an automatic gearbox:
●
gear selector in position Dor M
, whenyou release the brake pedal,
●
or gear selector in position N
and brakepedal released, when you place the gear selector in position D
or M,●
or when you engage reverse.
START mode is invoked automatically when:
- you open the the driver's door,
- you unfasten the driver's seat belt,
- the speed of the vehicle exceeds 15 mph (25 km/h) with a manual gearbox, 7 mph(11 k m / h) with an electronic gearbox and
2 mph (3 km/h) with an automatic gearbox,
- the electric parking brake is being applied,
- some special conditions (battery charge,engine temperature, braking assistance,
ambient temperature...) where the engine is
needed for control of a system.
Special cases: START invoked automatically
If the system has been deactivatedin STOP mode, the engine restar ts immediately. Deactivation o
f Stop & Star t is done in the
"Driving assistance" menu.
Deactivation
In this case the "ECO"
warning lampflashes for a few seconds, then goes off.
This operation is per fectly normal.
Press this button to deactivate thesystem.
This is con
firmed by the indicator lamp in the button and this symbol.
When driving on a flooded road, it isrecommended that the Stop & Star tfunction be deactivated and that you drive very slowly.
Page 173 of 420
171
4
Driving
Steering mounted controls
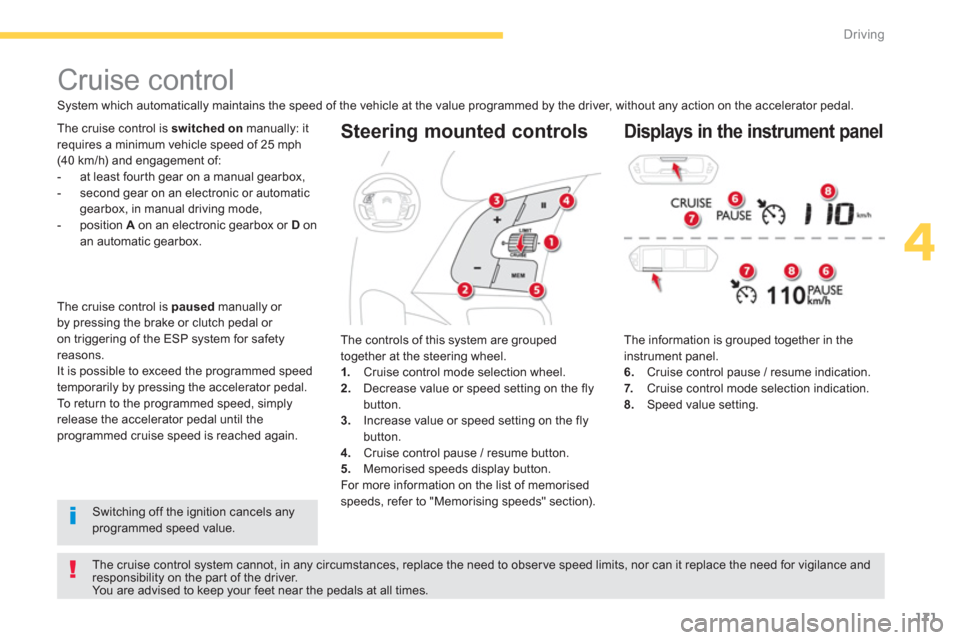
The information is grouped together in the instrument panel.
6. Cruise control pause / resume indication.
7.Cruise control mode selection indication. 8.Speed value setting.
Cruise control
System which automatically maintains the speed of the vehicle at the value programmed by the driver, without any action on the accelerator pedal.
The cruise control system cannot, in any circumstances, replace the need to obser ve speed limits, nor can it replace the need for vigilance and responsibility on the par t of the driver.
You are advised to keep your feet near the pedals at all times.
Th
e cruise control is switched on
manually: it
requires a minimum vehicle speed of 25 mph
(40 km/h) and engagement of:
- at least four th gear on a manual gearbox,
- second gear on an electronic or automatic gearbox, in manual driving mode,
- position A
on an electronic gearbox or D
on an automatic gearbox.
The controls o
f this system are grouped
together at the steering wheel. 1.Cruise control mode selection wheel.
2. Decrease value or speed setting on the flybutton.3.
Increase value or speed setting on the flybutton.
4. Cruise control pause / resume button.
5. Memorised speeds display button.
For more information on the list of memorisedspeeds, refer to "Memorising speeds" section).
Displays in the instrument panel
Switching off the ignition cancels any programmed speed value. Th
e cruise control is paused
manually or
by pressing the brake or clutch pedal or
on triggering of the ESP system for safety
reasons.
It is possible to exceed the programmed speed
temporarily by pressing the accelerator pedal.
To return to the programmed speed, simply
release the accelerator pedal until the programmed cruise speed is reached again.
Page 177 of 420
175
4
Driving
The active cruise control is switched onmanually: it requires that the speed of the vehicle
be between 25 mph (40 km/h) and 90 mph (15 0 km / h), as well as the engagement of:
- at least four th gear with a manual gearbox,
- second gear with an electronic or automatic gearbox in manual mode,
- position A
with an electronic gearbox or Dwith an automatic gearbox.
General points
The active cruise control can above be pausedmanually with the control, or automatically:
- b
y pressing the brake or clutch pedal,
- in the event of operation of the DSC, for
safety reasons,
- in the event of an action of the electric
parking brake control,
- when an inter-vehicle time threshold isreached (calculated according to therelative speeds of your vehicle and the
vehicle in front and the inter-vehicle time setting chosen),
- when the distance between your vehicle
and the one in front becomes to small,
- when the speed of the vehicle in front is to
low,
- when the speed of your vehicle becomes
too low.
The active cruise control cannot in any
circumstances replace the obser vation of speed limits, nor the the vigilanceand responsibility of the driver. It is recommended that you always keepyour feet close to the pedals.
If the speed setting selected is above93 mph (15 0 km/h), the system switches
to normal cruise control operation(a message appears in the instrument panel).
Switching off the ignition cancels any
programmed value, and the inter-vehicle time is reset to 2 seconds.
Page 196 of 420
194
Driving
Park Assist
This system provides active assistance with parking, detecting a parking space then controlling the steering to park in the space. It controls the steering while the driver manages the accelerator, brakes, gears andclutch (manual gearbox). During phases of entry into and exit from a parking space, the system provides visual and audible information
to the driver in order to make the manoeuvres safe. It may be necessary to move for wards and backwards more than once.
During a manoeuvre the steering wheelturns quickly: do not hold the steeringwheel, do not place your hand between
the spokes of the steering wheel and take care with loose and bulky clothing, scarves, handbags... There is a risk of injury.
When Park Assist is activated, itprevents a change to STOP mode of Stop & Start. In STOP mode, activation of Park Assist restarts the engine.
The Park Assist system cannot in anycircumstances replace the care and responsibility of the driver.
The driver must remain in control of their vehicle ensuring that thespace remains clear throughout themanoeuvre. In some circumstances, the sensors may not detect small obstacles located in their blind spots.
The driver can take control at any time bygripping the steering wheel.
The Park Assist s
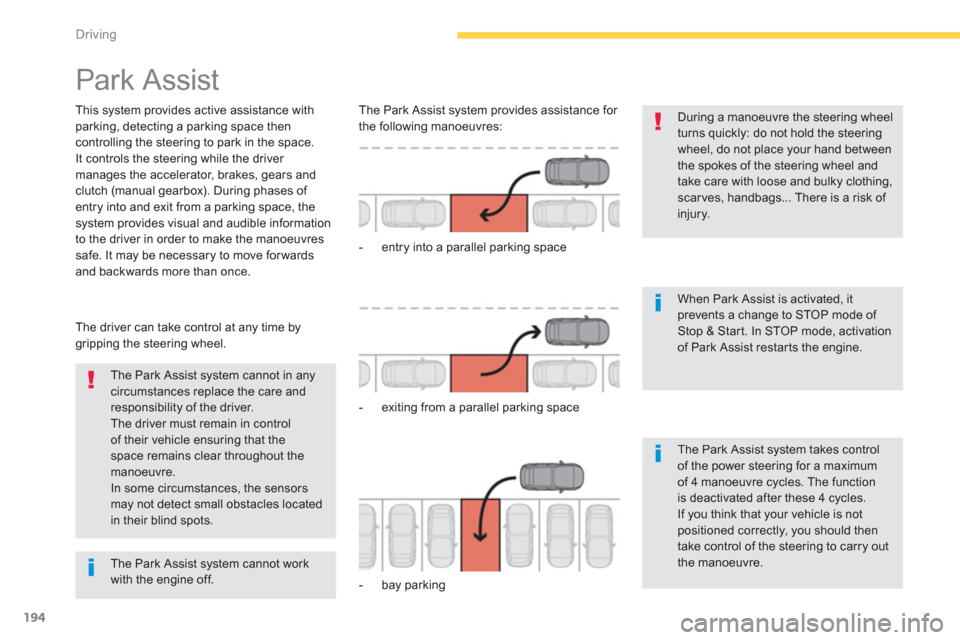
ystem provides assistance for
the following manoeuvres:
- entr
y into a parallel parking space
- exitin
g from a parallel parking space
- ba
y parking
The Park Assist system takes control of the power steering for a maximumof 4 manoeuvre cycles. The functionis deactivated after these 4 cycles.If you think that your vehicle is notpositioned correctly, you should then take control of the steering to carry outthe manoeuvre.
The Park Assist system cannot workwith the engine off.
Page 270 of 420
268
Practical information
Changing a wheel
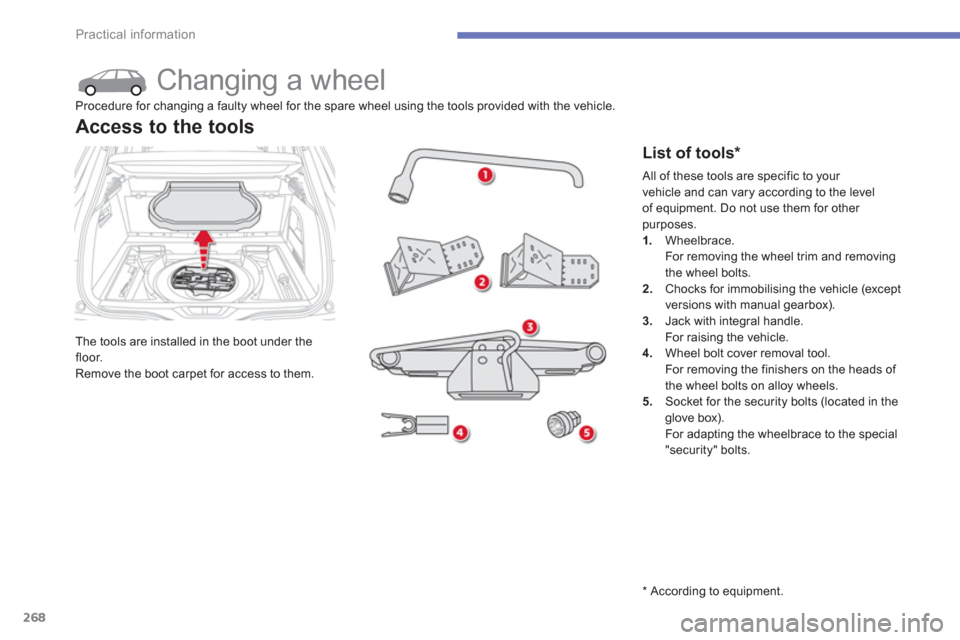
The tools are installed in the boot under the
floor.
Remove the boot carpet for access to them.
Access to the tools
List of tools *
Procedure for changing a faulty wheel for the spare wheel using the tools provided with the vehicle.
*
According to equipment.
All of these tools are specific to your
vehicle and can vary according to the level
of equipment. Do not use them for other
purposes. 1. Wheelbrace.
For removing the wheel trim and removingthe wheel bolts. 2.Chocks for immobilising the vehicle (except
versions with manual gearbox). 3.Jack with integral handle.
For raising the vehicle.4. Wheel bolt cover removal tool.
For removing the finishers on the heads of
the wheel bolts on alloy wheels.
5. Socket for the security bolts (located in the glove box).
For adapting the wheelbrace to the special
"security" bolts.
Page 272 of 420
270
Practical information
*
Depending on version. The complete tooling
is with the spare wheel.
Changing a wheel Procedure for changing a wheel with a punctured tyre by the spare wheel using the tools provided with the vehicle.
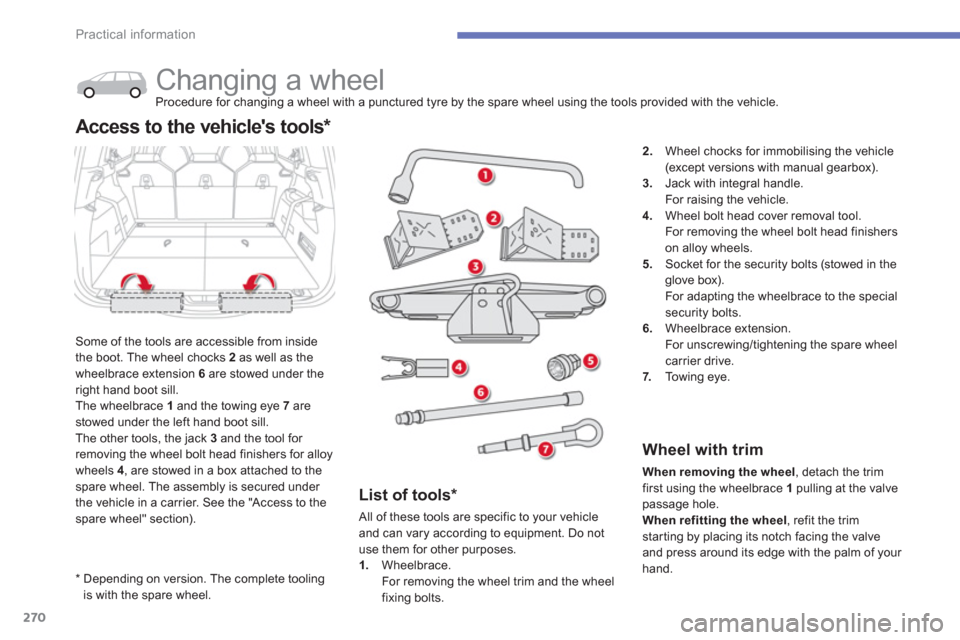
Some of the tools are accessible from inside
th
e boot. The wheel chocks 2as well as thewheelbrace extension 6are stowed under theright hand boot sill.The wheelbrace 1
and the towing eye 7
arestowed under the left hand boot sill.The other tools, the jack 3
and the tool for removing the wheel bolt head finishers for alloy
wheels 4 , are stowed in a box attached to thespare wheel. The assembly is secured under
the vehicle in a carrier. See the "Access to thespare wheel" section).
Access to the vehicle's tools *
2.Wheel chocks for immobilising the vehicle
(except versions with manual gearbox).3.Jack with integral handle.
For raising the vehicle.4. Wheel bolt head cover removal tool.
For removing the wheel bolt head finishers
on alloy wheels.
5. Socket for the security bolts (stowed in the glove box).
For adapting the wheelbrace to the specialsecurity bolts.
6.Wheelbrace extension.
For unscrewing/tightening the spare wheelcarrier drive.
7. To w i ng eye.
Wheel with trim
When removing the wheel
, detach the trimfirst using the wheelbrace 1
pulling at the valvepassage hole.
When refitting the wheel
, refit the trimstarting by placing its notch facing the valve
and press around its edge with the palm of your hand.
List of tools *
All of these tools are specific to your vehicle
and can var
y according to equipment. Do not use them for other purposes. 1.Wheelbrace.
For removing the wheel trim and the wheelfixing bolts.
Page 276 of 420

274
Practical information
Parking the vehicle
Immobilise the vehicle where it does notblock traffic: the ground must be level,stable and not slippery. Apply the parking brake unless it has
been programmed to automatic mode,switch off the ignition and engage first gear *
to block the wheels.
Check that the braking warning lamp and the P
warning lamp in the parking brake control lever come on.
For greater safety, place a chock 2against the wheel opposite to the one being changed.
The occupants must get out of the vehicle and wait where they are safe.
Never go underneath a vehicle raised using a jack; use an axle stand.
List of operations
*
Position Rfor an electronic gearbox or P
for an automatic gearbox.
�)
Remove the finisher from from each of bolts using the tool 4(depending on equipment). �)
Fit the security socket 5
on the wheelbrace 1to slacken the security bolt (if fitted).�)
Slacken the other bolts (no more than a 1/4 turn) using the wheelbrace 1only.