buttons Citroen C4 RHD 2015 2.G User Guide
[x] Cancel search | Manufacturer: CITROEN, Model Year: 2015, Model line: C4 RHD, Model: Citroen C4 RHD 2015 2.GPages: 328, PDF Size: 12.72 MB
Page 161 of 328
99
159
When the cruise control is
switched on, be careful if you
maintain
the
pressure
on
one
of
the
programmed
speed
chang
-
ing
buttons:
this
may
result
in
a
very
rapid
change
in
the
speed
of
your vehicle.
d
o not use the cruise control on
slippery
roads
or
in
heavy
traffic.
On
a
steep
descent,
the
cruise
control will not be able to prevent
the
vehicle
from
exceeding
the
programmed
speed.
On
steep
climbs
or
when
towing,
the
programmed
speed
may
not
be
reached or maintained.
To
avoid
any
risk
of
jamming
of
the
pedals:
-
ensure
that
the
mat
is
posi
-
tioned
correctly,
-
never
fit
one
mat
on
top
of
another
.
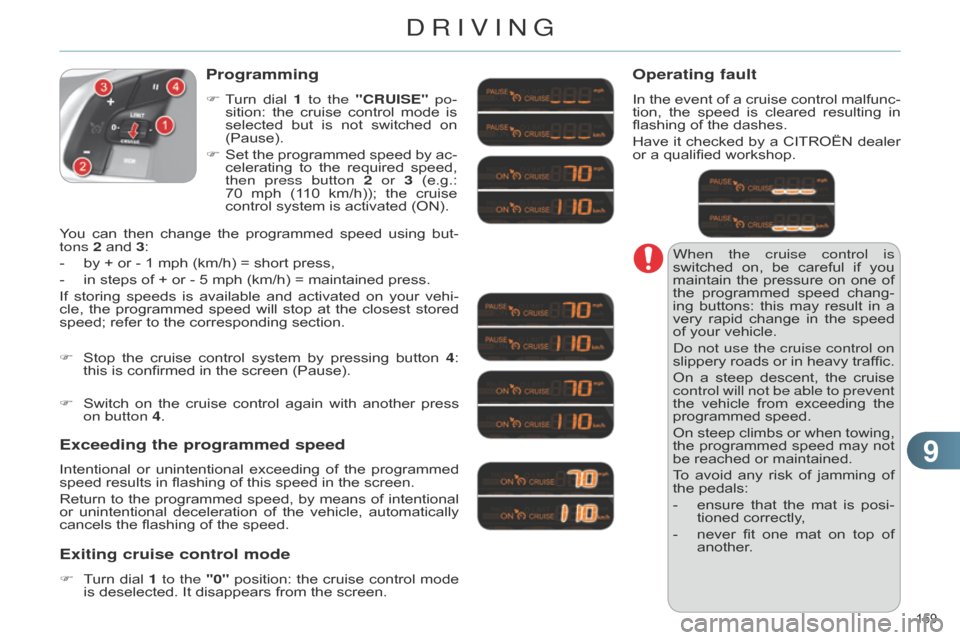
Programming
F Turn dial 1 to the "CRUISE" po-
sition: the cruise control mode is
selected
but
is
not
switched
on
(Pause).
F
Set
the
programmed
speed
by
ac
-
celerating
to
the
required
speed,
then press button
2 or 3
(e.g.:
70
mph
(1
10
km/h));
the
cruise
control
system is activated (ON).
Exceeding the programmed speed
Intentional or unintentional exceeding of the programmed speed
results in flashing of this speed in the screen.
Return
to
the
programmed
speed,
by
means
of
intentional
or
unintentional
deceleration
of
the
vehicle,
automatically
cancels
the flashing of the speed.
Exiting cruise control mode
F Turn dial 1 to the "0" position: the cruise control mode is
deselected. It disappears from the screen.
F
Stop
the
cruise
control
system
by
pressing
button
4
:
this
is confirmed in the screen (Pause).
Operating fault
In the
event of a cruise control malfunc -
tion, the speed is cleared resulting in
flashing
of the dashes.
Have
it
checked
by
a
CITROËN
dealer
or
a qualified workshop.
You
can
then
change
the
programmed
speed
using
but
-
tons
2
and
3:
-
by
+
or
-
1
mph
(km/h)
=
short
press,
-
in
steps
of
+
or
-
5
mph
(km/h)
=
maintained
press.
If
storing
speeds
is
available
and
activated
on
your
vehi
-
cle,
the
programmed
speed
will
stop
at
the
closest
stored
speed;
refer
to
the
corresponding
section.
F
Switch
on
the
cruise
control
again
with
another
press
on button
4.
DRIVING
Page 265 of 328
07
263
Press
the
button
on
the
numerical
keypad
to
recall
a
preset
station.
Or
press
then
turn
the
thumb
wheel
at
the
steering
mounted
controls.
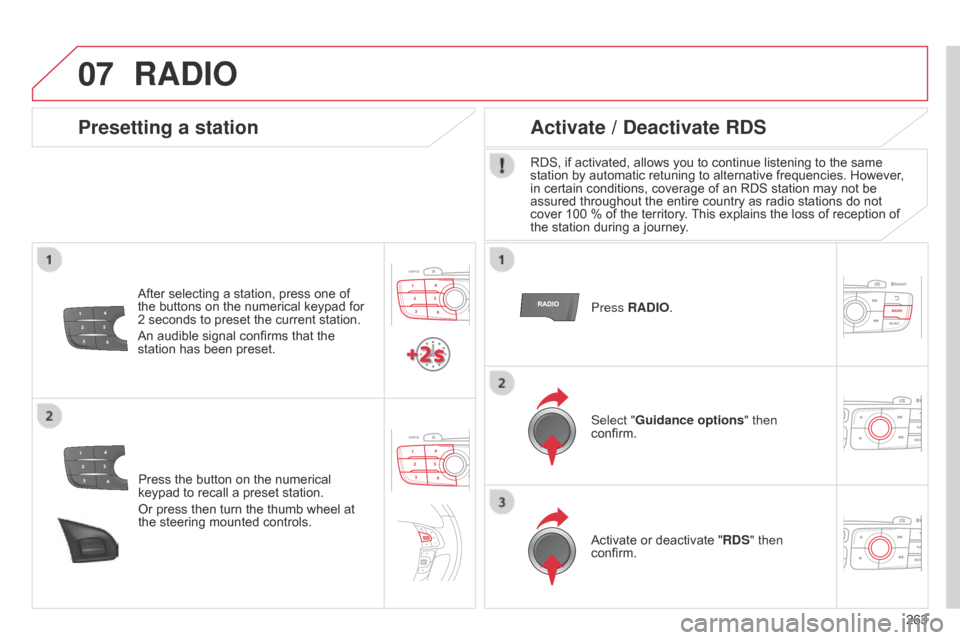
Presetting a station
After selecting a station, press one of the
buttons on the numerical keypad for
2
seconds to preset the current station.
An
audible signal confirms that the
station
has been preset. Press RADIO.
Activate / Deactivate RDS
RDS, if activated, allows you to continue listening to the same station
by automatic retuning to alternative frequencies. However,
in
certain conditions, coverage of an RDS station may not be
assured
throughout the entire country as radio stations do not
cover
100 % of the territory.
This
explains the loss of reception of
the
station during a journey.
Select "Guidance options " then
confirm.
Activate
or deactivate "RDS" then
confirm.
RADIO
Page 266 of 328
07
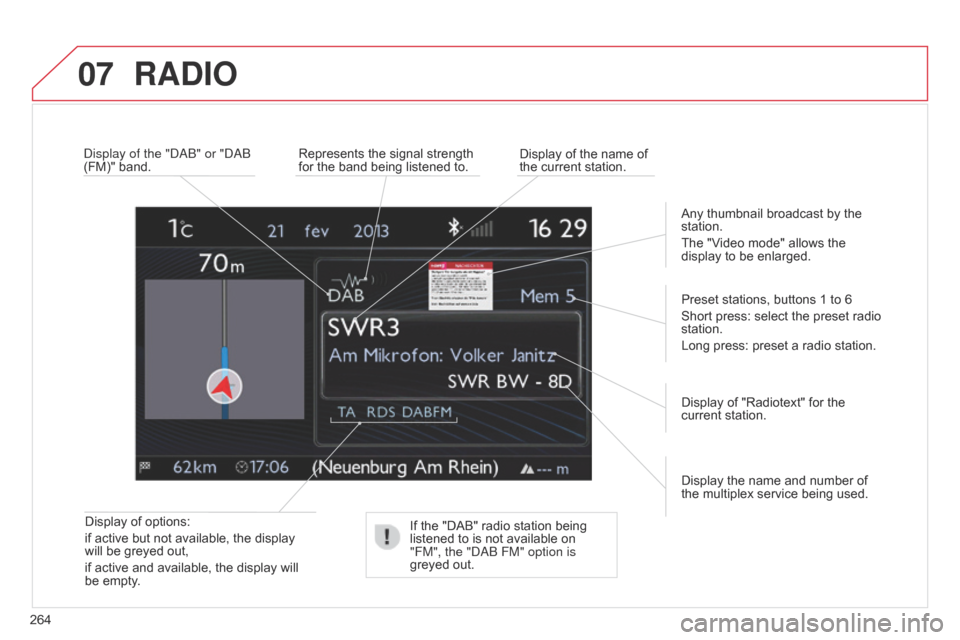
264Display of options:
if active but not available, the display
will
be greyed out,
if active and available, the display will
be
empty. Display the name and number of
the
multiplex service being used.
Preset stations, buttons 1 to 6
Short press: select the preset radio
station.
Long
press: preset a radio station.
Display of "Radiotext" for the
current
station.
d
isplay of the " dab " or " dab
(FM)" band.
Display of the name of
the
current station.
Represents the signal strength
for
the band being listened to.
If the "DAB" radio station being
listened
to is not available on
"FM", the "
dab FM" option is
greyed out.Any thumbnail broadcast by the
station.
The
"Video mode" allows the
display
to be enlarged.
RADIO
Page 272 of 328
08
270
Audio streaming
Streaming allows audio files on your telephone to be played via the vehicle's speakers.
Connect
the telephone: see "USING THE TELEPHONE ".
Select "Audio" or "All"
profile.
If
play does not start automatically, it may be necessary to start the
audio
playback from the telephone.
Control
is from the peripheral device or by using the audio system
buttons.
Once
connected in streaming mode, the telephone is considered to be
a
media source.
It
is recommended that you activate "Repeat" on the b luetooth
peripheral.
MUSIC MEDIA PLAYERS
Connecting APPLE® players
Connect the apple® player to the USB port using a suitable cable (not supplied).
Play
starts
automatically.
Control
is
via
the
audio system.
The
classifications
available are those of the portable device
connected
(artists
/
albums / genres / playlists / audiobooks /
podcasts).
The
default
classification used is by artist.
T
o modify the classification
used,
return
to
the
first level of the menu then select the desired
classification
(playlists for example) and confirm to go down through
the
menu
to
the
desired track.
The
"Shuffle
tracks" mode on an iPod
® corresponds to the "Random" mode
on
the
audio
system.
The
"Shuffle
albums"
mode
on
an
iPod
® corresponds to the "Random all"
on
the
audio
system.
"Shuffle
tracks"
is
restored
by
default
on each connection.
The
version
of
software
in
the
audio
system may not be compatible
with
the
generation
of
your
Apple® player.
Page 294 of 328
04AUDIO
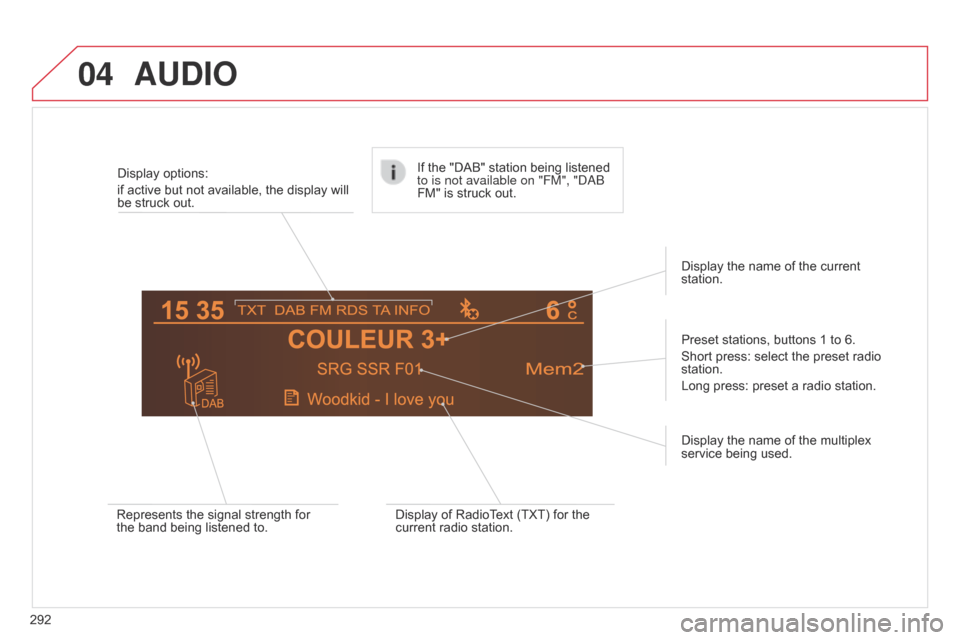
292Display options:
if active but not available, the display will
be
struck out.
Preset stations, buttons 1 to 6.
Short press: select the preset radio
station.
Long
press: preset a radio station.
Display the name of the multiplex
service
being used.
Represents the signal strength for
the
band being listened to.If the "DAB" station being listened
to is not available on "FM", "
dab
FM" is struck out.
Display of RadioText (TXT) for the
current
radio station.Display the name of the current
station.
Page 296 of 328
04
294
AUDIO
Audio CD
Insert 12 cm diameter circular compact discs only.
Some anti-pirating systems, on original discs or CDs copied using a
personal
recorder, may cause faults which are no reflection on the
quality
of the original player.
Without
pressing the E j ECT button, insert a C d in the player, play
begins
automatically.
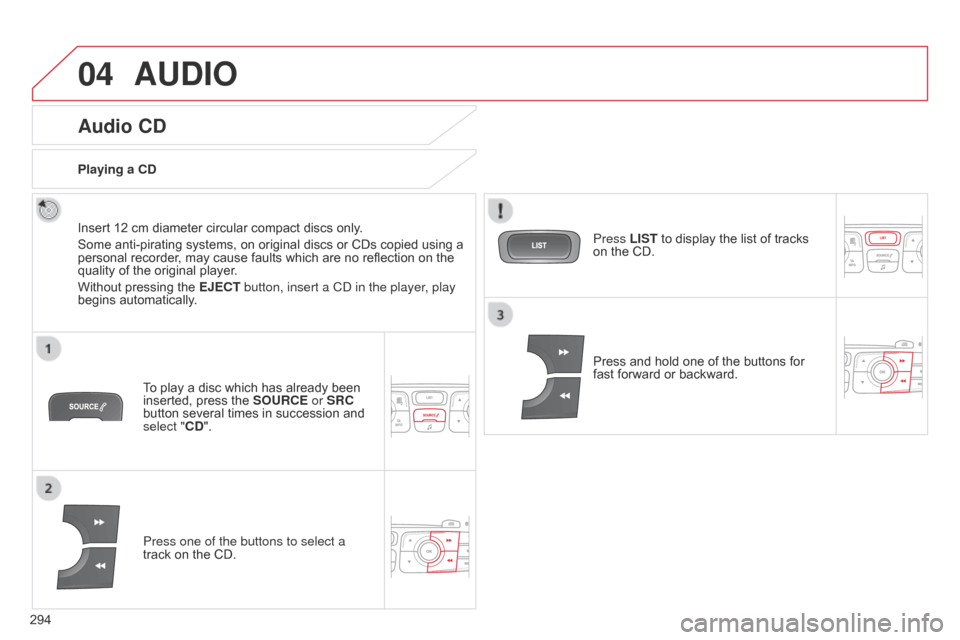
To
play a disc which has already been
inserted,
press the SOURCE or SRC
button
several times in succession and
select "
CD".
Press one of the buttons to select a
track
on the CD.
Playing a CD
Press LIST to display the list of tracks
on
the CD.
Press
and hold one of the buttons for
fast
forward or backward.
Page 298 of 328
04
296
CD, USB
AUDIO
Playing a compilationInsert an MP3 compilation in the CD player or
connect
a memory stick to the USB port, directly or
via
an extension lead.
The
system creates playlists (temporary memory) the creation time
for
which can take from a few seconds to several minutes.
The
playlists are updated every time the ignition is switched off or a
USB
memory stick is connected.
Play
starts automatically after a period which depends on the
capacity
of the USB memory stick.
Use
only USB memory sticks formatted FAT32 (File
Allocation
T
able).
At
a first connection, the order suggested is by folder.
When
connecting again, the order previously chosen is
retained.T
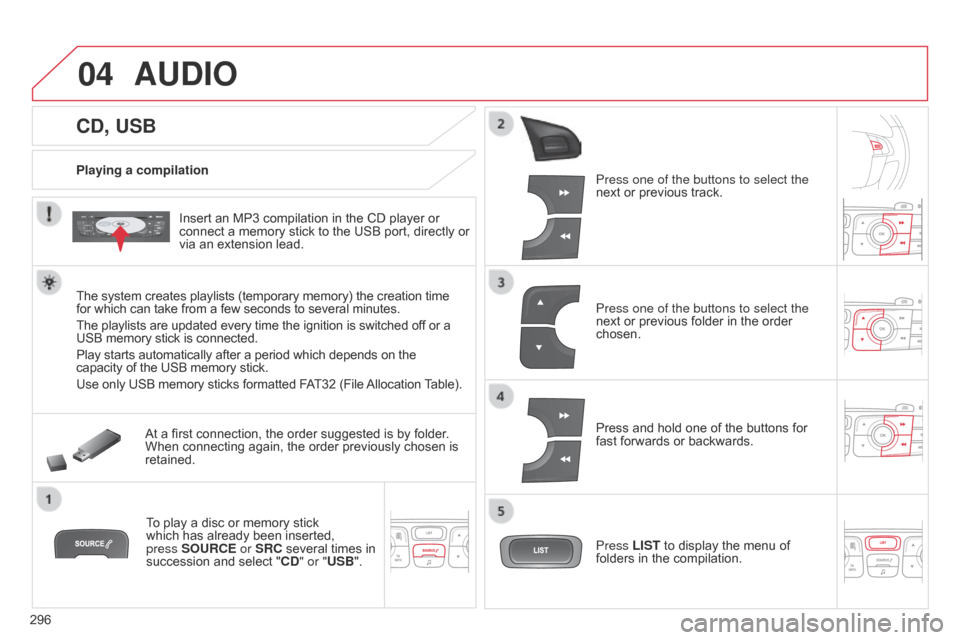
o play a disc or memory stick
which
has already been inserted,
press
SOURCE or SRC several times in
succession
and select "CD" or "USB". Press one of the buttons to select the
next
or previous track.
Press one of the buttons to select the
next
or previous folder in the order
chosen.
Press
and hold one of the buttons for
fast
forwards or backwards.
Press LIST
to display the menu of
folders
in the compilation.
Page 306 of 328
05
304
USING THE TELEPHONE
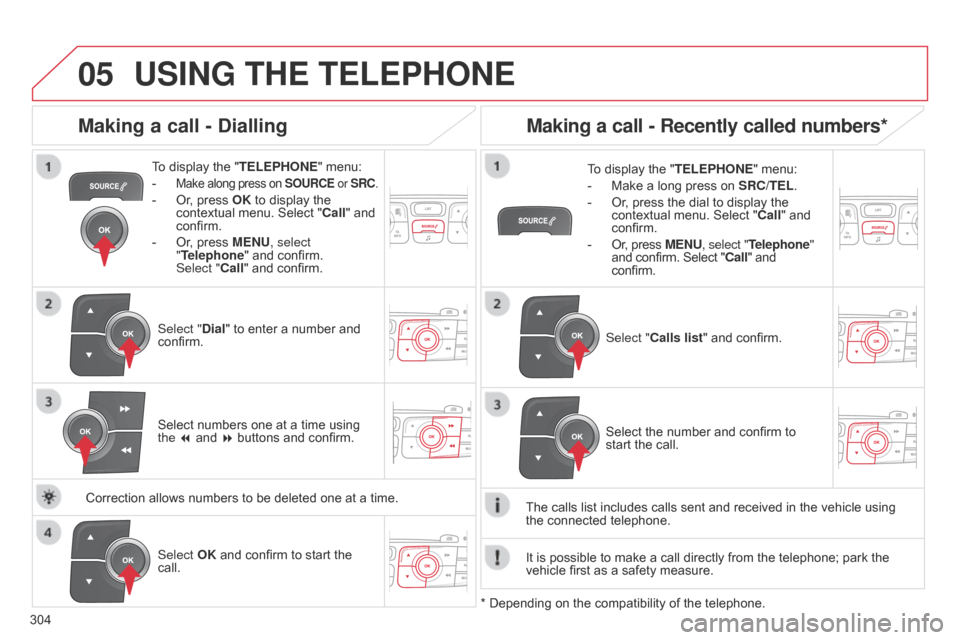
To display the "TELEPHONE " menu:
-
Make along press on SOURCE or SRC.
- Or, press OK to display the contextual
menu. Select "Call"
and
confirm.
-
Or
, press MENU, select
"Telephone"
and confirm.
Select
"Call" and confirm.
Select "Dial"
to enter a number and
confirm. T
o display the "
TELEPHONE" menu:
- Make a long press on SRC/TEL .
- Or , press the dial to display the contextual
menu. Select "Call"
and
confirm.
-
Or
, press MENU, select "Telephone"
and
confirm. Select "Call" and
confirm.
Select
OK and confirm to start the
call. Select "
Calls list" and confirm.
Making a call - Dialling
Select numbers one at a time using the 7 and 8 buttons and confirm.
Making a call - Recently called numbers*
Select the number and confirm to start the call.
The
calls
list
includes calls sent and received in the vehicle using
the connected
telephone.
*
Depending
on
the
compatibility of the telephone.
Correction
allows
numbers
to
be
deleted
one
at
a
time. It
is
possible
to make a call directly from the telephone; park the
vehicle
first
as a safety measure.
Page 307 of 328
05
305
USING THE TELEPHONE
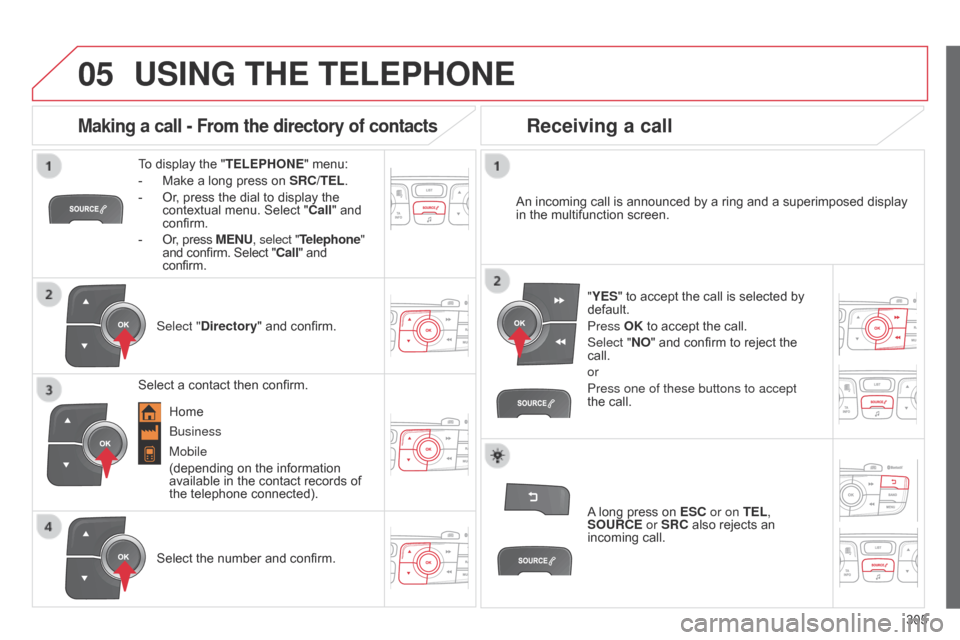
To display the "TELEPHONE " menu:
-
Make
a long press on
SRC/TEL
.
-
Or
, press the dial to display the
contextual
menu. Select "Call"
and
confirm.
-
Or
, press MENU, select "Telephone"
and
confirm. Select "Call" and
confirm.
Select "
Directory"
and confirm. An
incoming call is announced by a ring and a superimposed display
in
the multifunction screen.
Mobile
(depending
on the information
available
in the contact records of
the
telephone connected). "YES"
to accept the call is selected by
default.
Press
OK to accept the call.
Select "NO"
and confirm to reject the
call.
or
Press one of these buttons to accept
the
call.
Making a call - From the directory of contacts
Select a contact then confirm.
Receiving a call
Select the number and confirm.A
long press on
ESC
or on TEL,
SOURCE or SRC also rejects an
incoming
call.
b
usiness
Home
Page 308 of 328
05
306
USING THE TELEPHONE
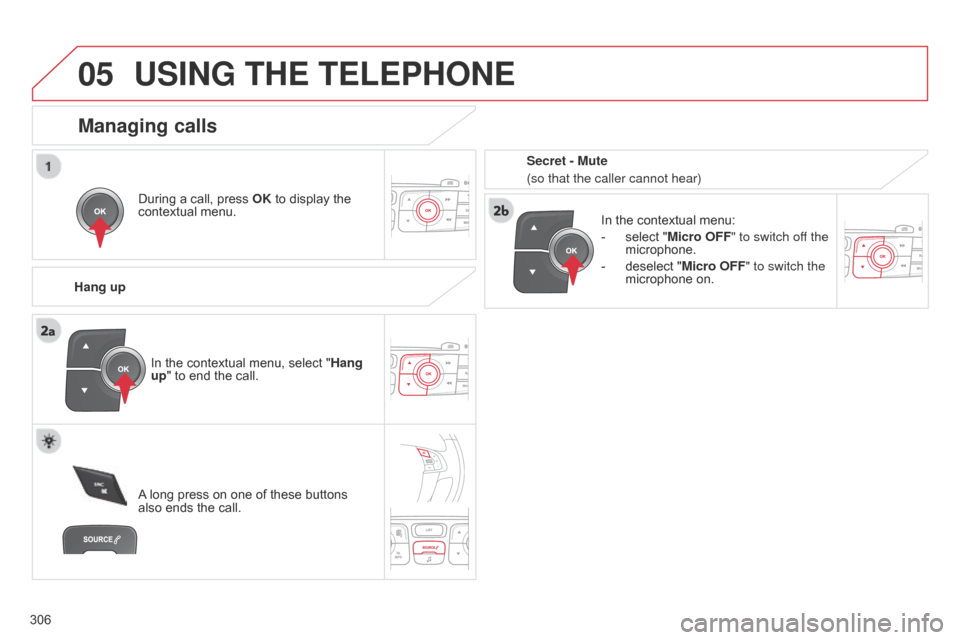
During a call, press OK to display the contextual
menu.
Hang up In
the contextual menu:
-
select
"Micro OFF" to switch off the
microphone.
-
deselect
"Micro OFF" to switch the
microphone
on.
Managing calls
A long press on one of these buttons also
ends the call.
In
the contextual menu, select "Hang
up" to end the call. Secret - Mute
(so that the caller cannot hear)