key Citroen C4 RHD 2015 2.G User Guide
[x] Cancel search | Manufacturer: CITROEN, Model Year: 2015, Model line: C4 RHD, Model: Citroen C4 RHD 2015 2.GPages: 328, PDF Size: 12.72 MB
Page 69 of 328

67ô
Locating your vehicle
Thisô functionô allows ô you ô to ô identify ô your ô vehicle
ô from ô a ô distance, ô particularly ô in ô
poor
ô
light.
ô
Y
our ô
vehicle
ô
must
ô
be
ô
locked.
Folding the key
F
ô
First
ô press ô this ô button ô to ô fold ô the ô key.
F ô
Press
ô
the
ô
closed
ô
padlock
ô
on
ô the ô remote ô control.
This
ô
will
ô
switch
ô
on
ô
the
ô
courtesy
ô
lamps
ô
and
ô
the
ô
direction
ô
indicators
ô
will
ô
flash
ô
for
ô
around
ô ten ô seconds.
If
ô
you
ô
do
ô
not
ô
press
ô
the
ô
buttonô when
ô
folding
ô
the
ô
key
, ô
there
ô
is
ô
aô risk
ô
of
ô
damage
ô
to
ô
the
ô
mechanism.
Fault with the remote control
Inô the
ô event ô of ô a ô malfunction ô with ô the ô remote
ô control, ô you ô can ô no ô longer ô un -
lock,
ô lock ô or ô locate ô your ô vehicle.
F
ô
First
ô
of
ô
all,
ô
use
ô
the
ô
key
ô
in
ô
the
ô
lock
ô
to
ô
unlock
ô or ô lock ô your ô vehicle.
F
ô
Then,
ô
reinitialise
ô
the
ô
remote
ô
control.
Reinitialisation
F
ô
Switch
ô
of
f ô
the
ô
ignition
ô
and
ô
remove
ô
the
ô ignition ô key.
F
ô
Press
ô
the
ô
closed
ô
padlock
ô
immedi
-
ately
ô for ô a ô few ô seconds.
F
ô
T
urn ô
the
ô
key
ô
to
ô
position
ô
2 (Ignition
on)
.
F
ô
Switch
ô
of
f ô
the
ô
ignition
ô
and
ô
remove
ô
the
ô key ô from ô the ô ignition ô switch.
The
ô
remote
ô
control
ô
is
ô
fully
ô
operational
ô
again. Battery
ô ref.: ô CR2032 ô / ô 3 ô volts.
Changing the battery
Ifô the
ô battery ô is ô flat, ô you ô are ô in -
formed ô by ô illumination ô of ô thisô warning
ô
lamp,
ô
an
ô
audible
ô
signalô and
ô a ô message ô in ô the ô screen.
Fô Unclipô the ô cover ô using ô a ô small ô screwdriver
ô at ô the ô two ô cutouts.
F
ô
Lift
ô off ô the ô cover.
F
ô
Remove
ô
the
ô
flat
ô
battery
ô
from
ô
its
ô
lo
-
cation.
F
Fit the new battery into its location
observing
ô
the
ô
original
ô
direction
ô
of
ô
fitment.
F
ô
Clip
ô the ô cover ô onto ô the ô casing.
If
ô
the
ô
problem
ô
persists,
ô
contact
ô
a
ô
CITROûN
ô
dealer
ô
as
ô
soon
ô
as
ô
possible.
4
ACCESS
Page 70 of 328

68ô
Lost keys
Goô toô a ô CITROûN ô dealer ô with ô the ô vehicle's ô registration ô document, ô your ô personal
ô identification ô documents ô and ô if ô possible ô the ô key ô code ô label.
The
ô
CITROûN
ô
dealer
ô
will
ô
be
ô
able
ô
to
ô
look
ô
up
ô
the
ô
key
ô
code
ô
and
ô
the
ô
transpon
-
der
ô code ô required ô to ô order ô a ô new ô key. Do
ô
not
ô
throw
ô
the
ô
remote
ô
con
-
trol batteries away, they contain
metals ô which ô are ô harmful ô to ô the ô environment.
T
ake ô
them
ô
to
ô
an
ô
approved
ô
col
-
lection
ô point.
Remote control
Theô highô frequency ô remote ô control ô is ô a ô sensitive ô system; ô do ô not ô operate ô it ô while
ô it ô is ô in ô your ô pocket ô as ô there ô is ô a ô possibility ô that ô it ô may ô unlock ô the ô ve -
hicle,
ô without ô you ô being ô aware ô of ô it.
Do
ô
not
ô
repeatedly
ô
press
ô
the
ô
buttons
ô
of
ô
your
ô
remote
ô
control
ô
out
ô
of
ô
range
ô
and
ô
out
ô
of
ô
sight
ô
of
ô
your
ô
vehicle.
ô
Y
ou ô
run
ô
the
ô
risk
ô
of
ô
stopping
ô
it
ô
from
ô
working
ô
and
ô
the
ô remote ô control ô would ô have ô to ô be ô reinitialised.
No
ô
remote
ô
control
ô
can
ô
operate
ô
when
ô
the
ô
key
ô
is
ô
in
ô
the
ô
ignition
ô
switch,
ô
even
ô
when
ô the ô ignition ô is ô switched ô off, ô except ô for ô reinitialisation.
Locking the vehicle
Drivingô withô the ô doors ô locked ô may ô make ô access ô to ô the ô passenger ô compart -
ment ô by ô the ô emergency ô services ô more ô difficult ô in ô an ô emergency.
As
ô
a
ô
safety
ô
precaution,
ô
never
ô
leave
ô
children
ô
alone
ô
in
ô
the
ô
vehicle,
ô
except
ô
for
ô
a
ô very ô short ô period.
In
ô
all
ô
cases,
ô
it
ô
is
ô
essential
ô
to
ô
remove
ô
the
ô
key
ô
from
ô
the
ô
ignition
ô
switch
ô
when
ô
leaving
ô the ô vehicle.
Anti-theft protection
Doô notô make ô any ô modifications ô to ô the ô electronic ô engine ô immobiliser ô system; ô this
ô could ô cause ô malfunctions.
When purchasing a second-hand vehicle
Haveô theô pairing ô of ô all ô of ô the ô keys ô in ô your ô possession ô checked ô by ô a ô CITROûN
ô dealer , ô to ô ensure ô that ô only ô your ô keys ô can ô be ô used ô to ô open ô and ô
start
ô the ô vehicle.
4
ACCESS
Page 71 of 328

69ô
CENTRAL LOCKING CONTROL
Locking
F
ô
Press
ô this ô button ô to ô lock ô the ô vehicle.
The
ô
red
ô
indicator
ô
lamp
ô
in
ô
the
ô
button
ô
comes
ô on. If
ô
the
ô
vehicle
ô
is
ô
locked
ô
from
ô
the
ô
outside,
ô this ô button ô is ô inactive.
F ô
In
ô
this
ô
case,
ô
use
ô
the
ô
remote
ô
control
ô
or
ô
the
ô
key
ô
to
ô
unlock
ô
the vehicle or pull an interior
door
ô handle ô to ô open ô a ô door.
If ô
one
ô
of
ô
the
ô
doors
ô
is
ô
open,
ô
cen
-
tral
ô
locking
ô
from
ô
the
ô
inside
ô
does
ô
not
ô take ô place. Unlocking
F
ô
Press
ô
the
ô
button
ô
again
ô
to
ô
unlock
ô
the
ô
vehicle.
The
ô
red
ô
indicator
ô
lamp
ô
in
ô
the
ô
button
ô
goes
ô off.
ANTI-INTRUSION SECURITY
Operation
If
ô
one
ô
of
ô
the
ô
doors
ô
or
ô
the
ô
boot
ô
is
ô
open,
ô
the
ô
automatic
ô
central
ô
locking
ô
does
ô
not
ô
take
ô place.
This
ô
control
ô
allows
ô
the
ô
simultaneous
ô
locking
ô
or
ô
unlocking
ô
of
ô
the
ô
doors
ô
and
ô
boot
ô
from
ô
inside
ô
the
ô
vehicle.
Thisô
system
ô
allows
ô
automatic
ô
simulta
-
neous ô
locking
ô
of
ô
the
ô
doors
ô
and
ô
boot
ô
as
ô
soon
ô
as
ô
the
ô
speed
ô
of
ô
the
ô
vehicle
ô
ex
-
ceeds ô 6 ô mph ô (10 ô km/h).
Carrying long and voluminous
objects
Ifô you ô want ô to ô drive ô with ô the ô bootô open,
ô you ô should ô press ô the ô centralô locking
ô
button
ô
to
ô
lock
ô
the
ô
the
ô
doors.ô Otherwise,
ô
every
ô
time
ô
the
ô
speedô of
ô
the
ô
vehicle
ô
exceeds
ô
6
ô
mphô
(10
ô
km/h),
ô
the
ô
locks
ô
will
ô
reboundô and
ô
the
ô
alerts
ô
mentioned
ô
above
ô
willô appear
.
Pressingô the ô central ô locking ô button ô un -
locks ô the ô vehicle.
Above
ô
6
ô
mph
ô
(10
ô
km/h),
ô
this
ô
locking
ô
is
ô
temporary
.
Thisô isô signalled ô by ô the ô sound ô of ô theô locks
ô rebounding, ô accompanied ô by ô il -
lumination
ô
of
ô
this
ô
symbol
ô
in
ô
the
ô
instru
-
ment
ô
panel,
ô
an
ô
audible
ô
signal
ô
and
ô
theô display
ô of ô an ô alert ô message.
4
ACCESS
Page 72 of 328
70ô
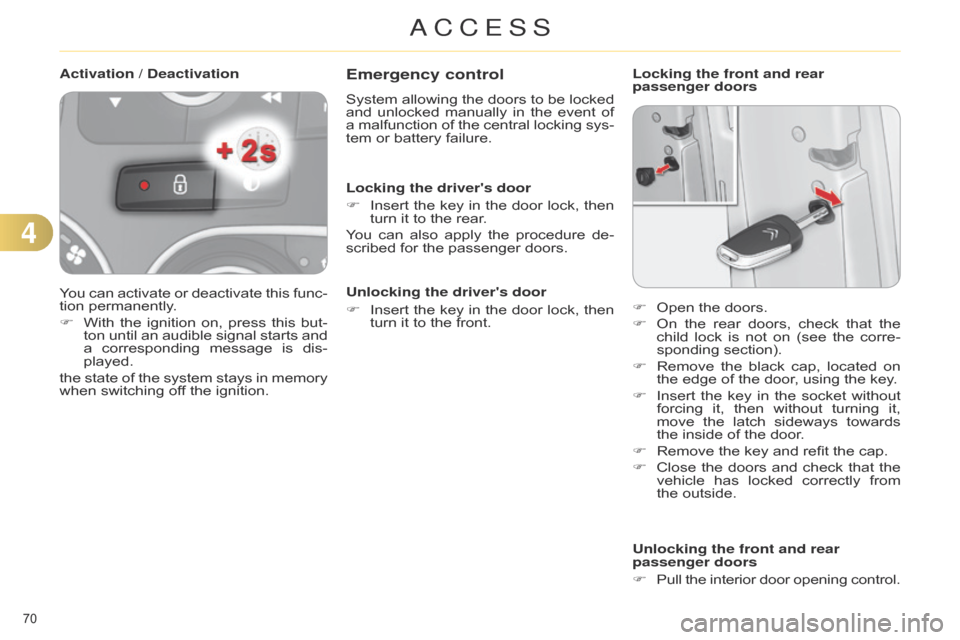
Emergency control
Systemô allowingô the ô doors ô to ô be ô locked ô and
ô unlocked ô manually ô in ô the ô event ô of ô
a
ô
malfunction
ô
of
ô
the
ô
central
ô
locking
ô
sys
-
tem
ô or ô battery ô failure.
Locking the driver's door
F
ô
Insert
ô
the
ô
key
ô
in
ô
the
ô
door
ô
lock,
ô
then
ô
turn
ô it ô to ô the ô rear.
You
ô
can
ô
also
ô
apply
ô
the
ô
procedure
ô
de
-
scribed
ô for ô the ô passenger ô doors.
Unlocking the driver's door
F
ô
Insert
ô
the
ô
key
ô
in
ô
the
ô
door
ô
lock,
ô
then
ô
turn
ô it ô to ô the ô front. Locking the front and rear
passenger doors
Unlocking the front and rear
passenger doors
F
ô
Pull
ô
the
ô
interior
ô
door
ô
opening
ô
control.
F
ô
Open
ô the ô doors.
F
ô
On
ô
the
ô
rear
ô
doors,
ô
check
ô
that
ô
the
ô
child
ô
lock
ô
is
ô
not
ô
on
ô
(see
ô
the
ô
corre
-
sponding
ô section).
F
ô
Remove
ô
the
ô
black
ô
cap,
ô
located
ô
on
ô
the
ô edge ô of ô the ô door, ô using ô the ô key.
F
ô
Insert
ô
the
ô
key
ô
in
ô
the
ô
socket
ô
without
ô
forcing
ô
it,
ô
then
ô
without
ô
turning
ô
it,
ô
move
ô
the
ô
latch
ô
sideways
ô
towards
ô
the
ô inside ô of ô the ô door.
F
ô
Remove
ô the ô key ô and ô refit ô the ô cap.
F
ô
Close
ô
the
ô
doors
ô
and
ô
check
ô
that
ô
the
ô
vehicle
ô
has
ô
locked
ô
correctly
ô
from
ô
the
ô outside.
Activation / Deactivation
You
ô
can
ô
activate
ô
or
ô
deactivate
ô
this
ô
func
-
tion
ô
permanently.
F
ô
With
ô
the
ô
ignition
ô
on,
ô
press
ô
this
ô
but
-
ton
ô
until
ô
an
ô
audible
ô
signal
ô
starts
ô
and
ô
a
ô
corresponding
ô
message
ô
is
ô
dis
-
played.
the
ô
state
ô
of
ô
the
ô
system
ô
stays
ô
in
ô
memory
ô
when
ô
switching
ô
off
ô
the
ô
ignition.
4
ACCESS
Page 74 of 328
72ô
Operating fault
Whenô theô ignition ô is ô switched ô on, ô fixedô illumination
ô of ô the ô indicator ô lamp ô in ô theô button
ô indicates ô a ô fault ô with ô the ô system.
Have
ô
it
ô
checked
ô
by
ô
a
ô
CITROûN
ô
dealer
ô
or
ô a ô qualified ô workshop.
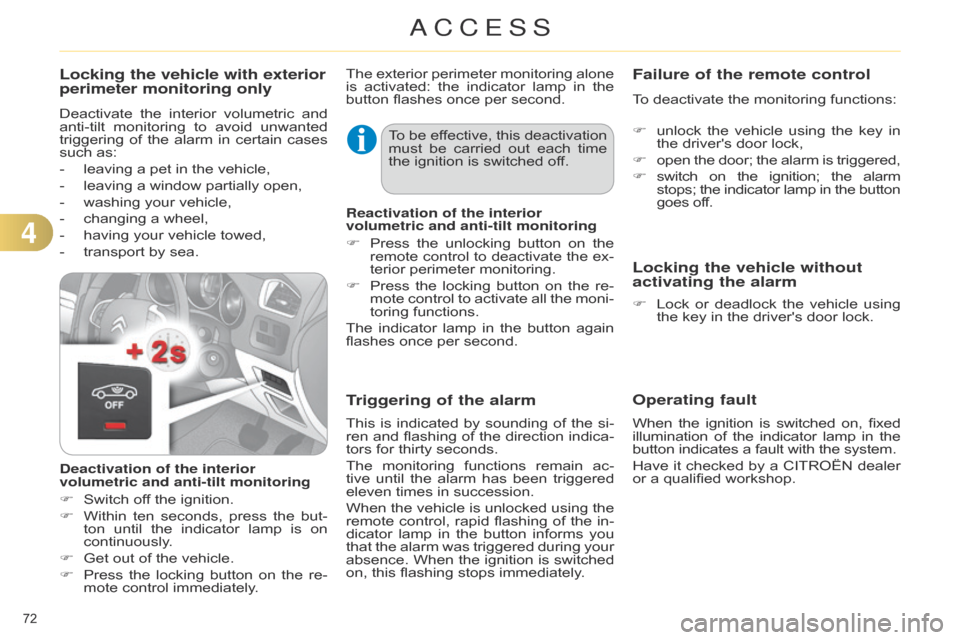
Locking the vehicle with exterior
perimeter monitoring only
Deactivateô the ô interior ô volumetric ô and ô anti-tilt
ô monitoring ô to ô avoid ô unwanted ô
triggering
ô
of
ô
the
ô
alarm
ô
in
ô
certain
ô
cases
ô
such
ô as:
-
ô
leaving
ô a ô pet ô in ô the ô vehicle,
-
ô
leaving
ô a ô window ô partially ô open,
-
ô
washing
ô your ô vehicle,
-
ô
changing
ô a ô wheel,
-
ô
having
ô your ô vehicle ô towed,
-
ô
transport
ô by ô sea.
Deactivation of the interior
volumetric and anti-tilt monitoring
F
ô
Switch
ô off ô the ô ignition.
F
ô
Within
ô
ten
ô
seconds,
ô
press
ô
the
ô
but
-
ton
ô
until
ô
the
ô
indicator
ô
lamp
ô
is
ô
on
ô
continuously
.
F
ô
Get
ô out ô of ô the ô vehicle.
F
ô
Press
ô
the
ô
locking
ô
button
ô
on
ô
the
ô
re
-
mote
ô control ô immediately. The
ô
exterior
ô
perimeter
ô
monitoring
ô
alone
ô
is
ô
activated:
ô
the
ô
indicator
ô
lamp
ô
in
ô
the
ô button
ô flashes ô once ô per ô second.
To ô
be
ô
ef
fective, ô
this
ô
deactivation
ô
must
ô
be
ô
carried
ô
out
ô
each
ô
time
ô
the
ô ignition ô is ô switched ô off.
Reactivation of the interior
volumetric and anti-tilt monitoring
F
ô
Press
ô
the
ô
unlocking
ô
button
ô
on
ô
the
ô
remote
ô
control
ô
to
ô
deactivate
ô
the
ô
ex
-
terior
ô perimeter ô monitoring.
F
ô
Press
ô
the
ô
locking
ô
button
ô
on
ô
the
ô
re
-
mote
ô
control
ô
to
ô
activate
ô
all
ô
the
ô
moni
-
toring
ô functions.
The
ô
indicator
ô
lamp
ô
in
ô
the
ô
button
ô
again
ô
flashes
ô once ô per ô second.
Triggering of the alarm
Thisô isô indicated ô by ô sounding ô of ô the ô si -
ren ô and ô flashing ô of ô the ô direction ô indica -
tors
ô for ô thirty ô seconds.
The
ô
monitoring
ô
functions
ô
remain
ô
ac
-
tive
ô
until
ô
the
ô
alarm
ô
has
ô
been
ô
triggered
ô
eleven
ô times ô in ô succession.
When
ô
the
ô
vehicle
ô
is
ô
unlocked
ô
using
ô
the
ô
remote
ô
control,
ô
rapid
ô
flashing
ô
of
ô
the
ô
in
-
dicator
ô
lamp
ô
in
ô
the
ô
button
ô
informs
ô
you
ô
that
ô
the
ô
alarm
ô
was
ô
triggered
ô
during
ô
your
ô
absence.
ô
When
ô
the
ô
ignition
ô
is
ô
switched
ô
on,
ô this ô flashing ô stops ô immediately.
Failure of the remote control
Toô deactivateô theô monitoringô functions:
F ô
unlock
ô
the
ô
vehicle
ô
using
ô
the
ô
key
ô
in
ô
the
ô driver's ô door ô lock,
F
ô
open
ô
the
ô
door;
ô
the
ô
alarm
ô
is
ô
triggered,
F
ô
switch
ô
on
ô
the
ô
ignition;
ô
the
ô
alarmô stops;
ô
the
ô
indicator
ô
lamp
ô
in
ô
the
ô
buttonô goes
ô off.
Locking the vehicle without
activating the alarm
Fô Lockô or ô deadlock ô the ô vehicle ô using ô the
ô key ô in ô the ô driver's ô door ô lock.
4
ACCESS
Page 75 of 328
73ô
DOORS
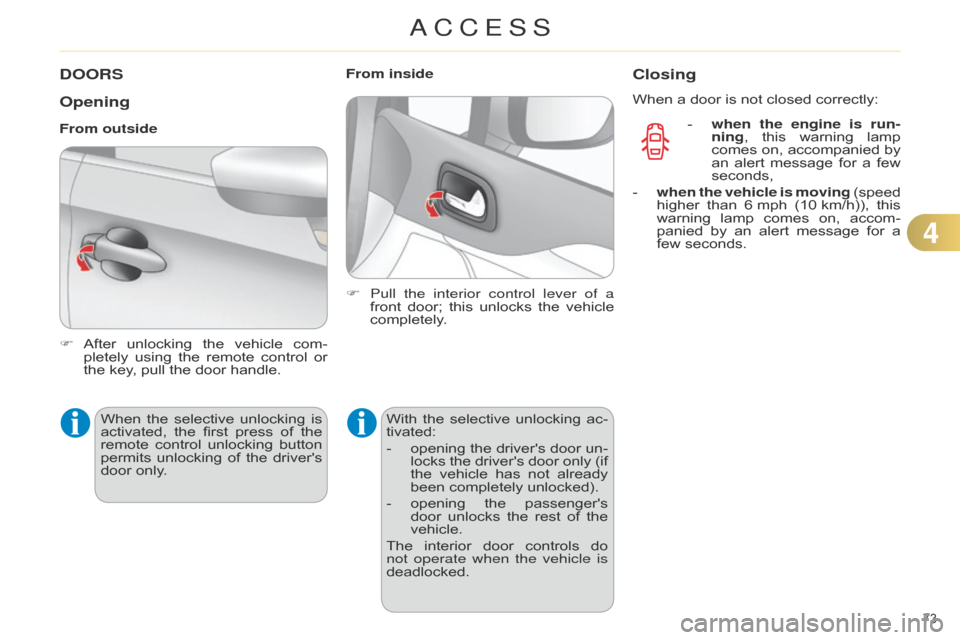
Opening
Fô Afterô unlocking ô the ô vehicle ô com -
pletely ô using ô the ô remote ô control ô or ô
the
ô key, ô pull ô the ô door ô handle.
From outside
When ô
the
ô
selective
ô
unlocking
ô
is
ô
activated,
ô
the
ô
first
ô
press
ô
of
ô
the
ô
remote
ô
control
ô
unlocking
ô
button
ô
permits
ô
unlocking
ô
of
ô
the
ô
driver's
ô
door
ô only. F
Pull the
interior control lever of a
front ô
door;
ô
this
ô
unlocks
ô
the
ô
vehicle
ô
completely
.
From inside
With ô
the
ô
selective
ô
unlocking
ô
ac
-
tivated:
-
ô
opening
ô
the
ô
driver's
ô
door
ô
un
-
locks
ô
the
ô
driver's
ô
door
ô
only
ô
(if
ô
the
ô
vehicle
ô
has
ô
not
ô
already
ô
been
ô completely ô unlocked).
-
ô
opening
ô
the
ô
passenger's
ô
door
ô
unlocks
ô
the
ô
rest
ô
of
ô
the
ô
vehicle.
The
ô
interior
ô
door
ô
controls
ô
do
ô
not operate when the vehicle is
deadlocked.
Closing
Whenô aô doorô isô notô closedô correctly:
- ô
when the engine is run
-
ning,
ô
this
ô
warning
ô
lamp
ô
comes
ô
on,
ô
accompanied
ô
by
ô
an
ô
alert
ô
message
ô
for
ô
a
ô
few
ô
seconds,
-
ô
when the vehicle is moving
ô
(speed
ô
higher
ô
than
ô
6
ô mph ô
(10
ô km/h)), ô
this
ô
warning
ô
lamp
ô
comes
ô
on,
ô
accom
-
panied
ô
by
ô
an
ô
alert
ô
message
ô
for
ô
a
ô
few
ô seconds.
4
ACCESS
Page 76 of 328
74ô
BOOT
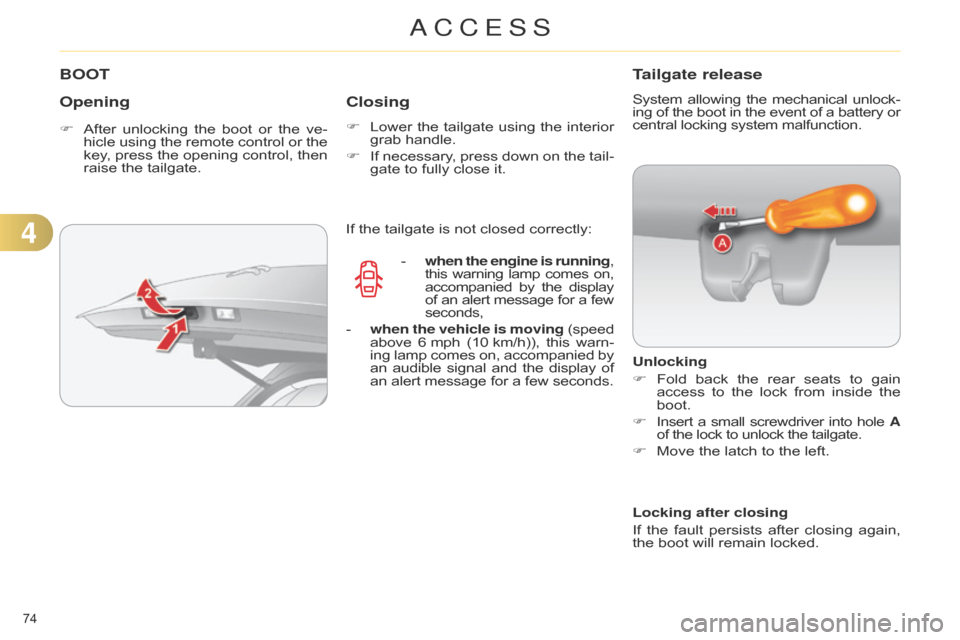
Opening
Fô Afterô unlocking ô the ô boot ô or ô the ô ve -
hicle ô using ô the ô remote ô control ô or ô the ô
key
, ô
press
ô
the
ô
opening
ô
control,
ô
then
ô
raise
ô the ô tailgate.
Closing
Fô Lowerô the ô tailgate ô using ô the ô interior ô grab
ô handle.
F
ô
If
ô
necessary
, ô
press
ô
down
ô
on
ô
the
ô
tail
-
gate
ô to ô fully ô close ô it.
Tailgate release
Systemô allowingô the ô mechanical ô unlock -
ing ô of ô the ô boot ô in ô the ô event ô of ô a ô battery ô orô central
ô locking ô system ô malfunction.
Unlocking
F
ô
Fold
ô
back
ô
the
ô
rear
ô
seats
ô
to
ô
gain
ô
access
ô
to
ô
the
ô
lock
ô
from
ô
inside
ô
the
ô
boot.
F
ô
Insert
ô
a
ô
small
ô
screwdriver
ô
into
ô
hole
ô
A
of
ô the ô lock ô to ô unlock ô the ô tailgate.
F
ô
Move
ô the ô latch ô to ô the ô left.
If
ô
the
ô
tailgate
ô
is
ô
not
ô
closed
ô
correctly:
-
ô
when
the engine is running,
this
ô
warning
ô
lamp
ô
comes
ô
on,ô accompanied
ô
by
ô
the
ô
displayô of
ô
an
ô
alert
ô
message
ô
for
ô
a
ô
fewô seconds,
-
ô
when the vehicle is moving
ô
(speedô above
ô
6
ô
mph
ô
(10
ô
km/h)),
ô
this
ô
warn
-
ing
ô
lamp
ô
comes
ô
on,
ô
accompanied
ô
byô an
ô
audible
ô
signal
ô
and
ô
the
ô
display
ô
ofô an
ô
alert
ô
message
ô
for
ô
a
ô
few
ô
seconds. Locking after closing
If
ô
the
ô
fault
ô
persists
ô
after
ô
closing
ô
again,
ô
the
ô boot ô will ô remain ô locked.
4
ACCESS
Page 78 of 328
76ô
Reinitialisation
Afterô
reconnecting
ô
the
ô
battery
ô
or
ô
a
ô
fault,
ô
you
ô
must
ô
be
ô
reinitialise
ô
the
ô
operation
ô
of
ô
the
ô
electric
ô
windows.
ô
For
ô
each
ô
of
ô
the
ô
control
ô
switches
ô
on
ô
the
ô
driver's
ô
side
ô
control
ô panel:
F
ô
pull
ô
the
ô
control
ô
until
ô
the
ô
window
ô
stops,
F
ô
release
ô
the
ô
control
ô
and
ô
pull
ô
it
ô
again
ô
until
ô the ô window ô closes ô fully,
F
ô
continue
ô
to
ô
hold
ô
the
ô
control
ô
for
ô
ap
-
proximately
ô
one
ô
second
ô
after
ô
the
ô
window
ô has ô closed,
F
press the control to lower the win
-
dow
ô
automatically
ô
to
ô
the
ô
low
ô
posi
-
tion,
F
ô
when
ô
the
ô
window
ô
has
ô
reached
ô
the
ô
low
ô
position,
ô
press
ô
the
ô
control
ô
again
ô
for
ô approximately ô one ô second.
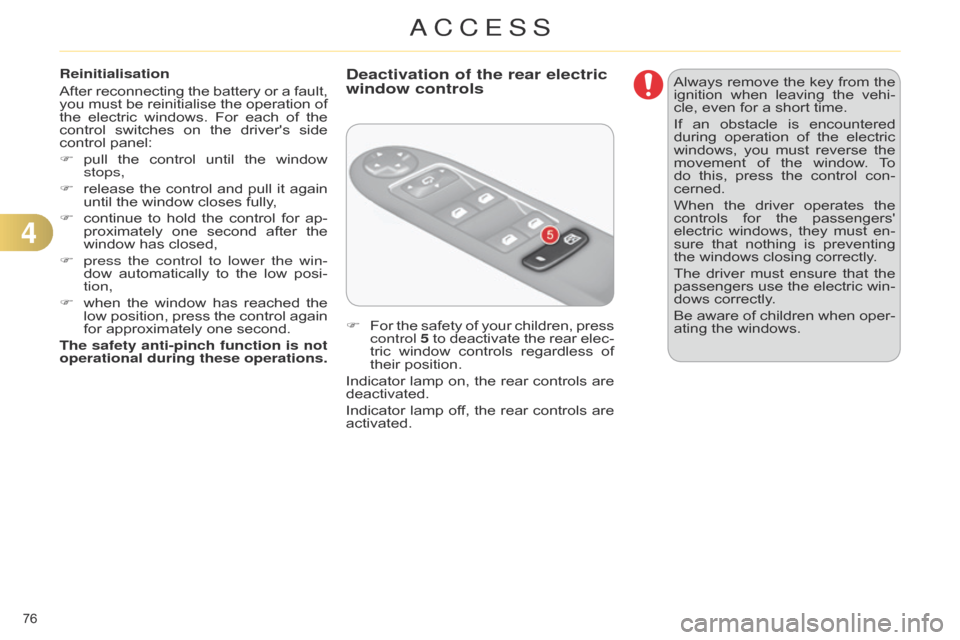
The safety anti-pinch function is not
operational during these operations. F
ô
For
ô
the
ô
safety
ô
of
ô
your
ô
children,
ô
press
ô
control 5
ô
to
ô
deactivate
ô
the
ô
rear
ô
elec
-
tric
ô
window
ô
controls
ô
regardless
ô
of
ô
their
ô position.
Indicator
ô
lamp
ô
on,
ô
the
ô
rear
ô
controls
ô
are
ô
deactivated.
Indicator
ô
lamp
ô
of
f, ô
the
ô
rear
ô
controls
ô
are
ô
activated.
Deactivation of the rear electric
window controlsAlwaysô removeô the ô key ô from ô the ô ignition
ô when ô leaving ô the ô vehi -
cle,
ô even ô for ô a ô short ô time.
If
ô
an
ô
obstacle
ô
is
ô
encountered
ô
during
ô
operation
ô
of
ô
the
ô
electric
ô
windows,
ô
you
ô
must
ô
reverse
ô
the
ô
movement
ô
of
ô
the
ô
window
. ô
T
o ô
do
ô
this,
ô
press
ô
the
ô
control
ô
con
-
cerned.
When
ô
the
ô
driver
ô
operates
ô
the
ô
controls
ô
for
ô
the
ô
passengers'
ô
electric
ô
windows,
ô
they
ô
must
ô
en
-
sure
ô
that
ô
nothing
ô
is
ô
preventing
ô
the
ô windows ô closing ô correctly.
The
ô
driver
ô
must
ô
ensure
ô
that
ô
the
ô
passengers
ô
use
ô
the
ô
electric
ô
win
-
dows
ô correctly.
Be
ô
aware
ô
of
ô
children
ô
when
ô
oper
-
ating
ô the ô windows.
4
ACCESS
Page 92 of 328
55
90ô
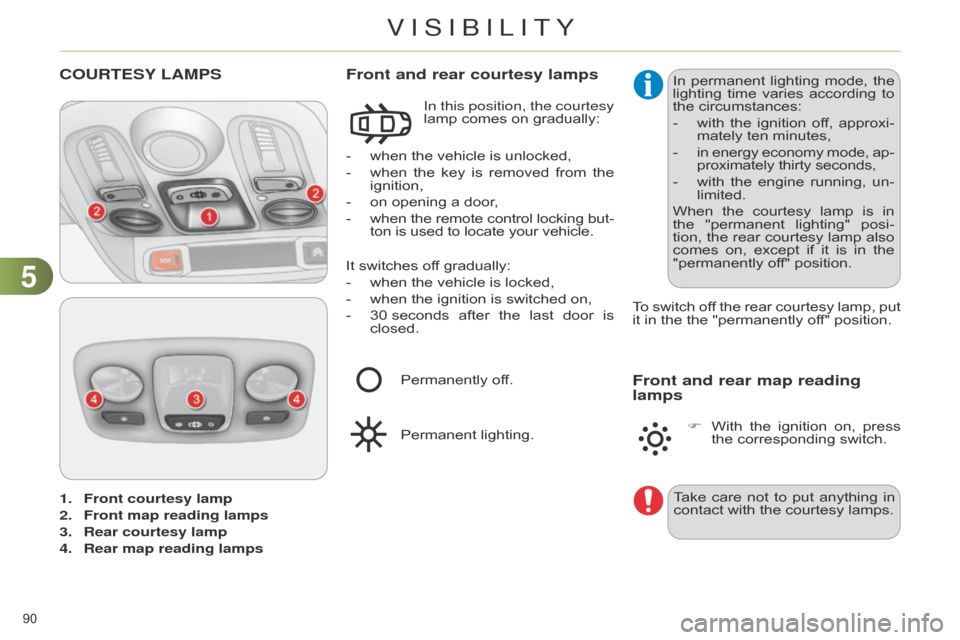
1. Front courtesy lamp
2.
Front map reading lamps
3.
Rear courtesy lamp
4.
Rear map reading lamps
COURTESY LAMPS
-ô whenô the ô vehicle ô is ô unlocked,
- ô
when
ô
the
ô
key
ô
is
ô
removed
ô
from
ô
the
ô
ignition,
-
ô
on
ô opening ô a ô door,
-
ô when
ô
the
ô
remote
ô
control
ô
locking
ô
but
-
ton
ô is ô used ô to ô locate ô your ô vehicle.
Front and rear courtesy lamps
In this position, the courtesy
lampô comes ô on ô gradually:
It
ô
switches
ô
off ô gradually:
-
ô
when
ô
the ô vehicle ô is ô locked,
-
ô
when
ô
the ô ignition ô is ô switched ô on,
-
ô
30
ô
seconds ô
after
ô
the
ô
last
ô
door
ô
is
ô
closed. T
o ô
switch
ô
of
f ô
the
ô
rear
ô
courtesy
ô
lamp,
ô
put
ô
it
ô in ô the ô the ô "permanently ô off" ô position.
Permanently
ô off.
Permanent
ô lighting. In
ô
permanent
ô
lighting
ô
mode,
ô
the
ô lighting
ô time ô varies ô according ô to ô the
ô circumstances:
-
ô
with
ô
the
ô
ignition
ô
of
f, ô
approxi
-
mately
ô ten ô minutes,
-
ô in
ô
energy
ô
economy
ô
mode,
ô
ap
-
proximately
ô thirty ô seconds,
-
ô
with
ô
the
ô
engine
ô
running,
ô
un
-
limited.
When
ô
the
ô
courtesy
ô
lamp
ô
is
ô
in
ô
the
ô
"permanent
ô
lighting"
ô
posi
-
tion,
ô
the
ô
rear
ô
courtesy
ô
lamp
ô
also
ô
comes
ô
on,
ô
except
ô
if
ô
it
ô
is
ô
in
ô
the
ô
"permanently
ô off" ô position.
Front and rear map reading
lamps
Takeô careô not ô to ô put ô anything ô in ô contact
ô with ô the ô courtesy ô lamps.
F
ô
With
ô
the
ô
ignition
ô
on,
ô
press
ô
the
ô corresponding ô switch.
VISIBILITY
Page 103 of 328
101ô
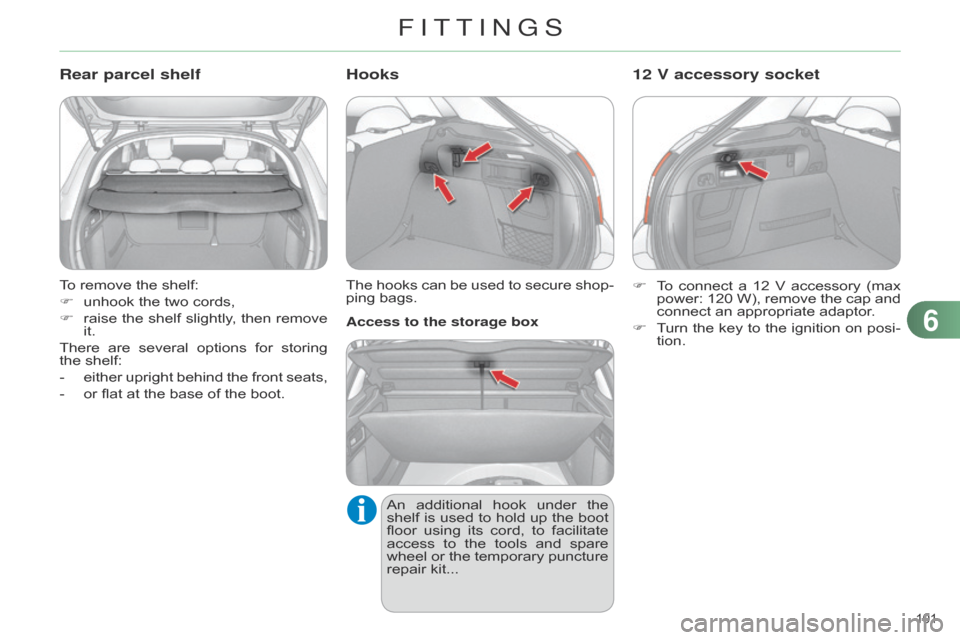
Toô removeô theô shelf:
F ô
unhook
ô the ô two ô cords,
F
ô
raise
ô
the
ô
shelf
ô
slightly
, ô
then
ô
remove
ô
it.
There
ô
are
ô
several
ô
options
ô
for
ô
storing
ô
the
ô shelf:
-
ô
either
ô
upright
ô
behind
ô
the
ô
front
ô
seats,
-
ô
or
ô flat ô at ô the ô base ô of ô the ô boot.
Rear parcel shelf
Theô hooksô can ô be ô used ô to ô secure ô shop -
ping ô bags.
Hooks
Anô additional ô hook ô under ô the ô shelf
ô is ô used ô to ô hold ô up ô the ô boot ô
floor
ô
using
ô
its
ô
cord,
ô
to
ô
facilitate
ô
access
ô
to
ô
the
ô
tools
ô
and
ô
spare
ô
wheel
ô
or
ô
the
ô
temporary
ô
puncture
ô
repair
ô kit...
Access to the storage box
Fô
T
o ô
connect
ô
a
ô
12
ô
V
ô
accessory
ô
(max
ô
power:
ô
120
ô
W),
ô
remove
ô
the
ô
cap
ô
and
ô
connect
ô an ô appropriate ô adaptor.
F ô
T
urn ô
the
ô
key
ô
to
ô
the
ô
ignition
ô
on
ô
posi
-
tion.
12 V accessory socket
6
FITTINGS