window Citroen C4 RHD 2015 2.G Owner's Guide
[x] Cancel search | Manufacturer: CITROEN, Model Year: 2015, Model line: C4 RHD, Model: Citroen C4 RHD 2015 2.GPages: 328, PDF Size: 12.72 MB
Page 209 of 328
1111
207ô
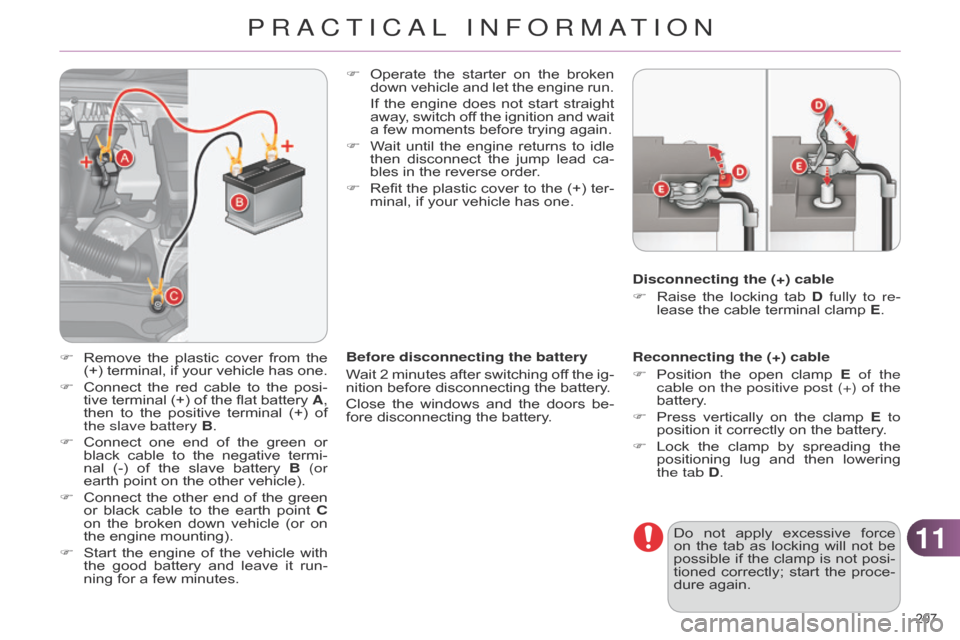
Reconnecting the (+) cable
Fô
Position
ô
the
ô
open
ô
clamp
ô
E
of the
cable on the positive post (+) of the
battery.
F
ô
Press
ô
vertically
ô
on
ô
the
ô
clamp
ô
E
to
position
ô it ô correctly ô on ô the ô battery.
F
ô
Lock
ô
the
ô
clamp
ô
by
ô
spreading
ô
the
ô
positioning
ô
lug
ô
and
ô
then
ô
lowering
ô
the tab
D.
F
ô
Operate
ô
the
ô
starter
ô
on
ô
the
ô
broken
ô
down
ô
vehicle
ô
and
ô
let
ô
the
ô
engine
ô
run.
ô If
ô
the
ô
engine
ô
does
ô
not
ô
start
ô
straight
ô
away
,
ô
switch
ô
of
f
ô
the
ô
ignition
ô
and
ô
wait
ô
a
ô
few
ô
moments
ô
before
ô
trying
ô
again.
F
ô
W
ait
ô
until
ô
the
ô
engine
ô
returns
ô
to
ô
idle
ô
then
ô
disconnect
ô
the
ô
jump
ô
lead
ô
ca
-
bles
ô
in
ô
the
ô
reverse
ô
order.
F
ô
Refit
ô
the
ô
plastic
ô
cover
ô
to
ô
the
ô
(+)
ô
ter
-
minal,
ô
if
ô
your
ô
vehicle
ô
has
ô
one.
Before disconnecting the battery
Wait
ô
2
ô
minutes
ô
after
ô
switching
ô
of
f
ô
the
ô
ig
-
nition
ô
before
ô
disconnecting
ô
the
ô
battery.
Close
ô
the
ô
windows
ô
and
ô
the
ô
doors
ô
be
-
fore
ô
disconnecting
ô
the
ô
battery. Disconnecting the (+) cable
F
ô
Raise
ô
the
ô
locking
ô
tab
ô
D
fully to re-
lease ô the ô cable ô terminal ô clamp ô E.
Do ô
not
ô
apply
ô
excessive
ô
force
ô
on
ô
the
ô
tab
ô
as
ô
locking
ô
will
ô
not
ô
be
ô
possible
ô
if
ô
the
ô
clamp
ô
is
ô
not
ô
posi
-
tioned
ô
correctly;
ô
start
ô
the
ô
proce
-
dure
ô again.
F
ô Remove
ô the
ô plastic
ô cover
ô from
ô the
ô (+)
ô terminal,
ô if
ô your
ô vehicle
ô has
ô one.
F
ô
Connect
ô
the
ô
red
ô
cable
ô
to
ô
the
ô
posi
-
tive
ô
terminal
ô
(+)
ô
of
ô
the
ô
flat
ô
battery
ô
A
,
then
ô
to
ô
the
ô
positive
ô
terminal
ô
(+)
ô
of
ô
the slave battery
B.
F
ô
Connect
ô
one
ô
end
ô
of
ô
the
ô
green
ô
or
ô
black
ô
cable
ô
to
ô
the
ô
negative
ô
termi
-
nalô (-)
ô
of
ô
the
ô
slave
ô
battery
ô
B
(or
earth
ô
point
ô
on
ô
the
ô
other
ô
vehicle).
F
ô
Connect
ô
the
ô
other
ô
end
ô
of
ô
the
ô
green
ô
or
ô
black
ô
cable
ô
to
ô
the
ô
earth
ô
point
ô
C
on
ô
the
ô
broken
ô
down
ô
vehicle
ô
(or
ô
on
ô
the
ô
engine
ô
mounting).
F
ô
Start
ô
the
ô
engine
ô
of
ô
the
ô
vehicle
ô
with
ô
the
ô
good
ô
battery
ô
and
ô
leave
ô
it
ô
run
-
ning
ô
for
ô
a
ô
few
ô
minutes.
PRACTICAL INFORMATION
Page 210 of 328
1111
208ô
Charging the battery using
a battery chargerItô is ô advisable ô to ô disconnect ô theô battery if the vehicle is to be left
unused
ô for ô more ô than ô one ô month.
The
ô
batteries
ô
contain
ô
harmful
ô
substances
such as sulphuric
acid
ô
and
ô
lead.
ô
They
ô
must
ô
be
ô
disposed
ô
of
ô
in
ô
accordance
ô
with
ô
regulations
ô
and
ô
must
ô
not,
ô
in
ô
any
ô
circumstances,
ô
be
ô
discarded
ô
with
ô
household
ô
waste.
Take
ô
used
ô
remote
ô
control
ô
bat
-
teries
ô
and
ô
vehicle
ô
batteries
ô
to
ô
a
ô
special
ô
collection
ô
point.
F
Disconnectô the ô battery ô from ô the ô vehicle.
F Follow the instructions for use pro -
vided ô by ô the ô manufacturer ô of ô the ô
charger
.
F
ô
Connect
ô
the
ô
battery
ô
starting
ô
with
ô
the
ô
negative
ô terminal ô (-).
F
ô
Check
ô
that
ô
the
ô
terminals
ô
and
ô
con
-
nectors
ô
are
ô
clean.
ô
If
ô
they
ô
are
ô
coveredô with
ô
sulphate
ô
(whitish
ô
or
ô
greenish
ô
deposit),
ô
remove
ô
them
ô
and
ô
clean
ô
them. Protect
ô
your
ô
eyes
ô
and
ô
face
ô
be
-
fore ô handling ô the ô battery.
a
ll operations on the battery
must ô be ô carried ô out ô in ô a ô well ô ventilated
ô area ô and ô away ô from ô naked
ô flames ô and ô sources ô of ô
sparks,
ô
so
ô
as
ô
to
ô
avoid
ô
the
ô
risk
ô
of
ô
explosion
ô or ô fire.
Do
ô
not
ô
try
ô
to
ô
charge
ô
a
ô
frozen
ô
battery;
ô
the
ô
battery
ô
must
ô
first
ô
be
ô
thawed
ô
out
ô
to
ô
avoid
ô
the
ô
risk
ô
of
ô
explosion.
ô
If
ô
the
ô
battery
ô
has
ô
been
ô
frozen,
ô
before
ô
charging
ô
have
ô
it
ô
checked
ô
by
ô
a
ô
CITROûN
ô
dealer
ô
or
ô
a
ô
qualified
ô
workshop
ô
who
ô
will
ô
check
ô
that
ô
the
ô
inter
-
nal
ô
components
ô
have
ô
not
ô
been
ô
damaged
ô
and
ô
the
ô
casing
ô
is
ô
not
ô
cracked,
ô
which
ô
could
ô
cause
ô
a
ô
leak
ô of ô toxic ô and ô corrosive ô acid.
Do
ô
not
ô
reverse
ô
the
ô
polarity
ô
and
ô
use
ô only ô a ô 12 ô V ô charger.
Do
ô
not
ô
disconnect
ô
the
ô
terminals
ô
while
ô the ô engine ô is ô running.
Do
ô
not
ô
charge
ô
the
ô
batteries
ô
with
-
out
ô
disconnecting
ô
the
ô
terminals
ô
first.
W
ash ô your ô hands ô afterwards.
Reinitialisation after
reconnection
after any reconnection of the battery,
switch ô on ô the ô ignition ô and ô wait ô at ô least ô
one
ô
minute
ô
before
ô
starting,
ô
to
ô
allow
ô
time
ô
for
the initialisation of the
electronic
systems.
By
ô
referring
ô
to
ô
the
ô
corresponding
ô
sections,ô you
ô
should
ô
set
ô
or
ô
initialise
ô
the
ô
followingô systems
ô yourself:
-
ô
one-touch
ô electric ô windows,
-
ô
time
ô and ô date,
-
ô
audio
ô
and
ô
navigation
ô
system
ô
set
-
tings.
Check
ô
that
ô
no
ô
alert
ô
message
ô
or
ô ô
warning
ô
lamp
ô
comes
ô
on
ô
after
ô
switching
ô
on
ô
the
ô
ignition.
However
, ô
if
ô
minor
ô
problems
ô
persist
ô
ô
after
ô
carrying
ô
out
ô
these
ô
operations,
ô
contact
ô
a
ô
CITROûN
ô
dealer
ô
or
ô
a
ô
quali
-
fied
ô ô
workshop. Some
ô
functions
ô
are
ô
not
ô
available
ô
if
ô
the
ô
battery
ô
is
ô
not
ô
sufficiently
ô
charged.
d
o not push the vehicle to start
the
ô
engine
ô
if
ô
you
ô
have
ô
an
ô
elec
-
tronic
ô or ô automatic ô gearbox.
With Stop & Start, the battery
does
ô
not
ô
have
ô
to
ô
be
ô
disconnect
-
ed
ô for ô charging.
PRACTICAL INFORMATION
Page 217 of 328

1111
215ô
ACCESSORIES
Aô wideô range ô of ô accessories ô and ô genu -
ine ô parts ô is ô available ô from ô the ô CITROûN ô
dealer
ô network.
These
ô
accessories
ô
and
ô
parts
ô
are
ô
all
ô
suitable
ô
for
ô
your
ô
vehicle
ô
and
ô
benefit
ô
from
ô
CITROûN's
ô
recommendation
ô
and
ô
warranty
.
Conversion kits
You
ô
can
ô
obtain
ô
an
ô
"Enterprise"
ô
kit
ô
to
ô
convert
ô
a
ô
trade
ô
vehicle
ô
to
ô
a
ô
private
ô
car
ô
and
ô vice-versa.
"Comfort":
door
ô
deflectors,
ô
side
ô
window
ô
blinds,
ô
rear
ô
screen
ô
blind,
ô
insulated
ô
module,
ô
coat
ô
hanger
ô
fixed
ô
to
ô
head
ô
restraint,
ô
reading
ô
lamp,
ô
mirror
ô
for
ô
caravan,
ô
cruise
ô
control,
ô
scented
ô
air
ô
freshener
ô
and
ô
car
-
tridges,
ô parking ô sensors... "Transport systems":
boot carpet, boot liner, boot net, boot
spacers, transverse roof bars, bicycle
carrier,
ô
ski
ô
carrier
, ô
roof
ô
boxes,
ô
towbars,
ô
towbar
ô wiring ô harnesses...
"Styling":
gear
ô
lever
ô
knobs,
ô
aluminium
ô
foot
ô
rest,
ô
alloy
ô
wheels,
ô
wheel
ô
embellishers,
ô
chrome
ô
mirror
ô
shells,
ô
chrome
ô
door
ô
ô
aperture
ô
finishers,
ô
door
ô
sill
ô
finishers,
ô
tailgate
ô lower ô chrome ô finisher...*
ô
T
o ô
avoid
ô
any
ô
risk
ô
of
ô
jamming
ô
the
ô
pedals:-
ô
ensure
ô
that
ô
mats
ô
are
ô
correctly
ô
positioned
ô and ô secured,
-
ô
never
ô
fit
ô
one
ô
mat
ô
on
ô
top
ô
of
ô
ô
another
.
"Security and safety":
anti-intrusion
ô alarm, ô microwave ô sensor , ô anti-tilt
ô sensor , ô stolen ô vehicle ô tracking ô
system,
ô
child
ô
seats
ô
and
ô
booster
ô
cush
-
ions,
ô
breathalyser
, ô
first
ô
aid
ô
kit,
ô
fire
ô
extin
-
guisher,
ô
warning
ô
triangle,
ô
high
ô
visibility
ô
vest,
ô
dog
ô
guard,
ô
pet
ô
seat
ô
belt,
ô
wheel
ô
security
ô
bolts,
ô
snow
ô
chains,
ô
non-slip
ô
covers,
ô front ô foglamp ô kit...
"Protection":
mats*,
ô
seat
ô
covers
ô
compatible
ô
with
ô
ô
lateral
ô
airbags,
ô
door
ô
sill
ô
protectors,
ô
mud
ô
flaps,
ô
door
ô
protective
ô
rubbing
ô
strips,
ô
bumper
ô
protection
ô
strips,
ô
protective
ô
covers
ô for ô pets, ô vehicle ô cover...
If
ô
a
ô
towbar
ô
and
ô
wiring
ô
harness
ô
are
ô
fitted
ô
outside
ô
the
ô
CITROûN
ô
dealer
ô
network,
ô
the
ô
installation
ô
must
ô
be
ô
done
ô
using
ô
the
ô
vehicle's
ô
electrical
ô
pre-equipment
ô
and
ô
in
ô
line
ô
with
ô
the
ô
manufacturer's
ô
rec
-
ommendations.
PRACTICAL INFORMATION
Page 235 of 328
03
233
For
ô
the
ô
details
ô
of
ô
the
ô
menus,
ô
refer
ô
to
ô
the
ô
"Screen
ô
menu
ô
map"
ô
section.
For
ô
cleaning
ô
the
ô
screen,
ô
the
ô
use
ô
of
ô
a
ô
soft,
ô
non-abrasive
ô
cloth
ô
(spectacles
ô
cloth)
ô
is
ô
recommended,
ô
with
ô
no
ô
additional
ô
product.
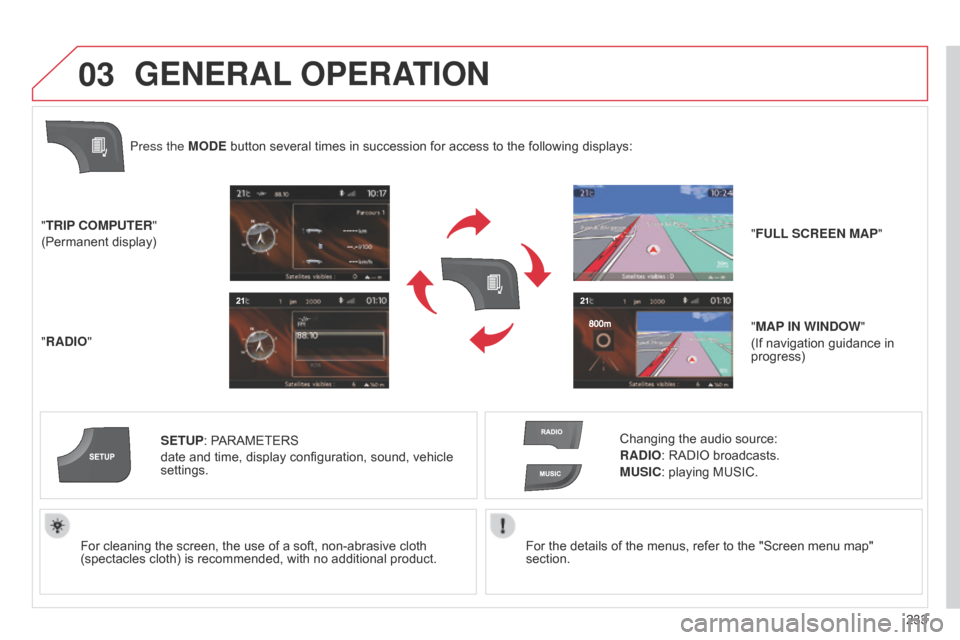
"TRIP COMPUTER"
(Permanent
ô
display)
"RADIO" SETUP:
ô
PARAMETERS
ô
date
ô
and
ô
time,
ô
display
ô
configuration,
ô
sound,
ô
vehicle
ô
settings.
Changing
ô
the
ô
audio
ô
source:
RADIO:
ô
RADIO
ô
broadcasts.
MUSIC:
ô
playing
ô
MUSIC.
Press the MODE
ô
button
ô
several
ô
times
ô
in
ô
succession
ô
for
ô
access
ô
to
ô
the
ô
following
ô
displays:
GENERAL
OPERATION
"FULL SCREEN MAP"
"MAP IN WINDOW "
(If
ô navigation ô guidance ô in ô
progress)
Page 236 of 328
03
234A
ô
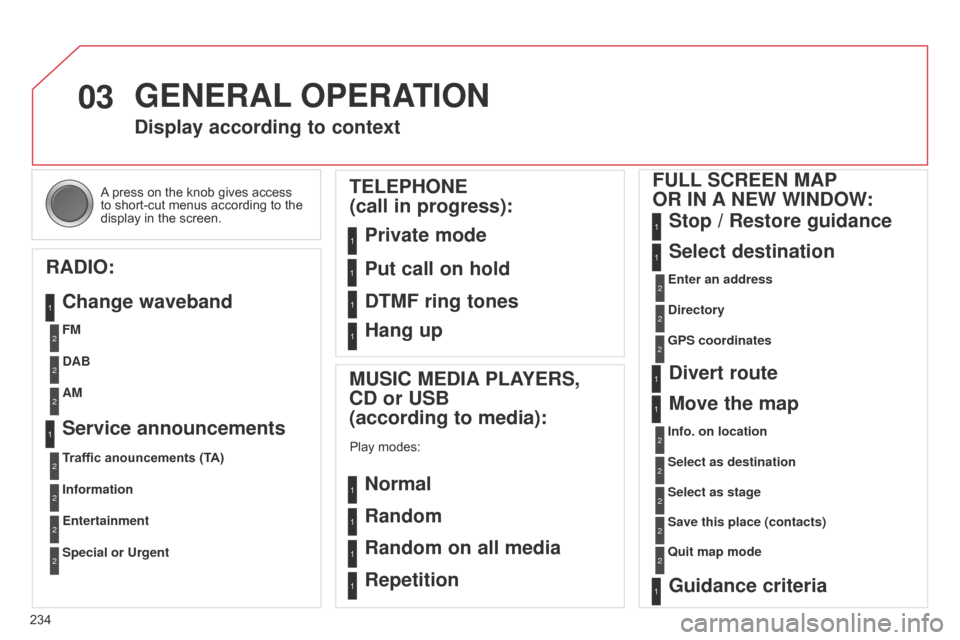
press ô on ô the ô knob ô gives ô access ô
to
ô short-cut ô menus ô according ô to ô the ô
display
ô in ô the ô screen.
GENERAL
OPERATION
Display according to context
RADIO: Change waveband
MUSIC MEDIA PLAYERS,
CD or USB
(according to media):
Playô modes:
Normal
Random
Random on all media
Repetition
TELEPHONE
(call in progress):
Private mode FULL SCREEN MAP
OR IN A NEW WINDOW:
Stop / Restore guidance
Select destination
Enter an address
Directory
GPS coordinates
Divert route
Move the map
Info. on location
Select as destination Select as stage
Save this place (contacts)
q
uit map mode
Guidance criteria
Put call on hold
DTMF ring tones
Hang up
FM
Traffic anouncements (TA) DAB
Information AM
Entertainment
Special or Urgent
Service announcements
1
1
1
1
1
1
1
2
2
2
2
2
1
2
2
2
1
1
1
1
1
12
2
2
2
2
2
2
1
Page 281 of 328
279
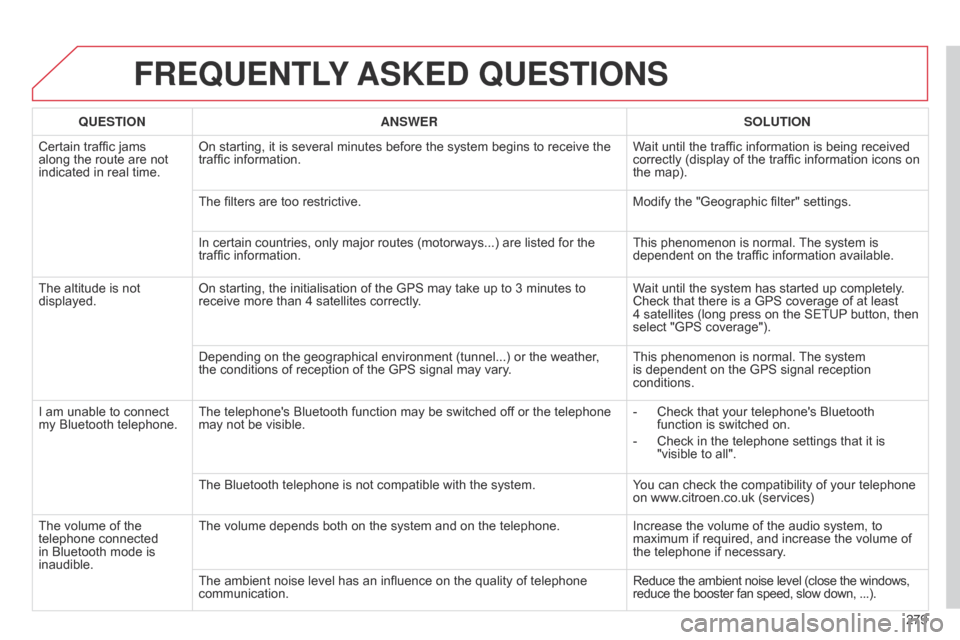
FREqUENTLY ASKED q UESTIONS
qUESTION ANSWER SOLUTION
Certain ô traffic ô jams ô
along
ô
the ô route ô are ô not ô
indicated
ô in ô real ô time. On
ô starting, ô it ô is ô several ô minutes ô before ô the ô system ô begins ô to ô receive ô the ô
traffic
ô information. Wait
ô until ô the ô traffic ô information ô is ô being ô received ô
correctly
ô (display ô of ô the ô traffic ô information ô icons ô on ô
the
ô map).
The
ô filters ô are ô too ô restrictive. Modify
ô the ô "Geographic ô filter" ô settings.
In
ô certain ô countries, ô only ô major ô routes ô (motorways...) ô are ô listed ô for ô the ô
traffic
ô information. This
ô phenomenon ô is ô normal. ô
The
ô system ô is ô
dependent
ô on ô the ô traffic ô information ô available.
The
ô
altitude ô is ô not ô
displayed. On
ô starting, ô the ô initialisation ô of ô the ô GPS ô may ô take ô up ô to ô 3 ô minutes ô to ô
receive
ô more ô than ô 4 ô satellites ô correctly.Wait
ô until ô the ô system ô has ô started ô up ô completely. ô
Check
ô that ô there ô is ô a ô GPS ô coverage ô of ô at ô least ô
4ô satellites
ô (long ô press ô on ô the ô SETUP
ô
button, ô then ô
select
ô "GPS ô coverage").
Depending
ô on ô the ô geographical ô environment ô (tunnel...) ô or ô the ô weather, ô
the
ô conditions ô of ô reception ô of ô the ô GPS ô signal ô may ô vary.This
ô phenomenon ô is ô normal. ô
The
ô system ô
is
ô dependent ô on ô the ô GPS ô signal ô reception ô
conditions.
I
ô
am
ô
unable ô to ô connect ô
my
ô
Bluetooth ô telephone. The
ô telephone's ô Bluetooth ô function ô may ô be ô switched ô off ô or ô the ô telephone ô
may
ô not ô be ô visible. -
ô
Check
ô that ô your ô telephone's ô Bluetooth ô
function
ô is ô switched ô on.
-
ô
Check
ô in ô the ô telephone ô settings ô that ô it ô is ô
"visible
ô to ô all".
The
ô Bluetooth ô telephone ô is ô not ô compatible ô with ô the ô system.You
ô can ô check ô the ô compatibility ô of ô your ô telephone ô
on
ô www.citroen.co.uk ô (services)
The
ô
volume ô of ô the ô
telephone
ô connected ô
in
ô
Bluetooth ô mode ô is ô
inaudible. The
ô volume ô depends ô both ô on ô the ô system ô and ô on ô the ô telephone.Increase
ô the ô volume ô of ô the ô audio ô system, ô to ô
maximum
ô if ô required, ô and ô increase ô the ô volume ô of ô
the
ô telephone ô if ô necessary.
The
ô ambient ô noise ô level ô has ô an ô influence ô on ô the ô quality ô of ô telephone ô
communication.Reduce
ô the ô ambient ô noise ô level ô (close ô the ô windows,
ô reduce
ô the ô booster ô fan ô speed, ô slow ô down, ô ...).
Page 288 of 328
01
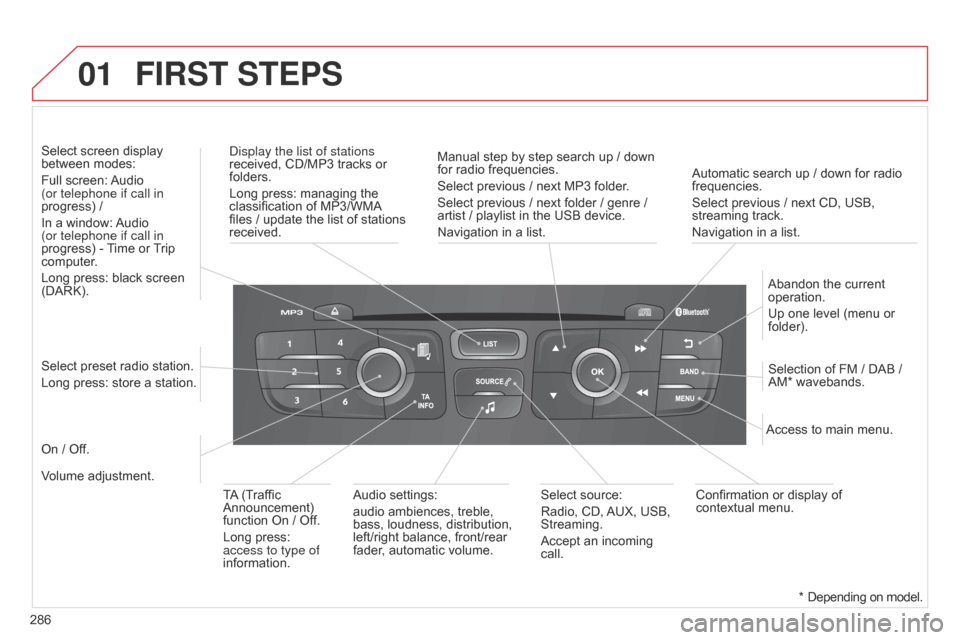
286Automatic ô search ô up ô / ô down ô for ô radio ô
frequencies.
Select
ô previous ô / ô next ô CD, ô USB, ô
streaming
ô track.
Navigation ô in ô a ô list.
d
isplay the list of stations
received, ô CD/MP3 ô tracks ô or ô
folders.
Long
ô press: ô managing ô the ô
classification
ô of ô MP3/WMA
ô files
ô / ô update ô the ô list ô of ô stations ô
received.
Abandon
ô the ô current ô
operation.
Up
ô one ô level ô (menu ô or ô
folder).
On
ô / ô Off.
Selection ô of ô FM ô / ô DAB ô / ô
AM*
ô wavebands.
Select ô preset ô radio ô station.
Long ô press: ô store ô a ô station.
Select ô screen ô display ô
between
ô modes:
Full ô screen: ô
Audio
ô
(or telephone if call in
progress) ô /
In ô a ô window: ô
Audio
ô
(or telephone if call in
progress)
ô - ô
T
ime ô or ô
T
rip ô
computer
.
Long ô press: ô black ô screen ô
(DARK).
Audio
ô settings:
audio ô ambiences, ô treble, ô
bass,
ô loudness, ô distribution, ô
left/right
ô balance, ô front/rear ô
fader
, ô automatic ô volume.Access ô to ô main ô menu.
TA
ô
(Traffic ô
Announcement)
ô
function
ô On ô / ô Off.
Long ô press: ô
access to type of
information.
Select
ô source:
Radio, ô CD, ô
AUX,
ô USB, ô
Streaming.
Accept
ô an ô incoming ô
call.
Confirmation
ô or ô display ô of ô
contextual
ô menu.
Manual ô step ô by ô step ô search ô up ô / ô down ô
for
ô radio ô frequencies.
Select ô previous ô / ô next ô MP3 ô folder.
Select ô previous ô / ô next ô folder ô / ô genre ô / ô
artist
ô / ô playlist ô in ô the ô USB ô device.
Navigation ô in ô a ô list.
Volume ô adjustment.
FIRST STEPS
*ô Depending
ô on ô model.
Page 303 of 328
05
301
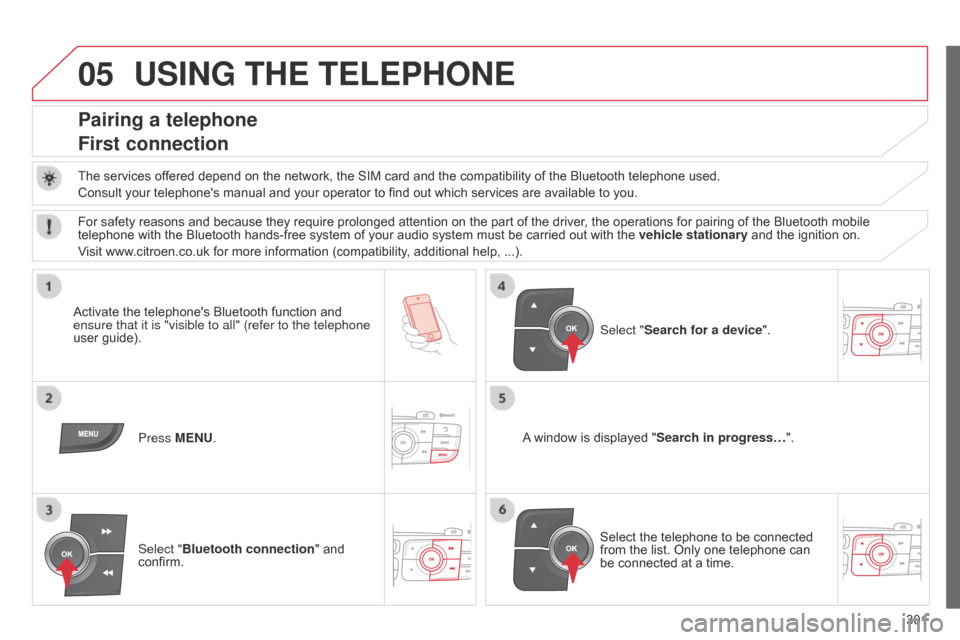
USING THE TELEPHONE
Pairing a telephone
First connection
Theô servicesô offeredô dependô onô theô network,ô theô SIMô cardô andô theô compatibilityô ofô theô Bluetoothô telephoneô used.
Consult ô your ô telephone's ô manual ô and ô your ô operator ô to ô find ô out ô which ô services ô are ô available ô to ô you.
Activate
ô the ô telephone's ô Bluetooth ô function ô and ô
ensure that
it is "visible to all" (refer to the telephone
user
ô guide). Press MENU. A
ô
window ô is ô displayed ô "Search in progressãÎ".
Select
ô the ô telephone ô to ô be ô connected ô
from
ô the ô list. ô Only ô one ô telephone ô can ô
be
ô connected ô at ô a ô time.
Select "Search for a device".
For
ô safety ô reasons ô and ô because ô they ô require ô prolonged ô attention ô on ô the ô part ô of ô the ô driver, ô the ô operations ô for ô pairing ô of ô the ô Bluetooth ô mobile ô
telephone
ô with ô the ô Bluetooth ô hands-free ô system ô of ô your ô audio ô system ô must ô be ô carried ô out ô with ô the ô
vehicle stationary
ô and ô the ô ignition ô on.
Visit
ô www.citroen.co.uk ô for ô more ô information ô (compatibility, ô additional ô help, ô ...).
Select "Bluetooth connection "
ô and ô
confirm.
Page 322 of 328

320ô
Deactivatingô theô passengerô
airbag...................................... 124
Deadlocking
ô
................................. 66
Defrosting
ô
.................................... 56
Diesel
ô additive ô level ô
................... 174
Diesel
ô engine ô pre-heat ô warning ô
lamp
ô
.......................................... 26
Dimensions
ô
................................ 225
Dipped
ô beam ô
............... 78,
ô 196, ô 198
Dipstick
ô
................................ 29,
ô 172
Directional
ô lighting ô
................. 85,
ô 86
d
irection indicators
ô
...81,
ô 117, ô 196, ô 197, ô 200
d
oors ô
........................................... 73
Doors
ô emergency ô control ô
............ 70d
oors, rear.................................. 11 6
d
oor trays ô
.................................... 92
Dynamic
ô emergency ô braking ô
..... 132
Dynamic
ô stability ô
control (
d SC) ô
........................... 11
9
EBA
ô
(Emergency ô braking ô
assistance)
ô
.............................. 11
8
Eco-driving
ô
.................................. 10
Eco-driving
ô (advice) ô
..................... 10
Economical
ô driving ô ô
..................... 10
Economy
ô mode.......................... 209
Electric
ô window ô controls ô
.............. 75
Electronic
ô brake ô force ô distribution ô
(E
b F d ) ô
..................................... 11
8
Electronic
ô engine ô
immobiliser
ô
....................... 68,
ô 129
Electronic
ô gearbox ô
system
ô
...... 10,
ô 139, ô 149, ô 176, ô 208
Emergency
ô boot ô release.............. 74
Emergency
ô braking ô
system
ô
..................................... 11
8Emergency
ô call ô .......... 120, ô 227, ô 228
Emergency ô warning ô
lamps
ô
.......................................11
7
Emissions
ô control ô
system,
ô SCR ô
............................. 24
eMyW
ay ô
............................... 41,
ô 229
Energy
ô economy ô
mode....................................... 209
Engine
ô compartment ô
......... 170,
ô 171
Engine
ô compartment ô
fusebox
ô
................................... 202
Engine,
ô
d
iesel........ 26, ô 166, ô 168, ô 171, ô 221
Engine
ô oil ô
................................... 172
Engine
ô oil ô level ô indicator ô
...... 29,
ô 172
Engine,
ô petrol ô
............ 166,
ô 170, ô 217
Engines.............................. 217,
ô 221
Environment
ô
.......................... 10,
ô 68
Equipment
ô settings ô
.... 35,
ô 37, ô 41, ô 42Gearbox,
ô
automatic ô .......... 10, ô 142, ô 176, ô 208
Gearbox,
ô
manual
ô
.............. 10,
ô 138, ô 149, ô 176
Gear
ô efficiency ô indicator ô
............ 146
Gear lever
ô
.................................... 10
Gear
ô lever, ô automatic ô
gearbox................................... 142
Gear
ô lever, ô manual ô gearbox ô
...... 138
Glove
ô box ô
.................................... 93
G.P
.S. ô
........................................ 238
Grab
ô handles ô
............................... 92
Guidance
ô
........................... 236,
ô 243
E Filling
ô with ô fuel ô
.................... 165-167
Fitting
ô a ô wheel ô
........................... 192
Fitting
ô roof ô bars.......................... 210
Fittings,
ô boot ô
.............................. 100
Fitting
ô speakers ô
......................... 214
Flashing
ô
indicators
ô
...........81,
ô 117, ô 197, ô 199
Foglamps,
ô rear ô
.................... 80,
ô 200
Front
ô foglamps....... 80, ô 86, ô 196, ô 199
Front seats ............................. 57,
ô 58
Fuel...................................... 10,
ô 166
Fuel
ô consumption ô
........................ 10
Fuel
ô filler ô flap ô
..................... 165,
ô 167
Fuel
ô gauge................................. 165
Fuel
ô tank ô
............................ 165,
ô 167
Fusebox,
ô dashboard ô
.................. 202
Fuses
ô
......................................... 202
F
H
Halogen
ô headlamps................... 196
Hands-free
ô kit ô
.................... 252,
ô 301
Hazard
ô warning ô lamps ô
................11
7
Headlamp
ô adjustment.................. 84
Headlamps,
ô
directional
ô
................... 84,
ô 85, ô 196
Headlamp
ô wash ô
........................... 88
Head
ô restraints, ô front ô
................... 59
Head
ô restraints, ô rear ô
.................... 61
Heated
ô seats ô
............................... 59
Heating
ô
............................ 10,
ô 49, ô 50
Height
ô and ô reach ô adjustment, ô
steering
ô wheel ô
.......................... 64
Hill start assist
ô
........................... 145
Hooks
ô
........................................ 101
Ignition
ô
....................................... 131
Indicators,
ô direction ô
............1
17, ô 197
Indicator
ô lamps, ô status................. 26
Inflating
ô accessories ô
(using
ô the ô kit) ô
.......................... 184
Inflating
ô tyres ô
............................... 10
I G
aLPHabETICaL IndEx
Page 324 of 328

322ô
Regenerationô ofô theô particleô emissionsô filter ô ........................ 175
Reinitialising
ô the ô electric ô
windows
ô
.................................... 75
Reinitialising
ô the ô remote ô
control
ô
....................................... 67
Remote
ô control ô
................ 65,
ô 66, ô 68
Removable
ô screen ô
(snow
ô shield) ô
.......................... 210
Removing
ô a ô wheel ô
..................... 192
Removing
ô the ô mat ô
....................... 98
Repair
ô kit, ô puncture ô
................... 184
Replacing
ô bulbs ô
................. 196,
ô 200
Replacing
ô fuses ô
......................... 202
Replacing
ô the ô air ô filter ô
................ 175
Replacing
ô the ô oil ô filter ô
................ 175
Replacing
ô the ô passenger ô
compartment
ô filter ô
................... 175
Replacing
ô wiper ô blades ô
....... 89,
ô 209
Resetting
ô the ô service ô indicator ô
.... 31
Resetting
ô the ô trip ô recorder ô
........... 32
Rev counter
ô
............................ 12-15
Reversing
ô lamps ô
........................ 200
Risk
ô areas ô (update) ô
................... 240
Roof bars
ô
................................... 210
Roof
ô blind ô
.................................... 77
Routine
ô checks ô
.................. 175,
ô 176
Running
ô out ô of ô fuel ô (Diesel) ô
....... 168Screenwash, front
........................ 88
SCR (Selective Catalytic
Reduction)
ô
.............................. 177
SCR
ô system ô
............................... 177
Seat
ô adjustment..................... 57, ô 58
Seat belts .................... 109,
ô 121-123
Seat, rear bench
ô
.......................... 61
Seats, electric
ô
.............................. 58
Seats, rear
ô
................................... 61
Selector lever
, electronic
gearbox
ô system ô
.............. 139,
ô 176
Serial
ô number, ô vehicle ô
............... 226
Service
ô indicator ô
.......................... 30
Service
ô warning ô light ô
................... 19
Servicing
ô
...................................... 10
Setting
ô the ô clock ô
........ 32,
ô 35, ô 37, ô 42
Short-cut
ô menus ô
........................ 234
Sidelamps
ô
...... 78,
ô 81, ô 196, ô 198, ô 200
Side
ô repeater ô
............................. 199
Ski
ô flap ô
......................................... 99
Snow chains
ô
.............................. 195
Spare wheel ............................... 189
Speakers
ô (fitting) ô
....................... 214
Speed
ô limiter...................... 155, ô 156
Speedometer
ô
.......................... 12-14
Spotlamps,
ô side ô
................... 83,
ô 199
Start
ô
........................................... 206
Starting
ô the ô engine ô
.................... 129
Starting
ô the ô vehicle ô
.... 129,
ô 139, ô 142
Steering
ô mounted ô controls ô
....232,
ô 287
Stopping
ô the ô
vehicle
ô
.................... 129,
ô 139, ô 142
Stop & Start
ô
............ 46,
ô 53, ô 56, ô 149,
165,
ô 169, ô 175, ô 206
Storage
ô
............... 92,
ô 93, ô 95-97, ô 100
Storage
ô compartments ô
.......... 92,
ô 95
Storage
ô drawer ô
............................ 98
Storage
ô net ô
................................ 100Stowing
ô rings ô ............................. 100
Sun visor ...................................... 93
Switching
ô off ô the ô engine ô
............ 129
Synchronising
ô the ô remote ô
control
ô
....................................... 67
Synthesiser
, voice...................... 246
System,
ô navigation ô
.................... 236
T T
able ô of ô weights ô
................. 217,
ô 221
Tables
ô of ô engines............... 217, ô 221
Tables of fuses ........................... 202
Tank,
ô
AdBlueôÛô additiveô ....... 177,ô 181
Tank,
ô
fuel
ô ................................... 167
T
echnical
ô
data.................... 217, ô 221
Telephone
ô
.......................... 252,
ô 256
Temperature
ô
control ô
for
ô
heated
ô
seats ô
........................ 59
T
emporary
ô
tyre ô repair ô kit ô
............ 184
T
icket
ô
holder
ô
................................ 92
TMC
ô
(Traffic
ô
info) ô
....................... 249
T
ools
ô
.......................................... 189
T
orch
ô
.......................................... 102
T
otal
ô
distance
ô recorder ô
................ 32
T
owbar
ô
....................................... 213
T
owed
ô
loads....................... 217, ô 221
Towing
ô
another ô vehicle ô
............... 2
11
Traction control (
a SR) ô
................ 11
9
Traffic
ô
information ô
(T
a
)
ô
......................... 250,
ô 263, ô 290
Traffic
ô
information ô (TMC) ô
... 249,
ô 250
Trailer
ô
........................................ 213
T
rajectory
ô
control ô
systems
ô
................................... 11
9
Trip
ô
computer
ô
......................... 43-46
T
rip
ô
distance
ô
recorder ô
.................. 32
T
yre pressures ô
........................... 226
Safety
ô
for
ô
children.................75,
ô
116
Satellite
ô
navigation
ô
system
ô
.......... 41
Screen,
ô
colour
ô
and
ô
mapping
ô
.............. 42,
ô
45,
ô
233,
ô
274
Screen
ô
menu
ô
map
ô
.......274,
ô
311-313
Screen,
ô
monochrome
ô
.....35,
ô
37,
ô
311
Screen,
ô
multifunction
ô
(with
ô
audio
ô
equipment)............ 35,
ô
37,
ô
41,
ô
288
S
aLPHabETICaL IndEx