key Citroen C4 RHD 2015 2.G Owner's Guide
[x] Cancel search | Manufacturer: CITROEN, Model Year: 2015, Model line: C4 RHD, Model: Citroen C4 RHD 2015 2.GPages: 328, PDF Size: 12.72 MB
Page 184 of 328
1010
182ô
Recommendations on storage
AdBlueôÛô freezesô at ô about ô -1 1ô¯C ô and ô deteriorates
ô above ô 25ô¯C. ô It ô is ô recom -
mended
ô
that
ô
bottles
ô
be
ô
stored
ô
in
ô
a
ô
cool
ô
area
ô
and
ô
protected
ô
from
ô
direct
ô
sunlight.
Under
ô
these
ô
conditions,
ô
the
ô
additive
ô
can
ô
be
ô
kept ô for ô at ô least ô a ô year.
If
ô
the
ô
additive
ô
has
ô
frozen,
ô
can
ô
be
ô
used
ô
once
ô
it
ô
has ô completely ô thawed ô out.
Never
ô
store
ô
bottles
ô
of
ô
AdBlueôÛ in
your
ô
vehicle. Procedure
Before
ô
topping-up,
ô
ensure
ô
that
ô
the
ô
ve
-
hicle ô
is
ô
parked
ô
on
ô
a
ô
flat
ô
and
ô
level
ô
sur
-
face.
In ô
wintry
ô
conditions,
ô
ensure
ô
that
ô
the
ô
temperature
ô
of
ô
the
ô
vehicle
ô
is
ô
above
ô
-1
1ô¯C. ô
Otherwise,
ô
by
ô
freezing,
ô
the
ô
AdBlueôÛô cannot
ô be ô poured ô into ô its ô tank. ô Park
ô your ô vehicle ô in ô a ô warmer ô area ô for ô
a
ô
few
ô
hours
ô
to
ô
allow
ô
the
ô
top-up
ô
to
ô
be
ô
carried
ô
out.
F
ô
Switch
ô
of
f ô
the
ô
ignition
ô
and
ô
remove
ô
the
ô
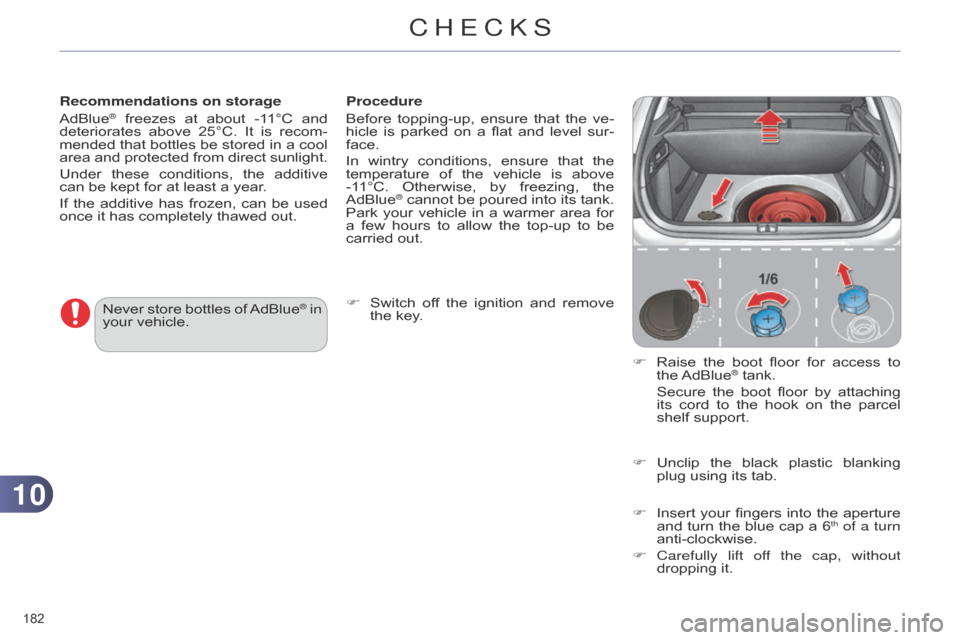
key. F
ô
Raise
ô
the
ô
boot
ô
floor
ô
for
ô
access
ô
to
ô
the
ô
AdBlueôÛô tank.
ô Secure
ô
the
ô
boot
ô
floor
ô
by
ô
attaching
ô
its
ô
cord
ô
to
ô
the
ô
hook
ô
on
ô
the
ô
parcel
ô
shelf
ô
support.
F
ô
Unclip
ô
the
ô
black
ô
plastic
ô
blanking
ô
plug
ô
using
ô
its ô tab.
F
ô
Insert
ô
your
ô
fingers
ô
into
ô
the
ô
aperture
ô
and
ô
turn
ô
the
ô
blue
ô
cap
ô
a
ô
6th of a turn
anti-clockwise.
F
Carefully
lift off the cap, without
dropping
ô
it.
CHECKS
Page 185 of 328
1010
183ô
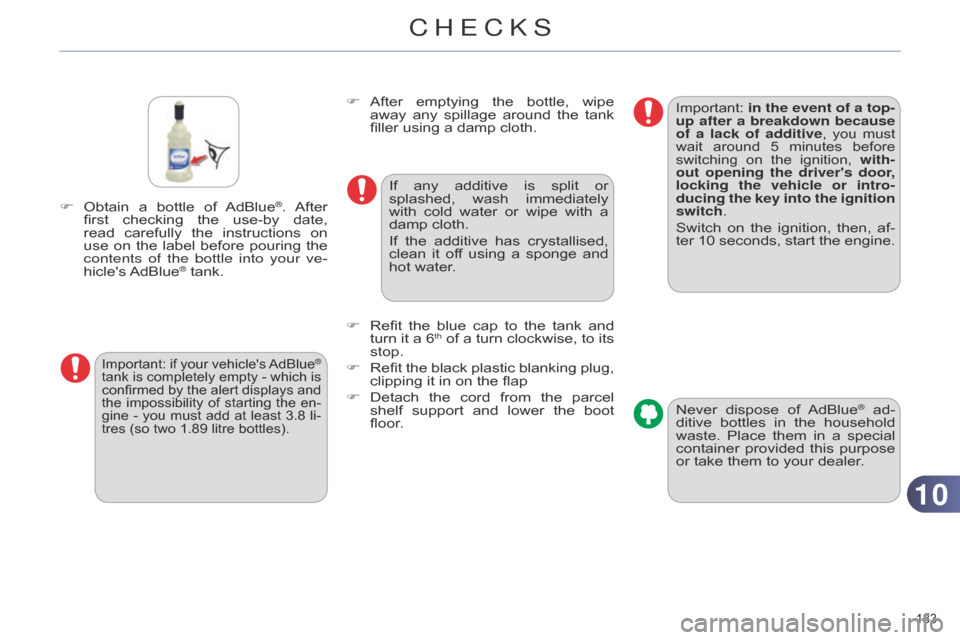
Fô Obtainô a ô bottle ô of ô AdBlueôÛ.ô Afterô first
ô checking
ô the
ô use-by
ô date, ô
read
ô
carefully
ô
the
ô
instructions
ô
on
ô
use
ô
on
ô
the
ô
label
ô
before
ô
pouring
ô
the
ô
c
ontents of the bottle into your ve
-
hicle's
ô
AdBlueôÛô tank.
Important:ô if ô your ô vehicle's ô AdBlueôÛ
tank
ô is
ô completely
ô emptyô
-
ô which
ô is ô
confirmed
ô
by
ô
the
ô
alert
ô
displays
ô
and
ô
the
ô
impossibility
ô
of
ô
starting
ô
the
ô
en
-
gineô -
ô
you
ô
must
ô
add
ô
at
ô
least
ô
3.8ô
li-
tres
ô
(so
ô
two
ô
1.89
ô
litre
ô
bottles).
Fô After ô emptying ô the ô bottle, ô wipe ô away
ô any ô spilla ge ô around ô the ô tank ô
filler
ô using ô a ô damp ô cloth.
If
ô
any
ô
additive
ô
is
ô
split
ô
or
ô
splashed,
ô
wash
ô
immediately
ô
with
ô
cold
ô
water
ô
or
ô
wipe
ô
with
ô
a
ô
damp
ô cloth.
If
ô
the
ô
additive
ô
has
ô
crystallised,
ô
clean
ô
it
ô
of
f ô
using
ô
a
ô
sponge
ô
and
ô
hot
ô water.
F
ô
Refit
ô
the
ô
blue
ô
cap
ô
to
ô
the
ô
tank
ô
and
ô
turn
ô
it
ô
a
ô
6thô ofô a ô turn ô clockwise, ô to ô its ô stop.
F
ô
Refit
ô
the
ô
black
ô
plastic
ô
blanking
ô
plug,
ô
clipping
ô
it
ô
in ô on ô the ô flap
F
ô
Detach
ô
the
ô
cord
ô
from
ô
the
ô
parcel
ô
shelf
ô
support
ô
and
ô
lower
ô
the
ô
boot
ô
floor
. Never
ô
dispose
ô
of
ô
AdBlueôÛô ad-
ditive
ô bottles
ô in
ô the
ô household ô
waste.
ô
Place
ô
them
ô
in
ô
a
ô
special
ô
container
ô
provided
ô
this
ô
purpose
ô
or
ô
take
ô
them
ô
to
ô
your
ô
dealer.
Important:ô in the event of a top-
up after a breakdown because
of a lack of additive,
ô
you
ô
must
ô
wait
ô
around
ô
5
ô
minutes
ô
before
ô
switching
ô
on
ô
the
ô
ignition,
ô
with
-
out opening the driver's door,
locking the vehicle or intro-
ducing the key into the ignition
switch.
Switchô on ô the ô ignition, ô then, ô af -
ter ô 10 ô seconds, ô start ô the ô engine.
CHECKS
Page 214 of 328
1111
212ô
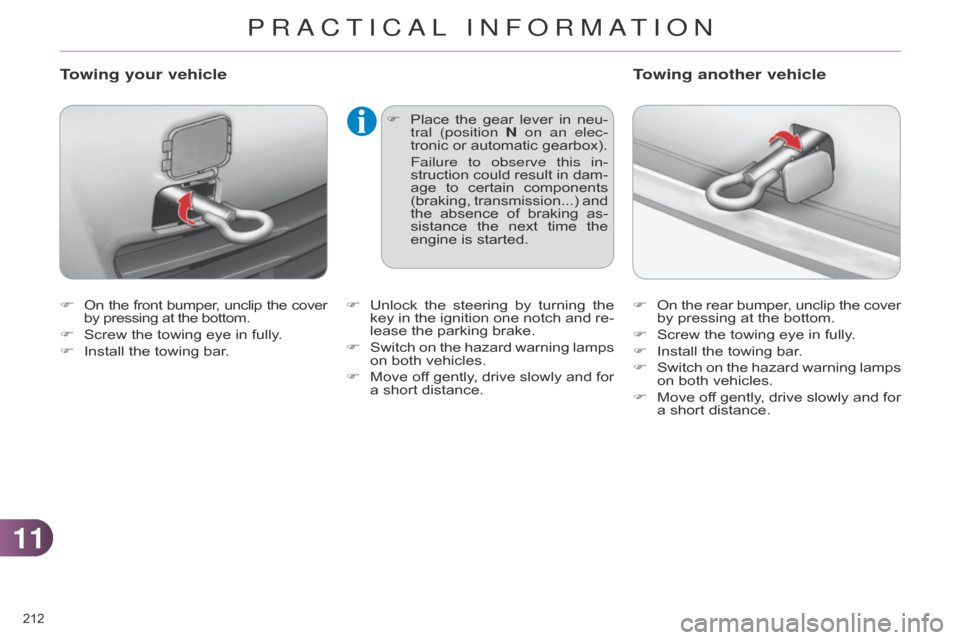
Fô Onô the ô front ô bumper , ô unclip ô the ô coverô by
ô pressing ô at ô the ô bottom.
F
ô
Screw
ô the ô towing ô eye ô in ô fully.
F
ô
Install
ô the ô towing ô bar.
Towing your vehicle
Fô Placeô the ô gear ô lever ô in ô neu -
tral (position N on an elec-
tronic
ô or ô automatic ô gearbox).
Failure to observe this in
-
struction
ô
could
ô
result
ô
in
ô
dam
-
age
ô
to
ô
certain
ô
components
ô
(braking,
ô
transmission...)
ô
and
ô
the
ô
absence
ô
of
ô
braking
ô
as
-
sistance
ô
the
ô
next
ô
time
ô
the
ô
engine
ô is ô started. F
ô
On
ô
the
ô
rear
ô
bumper
, ô
unclip
ô
the
ô
coverô by
ô pressing ô at ô the ô bottom.
F
ô
Screw
ô the ô towing ô eye ô in ô fully.
F
ô
Install
ô the ô towing ô bar.
F
ô
Switch
ô
on
ô
the
ô
hazard
ô
warning
ô
lamps
ô
on
ô both ô vehicles.
F
ô
Move
ô
of
f ô
gently
, ô
drive
ô
slowly
ô
and
ô
for
ô
a
ô short ô distance.
Towing another vehicle
Fô Unlockô the ô steering ô by ô turning ô the ô key
ô in ô the ô ignition ô one ô notch ô and ô re -
lease
ô the ô parking ô brake.
F
ô
Switch
ô
on
ô
the
ô
hazard
ô
warning
ô
lamps
ô
on
ô both ô vehicles.
F
ô
Move
ô
of
f ô
gently
, ô
drive
ô
slowly
ô
and
ô
for
ô
a
ô short ô distance.
PRACTICAL INFORMATION
Page 258 of 328
06
256
USING THE TELEPHONE
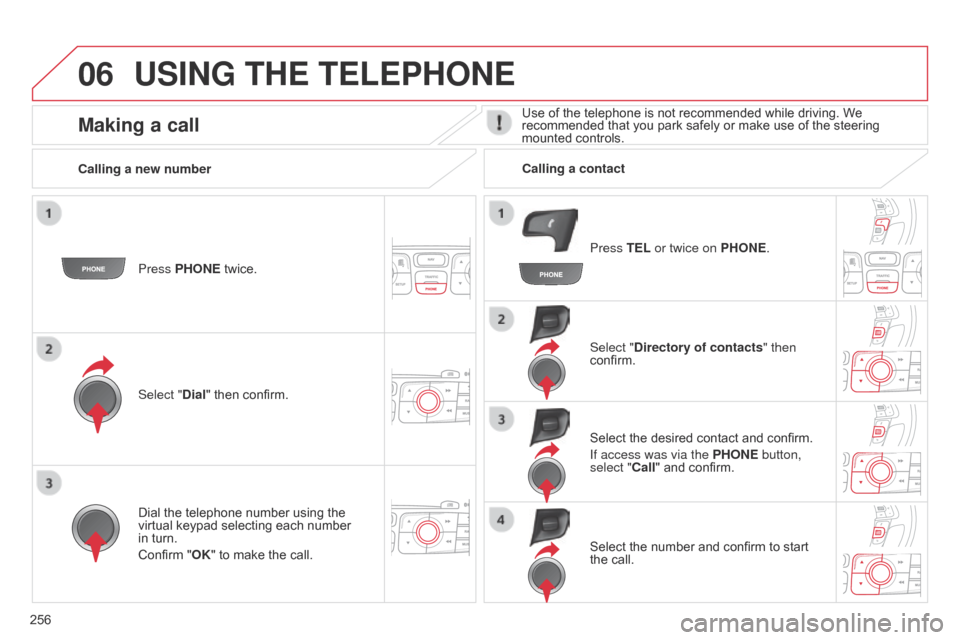
Press PHONEô twice.
Select " Dial" ô then ô confirm. Select "Directory of contacts" then
confirm.
Dial
ô the ô telephone ô number ô using ô the ô
virtual
ô keypad ô selecting ô each ô number ô
in
ô turn.
Confirm
ô "OK" ô to ô make ô the ô call. Press TEL or twice on PHONE.
Calling a new number
Calling a contact
Select ô the ô desired ô contact ô and ô confirm.
If access was via the PHONE button,
select "Call"
ô and ô confirm.
Select
ô the ô number ô and ô confirm ô to ô start ô
the
ô call.
Making a callUseô ofô theô telephoneô isô notô recommendedô whileô driving.ô Weô recommendedô that ô you ô park ô safely ô or ô make ô use ô of ô the ô steering ô
mounted
ô controls.
Page 261 of 328
06
259
USING THE TELEPHONE
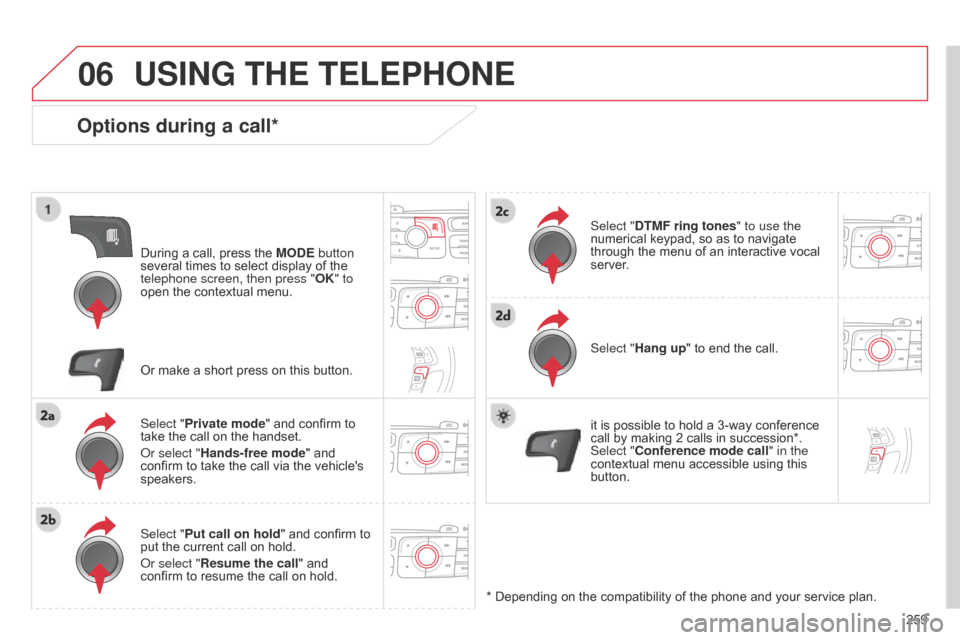
Options during a call*
Duringô aô call,ô pressô theô MODE button
several ô times ô to ô select ô display ô of ô the ô
telephone screen, then press "OK
" to
open
ô the ô contextual ô menu.
Select "Private mode"
ô and ô confirm ô to ô
take
ô the ô call ô on ô the ô handset.
o
r select "Hands-free mode" ô and ô
confirm
ô to ô take ô the ô call ô via ô the ô vehicle's ô
speakers.
Select "
Put call on hold "
ô and ô confirm ô to ô
put
ô the ô current ô call ô on ô hold.
o
r select "Resume the call" ô and ô
confirm
ô to ô resume ô the ô call ô on ô hold. Select "DTMF ring tones
" to use the
numerical ô keypad, ô so ô as ô to ô navigate ô through
ô the ô menu ô of ô an ô interactive ô vocal ô server
.
Select "Hang up"
ô to ô end ô the ô call.
*
ô Depending ô on ô the ô compatibility ô of ô the ô phone ô and ô your ô service ô plan.
it
ô is ô possible ô to ô hold ô a ô 3-way ô conference ô
call
ô by ô making ô 2 ô calls ô in ô succession*. ô
Select "
Conference mode call" in the
contextual
ô menu ô accessible ô using ô this ô
button.
Or
ô make ô a ô short ô press ô on ô this ô button.
Page 265 of 328
07
263
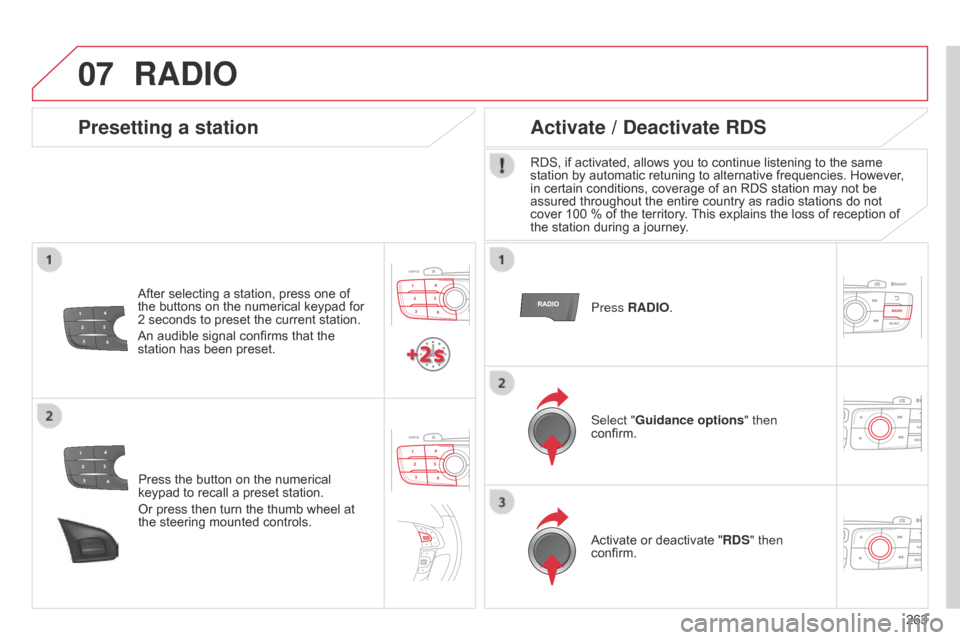
Press
ô
the
ô
button
ô
on
ô
the
ô
numerical
ô
keypad
ô
to
ô
recall
ô
a
ô
preset
ô
station.
Or
ô
press
ô
then
ô
turn
ô
the
ô
thumb
ô
wheel
ô
at
ô
the
ô
steering
ô
mounted
ô
controls.
Presetting a station
Afterô selectingô aô station,ô pressô oneô ofô the
ô buttons ô on ô the ô numerical ô keypad ô for ô
2
ô seconds ô to ô preset ô the ô current ô station.
An
ô audible ô signal ô confirms ô that ô the ô
station
ô has ô been ô preset. Press RADIO.
Activate / Deactivate RDS
RDS,ô ifô activated,ô allowsô youô toô continueô listeningô toô theô sameô station
ô by ô automatic ô retuning ô to ô alternative ô frequencies. ô However, ô
in
ô certain ô conditions, ô coverage ô of ô an ô RDS ô station ô may ô not ô be ô
assured
ô throughout ô the ô entire ô country ô as ô radio ô stations ô do ô not ô
cover
ô 100 ô % ô of ô the ô territory. ô
This
ô explains ô the ô loss ô of ô reception ô of ô
the
ô station ô during ô a ô journey.
Select "Guidance options " then
confirm.
Activate
ô or ô deactivate ô "RDS" then
confirm.
RADIO
Page 269 of 328
08
267
MUSIC MEDIA PLAYERS
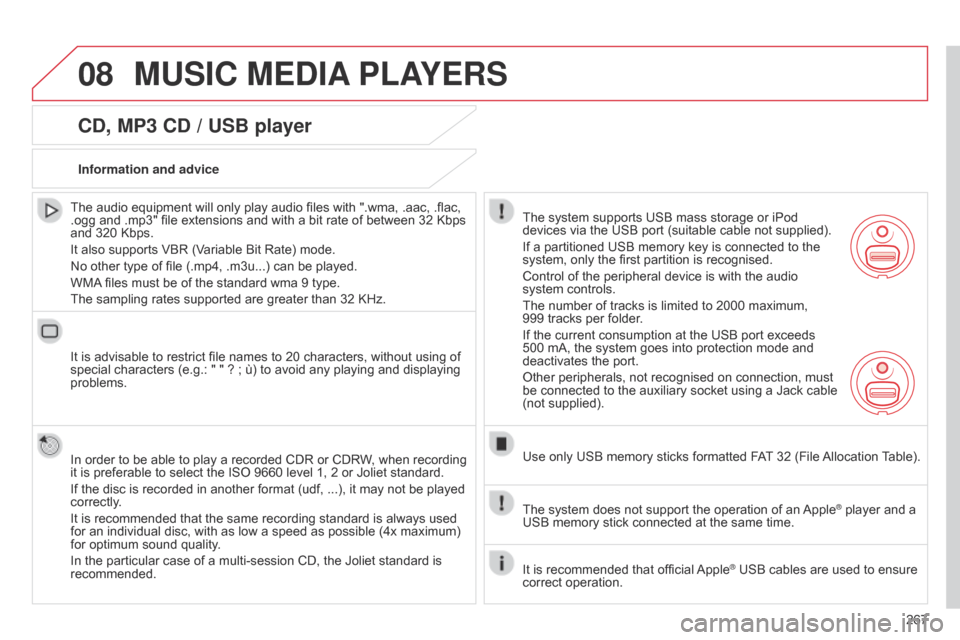
CD, MP3 CD / USB player
Theô audioô equipmentô willô onlyô playô audioô filesô withô ".wma,ô .aac,ô .flac,ô .ogg
ô and ô .mp3" ô file ô extensions ô and ô with ô a ô bit ô rate ô of ô between ô 32 ô Kbps ô
and
ô 320 ô Kbps.
It
ô also ô supports ô VBR ô (Variable ô Bit ô Rate) ô mode.
No
ô other ô type ô of ô file ô (.mp4, ô .m3u...) ô can ô be ô played.
WMA
ô
files ô must ô be ô of ô the ô standard ô wma ô 9 ô type.
The
ô sampling ô rates ô supported ô are ô greater ô than ô 32 ô KHz.
It
ô is ô advisable ô to ô restrict ô file ô names ô to ô 20 ô characters, ô without ô using ô of ô
special
ô characters ô (e.g.: ô " ô " ô ? ô ; ô û¿) ô to ô avoid ô any ô playing ô and ô displaying ô
problems.
In
ô order ô to ô be ô able ô to ô play ô a ô recorded ô CDR ô or ô CDRW, ô when ô recording ô
it
ô is ô preferable ô to ô select ô the ô ISO ô 9660 ô level ô 1, ô 2 ô or ô Joliet ô standard.
If
ô the ô disc ô is ô recorded ô in ô another ô format ô (udf, ô ...), ô it ô may ô not ô be ô played ô
correctly
.
It
ô is ô recommended ô that ô the ô same ô recording ô standard ô is ô always ô used ô
for
ô an ô individual ô disc, ô with ô as ô low ô a ô speed ô as ô possible ô (4x ô maximum) ô
for
ô optimum ô sound ô quality.
In
ô the ô particular ô case ô of ô a ô multi-session ô CD, ô the ô Joliet ô standard ô is ô
recommended.Information and advice
The
ô system ô supports ô USB ô mass ô storage ô or ô iPod ô
devices
ô via ô the ô USB ô port ô (suitable ô cable ô not ô supplied).
If
ô a ô partitioned ô USB ô memory ô key ô is ô connected ô to ô the ô
system,
ô only ô the ô first ô partition ô is ô recognised.
Control
ô of ô the ô peripheral ô device ô is ô with ô the ô audio ô
system
ô controls.
The
ô number ô of ô tracks ô is ô limited ô to ô 2000 ô maximum, ô
999
ô tracks ô per ô folder.
If
ô the ô current ô consumption ô at ô the ô USB ô port ô exceeds ô
500
ô mA, ô the ô system ô goes ô into ô protection ô mode ô and ô
deactivates
ô the ô port.
Other
ô peripherals, ô not ô recognised ô on ô connection, ô must ô
be
ô connected ô to ô the ô auxiliary ô socket ô using ô a ô Jack ô cable ô
(not
ô supplied).
Use
ô only ô USB ô memory ô sticks ô formatted ô FAT
ô
32 ô (File ô
Allocation
ô
T
able).
The
ô system ô does ô not ô support ô the ô operation ô of ô an ô
AppleôÛô playerô andô aô USB
ô
memory
ô
stick
ô
connected
ô
at
ô
the
ô
same
ô
time.
It
ô
is
ô
recommended
ô
that
ô
official
ô
AppleôÛô USBô cablesô areô usedô toô ensureô correct
ô
operation.
Page 304 of 328
05
Saisir code authentification
01
OK Del 23456789
_
302
USING THE TELEPHONE
Aô
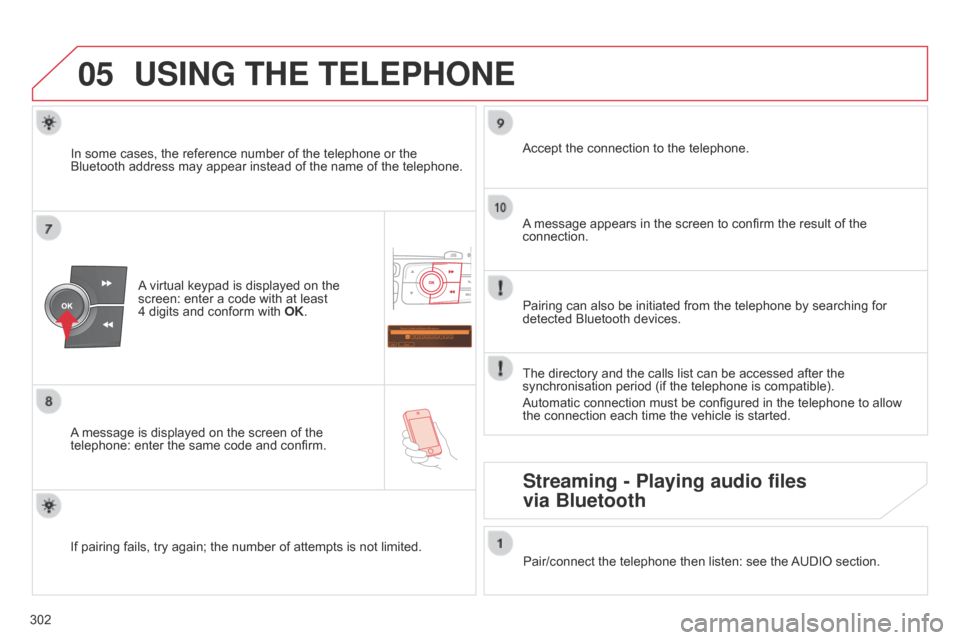
virtual ô keypad ô is ô displayed ô on ô the ô screen:
ô enter ô a ô code ô with ô at ô least ô
4ô digits
ô and ô conform ô with ô
OK
.
A
ô
message
ô
is ô displayed ô on ô the ô screen ô of ô the ô
telephone:
ô
enter ô the ô same ô code ô and ô confirm. A
ô
message ô appears ô in ô the ô screen ô to ô confirm ô the ô result ô of ô the ô
connection.
Pairing
ô can ô also ô be ô initiated ô from ô the ô telephone ô by ô searching ô for ô
detected
ô Bluetooth ô devices.
Accept
ô the ô connection ô to ô the ô telephone.
If
ô
pairing
ô
fails, ô try ô again; ô the ô number ô of ô attempts ô is ô not ô limited.The
ô directory ô and ô the ô calls ô list ô can ô be ô accessed ô after ô the ô
synchronisation
ô period ô (if ô the ô telephone ô is ô compatible).
Automatic
ô connection ô must ô be ô configured ô in ô the ô telephone ô to ô allow ô
the
ô connection ô each ô time ô the ô vehicle ô is ô started.
In
ô
some
ô
cases, ô the ô reference ô number ô of ô the ô telephone ô or ô the ô
Bluetooth
ô
address ô may ô appear ô instead ô of ô the ô name ô of ô the ô telephone.
Pair/connect ô the ô telephone ô then ô listen: ô see ô the ô
AUDIO
ô section.
Streaming - Playing audio files
via Bluetooth
Page 309 of 328
05
307
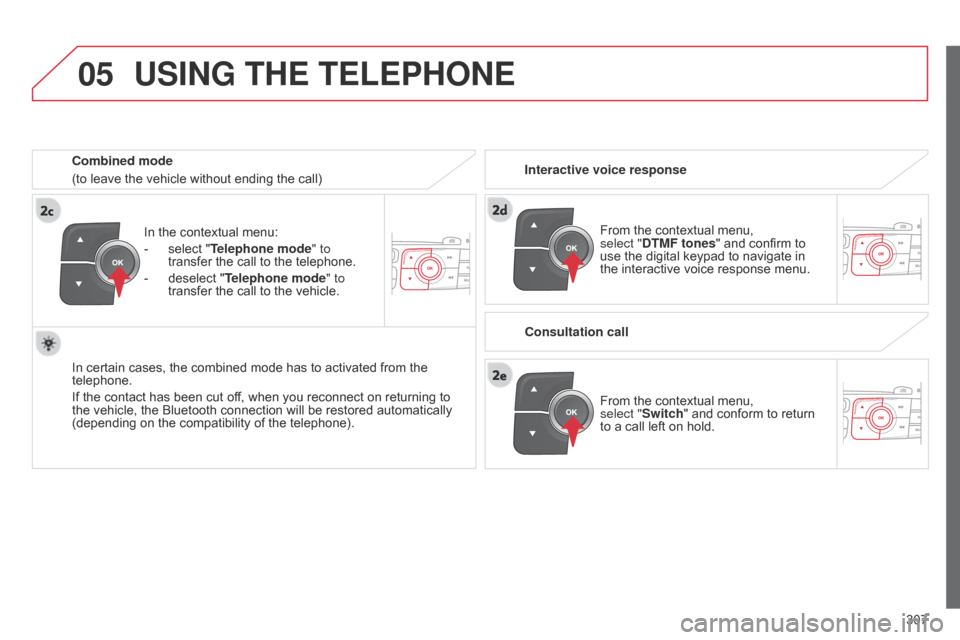
In
ô
the
ô
contextual
ô
menu:
-
ô
select
ô
"Telephone mode
" to
transfer
ô
the
ô
call
ô
to
ô
the
ô
telephone.
-
ô
deselect
ô
"Telephone mode" to
transfer
ô
the
ô
call
ô
to
ô
the
ô
vehicle.
In
ô
certain
ô
cases,
ô
the
ô
combined
ô
mode
ô
has
ô
to
ô
activated
ô
from
ô
the
ô
telephone.
If
ô
the
ô
contact
ô
has
ô
been
ô
cut
ô
off,
ô
when
ô
you
ô
reconnect
ô
on
ô
returning
ô
to
ô
the
ô
vehicle,
ô
the
ô
Bluetooth
ô
connection
ô
will
ô
be
ô
restored
ô
automatically
ô
(depending
ô
on
ô
the
ô
compatibility
ô
of
ô
the
ô
telephone).
Combined mode
(to
ô
leave
ô
the
ô
vehicle
ô
without
ô
ending
ô
the
ô
call)
USING THE TELEPHONE
Fromô theô contextualô menu,ô select
"DTMF tones" ô and ô confirm ô to ô
use
ô the ô digital ô keypad ô to ô navigate ô in ô
the
ô interactive ô voice ô response ô menu.
From
ô the ô contextual ô menu, ô
select
"Switch" ô and ô conform ô to ô return ô
to
ô a ô call ô left ô on ô hold.
Interactive voice response
Consultation call
Page 323 of 328
321ô
Labels,ô identificationô .................. 226
Lamps, ô warning ô and ô
indicator
ô
........................ 16,
ô 25, ô 28
Level,
ô
AdBlueôÛô additiveô .............. 177
Level,
ô
brake
ô
fluid ô ....................... 173
Level,
ô
power
ô
steering ô fluid ô
......... 173
Levels
ô
and
ô
checks ô
.............. 170-174
Lighting
ô
bulbs
ô
(replacement)
ô
................. 196,
ô 200
Lighting
ô
control ô stalk ô
.............. 78,
ô 81 Oil
ô filter ô
...................................... 175o
il level ô
................................ 29,
ô 172
Opening ô the ô bonnet ô
................... 169
Opening
ô the ô boot ô
......................... 74
Opening
ô the ô doors ô
....................... 73
Opening
ô the ô panoramic ô
sunroof ô blind ô
............................. 77
Operation
ô indicator ô
lamps ô
............................ 25,
ô 26, ô 28
Inputs
ô
for
ô
audio ô
system
ô
...................... 94,
ô 271, ô 299
Installing
ô
speakers ô
..................... 214
Instrument
ô
panel ô lighting ô
............. 33
Instrument
ô
panels ô
............. 12-14,
ô 34
Instrument
ô
panel ô
screen
ô
.......................... 12-14,
ô 146
Intelligent
ô
T
raction ô Control ô
..........
11
9
Interior
ô
fittings
ô
........................ 92,
ô 93
Interior
ô
mood
ô
lighting ô
................... 91
IS
o
FI
xô
........................................
11
3
ISOFIX
ô
child
ô
seats ô
............... 1
12-114
ISOFIX
ô
mountings ô
......................
11
2
jJack
ô
........................................... 189
JACK
ô
socket
ô
................ 94,
ô 271, ô 299
K Keeping
ô
children ô safe ô
....... 103,
ô 104,
108, ô 110, ô 113, ô 114, ô 124
Key
ô
in
ô
ignition
ô
warning
ô
................................... 131
Key
ô
with
ô
remote ô
control
ô
................... 65,
ô 66, ô 68, ô 129
L Lightingô dimmer ô
................ 12-14,
ô 33
Lighting, ô guide-me ô home ô
....... 81,
ô 82
Lighting, ô interior ô
..................... 90,
ô 91
Loading ô
................................ 10,
ô 210
Load ô reduction ô mode ô
................. 209
Locating
ô your ô vehicle ô
................... 67
Locking
ô from ô the ô inside................ 69
Locking ô the ô boot ô
.......................... 74
Long
ô objects, ô transporting ô
........... 99
Luggage
ô retaining ô strap ô
............. 100
Main
ô beam ô
................... 78,
ô 196, ô 198
Maintenance ô
................................ 10
Map
ô reading ô lamps ô
...................... 90
Markings,
ô identification ô
.............. 226
Massage
ô function ô ô
....................... 60
Mat
............................................... 98
Menu, ô main ô
................................ 288
Mini fuel level
ô
............................. 165
Mirror
, rear view ô
........................... 64
Mirrors,
ô door ô
.................. 62,
ô 63, ô 152
Misfuel prevention ô
..................... 167
Motorway function
(direction ô indicators) ô
................
11
7
Mountings ô for ô ISOFIX ô seats ô
.......
11
2
MP3 ô CD ô
............................. 295,
ô 296
Music ô media ô players ô
.................. 266
M
N P
Paint
ô colour ô code ô
....................... 226
Panoramic
ô glass ô sunroof ô
............. 77
Parcel shelf, rear
ô
....................... 101
Parking
ô brake ô
.................... 138,
ô 176
Parking ô brake, ô electric ô
......... 18,
ô 132
Parking ô lamps ô
.............................. 81
Parking
ô sensors, ô front................ 163
Parking ô sensors, ô rear ô
................ 162
Parking
ô space ô sensor ô ô
............... 160
Particle
ô emission ô filter........ 174, ô 175
Passenger ô compartment ô filter.... 175
Personalisation ô
............................ 34
Player
, ô CD ô MP3 ô
................. 295,
ô 296
Port, ô USB..................... 94, ô 271, ô 297
Priming ô the ô fuel ô system ô
............. 168
Preheater
, d iesel ô
......................... 26
Protecting
ô children ô
............ 103,
ô 104,
108, ô 110, ô 112-114, ô 124
Puncture ô
.................................... 184
Navigation.......................... 235,
ô 236
Number
ô plate ô lamps ô
.................. 201Radio
ô
......................... 261,
ô 262, ô 289
Radio
ô pre-equipment ô
................. 214
Rear
ô screen ô (demisting) ô
.............. 56
Recharging
ô the ô battery ô
.............. 208
Reduction
ô of ô electrical ô load ô
....... 209
R
O Oil
ô change ô
................................. 172
Oil
ô consumption ô
......................... 172
aLPHabETICaL IndEx