open Citroen DS4 RHD 2011.5 1.G Workshop Manual
[x] Cancel search | Manufacturer: CITROEN, Model Year: 2011.5, Model line: DS4 RHD, Model: Citroen DS4 RHD 2011.5 1.GPages: 396, PDF Size: 12.14 MB
Page 239 of 396
237
Checks
Additive level (Diesel with
particle emissions filter
)
To p p i ng up
The reser voir must be topped up without delay
by a CITROËN dealer or a qualified workshop.
Used products
Avoid prolonged contact of used oil or fluids with the skin.
Most of these fluids are harmful tohealth or indeed very corrosive.
Do not discard used oil or fluids into sewers or onto the ground.
Take used oil to a CITROËN dealer or a qualified workshop (France) or to anauthorised waste disposal site.
�)Open the bonnet and secure it withthe stay. �)Open the screenwash reservoir filler cap. �)Take and pinch the level gauge to block its breather. �)Remove the gauge completely from
the reservoir to read the level in the
transparent section. �)Top up if necessary. �)Refit the filler cap to the reser voir and close the bonnet.
Specifi cation of the fl uid
To ensure optimum cleaning and to avoid
freezing, the fluid should never be topped up or
replaced by plain water. Accordin
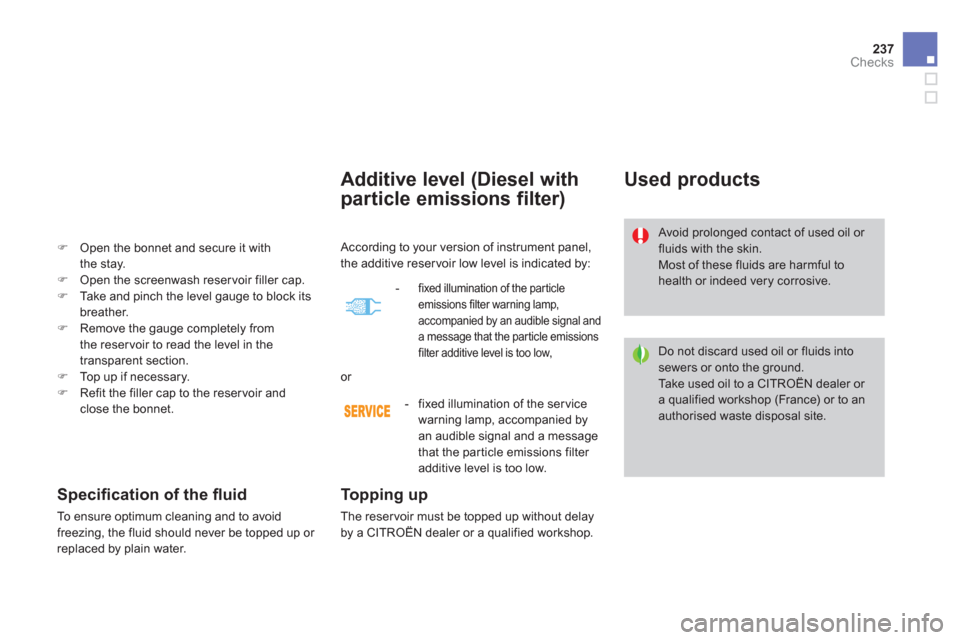
g to your version of instrument panel,
the additive reser voir low level is indicated by:
-fixed illumination of the particle emissions filter warning lamp, accompanied by an audible signal anda message that the particle emissionsfilter additive level is too low,
or
- fix
ed illumination of the servicewarning lamp, accompanied by
an au
dible signal and a message
that the par ticle emissions filter additive level is too low.
Page 251 of 396
249Practical information
Changing a wheel
Procedure for changing a faulty wheel for the spare wheel using the tools provided with the vehicle.
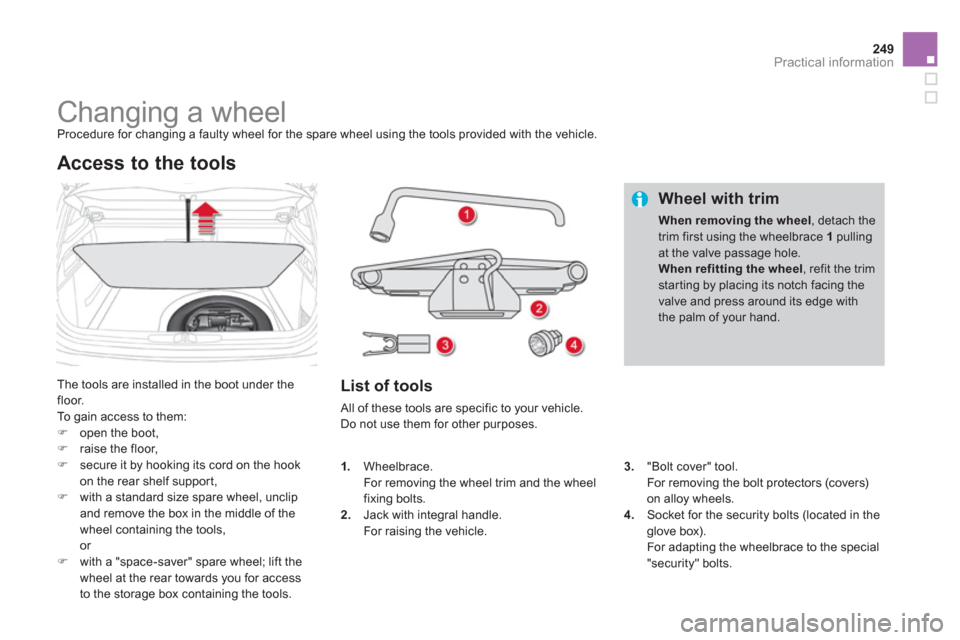
The tools are installed in the boot under the floor.
To gain access to them: �)open the boot, �)raise the floor,�)secure it by hooking its cord on the hook
on the rear shelf suppor t,
�)with a standard size spare wheel, unclip and remove the box in the middle of the
wheel containing the tools,
or �)with a "space-saver" spare wheel; lift the
wheel at the rear towards you for access
to the storage box containing the tools.
Access to the tools
List of tools
All of these tools are specific to your vehicle. Do not use them for other purposes.
Wheel with trim
When removing the wheel, detach thetrim first using the wheelbrace 1pulling at the valve passage hole.When refitting the wheel
, refit the trim starting by placing its notch facing the valve and press around its edge withthe palm of your hand.
3."Bolt cover" tool.
For removing the bolt protectors (covers)on alloy wheels.4.Socket for the security bolts (located in theglove box).
For adapting the wheelbrace to the special"security" bolts. 1
.Wheelbrace.
For removing the wheel trim and the wheel
fixing bolts.
2. Jack with integral handle.For raising the vehicle.
Page 263 of 396
261Practical information
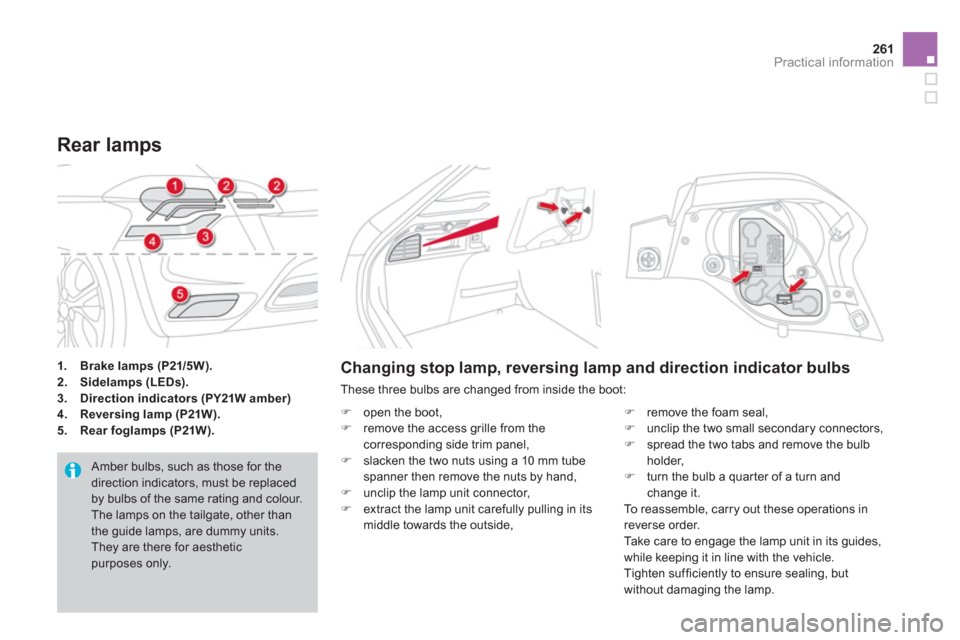
1.Brake lamps (P21/5W).2.Sidelamps (LEDs).3.Direction indicators (PY21W amber)4.Reversing lamp (P21W).5. Rear foglamps (P21W).
Rear lamps
Amber bulbs, such as those for thedirection indicators, must be replaced by bulbs of the same rating and colour. The lamps on the tailgate, other than the guide lamps, are dummy units. They are there for aestheticpurposes only.
Changing stop lamp, reversing lamp and direction indicator bulbs
These three bulbs are changed from inside the boot:
�)
open the boot,�)
remove the access grille from thecorresponding side trim panel, �)
slacken the two nuts using a 10 mm tube spanner then remove the nuts by hand,�)
unclip the lamp unit connector,�)
extract the lamp unit carefully pulling in its
middle towards the outside,
�) remove the foam seal,�)
unclip the two small secondary connectors,�)
spread the two tabs and remove the bulb holder, �)
turn the bulb a quarter of a turn andchange it.
To reassemble, carry out these operations in
reverse order.
Take care to en
gage the lamp unit in its guides,
while keeping it in line with the vehicle.
Tighten sufficiently to ensure sealing, but
without damaging the lamp.
Page 264 of 396
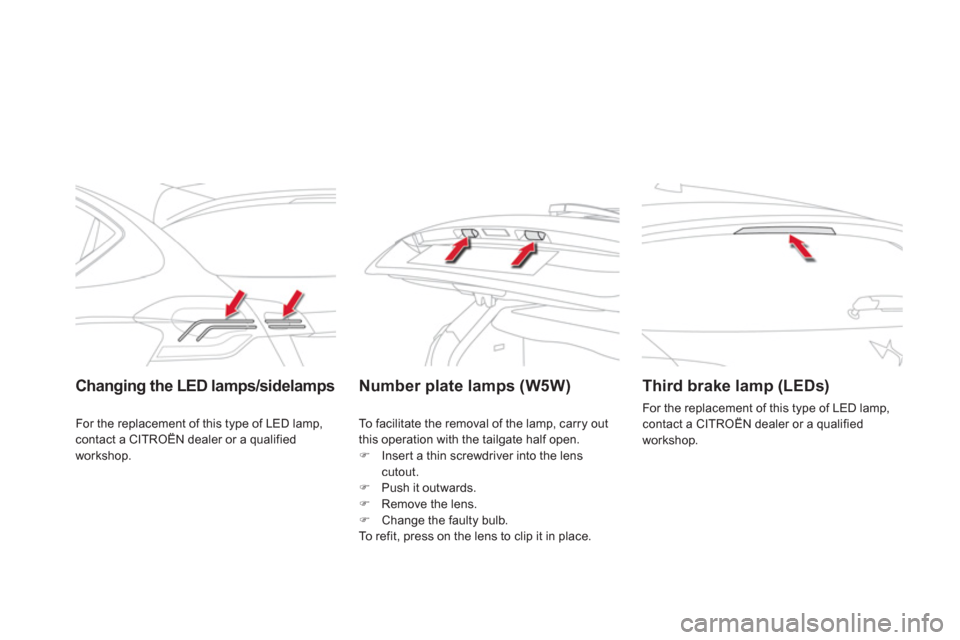
Changing the LED lamps/sidelamps Number plate lamps (W5W)
Third brake lamp (LEDs)
For the replacement of this type of LED lamp,contact a CITROËN dealer or a qualified
workshop. For the replacement of this type of LED lamp,contact a CITROËN dealer or a qualified
workshop. To
facilitate the removal of the lamp, carry out
this operation with the tailgate half open. �) Insert a thin screwdriver into the lenscutout. �)
Push it outwards. �)
Remove the lens. �)
Change the faulty bulb.
To refit, press on the lens to clip it in place.
Page 265 of 396
263Practical information
Changing a fuse
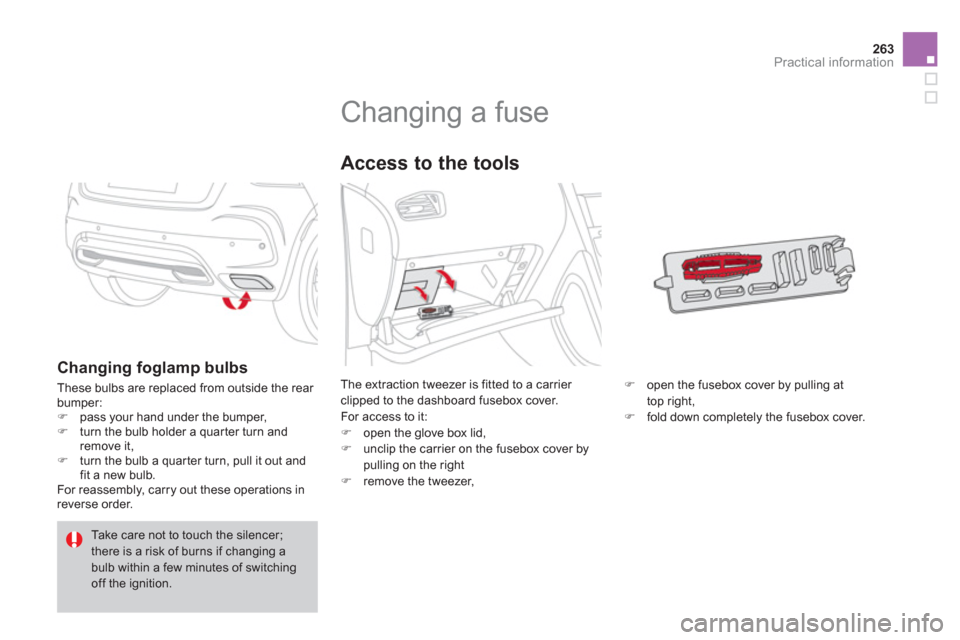
The extraction tweezer is fitted to a carrier clipped to the dashboard fusebox cover.
For access to it: �) open the glove box lid, �)
unclip the carrier on the fusebox cover bypulling on the right�)
remove the tweezer,
Access to the tools
�)
open the fusebox cover by pulling at
top right,�) fold down completely the fusebox cover.
Changing foglamp bulbs
These bulbs are replaced from outside the rear
bumper:
�)pass your hand under the bumper, �)turn the bulb holder a quar ter turn and remove it,�)turn the bulb a quar ter turn, pull it out and
fit a new bulb.
For reassembly, carry out these operations in
reverse order.
Take care not to touch the silencer;there is a risk of burns if changing abulb within a few minutes of switchingoff the ignition.
Page 272 of 396
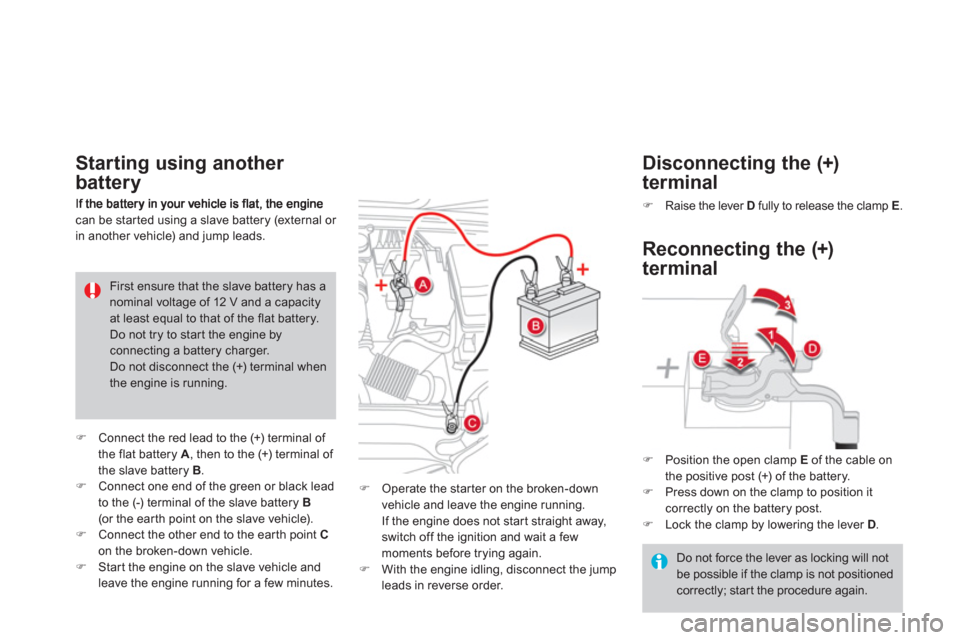
can be star ted using a slave battery (external or
in another vehicle
) and jump leads.
Starting using another
battery
�)Connect the red lead to the (+) terminal of
the flat battery A, then to the (+) terminal of
the slave battery B.�)Connect one end of the green or black lead
to the (-) terminal of the slave battery B(or the ear th point on the slave vehicle). �)Connect the other end to the ear th point Con the broken-down vehicle.�)Star t the engine on the slave vehicle andleave the engine running for a few minutes.
First ensure that the slave battery has anominal voltage of 12 V and a capacityat least equal to that of the flat battery.
Do not try to star t the engine by connecting a battery charger.
Do not disconnect the (+) terminal when the engine is running.
�)
Operate the star ter on the broken-down
vehicle and leave the engine running.
I
f the engine does not star t straight away, switch off the ignition and wait a few
moments before trying again.�) With the engine idling, disconnect the jumpleads in reverse order.
�)Position the open clamp Eof the cable on
the positive post (+) of the battery. �)Press down on the clamp to position itcorrectly on the battery post. �)Lock the clamp by lowering the lever D .
Reconnecting the (+)
term
inal
Disconnectin
g the (+)
terminal
�)Raise the lever D
fully to release the clamp E.
Do not force the lever as locking will not be possible if the clamp is not positioned
correctly; star t the procedure again.
Page 273 of 396

271Practical information
Charging the battery using
a battery charger
If the battery of your vehicle is flat or prior
to taking the vehicle out of ser vice for an extended period, you can charge the battery
using a battery charger.
For information on the specification of batterychargers compatible with your battery, refer to
a CITROËN dealer or a qualified workshop.
The Stop & Start battery does not haveto be disconnected for charging.
Reinitialisation after
reconnection
After any reconnection of the battery, switch on
the ignition and wait at least one minute before
starting, to allow time for the initialisation of theelectronic systems.
By referring to the corresponding sections, you should set or initialise the following systems yourself:
- one-touch electric windows,
- time and date,
- audio and navigation system settings.
It is recommended that the battery be disconnected if the vehicle is not be used for more than a month.
Check that no aler t message or warning lamp comes on after switching on the ignition.
However, if minor problems persist after carrying out these operations, contact a CITROËN dealer or a qualified workshop.
Before disconnecting
�)Go to the battery. �)Check that all of the openings - doors, boot... - are closed but not locked.�)Wait at least four minutes after switchingoff the ignition.
Charging
�)
Disconnect the (+)terminal. �)
Follow the instructions on use provided by
the manufacturer of the charger.�) Connect the red cable of the charger to the (+) post of the battery, then the black cable
to the (-) terminal.�) Once charging is complete, disconnect thecharger cables in reverse order.
The charging operation must be carried outin a well ventilated area and well away from naked flames and sources of sparks, so as to avoid any risk of explosion and fire. Do not try to charge a frozen battery; the
battery must first be thawed out to avoid any risk of explosion. If the battery hasfrozen, before charging, have it checkedby a CITROËN dealer or a qualified workshop, who will ensure that the internal components have not been damaged and that the casing is not cracked, which wouldintroduce the risk of a leak of toxic and corrosive acid.
Page 277 of 396
Practical information
Towing the vehicle
Procedure for having your vehicle towed or for towing another vehicle using a removable towing eye.
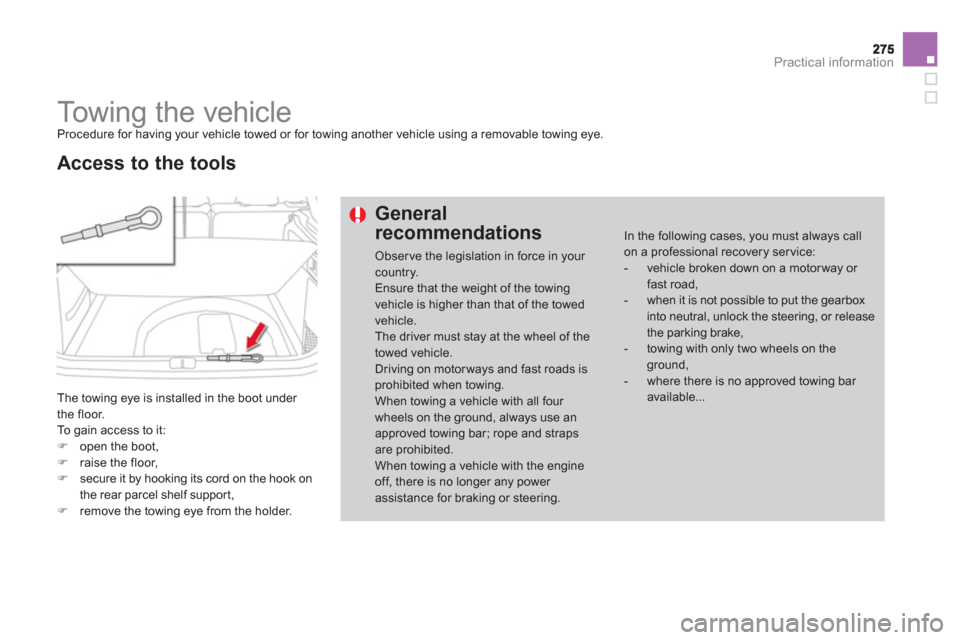
The towing eye is installed in the boot under
the floor.
To
gain access to it: �)open the boot, �)raise the floor,�)secure it by hooking its cord on the hook on
the rear parcel shelf suppor t,
�)remove the towing eye from the holder.
Access to the tools
General
recommendations
Obser ve the legislation in force in your country. Ensure that the weight of the towing vehicle is higher than that of the towedvehicle.The driver must stay at the wheel of thetowed vehicle. Driving on motorways and fast roads is prohibited when towing.When towing a vehicle with all four wheels on the ground, always use an approved towing bar; rope and straps are prohibited. When towing a vehicle with the engine off, there is no longer any power assistance for braking or steering.
In the following cases, you must always callon a professional recovery service:
- vehicle broken down on a motor way or fast road,
- when it is not possible to put the gearbox into neutral, unlock the steering, or releasethe parking brake,
- towing with only two wheels on the ground,
- where there is no approved towing bar available...
Page 298 of 396
01 FIRST STEPS
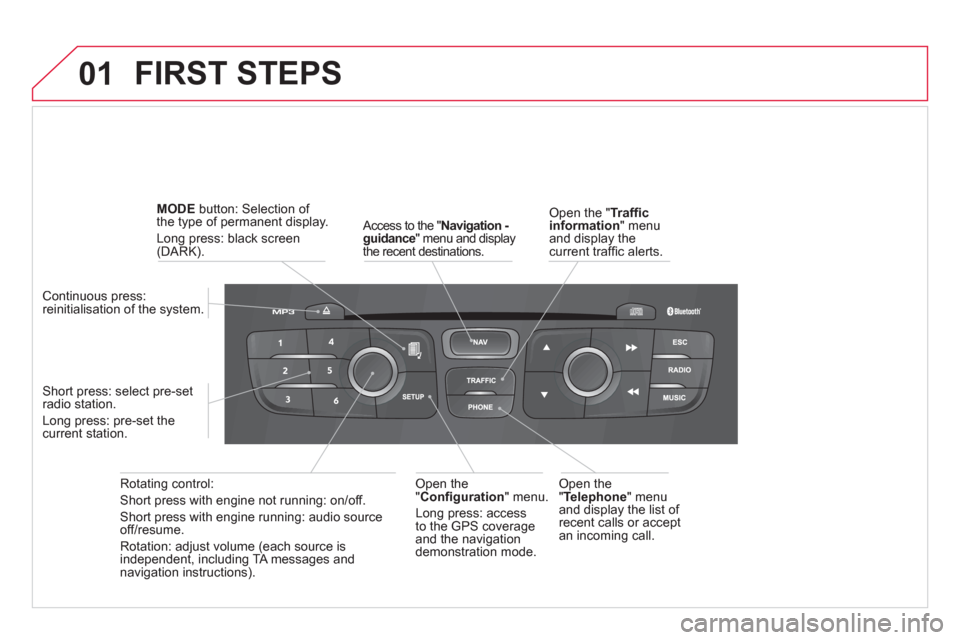
Access to the "Navigation - guidance" menu and displaythe recent destinations.
Rotating control:
Short press with engine not running: on/off.
Short press with engine running: audio source off/resume.
Rotation: ad
just volume (each source is
independent, including TA messages and
navigation instructions).
Continuous press:
reinitialisation of the system.
Short press: select pre-set
r
adio station.
Long press: pre-set thecurrent station.
MODE
button: Selection of
the type of permanent display.
Long press: black screen(DARK).
Open the "Telephone " menuand display the list of
recent calls or accept
an incoming call.
Open the
" Confi guration" menu.
Lon
g press: access
to the GPS coverage
and the navigationdemonstration mode.
Open the "Traffi c information " menu and display thecurrent traffi c alerts.
Page 299 of 396
297
01
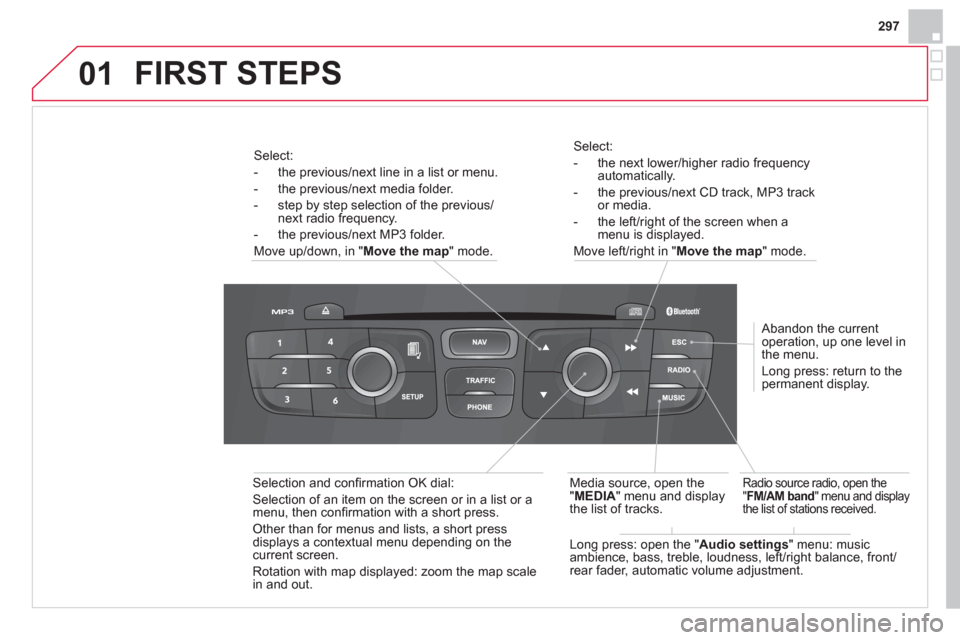
Select:
- the next lower/hi
gher radio frequencyautomatically.
- the previous/next CD track, MP3 track
or media.
- the le
ft/right of the screen when a menu is displayed.
Move le
ft/right in "Move the map " mode.
Abandon the current
operation, up one level in
the menu.
Long press: return to the
permanent displa
y.
Radio source radio, open the
"FM/AM band" menu and display
the list of stations received.
Long press: open the " Audio settings
" menu: music
ambience, bass, treble, loudness, left/right balance, front/rear fader, automatic volume adjustment.
Media source, o
pen the
"MEDIA" menu and display
the list of tracks.
Selection and confi rmation OK dial:
Selection of an item on the screen or in a list or a
menu, then confi rmation with a short press.
Other than for menus and lists, a short press displays a contextual menu depending on thecurrent screen.
Rotation with map displa
yed: zoom the map scale
in and out.
Select:
- the
previous/next line in a list or menu.
- the previous/next media folder.
- step b
y step selection of the previous/next radio frequency.
- the previous
/next MP3 folder.
Move up
/down, in " Move the map" mode.
FIRST STEPS