boot Citroen GRAND C4 PICASSO RHD 2016 2.G Owner's Guide
[x] Cancel search | Manufacturer: CITROEN, Model Year: 2016, Model line: GRAND C4 PICASSO RHD, Model: Citroen GRAND C4 PICASSO RHD 2016 2.GPages: 523, PDF Size: 13.63 MB
Page 292 of 523
290
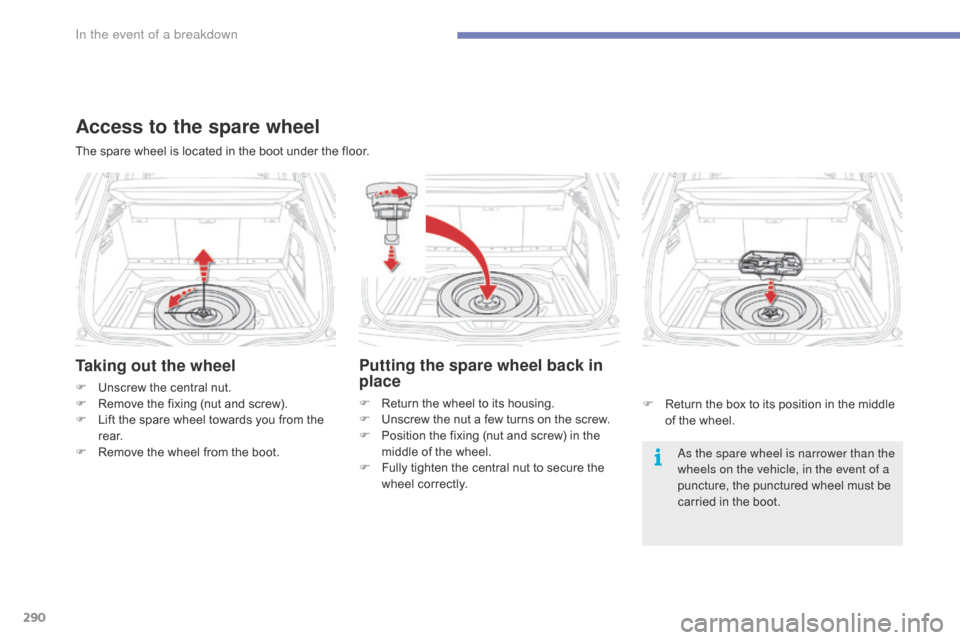
Taking out the wheel
F Unscrew the central nut.
F R emove the fixing (nut and screw).
F
L
ift the spare wheel towards you from the
r
e a r.
F
R
emove the wheel from the boot. As the spare wheel is narrower than the
wheels on the vehicle, in the event of a
puncture,
the punctured wheel must be
c
arried in the boot.
The
spare wheel is located in the boot under the floor.
Access to the spare wheel
Putting the spare wheel back in
place
F Return
the wheel to its housing.
F U nscrew the nut a few turns on the screw.
F
P
osition the fixing (nut and screw) in the
m
iddle of the wheel.
F
F
ully tighten the central nut to secure the
w
heel correctly. F
R eturn the box to its position in the middle
o
f the wheel.
In the event of a breakdown
Page 293 of 523
291
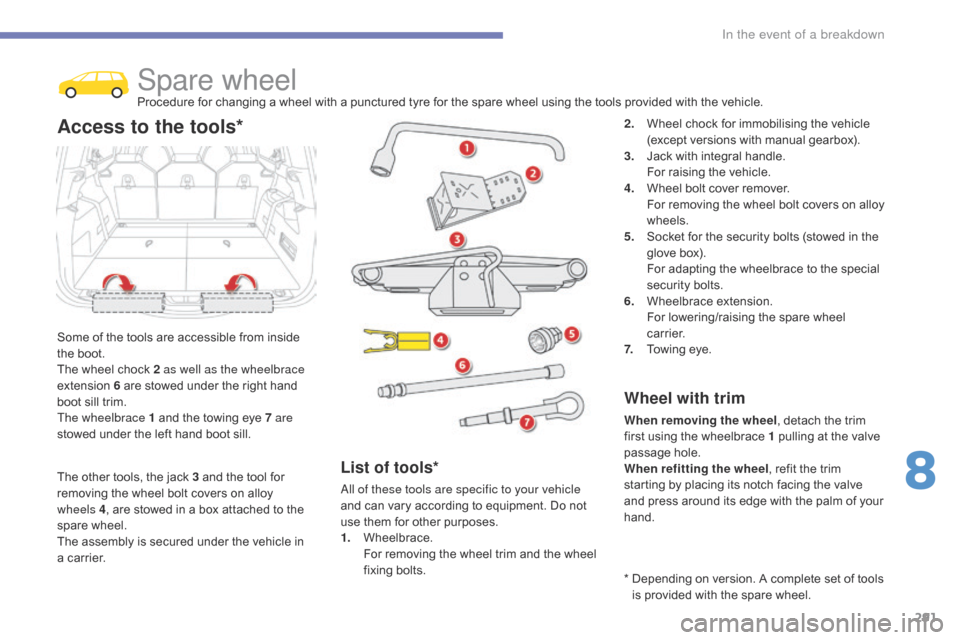
Spare wheelProcedure for changing a wheel with a punctured tyre for the spare wheel using the tools provided with the vehicle.
S
ome
of
the
tools are accessible from inside
t
he
boot.
The
wheel
chock 2 as well as the wheelbrace
extension
6
are stowed under the right hand
b
oot
sill
trim.
The wheelbrace 1
and the towing eye 7 are
stowed
under
the left hand boot sill.
Access to the tools*2. Wheel chock for immobilising the vehicle (
except versions with manual gearbox).
3.
J
ack with integral handle.
F
or raising the vehicle.
4.
W
heel bolt cover remover.
F
or removing the wheel bolt covers on alloy
w
heels.
5.
S
ocket for the security bolts (stowed in the
g
love box).
F
or adapting the wheelbrace to the special
s
ecurity bolts.
6.
W
heelbrace
e
xtension.
F
or lowering/raising the spare wheel
c
a r r i e r.
7.
T
owing eye.
Wheel with trim
When removing the wheel , detach the trim f
irst using the wheelbrace 1 pulling at the valve
p
assage hole.
When refitting the wheel ,
refit the trim
s
tarting by placing its notch facing the valve
a
nd press around its edge with the palm of your
han
d.
List of tools*
All of these tools are specific to your vehicle
and can vary according to equipment. Do not
u
se them for other purposes.
1.
W
heelbrace.
F
or removing the wheel trim and the wheel
f
ixing
bol
ts. *
D
epending on version. A complete set of tools
i
s provided with the spare wheel.
The
other
tools,
the
jack
3
and
the
tool
for
r
emoving
the
wheel
bolt
covers
on
alloy
w
heels
4 ,
are
stowed
in
a
box
attached
to
the
spar
e
w
heel.
The
assembly
is
secured
under
the
vehicle
in
a
carrier.
8
In the event of a breakdown
Page 295 of 523
293
A punctured wheel from the vehicle cannot be fitted under the vehicle. It
m
ust
b
e
c
arried
i
n
t
he
b
oot.
U
se
a
c
over
t
o protect the boot.
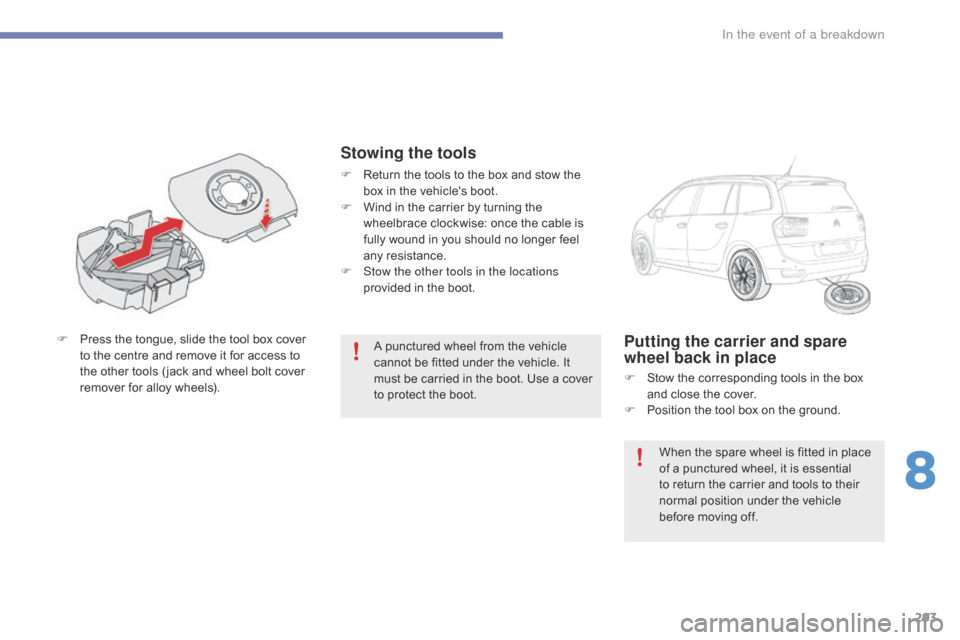
F
P
ress
the
tongue,
slide
the
tool
box
cover
t
o
the
centre
and
remove
it
for
access
to
t
he
other
tools
( jack
and
wheel
bolt
cover
r
emover
for
alloy
wheels).Putting the carrier and spare
wheel back in place
F Stow the corresponding tools in the box a
nd close the cover.
F
P
osition the tool box on the ground.
Stowing the tools
F Return the tools to the box and stow the b
ox in the vehicle's boot.
F
W
ind in the carrier by turning the
w
heelbrace clockwise: once the cable is
f
ully wound in you should no longer feel
an
y
r
esistance.
F
S
tow the other tools in the locations
provided
in the boot.
When
the spare wheel is fitted in place
o
f a punctured wheel, it is essential
t
o return the carrier and tools to their
n
ormal position under the vehicle
b
efore moving off.
8
In the event of a breakdown
Page 300 of 523
298
Fitting the "space-saver"
spare wheel
If your vehicle is fitted with alloy wheels, when tightening the bolts on fitting, it
i
s normal to notice that the washers
d
o not come into contact with the
"
space-saver" spare wheel. The wheel
i
s secured by the conical sur face of
e
ach bolt.
After changing a wheel
To correctly store the punctured wheel in the boot ( not in the location for the
space-saver wheel ),
first remove the
c
entral cover.
When
using the "space-saver" type
s
pare wheel, do not exceed 50 mph
(
80 km/h).
Have
the tightening of the bolts and the
p
ressure of the spare wheel checked
b
y a CITROËN dealer or a qualified
w
orkshop without delay.
Have
the punctured wheel repaired
a
nd refitted to the vehicle as soon as
p
ossible.
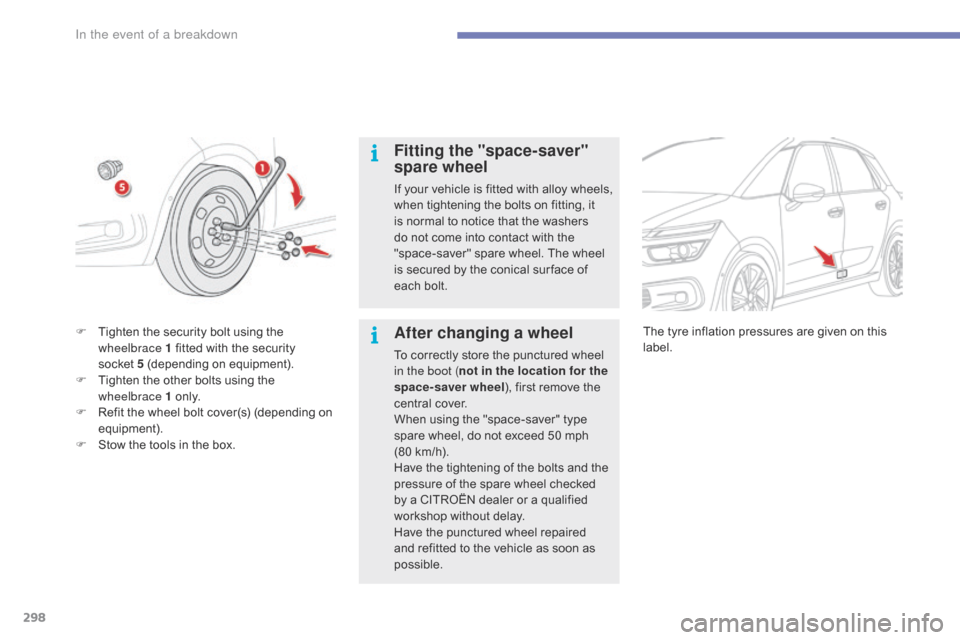
F
T
ighten
the
security
bolt
using
the
w
heelbrace 1
fitted
with
the
security
s
ocket 5
(depending
on
equipment).
F
T
ighten
the
other
bolts
using
the
w
heelbrace 1
o
n l y.
F
R
efit
the
wheel
bolt
cover(s)
(depending
on
e
quipment).
F
S
tow
the
tools
in
the
box. The
tyre inflation pressures are given on this lab
el.
In the event of a breakdown
Page 306 of 523
304
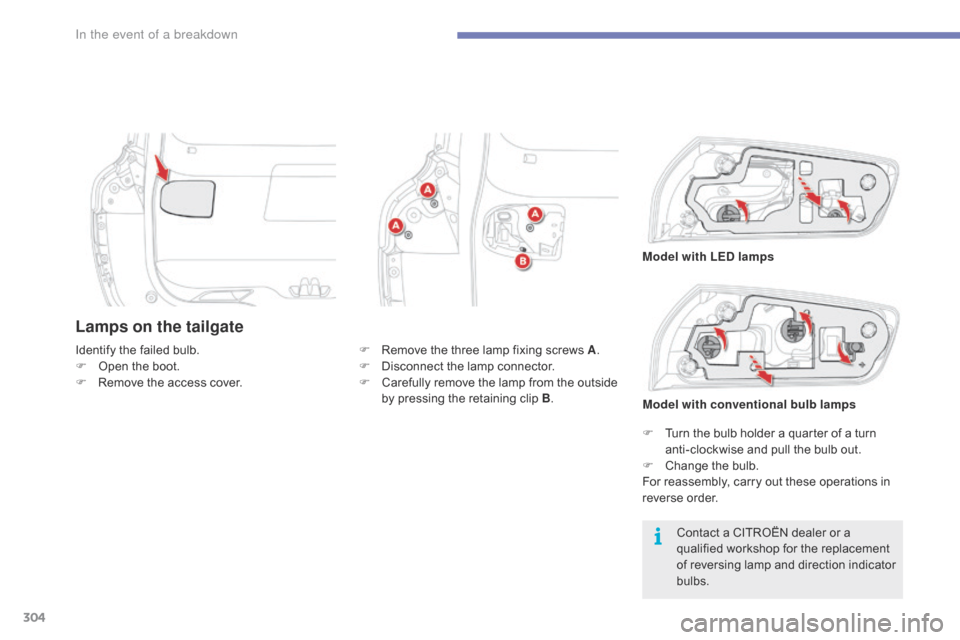
Lamps on the tailgate
Contact a CITROËN dealer or a qualified workshop for the replacement
o
f reversing lamp and direction indicator
b
ulbs.
Identify
the
failed
bulb.
F
O
pen
the
boot.
F
R
emove
the
access
cover.
F
R
emove
the
three
lamp
fixing
screws
A
.
F
D
isconnect
the
lamp
connector.
F
C
arefully
remove
the
lamp
from
the
outside
b
y
pressing
the
retaining
clip
B
.
F
T
urn the bulb holder a quarter of a turn
a
nti-clockwise and pull the bulb out.
F
C
hange the bulb.
For
reassembly, carry out these operations in
r
everse
o
rder.
Model with LED lamps
Model with conventional bulb lamps
In the event of a breakdown
Page 308 of 523
306
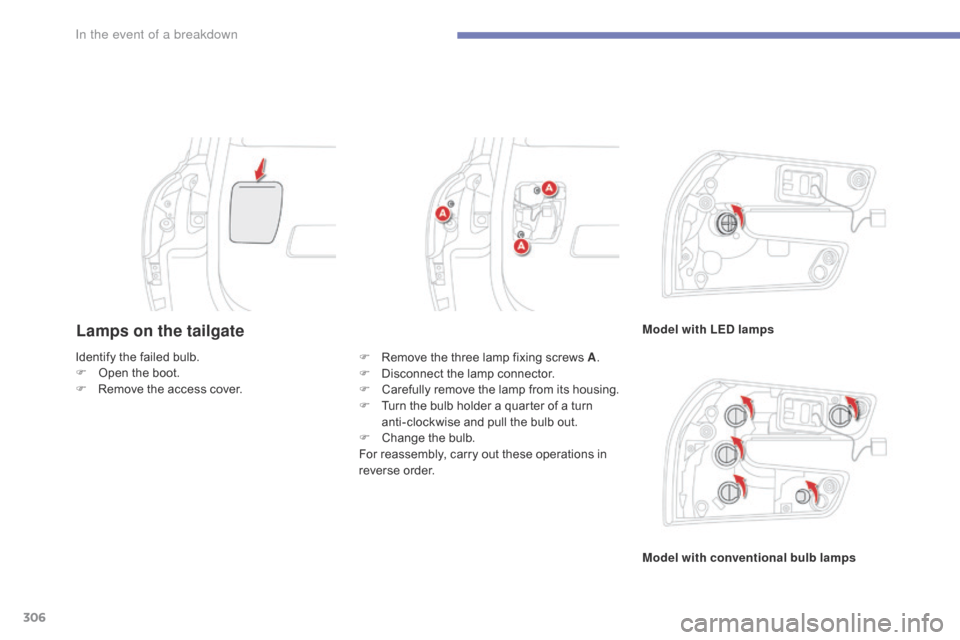
Lamps on the tailgateModel with LED lamps
Model with conventional bulb lamps
Identify
the
failed
bulb.
F
O
pen
the
boot.
F
R
emove
the
access
cover. F
R
emove
the
three
lamp
fixing
screws
A .
F
D
isconnect
the
lamp
connector.
F
C
arefully
r
emove
t
he
l
amp
f
rom
i
ts
h
ousing.
F
T
urn
the
bulb
holder
a
quarter
of
a
turn
a
nti-clockwise
and
pull
the
bulb
out.
F
C
hange
the
bulb.
For
reassembly,
carry
out
these
operations
in
r
everse
o
rder.
In the event of a breakdown
Page 313 of 523
311
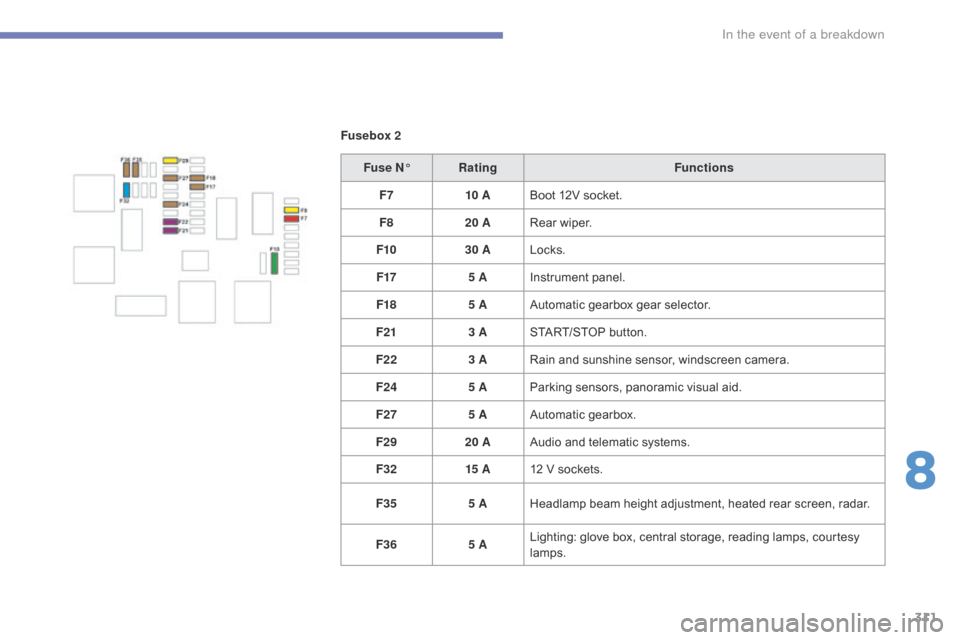
Fusebox 2Fuse N° Rating Functions
F7 10 ABoot
12V socket.
F8 20 ARear
wiper.
F10 30 ALocks.
F17 5 AInstrument
panel.
F18 5 AAutomatic
gearbox gear selector.
F21 3 ASTART/STOP
button.
F22 3 ARain
and sunshine sensor, windscreen camera.
F24 5 AParking
sensors, panoramic visual aid.
F27 5 AAutomatic
gearbox.
F29 20 AAudio
and telematic systems.
F32 15 A12
V sockets.
F35 5 AHeadlamp
beam height adjustment, heated rear screen, radar.
F36 5 ALighting:
glove box, central storage, reading lamps, courtesy
lam
ps.
8
In the event of a breakdown
Page 318 of 523
316
The Stop & Start system may not be operational during the trip following the
f
irst engine start.
In
this case, the system will only be
a
vailable again after a continuous
p
eriod of immobilisation of the vehicle,
a
period which depends on the ambient
t
emperature and the state of charge of
t
he battery (up to about 8 hours).
Do
not
force
the
lever
as
locking
will
n
ot
be
possible
if
the
clamp
is
not
p
ositioned
correctly;
start
the
procedure
ag
ain.
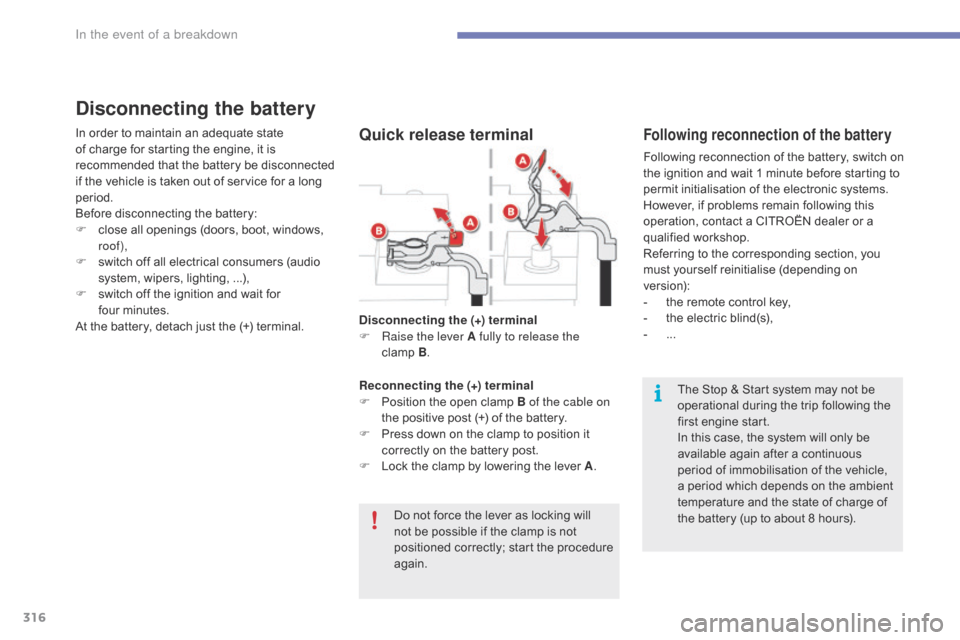
Disconnecting the (+) terminal
F
Ra
ise the lever A fully to release the
clamp B.
Reconnecting the (+) terminal
F
P
osition
the
open
clamp
B of the cable on
the
positive
post
(+)
of
the
battery.
F
P
ress
down
on
the
clamp
to
position
it
c
orrectly
on
the
battery
post.
F
L
ock
the
clamp
by
lowering
the
lever
A .
Disconnecting the battery
In order to maintain an adequate state o
f charge for starting the engine, it is
r
ecommended that the battery be disconnected
i
f the vehicle is taken out of service for a long
p
eriod.
Before
disconnecting the battery:
F
c
lose all openings (doors, boot, windows,
r
oof),
F
s
witch off all electrical consumers (audio
s
ystem, wipers, lighting, ...),
F
s
witch off the ignition and wait for
f
our minutes.
At
the battery, detach just the (+) terminal.Following reconnection of the battery
Following reconnection of the battery, switch on the ignition and wait 1 minute before starting to
p
ermit initialisation of the electronic systems.
H
owever, if problems remain following this
o
peration, contact a CITROËN dealer or a
q
ualified
w
orkshop.
Referring
to the corresponding section, you
m
ust
y
ourself
r
einitialise
(
depending
o
n
ve
rsion):
-
t
he remote control key,
-
t
he electric blind(s),
-
...
Quick release terminal
In the event of a breakdown
Page 319 of 523
317
To w i n g
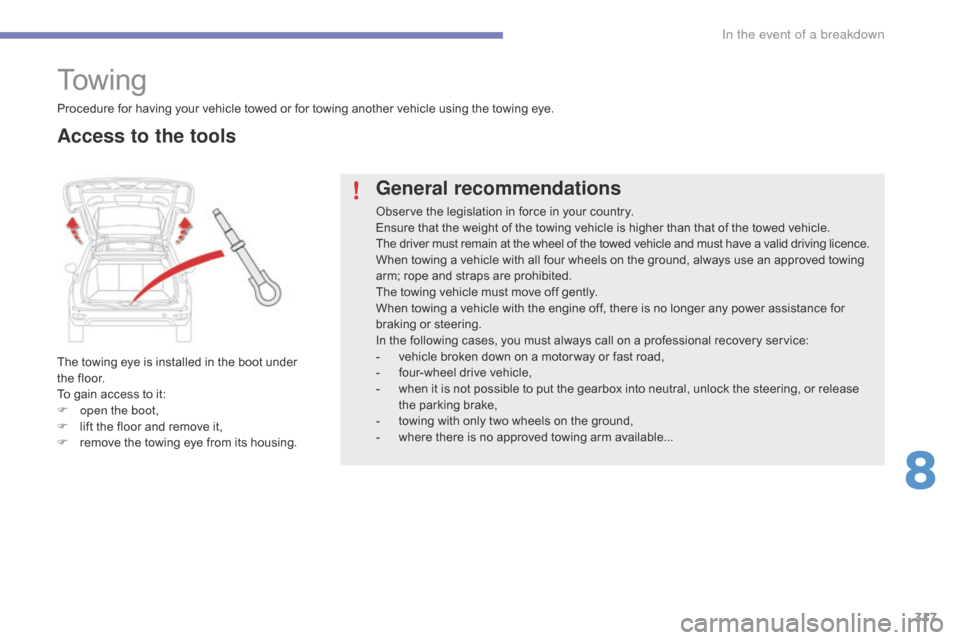
The towing eye is installed in the boot under the floor.
To
gain access to it:
F
o
pen the boot,
F
l
ift the floor and remove it,
F
r
emove the towing eye from its housing.
General recommendations
Observe the legislation in force in your country.
E nsure that the weight of the towing vehicle is higher than that of the towed vehicle.
The
driver must remain at the wheel of the towed vehicle and must have a valid driving licence.
When
towing a vehicle with all four wheels on the ground, always use an approved towing
a
rm; rope and straps are prohibited.
The
towing vehicle must move off gently.
When
towing a vehicle with the engine off, there is no longer any power assistance for
b
raking or steering.
In
the following cases, you must always call on a professional recovery service:
-
v
ehicle broken down on a motor way or fast road,
-
f
our-wheel drive vehicle,
-
w
hen it is not possible to put the gearbox into neutral, unlock the steering, or release
t
he parking brake,
-
t
owing with only two wheels on the ground,
-
w
here there is no approved towing arm available...
Procedure
for
having
your
vehicle
towed
or
for
towing
another vehicle using the towing eye.
Access to the tools
8
In the event of a breakdown
Page 334 of 523
332
ABS ...............................................................223
Accessories .............................. ....................264
Accessory position
....................................... 12
8
Access
to the 3rd row
..................................... 86
Ad
Blue
® ............................... ........18, 35, 42, 277 A
djusting head restraints ..........................7 9, 83
Adjusting
s
eats
........................ 7
5, 77, 82, 84, 87
Adjusting
the air distribution
.............. 9
4, 96, 98
Adjusting
the air flow
...........................9
4, 95, 97
Adjusting
the height and reach
of
the
steering wheel
.................................... 91
A
djusting the seat belt
height
...............
........................................... 226
Adjusting
the temperature
..................9
4, 95, 97
Advice
on care
and
m
aintenance
........................................ 2
76
Advice
on driving
..............................
....121,
12
2
Airbags
...............
..................................... 32, 231
Airbags,
c
urtain
.................................... 2
34, 235
Airbags,
front.........................................232, 235
Airbags,
la
teral
..................................... 2
33, 235
Air
c
onditioning
...............................9
, 93, 95, 97
Air
conditioning, automatic
.............................97
A
ir
c
onditioning,
m
anual
................................. 95
A
ir
intake
...............
............................. 94, 96, 98
Air vents
..............................
............................92
Alarm
............................................................... 70
A
nti-lock braking
system
(ABS)
.............................................. 2
23
Anti-pinch
................................................7
3, 221
Anti-theft
..............................
.........................128
Armrest,
front
.................................................. 81
AS
R
............................................................... 2
23
Assistance call
...............................
...... 222, 330
Assistance,
em
ergency
b
raking
...............
......................................... 223
Audible
w
arning
............................................ 2
22
Automatic
hea
dlamps
............................. 2
3, 210Battery
...............................
.............
275,
31
3 - 316
Battery,
c
harging
...............................
............
315
Battery, remote control
.............................5
8, 59
Black pan el
...................................................... 47
Black screen .............................. .....................
47
Blanking screen
(snow
s
hield)
...............................
................259
Blind,
pan
oramic
sun
roof
................
........................................221
Blind
spot sensors
.................................. 2
4, 180
Blinds,
side
....................................................111
Bl
ueHDi
...............................
............ 42, 277, 319
Bonnet
...............
............................................269
Boot
........
.........................................................63
Boot
(fittings)
...............................
..................115
Boot
(opening)
...............................
..................51
Brake
d
iscs/pads........................................... 276
Brake
lamps
...............................
...........303-306
Brake
warning lamp
.................................. 3
1, 34
Braking,
dynamic
emergency
.................................................. 13
3
Bulbs
(
changing)
...............................
............299 Changing
the remote
control battery ............................................... 58
Checking the engine
oil level ............... ................................... 41, 232
Checking the levels ................................
2 72-274
Checking tyre pressures
(using
the kit)
..............................
................288
Checks
...............
...................................270-276
Checks,
routine
.....................................2
75, 276
Child
lock
...............................
........................254
Children
(
safety)
....................2
30, 232, 236 -254
Child
seats,
conventional
............................................... 2
42
Child
seats, ISOFIX
......................................24
8
C
ITROËN
Connect Box
...............................33
0
C
ITROËN
Localised
Emergency
C
all
..........................................33
0
Closing
the boot
...............................
...............63
Closing
the doors
............................... 5
2, 54, 56
Collision
risk alert
..............................
...........174
Configurations,
sea
ts
...............
..............................................89
Configuration,
v
ehicle
.....................................13
C
ontrol,
em
ergency
b
oot release
...............................
...................67
Control,
em
ergency
do
or
................
...............................................62
Control,
heated seats
......................................81
C
ontrol stalk, lighting
..............................2
3, 204
Control
stalk, wipers
..................... 2
16, 217, 219
Courtesy
lamps
.............................................11
9
Cruise control
................ 1
47, 150, 155, 158, 165
Cruise control, dynamic
...............
...............................158, 165
Cruise
control by speed limit
recognition
.................................................. 14
8
Cup
holder
...............................
......................105
A
Capacity, fuel tank .............................. ..........255
Cap, fuel filler ................................................ 25
5
Cartridge,
f
ragrance
..................................... 10
3
Central
locking
.................................... 5
1, 53, 60
Changing
a bu
lb
............................................ 29
9
Changing
a f
use
............................................ 3
08
Changing
a wheel
...............................
..........289
Changing
a wiper blade
....................... 2
20, 266
C
B
Alphabetical index