tailgate Citroen GRAND C4 PICASSO RHD 2017 2.G User Guide
[x] Cancel search | Manufacturer: CITROEN, Model Year: 2017, Model line: GRAND C4 PICASSO RHD, Model: Citroen GRAND C4 PICASSO RHD 2017 2.GPages: 523, PDF Size: 11.96 MB
Page 69 of 523
67
Memorising an
opening position
Where height is restricted (garage with a low
ceiling,
...) it is possible to limit and memorise
the opening angle of the motorised tailgate.
This memorisation is done as follows:
-
o
pen the tailgate to the desired position,
-
p
ress button C or the exterior control B for
more than 3 seconds.
Memorisation of the maximum opening position
of the tailgate is confirmed by an audible signal.
To cancel the memorised position:
-
s
top the tailgate in an intermediate
position,
-
p
ress button C or the exterior control B for
more than 3 seconds.
Cancellation of the memorised position is
confirmed by an audible signal.
Manual operation
The motorised tailgate can be opened and
closed manually, even if motorised operation is
activated.
However, any manual intervention must be
done with the tailgate stopped.
Repeated opening and closing of the
tailgate can cause overheating of its
electric motor, after which opening and
closing will not be possible.
Allow 10 minutes for the motor to cool
down before operating the tailgate
again.
If you are not able to wait, operate it
manually.
Detection of obstacles
Should an obstacle (person or object) be
encountered, the anti-pinch system interrupts
the closing movement and raises the tailgate a
few centimetres to clear the obstacle. When opening and closing a motorised tailgate
manually, there is no assistance from gas-filled
struts. Resistance to opening and closing is
therefore entirely normal.
2
Access
Page 70 of 523
68
Reinitialising the motorised
tailgate
This operation is necessary where there is
no movement - after detection of an obstacle,
connecting or recharging the battery, ...
F
O
pen the tailgate manually, if necessary.
F
M
anually close the tailgate fully.
If the problem persists, contact a CITROËN
dealer or a qualified workshop.
Precautions in use
In wintry conditions
In the event of an accumulation of snow
on the tailgate, clear the snow before
commanding a motorised opening of
the tailgate.
The formation of ice can block the
tailgate and prevent its opening: wait
until the ice melts with the heating of
the passenger compartment.
When washing the vehicle
When washing the vehicle in an
automatic car wash, don't forget to
lock your vehicle to avoid the risk of
unexpected opening.
Back-up release
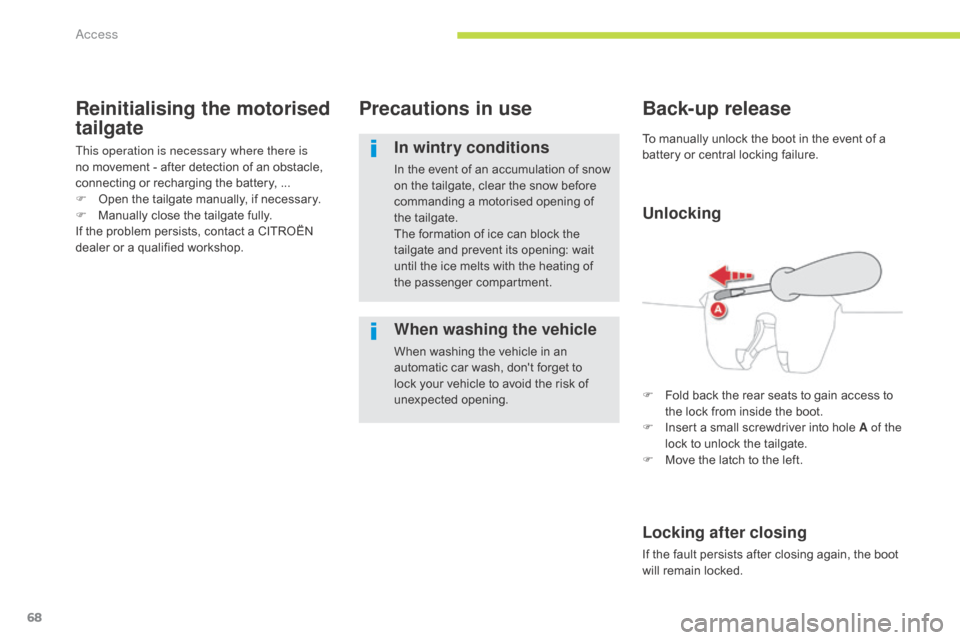
F Fold back the rear seats to gain access to the lock from inside the boot.
F
I
nsert a small screwdriver into hole A of the
lock to unlock the tailgate.
F
M
ove the latch to the left.
Locking after closing
If the fault persists after closing again, the boot
will remain locked. To manually unlock the boot in the event of a
battery or central locking failure.
Unlocking
Access
Page 71 of 523

69
Hands-free tailgate access
The tailgate my be equipped with a hands-free function, to allow you to open or close the tailgate
when your hands are full.
For more information on the Motorised tailgate, refer to the corresponding section.
F
W
ith your hands full and the remote control
on your person in the recognition zone
A,
pass your foot rapidly below the rear
b u m p e r.
The instruction is confirmed by flashing of the
direction indicators and an audible signal.
The tailgate opens to the memorised position.
Passing your foot below the bumper again while
the tailgate is opening stops the movement.
Passing your foot below the bumper for a third
time reverses the direction of movement.
"Hands-free" closing
F With your hands full and the remote control on your person in the recognition zone A,
pass your foot rapidly below the rear
b u m p e r.
The instruction is confirmed by flashing of the
direction indicators and an audible signal.
Deactivation
Hands-free tailgate access is activated by
default.
This function can be activated or deactivated
by selecting " Hands-Free Tailgate Access " in
the Driving menu of the touch screen.
Ensure that you are steady on your feet
before passing a foot rapidly below the
rear bumper.
Take care not to touch the exhaust
system, which may be hot - Risk of
burns! If the vehicle is locked, it is unlocked
before opening the tailgate.
Automatic locking
To have the vehicle lock itself after closing the
tailgate by passing a foot below the bumper,
activate " Hands-free tailgate access self-
locking " in the Driving menu of the touch
screen.
Passing your foot below the bumper again while
the tailgate is closing stops the movement.
Passing your foot below the bumper for a third
time reverses the direction of movement.
"Hands-free" opening
2
Access
Page 72 of 523
70
Recommendations related to the "Hands-free tailgate
access" function
If several passes of your foot below the rear
bumper fail to open the tailgate, wait a few
seconds before starting again.
The function is automatically deactivated in the
event of heavy rain or accumulation of snow.
If the function fails to operate, check that
the electronic key is not exposed to strong
electromagnetic inter ference (a smartphone, ...).
The function may not work correctly with a
prosthetic leg.
The function may not work correctly if your
vehicle is fitted with a towbar. In some circumstances, the tailgate may only
open or close, particularly if:
-
y
our vehicle is fitted with a towbar,
-
y
ou hitch or unhitch a trailer,
-
y
ou fit or remove a bicycle carrier,
-
y
ou load or unload bicycles from a bicycle
c a r r i e r,
-
y
ou place or lift something behind the
vehicle,
-
a
n animal approaches the rear bumper,
-
y
ou are washing your vehicle,
-
a s
ervice is being carried out on your
vehicle,
-
y
ou are accessing the spare wheel
(depending on version).
To avoid such operating problems, keep the
electronic key away from the recognition zone
or deactivate "Hands-free tailgate access".
Ensure that no object or person might prevent
the correct opening or closing of the tailgate.
Be particularly aware of children when
operating the tailgate.
Access
Page 193 of 523
191
Reversing camera
Clean the reversing camera regularly
using a soft, dry cloth.
The reversing camera is activated automatically
when reverse gear is engaged.
Depending on version, the image is displayed
in the touch screen or the instrument panel.
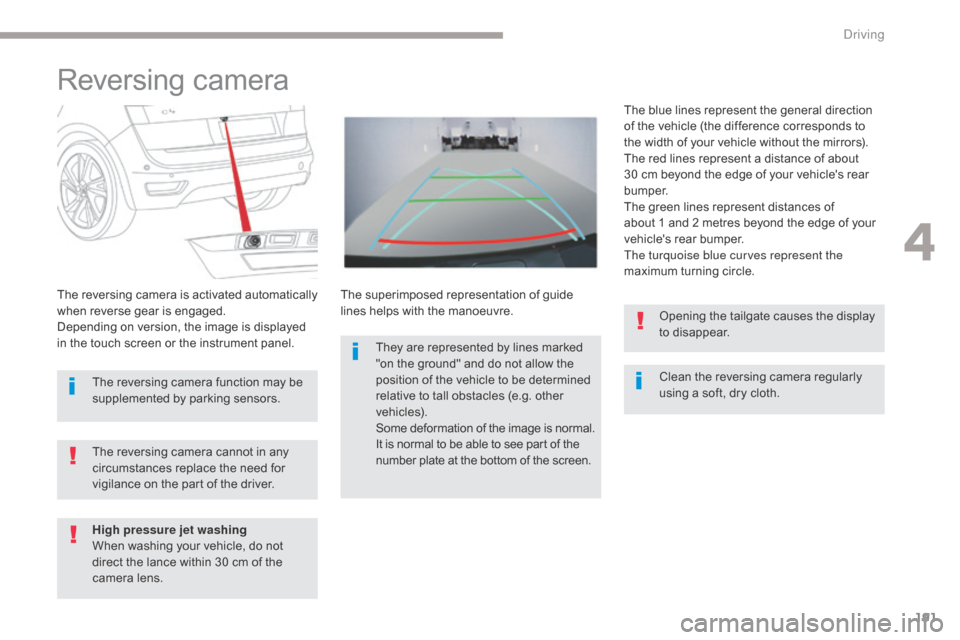
The superimposed representation of guide
lines helps with the manoeuvre.The blue lines represent the general direction
of the vehicle (the difference corresponds to
the width of your vehicle without the mirrors).
The red lines represent a distance of about
30 cm beyond the edge of your vehicle's rear
b u m p e r.
The green lines represent distances of
about
1 and 2 metres beyond the edge of your
vehicle's rear bumper.
The turquoise blue curves represent the
maximum turning circle.
The reversing camera cannot in any
circumstances replace the need for
vigilance on the part of the driver. Opening the tailgate causes the display
to disappear.
The reversing camera function may be
supplemented by parking sensors.
High pressure jet washing
When washing your vehicle, do not
direct the lance within 30 cm of the
camera lens. They are represented by lines marked
"on the ground" and do not allow the
position of the vehicle to be determined
relative to tall obstacles (e.g. other
vehicles).
Some deformation of the image is normal.
It is normal to be able to see part of the
number plate at the bottom of the screen.
4
Driving
Page 194 of 523
192
360 Vision
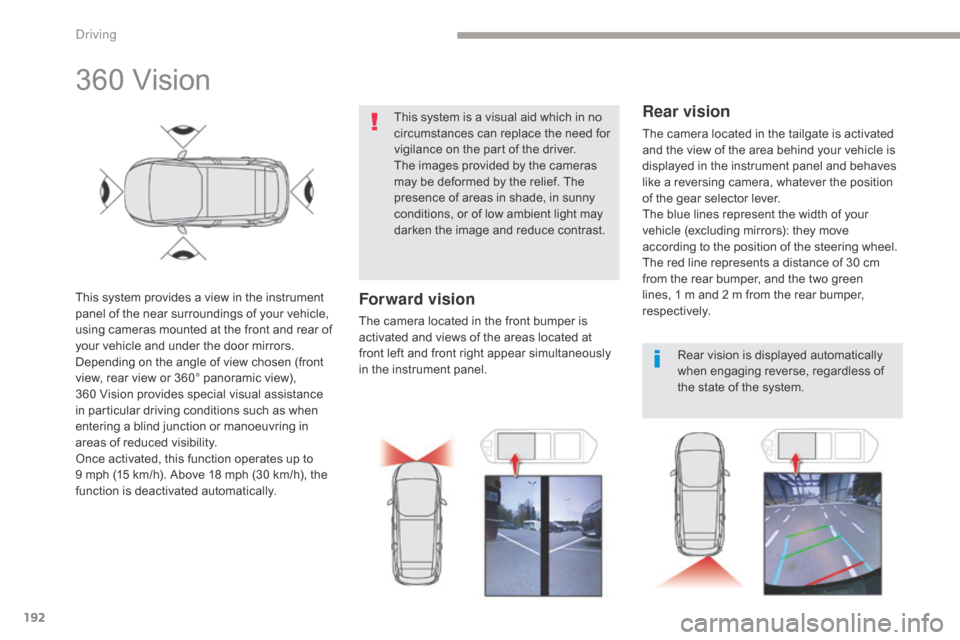
This system provides a view in the instrument
panel of the near surroundings of your vehicle,
using cameras mounted at the front and rear of
your vehicle and under the door mirrors.
Depending on the angle of view chosen (front
view, rear view or 360° panoramic view),
360 Vision provides special visual assistance
in particular driving conditions such as when
entering a blind junction or manoeuvring in
areas of reduced visibility.
Once activated, this function operates up to
9
mph (15 km/h). Above 18 mph (30 km/h), the
function is deactivated automatically. This system is a visual aid which in no
circumstances can replace the need for
vigilance on the part of the driver.
The images provided by the cameras
may be deformed by the relief. The
presence of areas in shade, in sunny
conditions, or of low ambient light may
darken the image and reduce contrast.Forward vision
The camera located in the front bumper is
activated and views of the areas located at
front left and front right appear simultaneously
in the instrument panel.
Rear vision
The camera located in the tailgate is activated
and the view of the area behind your vehicle is
displayed in the instrument panel and behaves
like a reversing camera, whatever the position
of the gear selector lever.
The blue lines represent the width of your
vehicle (excluding mirrors): they move
according to the position of the steering wheel.
The red line represents a distance of 30 cm
from the rear bumper, and the two green
lines, 1 m and 2 m from the rear bumper,
respectively.
Rear vision is displayed automatically
when engaging reverse, regardless of
the state of the system.
Driving
Page 195 of 523
193
Operation
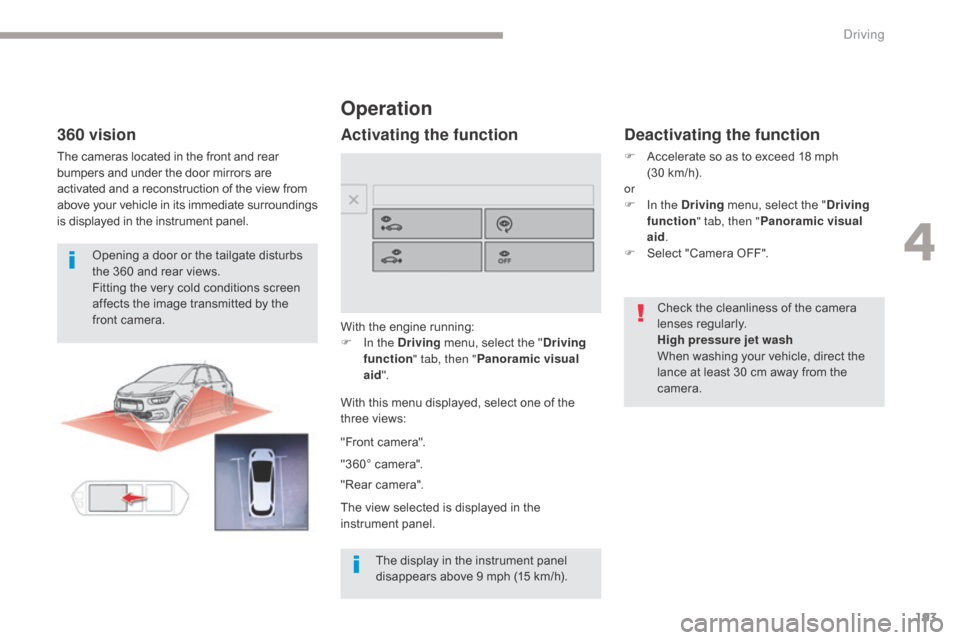
With the engine running:
F I n the Driving menu, select the " Driving
function " tab, then " Panoramic visual
aid ".
With this menu displayed, select one of the
three views:
Deactivating the function
F Accelerate so as to exceed 18 mph (30 km/h).
or
F
I
n the Driving menu, select the " Driving
function " tab, then " Panoramic visual
aid .
F
Sel
ect "Camera OFF".
"Front camera".
"360° camera".
"Rear camera".
The view selected is displayed in the
instrument panel.
360 vision
The cameras located in the front and rear
bumpers and under the door mirrors are
activated and a reconstruction of the view from
above your vehicle in its immediate surroundings
is displayed in the instrument panel. Opening a door or the tailgate disturbs
the 360 and rear views.
Fitting the very cold conditions screen
affects the image transmitted by the
front camera.
The display in the instrument panel
disappears above 9 mph (15 km/h).
Activating the function
Check the cleanliness of the camera
lenses regularly.
High pressure jet wash
When washing your vehicle, direct the
lance at least 30 cm away from the
camera.
4
Driving
Page 211 of 523
209
Displays
Illumination of the corresponding indicator
lamp in the instrument panel confirms that the
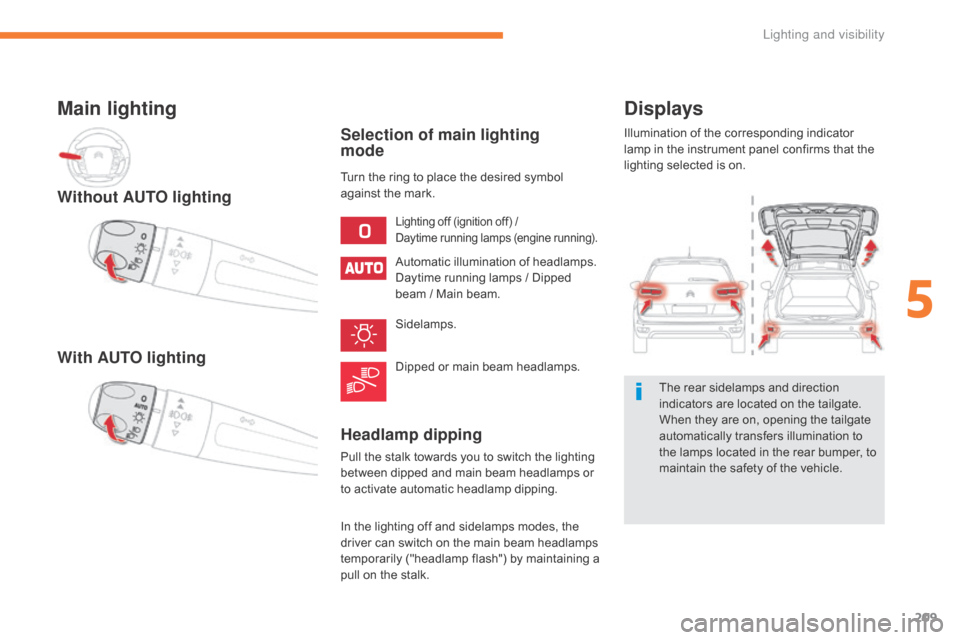
lighting selected is on.The rear sidelamps and direction
indicators are located on the tailgate.
When they are on, opening the tailgate
automatically transfers illumination to
the lamps located in the rear bumper, to
maintain the safety of the vehicle.
Main lighting
Lighting off (ignition off) /
Daytime running lamps (engine running).
Automatic illumination of headlamps.
Daytime running lamps / Dipped
beam / Main beam.
Sidelamps.
Dipped or main beam headlamps.
Turn the ring to place the desired symbol
against the mark.
Selection of main lighting
mode
Without AUTO lighting
With AUTO lighting
Headlamp dipping
Pull the stalk towards you to switch the lighting
between dipped and main beam headlamps or
to activate automatic headlamp dipping.
In the lighting off and sidelamps modes, the
driver can switch on the main beam headlamps
temporarily ("headlamp flash") by maintaining a
pull on the stalk.
5
Lighting and visibility
Page 213 of 523
211
Operation of the rear foglamps is
inhibited with the tailgate open.
Opening the tailgate when these lamps
are on causes them and their indicator
lamp in the instrument panel to go off.
They do not come back on
automatically when the tailgate is
closed: they must be switched on again
using the control stalk.In good or rainy weather, by both day
and night, the front foglamps and the
rear foglamps are prohibited. In these
situations, the power of their beams
may dazzle other drivers. They should
only be used in fog or falling snow.
In these weather conditions, you
should switch on the foglamps and
dipped beam headlamps manually,
as the sunshine sensor may detect
sufficient
light.
Do not forget to switch off the front and
rear foglamps when they are no longer
necessary.Switching off the lighting
when switching off the ignition
When the ignition is switched off, all of the
lamps switch off immediately, except for
the dipped beam headlamps if automatic
guide-me-home lighting is activated.
Switching on the lighting when
switching on the ignition
To reactivate the lighting control stalk,
turn the ring A to position "0" - lighting
off, then to the position of your choice.
When the driver's door is opened,
a
temporary audible signal warns you
that the vehicle's lighting is on.
They switch off automatically after a
period which depends on the state of
charge of the battery (entry to energy
economy mode).
5
Lighting and visibility
Page 271 of 523
269
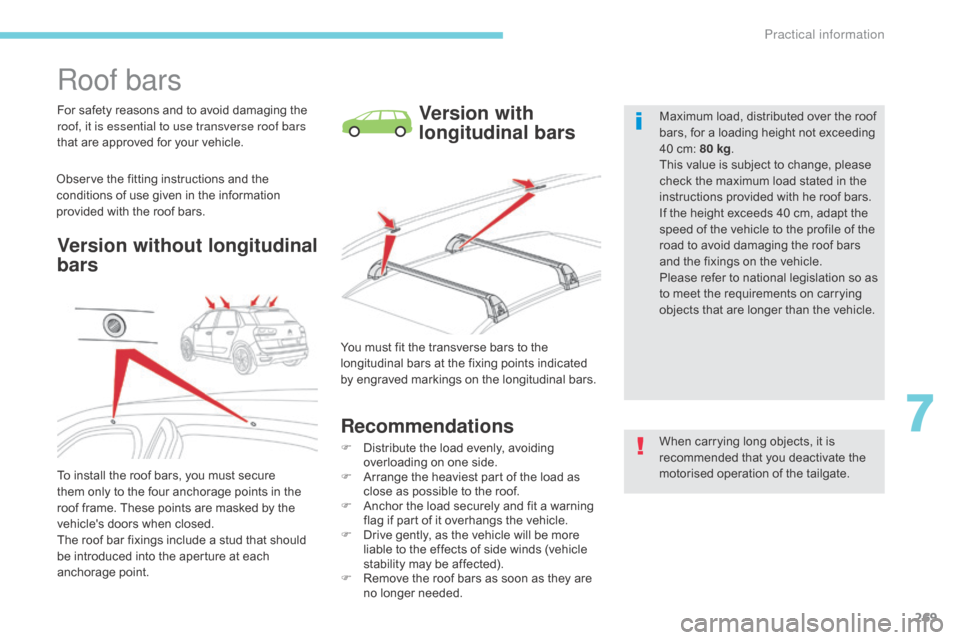
Roof bars
For safety reasons and to avoid damaging the
roof, it is essential to use transverse roof bars
that are approved for your vehicle.
Observe the fitting instructions and the
conditions of use given in the information
provided with the roof bars.Version with
longitudinal bars
To install the roof bars, you must secure
them only to the four anchorage points in the
roof frame. These points are masked by the
vehicle's doors when closed.
The roof bar fixings include a stud that should
be introduced into the aperture at each
anchorage point.
Version without longitudinal
bars
You must fit the transverse bars to the
longitudinal bars at the fixing points indicated
by engraved markings on the longitudinal bars.
Recommendations
F Distribute the load evenly, avoiding overloading on one side.
F
A
rrange the heaviest part of the load as
close as possible to the roof.
F
A
nchor the load securely and fit a warning
flag if part of it overhangs the vehicle.
F
D
rive gently, as the vehicle will be more
liable to the effects of side winds (vehicle
stability may be affected).
F
R
emove the roof bars as soon as they are
no longer needed. Maximum load, distributed over the roof
bars, for a loading height not exceeding
40 cm: 80 kg
.
This value is subject to change, please
check the maximum load stated in the
instructions provided with he roof bars.
If the height exceeds 40 cm, adapt the
speed of the vehicle to the profile of the
road to avoid damaging the roof bars
and the fixings on the vehicle.
Please refer to national legislation so as
to meet the requirements on carrying
objects that are longer than the vehicle.
When carrying long objects, it is
recommended that you deactivate the
motorised operation of the tailgate.
7
Practical information