display Citroen JUMPY 2010 2.G Owner's Manual
[x] Cancel search | Manufacturer: CITROEN, Model Year: 2010, Model line: JUMPY, Model: Citroen JUMPY 2010 2.GPages: 225, PDF Size: 10.84 MB
Page 4 of 225
Interior
8
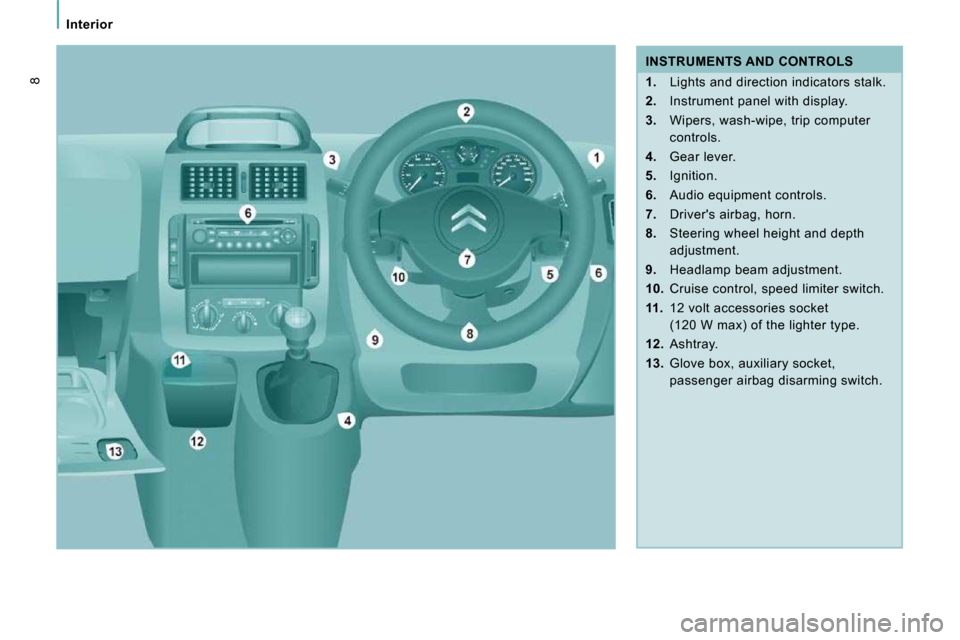
INSTRUMENTS AND CONTROLS
1. Lights and direction indicators stalk.
2. Instrument panel with display.
3. Wipers, wash-wipe, trip computer
controls.
4. Gear lever.
5. Ignition.
6. Audio equipment controls.
7. Driver's airbag, horn.
8. Steering wheel height and depth
adjustment.
9. Headlamp beam adjustment.
10. Cruise control, speed limiter switch.
11. 12 volt accessories socket
(120 W max) of the lighter type.
12. Ashtray.
13. Glove box, auxiliary socket,
passenger airbag disarming switch.
Page 5 of 225
9
Interior
FAMILIARISATION
1
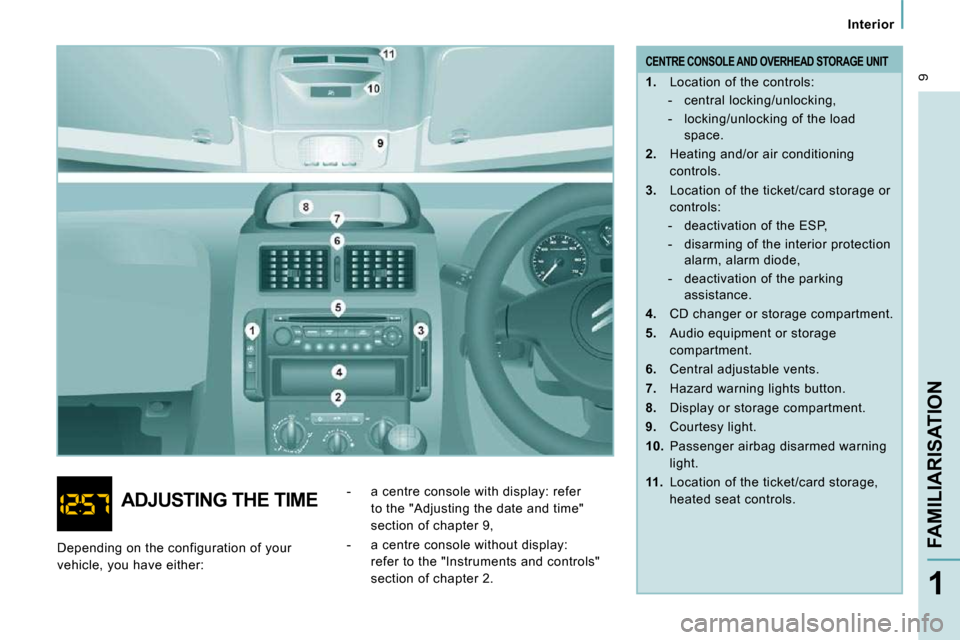
CENTRE CONSOLE AND OVERHEAD STORAGE UNIT
1. Location of the controls:
- central locking/unlocking,
- locking/unlocking of the load space.
2. Heating and/or air conditioning
controls.
3. Location of the ticket/card storage or
controls:
- deactivation of the ESP,
- disarming of the interior protection alarm, alarm diode,
- deactivation of the parking assistance.
4. CD changer or storage compartment.
5. Audio equipment or storage
compartment.
6. Central adjustable vents.
7. Hazard warning lights button.
8. Display or storage compartment.
9. Courtesy light.
10. Passenger airbag disarmed warning
light.
11. Location of the ticket/card storage,
heated seat controls.
ADJUSTING THE TIME - a centre console with display: refer
to the "Adjusting the date and time"
section of chapter 9,
- a centre console without display: refer to the "Instruments and controls"
section of chapter 2.
Depending on the configuration of your
vehicle, you have either:
Page 9 of 225
9
9
3
9
3
9
13
Interior
FAMILIARISATION
1
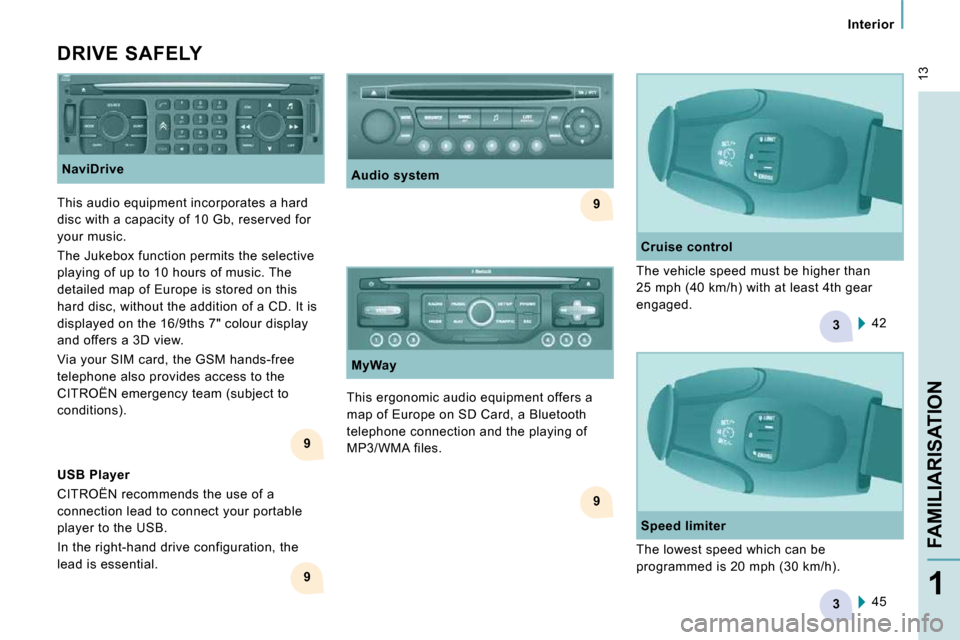
DRIVE SAFELY NaviDrive
This ergonomic audio equipment offers a
map of Europe on SD Card, a Bluetooth
telephone connection and the playing of
MP3/WMA files. 42
Cruise control
The vehicle speed must be higher than
25 mph (40 km/h) with at least 4th gear
engaged.
Audio system
This audio equipment incorporates a hard
disc with a capacity of 10 Gb, reserved for
your music.
The Jukebox function permits the selective
playing of up to 10 hours of music. The
detailed map of Europe is stored on this
hard disc, without the addition of a CD. It is
displayed on the 16/9ths 7" colour display
and offers a 3D view.
Via your SIM card, the GSM hands-free
telephone also provides access to the
CITROËN emergency team (subject to
conditions). MyWay
45
Speed limiter
The lowest speed which can be
programmed is 20 mph (30 km/h).
USB Player
CITROËN recommends the use of a
connection lead to connect your portable
player to the USB.
In the right-hand drive configuration, the
lead is essential.
Page 14 of 225
Access
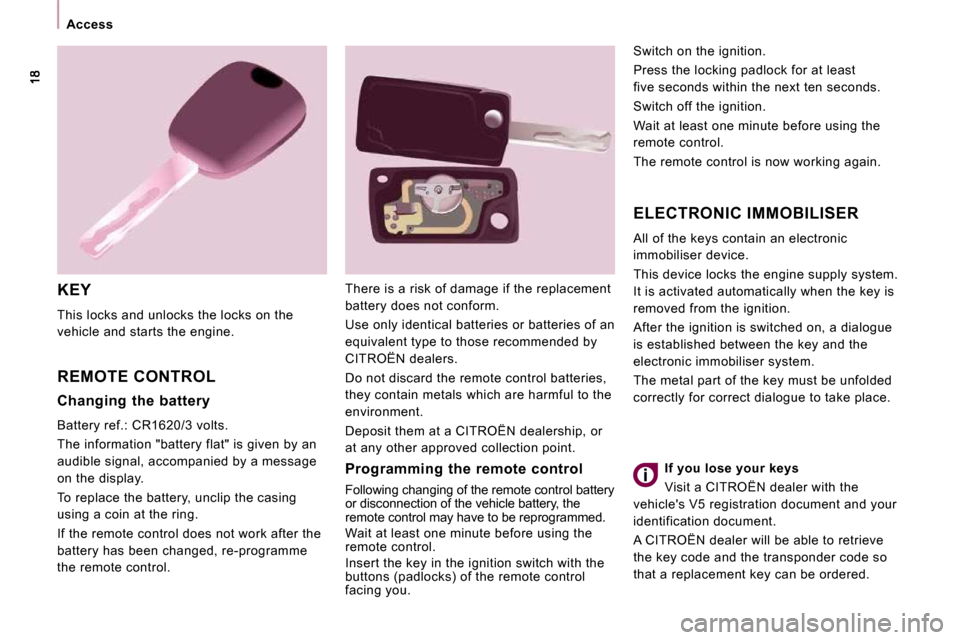
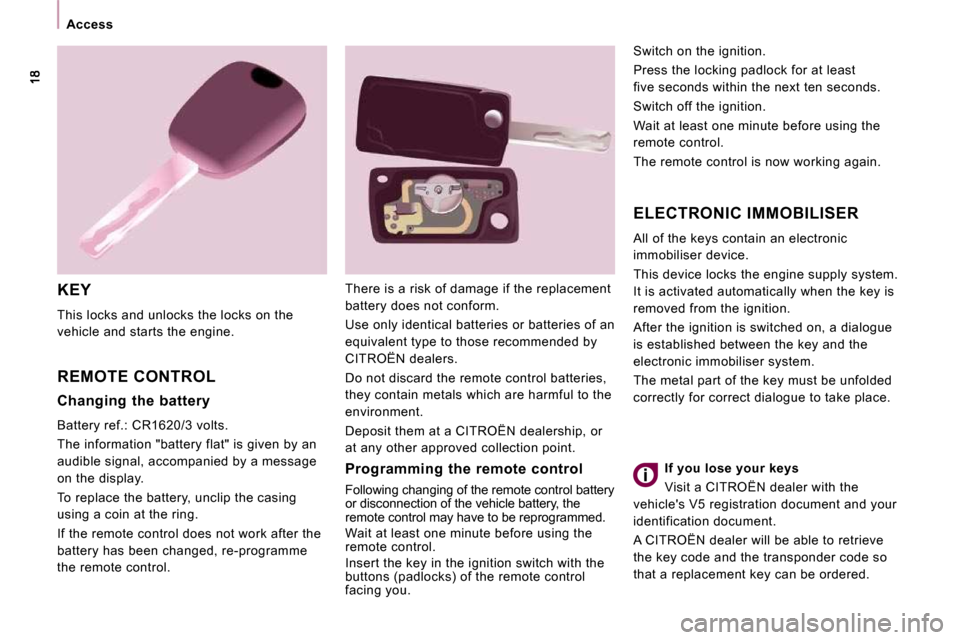
KEY
This locks and unlocks the locks on the
vehicle and starts the engine.
REMOTE CONTROL
ELECTRONIC IMMOBILISER
All of the keys contain an electronic
immobiliser device.
This device locks the engine supply system.
It is activated automatically when the key is
removed from the ignition.
After the ignition is switched on, a dialogue
is established between the key and the
electronic immobiliser system.
The metal part of the key must be unfolded
correctly for correct dialogue to take place.
Programming the remote control
Following changing of the remote control battery
or disconnection of the vehicle battery, the
remote control may have to be reprogrammed.
Wait at least one minute before using the
remote control.
Insert the key in the ignition switch with the
buttons (padlocks) of the remote control
facing you. Switch on the ignition.
Press the locking padlock for at least
five seconds within the next ten seconds.
Switch off the ignition.
Wait at least one minute before using the
remote control.
The remote control is now working again.
There is a risk of damage if the replacement
battery does not conform.
Use only identical batteries or batteries of an
equivalent type to those recommended by
CITROËN dealers.
Do not discard the remote control batteries,
they contain metals which are harmful to the
environment.
Deposit them at a CITROËN dealership, or
at any other approved collection point.
Changing the battery
Battery ref.: CR1620/3 volts.
The information "battery flat" is given by an
audible signal, accompanied by a message
on the display.
To replace the battery, unclip the casing
using a coin at the ring.
If the remote control does not work after the
battery has been changed, re-programme
the remote control. If you lose your keys
Visit a CITROËN dealer with the
vehicle's V5 registration document and your
identification document.
A CITROËN dealer will be able to retrieve
the key code and the transponder code so
that a replacement key can be ordered.
Page 16 of 225
Access
KEY
This locks and unlocks the locks on the
vehicle and starts the engine.
REMOTE CONTROL
ELECTRONIC IMMOBILISER
All of the keys contain an electronic
immobiliser device.
This device locks the engine supply system.
It is activated automatically when the key is
removed from the ignition.
After the ignition is switched on, a dialogue
is established between the key and the
electronic immobiliser system.
The metal part of the key must be unfolded
correctly for correct dialogue to take place.
Programming the remote control
Following changing of the remote control battery
or disconnection of the vehicle battery, the
remote control may have to be reprogrammed.
Wait at least one minute before using the
remote control.
Insert the key in the ignition switch with the
buttons (padlocks) of the remote control
facing you. Switch on the ignition.
Press the locking padlock for at least
five seconds within the next ten seconds.
Switch off the ignition.
Wait at least one minute before using the
remote control.
The remote control is now working again.
There is a risk of damage if the replacement
battery does not conform.
Use only identical batteries or batteries of an
equivalent type to those recommended by
CITROËN dealers.
Do not discard the remote control batteries,
they contain metals which are harmful to the
environment.
Deposit them at a CITROËN dealership, or
at any other approved collection point.
Changing the battery
Battery ref.: CR1620/3 volts.
The information "battery flat" is given by an
audible signal, accompanied by a message
on the display.
To replace the battery, unclip the casing
using a coin at the ring.
If the remote control does not work after the
battery has been changed, re-programme
the remote control. If you lose your keys
Visit a CITROËN dealer with the
vehicle's V5 registration document and your
identification document.
A CITROËN dealer will be able to retrieve
the key code and the transponder code so
that a replacement key can be ordered.
Page 23 of 225
24
Instruments and controls
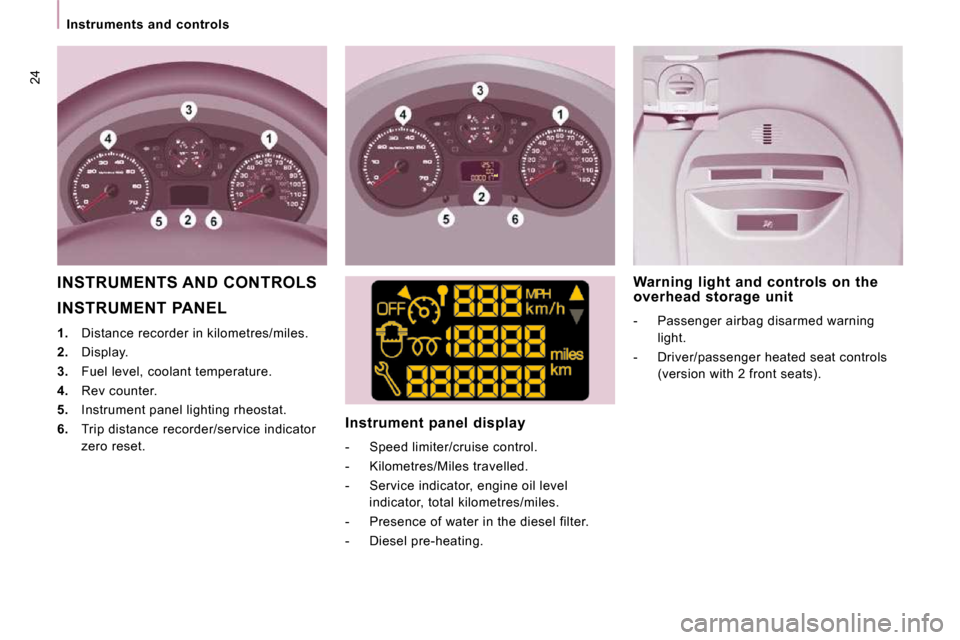
INSTRUMENT PANEL
1. Distance recorder in kilometres/miles.
2. Display.
3. Fuel level, coolant temperature.
4. Rev counter.
5. Instrument panel lighting rheostat.
6. Trip distance recorder/service indicator
zero reset. Instrument panel display
- Speed limiter/cruise control.
- Kilometres/Miles travelled.
- Service indicator, engine oil level
indicator, total kilometres/miles.
- Presence of water in the diesel filter.
- Diesel pre-heating. Warning light and controls on the
overhead storage unit
- Passenger airbag disarmed warning
light.
- Driver/passenger heated seat controls (version with 2 front seats).
INSTRUMENTS AND CONTROLS
Page 24 of 225

25
Instruments and controls
READY TO GO
2
ADJUSTING THE TIME
- turn to the left: 24 H or 12 H is displayed,
- turn to the right to select 24 H or 12 H,
- turn to the left to complete the time adjustment.
After approximately 30 seconds without any
action, the display returns to the normal
display. Centre console with display
The display - time sequence
is linked according to model
(version). The access to the Date
is only active when the model
version offers a date in words.
Centre console without display
To adjust the time of the clock
on the instrument panel, use the
left-hand button on the instrument
panel then carry out the
operations in the following order:
- turn to the left: the minutes flash,
- turn to the right to increase the minutes (hold the button to the right for rapid
scrolling),
- turn to the left: the hours flash,
- turn to the right to increase the hours (hold the button to the right for rapid
scrolling), To adjust the time indicated on the
display, refer to the "Adjusting the date
and time" section of chapter 9.
Instrument panel without display
Page 25 of 225

25
Instruments and controls
READY TO GO
2
ADJUSTING THE TIME
- turn to the left: 24 H or 12 H is displayed,
- turn to the right to select 24 H or 12 H,
- turn to the left to complete the time adjustment.
After approximately 30 seconds without any
action, the display returns to the normal
display. Centre console with display
The display - time sequence
is linked according to model
(version). The access to the Date
is only active when the model
version offers a date in words.
Centre console without display
To adjust the time of the clock
on the instrument panel, use the
left-hand button on the instrument
panel then carry out the
operations in the following order:
- turn to the left: the minutes flash,
- turn to the right to increase the minutes (hold the button to the right for rapid
scrolling),
- turn to the left: the hours flash,
- turn to the right to increase the hours (hold the button to the right for rapid
scrolling), To adjust the time indicated on the
display, refer to the "Adjusting the date
and time" section of chapter 9.
Instrument panel without display
Page 26 of 225
Instruments and controls
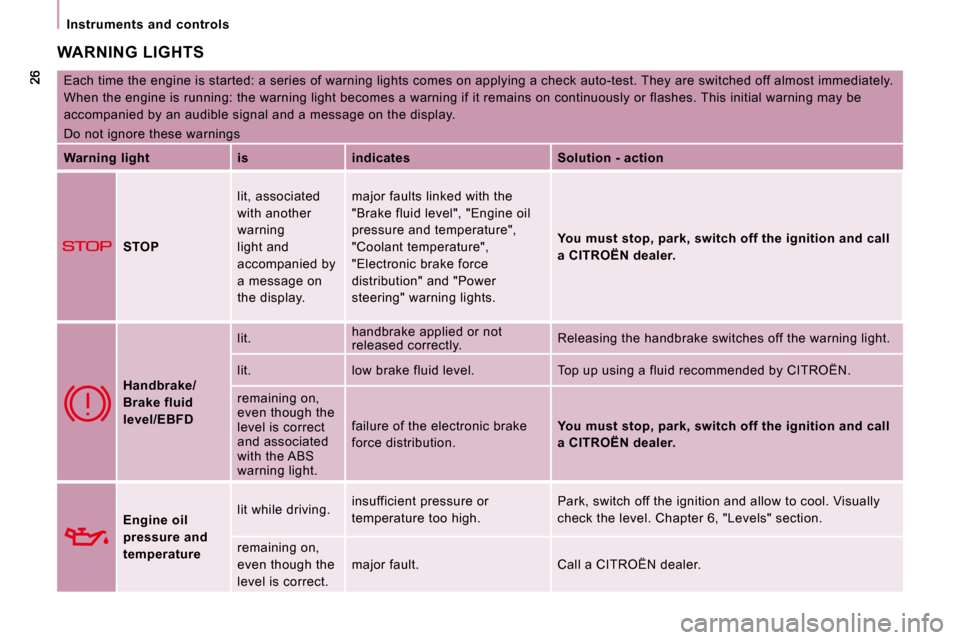
WARNING LIGHTS
Each time the engine is started: a series of warning lights comes on applying a check auto-test. They are switched off almost immediately.
When the engine is running: the warning light becom es a warning if it remains on continuously or flashes. This initial warning may be
accompanied by an audible signal and a message on t he display.
Do not ignore these warnings
Warning light is indicates Solution - action
STOP lit, associated
with another
warning
light and
accompanied by
a message on
the display. major faults linked with the
"Brake fluid level", "Engine oil
pressure and temperature",
"Coolant temperature",
"Electronic brake force
distribution" and "Power
steering" warning lights.
You must stop, park, switch off the ignition and
call
a CITROËN dealer.
Handbrake/
Brake fluid
level/EBFD lit.
handbrake applied or not
released correctly. Releasing the handbrake switches off the warning l
ight.
lit. low brake fluid level. Top up using a fluid recommended by CITROËN.
remaining on,
even though the
level is correct
and associated
with the ABS
warning light. failure of the electronic brake
force distribution.
You must stop, park, switch off the ignition and
call
a CITROËN dealer.
Engine oil
pressure and
temperature lit while driving.
insufficient pressure or
temperature too high. Park, switch off the ignition and allow to cool. V
isually
check the level. Chapter 6, "Levels" section.
remaining on,
even though the
level is correct. major fault. Call a CITROËN dealer.
Page 27 of 225
27
Instruments and controls
READY TO GO
2
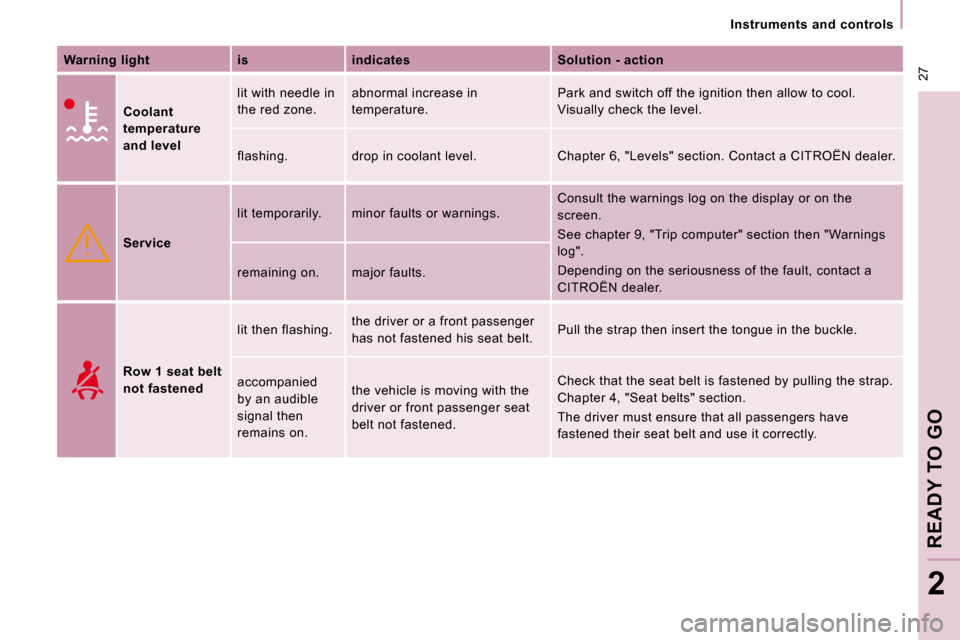
Warning light is indicates Solution - action
Coolant
temperature
and level lit with needle in
the red zone.
abnormal increase in
temperature. Park and switch off the ignition then allow to coo
l.
Visually check the level.
flashing. drop in coolant level. Chapter 6, "Lev els" section. Contact a CITROËN dealer.
Service lit temporarily. minor faults or warnings.
Consult the warnings log on the display or on the
screen.
See chapter 9, "Trip computer" section then "Warnin
gs
log".
Depending on the seriousness of the fault, contact a
CITROËN dealer.
remaining on. major faults.
Row 1 seat belt
not fastened lit then flashing.
the driver or a front passenger
has not fastened his seat belt. Pull the strap then insert the tongue in the buckl
e.
accompanied
by an audible
signal then
remains on. the vehicle is moving with the
driver or front passenger seat
belt not fastened. Check that the seat belt is fastened by pulling th
e strap.
Chapter 4, "Seat belts" section.
The driver must ensure that all passengers have
fastened their seat belt and use it correctly.