stop and go DACIA SANDERO STEPWAY 2016 2.G Owner's Manual
[x] Cancel search | Manufacturer: DACIA, Model Year: 2016, Model line: SANDERO STEPWAY, Model: DACIA SANDERO STEPWAY 2016 2.GPages: 174, PDF Size: 2.78 MB
Page 93 of 174
headrest................................................ (up to the end of the DU)
adjusting your driving position .............. (up to the end of the DU)
3.17
ENG_UD20454_5
Appuis-tête arrière (B90 - Dacia)
ENG_NU_817-10_B90_Dacia_3
Rear headrests
REAR HEADRESTS
The headrest is a safety
component. Ensure that it is
fitted and in the correct po-
sition: the top of your head
should be in line with the top of the
headrest.
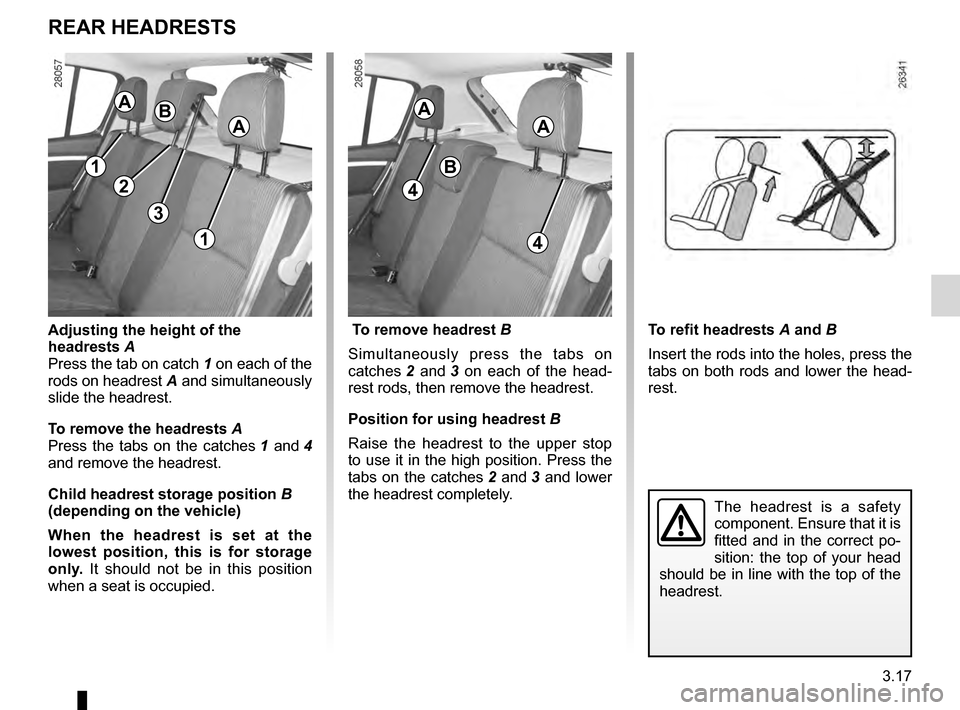
Adjusting the height of the
headrests A
Press the tab on catch
1 on each of the
rods on headrest
A and simultaneously
slide the headrest.
To remove the headrests
A
Press the tabs on the catches
1 and 4
and remove the headrest.
Child headrest storage position
B
(depending on the vehicle)
W
hen the headrest is set at the
lowest position, this is for storage
only. It should not be in this position
when a seat is occupied. To remove headrest
B
Simultaneously press the tabs on
catches
2
and
3
on each of the head-
rest rods, then remove the headrest.
Position for using headrest
B
R
aise the headrest to the upper stop
to use it in the high position. Press the
tabs on the catches
2 and 3 and lower
the headrest completely. To refit headrests
A and B
Insert the rods into the holes, press the
tabs on both rods and lower the head-
rest.
1
2
3
1
ABA
A
B
A
4
4
Page 112 of 174
4.14
ENG_UD26811_2
Entretien de la carrosserie (peinture mate) (X44 - X77 - J77 - X85 - \
B90 - X61 - TEST - X77 ph2 - X95 - B95 - D95 - K95 - J95 - R95 - L90 Ph2 - F90 Ph2 - R90\
Ph2 - X62
ENG_NU_817-10_B90_Dacia_4
Respect local regulations about wash-
ing vehicles (e.g. do not wash your ve-
hicle on a public highway).
Observe the vehicle stopping distances
when driving on gravelled surfaces to
prevent paint damage.
Repair, or have repaired quickly, areas
where the paint has been damaged, to
prevent corrosion spreading.
Remember to visit the body shop pe-
riodically in order to maintain your
anti-corrosion warranty. Refer to the
Maintenance Document.
If it is necessary to clean mechani-
cal components, hinges, etc., spray
them with products approved by our
Technical Department to protect them
after they have been cleaned.
BOdyWORk MAINTENANCE (2/2)
We have selected special products
to care for your vehicle and you can
obtain these from the manufactur-
er’s accessory outlets.
Using a roller type car wash
Return the windscreen wiper stalk to
the Park position (refer to the informa-
tion on the “Windscreen washer, wiper”
in Section 1). Check the mounting of
external accessories, additional lights
and mirrors, and ensure that the wiper
blades are secured with adhesive tape.
Remove the radio aerial mast if your
vehicle is fitted with this equipment.
Remember to remove the tape and refit
the antenna after washing.
Cleaning the headlights
As the headlights are made of plastic
“glass”, use a soft cloth or cotton wool
to clean them. If this does not clean
them properly, moisten the cloth with
soapy water, then wipe clean with a soft
damp cloth or cotton wool.
Finally, carefully dry off with a soft dry
cloth.
Cleaning products containing alco-
hol must not be used.
Vehicles with a matte paint
finish
This type of paint requires certain pre-
cautions.
d
o not do the following
–
use wax-based products (polishing);
–
rub hard;
–
wash
the vehicle in a roller-type car
wash;
–
wash
the vehicle using a high-pres-
sure device;
–
attach
stickers to the paintwork (risk
of leaving marks).
you should do the following
W
ash the vehicle by hand using plenty
of water, using a soft cloth or a gentle
sponge.
Page 119 of 174
JauneNoirNoir texte
5.5
ENG_UD22290_8
Kit de gonflage des pneumatiques (B90 - L90 Ph2 - F90 Ph2 - R90 Ph2 - D\
acia)
ENG_NU_817-10_B90_Dacia_5
TYRE INFLATION KIT (2/3)
Depending on the vehicle, in the event
of a puncture, use the kit located in the
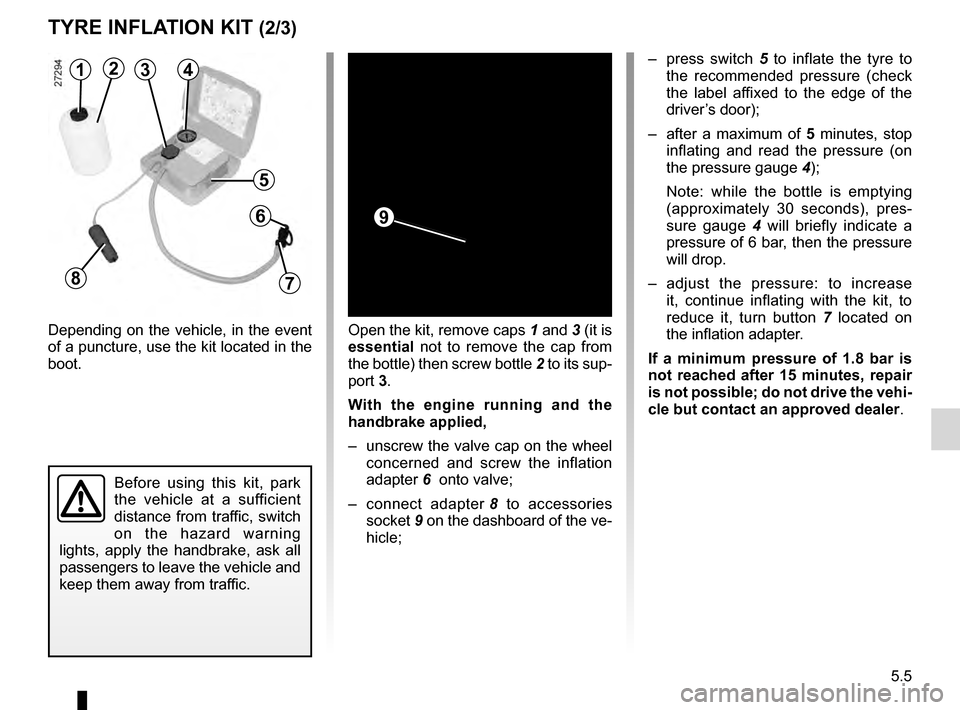
boot. –
p
ress switch
5
to inflate the tyre to
the recommended pressure (check
the label affixed to the edge of the
driver’s door);
–
after
a maximum of
5 minutes, stop
inflating and read the pressure (on
the pressure gauge
4
);
Note: while the bottle is emptying
(approximately 30 seconds), pres-
sure gauge
4
will briefly indicate a
pressure of 6 bar, then the pressure
will drop.
–
a
djust the pressure: to increase
it, continue inflating with the kit, to
reduce it, turn button 7 located on
the inflation adapter.
If a minimum pressure of 1.8 bar is
not reached after 15 minutes, repair
is not possible; do not drive the vehi-
cle but contact an approved dealer .
1234
5
6
Before using this kit, park
the vehicle at a sufficient
distance from traffic, switch
on the hazard warning
lights, apply the handbrake, ask all
passengers to leave the vehicle and
keep them away from traffic.
8
Open the kit, remove caps 1 and 3 (it is
essential not to remove the cap from
the bottle) then screw bottle
2
to its sup-
port 3.
With the engine running and the
handbrake applied,
–
unscrew
the valve cap on the wheel
concerned and screw the inflation
adapter
6 onto valve;
–
c
onnect adapter
8
to accessories
socket
9
on the dashboard of the ve-
hicle;
9
7
Page 120 of 174
5.6
ENG_UD22290_8
Kit de gonflage des pneumatiques (B90 - L90 Ph2 - F90 Ph2 - R90 Ph2 - D\
acia)
ENG_NU_817-10_B90_Dacia_5
TYRE INFLATION KIT (3/3)
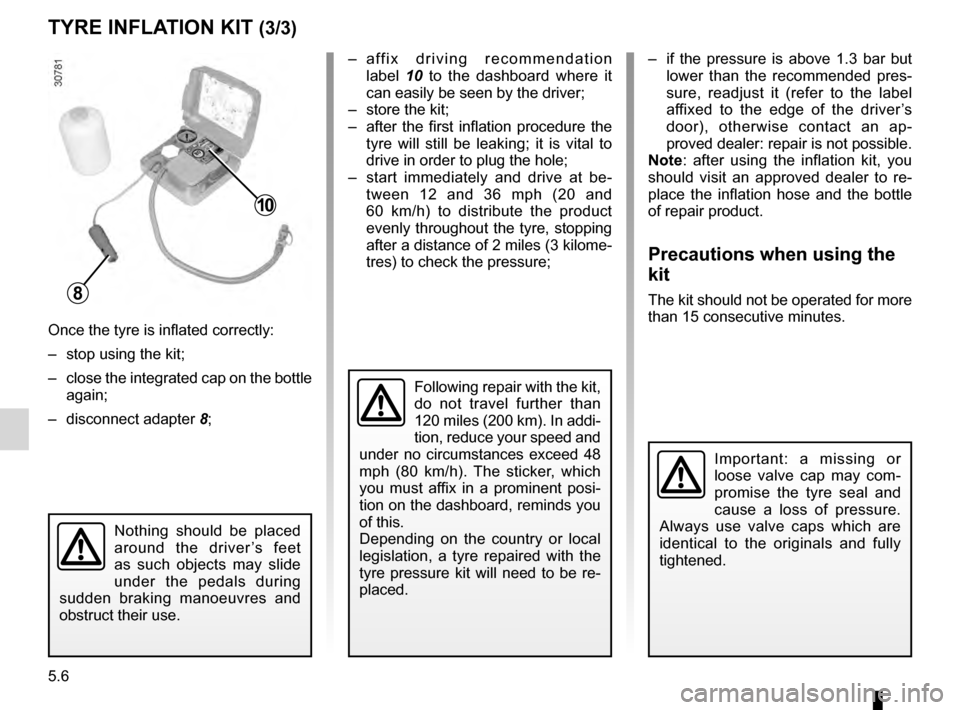
Once the tyre is inflated correctly:
–
stop using the kit;
–
close
the integrated cap on the bottle
again;
–
disconnect adapter
8;–
a
ff i x d r i v i n g r e c o m m e n d a t i o n
label
1
0
to the dashboard where it
can easily be seen by the driver;
–
store the kit;
–
after
the first inflation procedure the
tyre will still be leaking; it is vital to
drive in order to plug the hole;
–
s
tart immediately and drive at be-
tween 12 and 36
m
ph (20 and
60
k
m/h) to distribute the product
evenly throughout the tyre, stopping
after a distance of 2 miles (3 kilome-
tres) to check the pressure; –
i
f the pressure is above 1.3 bar but
lower than the recommended pres-
sure, readjust it (refer to the label
affixed to the edge of the driver ’s
door), otherwise contact an ap-
proved dealer: repair is not possible.
Note : after using the inflation kit, you
should visit an approved dealer to re-
place the inflation hose and the bottle
of repair product.
Precautions when using the
kit
The kit should not be operated for more
than 15 consecutive minutes.
Important: a missing or
loose valve cap may com-
promise the tyre seal and
cause a loss of pressure.
Always use valve caps which are
identical to the originals and fully
tightened.
Following repair with the kit,
do not travel further than
120 miles (200 km). In addi-
tion, reduce your speed and
under no circumstances exceed 48
mph (80 km/h). The sticker, which
you must affix in a prominent posi-
tion on the dashboard, reminds you
of this.
Depending on the country or local
legislation, a tyre repaired with the
tyre pressure kit will need to be re-
placed.
Nothing should be placed
around the driver ’s feet
as such objects may slide
under the pedals during
sudden braking manoeuvres and
obstruct their use.
8
10
Page 139 of 174
batterytroubleshooting ............................... (up to the end of the DU)
practical advice ..................................... (up to the end of the DU)
5.25
ENG_UD17938_1
Batterie : dépannage (B90 - Dacia)
ENG_NU_817-10_B90_Dacia_5
Battery
BATTERY: troubleshooting (1/2)
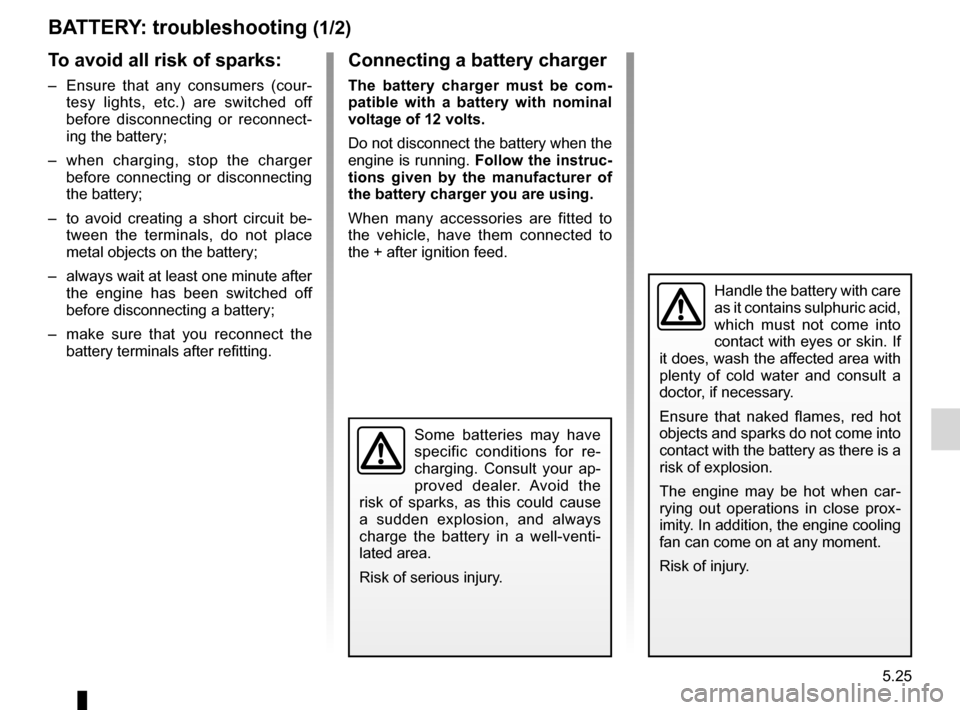
To avoid all risk of sparks:
– Ensure that any consumers (cour- tesy lights, etc.) are switched off
before disconnecting or reconnect-
ing the battery;
–
w
hen charging, stop the charger
before connecting or disconnecting
the battery;
–
t
o avoid creating a short circuit be-
tween the terminals, do not place
metal objects on the battery;
–
always
wait at least one minute after
the engine has been switched off
before disconnecting a battery;
–
m
ake sure that you reconnect the
battery terminals after refitting.
Handle the battery with care
as it contains sulphuric acid,
which must not come into
contact with eyes or skin. If
it does, wash the affected area with
plenty of cold water and consult a
doctor, if necessary.
Ensure that naked flames, red hot
objects and sparks do not come into
contact with the battery as there is a
risk of explosion.
The engine may be hot when car-
rying out operations in close prox-
imity. In addition, the engine cooling
fan can come on at any moment.
Risk of injury.
Connecting a battery charger
The battery charger must be com-
patible with a battery with nominal
voltage of 12 volts.
Do not disconnect the battery when the
engine is running. Follow the instruc-
tions given by the manufacturer of
the battery charger you are using.
When many accessories are fitted to
the vehicle, have them connected to
the + after ignition feed.
Some batteries may have
specific conditions for re-
charging. Consult your ap-
proved dealer. Avoid the
risk of sparks, as this could cause
a sudden explosion, and always
charge the battery in a well-venti-
lated area.
Risk of serious injury.
Page 143 of 174
towing hitch........................................... (up to the end of the DU)
practical advice ..................................... (up to the end of the DU)
towing breakdown ...................................... (up to the end of the DU)
5.29
ENG_UD17944_4
Remorquage : dépannage (B90 - Dacia)
ENG_NU_817-10_B90_Dacia_5
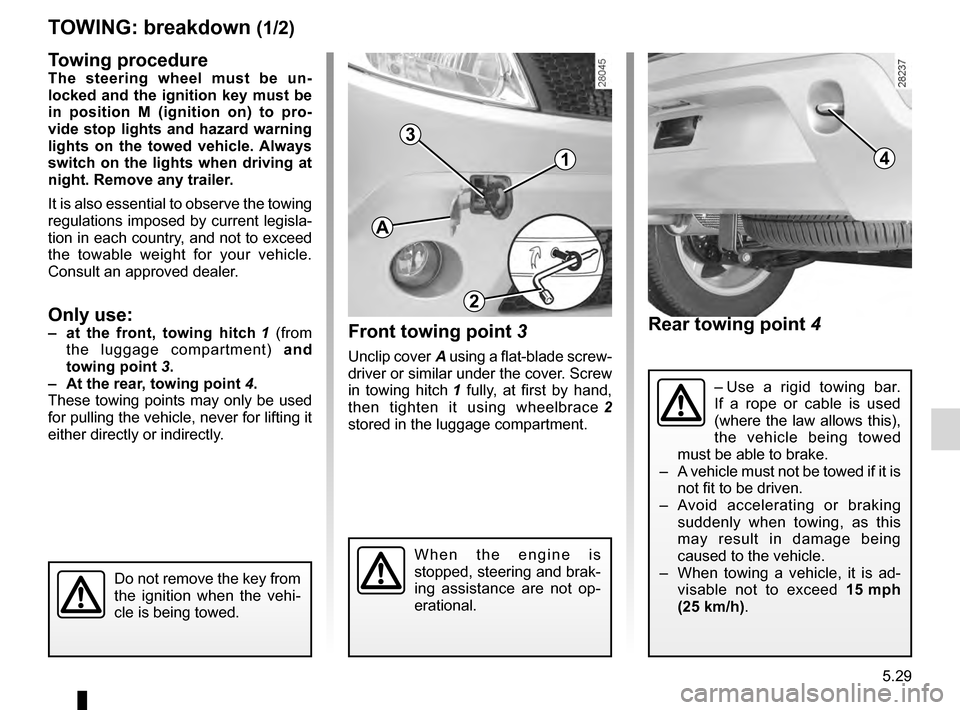
Rear towing point 4
Front towing point
3
Unclip cover A using a flat-blade screw-
driver or similar under the cover. Screw
in towing hitch
1
fully, at first by hand,
then tighten it using wheelbrace
2
stored in the luggage compartment.
Towing: breakdown
W h e n t h e e n g i n e i s
stopped, steering and brak-
ing assistance are not op-
erational.
41
3
Towing procedureThe steering wheel must be un-
locked and the ignition key must be
in position M (ignition on) to pro-
vide stop lights and hazard warning
lights on the towed vehicle. Always
switch on the lights when driving at
night. Remove any trailer.
It is also essential to observe the towing
regulations imposed by current legisla-
tion in each country, and not to exceed
the towable weight for your vehicle.
Consult an approved dealer.
Only use:– at the front, towing hitch 1 (from
the luggage compartment) and
towing point
3.
–
At the rear
, towing point 4.
These towing points may only be used
for pulling the vehicle, never for lifting it
either directly or indirectly.
Do not remove the key from
the ignition when the vehi-
cle is being towed.
– Use a rigid towing bar.
If a rope or cable is used
(where the law allows this),
the vehicle being towed
must be able to brake.
–
A
vehicle must not be towed if it is
not fit to be driven.
–
A
void accelerating or braking
suddenly when towing, as this
may result in damage being
caused to the vehicle.
–
W
hen towing a vehicle, it is ad-
visable not to exceed 15
m
ph
(25
km/h).
TOWING: breakdown (1/2)
A
2
Page 148 of 174
operating faults ..................................... (up to the end of the DU)
practical advice ..................................... (up to the end of the DU)
faults operating faults ............................... (up to the end of the DU)
5.34
ENG_UD19739_7
Anomalies de fonctionnement (B90 - U90 - L90 Ph2 - F90 Ph2 - R90 Ph2 - \
Dacia)
ENG_NU_817-10_B90_Dacia_5
Jaune NoirNoir texte
Operating faults
OPERATING FAULTS (1/5)
The following advice will enable you to carry out quick, temporary repairs. For safety reasons you should always contact
an approved dealer as soon as possible.
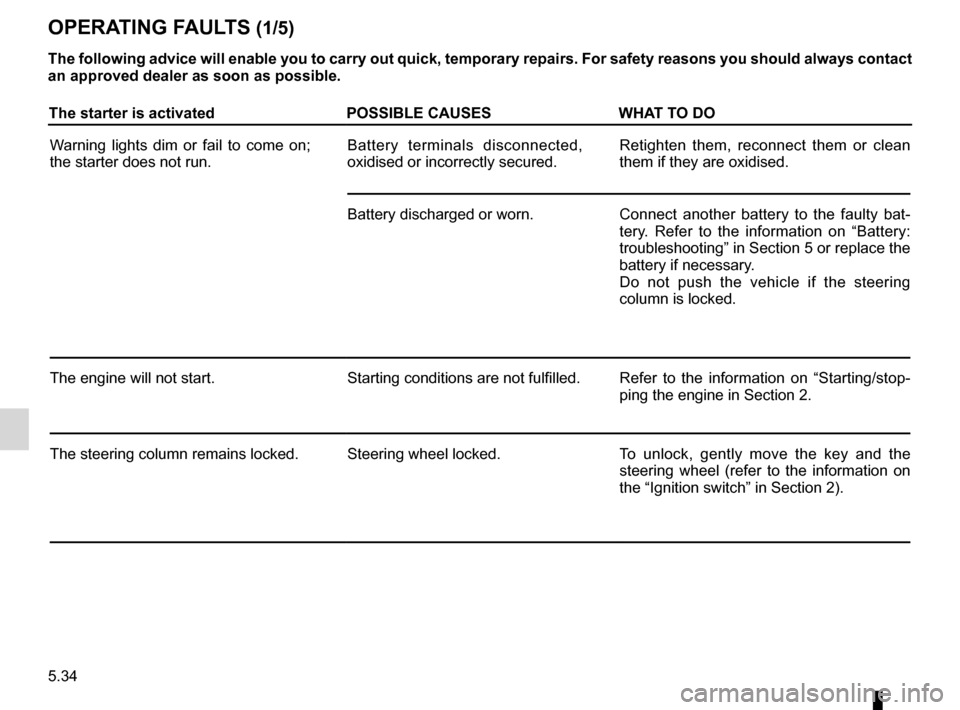
The starter is activated POSSIBLE CAUSESWHAT TO DO
Warning lights dim or fail to come on;
the starter does not run. Battery terminals disconnected,
oxidised or incorrectly secured.Retighten them, reconnect them or clean
them if they are oxidised.
Battery discharged or worn. Connect another battery to the faulty bat-
tery. Refer to the information on “Battery:
troubleshooting” in Section 5 or replace the
battery if necessary.
Do not push the vehicle if the steering
column is locked.
The engine will not start. Starting conditions are not fulfilled. Refer to the information on “Starting/stop-
ping the engine in Section 2.
The steering column remains locked. Steering wheel locked. To unlock, gently move the key and the
steering wheel (refer to the information on
the “Ignition switch” in Section 2).
Page 149 of 174
JauneNoirNoir texte
5.35
ENG_UD19739_7
Anomalies de fonctionnement (B90 - U90 - L90 Ph2 - F90 Ph2 - R90 Ph2 - \
Dacia)
ENG_NU_817-10_B90_Dacia_5
OPERATING FAULTS (2/5)
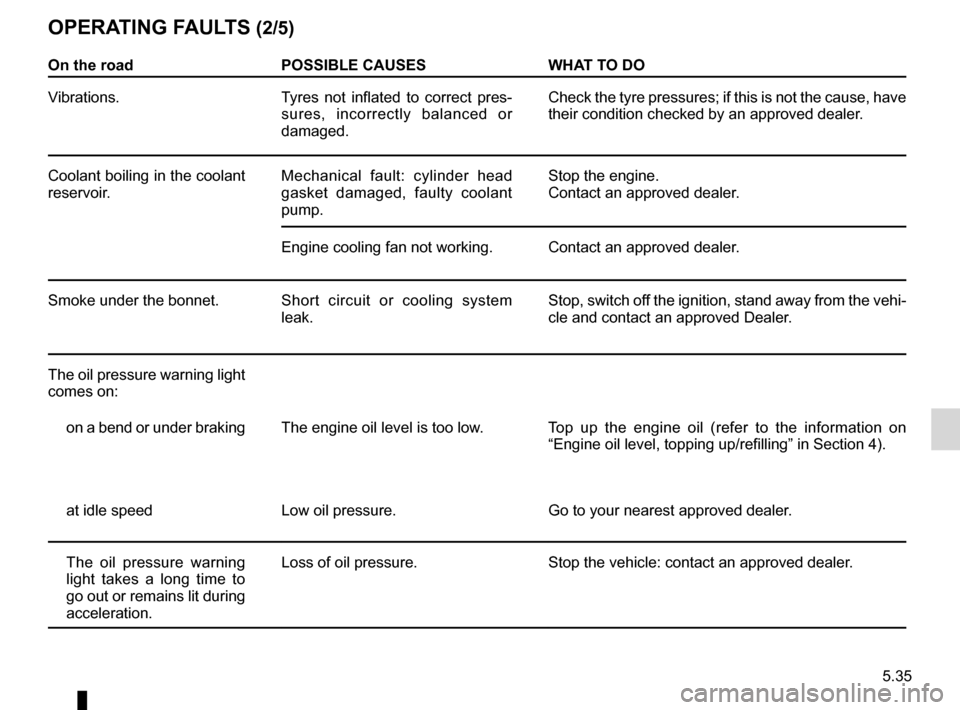
On the road POSSIBLE CAUSES WHAT TO DO
Vibrations. Tyres not inflated to correct pres-
sures, incorrectly balanced or
damaged. Check the tyre pressures; if this is not the cause, have
their condition checked by an approved dealer.
Coolant boiling in the coolant
reservoir. Mechanical fault: cylinder head
gasket damaged, faulty coolant
pump. Stop the engine.
Contact an approved dealer.
Engine cooling fan not working. Contact an approved dealer.
Smoke under the bonnet. Short circuit or cooling system leak. Stop, switch off the ignition, stand away from the vehi-
cle and contact an approved Dealer.
The oil pressure warning light
comes on: on a bend or under braking The engine oil level is too low. Top up the engine oil (refer to the information on “Engine oil level, topping up/refilling” in Section 4).
at idle speed Low oil pressure. Go to your nearest approved dealer.
The oil pressure warning
light takes a long time to
go out or remains lit during
acceleration. Loss of oil pressure.
Stop the vehicle: contact an approved dealer.
Page 151 of 174
JauneNoirNoir texte
5.37
ENG_UD19739_7
Anomalies de fonctionnement (B90 - U90 - L90 Ph2 - F90 Ph2 - R90 Ph2 - \
Dacia)
ENG_NU_817-10_B90_Dacia_5
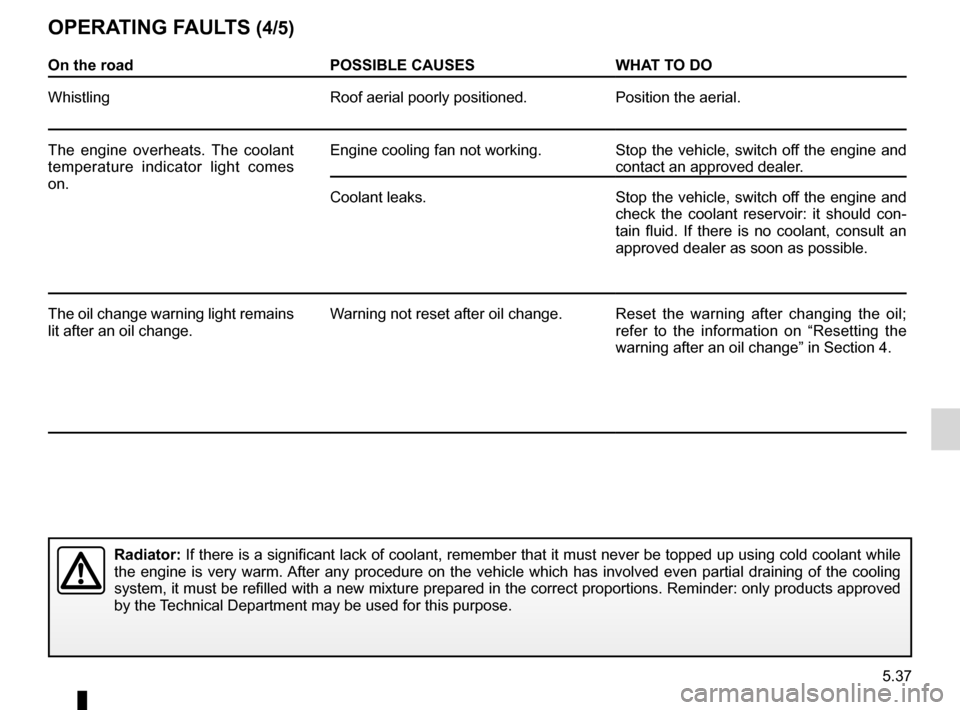
OPERATING FAULTS (4/5)
On the road POSSIBLE CAUSES WHAT TO DO
Whistling Roof aerial poorly positioned. Position the aerial.
The engine overheats. The coolant
temperature indicator light comes
on. Engine cooling fan not working. Stop the vehicle, switch off the engine and
contact an approved dealer.
Coolant leaks. Stop the vehicle, switch off the engine and
check the coolant reservoir: it should con-
tain fluid. If there is no coolant, consult an
approved dealer as soon as possible.
The oil change warning light remains
lit after an oil change. Warning not reset after oil change. Reset the warning after changing the oil;
refer to the information on “Resetting the
warning after an oil change” in Section 4.
Radiator: If there is a significant lack of coolant, remember that it must never be topped up using cold coolant while
the engine is very warm. After any procedure on the vehicle which has involved even partial draining of the cooling
system, it must be refilled with a new mixture prepared in the correct proportions. Reminder: only products approved
by the Technical Department may be used for this purpose.