length DATSUN PICK-UP 1977 Service Manual
[x] Cancel search | Manufacturer: DATSUN, Model Year: 1977, Model line: PICK-UP, Model: DATSUN PICK-UP 1977Pages: 537, PDF Size: 35.48 MB
Page 54 of 537
Engine
Mechanical
Valve
head
diameter
I
In
42
0
to
42
2
1
654
to
1
661
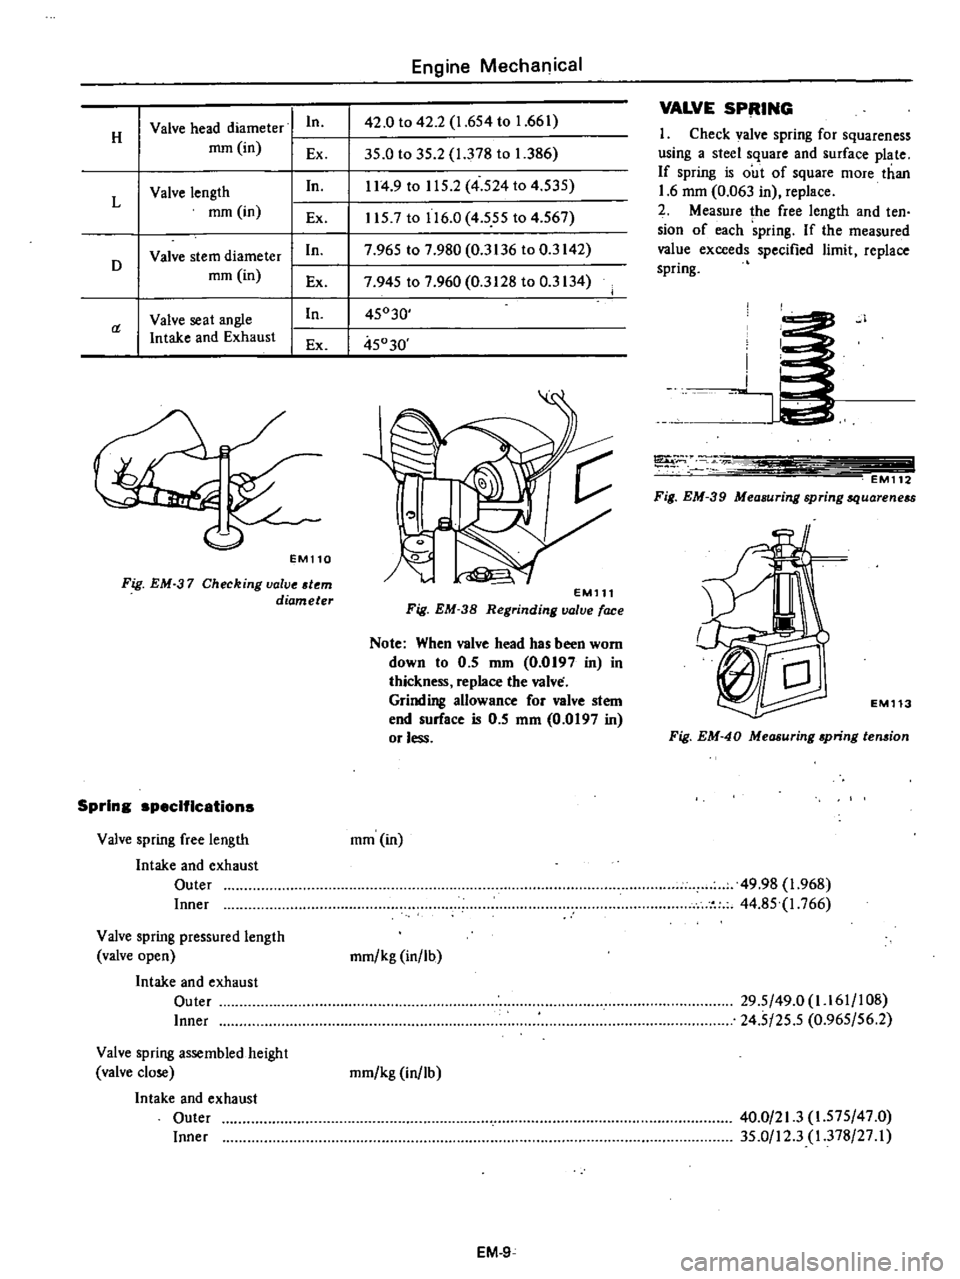
VALVE
SPRING
H
1
Check
valve
spring
for
squareness
mm
in
Ex
35
0
to
35
2
1
378
to
1
386
using
a
steel
square
and
surface
plate
In
114
9
to
115
2
4
524
to
4
535
If
spring
is
out
of
square
more
than
Valve
length
1
6
mm
0
063
in
replace
L
mm
in
2
Measure
lhe
free
length
and
ten
Ex
1157
to
116
0
4
555
to
4
567
sion
of
each
spring
If
the
measured
Valve
stem
diameter
In
7
965
to
7
980
0
3136
to
0
3142
value
exceeds
specified
limit
replace
D
mm
in
spring
Ex
7
945
to
7
960
0
3128
to
0
3134
Valve
seat
angle
In
45030
a
Intake
and
Exhaust
Ex
45030
EM110
Fig
EM
37
Checking
valve
tern
diameter
Spring
specifications
Valve
spring
free
length
Intake
and
exhaust
Outer
Inner
Valve
spring
pressured
length
valve
open
Intake
and
exhaust
Outer
Inner
Valve
spring
assembled
height
valve
close
Intake
and
exhaust
Outer
Inner
EMll1
Fig
EM
38
Regrinding
valve
face
Note
When
valve
head
has
been
worn
down
to
0
5
nun
0
0197
in
in
thickness
replace
the
valve
Grinding
allowance
for
valve
stem
end
surface
is
0
5
mm
0
0197
in
or
less
mm
in
mmlkg
in
lb
mmlkg
in
lb
EM
9
I
i
J
T
EM112
Fig
EM
39
Measuring
spring
quareneu
1
EM113
Fig
EM
40
Measuring
apring
ten
ion
49
98
1
968
44
85
1
766
29
5
49
0
1
161
108
24
5
25
5
0
965156
2
40
0
21
3
1
575
47
0
35
0
12
3
1
378
27
I
Page 61 of 537
r
Piston
pin
outside
diameter
Piston
pin
hole
diameter
Piston
pin
to
piston
clearance
I
Interference
fit
of
piston
pin
to
connecting
rod
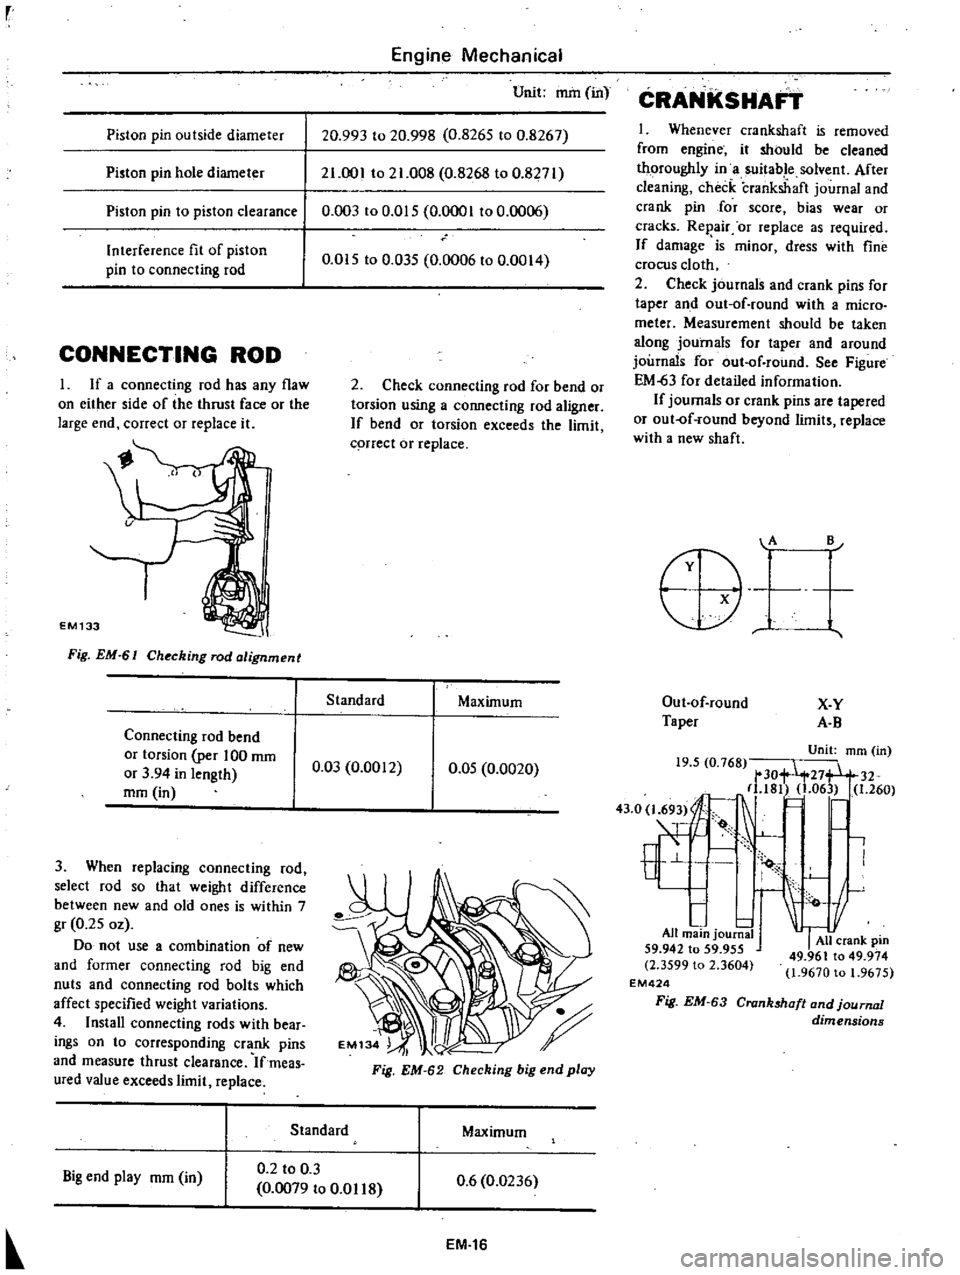
CONNECTING
ROD
I
If
a
connecting
rod
has
any
flaw
on
either
side
of
the
thrust
face
or
the
large
end
correct
or
replace
it
EM133
Fig
EM
61
Ch
cking
rod
alignment
Connecting
rod
bend
or
torsion
per
100
mm
or
3
94
in
length
mm
in
3
When
replacing
connecting
rod
select
rod
so
that
weight
difference
between
new
and
old
ones
is
within
7
gr
0
25
oz
Do
not
use
a
combination
of
new
and
former
connecting
rod
big
end
nuts
and
connecting
rod
bolts
which
affect
specified
weight
variations
4
Install
connecting
rods
with
bear
ings
on
to
corresponding
crank
pins
and
measure
thrust
clearance
Ifmeas
ured
value
exceeds
limit
replace
Engine
Mechanical
Unit
mm
in
20
993
to
20
998
0
8265
to
0
8267
21
001
to
21
008
0
8268
to
0
8271
0
003
to
0
015
0
0001
to
0
006
0
015
to
0
035
0
0006
to
0
0014
2
Check
connecting
rod
for
bend
or
torsion
using
a
connecting
rod
aligner
If
bend
or
torsion
exceeds
the
limit
q
rrect
or
replace
Standard
Maximum
0
03
0
0012
0
05
0
0020
Fig
EM
62
Checking
big
end
play
Standard
Maximum
Big
end
play
mm
in
0
2
to
0
3
0
0079
to
0
01
18
0
6
0
0236
EM
16
CRANKSHAFT
1
Whenever
crankshaft
is
removed
from
engine
it
should
be
cleaned
thoroughly
in
a
suitable
solvent
After
cleaning
check
crankshaft
journal
and
crank
pin
Jor
score
bias
wear
or
cracks
Rep
air
or
replace
as
required
If
damage
is
minor
dress
with
fine
crocus
cloth
2
Check
journals
and
crank
pins
for
taper
and
out
of
round
with
a
micro
meter
Measurement
should
be
taken
along
journals
for
taper
and
around
journals
for
out
of
round
See
Figure
EM
63
for
detailed
information
If
journals
or
crank
pins
are
tapered
or
out
of
round
beyond
limits
replace
with
a
new
shaft
A
B
Out
of
round
X
Y
Taper
A
B
Unit
mm
in
19
5
0
768
tt
30
27
32
181
1
06
1
260
43
O
l
69
I
E
1
All
main
journa
59
942
to
59
955
All
crank
pm
2
3599
l
2
3604
49
961
to
49
974
o
1
9670
to
1
9675
EM424
Fig
EM
63
Crankshaft
and
journal
dimensions
Page 72 of 537
Engine
Mechanical
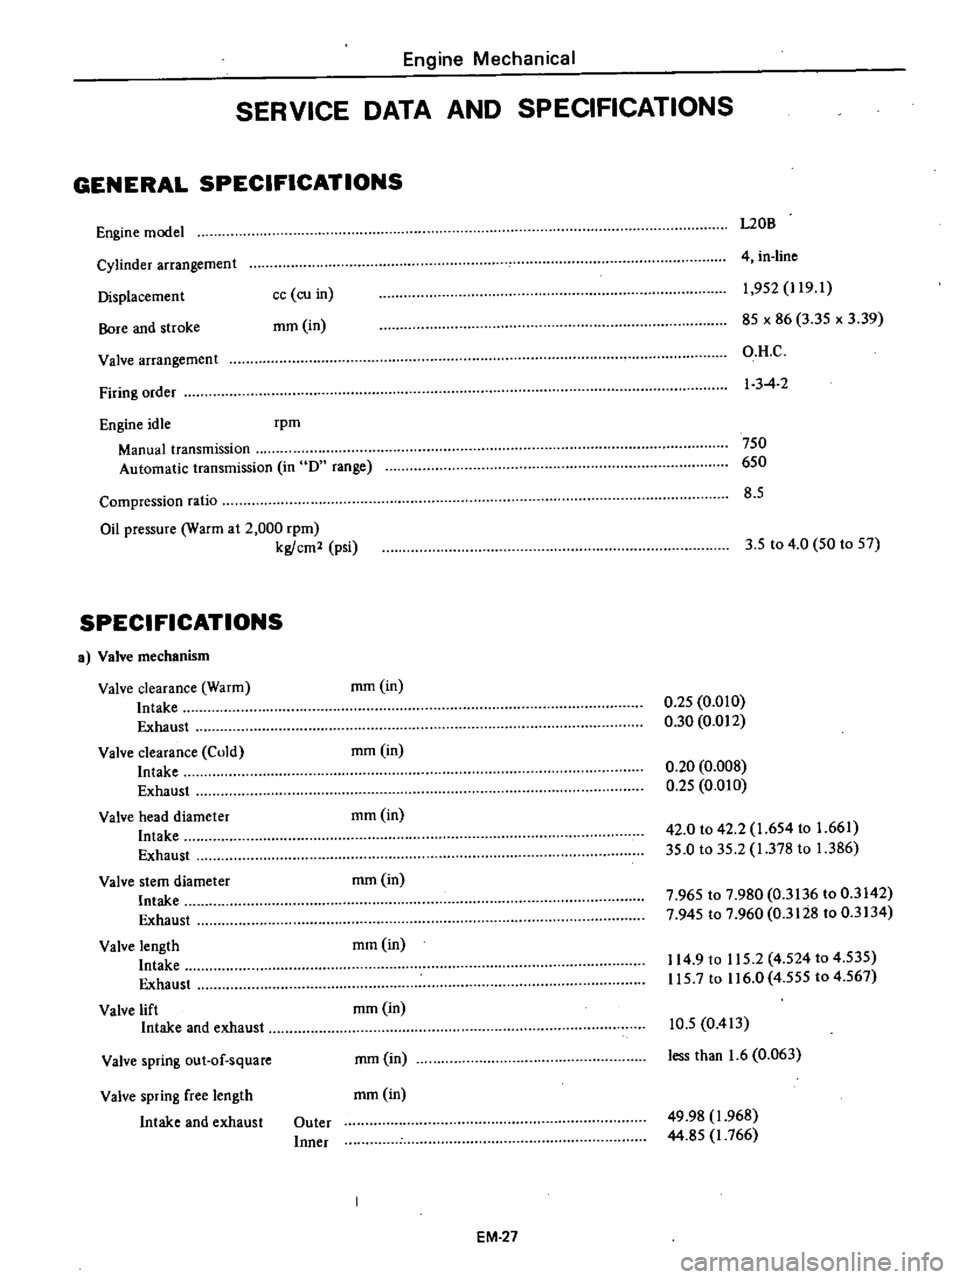
SERVICE
DATA
AND
SPECIFICATIONS
GENERAL
SPECIFICATIONS
Engine
model
L20B
Cylinder
arrangement
Displacemen
t
Bore
and
stroke
4
in
line
cc
co
in
mm
in
1
952
J
19
1
85
x
86
3
35
x
3
39
O
H
C
I
3
4
2
Valve
arrangement
Firing
order
Engine
idle
rpm
Manual
transmission
Automatic
transmission
in
D
range
750
650
8
5
Compression
ratio
Oil
pressure
Warm
at
2
000
rpm
kg
cm2
psi
3
5
to
4
0
50
to
57
SPECIFICATIONS
a
Valve
mechanism
Valve
clearance
Warm
Intake
Exhaust
Valve
clearance
Cold
Intake
Exhaust
Valve
head
diameter
Intake
Exhaust
Valve
stem
diameter
Intake
Exhaust
Valve
length
Intake
Exhaust
Valve
lift
Intake
and
exhaust
mm
in
0
25
0
010
0
30
0
012
mmOn
0
20
0
008
0
25
0
010
mm
in
42
0
to
42
2
1
654
to
1
661
35
0
to
35
2
1
378
to
1
386
mm
in
7
965
to
7
980
0
3136
to
0
3142
7
945
to
7
960
0
3128
to
0
3134
mmOn
114
9
to
115
2
4
524
to
4
535
115
7
to
116
0
4
555
to
4
567
mmOn
Valve
spring
out
of
square
mm
in
10
5
0
413
less
than
1
6
0
063
Valve
spring
free
length
mm
in
Intake
and
exhaust
Outer
Inner
49
98
1
968
44
85
J
766
EM
27
Page 73 of 537
Valve
spring
pressured
length
valve
open
Intake
and
exhaust
Outer
Inner
Valve
spring
assembled
height
valve
close
Intake
and
exhaust
Outer
Inner
Valve
guide
length
Intake
and
exhaust
Valve
guide
height
from
head
surface
Valve
guide
inner
diameter
Intake
and
exhaust
Valve
guide
outer
diameter
service
parts
Intake
and
exhaust
Valve
guide
to
stem
clearance
Intake
Exhaust
Valve
seat
width
Intake
Exhaust
Valve
seat
angle
Intake
and
exhaust
Valve
seat
interference
fit
Intake
Exhaust
Valve
guide
interference
fit
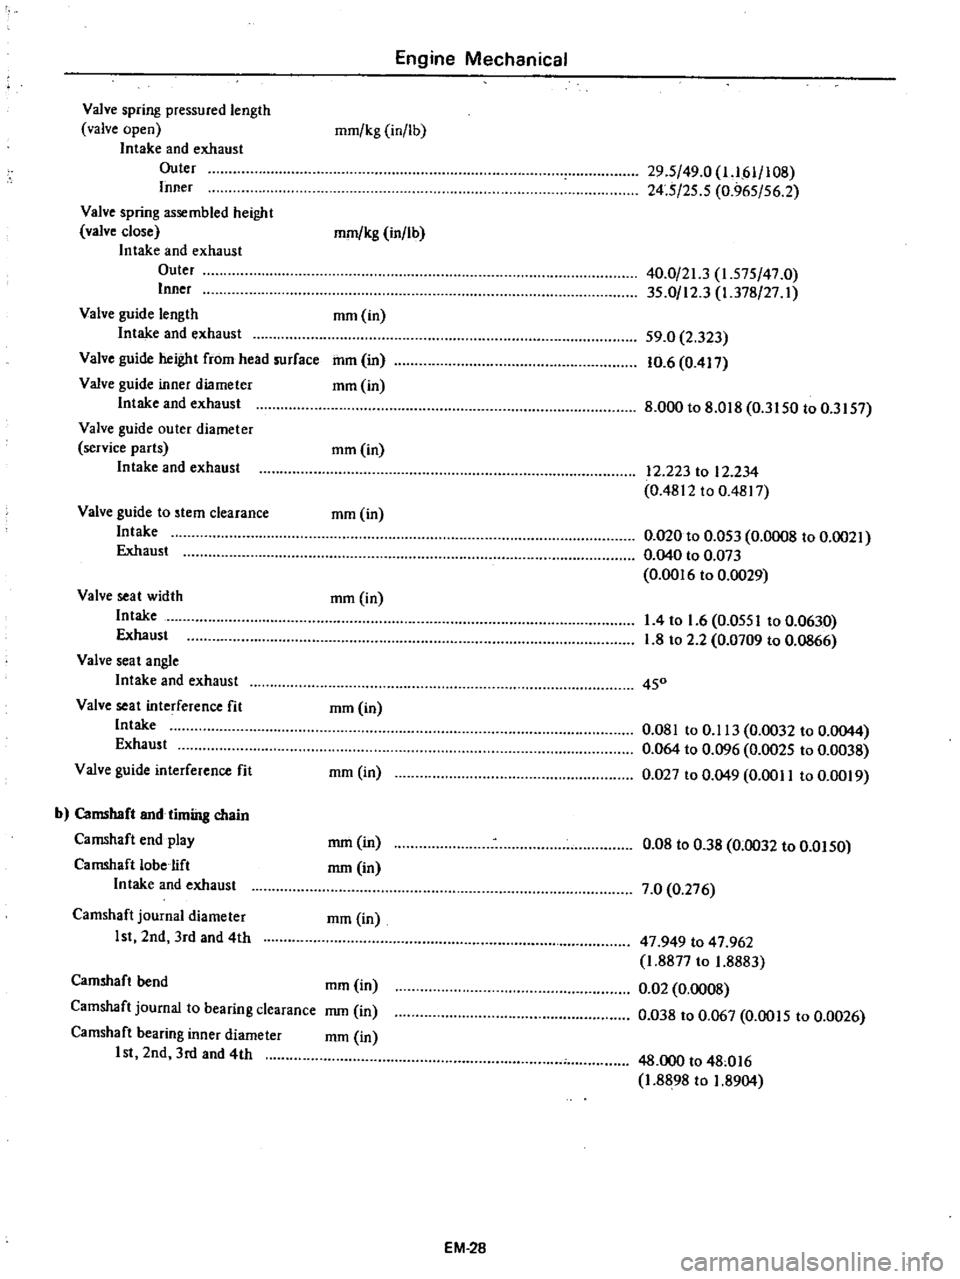
b
Camshaft
and
timing
chain
Camshaft
end
play
Camshaft
lobe
ift
Intake
and
exhaust
Camshaft
joumal
diameter
1st
2nd
3rd
and
4th
Engine
Mechanical
mm
kg
in
lb
mm
kg
in
lb
mm
in
mIll
in
mm
in
mm
in
mm
in
mm
in
mm
in
mm
in
rnm
in
rnm
in
mm
in
Camshaft
bend
mm
in
Camshaft
journal
to
bearing
clearance
mm
in
Camshaft
bearing
inner
diameter
rnm
in
1st
2nd
3rd
and
4th
29
5
49
0
1
IM
108
24
5
25
5
0
965
56
2
40
0
21
3
1
575
47
0
35
0
12
3
1
378
27
I
59
0
2
323
10
6
0
417
8
000
to
8
018
0
3150
to
0
3157
12
223
to
12
234
0
4812
to
0
4817
0
020
to
0
053
0
0008
to
0
0021
0
040
to
0
073
0
0016
to
0
0029
1
4
to
1
6
0
0551
to
0
0630
1
8
to
2
2
0
0709
to
0
0866
450
0
081
to
0
113
0
0032
to
0
0044
0
064
to
0
096
0
0025
to
0
0038
0
027
to
0
049
0
0011
to
0
0019
0
08
to
038
0
0032
to
0
0150
7
0
0
276
47
949
to
47
962
1
8877
to
1
8883
0
02
0
0008
0
Q38
to
0
067
0
00
I
5
to
0
0026
48
000
to
48
016
1
8898
to
1
8904
EM
28
Page 74 of 537
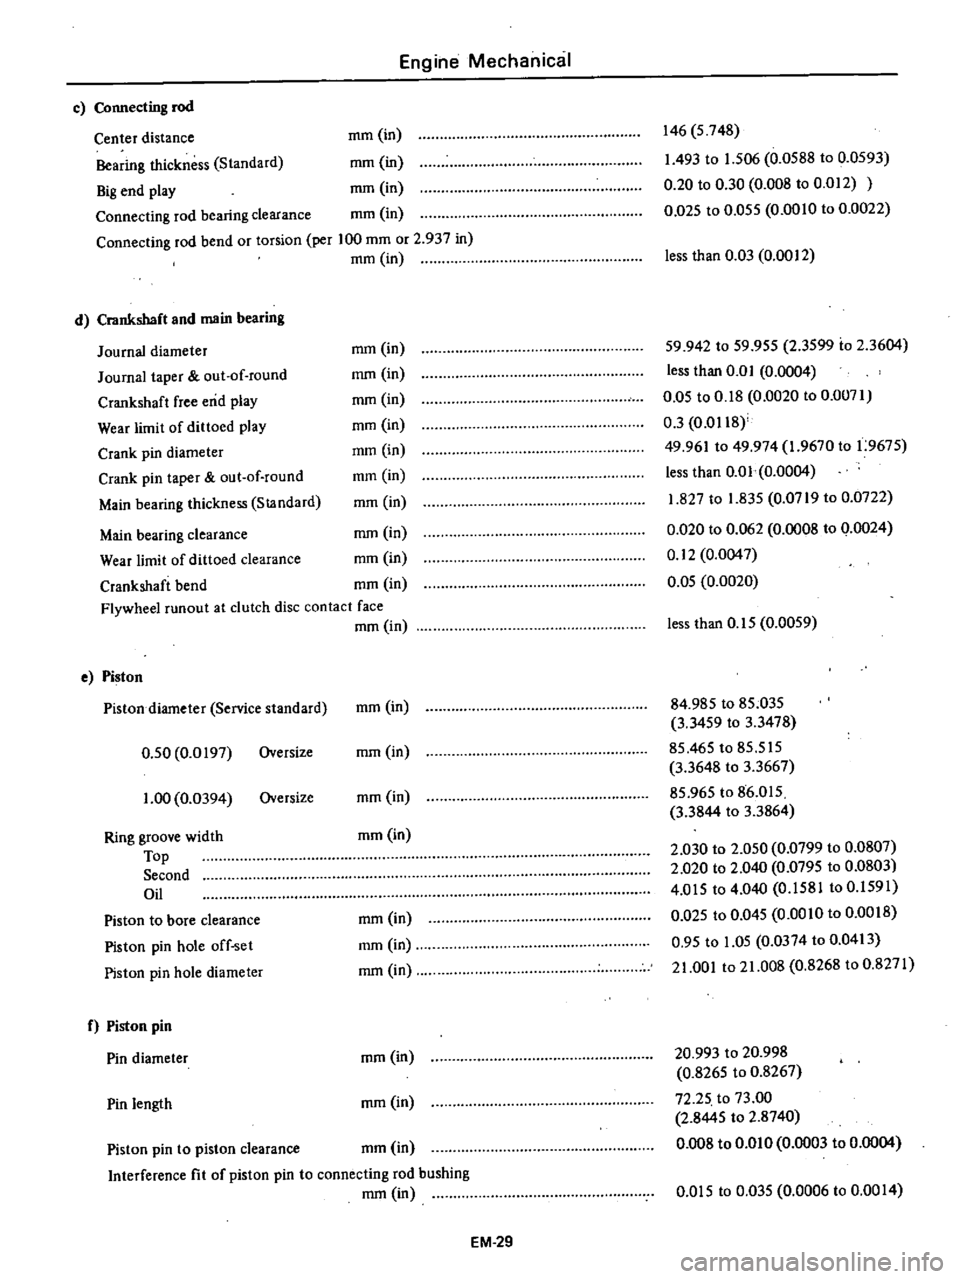
Engine
Mechanical
c
Connecting
rod
Center
distance
mm
in
Bearing
thickness
Standard
mm
in
Big
end
play
mm
in
Connecting
rod
bearing
clearance
mm
in
Connecting
rod
bend
or
torsion
per
100
mm
or
2
937
in
mm
in
d
Crankshaft
and
main
bearing
Journal
diameter
Journal
taper
out
of
round
Crankshaft
free
end
play
Wear
limit
of
dittoed
play
Crank
pin
diameter
Crank
pin
taper
out
of
round
Main
bearing
thickness
StJlndard
146
5
748
1
493
to
1
506
0
0588
to
0
0593
0
20
to
0
30
0
008
to
0
012
0
D25
to
0
055
0
0010
to
0
0022
less
than
0
03
0
0012
mm
in
mm
in
mm
in
mm
in
mm
in
mm
in
mm
in
59
942
to
59
955
2
3599
io
2
3604
less
than
0
0
I
0
0004
0
05
to
0
18
0
0020
to
0
0071
0
3
0
0118
49
961
to
49
974
1
9670
to
1
9675
less
than
0
01
0
0004
1
827
to
1
835
0
0719
to
0
0722
0
020
to
0
062
0
0008
to
0
0024
0
12
0
0047
0
05
0
0020
Main
bearing
clearance
mm
in
Wear
limit
of
dittoed
clearance
mm
in
Crankshaft
bend
mm
in
Flywheel
runout
at
clutch
disc
contact
face
mm
in
e
Piston
Pistondiarneter
Service
standard
0
50
0
0197
Oversize
1
00
0
0394
Oversize
Ring
groove
width
Top
Second
Oil
Piston
to
bore
clearance
Piston
pin
hole
off
set
Piston
pin
hole
diameter
f
Piston
pin
Pin
diameter
Pin
length
less
than
0
15
0
0059
mm
in
84
985
to
85
035
3
3459
to
3
3478
85
465
to
85
515
3
3648
to
3
3667
85
965
to
86
015
3
3844
to
3
3864
2
030
to
2
050
0
0799
to
0
0807
2
020
to
2
040
0
0795
to
0
0803
4
015
to
4
040
0
1581
to
0
1591
0
Q25
to
0
045
0
0010
to
0
0018
0
95
to
1
05
0
0374
to
0
0413
21
001
to
21
008
0
8268
to
0
8271
mm
in
mm
in
mm
in
mm
in
mm
in
mm
in
mm
in
20
993
to
20
998
0
8265
to
0
8267
72
25
to
73
00
2
8445
to
2
8740
0
008
to
om
0
0
0003
to
0
0004
mm
in
Piston
pin
to
piston
clearance
mm
in
Interference
fit
of
piston
pin
to
connecting
rod
bushing
mm
in
om
5
to
0
035
0
0006
to
0
00
I
4
EM
29
Page 87 of 537
ENGINE
LUBRI
CATION
SYSTEM
Note
Pump
rotors
and
body
are
not
serviced
separately
If
pump
rotors
or
body
are
damaged
or
worn
replacement
of
the
entire
oil
pump
assembly
is
necessary
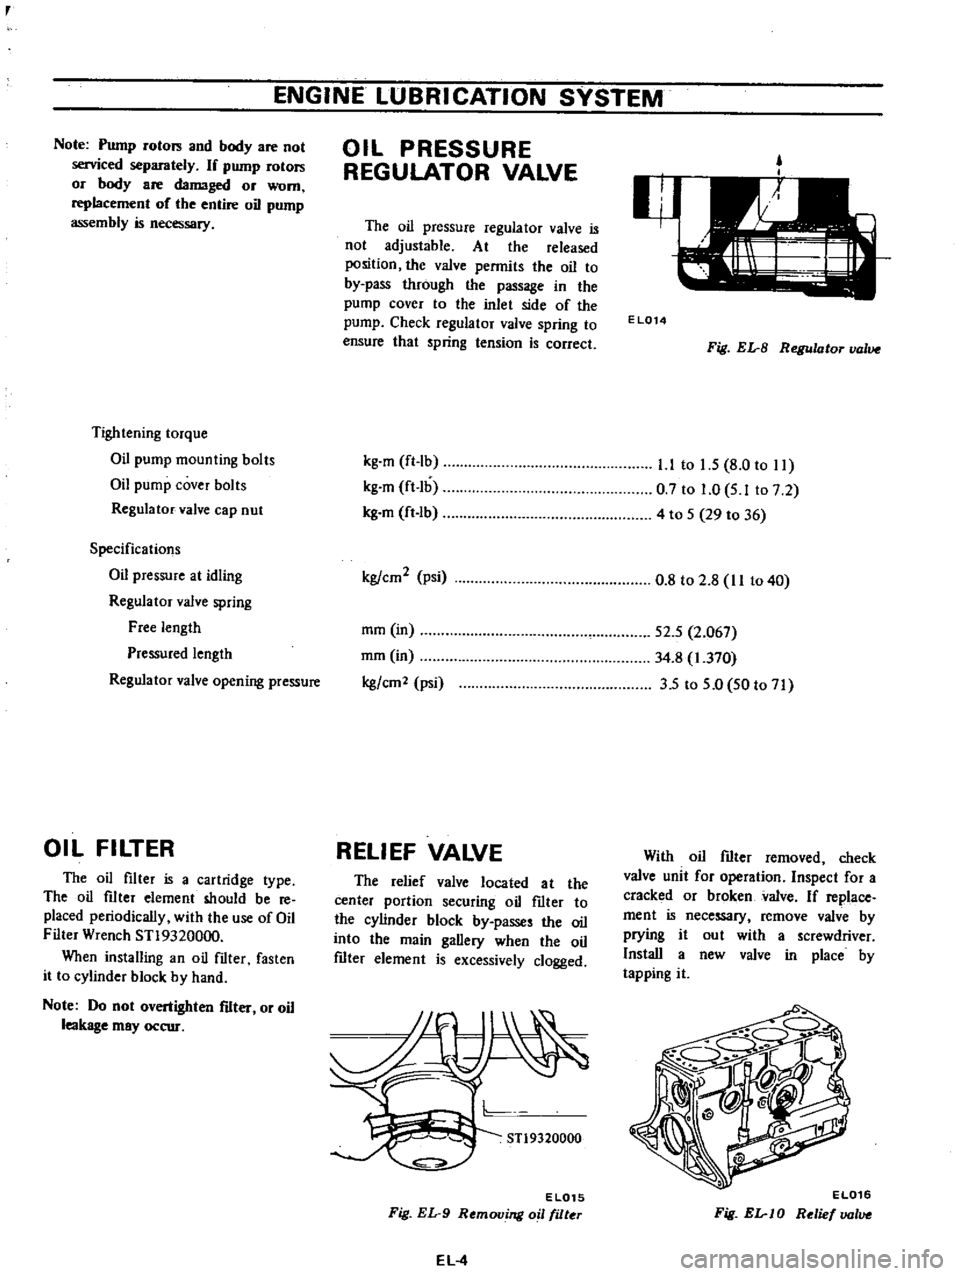
Tightening
torque
Oil
pump
mounting
bolts
Oil
pump
cover
bolts
Regulator
valve
cap
nut
Specifications
Oil
pressure
at
idling
Regulator
valve
spring
Free
length
Pressured
length
Regulator
valve
opening
pressure
OIL
FILTER
The
oil
filter
is
a
cartridge
type
The
oil
filter
element
should
be
reo
placed
periodically
with
the
use
of
Oil
Filter
Wrench
ST19320000
When
installing
an
oil
filter
fasten
it
to
cylinder
block
by
hand
Note
Do
not
overtighten
filter
or
oil
leakage
may
occur
OIL
PRESSURE
REGULATOR
VALVE
The
oil
pressure
regulator
valve
is
not
adjustable
At
the
released
position
the
valve
permits
the
oil
to
by
pass
through
the
passage
in
the
pump
cover
to
the
inlet
side
of
the
pump
Check
regulator
valve
spring
to
ensure
that
spring
tension
is
correct
kg
m
ft
Ib
kg
m
ft
lb
kg
m
ft
lb
kg
cm2
psi
mm
in
mm
in
kg
em
2
psi
RELIEF
VALVE
The
relief
valve
located
at
the
center
portion
securing
oil
fIlter
to
the
cylinder
block
by
passes
the
oil
into
the
main
gallery
when
the
oil
fIlter
element
is
excessively
clogged
STl9320000
EL015
Fig
EL
9
Removing
oil
filter
EL
4
EL014
Fig
EL
B
Regulator
value
l
l
to
1
5
8
0
to
11
0
7
to
1
0
5
Ito
7
2
4
to
5
29
to
36
0
8
to
2
8
II
to
40
52
5
2
067
34
8
1
370
35
to
5
0
50
to
71
With
oil
fIlter
removed
check
valve
unit
for
operation
Inspect
for
a
cracked
or
broken
valve
If
replace
ment
is
necessary
remove
valve
by
prying
it
out
with
a
screwdriver
Install
a
new
valve
in
place
by
tapping
it
EL016
Fig
EL
JO
Relief
lJOlue
Page 88 of 537
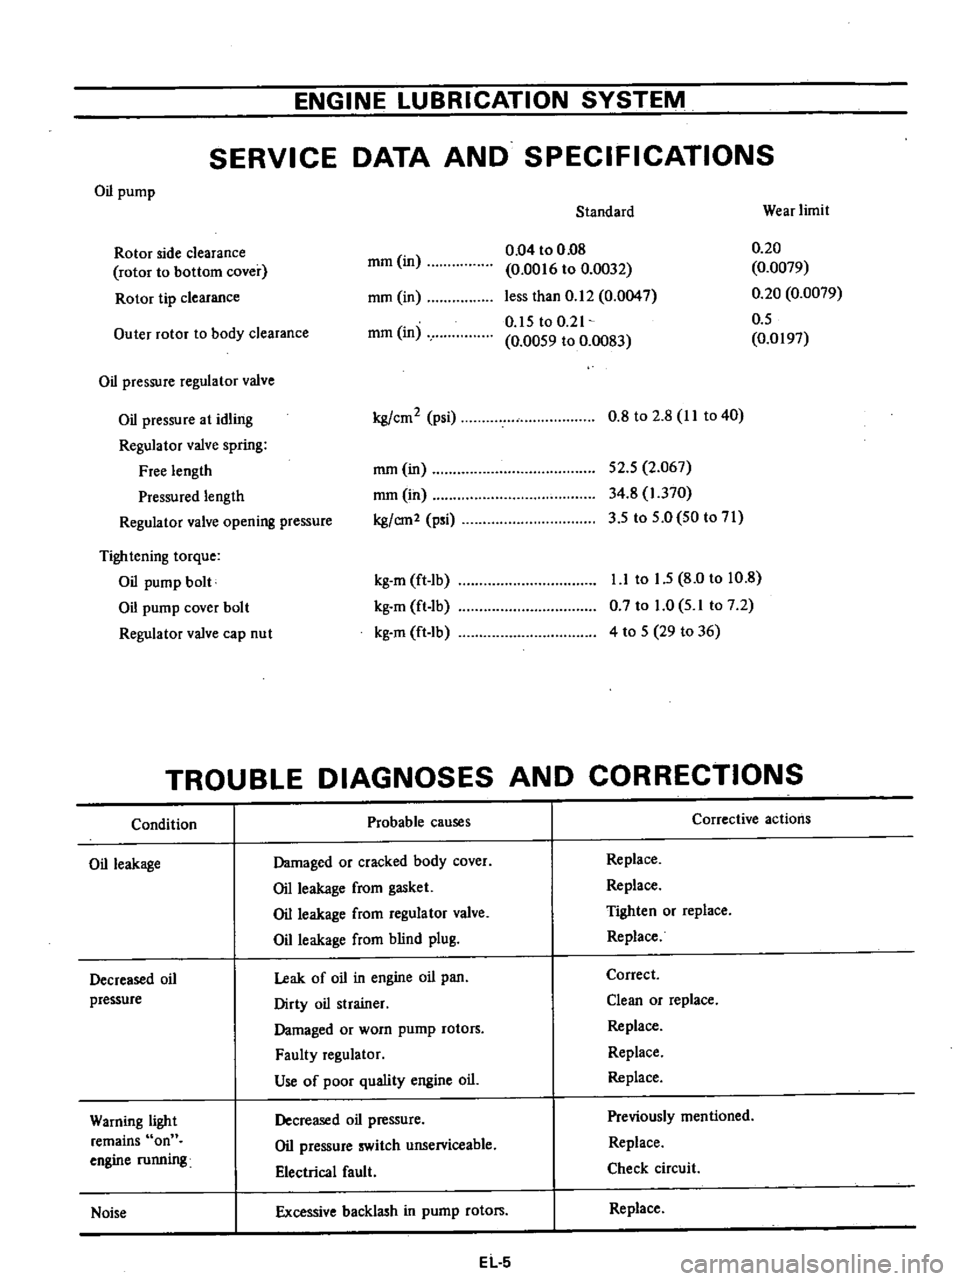
ENGINE
LUBRICATION
SYSTEM
SERVICE
DATA
AND
SPECIFICATIONS
Oil
pump
Standard
Wear
limit
mm
in
0
04
to
0
08
0
0016
to
0
0032
less
than
0
12
0
0047
0
15
toO
21
0
0059
to
0
0083
0
20
0
0079
0
20
0
0079
0
5
0
0197
Rotor
side
clearance
rotor
to
bottom
cover
Rotor
tip
clearance
mm
in
Outer
rotor
to
body
clearance
mm
in
Oil
pressure
regulator
valve
Oil
pressure
at
idling
Regulator
valve
spring
Free
length
Pressured
length
Regulator
valve
opening
pressure
kg
cm2
psi
0
8
to
2
8
II
to
40
mm
in
mmOn
kg
em2
psi
52
5
2
067
34
8
1
370
3
5
to
5
0
50
to
71
Tightening
torque
Oil
pump
bolt
Oil
pump
cover
bolt
Regulator
valve
cap
nut
kg
m
ft
lb
kg
m
ft
lb
kg
m
ft
Ib
1
1
to
1
5
8
0
to
10
8
0
7
to
1
0
5
1
to
7
2
4
to
5
29
to
36
TROUBLE
DIAGNOSES
AND
CORRECTIONS
Condition
Probable
causes
Corrective
actions
Oil
leakage
Damaged
or
cracked
body
cover
Oil
leakage
from
gasket
Oil
leakage
from
regulator
valve
Oil
leakage
from
blind
plug
Replace
Replace
Tighten
or
replace
Replace
Decreased
oil
pressure
Leak
of
oil
in
engine
oil
pan
Dirty
oil
strainer
Damaged
or
worn
pump
rotors
Faulty
regulator
Use
of
poor
quality
engine
oiL
Correct
Clean
or
replace
Replace
Replace
Replace
Warning
light
remains
on
engine
running
Decreased
oil
pressure
Oil
pressure
switch
unserviceable
Electrical
fault
Previously
mentioned
Replace
Check
circuit
Noise
Excessive
backlash
in
pump
rotors
Replace
EL
5
Page 175 of 537

CLEANING
AND
INSPECTION
Clean
all
disassembled
parts
but
do
not
use
grease
dissolving
solvents
for
cleaning
overrunning
clutch
annature
assembly
magnetic
switch
assembly
and
field
coils
since
such
a
solvent
would
dissolve
grease
packed
in
c1u
tch
mechanism
and
would
damage
coils
or
other
insulators
Check
them
for
excessive
damage
or
wear
and
replace
if
necessary
TERMINAL
Check
terminal
for
damage
and
wear
and
replace
magnetic
switch
assembly
if
necessary
FIELD
COIL
Check
field
coil
for
insulation
If
the
insulation
of
coil
is
damaged
or
worn
it
should
be
replaced
Testing
field
coil
for
continuity
Connect
the
probe
of
a
circuit
tester
or
an
ohmmeter
to
field
coil
positive
terminal
and
positive
brush
holder
If
tester
shows
no
continuity
field
circuit
or
coil
is
open
EE016
Fig
EE
I2
Testing
field
coil
for
continuity
TestIng
field
coD
for
ground
Place
one
probe
of
circuit
tester
onto
yoke
and
the
other
onto
field
coil
lead
positive
tenninal
If
very
little
resistance
is
read
field
coil
is
grounded
Engine
Electrical
System
EE017
Fig
EE
I3
Testing
rU
ld
coil
for
ground
BRUSHES
AND
BRUSH
LEAD
WIRE
Check
the
surface
condition
of
brush
contact
and
wear
of
brush
If
a
loose
contact
is
found
it
should
be
replaced
If
brush
is
worn
so
that
its
length
is
less
than
12
mm
0
472
in
replace
Check
the
connection
of
lead
clip
and
lead
wire
o
@
EE
8
Check
brush
holders
and
spring
cUp
to
see
if
they
are
not
deformed
or
bent
and
will
properly
hold
brushes
against
the
commutator
If
brushes
or
brush
holders
are
dirty
they
should
be
cleaned
BRUSH
SPRING
TENSION
Check
brush
spring
tension
by
a
spring
scale
as
shown
in
Figure
EE
13
The
reading
should
be
1
6
kg
3
5
Ib
Replace
spring
if
tension
is
lower
than
I
4
kg
3
1
Ib
ARMATURE
ASSEMBLY
Check
external
appearance
of
armature
and
commutator
1
Inspect
commutator
If
the
sur
face
of
commutator
is
rough
it
must
be
sanded
lightly
with
a
No
500
emery
cloth
If
the
depth
of
insulating
mica
is
less
than
0
2
mm
0
0079
in
from
commutator
surface
insulating
mica
should
also
be
undercut
so
that
its
depth
is
0
5
to
0
8
mm
0
01
97
to
0
0315
in
The
wear
limit
of
commutator
dia
meter
is
2
mm
0
0787
in
If
the
diameter
of
cammu
tator
is
less
than
31
mm
1
220
in
replace
annature
assembly
EE018
Fig
EE
14
Inspecting
brush
spring
tension
Page 178 of 537

Engine
Electrical
System
SERVICE
DATA
AND
SPECIFICATIONS
Type
System
voltage
No
load
Terminal
voltage
Current
Revolution
v
V
A
rpm
Brush
length
Outer
diameter
of
commutator
mm
in
mm
in
Brush
spring
tension
kg
Ib
Clearance
between
bearing
metal
and
armature
shaft
mm
in
Clearance
L
between
pinion
front
edge
and
pinion
stopper
mm
in
TROUBLE
DIAGNOSES
AND
CORRECTIONS
Condition
Starting
motor
will
not
operate
Noisy
starting
motor
Starting
motor
cranks
slowly
Probable
cause
Discharged
battery
Damaged
solenoid
switch
Loose
connections
of
terminal
Damaged
brushes
Starti
g
motor
inoperative
Loose
securing
bolt
Worn
pinion
gear
Poor
lubrication
Worn
commutator
Worn
brushes
Discharged
battery
Loose
connection
of
terminal
Worn
brushes
Locked
brushes
EE
ll
Manual
transmission
Automatic
transmission
Optional
for
manual
transmission
SII4
ISOB
S114
170B
12
12
Less
than
60
More
than
7
000
More
than
6
000
More
than
39
1
54
More
than
12
0
47
1
4
to
I
S
3
1
to
4
0
Less
than
0
2
O
OOS
0
3
to
1
5
0
012
to
0
059
Corrective
action
Charge
or
replace
battery
Repair
or
replace
solenoid
switch
Clean
and
tighten
terminal
Replace
brushes
Remove
starting
motor
and
make
test
Tighten
Replace
Add
oil
Replace
Replace
Charge
Clean
and
tighten
Replace
Inspect
brush
spring
tension
or
repair
brush
holder
Page 186 of 537

Engine
Electrical
System
ALTERNATOR
TEST
Before
conducting
an
alternator
test
make
sure
th
tthe
battery
is
fully
charged
A
30
V
olt
voltmeter
and
suitable
test
probes
3re
necessary
for
the
test
Set
up
a
test
circuit
as
shown
in
Figure
EE45
and
test
auernator
in
the
manner
indica
ted
in
the
flow
chart
below
1
Disconnect
connectors
at
alternator
2
Connect
A
terminal
to
F
terminal
3
Connect
one
test
probe
from
voltmeter
positive
terminal
to
A
terminal
Connect
the
other
test
probe
to
ground
Make
sure
that
voltmeter
registers
battery
voltage
4
Turn
on
headlights
and
switch
to
High
Beam
5
Start
engine
6
Increase
engine
speed
gradually
until
it
is
approximately
1
100
rpm
and
take
the
voltmeter
reading
Measured
value
Below
12
5
Volts
Alternator
is
in
trouble
remove
and
check
it
for
condition
Measured
value
Over
12
5
Volts
Alternator
is
in
good
condition
Notes
a
Do
Dot
run
engine
at
the
speed
of
more
than
1
100
rpm
while
test
is
being
conducted
on
alternator
b
Do
not
race
engine
i
9
l
IV
I
Battery
EE052
Voltmeter
Fig
EE
45
Testing
alternator
SERVICE
DATA
AND
SPECIFICATIONS
Nominal
rating
V
A
LT138
IB
LTl35
36B
For
air
conditioner
1235
12
38
Negative
Negative
1
000
1
000
28
2
500
30
2
500
35
5
000
38
5
000
2
25
2
25
More
than
7
5
0
295
More
than
7
5
0
295
255
to
345
255
to
345
9
0
to
12
2
9
0
to
12
2
More
than
30
1
181
More
than
30
1
181
EE
19
Type
Ground
polarity
Minimum
revolution
when
generating
14V
with
no
load
rpm
Hot
output
current
Nrpm
Pulley
ratio
Brush
Length
Spring
pressure
mm
in
gr
oz
Slip
ring
outer
diameter
mm
in