tow DODGE CALIBER 2006 1.G Service Manual
[x] Cancel search | Manufacturer: DODGE, Model Year: 2006, Model line: CALIBER, Model: DODGE CALIBER 2006 1.GPages: 322, PDF Size: 5.99 MB
Page 242 of 322
ONBOARD DIAGNOSTIC SYSTEM Ð OBD II
Your vehicle is equipped with a sophisticated onboard
diagnostic system called OBD II. This system monitors
the performance of the emissions, engine, and automatic
transmission control systems. When these systems are
operating properly, your vehicle will provide excellent
performance and fuel economy, as well as engine emis-
sions well within current government regulations.
If any of these systems require service, the OBD II system
will turn on the ªMalfunction Indicator Light.º It will
also store diagnostic codes and other information to
assist your service technician in making repairs. Al-
though your vehicle will usually be drivable and not
need towing, see your dealer for service as soon as
possible.CAUTION!
²Prolonged driving with the ªMalfunction Indica-
tor Lightº on could cause further damage to the
emission control system. It could also affect fuel
economy and driveability. The vehicle must be
serviced before any emissions tests can be per-
formed.
²If the ªMalfunction Indicator Lightº is flashing
while the engine is running, severe catalytic con-
verter damage and power loss will soon occur.
Immediate service is required.
Loose Fuel Filler Cap Message
After fuel is added, the vehicle diagnostic system can
determine if the fuel filler cap is loose or improperly
installed. A GASCAP message will be displayed in the
instrument cluster. Tighten the gas cap until a9clicking9
sound is heard. This is an indication that the gas cap is
properly tightened. Press the odometer reset button to
turn the message off. If the problem persists, the message
will appear the next time the vehicle is started. This
242 MAINTAINING YOUR VEHICLE
Page 246 of 322
Checking the oil while the vehicle is on level ground and
only when the engine is hot, will improve the accuracy of
the oil level readings. Maintain the oil level between the
range markings on the dipstick. The range markings will
consist of a crosshatch zone that says SAFE or a cross-
hatch zone that says MIN at the low end of the range and
MAX at the high end of the range. Adding one quart of
oil when the reading is at the low end of the indicated
range will result in the oil level at the full end of the
indicator range.
CAUTION!
Do not overfill the engine. Overfilling the engine as
indicated by the range markings, as described above,
on the engine oil dipstick will cause oil aeration,
which can lead to loss of oil pressure and an increase
in oil temperature. This could damage your engine.
Change Engine Oil
Road conditions and your kind of driving affects the
interval at which your oil should be changed. Check the
following list to decide if any apply to you.
²Day and night temperatures are below 32ÉF (0ÉC).
²Stop and Go driving.
²Extensive engine idling.
²Driving in dusty conditions.
²Short trips of less than 10 miles (16 km).
²More than 50% of your driving is at sustained high
speeds during hot weather, above 90ÉF (32ÉC).
²Trailer towing.
²Taxi, Police or delivery service (commercial service).
²Off-Road or desert operation.
NOTE:IfANYof these apply to you then change your
engine oil every 3,000 miles (5 000 km) or 3 months,
whichever comes first, and follow schedule ªBÐAll
Enginesº of the9Maintenance Schedules9section of this
manual.
246 MAINTAINING YOUR VEHICLE
Page 250 of 322
CAUTION!
Damage to the catalytic converter can result if your
vehicle is not kept in proper operating condition. In
the event of engine malfunction, particularly involv-
ing engine misfire or other apparent loss of perfor-
mance, have your vehicle serviced promptly. Contin-
ued operation of your vehicle with a severe
malfunction could cause the converter to overheat,
resulting in possible damage to the converter and the
vehicle.
WARNING!
A hot exhaust system can start a fire if you park over
materials that can burn. Such materials might be
grass or leaves coming into contact with your ex-
haust system. Do not park or operate your vehicle in
areas where your exhaust system can contact any-
thing that can burn.
In unusual situations involving grossly malfunctioning
engine operation, a scorching odor may suggest severe
and abnormal catalyst overheating. If this occurs, stop
the vehicle, turn off the engine and allow it to cool.
Service, including a tune up to manufacturers specifica-
tions, should be obtained immediately.
To minimize the possibility of catalyst damage:
²Do not shut off the engine or interrupt the ignition
when the transaxle is in gear and the vehicle is in
motion.
²Do not try to start the engine by pushing or towing the
vehicle.
²Do not idle the engine with any spark plug wires
disconnected for prolonged period.
Crankcase Emission Control System
Proper operation of this system depends on freedom
from sticking or plugging due to deposits. As vehicle
mileage builds up, the PCV valve and passages may
accumulate deposits. If a valve is not working properly,
replace it with a new valve. DO NOT ATTEMPT TO
CLEAN THE OLD PCV VALVE!
250 MAINTAINING YOUR VEHICLE
Page 268 of 322
WARNING!
Do not use volatile solvents for cleaning purposes.
Many are potentially flammable, and if used in
closed areas they may cause respiratory harm.
Cleaning Headlights
Your vehicle has plastic headlights that are lighter and
less susceptible to stone breakage than glass headlights.
Plastic is not as scratch resistant as glass and therefore
different lens cleaning procedures must be followed.
To minimize the possibility of scratching the lenses and
reducing light output, avoid wiping with a dry cloth. To
remove road dirt, wash with a mild soap solution fol-
lowed by rinsing.
Do not use abrasive cleaning components, solvents, steel
wool or other aggressive material to clean the lenses.
Glass Surfaces
All glass surfaces should be cleaned on a regular basis
with Mopar Glass Cleaner or any commercial household-
type glass cleaner. Never use an abrasive type cleaner.Use caution when cleaning the inside rear window
equipped with electric defrosters or the right rear quarter
window equipped with the radio antenna. Do not use
scrapers or other sharp instruments which may scratch
the elements. When cleaning the rear view mirror, spray
cleaner on the towel or rag that you are using. Do not
spray cleaner directly on the mirror.
Instrument Panel Cover
The instrument panel cover has a low glare surface which
minimizes reflections in the windshield. Do not use
protectants or other products which may cause undesir-
able reflections. Use soap and warm water to restore the
low glare surface.
Cleaning Plastic Instrument Cluster Lenses
The lenses in front of the instruments in this vehicle are
molded in clear plastic. When cleaning the lenses, care
must be taken to avoid scratching the plastic.
1. Clean with a wet soft rag. A mild soap solution may be
used, but do not use high alcohol content or abrasive
cleaners. If soap is used, wipe clean with a clean damp
rag.
268 MAINTAINING YOUR VEHICLE
Page 270 of 322
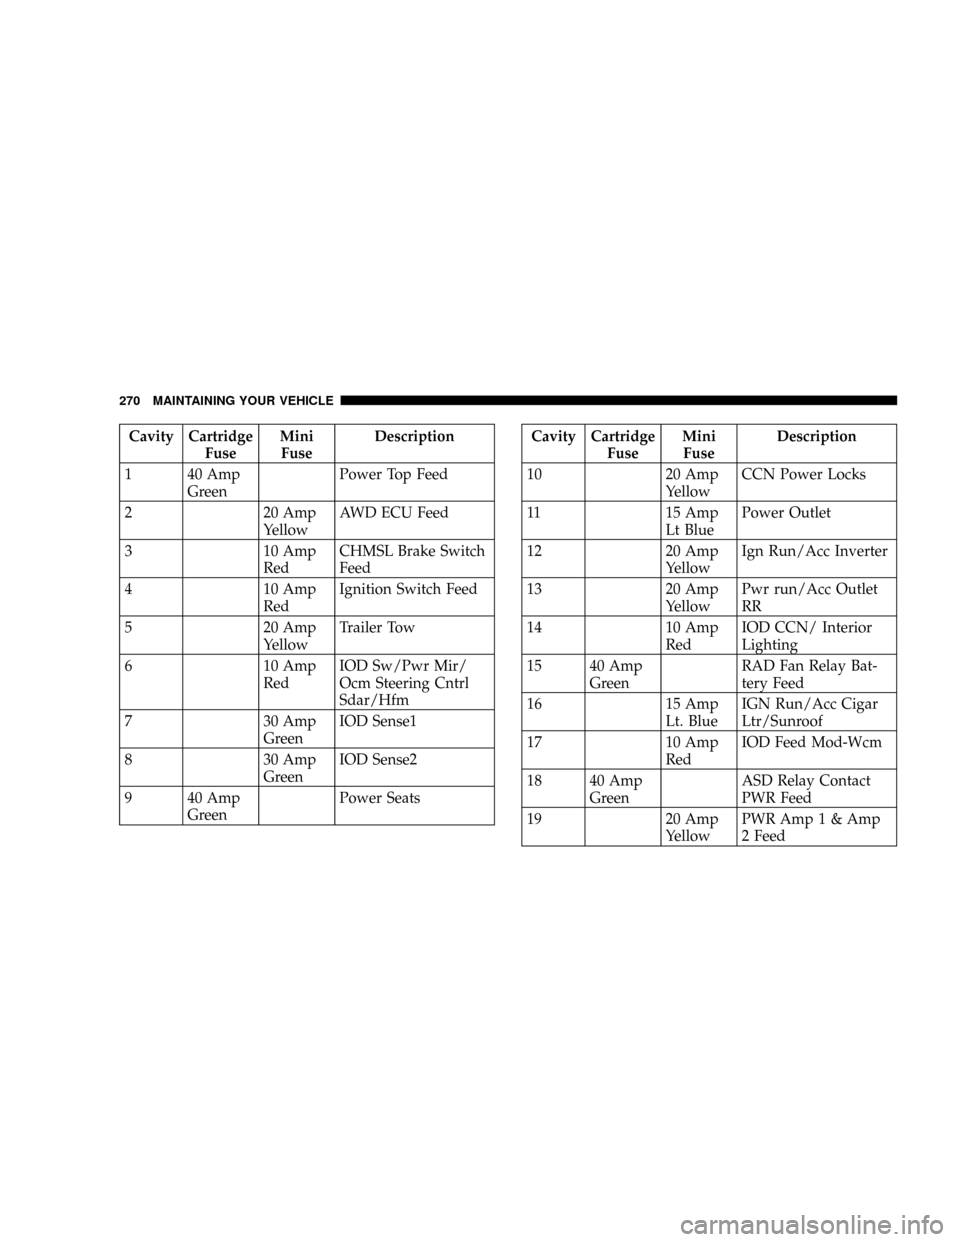
Cavity Cartridge
FuseMini
FuseDescription
1 40 Amp
GreenPower Top Feed
2 20 Amp
YellowAWD ECU Feed
3 10 Amp
RedCHMSL Brake Switch
Feed
4 10 Amp
RedIgnition Switch Feed
5 20 Amp
YellowTrailer Tow
6 10 Amp
RedIOD Sw/Pwr Mir/
Ocm Steering Cntrl
Sdar/Hfm
7 30 Amp
GreenIOD Sense1
8 30 Amp
GreenIOD Sense2
9 40 Amp
GreenPower SeatsCavity Cartridge
FuseMini
FuseDescription
10 20 Amp
YellowCCN Power Locks
11 15 Amp
Lt BluePower Outlet
12 20 Amp
YellowIgn Run/Acc Inverter
13 20 Amp
YellowPwr run/Acc Outlet
RR
14 10 Amp
RedIOD CCN/ Interior
Lighting
15 40 Amp
GreenRAD Fan Relay Bat-
tery Feed
16 15 Amp
Lt. BlueIGN Run/Acc Cigar
Ltr/Sunroof
17 10 Amp
RedIOD Feed Mod-Wcm
18 40 Amp
GreenASD Relay Contact
PWR Feed
19 20 Amp
YellowPWR Amp 1 & Amp
2 Feed
270 MAINTAINING YOUR VEHICLE
Page 282 of 322
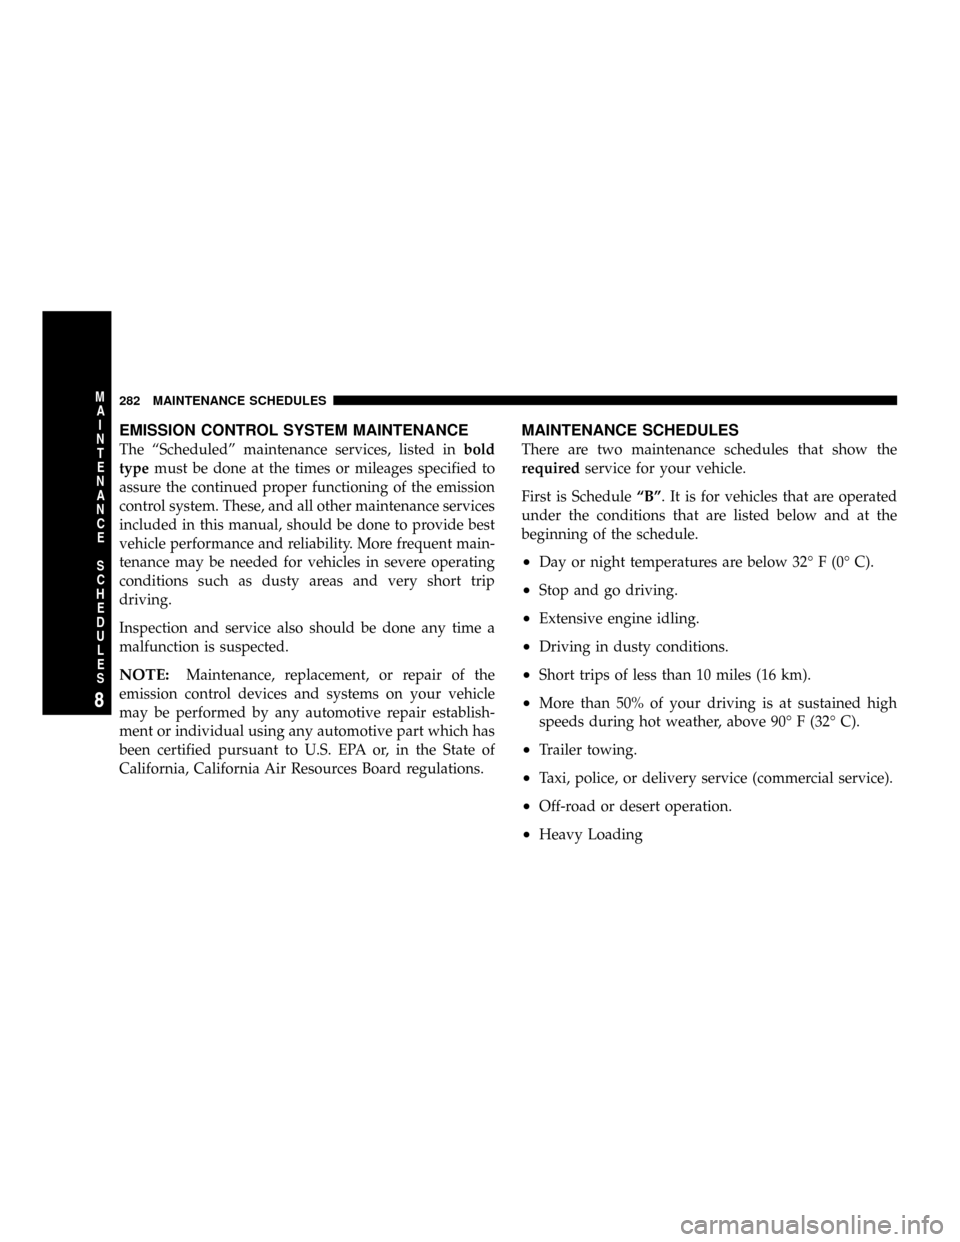
EMISSION CONTROL SYSTEM MAINTENANCE
The ªScheduledº maintenance services, listed inbold
typemust be done at the times or mileages specified to
assure the continued proper functioning of the emission
control system. These, and all other maintenance services
included in this manual, should be done to provide best
vehicle performance and reliability. More frequent main-
tenance may be needed for vehicles in severe operating
conditions such as dusty areas and very short trip
driving.
Inspection and service also should be done any time a
malfunction is suspected.
NOTE:Maintenance, replacement, or repair of the
emission control devices and systems on your vehicle
may be performed by any automotive repair establish-
ment or individual using any automotive part which has
been certified pursuant to U.S. EPA or, in the State of
California, California Air Resources Board regulations.
MAINTENANCE SCHEDULES
There are two maintenance schedules that show the
requiredservice for your vehicle.
First is ScheduleªBº. It is for vehicles that are operated
under the conditions that are listed below and at the
beginning of the schedule.
²Day or night temperatures are below 32É F (0É C).
²Stop and go driving.
²Extensive engine idling.
²Driving in dusty conditions.
²Short trips of less than 10 miles (16 km).
²More than 50% of your driving is at sustained high
speeds during hot weather, above 90É F (32É C).
²Trailer towing.
²Taxi, police, or delivery service (commercial service).
²Off-road or desert operation.
²Heavy Loading
282 MAINTENANCE SCHEDULES
8
M
A
I
N
T
E
N
A
N
C
E
S
C
H
E
D
U
L
E
S
Page 285 of 322
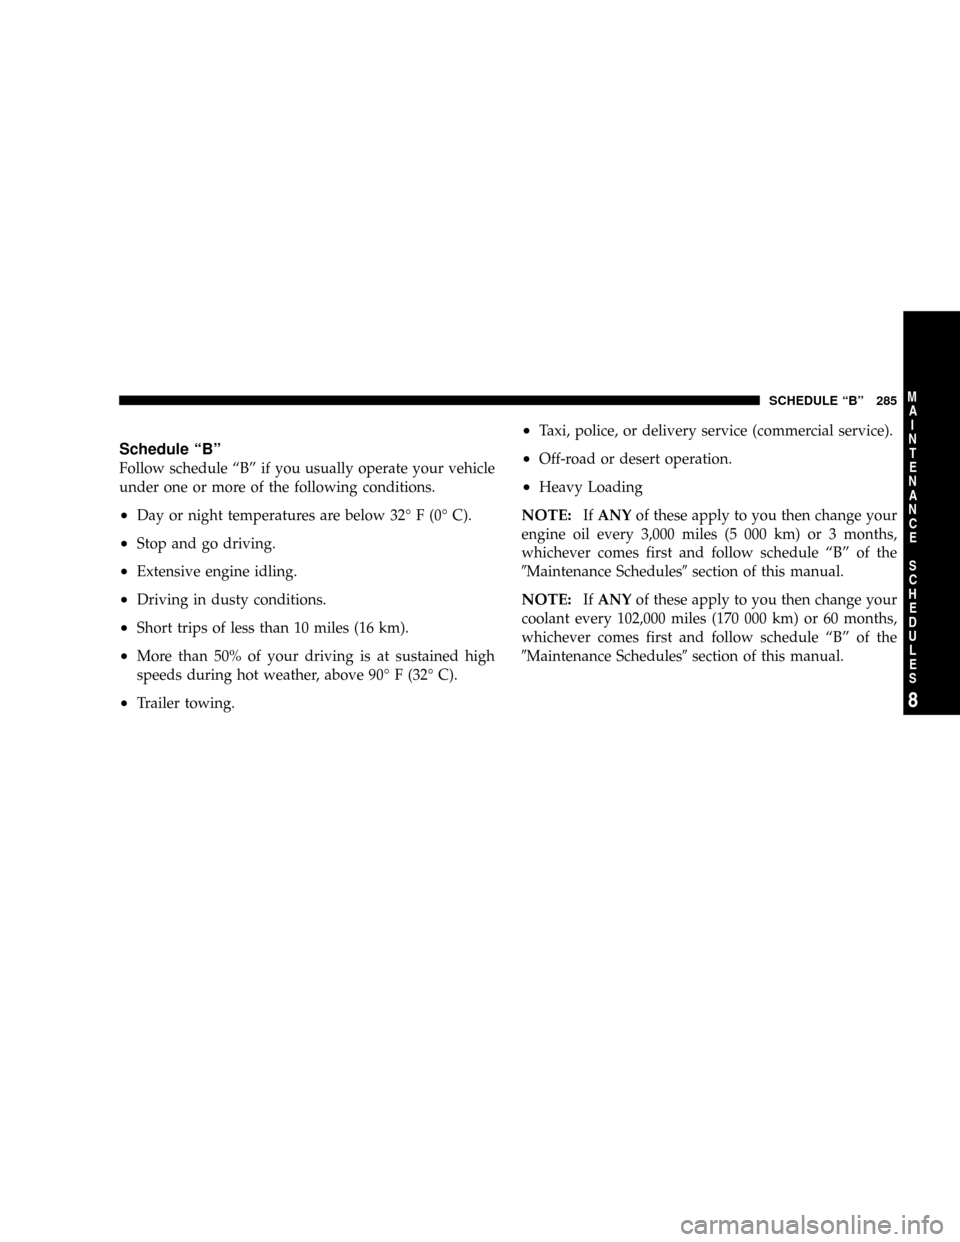
Schedule ªBº
Follow schedule ªBº if you usually operate your vehicle
under one or more of the following conditions.
²Day or night temperatures are below 32É F (0É C).
²Stop and go driving.
²Extensive engine idling.
²Driving in dusty conditions.
²Short trips of less than 10 miles (16 km).
²More than 50% of your driving is at sustained high
speeds during hot weather, above 90É F (32É C).
²Trailer towing.
²Taxi, police, or delivery service (commercial service).
²Off-road or desert operation.
²Heavy Loading
NOTE:IfANYof these apply to you then change your
engine oil every 3,000 miles (5 000 km) or 3 months,
whichever comes first and follow schedule ªBº of the
9Maintenance Schedules9section of this manual.
NOTE:IfANYof these apply to you then change your
coolant every 102,000 miles (170 000 km) or 60 months,
whichever comes first and follow schedule ªBº of the
9Maintenance Schedules9section of this manual.
SCHEDULE ªBº 285
8
M
A
I
N
T
E
N
A
N
C
E
S
C
H
E
D
U
L
E
S
Page 286 of 322
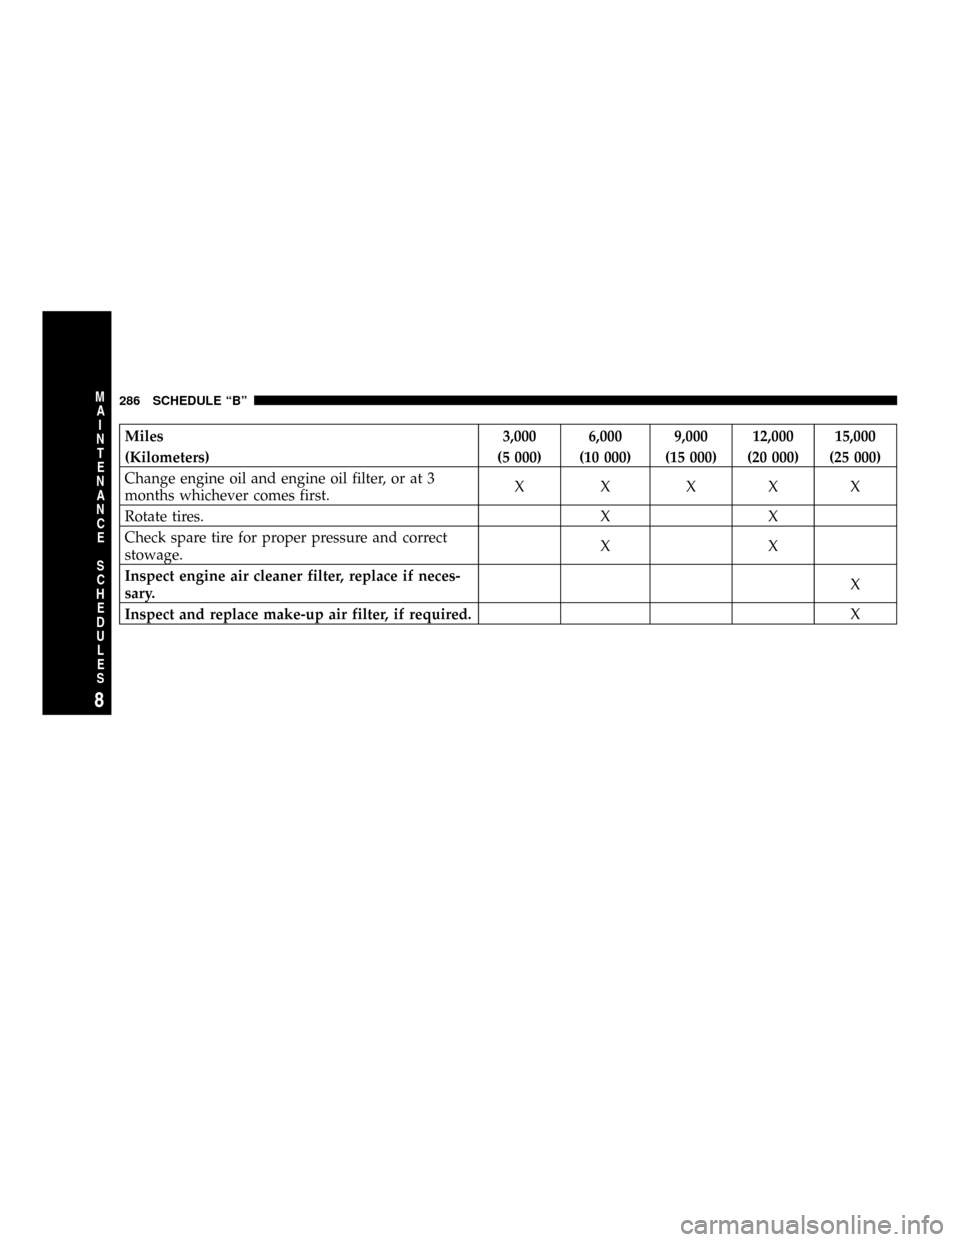
Miles 3,000 6,000 9,000 12,000 15,000
(Kilometers) (5 000) (10 000) (15 000) (20 000) (25 000)
Change engine oil and engine oil filter, or at 3
months whichever comes first.X X XXX
Rotate tires. X X
Check spare tire for proper pressure and correct
stowage.XX
Inspect engine air cleaner filter, replace if neces-
sary.X
Inspect and replace make-up air filter, if required.X
286 SCHEDULE ªBº
8
M
A
I
N
T
E
N
A
N
C
E
S
C
H
E
D
U
L
E
S
Page 287 of 322
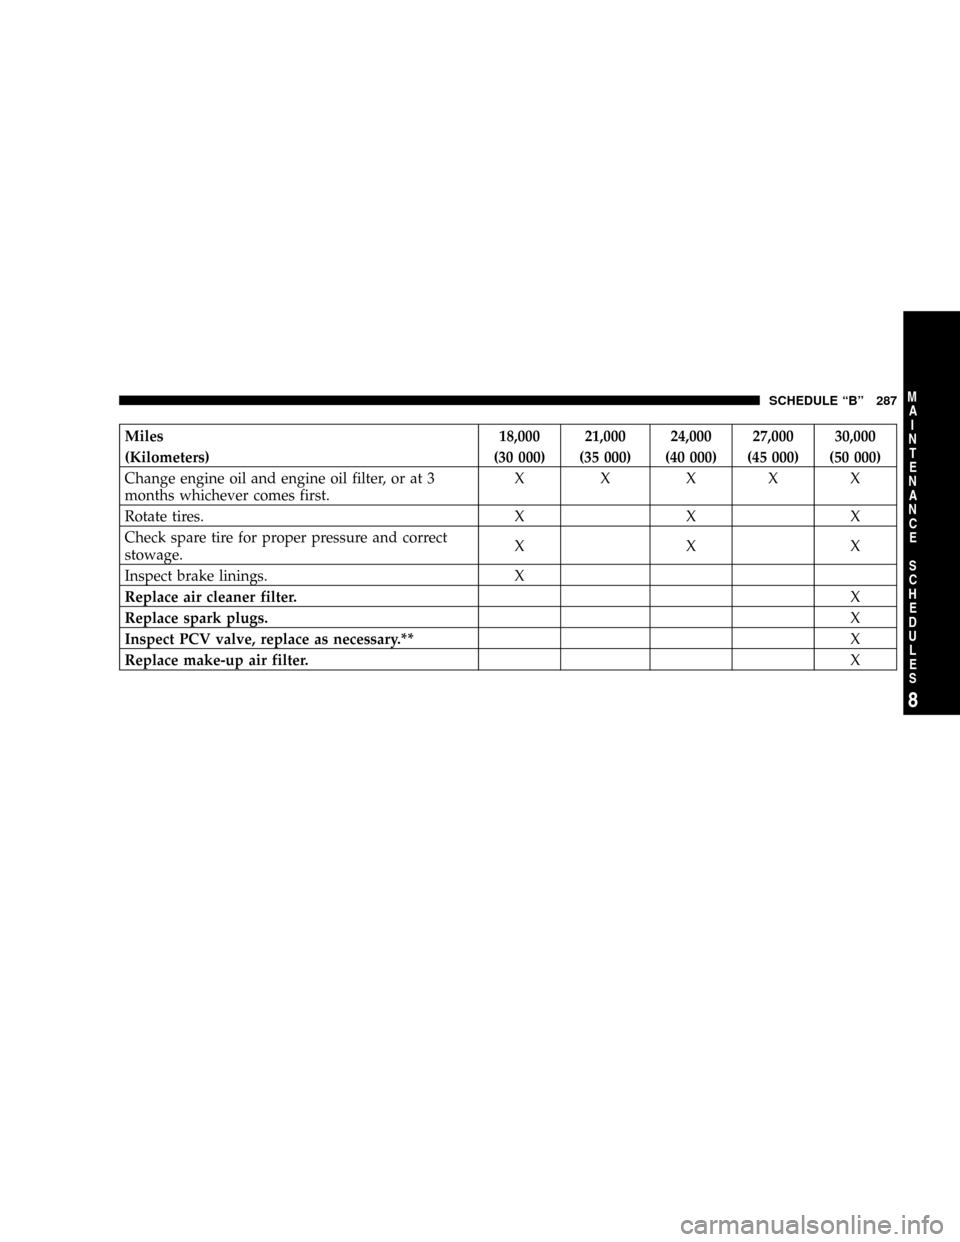
Miles 18,000 21,000 24,000 27,000 30,000
(Kilometers) (30 000) (35 000) (40 000) (45 000) (50 000)
Change engine oil and engine oil filter, or at 3
months whichever comes first.X X XXX
Rotate tires. X X X
Check spare tire for proper pressure and correct
stowage.XXX
Inspect brake linings. X
Replace air cleaner filter.X
Replace spark plugs.X
Inspect PCV valve, replace as necessary.**X
Replace make-up air filter.X
SCHEDULE ªBº 287
8
M
A
I
N
T
E
N
A
N
C
E
S
C
H
E
D
U
L
E
S
Page 288 of 322
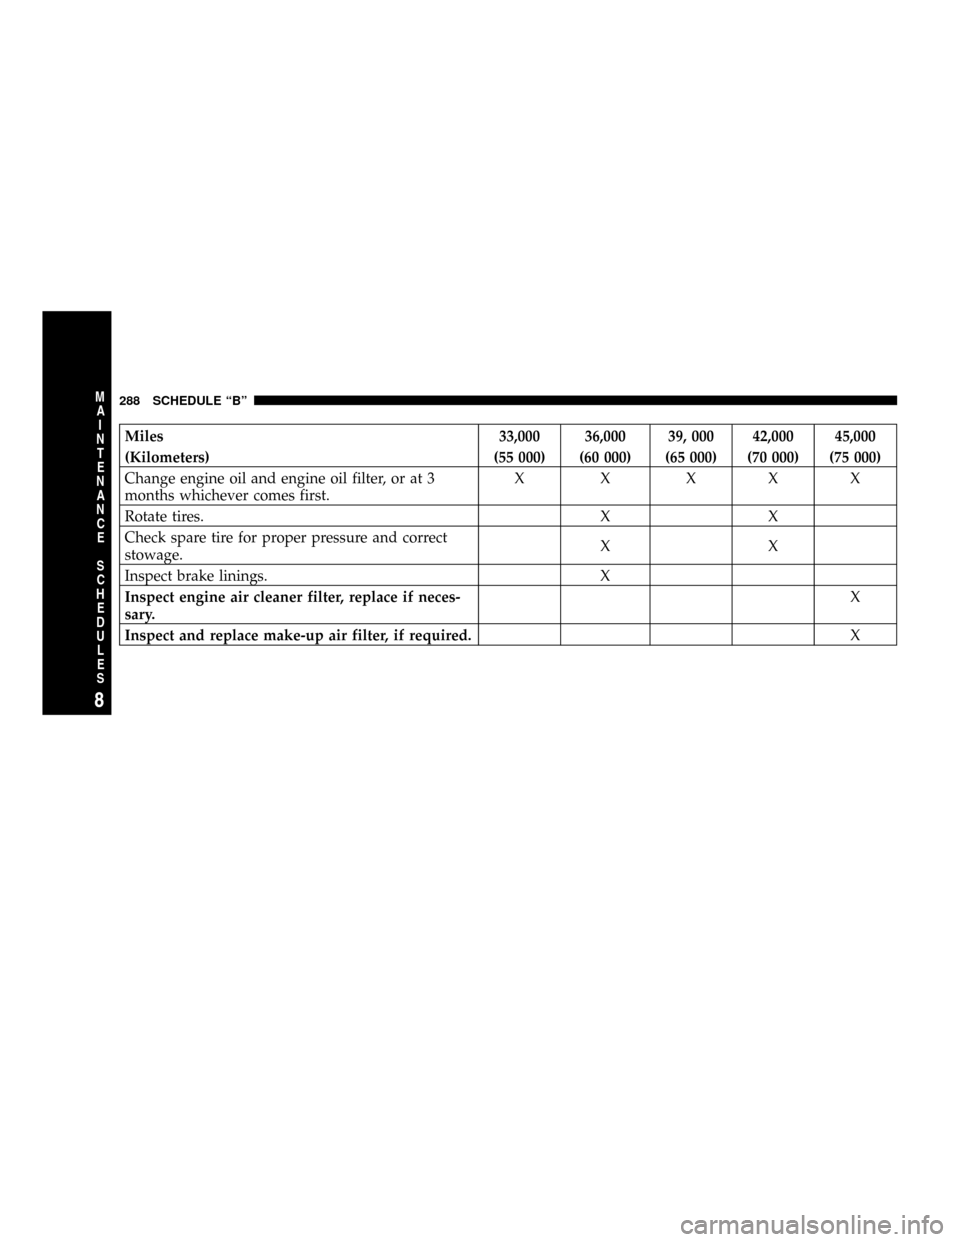
Miles 33,000 36,000 39, 000 42,000 45,000
(Kilometers) (55 000) (60 000) (65 000) (70 000) (75 000)
Change engine oil and engine oil filter, or at 3
months whichever comes first.X X XXX
Rotate tires. X X
Check spare tire for proper pressure and correct
stowage.XX
Inspect brake linings. X
Inspect engine air cleaner filter, replace if neces-
sary.X
Inspect and replace make-up air filter, if required.X
288 SCHEDULE ªBº
8
M
A
I
N
T
E
N
A
N
C
E
S
C
H
E
D
U
L
E
S