radio DODGE CALIBER 2010 1.G Owner's Manual
[x] Cancel search | Manufacturer: DODGE, Model Year: 2010, Model line: CALIBER, Model: DODGE CALIBER 2010 1.GPages: 76, PDF Size: 12.18 MB
Page 34 of 76
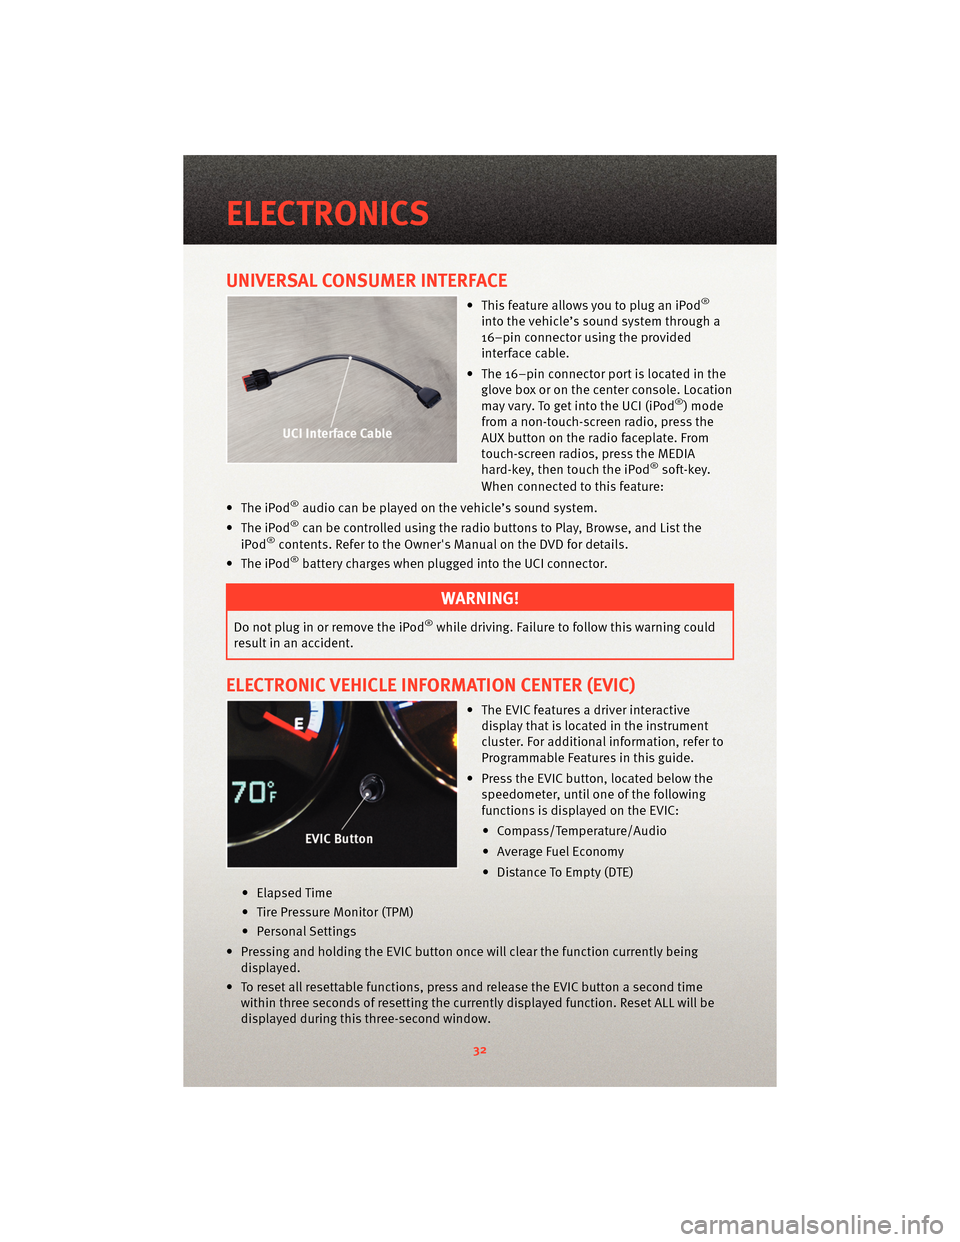
UNIVERSAL CONSUMER INTERFACE
• This feature allows you to plug an iPod®
into the vehicle’s sound system through a
16–pin connector using the provided
interface cable.
• The 16–pin connector port is located in the glove box or on the center console. Location
may vary. To get into the UCI (iPod
®) mode
from a non-touch-screen radio, press the
AUX button on the radio faceplate. From
touch-screen radios, press the MEDIA
hard-key, then touch the iPod
®soft-key.
When connected to this feature:
• The iPod
®audio can be played on the vehicle’s sound system.
• The iPod®can be controlled using the radio buttons to Play, Browse, and List the
iPod®contents. Refer to the Owner's Manual on the DVD for details.
• The iPod®battery charges when plug ged into the UCI connector.
WARNING!
Do not plug in or remove the iPod®while driving. Failure to follow this warning could
result in an accident.
ELECTRONIC VEHICLE INFORMATION CENTER (EVIC)
• The EVIC features a driver interactive display that is located in the instrument
cluster. For additional information, refer to
Programmable Features in this guide.
• Press the EVIC button, located below the speedometer, until one of the following
functions is displayed on the EVIC:
• Compass/Temperature/Audio
• Average Fuel Economy
• Distance To Empty (DTE)
• Elapsed Time
• Tire Pressure Monitor (TPM)
• Personal Settings
• Pressing and holding the EVIC button once will clear the function currently being
displayed.
• To reset all resettable functions, press and release the EVIC button a second time within three seconds of resetting the curr ently displayed function. Reset ALL will be
displayed during this three-second window.
ELECTRONICS
32
Page 39 of 76
Changing The Volume
• Start a dialogue by pressing the Phone button, then adjust the volume during a
normal call.
• Use the radio ON/OFF VOLUME rotary knob to adjust the volume to a comfortable level while the Uconnect™ system is speaking. Please note the volume setting for
Uconnect™ is different than the audio system.
NOTE: To access the tutorial, press the Uconnect™ hard-key. After the BEEP, say
“tutorial”. Press any hard-key or touch the display to cancel the tutorial.
VOICE COMMAND
• The Voice Command system allows you to control your AM, FM radio, satellite radio, disc player, Uconnect™ Phone and a memo recorder. When you press the Voice
Command button
, you will hear a beep. The beep is your signal to give a
command. If you do not say a command within a few seconds, the system will present
you with a list of options. If you ever wish to interrupt the system while it lists options,
press the Voice Command button
, listen for the BEEP, and say your command.
• For vehicles equipped with Video Entertainment System (VES)™, refer to the Voice Command section of the Uconnect™ User's Manual on the DVD for further details.
• For vehicles not equipped with VES™, refer to your vehicle Owner's Manual on the DVD for Voice Command information.
Changing The Volume
• Start a dialogue by pressing the Voice Command button, then say a command
(e.g., “tutorial”).
• Use the radio ON/OFF VOLUME rotary knob to adjust the volume to a comfortable level while the Voice Command system is speaking. Please note the volume setting for
Voice Command is different than the audio system.
WARNING!
Any voice commanded system should be used only in safe driving conditions and all
attention should be kept on the roadway ahead. Failure to do so may result in an
accident causing serious injury or death.
NOTE: To access the tutorial, press the Voice Command button
. After the BEEP,
say “tutorial”. Press any hard-key or touch the display to cancel the tutorial.
37
ELECTRONICS
Page 53 of 76
• Set the parking brake, shift the automatic transmission into PARK and turn the ignition
to LOCK.
• Turn off the heater, radio, and all unnecessary electrical accessories.
• If using another vehicle to jump-start the battery, park the vehicle within the jumper cables reach, set the parking brake and make sure the ignition is OFF.
WARNING!
Do not allow vehicles to touch each other as this could establish a ground connection
and personal injury could result.
Jump-Starting Procedure
WARNING!
Failure to follow this procedure could result in personal injury or property damage due
to battery explosion.
CAUTION!
Failure to follow these procedures could result in damage to the charging system of
the booster vehicle or the discharged vehicle.
• Connect the positive (+)end of the jumper cable to the positive (+)post of the
discharged vehicle.
• Connect the opposite end of the positive (+)jumper cable to the positive (+)post of
the booster battery.
• Connect the negative end (-)of the jumper cable to the negative (-)post of the booster
battery.
• Connect the opposite end of the negative (-)jumper cable to a good engine ground
(exposed metal part of the discharged vehicle’s engine) away from the battery and the
fuel injection system.
WARNING!
Do not connect the cable to the negative post (-)of the discharged battery. The
resulting electrical spark could cause the battery to explode and could result in
personal injury.
51
WHAT TO DO IN EMERGENCIES
Page 64 of 76
FUSES
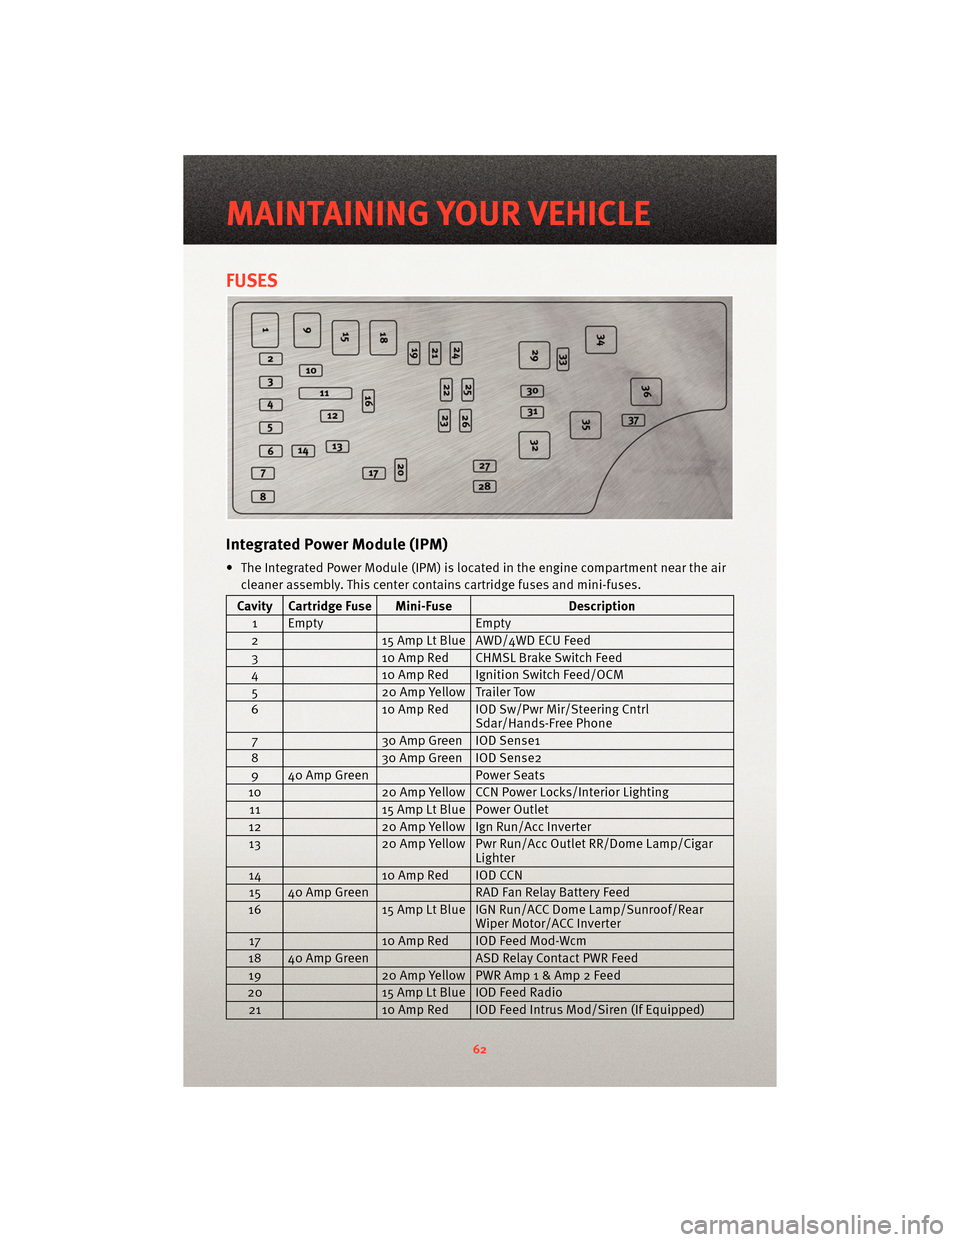
Integrated Power Module (IPM)
• The Integrated Power Module (IPM) is located in the engine compartment near the aircleaner assembly. This center contains cartridge fuses and mini-fuses.
Cavity Cartridge Fuse Mini-Fuse Description
1 Empty Empty
2 15 Amp Lt Blue AWD/4WD ECU Feed
3 10 Amp Red CHMSL Brake Switch Feed
4 10 Amp Red Ignition Switch Feed/OCM
5 20 Amp Yellow Trailer Tow
6 10 Amp Red IOD Sw/Pwr Mir/Steering Cntrl
Sdar/Hands-Free Phone
7 30 Amp Green IOD Sense1
8 30 Amp Green IOD Sense2
9 40 Amp Green Power Seats
10 20 Amp Yellow CCN Power Locks/Interior Lighting
11 15 Amp Lt Blue Power Outlet
12 20 Amp Yellow Ign Run/Acc Inverter
13 20 Amp Yellow Pwr Run/Acc Outlet RR/Dome Lamp/Cigar
Lighter
14 10 Amp Red IOD CCN
15 40 Amp Green RAD Fan Relay Battery Feed
16 15 Amp Lt Blue IGN Run/ACC Dome Lamp/Sunroof/Rear
Wiper Motor/ACC Inverter
17 10 Amp Red IOD Feed Mod-Wcm
18 40 Amp Green ASD Relay Contact PWR Feed
19 20 Amp Yellow PWR Amp 1 & Amp 2 Feed
20 15 Amp Lt Blue IOD Feed Radio
21 10 Amp Red IOD Feed Intrus Mod/Siren (If Equipped)
MAINTAINING YOUR VEHICLE
62
Page 67 of 76
CHRYSLER GROUP LLC
CUSTOMER CENTER
P.O. Box 21–8004
Auburn Hills, MI 48321–8004
Phone: 1–800–423–6343
CHRYSLER CANADA INC.
CUSTOMER CENTER
P.O. Box 1621
Windsor, Ontario N9A 4H6
Phone: 1–800–465–2001
ASSISTANCE FOR THE
HEARING IMPAIRED
• To assist customers who have hearingdifficulties, the manufacturer has
installed special TDD
(Telecommunication Devices for the
Deaf) equipment at its customer
center. Any hearing or speech
impaired customer, who has access to
a TDD or a conventional teletypewriter
(TTY) in the United States, can
communicate with the manufacturer
by dialing 1–800–380–CHRY.
Canadian residents with hearing
difficulties that requir e assistance can
use the special needs relay service
offered by Bell Canada. For TTY
teletypewriter users, dial 711 and for
Voice callers, dial 1–800–855–0511 to
connect with a Bell Relay Service
operator.
WARNING!
Engine exhaust, some of its
constituents, and certain vehicle
components contain, or emit,
chemicals known to the State of
California to cause cancer and birth
defects, or other reproductive harm.
In addition, certain fluids contained
in vehicles and certain products of
component wear contain, or emit,
chemicals known to the State of
California to cause cancer and birth
defects, or other reproductive harm.
PUBLICATIONS ORDERING
• If you are the first registered retail
owner of your vehicle, you may obtain
one free printed copy of the Owner's
Manual, Warranty Booklet or Radio
Manuals on your DVD by calling
1–800–423–6343 (U.S.) or
1–800–387–1143 (Canada) or by
contacting your dealer.
• Replacement User Guides or DVDs or, if you prefer, additional printed
copies of the Owner's Manual,
Warranty Booklet or Radio Manuals
may be purchased by visiting
www.techauthority.com or by calling
1–800–890–4038 (U.S.) or
1–800–387–1143 (Canada). Visa,
Master Card, American Express and
Discover orders are accepted. If you
prefer mailing your order, please call
the above numbers for an order form.
65
CONSUMER ASSISTANCE
Page 71 of 76
MOPAR®ACCESSORIES
• The following highlights just some of the authentic Dodge Accessories by MOPAR®
that have been engineered to customize your Dodge Caliber.
• To see the full line of accessories, sto p by your Dodge dealer or visitMOPAR.com.
CHROME:
• Chrome Bodyside Moldings • 17 Inch Chrome Wheel • Chrome Fuel Filler Door
EXTERIOR:
• Fog Lights • Side Window Air Deflector • Rear Spoiler
• Decal Kit • Front End and Hood Cover • Molded Splash Guards
INTERIOR:
• Premium Carpet Floor Mats • Door Sill Guards • Bright Pedal Kit
• Slush Mats • Shift Knob• Heated Seats
ELECTRONICS:
• Portable Navigation Systems • Uconnect™ Web (WiFi) • DVD Rear Seat Video
•iPod
®Adapter • Uconnect™ Phone • Media Center 730N (RER
Navigation Radio)
CARRIERS:
• Hitch-mount Bike Carrier • Roof Mount Bike Carrier • Roof Box Cargo Carrier
• Roof Mount Ski and Snowboard Carrier • Roof Mount Water Sports
Carrier • Roof Mount Canoe Carrier
•iPod
®is a registered trademark of Apple, Inc.
69
MOPAR ACCESSORIES