climate control DODGE DART 2015 PF / 1.G User Guide
[x] Cancel search | Manufacturer: DODGE, Model Year: 2015, Model line: DART, Model: DODGE DART 2015 PF / 1.GPages: 164, PDF Size: 25.19 MB
Page 3 of 164
INTRODUCTION/WELCOME
WELCOME FROM CHRYSLER GROUP LLC..2
CONTROLS AT A GLANCE
DRIVER COCKPIT...............4INSTRUMENT CLUSTER...........6
GETTING STARTED
KEY FOB . . . . . . . . . . . . . . . . . . . . 8REMOTE START . . . . . . . . . . . . . . . . 9KEYLESS ENTER-N-GO™..........9VEHICLE SECURITY ALARM........13SEAT BELT SYSTEMS............15SUPPLEMENTAL RESTRAINT SYSTEM(SRS) — AIR BAGS.............16CHILD RESTRAINTS............22HEAD RESTRAINTS.............26FRONT SEATS................27REAR SEAT..................29HEATED SEATS . . . . . . . . . . . . . . . 29HEATED STEERING WHEEL........30TILT/TELESCOPING STEERING COLUMN..31
OPERATING YOUR VEHICLE
ENGINE BREAK-INRECOMMENDATIONS............32TURN SIGNAL/WIPER/WASHER/HIGHBEAM LEVER.................33HEADLIGHT SWITCH............35ELECTRONIC SPEED CONTROL — IFEQUIPPED...................36MANUAL CLIMATE CONTROLS.......38Uconnect®8.4 MANUAL CLIMATECONTROLS..................39Uconnect®8.4 AUTOMATIC CLIMATECONTROLS..................41BLIND SPOT MONITORING.........44PA R K V I E W®REAR BACK-UP CAMERA . . 44WIND BUFFETING..............44POWER SUNROOF — IF EQUIPPED....45MANUAL TRANSMISSION — IFEQUIPPED...................46SIX-SPEED AUTOMATIC TRANSMISSION . . . 47
ELECTRONICS
YOUR VEHICLE'S SOUND SYSTEM....50Uconnect®200 . . . . . . . . . . . . . . . . 52Uconnect®8.4 & 8.4N............62STEERING WHEEL AUDIO CONTROLS . . 88ELECTRONIC VEHICLE INFORMATIONCENTER(EVIC) — STANDARD (2 BUTTON) . . . . . . . . 89DRIVER INFORMATION DISPLAY (DID) —PREMIUM (4 BUTTON)...........90Uconnect®8.4 CUSTOMERPROGRAMMABLE FEATURES.......94UNIVERSAL GARAGE DOOR OPENER(HomeLink®).................94POWER OUTLET...............97
UTILITY
TRAILER TOWING WEIGHTS (MAXIMUMTRAILER WEIGHT RATINGS)........98RECREATIONAL TOWING (BEHINDMOTORHOME, ETC.)............98
WHAT TO DO IN EMERGENCIES
ROADSIDE ASSISTANCE..........100INSTRUMENT CLUSTER WARNINGLIGHTS...................100INSTRUMENT CLUSTER INDICATORLIGHTS...................106IF YOUR ENGINE OVERHEATS......107JACKING AND TIRE CHANGING — IFEQUIPPED..................108TIRE SERVICE KIT.............114JUMP-STARTING..............120SHIFT LEVER OVERRIDE.........122TOWING A DISABLED VEHICLE.....123FREEING A STUCK VEHICLE.......123EVENT DATA RECORDER (EDR).....124
MAINTAINING YOUR VEHICLE
OPENING THE HOOD...........1251.4L Turbo Engine..............1262.0L Engine.................1282.4L Engine.................130FLUID CAPACITIES.............132FLUIDS, LUBRICANTS AND GENUINEPA RT S . . . . . . . . . . . . . . . . . . . . 1 3 2MAINTENANCE PROCEDURES......133MAINTENANCE SCHEDULE.......134MAINTENANCE RECORD.........138FUSES....................139TIRE PRESSURES.............142SPARE TIRES — IF EQUIPPED......143WHEEL AND WHEEL TRIM CARE....144REPLACEMENT BULBS..........145
CONSUMER ASSISTANCE
CHRYSLER GROUP LLC CUSTOMERCENTER...................146CHRYSLER CANADA INC. CUSTOMERCENTER...................146ASSISTANCE FOR THE HEARINGIMPAIRED..................146PUBLICATIONS ORDERING........147REPORTING SAFETY DEFECTS IN THEUNITED STATES..............148Uconnect®CUSTOMER CENTER.....148
MOPAR® ACCESSORIES
AUTHENTIC ACCESSORIES BY MOPAR®..149
FAQ
FREQUENTLY ASKED QUESTIONS....150
INDEX.....................152
TABLE OF CONTENTS
Page 7 of 164
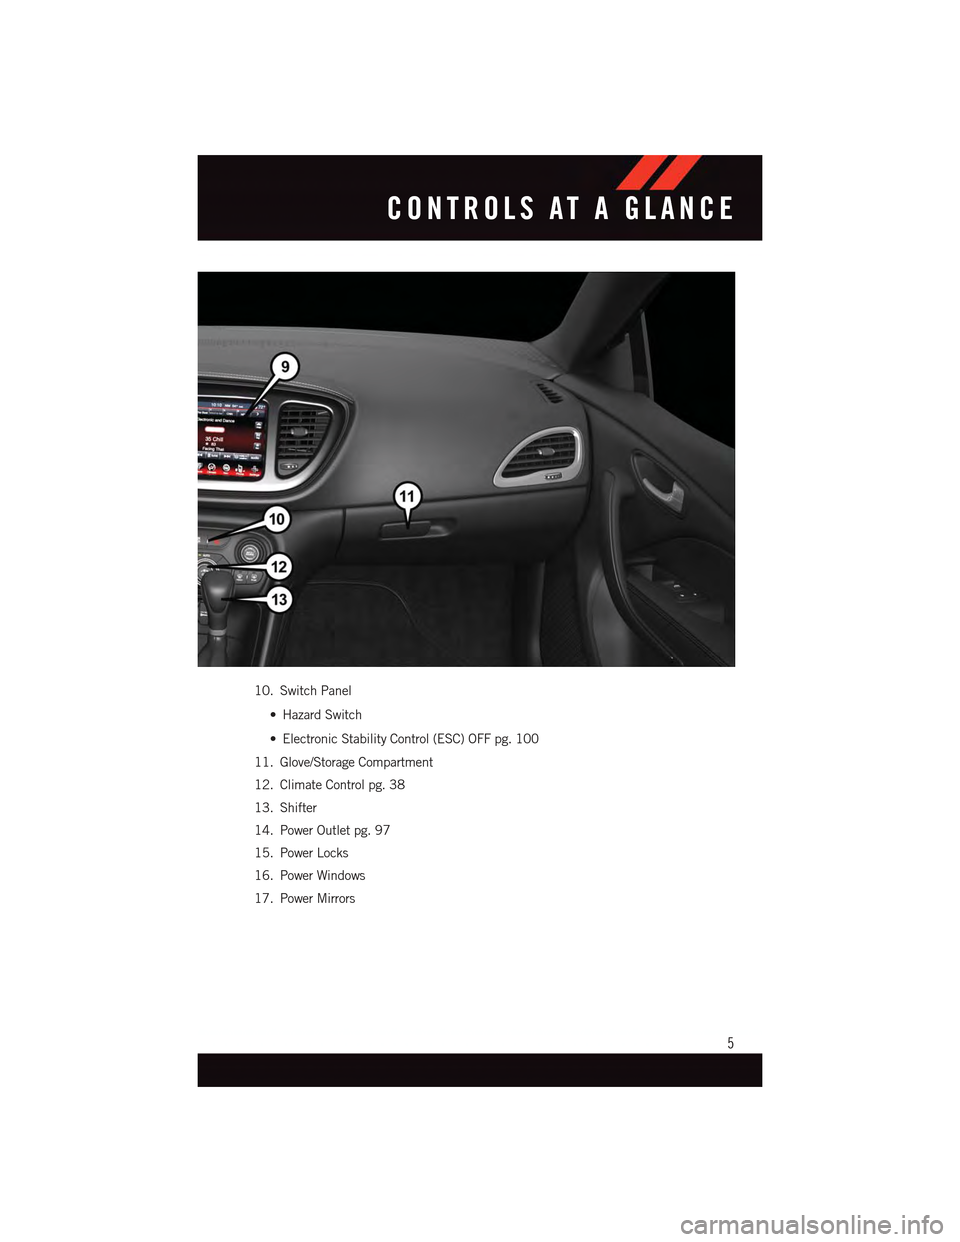
10. Switch Panel
•HazardSwitch
•ElectronicStabilityControl(ESC)OFFpg.100
11. Glove/Storage Compartment
12. Climate Control pg. 38
13. Shifter
14. Power Outlet pg. 97
15. Power Locks
16. Power Windows
17. Power Mirrors
CONTROLS AT A GLANCE
5
Page 31 of 164
REAR SEAT
Folding Rear Seatback
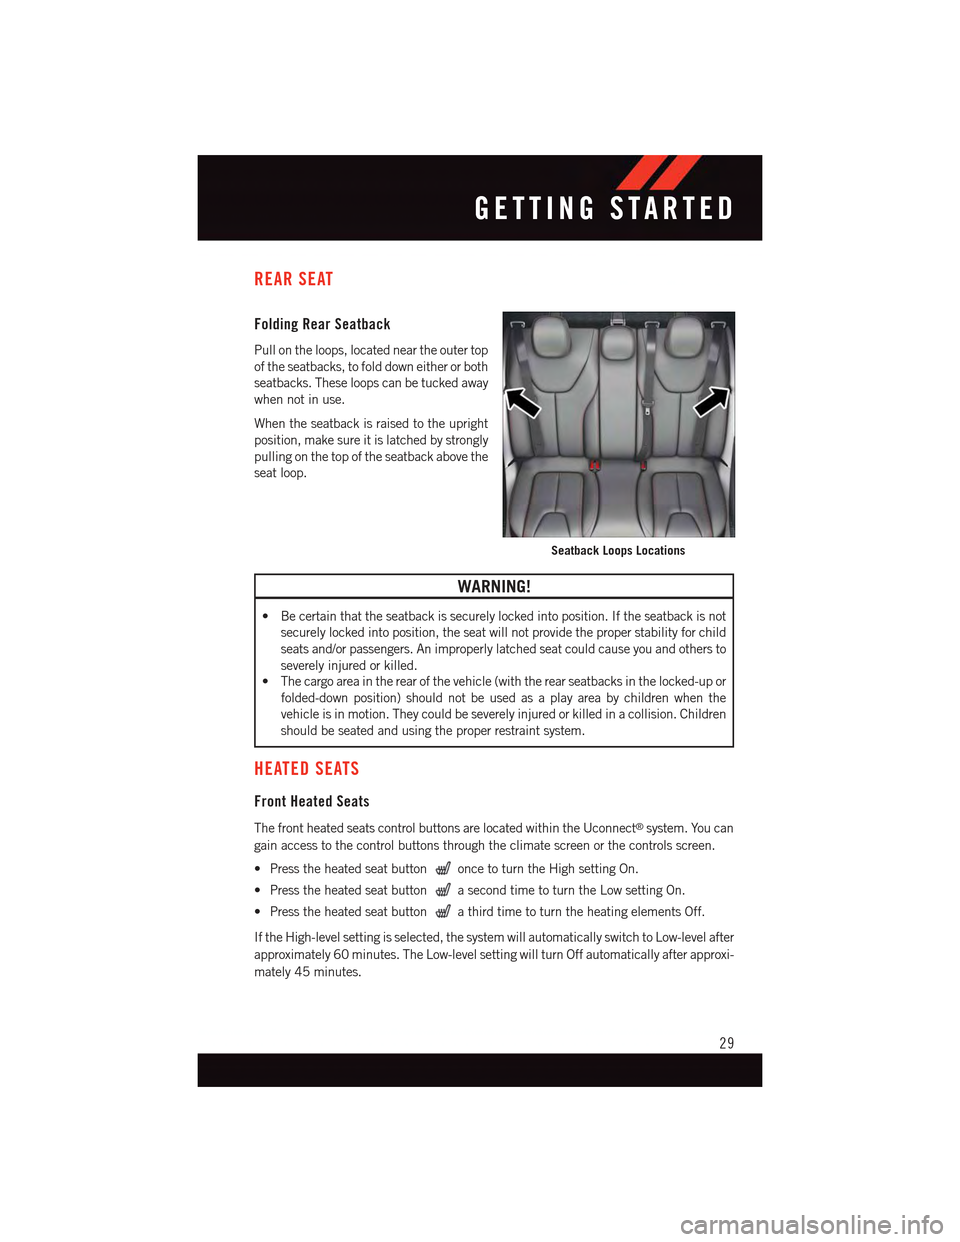
Pull on the loops, located near the outer top
of the seatbacks, to fold down either or both
seatbacks. These loops can be tucked away
when not in use.
When the seatback is raised to the upright
position, make sure it is latched by strongly
pulling on the top of the seatback above the
seat loop.
WARNING!
•Becertainthattheseatbackissecurelylockedintoposition.Iftheseatbackisnot
securely locked into position, the seat will not provide the proper stability for child
seats and/or passengers. An improperly latched seat could cause you and others to
severely injured or killed.
•Thecargoareaintherearofthevehicle(withtherearseatbacksinthelocked-upor
folded-down position) should not be used as a play area by children when the
vehicle is in motion. They could be severely injured or killed in a collision. Children
should be seated and using the proper restraint system.
HEATED SEATS
Front Heated Seats
The front heated seats control buttons are located within the Uconnect®system. You can
gain access to the control buttons through the climate screen or the controls screen.
•Presstheheatedseatbuttononce to turn the High setting On.
•PresstheheatedseatbuttonasecondtimetoturntheLowsettingOn.
•PresstheheatedseatbuttonathirdtimetoturntheheatingelementsOff.
If the High-level setting is selected, the system will automatically switch to Low-level after
approximately 60 minutes. The Low-level setting will turn Off automatically after approxi-
mately 45 minutes.
Seatback Loops Locations
GETTING STARTED
29
Page 32 of 164
NOTE:
On models that are equipped with remote start, this feature can be programmed to come
on during a remote start through the Uconnect®system. Refer to “Uconnect®Settings”
in “Understanding Your Instrument Panel” in the Owner's Manual on the DVD.
WARNING!
•Personswhoareunabletofeelpaintotheskinbecauseofadvancedage,chronic
illness, diabetes, spinal cord injury, medication, alcohol use, exhaustion or other
physical conditions must exercise care when using the seat heater. It may cause
burns even at low temperatures, especially if used for long periods of time.
•Donotplaceanythingontheseatthatinsulatesagainstheat,suchasablanketor
cushion. This may cause the seat heater to overheat. Sitting in a seat that has been
overheated could cause serious burns due to the increased surface temperature of
the seat.
HEATED STEERING WHEEL
The steering wheel contains a heating element that heats the steering wheel to one
temperature setting.
The heated steering wheel control button is located within the Uconnect®system. You can
gain access to the control buttons through the climate screen or the controls screen.
•Presstheheatedsteeringwheelbuttononce to turn the heating element ON.
•Presstheheatedsteeringwheelbuttonasecondtimetoturntheheatingelement
OFF.
Once the heated steering wheel has been turned on, it will operate for up to 80 minutes
before automatically shutting off. The heated steering wheel can shut off early or may not
turn on when the steering wheel is already warm.
NOTE:
Vehicle Equipped With Remote Start
On models that are equipped with remote start, this feature can be programmed to come
on during a remote start through the Uconnect®system. Refer to “Uconnect®Settings”
in “Understanding Your Instrument Panel” in the Owner's Manual on the DVD.
WARNING!
•Personswhoareunabletofeelpaintotheskinbecauseofadvancedage,chronic
illness, diabetes, spinal cord injury, medication, alcohol use, exhaustion, or other
physical conditions must exercise care when using the steering wheel heater. It may
cause burns even at low temperatures, especially if used for long periods.
•Donotplaceanythingonthesteeringwheelthatinsulatesagainstheat,suchasa
blanket or steering wheel covers of any type and material. This may cause the
steering wheel heater to overheat.
GETTING STARTED
30
Page 40 of 164
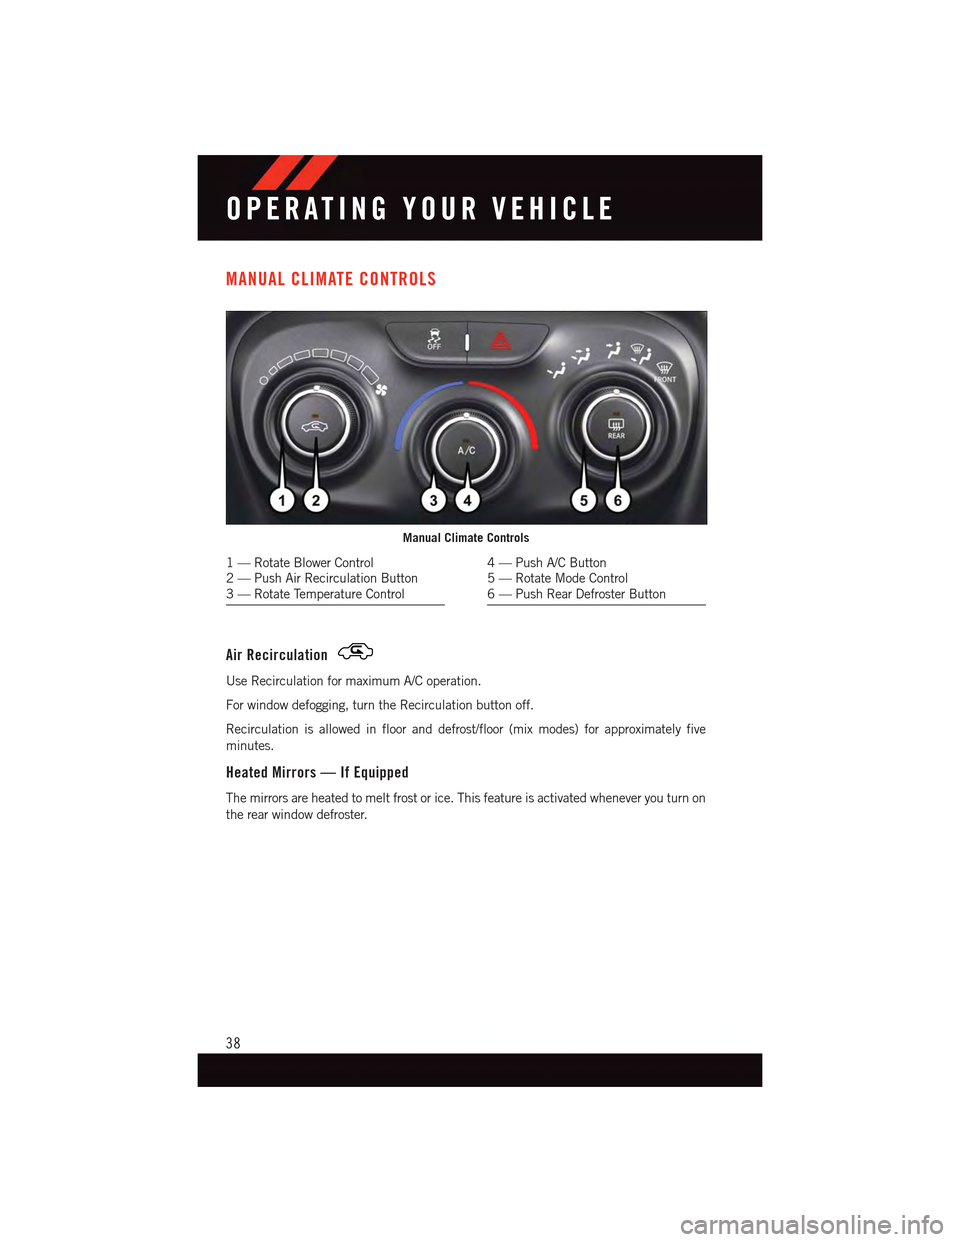
MANUAL CLIMATE CONTROLS
Air Recirculation
Use Recirculation for maximum A/C operation.
For window defogging, turn the Recirculation button off.
Recirculation is allowed in floor and defrost/floor (mix modes) for approximately five
minutes.
Heated Mirrors — If Equipped
The mirrors are heated to melt frost or ice. This feature is activated whenever you turn on
the rear window defroster.
Manual Climate Controls
1—RotateBlowerControl2—PushAirRecirculationButton3—RotateTemperatureControl
4—PushA/CButton5—RotateModeControl6—PushRearDefrosterButton
OPERATING YOUR VEHICLE
38
Page 41 of 164
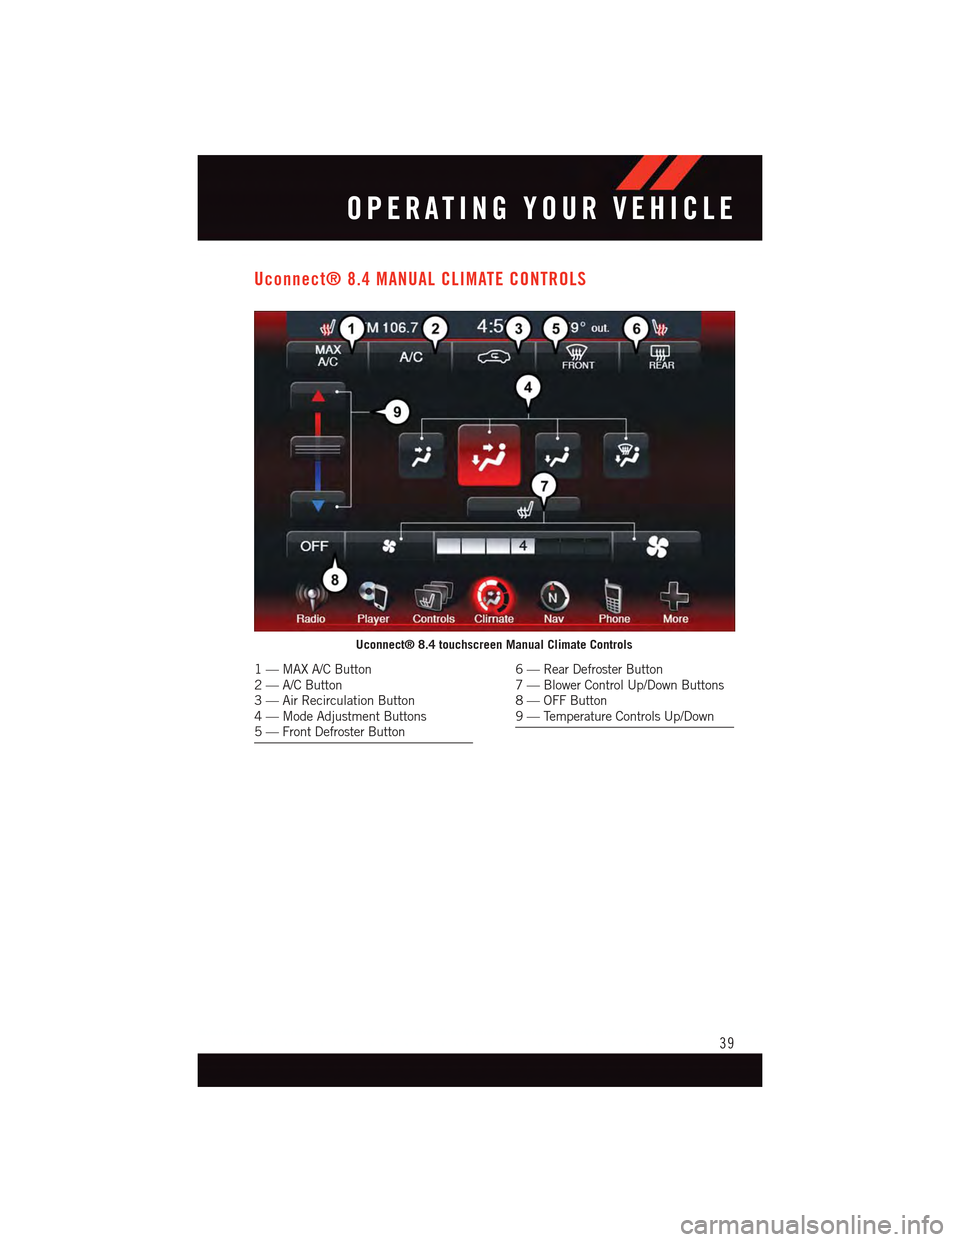
Uconnect® 8.4 MANUAL CLIMATE CONTROLS
Uconnect® 8.4 touchscreen Manual Climate Controls
1—MAXA/CButton2—A/CButton3—AirRecirculationButton4—ModeAdjustmentButtons5—FrontDefrosterButton
6—RearDefrosterButton7—BlowerControlUp/DownButtons8—OFFButton9—TemperatureControlsUp/Down
OPERATING YOUR VEHICLE
39
Page 42 of 164
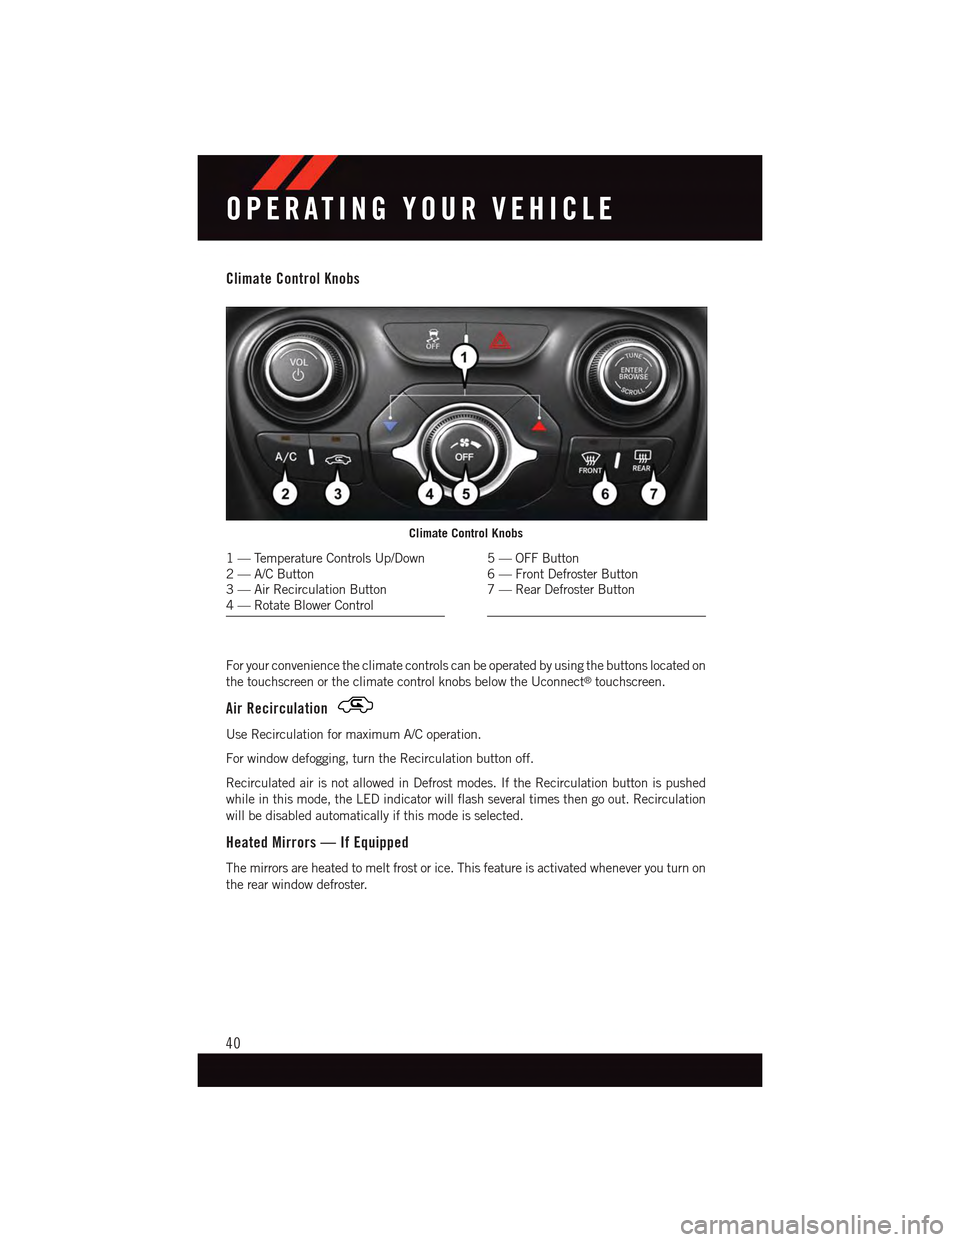
Climate Control Knobs
For your convenience the climate controls can be operated by using the buttons located on
the touchscreen or the climate control knobs below the Uconnect®touchscreen.
Air Recirculation
Use Recirculation for maximum A/C operation.
For window defogging, turn the Recirculation button off.
Recirculated air is not allowed in Defrost modes. If the Recirculation button is pushed
while in this mode, the LED indicator will flash several times then go out. Recirculation
will be disabled automatically if this mode is selected.
Heated Mirrors — If Equipped
The mirrors are heated to melt frost or ice. This feature is activated whenever you turn on
the rear window defroster.
Climate Control Knobs
1—TemperatureControlsUp/Down2—A/CButton3—AirRecirculationButton4—RotateBlowerControl
5—OFFButton6—FrontDefrosterButton7—RearDefrosterButton
OPERATING YOUR VEHICLE
40
Page 43 of 164
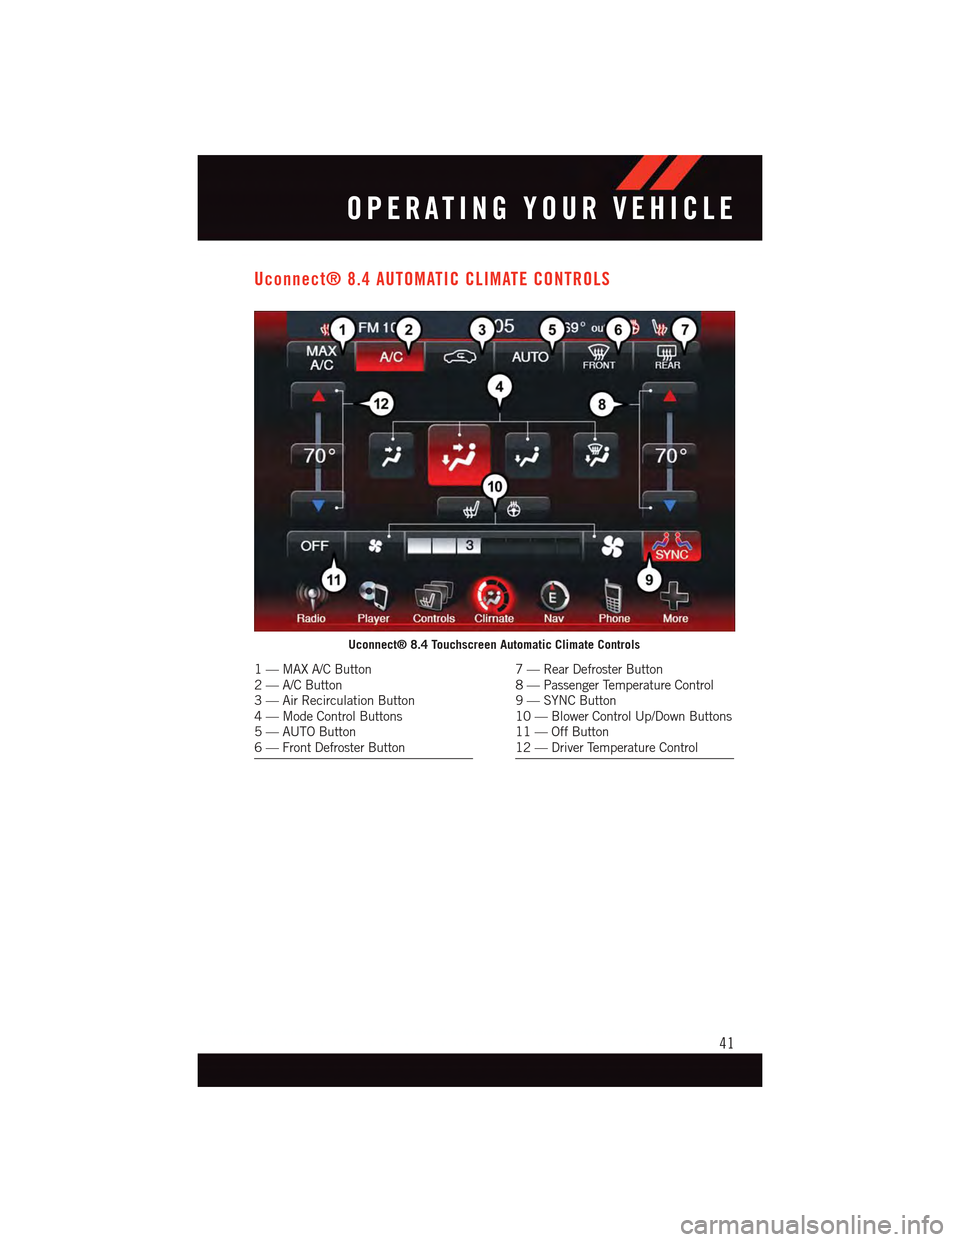
Uconnect® 8.4 AUTOMATIC CLIMATE CONTROLS
Uconnect® 8.4 Touchscreen Automatic Climate Controls
1—MAXA/CButton2—A/CButton3—AirRecirculationButton4—ModeControlButtons5—AUTOButton6—FrontDefrosterButton
7—RearDefrosterButton8—PassengerTemperatureControl9—SYNCButton10 — Blower Control Up/Down Buttons11 — Off Button12 — Driver Temperature Control
OPERATING YOUR VEHICLE
41
Page 44 of 164
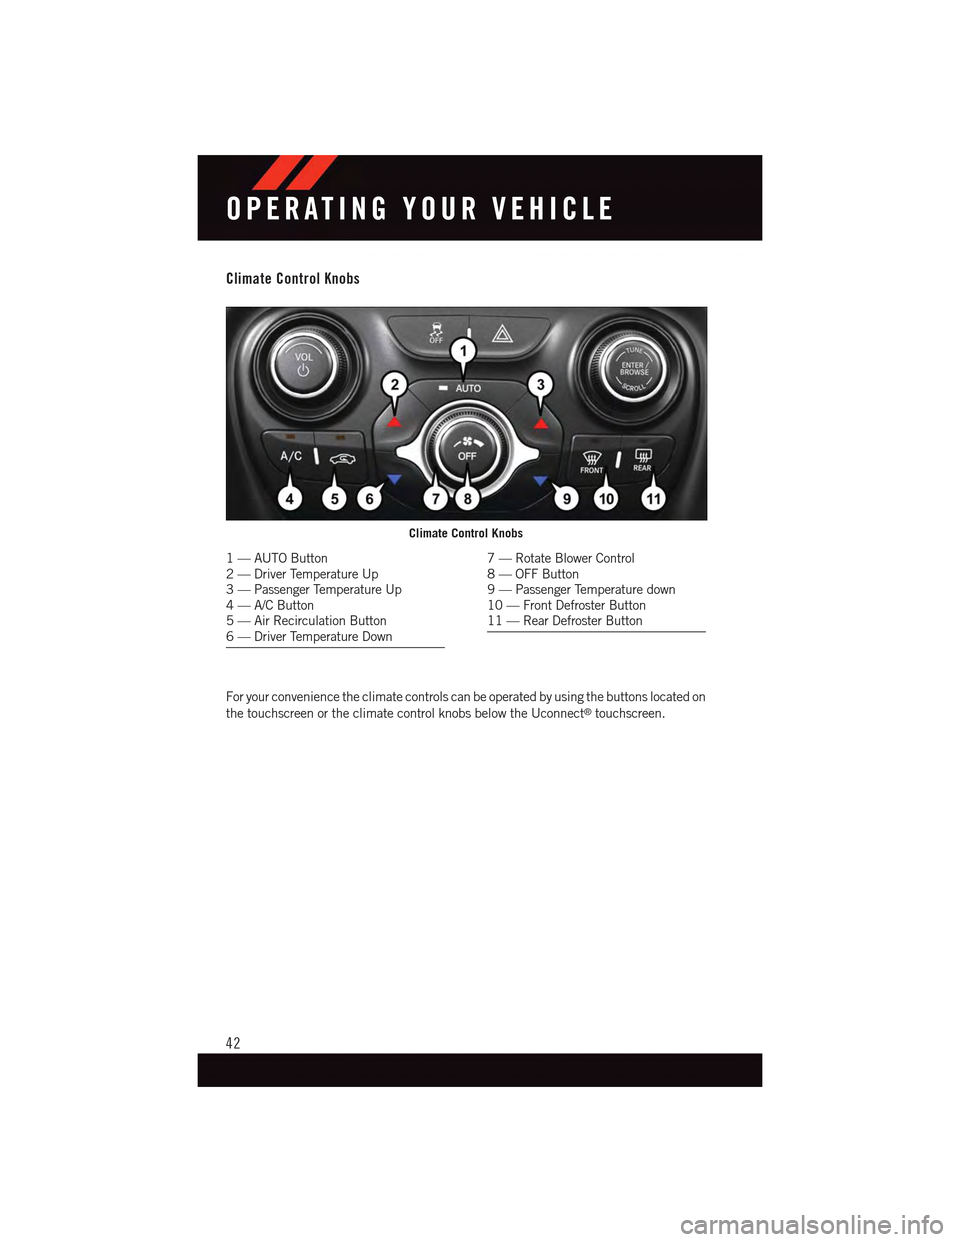
Climate Control Knobs
For your convenience the climate controls can be operated by using the buttons located on
the touchscreen or the climate control knobs below the Uconnect®touchscreen.
Climate Control Knobs
1—AUTOButton2—DriverTemperatureUp3—PassengerTemperatureUp4—A/CButton5—AirRecirculationButton6—DriverTemperatureDown
7—RotateBlowerControl8—OFFButton9—PassengerTemperaturedown10 — Front Defroster Button11 — Rear Defroster Button
OPERATING YOUR VEHICLE
42
Page 65 of 164
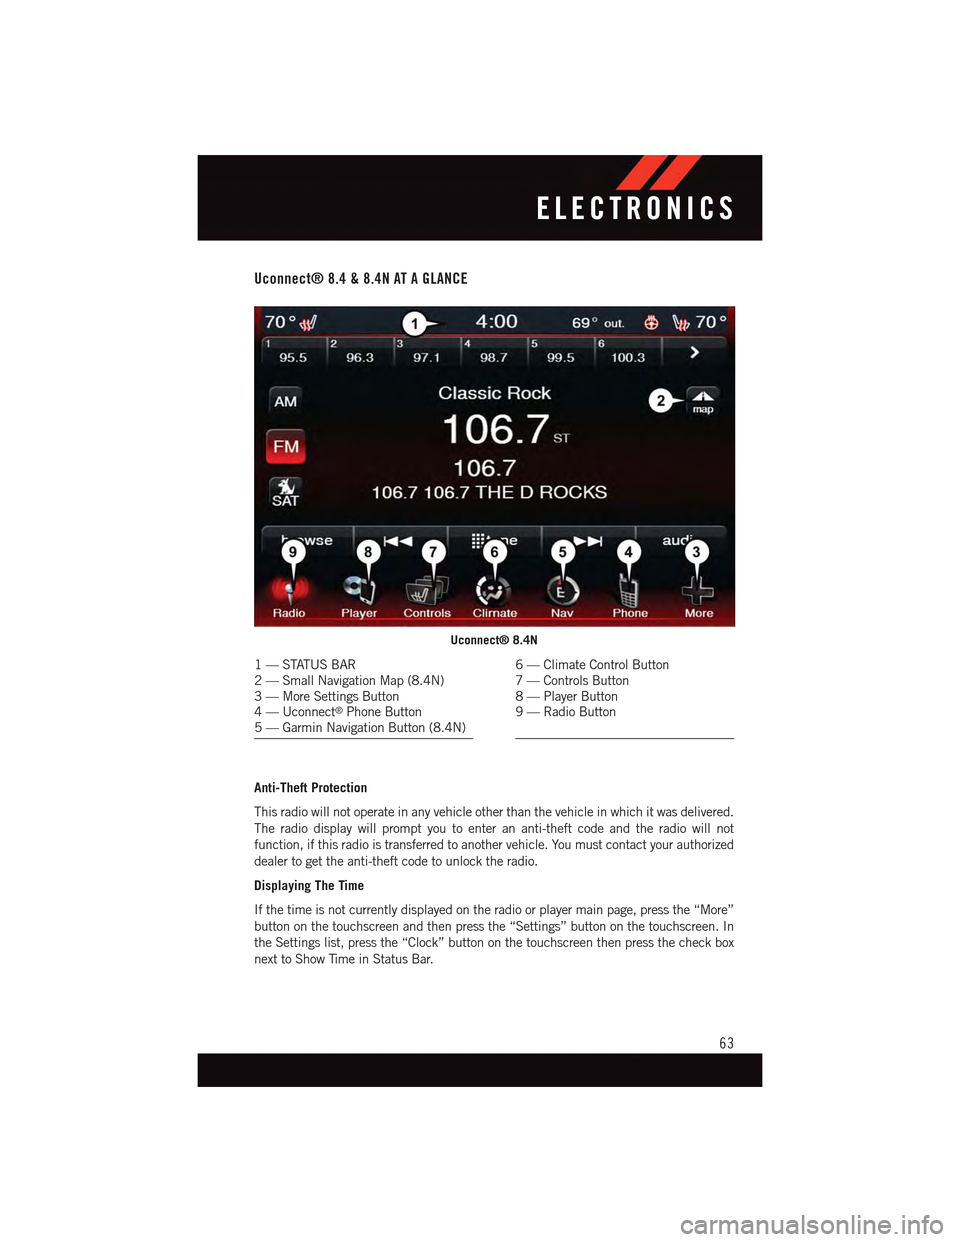
Uconnect® 8.4 & 8.4N AT A GLANCE
Anti-Theft Protection
This radio will not operate in any vehicle other than the vehicle in which it was delivered.
The radio display will prompt you to enter an anti-theft code and the radio will not
function, if this radio is transferred to another vehicle. You must contact your authorized
dealer to get the anti-theft code to unlock the radio.
Displaying The Time
If the time is not currently displayed on the radio or player main page, press the “More”
button on the touchscreen and then press the “Settings” button on the touchscreen. In
the Settings list, press the “Clock” button on the touchscreen then press the check box
next to Show Time in Status Bar.
Uconnect® 8.4N
1—STATUSBAR2—SmallNavigationMap(8.4N)3—MoreSettingsButton4—Uconnect®Phone Button5—GarminNavigationButton(8.4N)
6—ClimateControlButton7—ControlsButton8—PlayerButton9—RadioButton
ELECTRONICS
63