display DODGE DURANGO 2015 3.G Owner's Manual
[x] Cancel search | Manufacturer: DODGE, Model Year: 2015, Model line: DURANGO, Model: DODGE DURANGO 2015 3.GPages: 236, PDF Size: 35.01 MB
Page 77 of 236
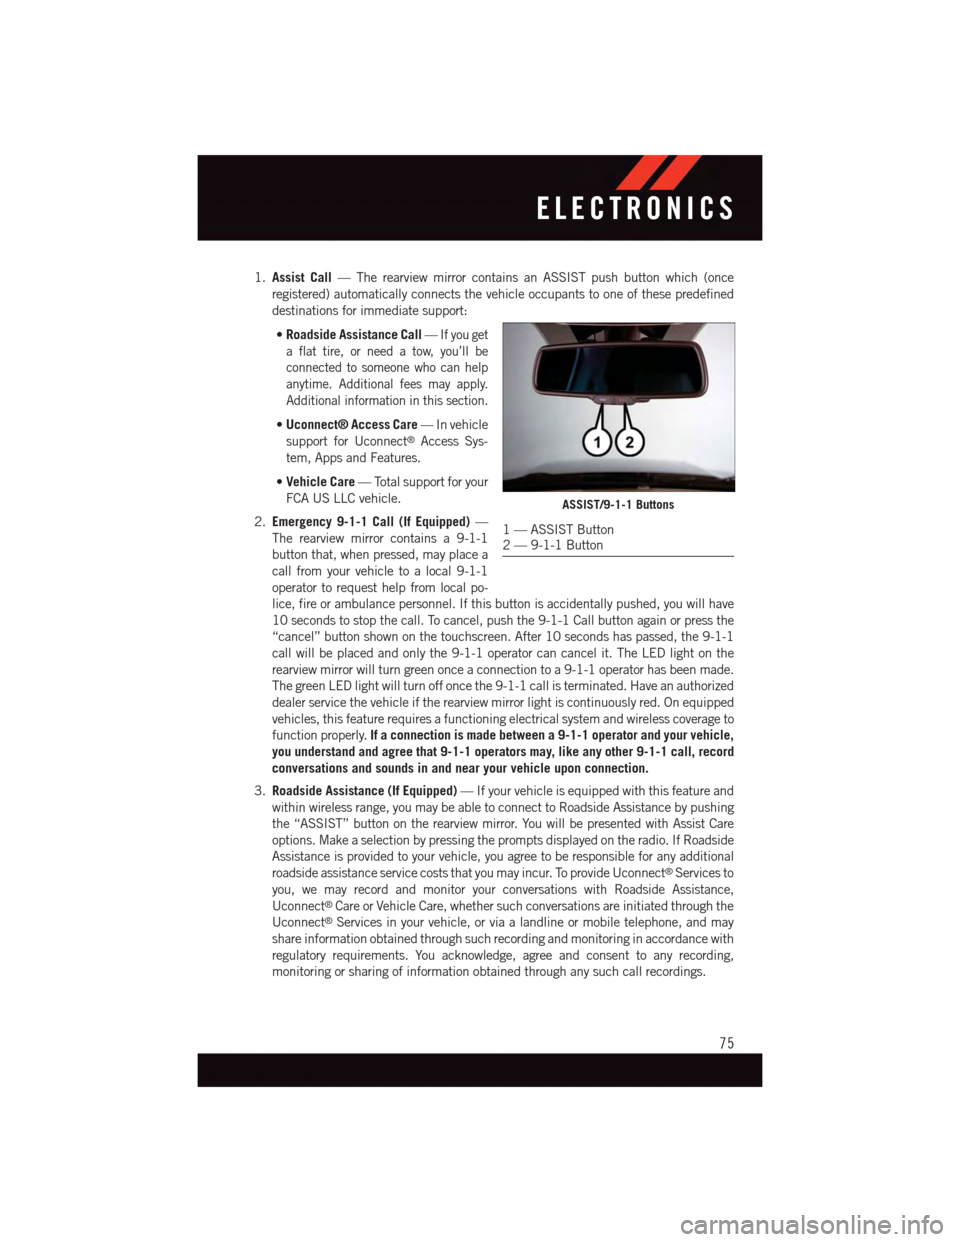
1.Assist Call—TherearviewmirrorcontainsanASSISTpushbuttonwhich(once
registered) automatically connects the vehicle occupants to one of these predefined
destinations for immediate support:
•Roadside Assistance Call—If you get
aflattire,orneedatow,you’llbe
connected to someone who can help
anytime. Additional fees may apply.
Additional information in this section.
•Uconnect® Access Care—Invehicle
support for Uconnect®Access Sys-
tem, Apps and Features.
•Vehicle Care—Totalsupportforyour
FCA US LLC vehicle.
2.Emergency 9-1-1 Call (If Equipped)—
The rearview mirror contains a 9-1-1
button that, when pressed, may place a
call from your vehicle to a local 9-1-1
operator to request help from local po-
lice, fire or ambulance personnel. If this button is accidentally pushed, you will have
10 seconds to stop the call. To cancel, push the 9-1-1 Call button again or press the
“cancel” button shown on the touchscreen. After 10 seconds has passed, the 9-1-1
call will be placed and only the 9-1-1 operator can cancel it. The LED light on the
rearview mirror will turn green once a connection to a 9-1-1 operator has been made.
The green LED light will turn off once the 9-1-1 call is terminated. Have an authorized
dealer service the vehicle if the rearview mirror light is continuously red. On equipped
vehicles, this feature requires a functioning electrical system and wireless coverage to
function properly.If a connection is made between a 9-1-1 operator and your vehicle,
you understand and agree that 9-1-1 operators may, like any other 9-1-1 call, record
conversations and sounds in and near your vehicle upon connection.
3.Roadside Assistance (If Equipped)—Ifyourvehicleisequippedwiththisfeatureand
within wireless range, you may be able to connect to Roadside Assistance by pushing
the “ASSIST” button on the rearview mirror. You will be presented with Assist Care
options. Make a selection by pressing the prompts displayed on the radio. If Roadside
Assistance is provided to your vehicle, you agree to be responsible for any additional
roadside assistance service costs that you may incur. To provide Uconnect®Services to
you, we may record and monitor your conversations with Roadside Assistance,
Uconnect®Care or Vehicle Care, whether such conversations are initiated through the
Uconnect®Services in your vehicle, or via a landline or mobile telephone, and may
share information obtained through such recording and monitoring in accordance with
regulatory requirements. You acknowledge, agree and consent to any recording,
monitoring or sharing of information obtained through any such call recordings.
ASSIST/9-1-1 Buttons
1—ASSISTButton2—9-1-1Button
ELECTRONICS
75
Page 84 of 236
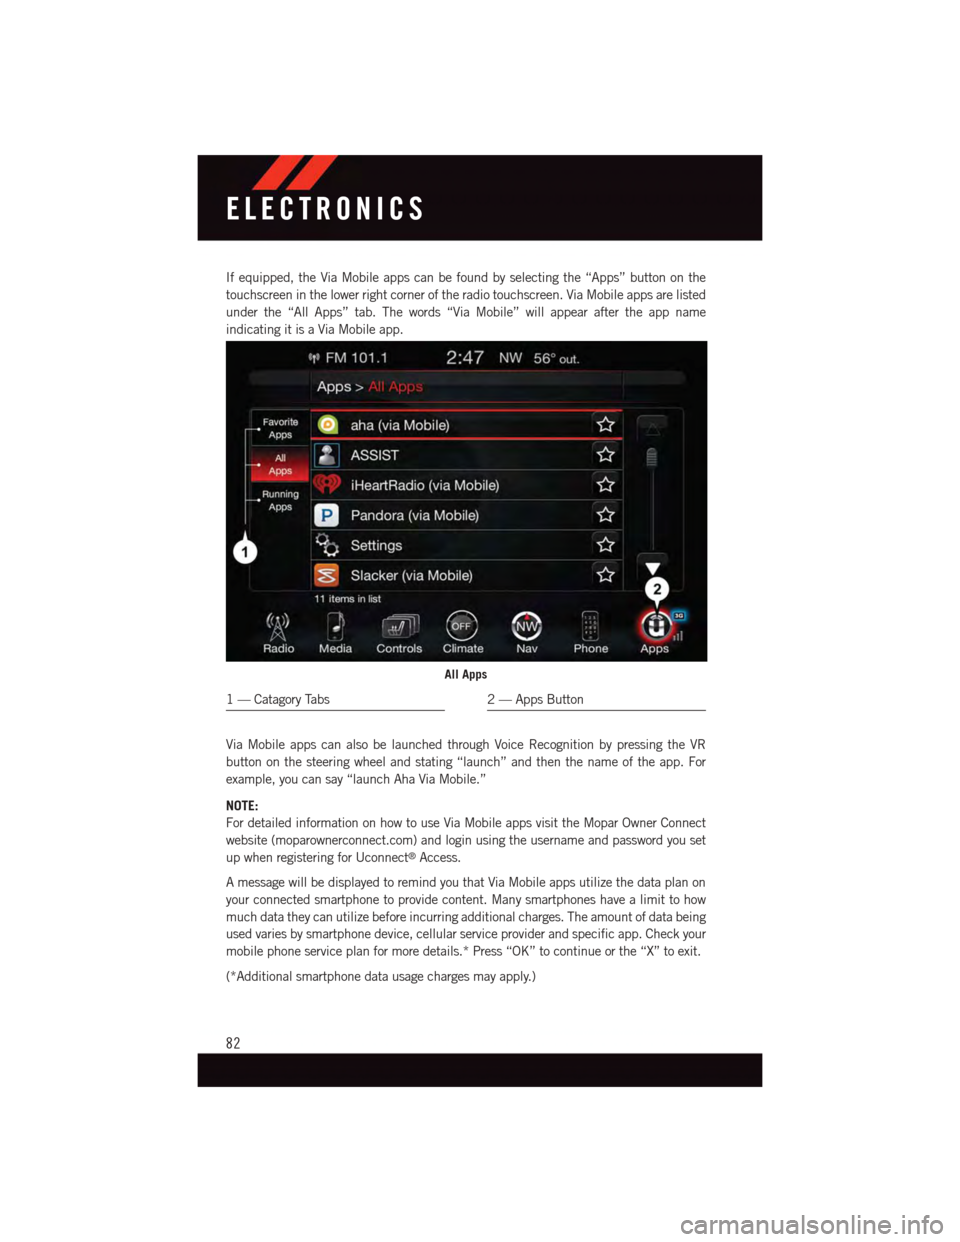
If equipped, the Via Mobile apps can be found by selecting the “Apps” button on the
touchscreen in the lower right corner of the radio touchscreen. Via Mobile apps are listed
under the “All Apps” tab. The words “Via Mobile” will appear after the app name
indicating it is a Via Mobile app.
Via Mobile apps can also be launched through Voice Recognition by pressing the VR
button on the steering wheel and stating “launch” and then the name of the app. For
example, you can say “launch Aha Via Mobile.”
NOTE:
For detailed information on how to use Via Mobile apps visit the Mopar Owner Connect
website (moparownerconnect.com) and login using the username and password you set
up when registering for Uconnect®Access.
AmessagewillbedisplayedtoremindyouthatViaMobileappsutilizethedataplanon
your connected smartphone to provide content. Many smartphones have a limit to how
much data they can utilize before incurring additional charges. The amount of data being
used varies by smartphone device, cellular service provider and specific app. Check your
mobile phone service plan for more details.* Press “OK” to continue or the “X” to exit.
(*Additional smartphone data usage charges may apply.)
All Apps
1—CatagoryTabs2—AppsButton
ELECTRONICS
82
Page 87 of 236
NOTE:
In the Clock Setting Menu you can also select Display Clock. Display Clock turns the clock
display in the status bar on or off.
Equalizer, Balance And Fade
To a d j u s t t h e A u d i o s e t t i n g s :
1. Push the + MORE button on the faceplate, then press the “Settings” button on the
touchscreen.
2. Scroll down and press the “Audio” button on the touchscreen to open the Audio menu.
The Audio Menu shows the following options for you to customize your audio settings.
Equalizer
•Pressthe“Equalizer”buttononthetouchscreentoadjusttheBass,MidandTreble.
Use the “+” or “–” button on the touchscreen to adjust the equalizer to your desired
settings. Press the “back arrow” button on the touchscreen when done.
Balance/Fade
•Pressthe“Balance/Fade”buttononthetouchscreentoadjustthesoundfromthe
speakers. Use the “arrow” button on the touchscreen to adjust the sound level from the
front and rear or right and left side speakers. Press the Center “C” button on the
touchscreen to reset the balance and fade to the factory setting. Press the “back arrow”
button on the touchscreen when done.
Speed Adjustable
•Pressthe“SpeedAdjustedVolume”buttononthetouchscreentoselectbetweenOFF,
1, 2 or 3. This will decrease the radio volume relative to a decrease in vehicle speed.
Press the “back arrow” button on the touchscreen when done.
Loudness
•Pressthe“Loudness”buttononthetouchscreentoselecttheLoudnessfeature.When
this feature is activated it improves sound quality at lower volumes. Press the “back
arrow” button on the touchscreen when done.
Radio Operation
Seek Up/Seek Down
•PresstoseekthroughradiostationsinAM,FMorSXMbands.
•Holdeitherbuttontobypassstationswithoutstopping.
ELECTRONICS
85
Page 88 of 236
Store Radio Presets
When you are receiving a station that you wish to commit into memory, press and hold the
desired numbered button on the touchscreen for more that two seconds or until you hear
aconfirmationbeep.
The Radio stores up to 12 presets in each of the Radio modes. Four presets are visible at
the top of the radio screen. Pressing the “All” button on the touchscreen on the radio
home screen will display all of the preset stations for that mode.
SiriusXM Premier Over 160 channels
Get every channel available on your satellite radio, and enjoy all you want, all in one place.
Hear commercial-free music plus sports, news, talk and entertainment. Get all the
premium programming, including Howard Stern, every NFL game, Oprah Radio®,every
MLB®and NHL®game, every NASCAR®race, Martha Stewart and more. And get 20+
extra channels, including SiriusXM Latino, offering 20 channels of commercial free
music, news, talk, comedy, sports and more dedicated to Spanish language programming.
•ToaccessSiriusXM™SatelliteRadio,pushthe“RADIO”buttononthefaceplateand
then the “SXM” button on the touchscreen.
SiriusXM services require subscriptions, sold separately after the 12-month trial included
with the new vehicle purchase.If you decide to continue your service at the end of your
trial subscription, the plan you choose will automatically renew and bill at then-current
rates until you call SiriusXM at 1-866-635-2349 for U.S. residents and 1-888-539-7474
for Canadian residents to cancel. See SiriusXM Customer Agreement for complete terms
at www.siriusxm.com for U.S. residents and www.siriusxm.ca for Canadian residents.All
fees and programming subject to change. Our satellite service is available only to those at
least 18 and older in the 48 contiguous USA and D.C. Our Sirius satellite service is also
available in PR (with coverage limitations). Our Internet radio service is available
throughout our satellite service area and in AK and HI. © 2014 Sirius XM Radio Inc.
Sirius, XM and all related marks and logos are trademarks of Sirius XM Radio Inc.
Disc Operation
Yo u r v e h i c l e m a y h a v e a r e m o t e C D p l a y e r l o c a t e d i n t h e l o w e r c e n t e r c o n s o l e s t o r a g e b i n .
•CD/DiscModeisenteredbyeitherinsertingaCD/Discorbypressingthe“+MEDIA”
button on the touchscreen. Once in Media Mode, select “Disc.”
•GentlyinsertoneCDintotheCDplayerwiththeCDlabelfacingasindicatedonthe
illustration located on the Disc player.
Seek Up/Down Buttons
•PresstoseekthroughDisctracks.
•Holdeitherbuttontobypasstrackswithoutstopping.
ELECTRONICS
86
Page 89 of 236
Browse
•Pressthe“Browse”buttononthetouchscreentoscrollthroughandselectadesired
track on the Disc. Press the “Exit” button on the touchscreen if you wish to cancel the
browse function.
MEDIA HUB — iPod®/USB/MP3/SD Card
USB/iPod®
•USB/iPod®Mode is entered by either inserting a USB Jump Drive or iPod®cable into
the USB port or by pushing the MEDIA button located left of the display. Once in Media
Mode, press the “source” button on the touchscreen and select “USB/iPod.”
•PushtheMEDIAbuttononthefaceplatethenpressthe“source”buttononthe
touchscreen. Select “USB/iPod” to change the mode to the USB device if the device is
connected, allowing the music from your portable device to play through the vehicle's
speakers.
Audio Jack (AUX)
The AUX allows a portable device, such as an MP3 player or an iPod®,tobepluggedinto
the radio and utilize the vehicle’s audio system, using a 3.5 mm stereo audio cable, to
amplify the source and play through the vehicle speakers.
•PushtheMEDIAbuttononthefaceplate,thenpressthe“source”buttononthe
touchscreen and select “AUX” to change the mode to auxiliary device if the audio jack
is connected, allowing the music from your portable device to play through the vehicle's
speakers.
The functions of the portable device are controlled using the device buttons, not the
buttons on the radio. The volume may be controlled using the radio or portable device.
Bluetooth®
If using a Bluetooth®-equippeddevice,youmayalsobeabletostreammusictoyour
vehicle's sound system.
•PushtheMEDIAbuttononthefaceplate,thenpressthe“source”buttononthe
touchscreen. Select “Bluetooth” to change the mode to Bluetooth®if the device is
paired, allowing the music from your portable device to play through the vehicle's
speakers.
SD Card
SD Card Mode allows you to play music that has been saved to your SD Card through your
vehicle’s sound system.
•YoucanenterSDCardModebyeitherinsertingaSDCardintotheSDCardslotorby
pushing the “SD Card” button on the left side of the display while in media mode.
For further information refer to your Radio Supplement.
ELECTRONICS
87
Page 91 of 236
Uconnect® 5.0 VOICE RECOGNITION QUICK TIPS
Introducing Uconnect®
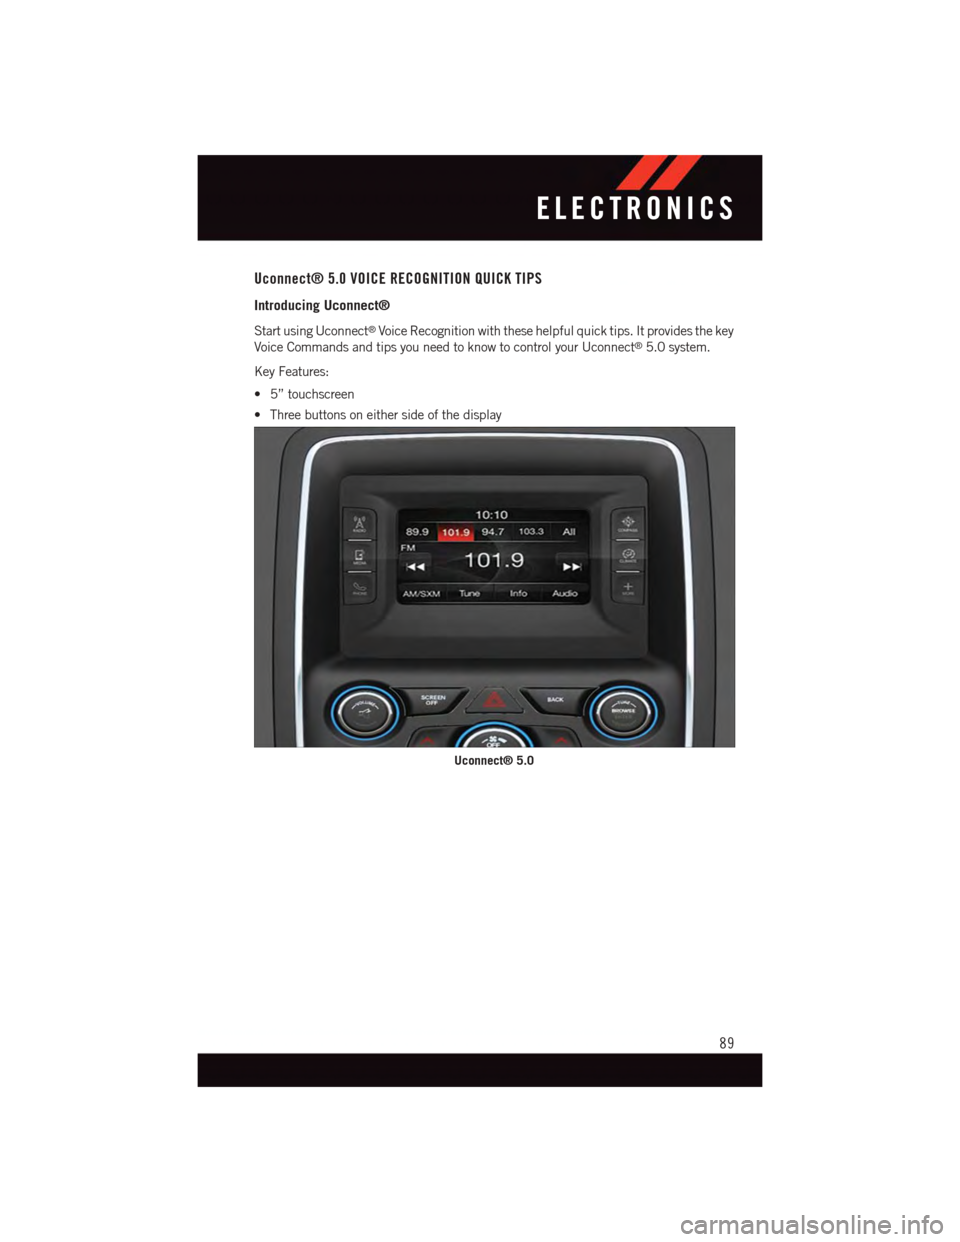
Start using Uconnect®Voice Recognition with these helpful quick tips. It provides the key
Voice Commands and tips you need to know to control your Uconnect®5.0 system.
Key Features:
•5”touchscreen
•Threebuttonsoneithersideofthedisplay
Uconnect® 5.0
ELECTRONICS
89
Page 95 of 236
Media
Uconnect®offers connections via USB, SD, Bluetooth®and auxiliary ports (If Equipped).
Voice operation is only available for connected USB and iPod®devices. (Remote CD
player optional and not available on all vehicles.)
Push the VR button.Afterthebeep,sayoneofthefollowingcommandsand
follow the prompts to switch your media source or choose an artist.
•Change sourceto Bluetooth®
•Change sourceto iPod®
•Change sourceto USB
•Play artistBeethoven;Play albumGreatest Hits;Play songMoonlight Sonata;Play
genreClassical
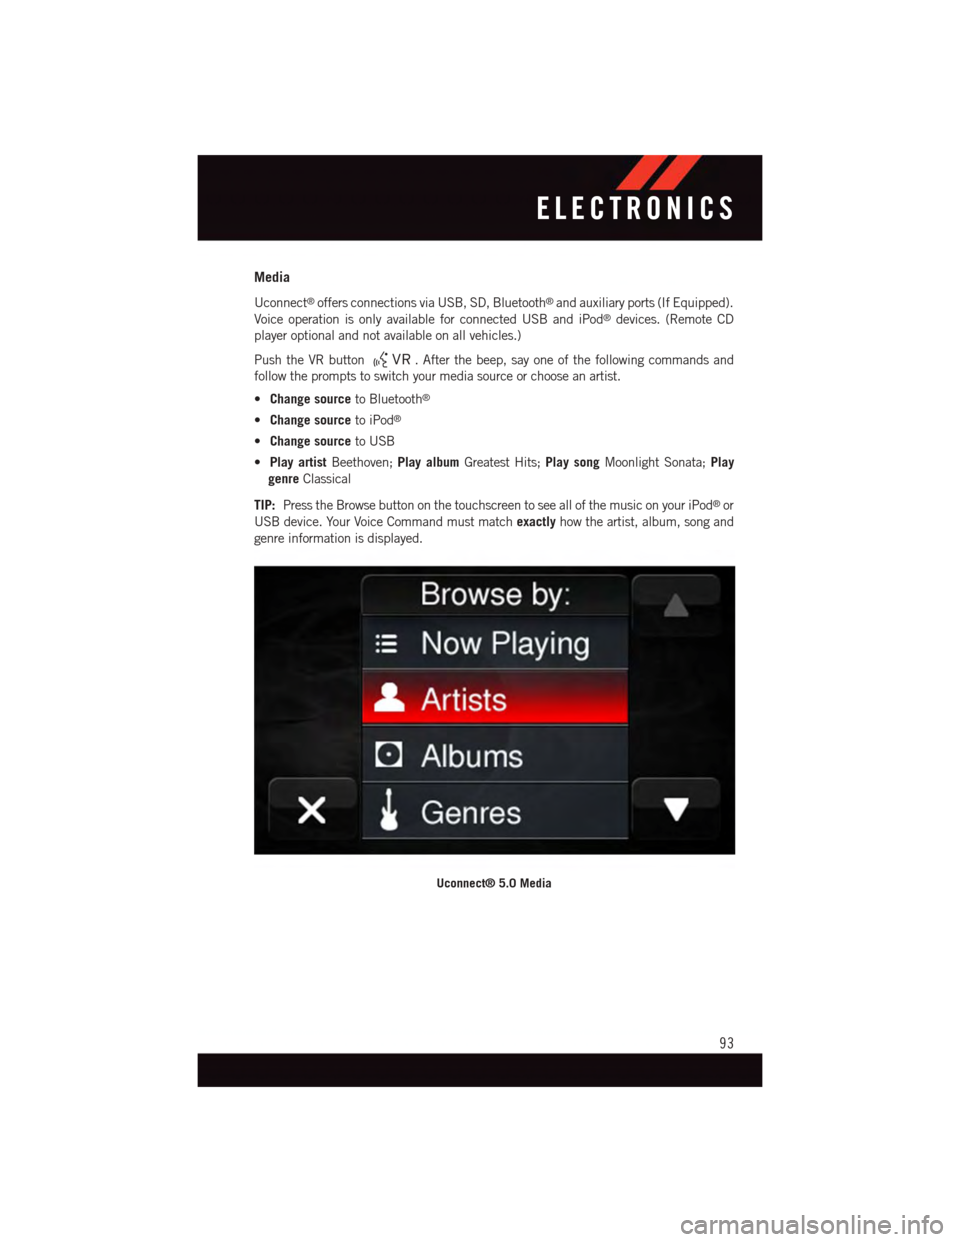
TIP:Press the Browse button on the touchscreen to see all of the music on your iPod®or
USB device. Your Voice Command must matchexactlyhow the artist, album, song and
genre information is displayed.
Uconnect® 5.0 Media
ELECTRONICS
93
Page 98 of 236
Uconnect® 8.4A
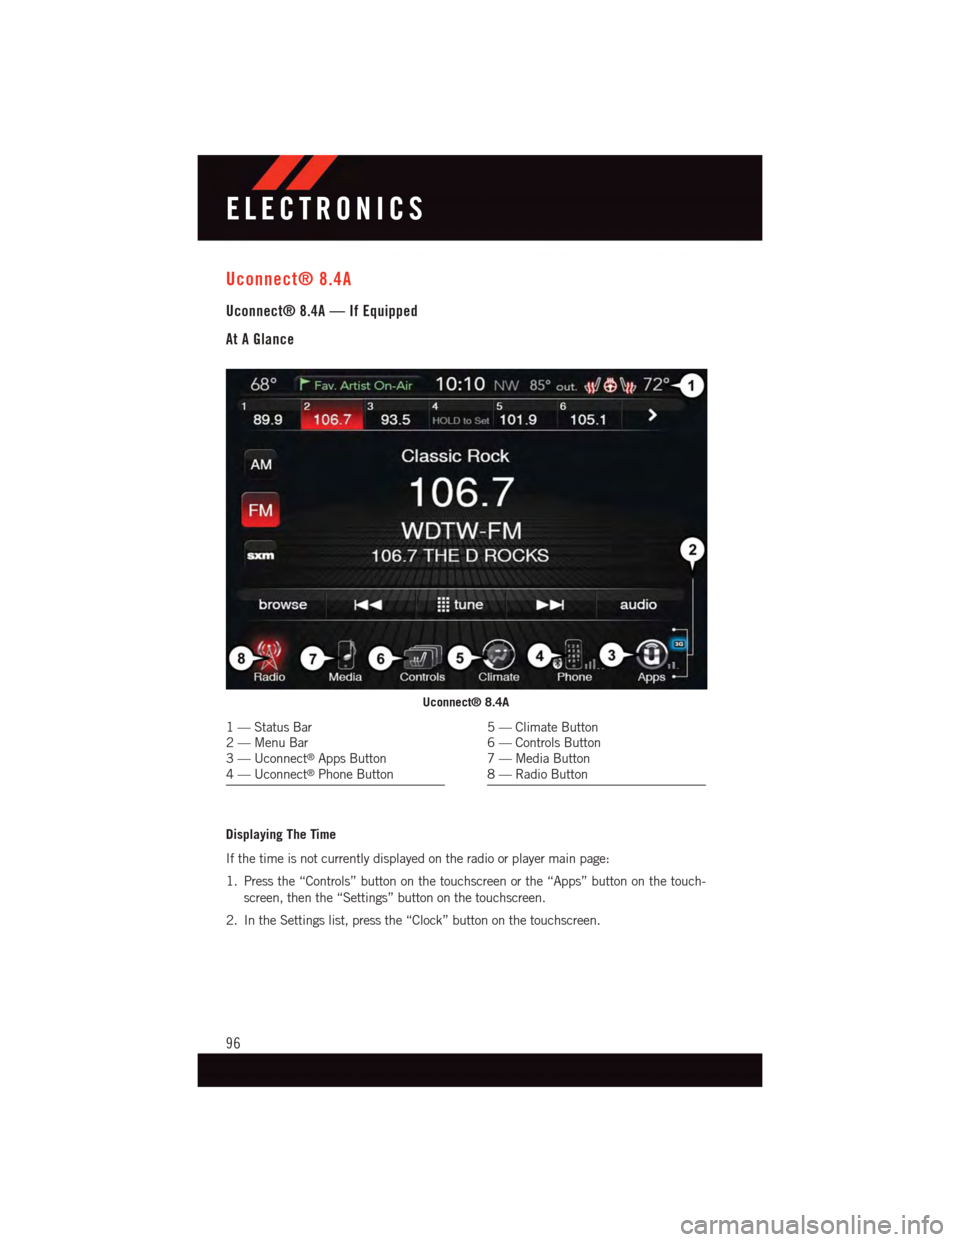
Uconnect® 8.4A — If Equipped
At A Glance
Displaying The Time
If the time is not currently displayed on the radio or player main page:
1. Press the “Controls” button on the touchscreen or the “Apps” button on the touch-
screen, then the “Settings” button on the touchscreen.
2. In the Settings list, press the “Clock” button on the touchscreen.
Uconnect® 8.4A
1—StatusBar2—MenuBar3—Uconnect®Apps Button4—Uconnect®Phone Button
5—ClimateButton6—ControlsButton7—MediaButton8—RadioButton
ELECTRONICS
96
Page 99 of 236
Setting The Time
Model 8.4AN synchronizes time automatically via GPS, so it should not require any time
adjustment. If you do need to set the time manually, follow the instructions below for
Model 8.4A.
1. Turn the unit on, then press the “Time Display” at the top of the screen. Press “Yes.”
NOTE:
If the time is not displayed at the top of the screen, press the “Controls” or the “Apps”
button on the touchscreen, then the “Settings” button on the touchscreen. In the Settings
screen, press the “Clock” button on the touchscreen.
2. Press “+” or “–” next to Set Time Hours and Set Time Minutes to adjust the time.
3. If these features are not available, uncheck the Sync with GPS box.
4. Press “X” to save your settings and exit out of the Clock Setting screen.
Audio Settings
To a d j u s t t h e A u d i o s e t t i n g s :
1. Press the “Media” or “Radio” button on the touchscreen.
2. Press the “Audio” button on the touchscreen to activate the Audio settings screen to
adjust Balance/Fade, Equalizer and Speed Adjusted Volume.
3. You can return to the Radio screen by pressing the “X” located at the top right.
Balance/Fade
To a d j u s t t h e B a l a n c e / F a d e s e t t i n g s :
1. Press the “Media” or “Radio” button on the touchscreen.
2. Press the “Audio” button on the touchscreen to activate the Audio settings screen to
adjust Balance/Fade, Equalizer and Speed Adjusted Volume.
3. Press the “Balance/Fade” button on the touchscreen to Balance audio between the
front speakers or fade the audio between the rear and front speakers.
4. Pressing the “Front,” “Rear,” “Left” or “Right” button on the touchscreens or press
and drag the Speaker Icon to adjust the Balance/Fade.
ELECTRONICS
97
Page 100 of 236
Equalizer
To a d j u s t t h e e q u a l i z e r s e t t i n g s :
1. Press the “Media” or “Radio” button on the touchscreen.
2. Press the “Audio” button on the touchscreen to activate the Audio settings screen to
adjust Balance/Fade, Equalizer and Speed Adjusted Volume.
3. Press the “Equalizer” button on the touchscreen to activate the Equalizer screen.
4. Press the “+” or “–” button on the touchscreens, or by pressing and dragging over the
“level bar” for each of the equalizer bands. The level value, which spans between plus
or minus 9, is displayed at the bottom of each of the Bands.
Speed Adjusted Volume
To a d j u s t t h e s p e e d a d j u s t e d v o l u m e s e t t i n g s :
1. Press the “Media” or “Radio” button on the touchscreen.
2. Press the “Audio” button on the touchscreen to activate the Audio settings screen to
adjust Balance/Fade, Equalizer and Speed Adjusted Volume.
3. Press the “Speed Adjusted Volume” button on the touchscreen to activate the Speed
Adjusted Volume screen. The Speed Adjusted Volume is adjusted by pressing the
“volume level” indicator. This alters the automatic adjustment of the audio volume
with variation to vehicle speed.
Surround Sound
To t u r n s u r r o u n d s o u n d O n / O f f :
1. Press the “Media” or “Radio” button on the touchscreen.
2. Press the “Audio” button on the touchscreen to activate the Audio settings screen to
adjust Balance/Fade, Equalizer and Speed Adjusted Volume.
3. Press the “Surround Sound” button on the touchscreen, select On or Off followed by
pressing the “back arrow” button on the touchscreen. When this feature is activated,
it provides simulated surround sound mode.
ELECTRONICS
98