child restraint DODGE DURANGO 2021 Owners Manual
[x] Cancel search | Manufacturer: DODGE, Model Year: 2021, Model line: DURANGO, Model: DODGE DURANGO 2021Pages: 340, PDF Size: 20.38 MB
Page 4 of 340
2
INTRODUCTION
SYMBOLS KEY ...........................................................9
ROLLOVER WARNING ............................................. 9
VEHICLE MODIFICATIONS/ALTERATIONS .......... 10
SYMBOL GLOSSARY.............................................. 10
GETTING TO KNOW YOUR VEHICLE
KEYS ........................................................................ 14 Key Fob .............................................................14
SENTRY KEY .......................................................... 16
IGNITION SWITCH .................................................. 17
Keyless Enter ‘n Go™ Ignition .........................17
REMOTE START — IF EQUIPPED .......................... 18
How To Use Remote Start ................................19
To Exit Remote Start Mode ..............................19
Remote Start Front Defrost Activation —
If Equipped........................................................20
Remote Start Comfort Systems —
If Equipped........................................................20
Remote Start Windshield Wiper De–Icer
Activation — If Equipped ..................................21
Remote Start Cancel Message —
If Equipped........................................................21
VEHICLE SECURITY SYSTEM — IF EQUIPPED ..... 21
To Arm The System ..........................................21
To Disarm The System .....................................21
Rearming Of The System .................................22
Security System Manual Override ...................22
Tamper Alert .....................................................22 DOORS ....................................................................22
Manual Door Locks ..........................................22
Power Door Locks ............................................23
Keyless Enter ‘n Go™ — Passive Entry ...........23
Automatic Unlock On Exit Feature —
If Equipped........................................................26
Automatic Door Locks — If Equipped ..............26
Child-Protection Door Lock System —
Rear Doors .......................................................26
STEERING WHEEL ..................................................27
Manual Tilt/Telescoping Steering
Column — If Equipped .....................................27
Power Tilt/Telescoping Steering
Column — If Equipped ......................................27
Heated Steering Wheel — If Equipped ...........27
DRIVER MEMORY SETTINGS — IF EQUIPPED .....28
Programming The Memory Feature ................28
Linking And Unlinking The Remote
Keyless Entry Key Fob To Memory ..................29
Memory Position Recall ...................................29
SEATS ..................................................................29
Manual Adjustment (Front Seats) —
If Equipped........................................................30
Manual Adjustment (Rear Seats) ....................31
Power Adjustment (Front Seats) —
If Equipped .......................................................35
Power Passenger Seat Adjustment —
If Equipped........................................................36
Heated Seats — If Equipped ...........................37
Front Ventilated Seats — If Equipped .............38
Head Restraints .............................................39 UCONNECT VOICE RECOGNITION ....................... 41
Introducing Voice Recognition ........................ 41
Basic Voice Commands ................................... 41
Get Started .......................................................41
Additional Information ..................................... 42
MIRRORS ............................................................... 42
Inside Rearview Mirror..................................... 42
Illuminated Vanity Mirrors .............................. 43
Outside Mirrors ................................................ 43
Outside Automatic Dimming Mirrors —
If Equipped .......................................................44
Power Mirrors .................................................. 44
Heated Mirrors — If Equipped ......................... 44
Tilt Side Mirrors In Reverse — If Equipped ..... 44
UNIVERSAL GARAGE DOOR OPENER
(HOMELINK®) ....................................................... 45
Before You Begin Programming
HomeLink® ...................................................... 45
Erasing All The HomeLink® Channels ............ 45
Identifying Whether You Have A Rolling
Code Or Non-Rolling Code Device ................... 45
Programming HomeLink® To A Garage
Door Opener ..................................................... 46
Programming HomeLink® To A
Miscellaneous Device ...................................... 47
Reprogramming A Single HomeLink®
Button ............................................................... 47
Canadian/Gate Operator Programming ......... 47
21_WD_OM_EN_USC_t.book Page 2
Page 7 of 340
5
TRAILER TOWING ................................................ 142 Common Towing Definitions ......................... 142Trailer Hitch Classification ............................ 145
Trailer Towing Weights
(Maximum Trailer Weight Ratings) ............ 145Trailer Hitch Receiver Cover Removal —
If Equipped..................................................... 146
Trailer And Tongue Weight ........................... 147
Towing Requirements .................................. 147
Towing Tips ................................................... 152
RECREATIONAL TOWING
(BEHIND MOTORHOME) ...................................... 153
Towing This Vehicle Behind Another
Vehicle............................................................ 153
Recreational Towing — Rear-Wheel
Drive Models.................................................. 153
Recreational Towing — All-Wheel Drive
Models (Single-Speed Transfer Case).......... 154
Recreational Towing — All-Wheel Drive
Models (Two-Speed Transfer Case) ............. 154
DRIVING TIPS ....................................................... 156
On-Road Driving Tips..................................... 156
Off-Road Driving Tips..................................... 157
MULTIMEDIA
UCONNECT SYSTEMS ........................................ 158
CYBERSECURITY ................................................ 158
UCONNECT SETTINGS ......................................... 159Customer Programmable Features.............. 159
STEERING WHEEL AUDIO CONTROLS .............. 178
Radio Operation ............................................ 178
Media Mode................................................... 178
UCONNECT REAR SEAT ENTERTAINMENT
(RSE) SYSTEM — IF EQUIPPED .......................... 178
Getting Started .............................................. 178
Dual Video Screen......................................... 179
Play A Blu-ray™ Disc...................................... 180
Play Video Games ......................................... 182
Important Notes For Dual Video Screen
System ........................................................... 182
Blu-ray™ Disc Player Remote Control .......... 183
Headphones Operation................................. 184
Controls.......................................................... 184Replacing The Headphone Batteries ........... 184Accessibility — If Equipped ........................... 184Stereo Headphone Lifetime Limited
Warranty ........................................................ 185
RADIO OPERATION AND MOBILE PHONES ..... 188
Regulatory And Safety Information .............. 188
SAFETY
SAFETY FEATURES .............................................. 189 Anti-Lock Brake System (ABS) ..................... 189Electronic Brake Control (EBC) System ...... 190
AUXILIARY DRIVING SYSTEMS .......................... 195
Blind Spot Monitoring (BSM) —
If Equipped .................................................... 195
Forward Collision Warning (FCW) With
Mitigation ....................................................... 199Tire Pressure Monitoring System
(TPMS) ........................................................... 201
OCCUPANT RESTRAINT SYSTEMS ................... 204
Occupant Restraint Systems Features ........ 204Important Safety Precautions ...................... 204
Seat Belt Systems ........................................ 205
Supplemental Restraint Systems (SRS) ...... 211Child Restraints ........................................... 223
SAFETY TIPS ...................................................... 239
Transporting Passengers.............................. 239
Transporting Pets ....................................... 239
Safety Checks You Should Make
Inside The Vehicle ........................................ 239
Periodic Safety Checks You Should
Make Outside The Vehicle ............................ 241
Exhaust Gas................................................... 241
Carbon Monoxide Warnings ....................... 242
21_WD_OM_EN_USC_t.book Page 5
Page 35 of 340
GETTING TO KNOW YOUR VEHICLE33
TO RAISE REAR SEAT
Fold the seat rearward to its original position, and
lock it into place. Then lift the head restraint until it
locks into place.
Rear Captain’s Chairs — If Equipped
SECOND ROW CAPTAIN’S CHAIRS FOLD FLAT
SEATS
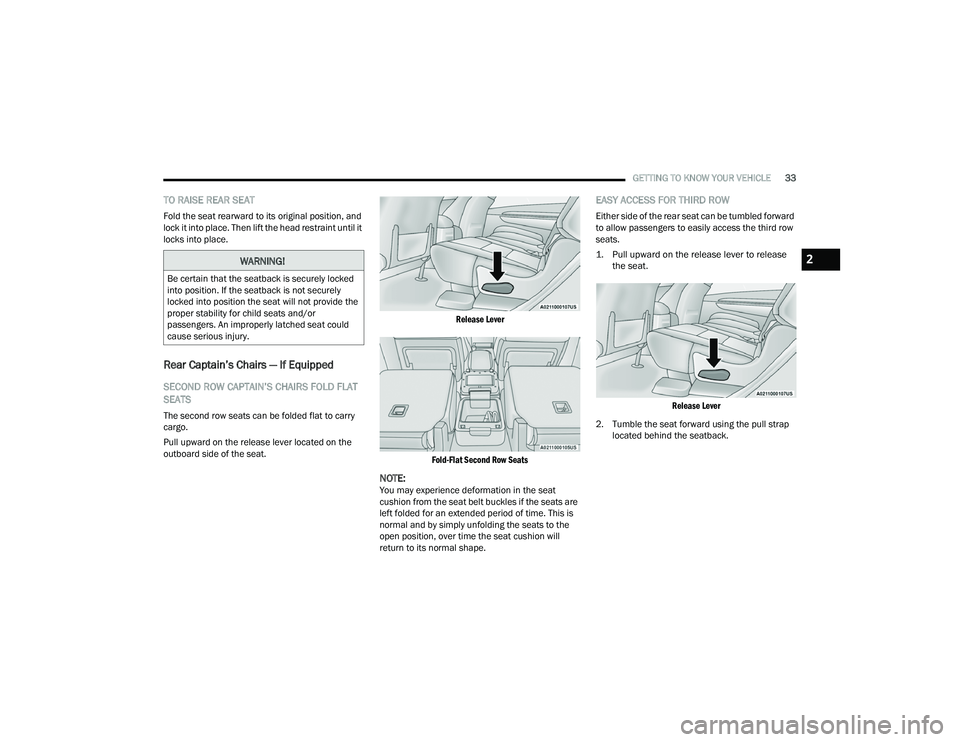
The second row seats can be folded flat to carry
cargo.
Pull upward on the release lever located on the
outboard side of the seat.
Release Lever
Fold-Flat Second Row Seats
NOTE:You may experience deformation in the seat
cushion from the seat belt buckles if the seats are
left folded for an extended period of time. This is
normal and by simply unfolding the seats to the
open position, over time the seat cushion will
return to its normal shape.
EASY ACCESS FOR THIRD ROW
Either side of the rear seat can be tumbled forward
to allow passengers to easily access the third row
seats.
1. Pull upward on the release lever to release the seat.
Release Lever
2. Tumble the seat forward using the pull strap located behind the seatback.
WARNING!
Be certain that the seatback is securely locked
into position. If the seatback is not securely
locked into position the seat will not provide the
proper stability for child seats and/or
passengers. An improperly latched seat could
cause serious injury.
2
21_WD_OM_EN_USC_t.book Page 33
Page 36 of 340
34GETTING TO KNOW YOUR VEHICLE
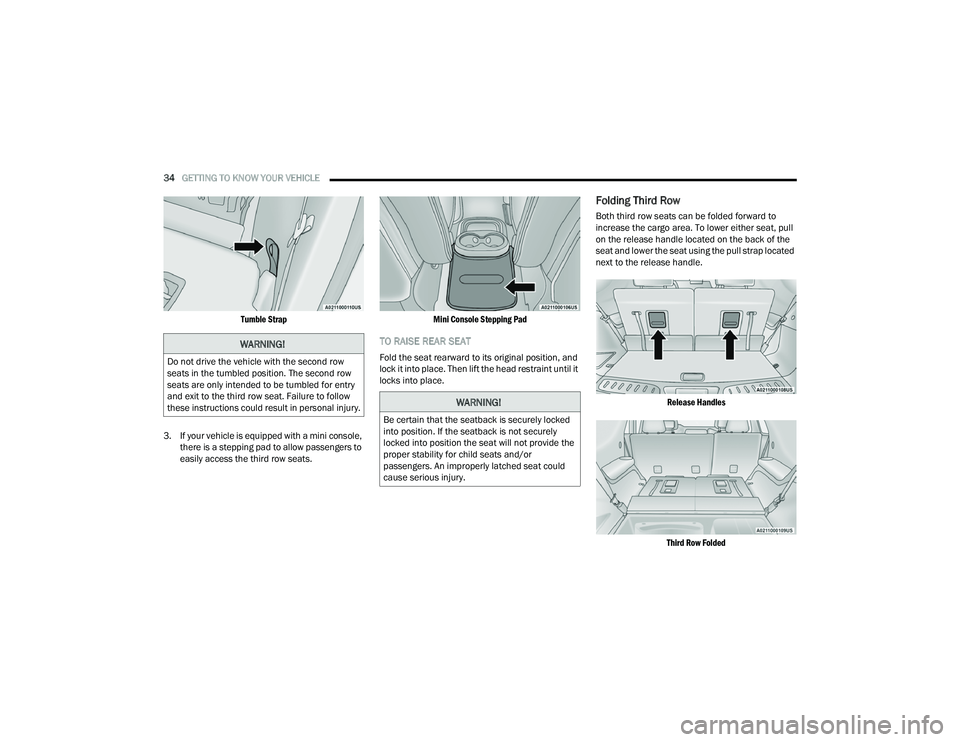
Tumble Strap
3. If your vehicle is equipped with a mini console, there is a stepping pad to allow passengers to
easily access the third row seats.
Mini Console Stepping Pad
TO RAISE REAR SEAT
Fold the seat rearward to its original position, and
lock it into place. Then lift the head restraint until it
locks into place.
Folding Third Row
Both third row seats can be folded forward to
increase the cargo area. To lower either seat, pull
on the release handle located on the back of the
seat and lower the seat using the pull strap located
next to the release handle.
Release Handles
Third Row Folded
WARNING!
Do not drive the vehicle with the second row
seats in the tumbled position. The second row
seats are only intended to be tumbled for entry
and exit to the third row seat. Failure to follow
these instructions could result in personal injury.
WARNING!
Be certain that the seatback is securely locked
into position. If the seatback is not securely
locked into position the seat will not provide the
proper stability for child seats and/or
passengers. An improperly latched seat could
cause serious injury.
21_WD_OM_EN_USC_t.book Page 34
Page 37 of 340
GETTING TO KNOW YOUR VEHICLE35
NOTE:The second row seats must be in their full upright
position, folded flat or tumbled when folding the
third row seats.
To raise the seat, pull the seat toward you using
the strap located on the back of the seat. Then lift
the head restraint until it locks into place.
NOTE:You may experience deformation in the seat
cushion from the seat belt buckles if the seats are
left folded for an extended period of time. This is
normal and by simply unfolding the seats to the
open position, over time the seat cushion will
return to its normal shape.
POWER ADJUSTMENT (FRONT SEATS) —
I
F EQUIPPED
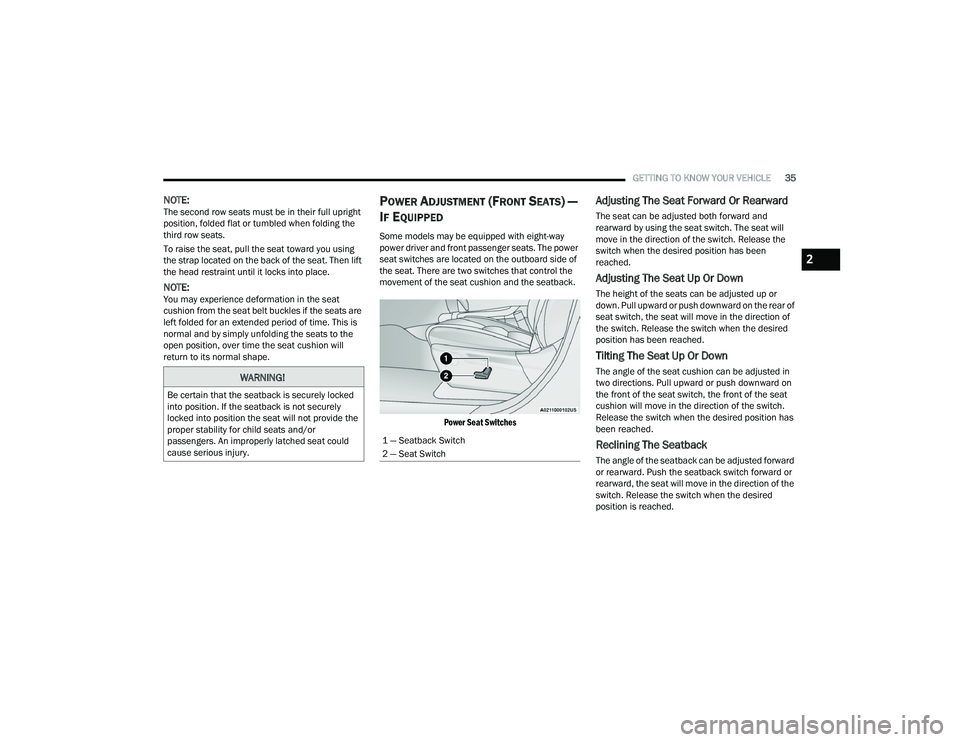
Some models may be equipped with eight-way
power driver and front passenger seats. The power
seat switches are located on the outboard side of
the seat. There are two switches that control the
movement of the seat cushion and the seatback.
Power Seat Switches
Adjusting The Seat Forward Or Rearward
The seat can be adjusted both forward and
rearward by using the seat switch. The seat will
move in the direction of the switch. Release the
switch when the desired position has been
reached.
Adjusting The Seat Up Or Down
The height of the seats can be adjusted up or
down. Pull upward or push downward on the rear of
seat switch, the seat will move in the direction of
the switch. Release the switch when the desired
position has been reached.
Tilting The Seat Up Or Down
The angle of the seat cushion can be adjusted in
two directions. Pull upward or push downward on
the front of the seat switch, the front of the seat
cushion will move in the direction of the switch.
Release the switch when the desired position has
been reached.
Reclining The Seatback
The angle of the seatback can be adjusted forward
or rearward. Push the seatback switch forward or
rearward, the seat will move in the direction of the
switch. Release the switch when the desired
position is reached.
WARNING!
Be certain that the seatback is securely locked
into position. If the seatback is not securely
locked into position the seat will not provide the
proper stability for child seats and/or
passengers. An improperly latched seat could
cause serious injury.
1 — Seatback Switch
2 — Seat Switch
2
21_WD_OM_EN_USC_t.book Page 35
Page 42 of 340
40GETTING TO KNOW YOUR VEHICLE
Head Restraints — Rear Seats
The head restraints on the outboard seats are not
adjustable. They automatically fold forward when
the rear seat is folded to a load floor position, but
do not return to their normal position when the rear
seat is raised. After returning either seat to its
upright position, raise the head restraint until it
locks in place. The outboard head restraints are
not removable.
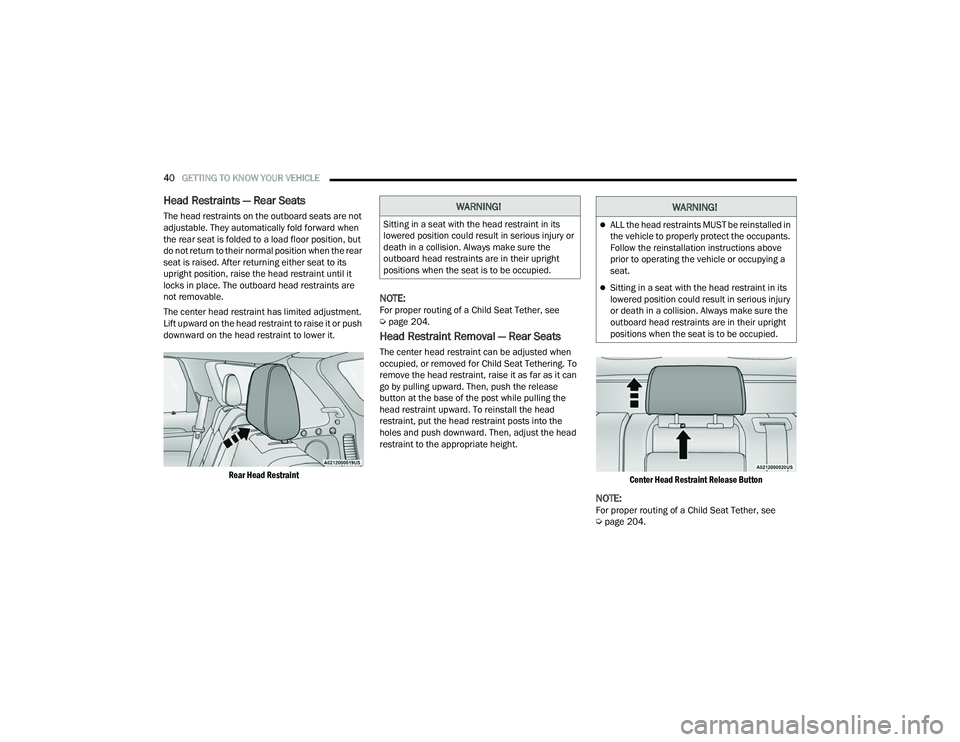
The center head restraint has limited adjustment.
Lift upward on the head restraint to raise it or push
downward on the head restraint to lower it.
Rear Head Restraint
NOTE:For proper routing of a Child Seat Tether, see
Úpage 204.
Head Restraint Removal — Rear Seats
The center head restraint can be adjusted when
occupied, or removed for Child Seat Tethering. To
remove the head restraint, raise it as far as it can
go by pulling upward. Then, push the release
button at the base of the post while pulling the
head restraint upward. To reinstall the head
restraint, put the head restraint posts into the
holes and push downward. Then, adjust the head
restraint to the appropriate height.
Center Head Restraint Release Button
NOTE:For proper routing of a Child Seat Tether, see
Úpage 204.
WARNING!
Sitting in a seat with the head restraint in its
lowered position could result in serious injury or
death in a collision. Always make sure the
outboard head restraints are in their upright
positions when the seat is to be occupied.
WARNING!
ALL the head restraints MUST be reinstalled in
the vehicle to properly protect the occupants.
Follow the reinstallation instructions above
prior to operating the vehicle or occupying a
seat.
Sitting in a seat with the head restraint in its
lowered position could result in serious injury
or death in a collision. Always make sure the
outboard head restraints are in their upright
positions when the seat is to be occupied.
21_WD_OM_EN_USC_t.book Page 40
Page 206 of 340
204SAFETY
(Continued)
Beginning with the next ignition cycle, the TPMS
will no longer chime or display the “SERVICE TPM
SYSTEM” message in the instrument cluster but
dashes (--) will remain in place of the pressure
values.
To reactivate the TPMS, replace all four wheel and
tire assemblies (road tires) with tires equipped with
TPMS sensors. Then, drive the vehicle for up to
20 minutes above 15 mph (24 km/h). The TPMS
will chime, the TPMS Warning Light will flash on and
off for 75 seconds and then turn off. The instrument
cluster will display the “SERVICE TPM SYSTEM”
message and then display pressure values in place
of the dashes. On the next ignition cycle the
"SERVICE TPM SYSTEM" message will no longer be
displayed as long as no system fault exists.
OCCUPANT RESTRAINT SYSTEMS
Some of the most important safety features in your
vehicle are the restraint systems:
OCCUPANT RESTRAINT SYSTEMS
F
EATURES
Seat Belt Systems
Supplemental Restraint Systems (SRS) Air Bags
Child Restraints Some of the safety features described in this
section may be standard equipment on some
models, or may be optional equipment on others.
If you are not sure, ask an authorized dealer.
IMPORTANT SAFETY PRECAUTIONS
Please pay close attention to the information in
this section. It tells you how to use your restraint
system properly, to keep you and your passengers
as safe as possible.
Here are some simple steps you can take to
minimize the risk of harm from a deploying air bag:
1. Children 12 years old and under should
always ride buckled up in the rear seat of a
vehicle with a rear seat.
2. A child who is not big enough to wear the vehicle seat belt properly must be secured in
the appropriate child restraint or
belt-positioning booster seat in a rear seating
position Ú page 223.
3. If a child from 2 to 12 years old (not in a rear-facing child restraint) must ride in the
front passenger seat, move the seat as far
back as possible and use the proper child
restraint Ú page 223.
4. Never allow children to slide the shoulder belt behind them or under their arm. 5. You should read the instructions provided with
your child restraint to make sure that you are
using it properly.
6. All occupants should always wear their lap and shoulder belts properly.
7. The driver and front passenger seats should be moved back as far as practical to allow the
front air bags room to inflate.
8. Do not lean against the door or window. If your vehicle has side air bags, and deployment
occurs, the side air bags will inflate forcefully
into the space between occupants and the
door and occupants could be injured.
9. If the air bag system in this vehicle needs to be modified to accommodate a disabled person,
see Úpage 324 for customer service contact
information.
WARNING!
Never place a rear-facing child restraint in
front of an air bag. A deploying passenger
front air bag can cause death or serious injury
to a child 12 years or younger, including a
child in a rear-facing child restraint.
21_WD_OM_EN_USC_t.book Page 204
Page 207 of 340
SAFETY205
SEAT BELT SYSTEMS
Buckle up even though you are an excellent driver,
even on short trips. Someone on the road may be
a poor driver and could cause a collision that
includes you. This can happen far away from home
or on your own street.
Research has shown that seat belts save lives, and
they can reduce the seriousness of injuries in a
collision. Some of the worst injuries happen when
people are thrown from the vehicle. Seat belts
reduce the possibility of ejection and the risk of
injury caused by striking the inside of the vehicle.
Everyone in a motor vehicle should be belted at all
times.
Enhanced Seat Belt Use Reminder System
(BeltAlert)
Driver And Passenger BeltAlert — If Equipped
BeltAlert is a feature intended to remind the
driver and outboard front seat passenger (if
equipped with outboard front passenger seat BeltAlert) to buckle their seat belts. The BeltAlert
feature is active whenever the ignition switch is in
the START or ON/RUN position.
Initial Indication
If the driver is unbuckled when the ignition switch
is first in the START or ON/RUN position, a chime
will signal for a few seconds. If the driver or
outboard front seat passenger (if equipped with
outboard front passenger seat BeltAlert) is
unbuckled when the ignition switch is first in the
START or ON/RUN position the Seat Belt Reminder
Light will turn on and remain on until both outboard
front seat belts are buckled. The outboard front
passenger seat BeltAlert is not active when an
outboard front passenger seat is unoccupied.
BeltAlert Warning Sequence
The BeltAlert warning sequence is activated when
the vehicle is moving above a specified vehicle
speed range and the driver or outboard front seat
passenger is unbuckled (if equipped with outboard
front passenger seat BeltAlert) (the outboard front
passenger seat BeltAlert is not active when the
outboard front passenger seat is unoccupied). The
BeltAlert warning sequence starts by blinking the
Seat Belt Reminder Light and sounding an
intermittent chime. Once the BeltAlert warning
sequence has completed, the Seat Belt Reminder
Light will remain on until the seat belts are
buckled. The BeltAlert warning sequence may
repeat based on vehicle speed until the driver and occupied outboard front seat passenger seat belts
are buckled. The driver should instruct all
occupants to buckle their seat belts.
Change of Status
If the driver or outboard front seat passenger (if
equipped with outboard front passenger seat
BeltAlert) unbuckles their seat belt while the
vehicle is traveling, the BeltAlert warning sequence
will begin until the seat belts are buckled again.
The outboard front passenger seat BeltAlert is not
active when the outboard front passenger seat is
unoccupied. BeltAlert may be triggered when an
animal or other items are placed on the outboard
front passenger seat or when the seat is folded flat
(if equipped). It is recommended that pets be
restrained in the rear seat (if equipped) in pet
harnesses or pet carriers that are secured by seat
belts, and cargo is properly stowed.
BeltAlert can be activated or deactivated by an
authorized dealer. FCA US LLC does not
recommend deactivating BeltAlert.
NOTE:If BeltAlert has been deactivated and the driver or
outboard front seat passenger (if equipped with
outboard front passenger seat BeltAlert) is
unbuckled the Seat Belt Reminder Light will turn
on and remain on until the driver and outboard
front seat passenger seat belts are buckled.
Never install a rear-facing child restraint in the
front seat of a vehicle. Only use a rear-facing
child restraint in the rear seat. If the vehicle
does not have a rear seat, do not transport a
rear-facing child restraint in that vehicle.
WARNING!
6
21_WD_OM_EN_USC_t.book Page 205
Page 211 of 340
SAFETY209
Seat Belt Extender
If a seat belt is not long enough to fit properly, even
when the webbing is fully extended and the
adjustable upper shoulder belt anchorage (if
equipped) is in its lowest position, an authorized
dealer can provide you with a Seat Belt Extender.
The Seat Belt Extender should be used only if the
existing seat belt is not long enough. When the
Seat Belt Extender is not required for a different
occupant, it must be removed.
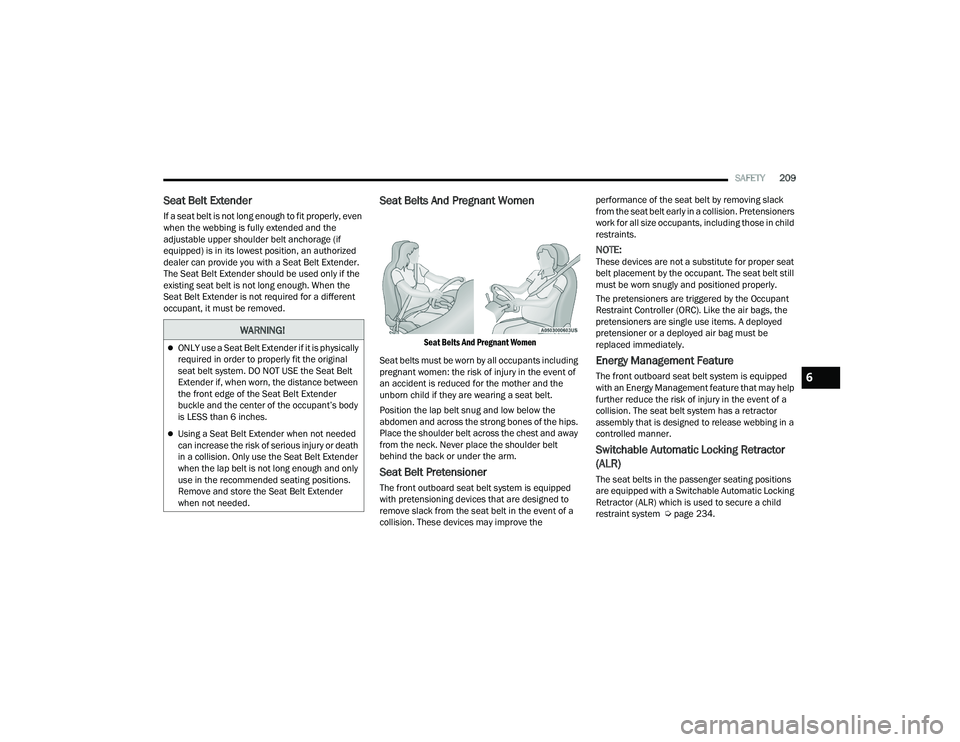
Seat Belts And Pregnant Women
Seat Belts And Pregnant Women
Seat belts must be worn by all occupants including
pregnant women: the risk of injury in the event of
an accident is reduced for the mother and the
unborn child if they are wearing a seat belt.
Position the lap belt snug and low below the
abdomen and across the strong bones of the hips.
Place the shoulder belt across the chest and away
from the neck. Never place the shoulder belt
behind the back or under the arm.
Seat Belt Pretensioner
The front outboard seat belt system is equipped
with pretensioning devices that are designed to
remove slack from the seat belt in the event of a
collision. These devices may improve the performance of the seat belt by removing slack
from the seat belt early in a collision. Pretensioners
work for all size occupants, including those in child
restraints.
NOTE:These devices are not a substitute for proper seat
belt placement by the occupant. The seat belt still
must be worn snugly and positioned properly.
The pretensioners are triggered by the Occupant
Restraint Controller (ORC). Like the air bags, the
pretensioners are single use items. A deployed
pretensioner or a deployed air bag must be
replaced immediately.
Energy Management Feature
The front outboard seat belt system is equipped
with an Energy Management feature that may help
further reduce the risk of injury in the event of a
collision. The seat belt system has a retractor
assembly that is designed to release webbing in a
controlled manner.
Switchable Automatic Locking Retractor
(ALR)
The seat belts in the passenger seating positions
are equipped with a Switchable Automatic Locking
Retractor (ALR) which is used to secure a child
restraint system Ú
page 234.
WARNING!
ONLY use a Seat Belt Extender if it is physically
required in order to properly fit the original
seat belt system. DO NOT USE the Seat Belt
Extender if, when worn, the distance between
the front edge of the Seat Belt Extender
buckle and the center of the occupant’s body
is LESS than 6 inches.
Using a Seat Belt Extender when not needed
can increase the risk of serious injury or death
in a collision. Only use the Seat Belt Extender
when the lap belt is not long enough and only
use in the recommended seating positions.
Remove and store the Seat Belt Extender
when not needed.
6
21_WD_OM_EN_USC_t.book Page 209
Page 212 of 340
210SAFETY
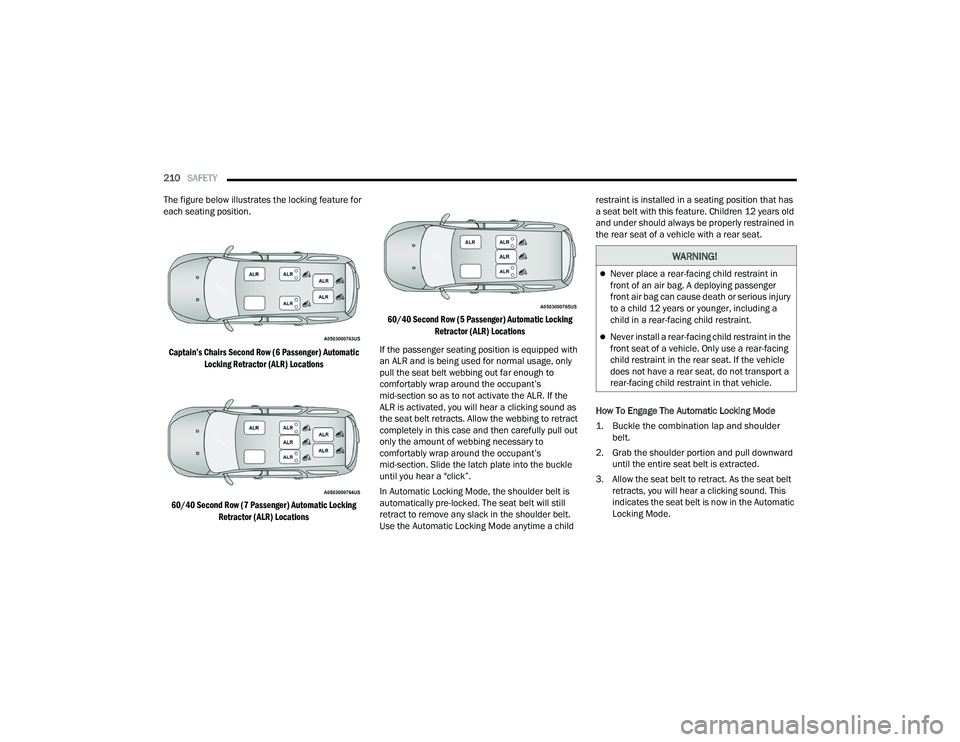
The figure below illustrates the locking feature for
each seating position.
Captain’s Chairs Second Row (6 Passenger) Automatic Locking Retractor (ALR) Locations
60/40 Second Row (7 Passenger) Automatic Locking Retractor (ALR) Locations 60/40 Second Row (5 Passenger) Automatic Locking
Retractor (ALR) Locations
If the passenger seating position is equipped with
an ALR and is being used for normal usage, only
pull the seat belt webbing out far enough to
comfortably wrap around the occupant’s
mid-section so as to not activate the ALR. If the
ALR is activated, you will hear a clicking sound as
the seat belt retracts. Allow the webbing to retract
completely in this case and then carefully pull out
only the amount of webbing necessary to
comfortably wrap around the occupant’s
mid-section. Slide the latch plate into the buckle
until you hear a "click”.
In Automatic Locking Mode, the shoulder belt is
automatically pre-locked. The seat belt will still
retract to remove any slack in the shoulder belt.
Use the Automatic Locking Mode anytime a child restraint is installed in a seating position that has
a seat belt with this feature. Children 12 years old
and under should always be properly restrained in
the rear seat of a vehicle with a rear seat.
How To Engage The Automatic Locking Mode
1. Buckle the combination lap and shoulder
belt.
2. Grab the shoulder portion and pull downward until the entire seat belt is extracted.
3. Allow the seat belt to retract. As the seat belt retracts, you will hear a clicking sound. This
indicates the seat belt is now in the Automatic
Locking Mode.
WARNING!
Never place a rear-facing child restraint in
front of an air bag. A deploying passenger
front air bag can cause death or serious injury
to a child 12 years or younger, including a
child in a rear-facing child restraint.
Never install a rear-facing child restraint in the
front seat of a vehicle. Only use a rear-facing
child restraint in the rear seat. If the vehicle
does not have a rear seat, do not transport a
rear-facing child restraint in that vehicle.
21_WD_OM_EN_USC_t.book Page 210