adjust mirrors DODGE DURANGO 2023 Owners Manual
[x] Cancel search | Manufacturer: DODGE, Model Year: 2023, Model line: DURANGO, Model: DODGE DURANGO 2023Pages: 328, PDF Size: 13.82 MB
Page 4 of 328
2
INTRODUCTION
SYMBOLS KEY ...........................................................8
ROLLOVER WARNING ............................................. 8
VEHICLE MODIFICATIONS/ALTERATIONS .............9
SYMBOL GLOSSARY.................................................9
GETTING TO KNOW YOUR VEHICLE
KEYS ....................................................................... 13 Key Fob .............................................................13
SENTRY KEY .......................................................... 16
IGNITION SWITCH .................................................. 16
Keyless Enter ‘n Go™ Ignition .........................16
REMOTE START — IF EQUIPPED .......................... 17
How To Use Remote Start ................................18
To Exit Remote Start Mode ..............................19
Remote Start Front Defrost Activation —
If Equipped........................................................19
Remote Start Comfort Systems —
If Equipped........................................................19
Remote Start Windshield Wiper De-Icer
Activation — If Equipped ..................................20
Remote Start Cancel Message — If Equipped .. 20
VEHICLE SECURITY SYSTEM — IF EQUIPPED ..... 20
To Arm The System ..........................................20
To Disarm The System .....................................20
Rearming Of The System .................................21
Security System Manual Override ...................21
Tamper Alert .....................................................21 DOORS ....................................................................21
Manual Door Locks ..........................................21
Power Door Locks ............................................22
Keyless Enter ‘n Go™ — Passive Entry ...........22
Automatic Unlock On Exit Feature —
If Equipped........................................................25
Child-Protection Door Lock System —
Rear Doors .......................................................25
STEERING WHEEL ..................................................25
Manual Tilt/Telescoping Steering Column —
If Equipped .......................................................25
Power Tilt/Telescoping Steering Column —
If Equipped........................................................26
Heated Steering Wheel —
If Equipped .......................................................26
DRIVER MEMORY SETTINGS — IF EQUIPPED .....27
Programming The Memory Feature ................27
Linking And Unlinking The Remote Keyless
Entry Key Fob To Memory ................................27
Memory Position Recall ...................................28
SEATS ......................................................................28
Manual Adjustment (Front Seats) —
If Equipped........................................................28
Manual Adjustment (Rear Seats) ....................30
Power Adjustment (Front Seats) —
If Equipped .......................................................33
Heated Seats — If Equipped ...........................35
Front Ventilated Seats — If Equipped .............36
Head Restraints ...............................................36 UCONNECT VOICE RECOGNITION —
IF EQUIPPED .......................................................... 38
Introducing Voice Recognition ........................ 38
Basic Voice Commands ................................... 38
Get Started .......................................................39
Additional Information ..................................... 39
MIRRORS ............................................................... 40
Inside Rearview Mirror..................................... 40
Illuminated Vanity Mirrors .............................. 40
Outside Mirrors ................................................ 40
Outside Mirrors With Turn Signal —
If Equipped .......................................................41
Outside Automatic Dimming Mirror —
If Equipped .......................................................41
Power Mirrors .................................................. 41
Heated Mirrors — If Equipped ......................... 41
UNIVERSAL GARAGE DOOR OPENER
(HOMELINK®) — IF EQUIPPED ............................ 41
Before You Begin Programming HomeLink® ... 42
Erasing All The HomeLink® Channels ............ 42
Identifying Whether You Have A Rolling Code
Or Non-Rolling Code Device ............................ 42
Programming HomeLink® To A Garage Door
Opener ..............................................................42
Programming HomeLink® To A Miscellaneous
Device ............................................................... 43
Reprogramming A Single HomeLink® Button .. 44
Canadian/Gate Operator Programming ......... 44
Security ............................................................. 45
Troubleshooting Tips........................................ 45
23_WD_OM_EN_USC_t.book Page 2
Page 29 of 328
GETTING TO KNOW YOUR VEHICLE27
DRIVER MEMORY SETTINGS — IF EQUIPPED
This feature allows the driver to save up to two
different memory profiles for easy recall through a
memory switch. Each memory profile saves
desired position settings for the following features:
Driver seat
Easy Entry/Exit seat (if equipped)
Side mirrors
Power tilt and telescopic steering column (if
equipped)
A set of desired radio station presets
NOTE:
Your vehicle is equipped with two key fobs, each
can be linked to either memory position 1 or 2.
Be sure to program the radio presets prior to
programming the memory settings.
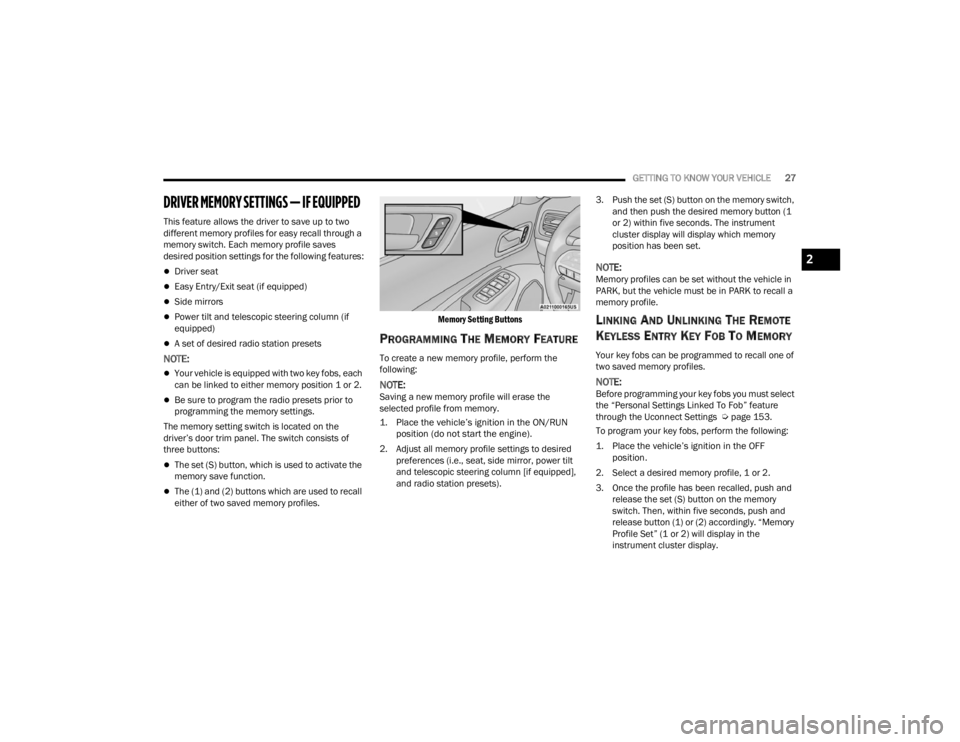
The memory setting switch is located on the
driver’s door trim panel. The switch consists of
three buttons:
The set (S) button, which is used to activate the
memory save function.
The (1) and (2) buttons which are used to recall
either of two saved memory profiles.
Memory Setting Buttons
PROGRAMMING THE MEMORY FEATURE
To create a new memory profile, perform the
following:
NOTE:Saving a new memory profile will erase the
selected profile from memory.
1. Place the vehicle’s ignition in the ON/RUN
position (do not start the engine).
2. Adjust all memory profile settings to desired preferences (i.e., seat, side mirror, power tilt
and telescopic steering column [if equipped],
and radio station presets). 3. Push the set (S) button on the memory switch,
and then push the desired memory button (1
or 2) within five seconds. The instrument
cluster display will display which memory
position has been set.
NOTE:Memory profiles can be set without the vehicle in
PARK, but the vehicle must be in PARK to recall a
memory profile.
LINKING AND UNLINKING THE REMOTE
K
EYLESS ENTRY KEY FOB TO MEMORY
Your key fobs can be programmed to recall one of
two saved memory profiles.
NOTE:Before programming your key fobs you must select
the “Personal Settings Linked To Fob” feature
through the Uconnect Settings Ú page 153.
To program your key fobs, perform the following:
1. Place the vehicle’s ignition in the OFF position.
2. Select a desired memory profile, 1 or 2.
3. Once the profile has been recalled, push and release the set (S) button on the memory
switch. Then, within five seconds, push and
release button (1) or (2) accordingly. “Memory
Profile Set” (1 or 2) will display in the
instrument cluster display.
2
23_WD_OM_EN_USC_t.book Page 27
Page 42 of 328
40GETTING TO KNOW YOUR VEHICLE
MIRRORS
INSIDE REARVIEW MIRROR
Automatic Dimming Mirror
The rearview mirror can be adjusted up, down, left,
and right. The mirror should be adjusted to center
on the view through the rear window.
This mirror automatically adjusts for headlight
glare from vehicles behind you.
NOTE:The Automatic Dimming Mirror feature is disabled
when the vehicle is in REVERSE to improve rear
view viewing.
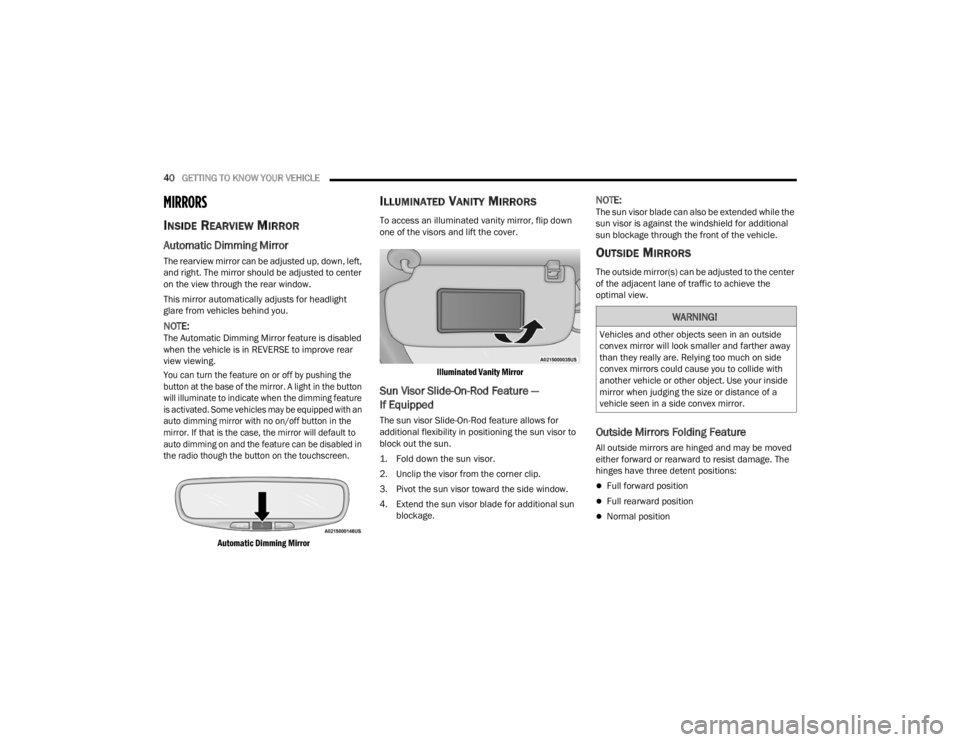
You can turn the feature on or off by pushing the
button at the base of the mirror. A light in the button
will illuminate to indicate when the dimming feature
is activated. Some vehicles may be equipped with an
auto dimming mirror with no on/off button in the
mirror. If that is the case, the mirror will default to
auto dimming on and the feature can be disabled in
the radio though the button on the touchscreen.
Automatic Dimming Mirror
ILLUMINATED VANITY MIRRORS
To access an illuminated vanity mirror, flip down
one of the visors and lift the cover.
Illuminated Vanity Mirror
Sun Visor Slide-On-Rod Feature —
If Equipped
The sun visor Slide-On-Rod feature allows for
additional flexibility in positioning the sun visor to
block out the sun.
1. Fold down the sun visor.
2. Unclip the visor from the corner clip.
3. Pivot the sun visor toward the side window.
4. Extend the sun visor blade for additional sun blockage.
NOTE:The sun visor blade can also be extended while the
sun visor is against the windshield for additional
sun blockage through the front of the vehicle.
OUTSIDE MIRRORS
The outside mirror(s) can be adjusted to the center
of the adjacent lane of traffic to achieve the
optimal view.
Outside Mirrors Folding Feature
All outside mirrors are hinged and may be moved
either forward or rearward to resist damage. The
hinges have three detent positions:
Full forward position
Full rearward position
Normal position
WARNING!
Vehicles and other objects seen in an outside
convex mirror will look smaller and farther away
than they really are. Relying too much on side
convex mirrors could cause you to collide with
another vehicle or other object. Use your inside
mirror when judging the size or distance of a
vehicle seen in a side convex mirror.
23_WD_OM_EN_USC_t.book Page 40
Page 43 of 328
GETTING TO KNOW YOUR VEHICLE41
OUTSIDE MIRRORS WITH TURN SIGNAL —
I
F EQUIPPED
Driver and passenger outside mirrors with turn
signal lighting contain LEDs, which are located in
the lower outer corner of each mirror.
The LEDs are turn signal indicators, which flash
with the corresponding turn signal lights in the
front and rear of the vehicle. Turning on the Hazard
Warning flashers will also activate these LEDs.
OUTSIDE AUTOMATIC DIMMING MIRROR —
I
F EQUIPPED
The driver’s side outside mirror will automatically
adjust for glare from vehicles behind you. This
feature is controlled by the inside automatic
dimming mirror. The mirror will automatically
adjust for headlight glare when the inside mirror
adjusts.
POWER MIRRORS
The power mirror switch is located on the driver's
side door trim panel.
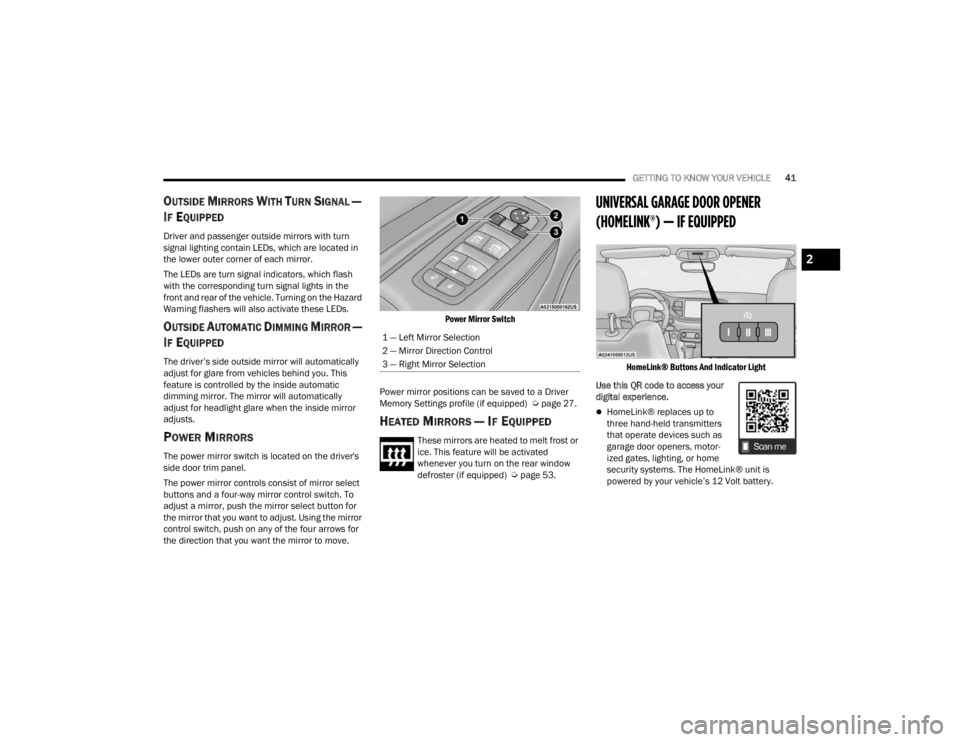
The power mirror controls consist of mirror select
buttons and a four-way mirror control switch. To
adjust a mirror, push the mirror select button for
the mirror that you want to adjust. Using the mirror
control switch, push on any of the four arrows for
the direction that you want the mirror to move.
Power Mirror Switch
Power mirror positions can be saved to a Driver
Memory Settings profile (if equipped) Ú page 27.
HEATED MIRRORS — IF EQUIPPED
These mirrors are heated to melt frost or
ice. This feature will be activated
whenever you turn on the rear window
defroster (if equipped) Úpage 53.
UNIVERSAL GARAGE DOOR OPENER
(HOMELINK®) — IF EQUIPPED
HomeLink® Buttons And Indicator Light
Use this QR code to access your
digital experience.
HomeLink® replaces up to
three hand-held transmitters
that operate devices such as
garage door openers, motor -
ized gates, lighting, or home
security systems. The HomeLink® unit is
powered by your vehicle’s 12 Volt battery.
1 — Left Mirror Selection
2 — Mirror Direction Control
3 — Right Mirror Selection
2
23_WD_OM_EN_USC_t.book Page 41
Page 56 of 328
54GETTING TO KNOW YOUR VEHICLE
(Continued)
A/C Button
Press and release this button on the
touchscreen to change the current
setting. The A/C indicator illuminates
when A/C is on.
The Air Conditioning (A/C) button allows the
operator to manually activate or deactivate the air
conditioning system. When the air conditioning
system is turned on, cool dehumidified air will flow
through the outlets into the cabin.
NOTE:If fog or mist appears on the windshield or side
glass, select Defrost mode and increase blower
speed if needed. If your air conditioning perfor -
mance seems lower than expected, check the front
of the A/C condenser (located in front of the
radiator), for an accumulation of dirt or insects.
Clean with a gentle water spray from the front of
the radiator and through the condenser.
Recirculation Button
Press and release this button to change
the system between recirculation mode
and outside air mode. The Recirculation
indicator and the A/C indicator illuminate
when the Recirculation button is pressed.
Recirculation can be used when outside conditions
such as smoke, odors, dust, or high humidity are
present. Recirculation can be used in all modes.
Recirculation may be unavailable (button on the touchscreen grayed out) if conditions exist that
could create fogging on the inside of the
windshield. The A/C can be deselected manually
without disturbing the mode control selection.
Continuous use of Recirculation mode may make
the inside air stuffy and window fogging may occur.
Extended use of this mode is not recommended.
Recirculation mode may automatically adjust to
optimize customer experience for warming,
cooling, dehumidification, etc.
AUTO Button
Press and release this button on the
touchscreen, or push the button on the
faceplate, to change the current setting.
The AUTO button automatically controls
the interior cabin temperature by adjusting
distribution and amount of airflow. Air Conditioning
(A/C) may be active during AUTO operation to
improve performance. Performing this function will
cause the system to switch between manual mode
and automatic modes. AUTO mode is highly
recommended for efficiency Ú page 59.
Front Defrost Button
Press and release the touchscreen
button, or push and release the button
on the faceplate, to change the current
airflow setting to Defrost mode. The Front
Defrost indicator illuminates when the Front
Defrost is on. Air comes from the windshield and
side window demist outlets. When the defrost button is selected, the blower level may increase.
Use Defrost mode with maximum temperature
settings for best windshield and side window
defrosting and defogging. When toggling the Front
Defrost mode button, the climate system will
return to the previous setting.
Rear Defrost Button
Press and release the button on the
touchscreen, or push and release the
button on the faceplate, to turn on the
rear window defroster and the heated
outside mirrors (if equipped). The Rear Defrost
indicator illuminates when the rear window
defroster is on. The rear window defroster
automatically turns off after 10 minutes.
CAUTION!
Failure to follow these cautions can cause
damage to the heating elements:
Use care when washing the inside of the rear
window. Do not use abrasive window cleaners
on the interior surface of the window. Use a
soft cloth and a mild washing solution, wiping
parallel to the heating elements. Labels can
be peeled off after soaking with warm water.
23_WD_OM_EN_USC_t.book Page 54
Page 100 of 328
98 (Continued)
(Continued)
STARTING AND OPERATING
STARTING THE ENGINE
Before starting your vehicle, adjust your seat,
adjust the inside and outside mirrors, fasten your
seat belt, and if present, instruct all other
occupants to buckle their seat belts.
AUTOMATIC TRANSMISSION
The gear selector must be in the NEUTRAL (N) or
PARK (P) position before you can start the engine.
Apply the brakes before shifting into any driving
gear.
NORMAL STARTING
To Turn On The Engine Using The ENGINE START/
STOP Button
1. The transmission must be in PARK (P).
2. Press and hold the brake pedal while pushing
the ENGINE START/STOP button once.
3. The system starts the vehicle. If the vehicle fails to start, the starter will disengage
automatically after 10 seconds.
4. If you wish to stop the cranking of the engine prior to the engine starting, push the ENGINE
START/STOP button again.
WARNING!
Before exiting a vehicle, always come to a
complete stop, then shift the automatic trans -
mission into PARK and apply the parking
brake.
Always make sure the keyless ignition node is
in the OFF position, key fob is removed from
the vehicle and vehicle is locked.
Never leave children alone in a vehicle, or with
access to an unlocked vehicle. Leaving chil -
dren in a vehicle unattended is dangerous for
a number of reasons. A child or others could
be seriously or fatally injured. Children should
be warned not to touch the parking brake,
brake pedal or the gear selector.
Do not leave the key fob in or near the vehicle,
or in a location accessible to children, and do
not leave the ignition of a vehicle equipped
with Keyless Enter ‘n Go™ in the ACC or ON/
RUN position. A child could operate power
windows, other controls, or move the vehicle.
Do not leave children or animals inside parked
vehicles in hot weather. Interior heat build-up
may cause serious injury or death.
CAUTION!
Damage to the transmission may occur if the
following precautions are not observed:
Do not shift from REVERSE (R), PARK, or
NEUTRAL into any forward gear when the
engine is above idle speed.
WARNING!
Shift into or out of PARK or REVERSE only after
the vehicle has come to a complete stop and
the engine is at idle speed.
Before shifting into any gear, make sure your
foot is firmly on the brake pedal.
CAUTION!
23_WD_OM_EN_USC_t.book Page 98
Page 163 of 328
MULTIMEDIA161
Active Lane Management This setting will alert the driver by vibrating the steering wheel and moving the
steering wheel when a lane departure is detected. The available options within
Active Lane Management are Lane Management “Vibration Only”, “Steering
Assist Only”, and “Vibration + Steering Assist”; Lane Warning “Early”,
“Medium”, and “Late”; Vibration Strength “Low”, “Medium” and “High”; and
Steering Assist Strength “Low”, “Medium” and “High”.
ParkSense This setting will change the type of ParkSense alert when a close object is
detected and can provide both an audible chime and a visual display.
Front ParkSense Volume This setting adjusts the volume of the Front ParkSense system. The available
settings are “Low”, “Medium”, and “High”.
Rear ParkSense Volume This setting adjusts the volume of the Rear ParkSense system. The available
settings are “Low”, “Medium”, and “High”.
Rear ParkSense Braking Assist This setting will turn the Rear ParkSense Braking Assist on or off.
Blind Spot Alert This setting will change the type of alert provided when an object is detected in
a vehicle’s blind spot. The “Off” setting will turn off Blind Spot Alert. The
“Lights” setting will activate the Blind Spot Alert lights on the outside mirrors.
The “Lights & Chime” setting will activate both the lights on the outside mirrors
and an audible chime.
Electric Power Steering Default This setting will change the Electric Power setting to “Normal”,” Sport”, or
“Comfort”.
Paddle Shifters This setting will turn the paddle shifters on or off.
LaneSense Warning This setting will change the distance at which the steering wheel will provide
lane departure feedback. The available settings are “Early”, “Medium”, and
“Late”.
Setting Name
Description
5
23_WD_OM_EN_USC_t.book Page 161
Page 185 of 328
SAFETY183
spinning wheel. This will allow more engine power
to be applied to the wheel that is not spinning. BLD
may remain enabled even if TCS and ESC are in
reduced modes.
Trailer Sway Control (TSC)
TSC uses sensors in the vehicle to recognize an
excessively swaying trailer and will take the
appropriate actions to attempt to stop the sway.
Note that TSC cannot stop all trailers from swaying.
Always use caution when towing a trailer and follow
the trailer tongue weight recommendations
Ú page 137.
When TSC is functioning, the ESC Activation/
Malfunction Indicator Light will flash, the engine
power may be reduced and you may feel the
brakes being applied to individual wheels to
attempt to stop the trailer from swaying. TSC is
disabled when the ESC system is in the “Partial
Off” mode.
AUXILIARY DRIVING SYSTEMS
BLIND SPOT MONITORING (BS M) —
I
F EQUIPPED
BSM uses two radar sensors, located inside the
rear fascia/bumper, to detect highway licensable
vehicles (automobiles, trucks, motorcycles, etc.)
that enter the blind spot zones from the rear/front/
side of the vehicle.
Rear Detection Zones
When the vehicle is started, the BSM Warning Light
will momentarily illuminate in both outside
rearview mirrors to let the driver know that the
system is operational. The BSM system sensors
operate when the vehicle is in any forward gear. The BSM detection zone covers approximately one
lane in width, on both sides of the vehicle 12 ft
(3.8 m). The zone length starts at the side of the
vehicle, near the B-pillar, and extends
approximately 10 ft (3 m) beyond the rear fascia/
bumper of the vehicle. The BSM system monitors
the detection zones on both sides of the vehicle
when the vehicle speed has reached
approximately 6 mph (10 km/h) or higher and will
alert the driver of vehicles in these areas.
NOTE:
The BSM system DOES NOT alert the driver
about rapidly approaching vehicles that are
outside the detection zones.
The BSM system detection zone DOES NOT
change if your vehicle is towing a trailer. There
-
fore, visually verify the adjacent lane is clear for
both your vehicle and trailer before making a
lane change. If the trailer or other object (i.e.,
bicycle, sports equipment) extends beyond the
side of your vehicle, this may result in random
false detections on the trailer, and false chimes
when the turn signal is used Ú page 153.
The BSM system can become blocked if snow,
ice, mud, or other road contaminations accumu -
late on the rear fascia/bumper where the radar
sensors are located. The system may also
detect blockage if the vehicle is operated in
areas with extremely low radar returns such as
a desert or parallel to a large elevation drop. If
WARNING!
If TSC activates while driving, slow the vehicle
down, stop at the nearest safe location, and
adjust the trailer load to eliminate trailer sway.
6
23_WD_OM_EN_USC_t.book Page 183