turn signal DODGE GRAND CARAVAN 2015 5.G User Guide
[x] Cancel search | Manufacturer: DODGE, Model Year: 2015, Model line: GRAND CARAVAN, Model: DODGE GRAND CARAVAN 2015 5.GPages: 164, PDF Size: 22.27 MB
Page 3 of 164
INTRODUCTION/WELCOME
WELCOME FROM CHRYSLERGROUP LLC..................3
CONTROLS AT A GLANCE
DRIVER COCKPIT...............6INSTRUMENT CLUSTER...........8
GETTING STARTED
KEY FOB . . . . . . . . . . . . . . . . . . . 10REMOTE START . . . . . . . . . . . . . . . 11KEYLESS ENTER-N-GO™.........12VEHICLE SECURITY ALARM........16SEAT BELT SYSTEMS............17SUPPLEMENTAL RESTRAINT SYSTEM(SRS) — AIR BAGS.............18CHILD RESTRAINTS............21HEAD RESTRAINTS.............26FRONT SEATS................28REAR SEATS.................31HEATED SEATS . . . . . . . . . . . . . . . 36HEATED STEERING WHEEL........37TILT/TELESCOPING STEERINGCOLUMN...................38
OPERATING YOUR VEHICLE
ENGINE BREAK-INRECOMMENDATIONS............39TURN SIGNAL/WIPER/WASHER/HIGHBEAM LEVER.................40HEADLIGHT SWITCH AND HALO LIGHTSWITCH....................42ELECTRONIC SPEED CONTROL......43ELECTRONIC RANGE SELECTION (ERS) . . 45FUEL ECONOMY (ECON) MODE......46MANUAL CLIMATE CONTROLS.......47THREE ZONE MANUAL CLIMATECONTROLS..................48THREE ZONE AUTOMATIC TEMPERATURECONTROLS (ATC)...............50PA R K S E N S E®REAR PARK ASSIST....52PA R K V I E W®REAR BACK-UP CAMERA . . 52BLIND SPOT MONITORING WITH REARCROSS PATH.................52POWER SLIDING SIDE DOORS.......53POWER LIFTGATE..............53POWER SUNROOF..............54WIND BUFFETING..............55
ELECTRONICS
YOUR VEHICLE'S SOUND SYSTEM....56Uconnect®130 . . . . . . . . . . . . . . . . 58Uconnect®130 WITH SiriusXM SATELLITERADIO.....................60Uconnect®430/430N............63
SiriusXM SATELLITE RADIO/TRAVELLINK......................73STEERING WHEEL AUDIO CONTROLS . . 77iPod®/USB/MP3 CONTROL.........77Uconnect®PHONE..............78Uconnect®VOICE COMMAND........81Bluetooth®STREAMING AUDIO......84VIDEO ENTERTAINMENT SYSTEM(VES™)....................84ELECTRONIC VEHICLE INFORMATIONCENTER (EVIC)................86PROGRAMMABLE FEATURES.......87UNIVERSAL GARAGE DOOR OPENER(HomeLink®).................89POWER INVERTER.............91POWER OUTLETS..............92
UTILITY
IN-FLOOR STORAGE — STOW'N GO®...94ROOF LUGGAGE RACK...........94TRAILER TOWING WEIGHTS (MAXIMUMTRAILER WEIGHT RATINGS)........95RECREATIONAL TOWING (BEHINDMOTORHOME, ETC.)............96
WHAT TO DO IN EMERGENCIES
ROADSIDE ASSISTANCE..........97INSTRUMENT CLUSTER WARNINGLIGHTS....................97INSTRUMENT CLUSTER INDICATORLIGHTS...................101IF YOUR ENGINE OVERHEATS......103TIRE SERVICE KIT.............103JACKING AND TIRE CHANGING.....110JUMP-STARTING..............122SHIFT LEVER OVERRIDE.........124TOWING A DISABLED VEHICLE.....124FREEING A STUCK VEHICLE.......125EVENT DATA RECORDER (EDR).....126
MAINTAINING YOUR VEHICLE
OPENING THE HOOD...........127ENGINE COMPARTMENT.........128FLUID CAPACITIES............130FLUIDS, LUBRICANTS AND GENUINEPA RT S . . . . . . . . . . . . . . . . . . . . 1 3 0MAINTENANCE PROCEDURES......132MAINTENANCE SCHEDULE.......132MAINTENANCE RECORD.........136FUSES....................137TIRE PRESSURES.............141SPARE TIRES — IF EQUIPPED.....142ADDING FUEL................144WHEEL AND WHEEL TRIM CARE....145REPLACEMENT BULBS..........146
TABLE OF CONTENTS
Page 8 of 164
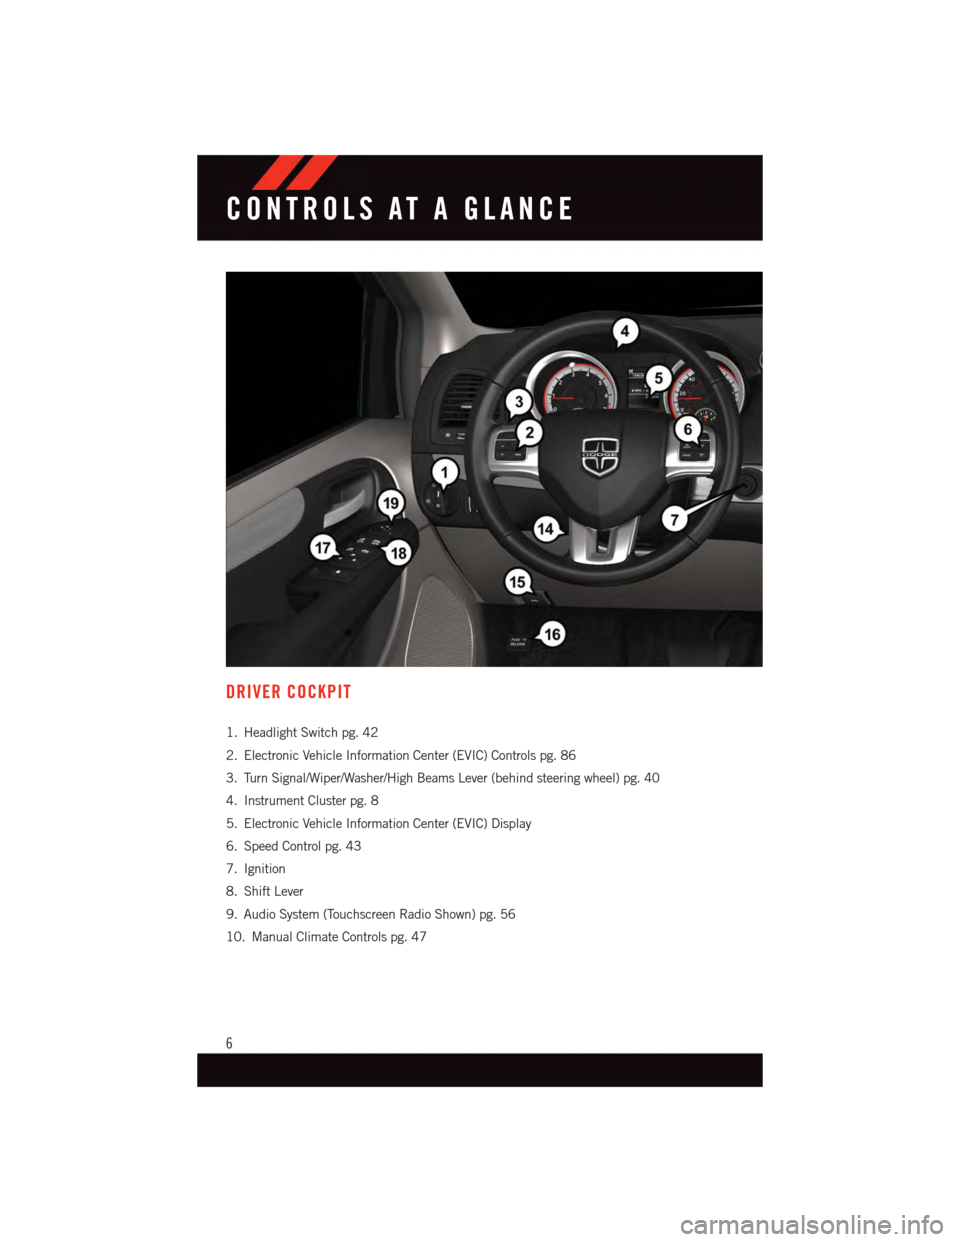
DRIVER COCKPIT
1. Headlight Switch pg. 42
2. Electronic Vehicle Information Center (EVIC) Controls pg. 86
3. Turn Signal/Wiper/Washer/High Beams Lever (behind steering wheel) pg. 40
4. Instrument Cluster pg. 8
5. Electronic Vehicle Information Center (EVIC) Display
6. Speed Control pg. 43
7. Ignition
8. Shift Lever
9. Audio System (Touchscreen Radio Shown) pg. 56
10. Manual Climate Controls pg. 47
CONTROLS AT A GLANCE
6
Page 12 of 164
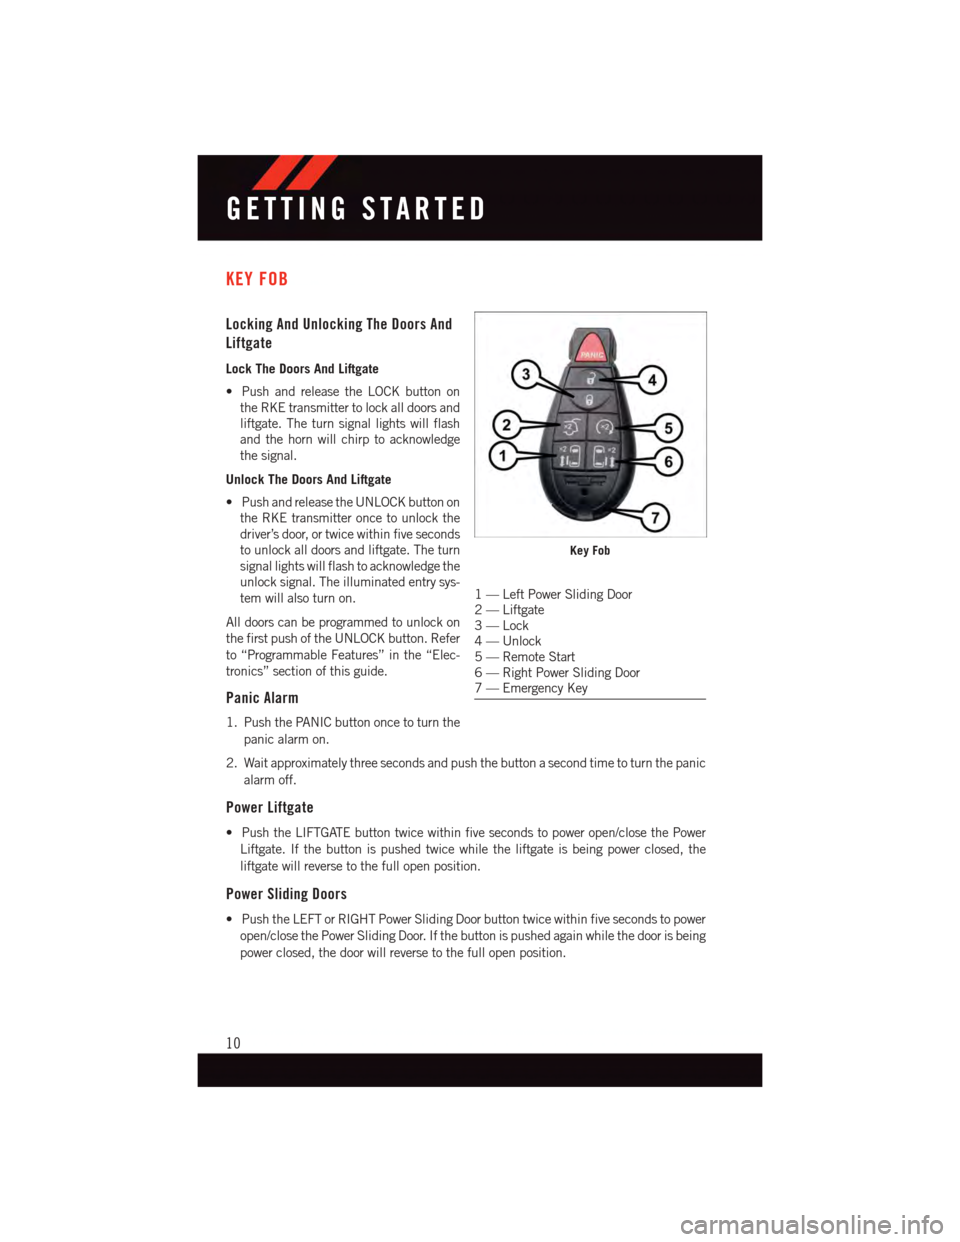
KEY FOB
Locking And Unlocking The Doors And
Liftgate
Lock The Doors And Liftgate
•PushandreleasetheLOCKbuttonon
the RKE transmitter to lock all doors and
liftgate. The turn signal lights will flash
and the horn will chirp to acknowledge
the signal.
Unlock The Doors And Liftgate
•PushandreleasetheUNLOCKbuttonon
the RKE transmitter once to unlock the
driver’s door, or twice within five seconds
to unlock all doors and liftgate. The turn
signal lights will flash to acknowledge the
unlock signal. The illuminated entry sys-
tem will also turn on.
All doors can be programmed to unlock on
the first push of the UNLOCK button. Refer
to “Programmable Features” in the “Elec-
tronics” section of this guide.
Panic Alarm
1. Push the PANIC button once to turn the
panic alarm on.
2. Wait approximately three seconds and push the button a second time to turn the panic
alarm off.
Power Liftgate
•PushtheLIFTGATEbuttontwicewithinfivesecondstopoweropen/closethePower
Liftgate. If the button is pushed twice while the liftgate is being power closed, the
liftgate will reverse to the full open position.
Power Sliding Doors
•PushtheLEFTorRIGHTPowerSlidingDoorbuttontwicewithinfivesecondstopower
open/close the Power Sliding Door. If the button is pushed again while the door is being
power closed, the door will reverse to the full open position.
Key Fob
1—LeftPowerSlidingDoor2—Liftgate3—Lock4—Unlock5—RemoteStart6—RightPowerSlidingDoor7—EmergencyKey
GETTING STARTED
10
Page 42 of 164
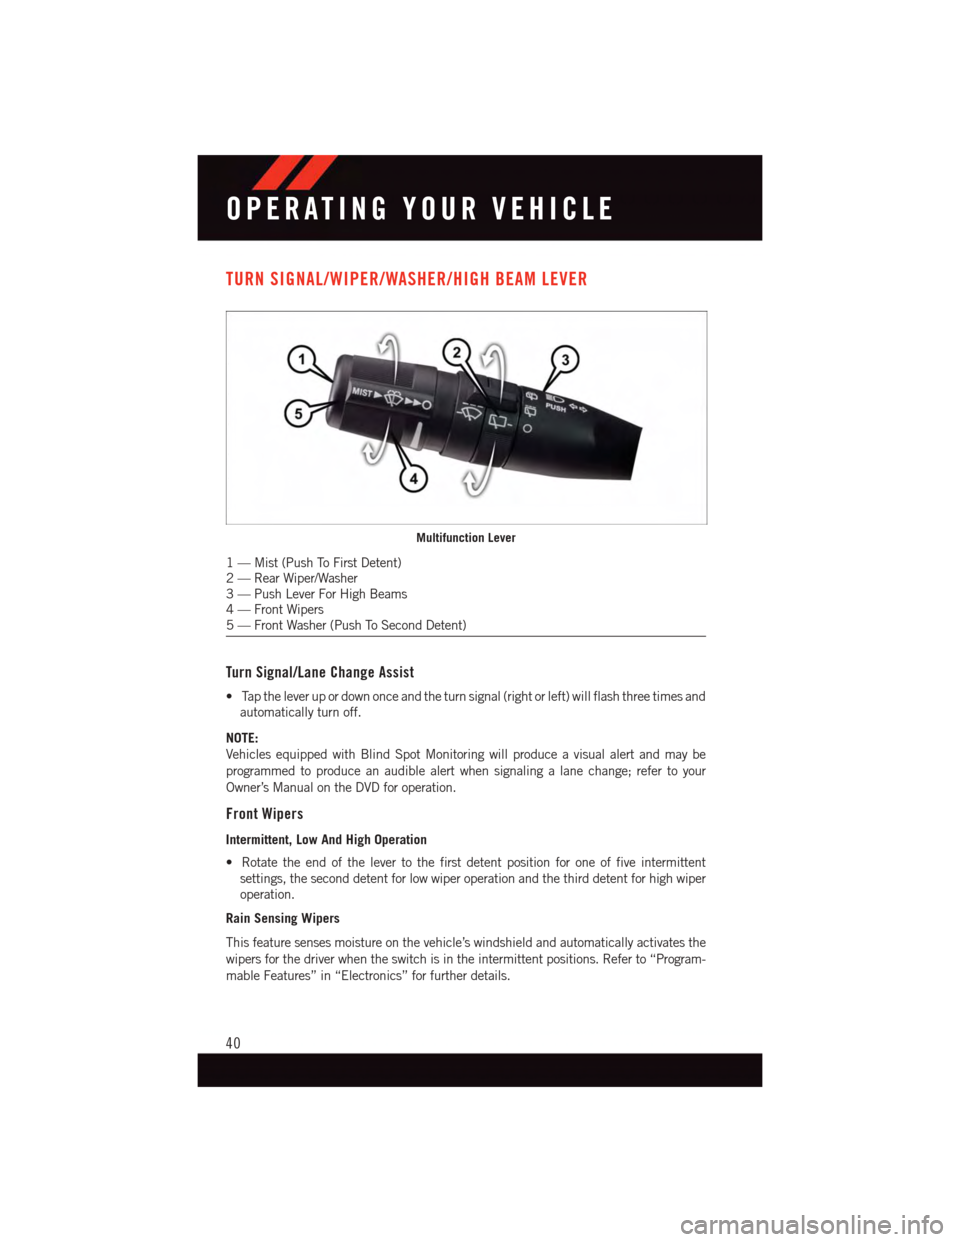
TURN SIGNAL/WIPER/WASHER/HIGH BEAM LEVER
Turn Signal/Lane Change Assist
•Taptheleverupordownonceandtheturnsignal(rightorleft)willflashthreetimesand
automatically turn off.
NOTE:
Vehicles equipped with Blind Spot Monitoring will produce a visual alert and may be
programmed to produce an audible alert when signaling a lane change; refer to your
Owner’s Manual on the DVD for operation.
Front Wipers
Intermittent, Low And High Operation
•Rotatetheendofthelevertothefirstdetentpositionforoneoffiveintermittent
settings, the second detent for low wiper operation and the third detent for high wiper
operation.
Rain Sensing Wipers
This feature senses moisture on the vehicle’s windshield and automatically activates the
wipers for the driver when the switch is in the intermittent positions. Refer to “Program-
mable Features” in “Electronics” for further details.
Multifunction Lever
1—Mist(PushToFirstDetent)2—RearWiper/Washer3—PushLeverForHighBeams4—FrontWipers5—FrontWasher(PushToSecondDetent)
OPERATING YOUR VEHICLE
40
Page 75 of 164
Taking A Detour
To t a k e a d e t o u r y o u m u s t b e n a v i g a t i n g a r o u t e .
•Pressthe“backarrow”iconbuttononthetouchscreenmultipletimestoreturntothe
Main Navigation menu.
•Pressthe“Detour”buttononthetouchscreen.
NOTE:
If the route you are currently taking is the only reasonable option, the device might not
calculate a detour.
Acquiring Satellites
The GPS Satellite strength bars indicate the strength of your satellite reception.
•Acquiringsatellitesignalscantakeafewminutes.Whenatleastoneofthebarsis
green, your device has acquired satellite signals.
•Youmayexperiencedelaysreceivingsatellitesignalswheninareaswithanobstructed
view to the sky, such as garages, tunnels, or large cities with tall buildings.
SiriusXM SATELLITE RADIO/TRAVEL LINK
•SiriusXMTravelLinkrequiresasubscription,soldseparatelyafterthe1yeartrial
subscription included with your vehicle purchase.
•SiriusXMTravelLinkisonlyavailableintheUnitedStates.
•ThefollowingdescribesfeaturesthatareavailablewheninSiriusXMSatelliteRadio
mode.
•ToaccessSiriusXMSatelliteRadio,pushtheRADIO/MEDIAorRADIObuttononthe
faceplate, then press the “SAT” button on the touchscreen.
Info
•Pressthe“i”buttononthetouchscreentoviewdetailedinformationaboutthecurrent
Sirius XM Satellite channel.
SiriusXM Parental Controls
•SiriusXM offers the option to permanently block selected channels. Call
1-888-539-7474 and request the Family Package.
•Uconnect® 430/430N and 730N:Push the “MENU” button on the faceplate while in
SiriusXM™ Satellite Radio Mode, then press the “Channel Lock” to enable and/or
disable desired channels. The SEEK and SCAN function will then only display channels
without Channel lock.
ELECTRONICS
73
Page 83 of 164
Transfer Ongoing Call Between Handset And Vehicle
•Duringacall,pushthe“VoiceCommand”button.
•AftertheBEEP,say“transfercall.”
Changing The Volume
•Startadialoguebypushingthe“Phone”button,thenadjustthevolumeduring
anormalcall.
•UsetheradioON/OFFVOLUMErotaryknobtoadjustthevolumetoacomfortablelevel
while the Uconnect®system is speaking. Please note the volume setting for Uconnect®
is different than the audio system.
WARNING!
•Anyvoicecommandedsystemshouldbeusedonlyinsafedrivingconditions
following applicable laws regarding phone use. Your attention should be focused on
safely operating the vehicle. Failure to do so may result in a collision causing you
and others to be severely injured or killed.
•Inanemergency,touseUconnect®Phone, your mobile phone must be:
•turnedon,
•pairedtoUconnect®Phone,
•andhavenetworkcoverage.
Uconnect® VOICE COMMAND
Voice Command Operation
•TheUconnect®Voice Command system allows you to control your AM, FM radio,
satellite radio, disc player, HDD, Uconnect®Phone, a memo recorder, and supported
portable media devices.
•Whenyoupressthe“VoiceCommand”buttonlocated on the radio faceplate or
steering wheel, you will hear a beep. The beep is your signal to give a command. If you
do not say a command within a few seconds, the system will present you with a list of
options. If you ever want to interrupt the system while it lists options, press the “Voice
Command” button,listenfortheBEEP,andsayyourcommand.
NOTE:
U.S. residents visit driveuconnect.com for more info on which voice command features
apply to your vehicle. Canadian residents visit driveuconnect.ca for more info on which
voice command features apply to your vehicle.
ELECTRONICS
81
Page 90 of 164
Auto Unlock Doors On Exit
To h a v e a l l o f t h e v e h i c l e d o o r s u n l o c k w h e n a n y d o o r i s o p e n e d :
•Enteryourvehicleandcloseallthedoors,andfastenyourseatbelt.
•CycletheignitionswitchbetweentheLOCKandONpositionfourtimes,endinginthe
LOCK position (do not start the engine).
•PushthepowerdoorUNLOCKswitchtounlockthedoors.Asinglechimewillindicate
that programming is complete.
Sound Horn With Lock
To t u r n t h e h o r n c h i r p o n o r o f f w h e n t h e d o o r s a r e l o c k e d :
•PushtheLOCKbuttonandPANICbuttonatthesametimeforatleastfourseconds,
but no longer than 10 seconds.
•Releasebothbuttonsatthesametime.
Flashing Lights With Lock
The turn signal lights flash when the doors are locked, which can be turned on or off. To
turn this feature on or off:
•PushandholdtheUNLOCKbuttonandtheLOCKbuttonatthesametimeforatleast
four seconds, but no longer than 10 seconds.
•Releasebothbuttonsatthesametime.
ELECTRONICS
88
Page 92 of 164
3. Push and hold the HomeLink®button you want to program while you push and hold
the hand-held transmitter button.
4. Continue to hold both buttons and observe the indicator light. The HomeLink®
indicator will flash slowly and then rapidly after HomeLink®has received the fre-
quency signal from the hand-held transmitter. Release both buttons after the indicator
light changes from slow to rapid.
5. At the garage door opener motor (in the garage), locate the “LEARN” or “TRAINING”
button. This can usually be found where the hanging antenna wire is attached to the
garage door opener motor. Firmly push and release the “LEARN” or “TRAINING”
button.
NOTE:
Yo u h a v e 3 0 s e c o n d s i n w h i c h t o i n i t i a t e t h e n e x t s t e p a f t e r t h e L E A R N b u t t o n h a s b e e n
pushed.
6. Return to the vehicle and push the programmed HomeLink®button twice (holding the
button for two seconds each time). If the device is plugged in and activates,
programming is complete.
NOTE:
If the device does not activate, push the button a third time (for two seconds) to complete
the training.
7. To program the remaining two HomeLink®buttons, repeat each step for each
remaining button. DO NOT erase the channels.
Programming A Non-Rolling Code
NOTE:
For programming Garage Door Openers manufactured before 1995.
1. Turn the ignition switch to the ON/RUN position.
2. Place the hand-held transmitter 1 to 3 inches (3 to 8 cm) away from the HomeLink®
button you wish to program while keeping the HomeLink®indicator light in view.
3. Push and hold the HomeLink®button you want to program while you push and hold
the hand-held transmitter button.
4. Continue to hold both buttons and observe the indicator light. The HomeLink®
indicator will flash slowly and then rapidly after HomeLink®has received the fre-
quency signal from the hand-held transmitter. Release both buttons after the indicator
light changes from slow to rapid.
5. Push and hold the programmed HomeLink®button and observe the indicator light. If
the indicator light stays on constantly, programming is complete and the garage door
(or device) should activate when the HomeLink®button is pushed.
6. To program the two remaining HomeLink®buttons, repeat each step for each
remaining button. DO NOT erase the channels.
ELECTRONICS
90
Page 100 of 164
If a problem is detected, the light will come on while the engine is running. Cycle the
ignition when the vehicle has completely stopped and the shift lever is placed in the PARK
position; the light should turn off.
If the light remains lit with the engine running, your vehicle will usually be drivable;
however, see an authorized dealer immediately. If the light is flashing when the engine is
running, immediate service is required and you may experience reduced performance, an
elevated/rough idle or engine stall and your vehicle may require towing.
-TirePressureMonitoringSystem(TPMS)Light
Each tire, including the spare (if provided), should be checked monthly when cold and
inflated to the inflation pressure recommended by the vehicle manufacturer on the
vehicle placard or tire inflation pressure label. (If your vehicle has tires of a different size
than the size indicated on the vehicle placard or tire inflation pressure label, you should
determine the proper tire inflation pressure for those tires.)
As an added safety feature, your vehicle has been equipped with a tire pressure
monitoring system (TPMS) that illuminates a low tire pressure telltale when one or more
of your tires is significantly under-inflated. Accordingly, when the low tire pressure telltale
illuminates, you should stop and check your tires as soon as possible, and inflate them to
the proper pressure. Driving on a significantly under-inflated tire causes the tire to
overheat and can lead to tire failure. Under-inflation also reduces fuel efficiency and tire
tread life, and may affect the vehicle’s handling and stopping ability.
IF THE LIGHT STARTS FLASHING INDICATING A LOW TIRE PRESSURE, ADJUST THE AIR
PRESSURE IN THE LOW TIRE TO THE AIR PRESSURE SHOWN ON THE VEHICLE PLACARD OR
TIRE INFLATION PRESSURE LABEL LOCATED ON THE DRIVER'S DOOR.
NOTE:
AFTER INFLATION, THE VEHICLE MAY NEED TO BE DRIVEN FOR 20 MINUTES
BEFORE THE FLASHING LIGHT WILL TURN OFF.
Please note that the TPMS is not a substitute for proper tire maintenance, and it is the
driver’s responsibility to maintain correct tire pressure, even if under-inflation has not
reached the level to trigger illumination of the TPMS low tire pressure telltale.
Yo u r v e h i c l e h a s a l s o b e e n e q u i p p e d w i t h a T P M S m a l f u n c t i o n i n d i c a t o r t o i n d i c a t e w h e n
the system is not operating properly. The TPMS malfunction indicator is combined with
the low tire pressure telltale.
When the system detects a malfunction, the telltale will flash for approximately one
minute and then remain continuously illuminated. This sequence will continue upon
subsequent vehicle start-ups as long as the malfunction exists. When the malfunction
indicator is illuminated, the system may not be able to detect or signal low tire pressure
as intended. TPMS malfunctions may occur for a variety of reasons, including the
installation of replacement or alternate tires or wheels on the vehicle that prevent the
TPMS from functioning properly. Always check the TPMS malfunction telltale after
replacing one or more tires or wheels on your vehicle to ensure that the replacement or
alternate tires and wheels allow the TPMS to continue to function properly.
WHAT TO DO IN EMERGENCIES
98
Page 103 of 164
-ElectronicStabilityControl(ESC)IndicatorLight
If this indicator light flashes during acceleration, apply as little throttle as possible. While
driving, ease up on the accelerator. Adapt your speed and driving to the prevailing road
conditions. To improve the vehicle's traction when starting off in deep snow, sand or
gravel, it may be desirable to switch the ESC system off.
INSTRUMENT CLUSTER INDICATOR LIGHTS
-TurnSignalIndicator
The arrows will flash with the exterior turn signals when the turn signal lever is operated.
Atonewillchime,andaEVICmessagewillappearifeitherturnsignalisleftonformore
than 1 mile (1.6 km).
NOTE:
If either indicator flashes at a rapid rate, check for a defective outside light bulb.
-HighBeamIndicator
Indicates that headlights are on high beam.
-FrontFogLightIndicator
This indicator will illuminate when the front fog lights are on.
-VehicleSecurityLight
This light will flash rapidly for approximately 15 seconds when the vehicle theft alarm is
arming. The light will flash at a slower speed continuously after the alarm is set. The
security light will also come on for about three seconds when the ignition is first turned on.
-ElectronicStabilityControl(ESC)OFFIndicatorLight
This light indicates the Electronic Stability Control (ESC) is off.
-ElectronicSpeedControlONIndicator
This indicator will illuminate when the electronic speed control has been activated to the
“ON” position.
-ElectronicSpeedControlSETIndicator
This indicator will illuminate when the cruising speed has been set.
OIL CHANGE REQUIRED
Yo u r v e h i c l e i s e q u i p p e d w i t h a n e n g i n e o i l c h a n g e i n d i c a t o r s y s t e m . T h e O i l C h a n g e
Required message will display in the EVIC display for approximately 10 seconds, after a
single chime has sounded, to indicate the next scheduled oil change interval. The engine
oil change indicator system is duty-cycle based, which means the engine oil change
interval may fluctuate dependent upon your personal driving style.
WHAT TO DO IN EMERGENCIES
101