key battery DODGE HORNET 2023 Owners Manual
[x] Cancel search | Manufacturer: DODGE, Model Year: 2023, Model line: HORNET, Model: DODGE HORNET 2023Pages: 288, PDF Size: 14.2 MB
Page 15 of 288
13
GETTING TO KNOW YOUR VEHICLE
KEYS
KEY FOBS
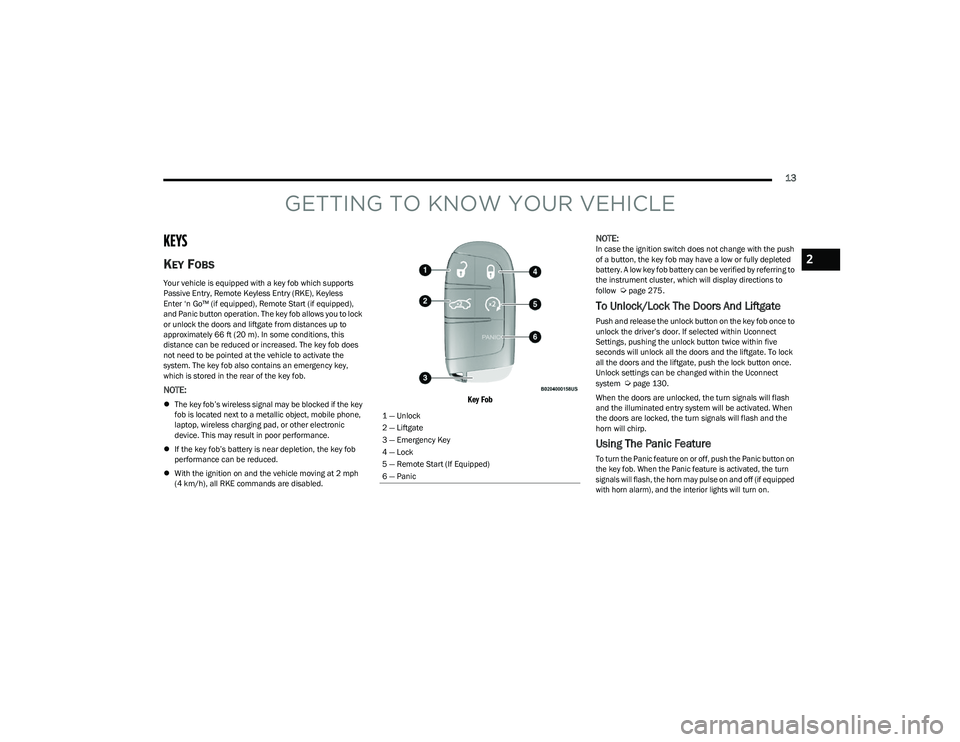
Your vehicle is equipped with a key fob which supports
Passive Entry, Remote Keyless Entry (RKE), Keyless
Enter ‘n Go™ (if equipped), Remote Start (if equipped),
and Panic button operation. The key fob allows you to lock
or unlock the doors and liftgate from distances up to
approximately 66 ft (20 m). In some conditions, this
distance can be reduced or increased. The key fob does
not need to be pointed at the vehicle to activate the
system. The key fob also contains an emergency key,
which is stored in the rear of the key fob.
NOTE:
The key fob’s wireless signal may be blocked if the key
fob is located next to a metallic object, mobile phone,
laptop, wireless charging pad, or other electronic
device. This may result in poor performance.
If the key fob’s battery is near depletion, the key fob
performance can be reduced.
With the ignition on and the vehicle moving at 2 mph
(4 km/h), all RKE commands are disabled.
Key Fob
NOTE:
In case the ignition switch does not change with the push
of a button, the key fob may have a low or fully depleted
battery. A low key fob battery can be verified by referring to
the instrument cluster, which will display directions to
follow
Úpage 275.
To Unlock/Lock The Doors And Liftgate
Push and release the unlock button on the key fob once to
unlock the driver’s door. If selected within Uconnect
Settings, pushing the unlock button twice within five
seconds will unlock all the doors and the liftgate. To lock
all the doors and the liftgate, push the lock button once.
Unlock settings can be changed within the Uconnect
system
Úpage 130.
When the doors are unlocked, the turn signals will flash
and the illuminated entry system will be activated. When
the doors are locked, the turn signals will flash and the
horn will chirp.
Using The Panic Feature
To turn the Panic feature on or off, push the Panic button on
the key fob. When the Panic feature is activated, the turn
signals will flash, the horn may pulse on and off (if equipped
with horn alarm), and the interior lights will turn on.
1 — Unlock
2 — Liftgate
3 — Emergency Key
4 — Lock
5 — Remote Start (If Equipped)
6 — Panic
2
23_GG_OM_EN_USC_t.book Page 13
Page 16 of 288
14GETTING TO KNOW YOUR VEHICLE
The Panic feature will stay on for three minutes unless you
turn it off by either pushing the Panic button a second time
or driving the vehicle at a speed of 15 mph (24 km/h) or
greater.
NOTE:
The interior lights will turn off if you place the ignition in
the ON/RUN position while the Panic feature is
activated. However, the exterior lights and horn
(if equipped with horn alarm) will remain on.
You may need to be closer than 66 ft (20 m) from the
vehicle when using the key fob to turn off the Panic
feature due to the radio frequency noises emitted by
the system.
Key Left Vehicle Feature
If a valid key fob is no longer detected inside the vehicle
while the vehicle’s ignition system is in the ON/RUN or
START position, the message “Key Fob Has Left The
Vehicle” will be shown in the instrument cluster display
and an interior chime will sound. An exterior audible and
visual alert will also be activated to warn the driver.
The vehicle’s horn will rapidly chirp three times along with
a single flash of the vehicle’s exterior lights.
NOTE:
The doors have to be open and then closed in order for
the vehicle to detect a key fob. The Key Left Vehicle
feature will activate when the first door is closed and
no key fob is detected in the vehicle. If the warning has
been activated, and the other doors are closed, no
other warnings will be issued.
These alerts will not be activated in situations where
either the vehicle’s engine is left running with the key
fob inside, or the key fob’s wireless signals are blocked.
Using The Key Fob To Open/Close Vehicle
Windows — If Equipped
To Open The Windows
From outside of the vehicle, push the unlock button on the
key fob twice, and hold for several seconds. All vehicle
door windows will open.
To Close The Windows
From outside of the vehicle, push the lock button on the
key fob twice, and hold for several seconds. All vehicle
door windows will close.
NOTE:
This feature is enabled through Uconnect Settings Úpage 130.
Vehicle must be equipped with front and rear auto up/
down windows.
Replacing The Battery In The Key Fob
The replacement battery is one CR2032 battery.
NOTE:
Customers are recommended to use a battery
obtained from Mopar®. Aftermarket coin battery
dimensions may not meet the original OEM coin battery
dimensions.
Perchlorate material — special handling may apply. See
www.dtsc.ca.gov/hazardouswaste/perchlorate for
further information.
Do not touch the battery terminals that are on the back
housing or the printed circuit board.
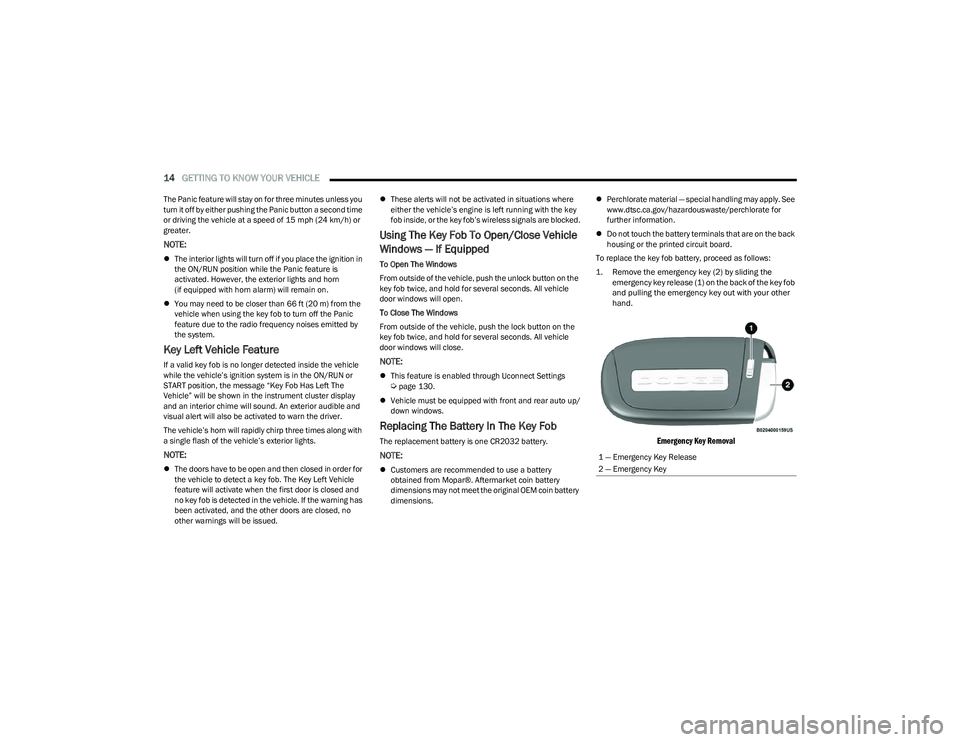
To replace the key fob battery, proceed as follows:
1. Remove the emergency key (2) by sliding the emergency key release (1) on the back of the key fob
and pulling the emergency key out with your other
hand.
Emergency Key Removal
1 — Emergency Key Release
2 — Emergency Key
23_GG_OM_EN_USC_t.book Page 14
Page 17 of 288
GETTING TO KNOW YOUR VEHICLE15
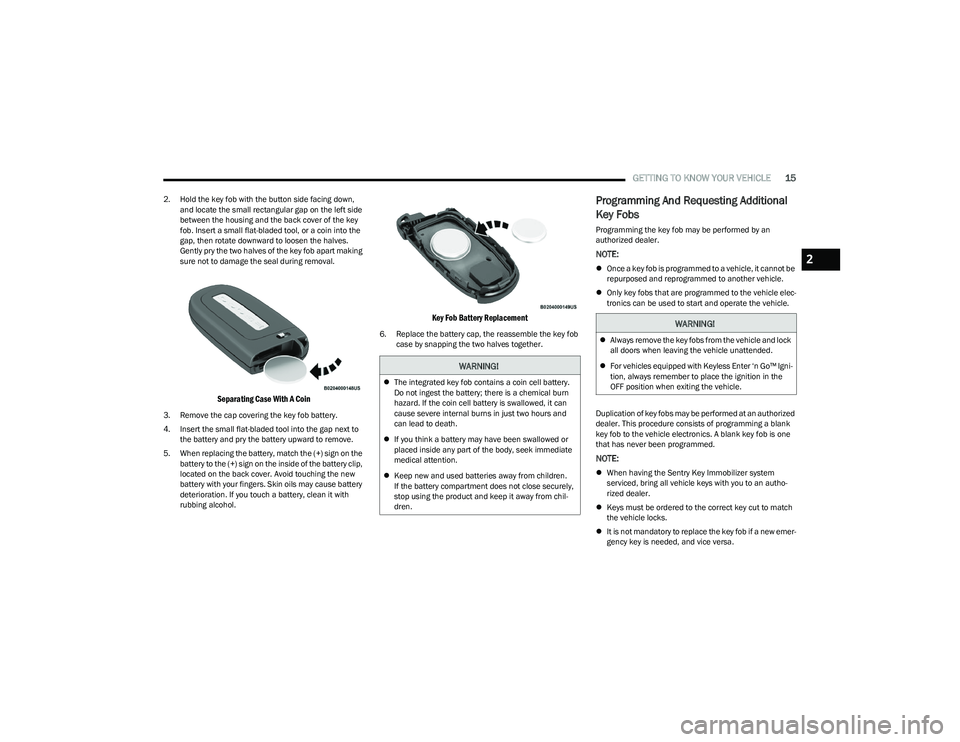
2. Hold the key fob with the button side facing down,
and locate the small rectangular gap on the left side
between the housing and the back cover of the key
fob. Insert a small flat-bladed tool, or a coin into the
gap, then rotate downward to loosen the halves.
Gently pry the two halves of the key fob apart making
sure not to damage the seal during removal.
Separating Case With A Coin
3. Remove the cap covering the key fob battery.
4. Insert the small flat-bladed tool into the gap next to the battery and pry the battery upward to remove.
5. When replacing the battery, match the (+) sign on the battery to the (+) sign on the inside of the battery clip,
located on the back cover. Avoid touching the new
battery with your fingers. Skin oils may cause battery
deterioration. If you touch a battery, clean it with
rubbing alcohol.
Key Fob Battery Replacement
6. Replace the battery cap, the reassemble the key fob case by snapping the two halves together.
Programming And Requesting Additional
Key Fobs
Programming the key fob may be performed by an
authorized dealer.
NOTE:
Once a key fob is programmed to a vehicle, it cannot be
repurposed and reprogrammed to another vehicle.
Only key fobs that are programmed to the vehicle elec -
tronics can be used to start and operate the vehicle.
Duplication of key fobs may be performed at an authorized
dealer. This procedure consists of programming a blank
key fob to the vehicle electronics. A blank key fob is one
that has never been programmed.
NOTE:
When having the Sentry Key Immobilizer system
serviced, bring all vehicle keys with you to an autho -
rized dealer.
Keys must be ordered to the correct key cut to match
the vehicle locks.
It is not mandatory to replace the key fob if a new emer -
gency key is needed, and vice versa.
WARNING!
The integrated key fob contains a coin cell battery.
Do not ingest the battery; there is a chemical burn
hazard. If the coin cell battery is swallowed, it can
cause severe internal burns in just two hours and
can lead to death.
If you think a battery may have been swallowed or
placed inside any part of the body, seek immediate
medical attention.
Keep new and used batteries away from children.
If the battery compartment does not close securely,
stop using the product and keep it away from chil -
dren.
WARNING!
Always remove the key fobs from the vehicle and lock
all doors when leaving the vehicle unattended.
For vehicles equipped with Keyless Enter ‘n Go™ Igni -
tion, always remember to place the ignition in the
OFF position when exiting the vehicle.
2
23_GG_OM_EN_USC_t.book Page 15
Page 19 of 288
GETTING TO KNOW YOUR VEHICLE17
Starting The Engine With A Depleted Key Fob Battery
If the ignition state/mode does not change with the push
of a button, the key fob may have a low or depleted
battery. In this situation, a backup method can be used to
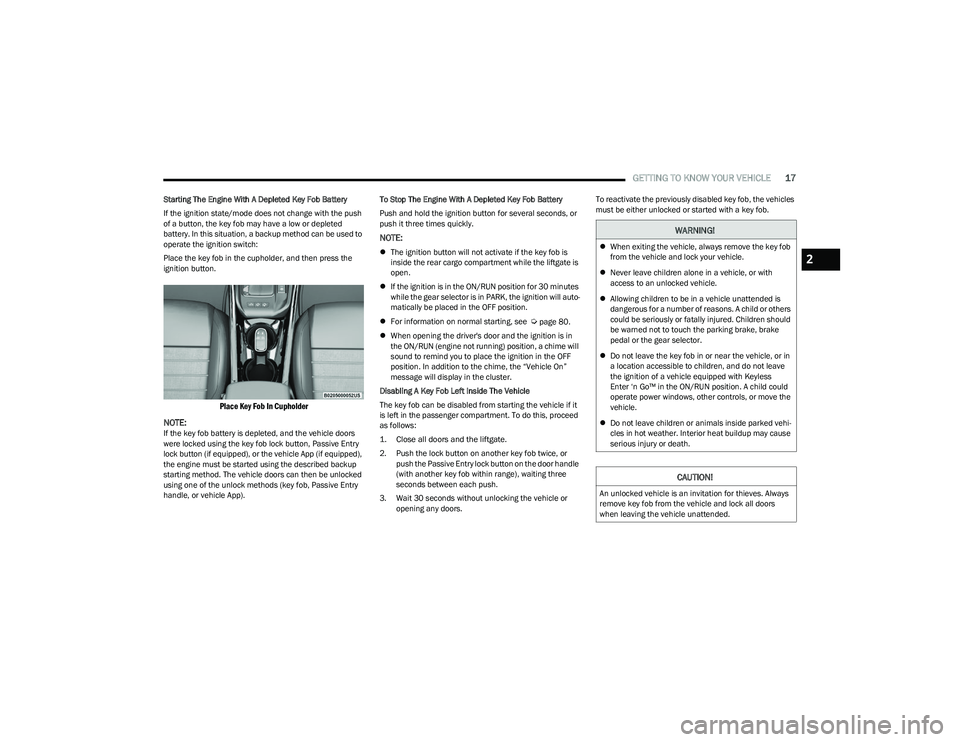
operate the ignition switch:
Place the key fob in the cupholder, and then press the
ignition button.
Place Key Fob In Cupholder
NOTE:
If the key fob battery is depleted, and the vehicle doors
were locked using the key fob lock button, Passive Entry
lock button (if equipped), or the vehicle App (if equipped),
the engine must be started using the described backup
starting method. The vehicle doors can then be unlocked
using one of the unlock methods (key fob, Passive Entry
handle, or vehicle App). To Stop The Engine With A Depleted Key Fob Battery
Push and hold the ignition button for several seconds, or
push it three times quickly.
NOTE:
The ignition button will not activate if the key fob is
inside the rear cargo compartment while the liftgate is
open.
If the ignition is in the ON/RUN position for 30 minutes
while the gear selector is in PARK, the ignition will auto -
matically be placed in the OFF position.
For information on normal starting, see
Úpage 80.
When opening the driver's door and the ignition is in
the ON/RUN (engine not running) position, a chime will
sound to remind you to place the ignition in the OFF
position. In addition to the chime, the “Vehicle On”
message will display in the cluster.
Disabling A Key Fob Left Inside The Vehicle
The key fob can be disabled from starting the vehicle if it
is left in the passenger compartment. To do this, proceed
as follows:
1. Close all doors and the liftgate.
2. Push the lock button on another key fob twice, or push the Passive Entry lock button on the door handle
(with another key fob within range), waiting three
seconds between each push.
3. Wait 30 seconds without unlocking the vehicle or opening any doors. To reactivate the previously disabled key fob, the vehicles
must be either unlocked or started with a key fob.
WARNING!
When exiting the vehicle, always remove the key fob
from the vehicle and lock your vehicle.
Never leave children alone in a vehicle, or with
access to an unlocked vehicle.
Allowing children to be in a vehicle unattended is
dangerous for a number of reasons. A child or others
could be seriously or fatally injured. Children should
be warned not to touch the parking brake, brake
pedal or the gear selector.
Do not leave the key fob in or near the vehicle, or in
a location accessible to children, and do not leave
the ignition of a vehicle equipped with Keyless
Enter ‘n Go™ in the ON/RUN position. A child could
operate power windows, other controls, or move the
vehicle.
Do not leave children or animals inside parked vehi -
cles in hot weather. Interior heat buildup may cause
serious injury or death.
CAUTION!
An unlocked vehicle is an invitation for thieves. Always
remove key fob from the vehicle and lock all doors
when leaving the vehicle unattended.
2
23_GG_OM_EN_USC_t.book Page 17
Page 20 of 288
18GETTING TO KNOW YOUR VEHICLE
REMOTE START — IF EQUIPPED
This system uses the key fob to start the engine
conveniently from outside the vehicle while still
maintaining security. The system has a range
of approximately 328 ft (100 m).
Remote Start is used to defrost windows in cold weather
and to reach a comfortable climate in all ambient
conditions before the customer enters the vehicle.
NOTE:Obstructions between the vehicle and key fob may reduce
this range Úpage 275.
HOW TO USE REMOTE START
Push and release the Remote Start button on the key fob
twice within five seconds. The vehicle doors will lock, the
parking lights will flash, and the horn will chirp twice (if
programmed). Then, the engine will start, and the vehicle
will remain in the Remote Start mode for a 15 minute
cycle. Pushing the Remote Start button a third time shuts
the engine off.
To drive the vehicle, push the unlock button and place the
ignition in the ON/RUN position.
NOTE:
With Remote Start, the engine will only run for
15 minutes.
Remote Start can only be used twice.
If an engine fault is present or fuel level is low, the
vehicle will start and then shut down in 10 seconds.
The parking lights will turn on and remain on during
Remote Start mode.
For security, power window and power sunroof opera -
tion (if equipped) are disabled when the vehicle is in
the Remote Start mode.
The ignition must be placed in the ON/RUN position
before the Remote Start sequence can be repeated for
a third cycle. All of the following conditions must be met before the
engine will remote start:
Gear selector in PARK
Doors closed
Hood closed
Liftgate closed
Hazard switch off
Brake switch inactive (brake pedal not pressed)
Battery at an acceptable charge level
Panic button not pushed
System not disabled from previous Remote Start event
Vehicle Security Light flashing (if equipped)
Ignition in the OFF position
Fuel level meets minimum requirement
Vehicle Security system is not signaling an intrusion
Malfunction Indicator Light is not illuminatedWARNING!
Do not start or run an engine in a closed garage or
confined area. Exhaust gas contains carbon
monoxide (CO) which is odorless and colorless.
Carbon monoxide is poisonous and can cause
serious injury or death when inhaled.
Keep key fobs away from children. Operation of the
Remote Start system, windows, door locks or other
controls could cause serious injury or death.
WARNING!
Do not start or run an engine in a closed garage or
confined area. Exhaust gas contains carbon
monoxide (CO) which is odorless and colorless.
Carbon monoxide is poisonous and can cause
serious injury or death when inhaled.
Keep key fobs away from children. Operation of the
Remote Start system, windows, door locks or other
controls could cause serious injury or death.
23_GG_OM_EN_USC_t.book Page 18
Page 22 of 288
20GETTING TO KNOW YOUR VEHICLE
REMOTE START ABORT MESSAGE —
I
F EQUIPPED
One of the following messages will display in the
instrument cluster display if the vehicle fails to remote
start or exits Remote Start prematurely:
Remote Start Aborted — Door Open
Remote Start Aborted — Hood Open
Remote Start Aborted — Fuel Low
Remote Start Aborted — Liftgate Open
Remote Start Aborted — Too Cold
Remote Start Aborted — Time Expired
Remote Start Disabled — Start Vehicle To Reset
The message will stay active until the ignition is placed in
the ON/RUN position.
VEHICLE SECURITY SYSTEM — IF EQUIPPED
The Vehicle Security system monitors the vehicle doors,
hood, liftgate, and the Keyless Enter ‘n Go™ Ignition for
unauthorized operation. It also monitors movement inside
the passenger compartment (volumetric protection —
if equipped), cutting of battery cables, and unexpected
lifting/tilting of the vehicle (anti-lift protection —
if equipped). If something triggers the system, the Vehicle Security
system will provide the following audible and visible
signals:
The horn will pulse
The turn signals will flash
NOTE:
The Vehicle Security system is activated by the Engine
Immobilizer system, which is automatically activated
when you get out of the vehicle with the key fob and
lock the doors.
The Vehicle Security system is factory adjusted to stan -
dards from different countries.
The Vehicle Security system is a complementary secu -
rity system developed to hinder the occurrence of
vehicle theft and prevent vandalism. It does not
prevent the theft of your vehicle; the system is a deter -
rent.
TO ARM THE SYSTEM
Follow these steps to arm the Vehicle Security system:
1. Make sure the vehicle’s ignition is placed in the OFF position.
For vehicles equipped with Keyless Entry, make
sure the vehicle’s keyless ignition system is OFF. 2. Perform one of the following methods to lock the
vehicle:
Push the lock button on the interior power door
lock switch with the driver and/or passenger door
open.
Push the lock button on the exterior Passive Entry
door handle with a valid key fob available in the
same exterior zone
Úpage 23.
Push the lock button on the key fob.
3. If any doors (or liftgate) are open, close them.
When the Vehicle Security system is armed (except on
some versions for specific markets), the system will emit
an acoustic warning and a warning light (located next to
the interior door handle) will flash until it is disarmed.
NOTE:
If there is a fault with the system, the system will emit
an acoustic signal a second time.
If this occurs, wait about 4 seconds and switch off the
Vehicle Security system following this procedure:
a. Press the unlock button on the key fob.
b. Check that the doors, hood, and liftgate are closed, and then reactivate the system by pressing
the lock button.
If the alarm emits a sound even when the doors, hood,
and liftgate are closed, there is a fault with the system.
Contact an authorized dealer for assistance.
The vehicle doors can be locked without arming the
Vehicle Security system by using the emergency key in
the exterior door lock cylinder.
23_GG_OM_EN_USC_t.book Page 20
Page 23 of 288
GETTING TO KNOW YOUR VEHICLE21
TO DISARM THE SYSTEM
The Vehicle Security system can be disarmed using any of
the following methods:
Push the unlock button on the key fob.
Grab the Passive Entry door handle to unlock the door
Úpage 23.
Cycle the ignition out of the OFF position to disarm the
system.
NOTE:
The driver's door key cylinder and liftgate button on the
key fob cannot arm or disarm the Vehicle Security
system. Use of the door key cylinder when the system
is armed will sound the alarm when the door is opened.
If the door is unlocked using the emergency key in the
driver’s door key cylinder when the alarm is active, the
alarm will not deactivate and will sound. The alarm can
then be disarmed by placing the ignition in the ON/RUN
position, or pushing the unlock button in the key fob.
The Vehicle Security system is designed to protect your
vehicle. However, you can create conditions where the
system will give you a false alarm. If one of the previously
described arming sequences has occurred, the Vehicle
Security system will arm regardless of whether you are in
the vehicle or not. If you remain in the vehicle and open a
door, the alarm will sound. If this occurs, disarm the
Vehicle Security system. If the Vehicle Security system is armed and the battery
becomes disconnected, the Vehicle Security system will
remain armed when the battery is reconnected; the
exterior lights will flash, and the horn will sound. If this
occurs, disarm the Vehicle Security system.
NOTE:The alarm does not turn off when the doors are unlocked
by inserting the blade of the emergency key (found inside
the key fob) into the door handle lock cylinder.
Disabling The System
To completely disable the system (e.g. during a lengthy
period of car inactivity), close the doors by turning the
emergency key in the door lock.
NOTE:If the key fob batteries become depleted, or the system
fails, the system can be switched off by cycling the ignition
out of the OFF position. Manually open the doors by
inserting the emergency key into the door lock cylinder,
and then place the key fob in the cupholder.
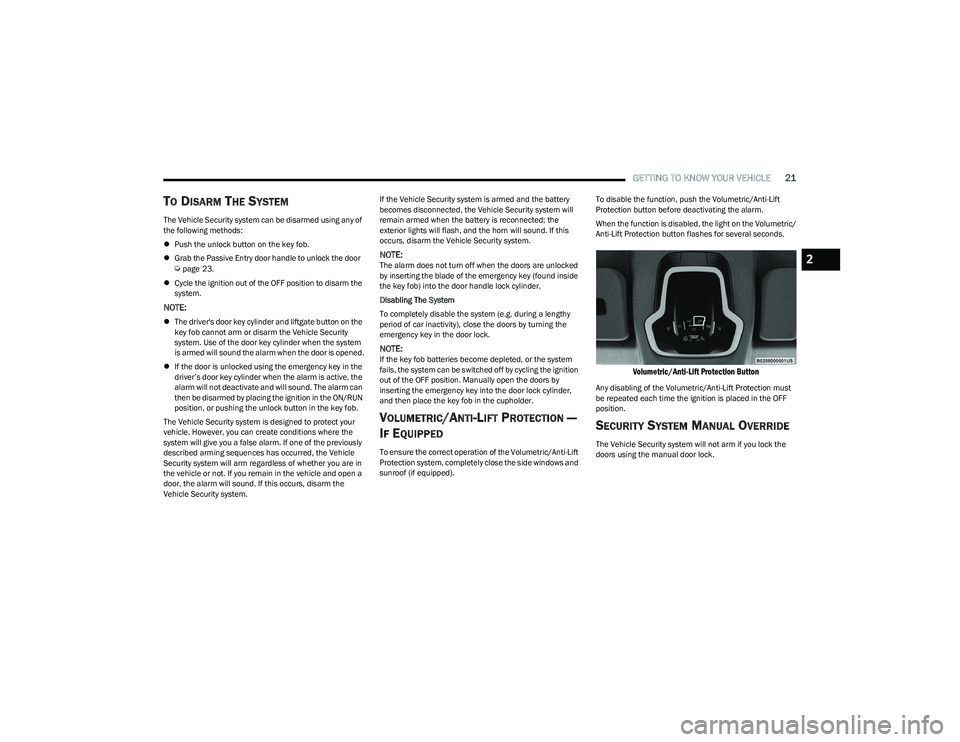
VOLUMETRIC/ANTI-LIFT PROTECTION —
I
F EQUIPPED
To ensure the correct operation of the Volumetric/Anti-Lift
Protection system, completely close the side windows and
sunroof (if equipped). To disable the function, push the Volumetric/Anti-Lift
Protection button before deactivating the alarm.
When the function is disabled, the light on the Volumetric/
Anti-Lift Protection button flashes for several seconds.
Volumetric/Anti-Lift Protection Button
Any disabling of the Volumetric/Anti-Lift Protection must
be repeated each time the ignition is placed in the OFF
position.
SECURITY SYSTEM MANUAL OVERRIDE
The Vehicle Security system will not arm if you lock the
doors using the manual door lock.
2
23_GG_OM_EN_USC_t.book Page 21
Page 26 of 288
24GETTING TO KNOW YOUR VEHICLE
To Lock The Vehicle’s Doors And Liftgate
With one of the vehicle’s Passive Entry key fobs within 5 ft
(1.5 m) of either front door handle, push the Passive Entry
lock button located on the outside door handle to lock the
vehicle doors and liftgate.
Push The Door Handle Button To Lock
NOTE:
DO NOT grab the door handle when pushing the door
handle lock button. This could unlock the door(s).
DO NOT Grab The Door Handle When Locking
NOTE:
After pushing the door handle button, you must wait
two seconds before you can lock or unlock the doors,
using either Passive Entry door handle. This is done to
allow you to check if the vehicle is locked by pulling the
door handle without the vehicle unlocking.
If Passive Entry is disabled using the Uconnect
settings, the key fob protection described in
"Frequency Operated Button Integrated Key
(FOBIK-Safe)" remains active/functional.
The Passive Entry system will not operate if the key fob
battery is depleted. To Unlock/Enter The Liftgate
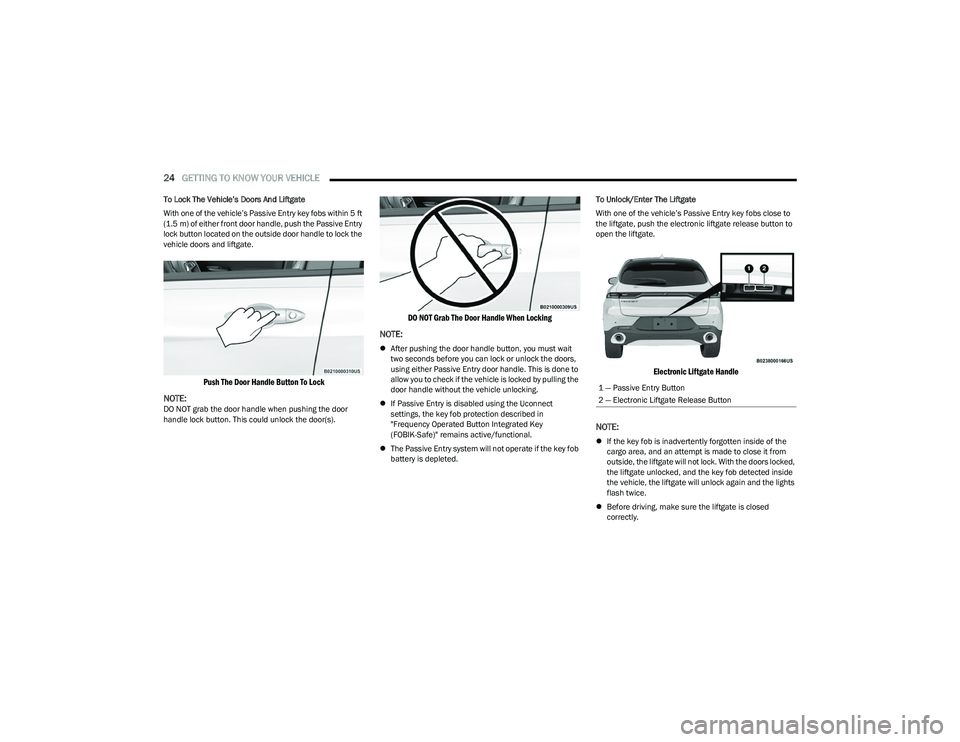
With one of the vehicle’s Passive Entry key fobs close to
the liftgate, push the electronic liftgate release button to
open the liftgate.
Electronic Liftgate Handle
NOTE:
If the key fob is inadvertently forgotten inside of the
cargo area, and an attempt is made to close it from
outside, the liftgate will not lock. With the doors locked,
the liftgate unlocked, and the key fob detected inside
the vehicle, the liftgate will unlock again and the lights
flash twice.
Before driving, make sure the liftgate is closed
correctly.
1 — Passive Entry Button
2 — Electronic Liftgate Release Button
23_GG_OM_EN_USC_t.book Page 24
Page 45 of 288
GETTING TO KNOW YOUR VEHICLE43
Overhead Light Timing
On certain models, to assist getting in and out of the
vehicle at night or in poorly-lit areas, two timed modes
have been provided.
Timing While Getting Into The Vehicle
The overhead lights turn on according to the following
modes:
Will illuminate for approximately three minutes when
the doors are unlocked.
Will illuminate for approximately three minutes when
one of the doors is opened.
Will illuminate for approximately 27 seconds when
each individual door is closed and switch off simultane -
ously when the doors are locked.
Timing is interrupted when the ignition is placed in the
ON/RUN position.
Three Modes Are Available For Turning Off Overhead
Lighting:
When all doors are closed after entering the vehicle,
the three-minute timer will stop and a seconds timer
will start for the interior lights. This timing will stop
when the ignition is placed in the ON/RUN position.
When doors are locked (either with key fob or with the
emergency key inserted in driver side door), the over -
head light turns off.
The interior lights will turn off after 15 minutes to
preserve the battery. Timing While Getting Out Of The Vehicle
After placing the ignition in the OFF position, the overhead
lights will turn on as follows:
For a few seconds after the engine stops.
For approximately three minutes when one of the doors
is opened.
For several seconds when the last door is closed.
The timing stops automatically when the doors are locked.
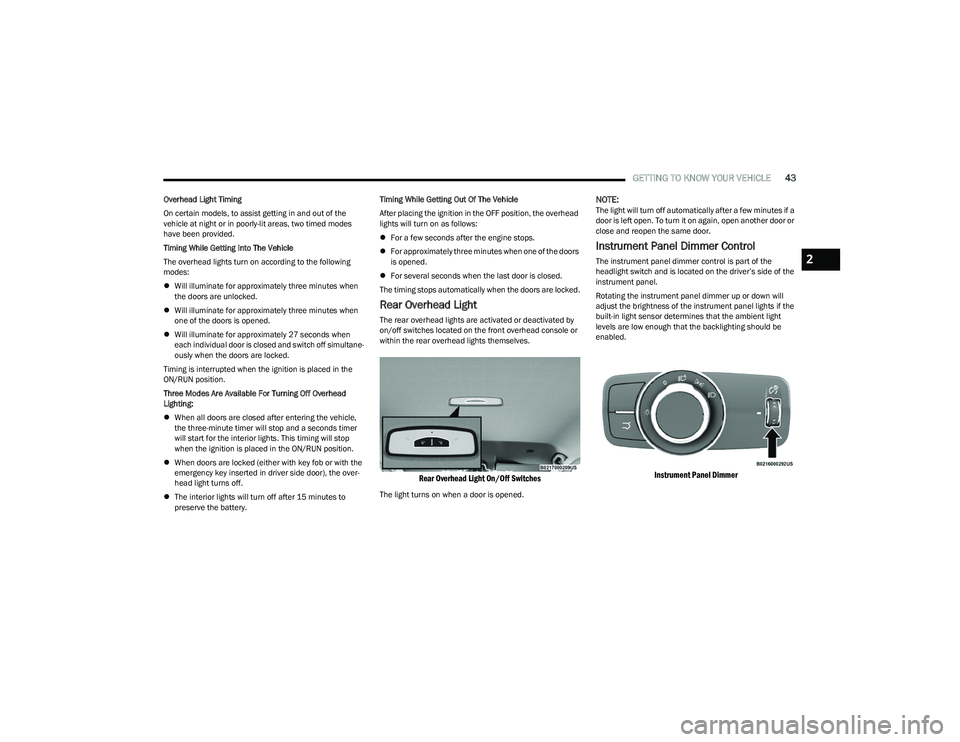
Rear Overhead Light
The rear overhead lights are activated or deactivated by
on/off switches located on the front overhead console or
within the rear overhead lights themselves.
Rear Overhead Light On/Off Switches
The light turns on when a door is opened.
NOTE:The light will turn off automatically after a few minutes if a
door is left open. To turn it on again, open another door or
close and reopen the same door.
Instrument Panel Dimmer Control
The instrument panel dimmer control is part of the
headlight switch and is located on the driver’s side of the
instrument panel.
Rotating the instrument panel dimmer up or down will
adjust the brightness of the instrument panel lights if the
built-in light sensor determines that the ambient light
levels are low enough that the backlighting should be
enabled.
Instrument Panel Dimmer
2
23_GG_OM_EN_USC_t.book Page 43
Page 55 of 288
GETTING TO KNOW YOUR VEHICLE53
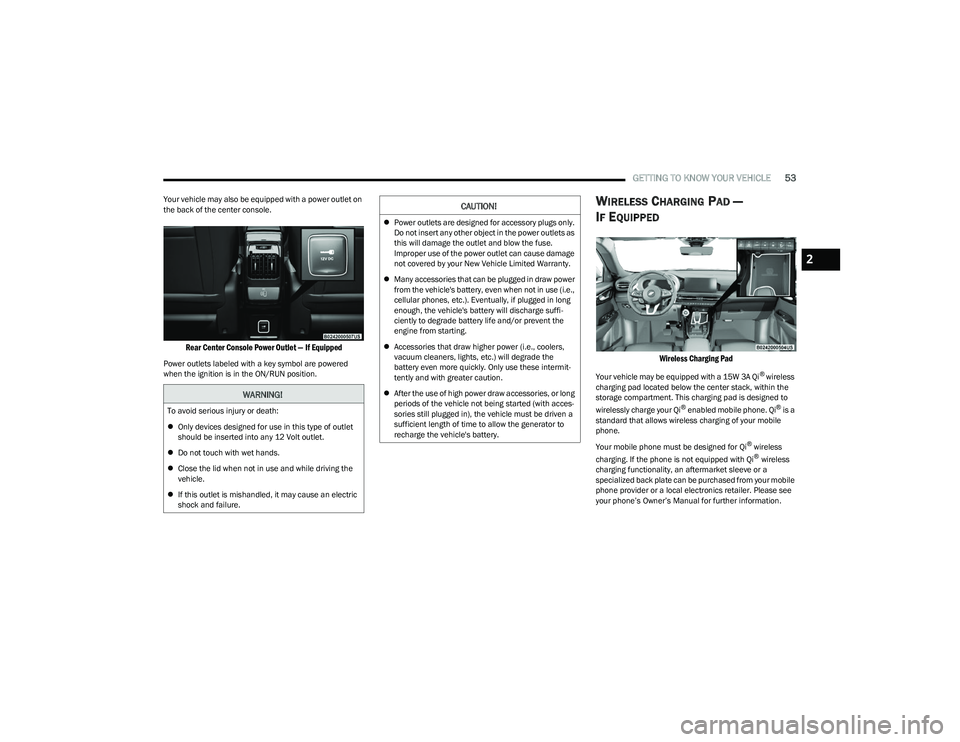
Your vehicle may also be equipped with a power outlet on
the back of the center console.
Rear Center Console Power Outlet — If Equipped
Power outlets labeled with a key symbol are powered
when the ignition is in the ON/RUN position.
WIRELESS CHARGING PAD —
I
F EQUIPPED
Wireless Charging Pad
Your vehicle may be equipped with a 15W 3A Qi® wireless
charging pad located below the center stack, within the
storage compartment. This charging pad is designed to
wirelessly charge your Qi
® enabled mobile phone. Qi® is a
standard that allows wireless charging of your mobile
phone.
Your mobile phone must be designed for Qi
® wireless
charging. If the phone is not equipped with Qi® wireless
charging functionality, an aftermarket sleeve or a
specialized back plate can be purchased from your mobile
phone provider or a local electronics retailer. Please see
your phone’s Owner’s Manual for further information.
WARNING!
To avoid serious injury or death:
Only devices designed for use in this type of outlet
should be inserted into any 12 Volt outlet.
Do not touch with wet hands.
Close the lid when not in use and while driving the
vehicle.
If this outlet is mishandled, it may cause an electric
shock and failure.
CAUTION!
Power outlets are designed for accessory plugs only.
Do not insert any other object in the power outlets as
this will damage the outlet and blow the fuse.
Improper use of the power outlet can cause damage
not covered by your New Vehicle Limited Warranty.
Many accessories that can be plugged in draw power
from the vehicle's battery, even when not in use (i.e.,
cellular phones, etc.). Eventually, if plugged in long
enough, the vehicle's battery will discharge suffi -
ciently to degrade battery life and/or prevent the
engine from starting.
Accessories that draw higher power (i.e., coolers,
vacuum cleaners, lights, etc.) will degrade the
battery even more quickly. Only use these intermit -
tently and with greater caution.
After the use of high power draw accessories, or long
periods of the vehicle not being started (with acces -
sories still plugged in), the vehicle must be driven a
sufficient length of time to allow the generator to
recharge the vehicle's battery.
2
23_GG_OM_EN_USC_t.book Page 53