check engine DODGE NEON 2000 Service Manual PDF
[x] Cancel search | Manufacturer: DODGE, Model Year: 2000, Model line: NEON, Model: DODGE NEON 2000Pages: 1285, PDF Size: 29.42 MB
Page 737 of 1285
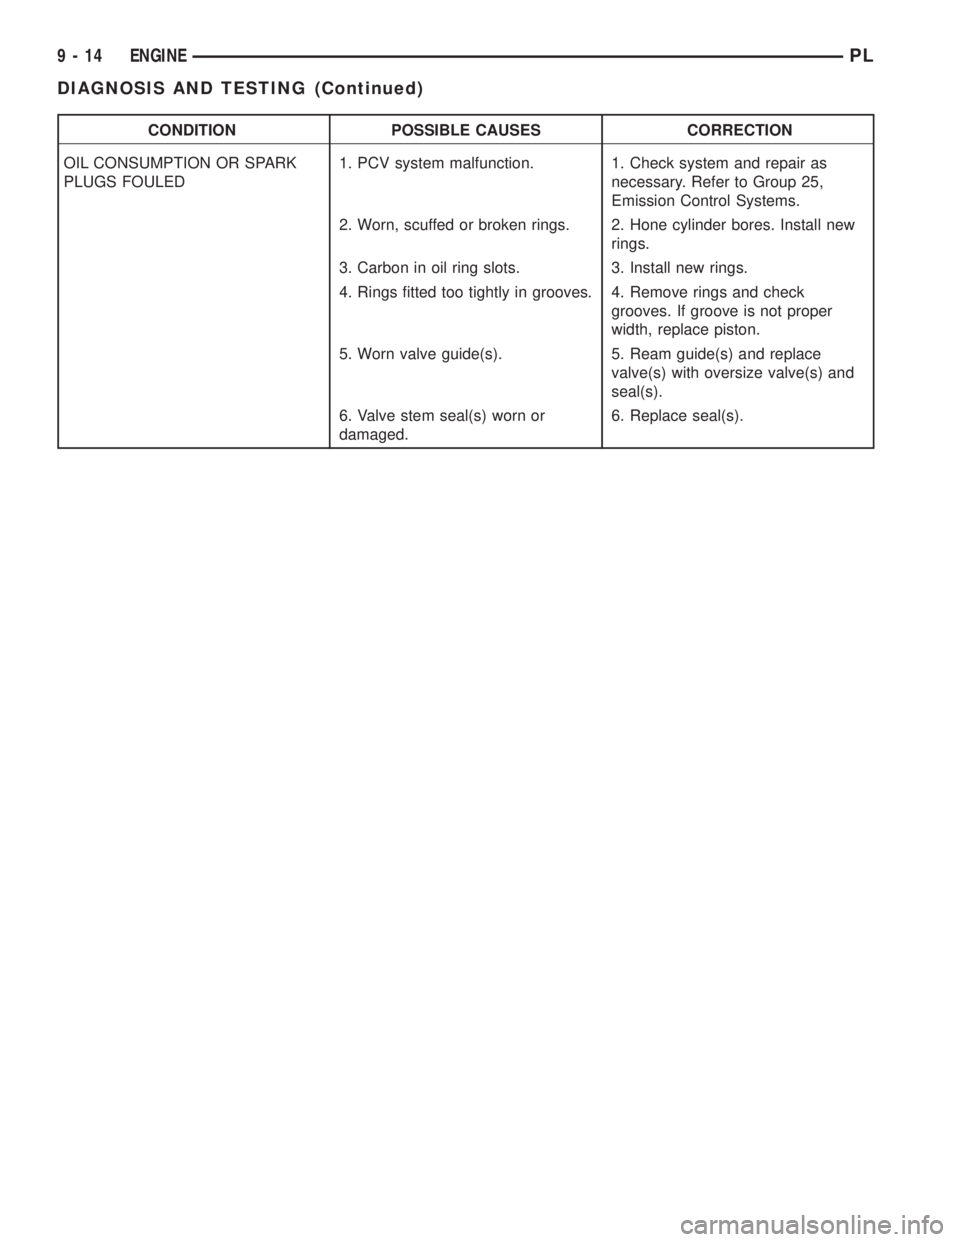
CONDITION POSSIBLE CAUSES CORRECTION
OIL CONSUMPTION OR SPARK
PLUGS FOULED1. PCV system malfunction. 1. Check system and repair as
necessary. Refer to Group 25,
Emission Control Systems.
2. Worn, scuffed or broken rings. 2. Hone cylinder bores. Install new
rings.
3. Carbon in oil ring slots. 3. Install new rings.
4. Rings fitted too tightly in grooves. 4. Remove rings and check
grooves. If groove is not proper
width, replace piston.
5. Worn valve guide(s). 5. Ream guide(s) and replace
valve(s) with oversize valve(s) and
seal(s).
6. Valve stem seal(s) worn or
damaged.6. Replace seal(s).
9 - 14 ENGINEPL
DIAGNOSIS AND TESTING (Continued)
Page 738 of 1285
2.0L SOHC ENGINE
TABLE OF CONTENTS
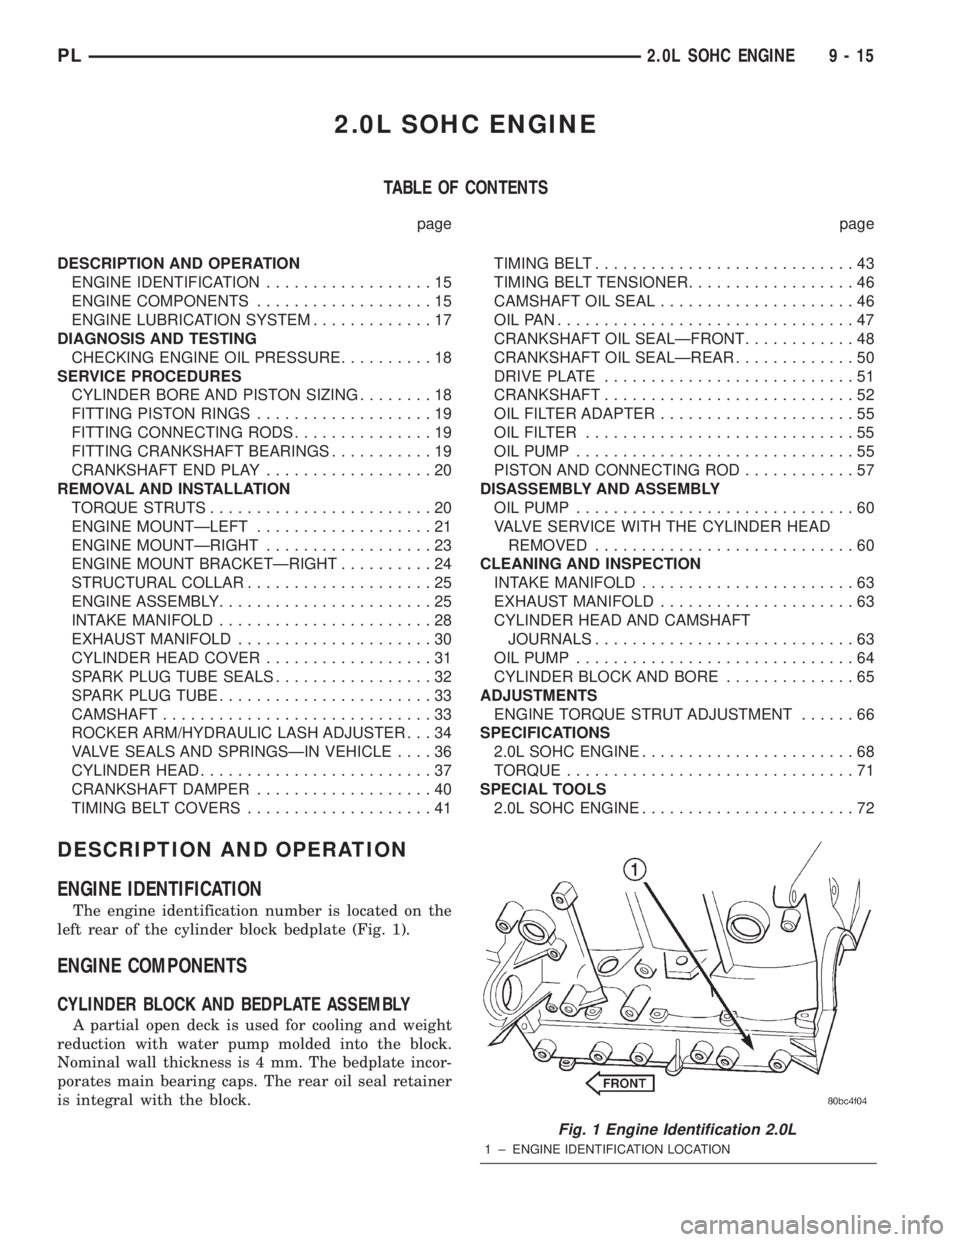
page page
DESCRIPTION AND OPERATION
ENGINE IDENTIFICATION..................15
ENGINE COMPONENTS...................15
ENGINE LUBRICATION SYSTEM.............17
DIAGNOSIS AND TESTING
CHECKING ENGINE OIL PRESSURE..........18
SERVICE PROCEDURES
CYLINDER BORE AND PISTON SIZING........18
FITTING PISTON RINGS...................19
FITTING CONNECTING RODS...............19
FITTING CRANKSHAFT BEARINGS...........19
CRANKSHAFT END PLAY..................20
REMOVAL AND INSTALLATION
TORQUE STRUTS........................20
ENGINE MOUNTÐLEFT...................21
ENGINE MOUNTÐRIGHT..................23
ENGINE MOUNT BRACKETÐRIGHT..........24
STRUCTURAL COLLAR....................25
ENGINE ASSEMBLY.......................25
INTAKE MANIFOLD.......................28
EXHAUST MANIFOLD.....................30
CYLINDER HEAD COVER..................31
SPARK PLUG TUBE SEALS.................32
SPARK PLUG TUBE.......................33
CAMSHAFT.............................33
ROCKER ARM/HYDRAULIC LASH ADJUSTER . . . 34
VALVE SEALS AND SPRINGSÐIN VEHICLE....36
CYLINDER HEAD.........................37
CRANKSHAFT DAMPER...................40
TIMING BELT COVERS....................41TIMING BELT............................43
TIMING BELT TENSIONER..................46
CAMSHAFT OIL SEAL.....................46
OILPAN................................47
CRANKSHAFT OIL SEALÐFRONT............48
CRANKSHAFT OIL SEALÐREAR.............50
DRIVE PLATE...........................51
CRANKSHAFT...........................52
OIL FILTER ADAPTER.....................55
OILFILTER .............................55
OIL PUMP..............................55
PISTON AND CONNECTING ROD............57
DISASSEMBLY AND ASSEMBLY
OIL PUMP..............................60
VALVE SERVICE WITH THE CYLINDER HEAD
REMOVED............................60
CLEANING AND INSPECTION
INTAKE MANIFOLD.......................63
EXHAUST MANIFOLD.....................63
CYLINDER HEAD AND CAMSHAFT
JOURNALS............................63
OIL PUMP..............................64
CYLINDER BLOCK AND BORE..............65
ADJUSTMENTS
ENGINE TORQUE STRUT ADJUSTMENT......66
SPECIFICATIONS
2.0L SOHC ENGINE.......................68
TORQUE...............................71
SPECIAL TOOLS
2.0L SOHC ENGINE.......................72
DESCRIPTION AND OPERATION
ENGINE IDENTIFICATION
The engine identification number is located on the
left rear of the cylinder block bedplate (Fig. 1).
ENGINE COMPONENTS
CYLINDER BLOCK AND BEDPLATE ASSEMBLY
A partial open deck is used for cooling and weight
reduction with water pump molded into the block.
Nominal wall thickness is 4 mm. The bedplate incor-
porates main bearing caps. The rear oil seal retainer
is integral with the block.
Fig. 1 Engine Identification 2.0L
1 ± ENGINE IDENTIFICATION LOCATION
PL2.0L SOHC ENGINE 9 - 15
Page 741 of 1285
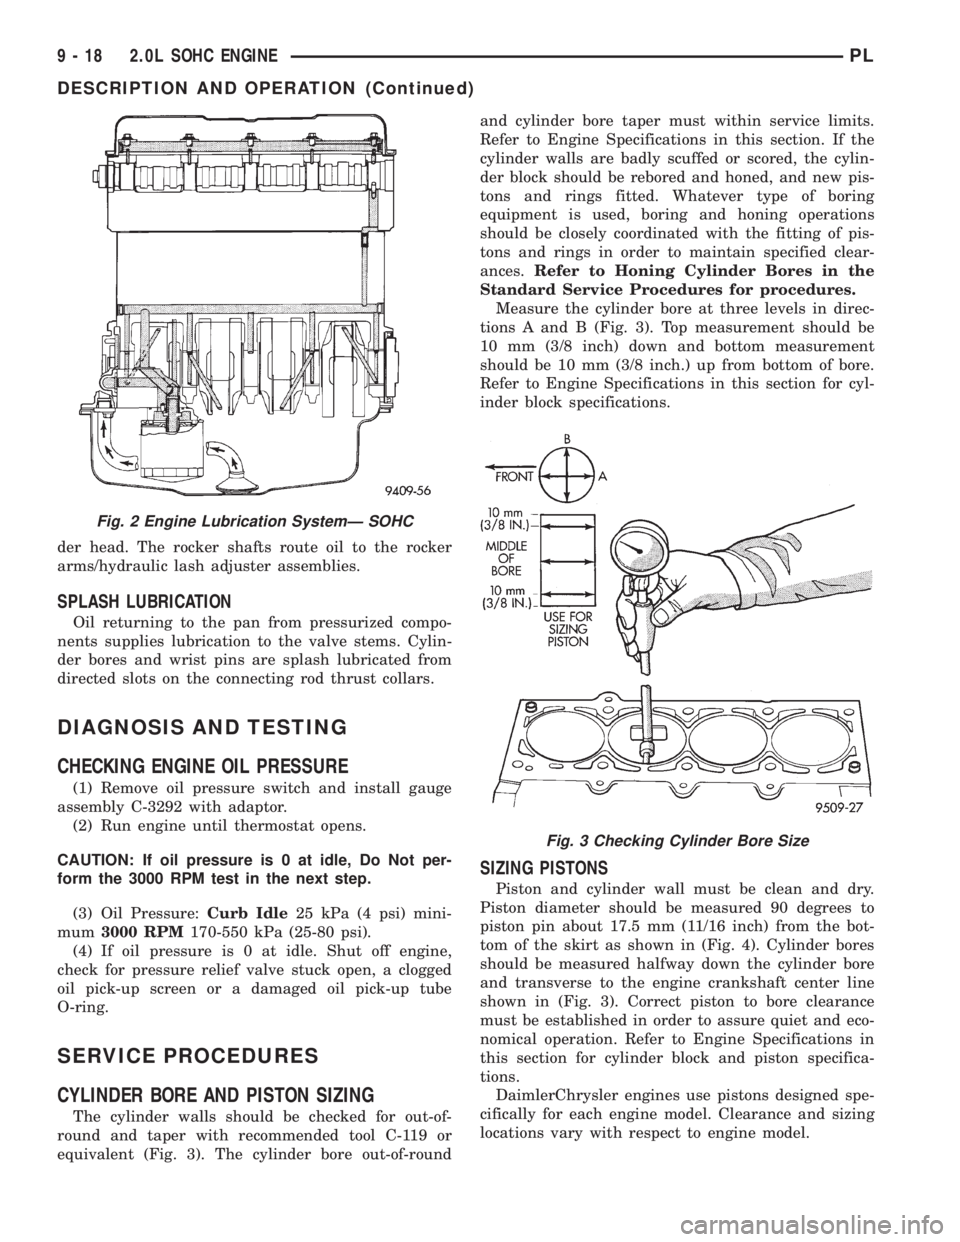
der head. The rocker shafts route oil to the rocker
arms/hydraulic lash adjuster assemblies.
SPLASH LUBRICATION
Oil returning to the pan from pressurized compo-
nents supplies lubrication to the valve stems. Cylin-
der bores and wrist pins are splash lubricated from
directed slots on the connecting rod thrust collars.
DIAGNOSIS AND TESTING
CHECKING ENGINE OIL PRESSURE
(1) Remove oil pressure switch and install gauge
assembly C-3292 with adaptor.
(2) Run engine until thermostat opens.
CAUTION: If oil pressure is 0 at idle, Do Not per-
form the 3000 RPM test in the next step.
(3) Oil Pressure:Curb Idle25 kPa (4 psi) mini-
mum3000 RPM170-550 kPa (25-80 psi).
(4) If oil pressure is 0 at idle. Shut off engine,
check for pressure relief valve stuck open, a clogged
oil pick-up screen or a damaged oil pick-up tube
O-ring.
SERVICE PROCEDURES
CYLINDER BORE AND PISTON SIZING
The cylinder walls should be checked for out-of-
round and taper with recommended tool C-119 or
equivalent (Fig. 3). The cylinder bore out-of-roundand cylinder bore taper must within service limits.
Refer to Engine Specifications in this section. If the
cylinder walls are badly scuffed or scored, the cylin-
der block should be rebored and honed, and new pis-
tons and rings fitted. Whatever type of boring
equipment is used, boring and honing operations
should be closely coordinated with the fitting of pis-
tons and rings in order to maintain specified clear-
ances.Refer to Honing Cylinder Bores in the
Standard Service Procedures for procedures.
Measure the cylinder bore at three levels in direc-
tions A and B (Fig. 3). Top measurement should be
10 mm (3/8 inch) down and bottom measurement
should be 10 mm (3/8 inch.) up from bottom of bore.
Refer to Engine Specifications in this section for cyl-
inder block specifications.
SIZING PISTONS
Piston and cylinder wall must be clean and dry.
Piston diameter should be measured 90 degrees to
piston pin about 17.5 mm (11/16 inch) from the bot-
tom of the skirt as shown in (Fig. 4). Cylinder bores
should be measured halfway down the cylinder bore
and transverse to the engine crankshaft center line
shown in (Fig. 3). Correct piston to bore clearance
must be established in order to assure quiet and eco-
nomical operation. Refer to Engine Specifications in
this section for cylinder block and piston specifica-
tions.
DaimlerChrysler engines use pistons designed spe-
cifically for each engine model. Clearance and sizing
locations vary with respect to engine model.
Fig. 2 Engine Lubrication SystemÐ SOHC
Fig. 3 Checking Cylinder Bore Size
9 - 18 2.0L SOHC ENGINEPL
DESCRIPTION AND OPERATION (Continued)
Page 742 of 1285
NOTE: Pistons and cylinder bores should be mea-
sured at normal room temperature, 21ÉC (70ÉF).
FITTING PISTON RINGS
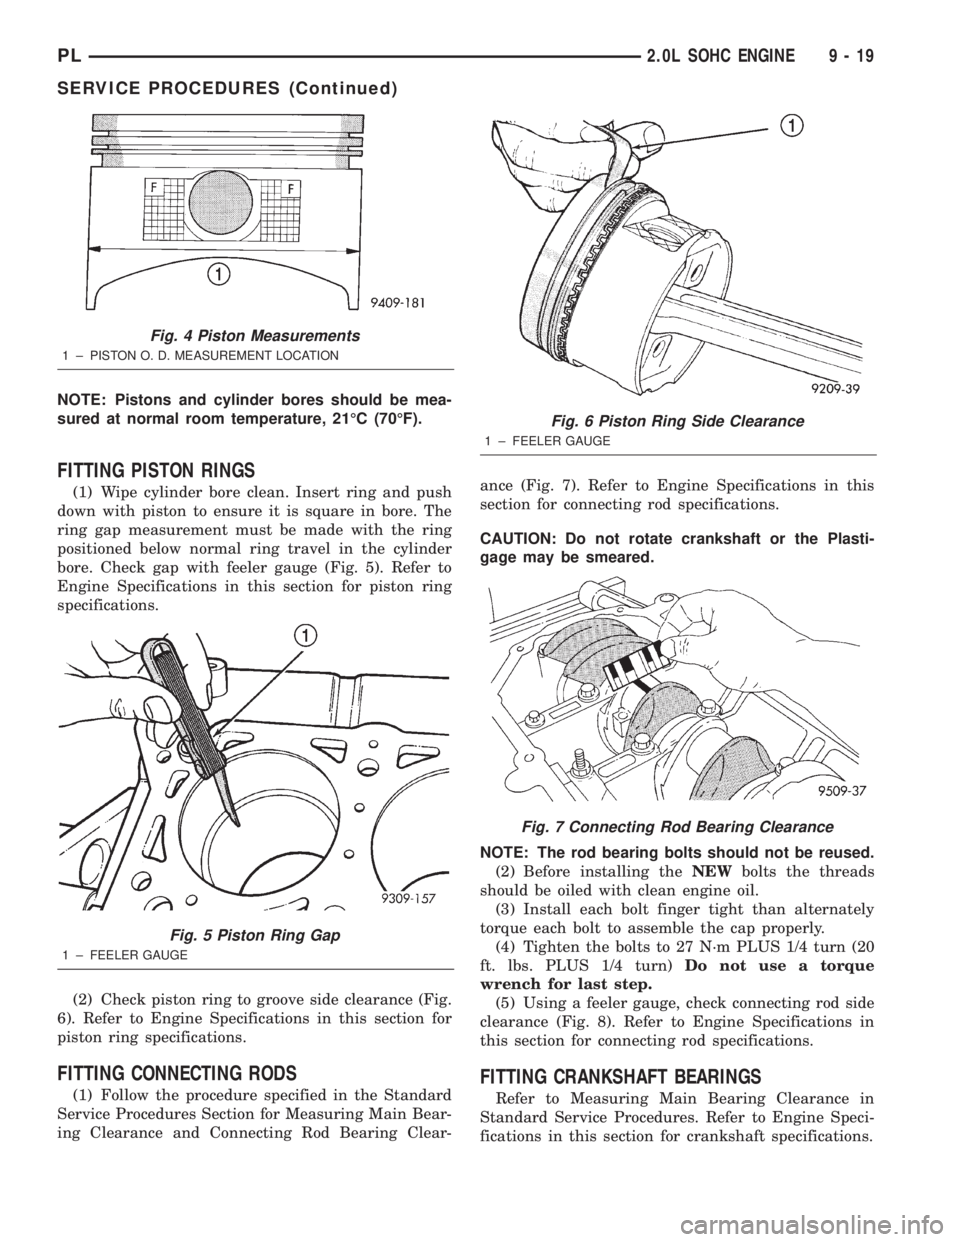
(1) Wipe cylinder bore clean. Insert ring and push
down with piston to ensure it is square in bore. The
ring gap measurement must be made with the ring
positioned below normal ring travel in the cylinder
bore. Check gap with feeler gauge (Fig. 5). Refer to
Engine Specifications in this section for piston ring
specifications.
(2) Check piston ring to groove side clearance (Fig.
6). Refer to Engine Specifications in this section for
piston ring specifications.
FITTING CONNECTING RODS
(1) Follow the procedure specified in the Standard
Service Procedures Section for Measuring Main Bear-
ing Clearance and Connecting Rod Bearing Clear-ance (Fig. 7). Refer to Engine Specifications in this
section for connecting rod specifications.
CAUTION: Do not rotate crankshaft or the Plasti-
gage may be smeared.
NOTE: The rod bearing bolts should not be reused.
(2) Before installing theNEWbolts the threads
should be oiled with clean engine oil.
(3) Install each bolt finger tight than alternately
torque each bolt to assemble the cap properly.
(4) Tighten the bolts to 27 N´m PLUS 1/4 turn (20
ft. lbs. PLUS 1/4 turn)Do not use a torque
wrench for last step.
(5) Using a feeler gauge, check connecting rod side
clearance (Fig. 8). Refer to Engine Specifications in
this section for connecting rod specifications.
FITTING CRANKSHAFT BEARINGS
Refer to Measuring Main Bearing Clearance in
Standard Service Procedures. Refer to Engine Speci-
fications in this section for crankshaft specifications.
Fig. 4 Piston Measurements
1 ± PISTON O. D. MEASUREMENT LOCATION
Fig. 5 Piston Ring Gap
1 ± FEELER GAUGE
Fig. 6 Piston Ring Side Clearance
1 ± FEELER GAUGE
Fig. 7 Connecting Rod Bearing Clearance
PL2.0L SOHC ENGINE 9 - 19
SERVICE PROCEDURES (Continued)
Page 743 of 1285
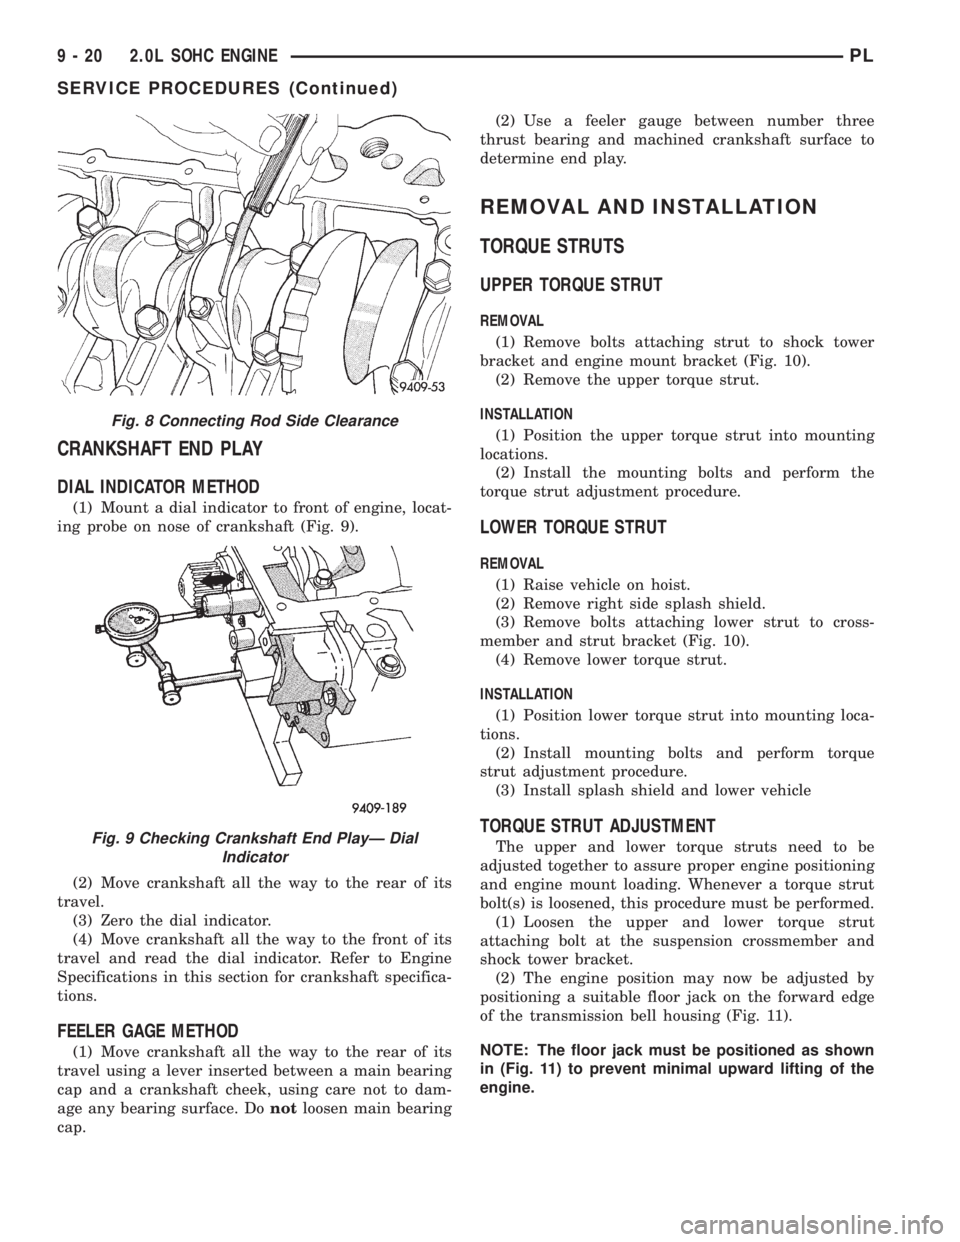
CRANKSHAFT END PLAY
DIAL INDICATOR METHOD
(1) Mount a dial indicator to front of engine, locat-
ing probe on nose of crankshaft (Fig. 9).
(2) Move crankshaft all the way to the rear of its
travel.
(3) Zero the dial indicator.
(4) Move crankshaft all the way to the front of its
travel and read the dial indicator. Refer to Engine
Specifications in this section for crankshaft specifica-
tions.
FEELER GAGE METHOD
(1) Move crankshaft all the way to the rear of its
travel using a lever inserted between a main bearing
cap and a crankshaft cheek, using care not to dam-
age any bearing surface. Donotloosen main bearing
cap.(2) Use a feeler gauge between number three
thrust bearing and machined crankshaft surface to
determine end play.
REMOVAL AND INSTALLATION
TORQUE STRUTS
UPPER TORQUE STRUT
REMOVAL
(1) Remove bolts attaching strut to shock tower
bracket and engine mount bracket (Fig. 10).
(2) Remove the upper torque strut.
INSTALLATION
(1) Position the upper torque strut into mounting
locations.
(2) Install the mounting bolts and perform the
torque strut adjustment procedure.
LOWER TORQUE STRUT
REMOVAL
(1) Raise vehicle on hoist.
(2) Remove right side splash shield.
(3) Remove bolts attaching lower strut to cross-
member and strut bracket (Fig. 10).
(4) Remove lower torque strut.
INSTALLATION
(1) Position lower torque strut into mounting loca-
tions.
(2) Install mounting bolts and perform torque
strut adjustment procedure.
(3) Install splash shield and lower vehicle
TORQUE STRUT ADJUSTMENT
The upper and lower torque struts need to be
adjusted together to assure proper engine positioning
and engine mount loading. Whenever a torque strut
bolt(s) is loosened, this procedure must be performed.
(1) Loosen the upper and lower torque strut
attaching bolt at the suspension crossmember and
shock tower bracket.
(2) The engine position may now be adjusted by
positioning a suitable floor jack on the forward edge
of the transmission bell housing (Fig. 11).
NOTE: The floor jack must be positioned as shown
in (Fig. 11) to prevent minimal upward lifting of the
engine.
Fig. 8 Connecting Rod Side Clearance
Fig. 9 Checking Crankshaft End PlayÐ Dial
Indicator
9 - 20 2.0L SOHC ENGINEPL
SERVICE PROCEDURES (Continued)
Page 752 of 1285
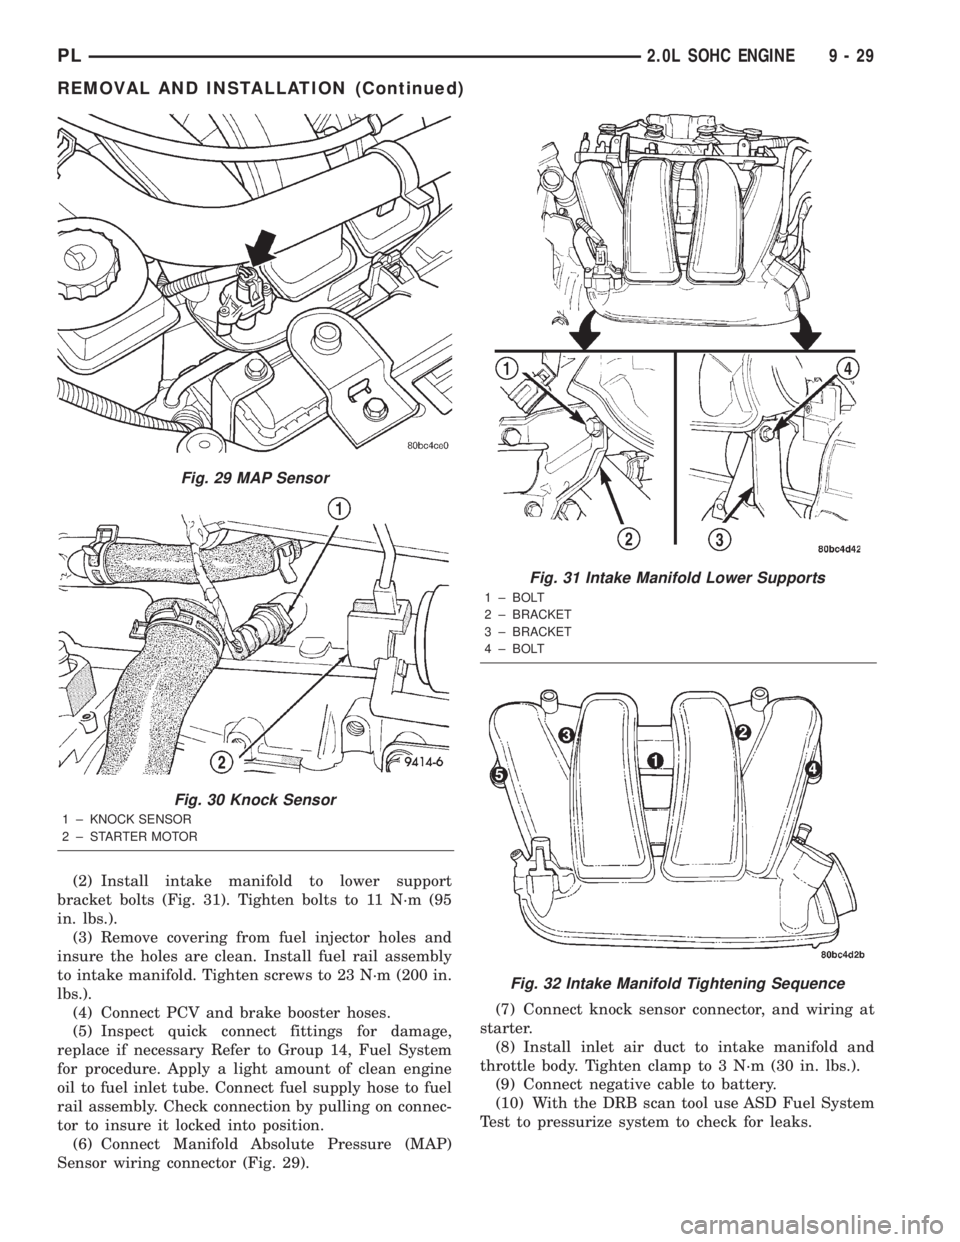
(2) Install intake manifold to lower support
bracket bolts (Fig. 31). Tighten bolts to 11 N´m (95
in. lbs.).
(3) Remove covering from fuel injector holes and
insure the holes are clean. Install fuel rail assembly
to intake manifold. Tighten screws to 23 N´m (200 in.
lbs.).
(4) Connect PCV and brake booster hoses.
(5) Inspect quick connect fittings for damage,
replace if necessary Refer to Group 14, Fuel System
for procedure. Apply a light amount of clean engine
oil to fuel inlet tube. Connect fuel supply hose to fuel
rail assembly. Check connection by pulling on connec-
tor to insure it locked into position.
(6) Connect Manifold Absolute Pressure (MAP)
Sensor wiring connector (Fig. 29).(7) Connect knock sensor connector, and wiring at
starter.
(8) Install inlet air duct to intake manifold and
throttle body. Tighten clamp to 3 N´m (30 in. lbs.).
(9) Connect negative cable to battery.
(10) With the DRB scan tool use ASD Fuel System
Test to pressurize system to check for leaks.
Fig. 29 MAP Sensor
Fig. 30 Knock Sensor
1 ± KNOCK SENSOR
2 ± STARTER MOTOR
Fig. 31 Intake Manifold Lower Supports
1 ± BOLT
2 ± BRACKET
3 ± BRACKET
4 ± BOLT
Fig. 32 Intake Manifold Tightening Sequence
PL2.0L SOHC ENGINE 9 - 29
REMOVAL AND INSTALLATION (Continued)
Page 757 of 1285
INSPECT CYLINDER HEAD FOR THE FOLLOWING:
NOTE:
²Check oil feed holes for blockage.
²Inspect cylinder head camshaft bearings for
wear, Refer to Cylinder Head, Inspection and Clean-
ing.
²Check camshaft bearing journals for scratches
and worn areas. If light scratches are present, they
may be removed with 400 grit sand paper. If deep
scratches are present, replace the camshaft and
check the cylinder head for damage. Replace the
cylinder head if worn or damaged. Check the lobes
for pitting and wear. If the lobes show signs of
wear, check the corresponding rocker arm roller for
wear or damage. Replace rocker arm/hydraulic lash
adjuster if worn or damaged. If lobes show signs of
pitting on the nose, flank or base circle; replace the
camshaft.
INSTALLATION
(1) Lubricate the camshaft journals with oil and
install camshaftwithoutrocker arm assemblies
installed.
(2) Install camshaft target magnet into the end of
the camshaft. Tighten mounting screw to 3.4 N´m (30
in. lbs.).
(3) Install camshaft position sensor and tighten
mounting screws to 9 N´m (80 in. lbs.).
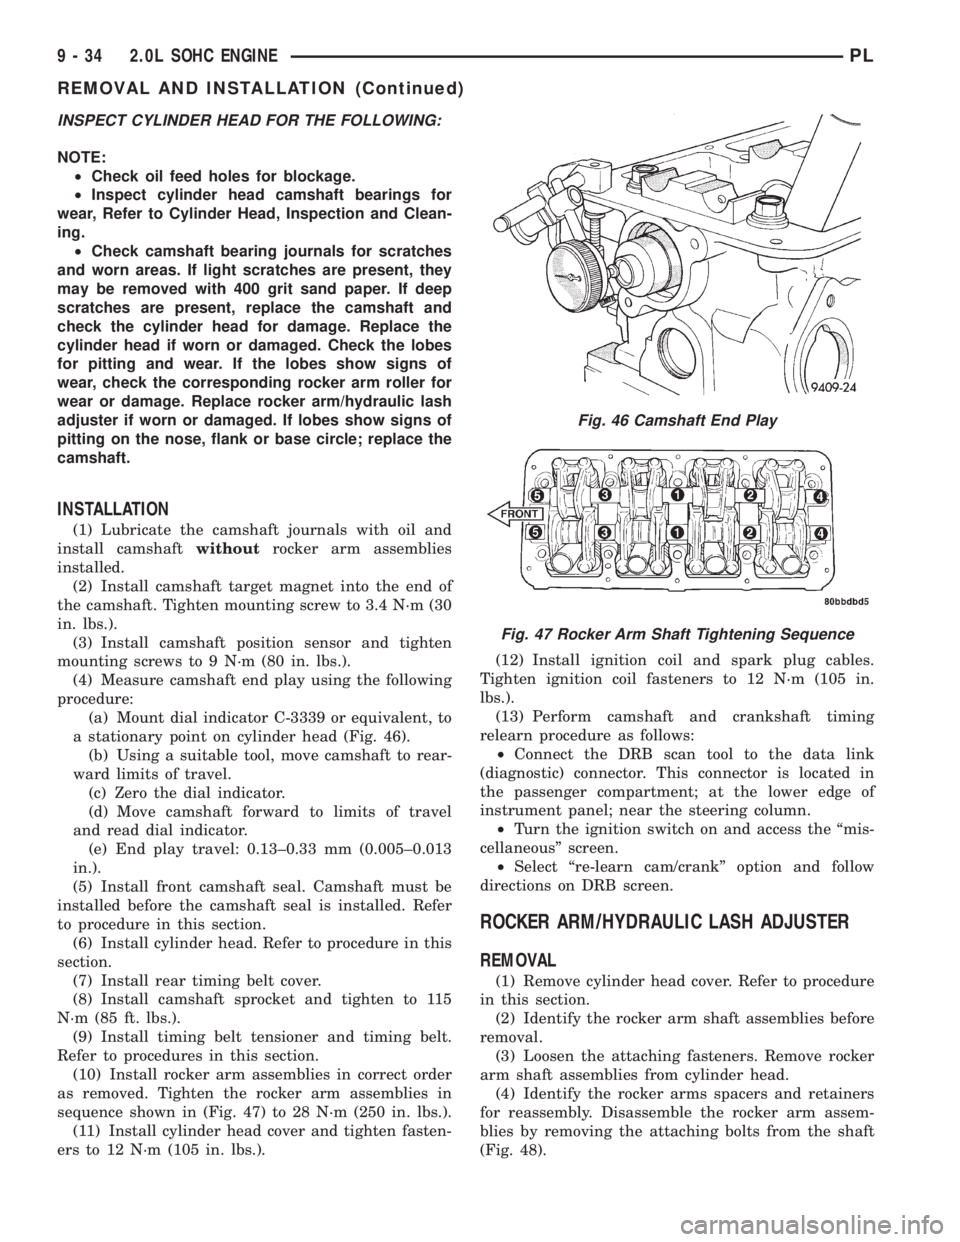
(4) Measure camshaft end play using the following
procedure:
(a) Mount dial indicator C-3339 or equivalent, to
a stationary point on cylinder head (Fig. 46).
(b) Using a suitable tool, move camshaft to rear-
ward limits of travel.
(c) Zero the dial indicator.
(d) Move camshaft forward to limits of travel
and read dial indicator.
(e) End play travel: 0.13±0.33 mm (0.005±0.013
in.).
(5) Install front camshaft seal. Camshaft must be
installed before the camshaft seal is installed. Refer
to procedure in this section.
(6) Install cylinder head. Refer to procedure in this
section.
(7) Install rear timing belt cover.
(8) Install camshaft sprocket and tighten to 115
N´m (85 ft. lbs.).
(9) Install timing belt tensioner and timing belt.
Refer to procedures in this section.
(10) Install rocker arm assemblies in correct order
as removed. Tighten the rocker arm assemblies in
sequence shown in (Fig. 47) to 28 N´m (250 in. lbs.).
(11) Install cylinder head cover and tighten fasten-
ers to 12 N´m (105 in. lbs.).(12) Install ignition coil and spark plug cables.
Tighten ignition coil fasteners to 12 N´m (105 in.
lbs.).
(13) Perform camshaft and crankshaft timing
relearn procedure as follows:
²Connect the DRB scan tool to the data link
(diagnostic) connector. This connector is located in
the passenger compartment; at the lower edge of
instrument panel; near the steering column.
²Turn the ignition switch on and access the ªmis-
cellaneousº screen.
²Select ªre-learn cam/crankº option and follow
directions on DRB screen.
ROCKER ARM/HYDRAULIC LASH ADJUSTER
REMOVAL
(1) Remove cylinder head cover. Refer to procedure
in this section.
(2) Identify the rocker arm shaft assemblies before
removal.
(3) Loosen the attaching fasteners. Remove rocker
arm shaft assemblies from cylinder head.
(4) Identify the rocker arms spacers and retainers
for reassembly. Disassemble the rocker arm assem-
blies by removing the attaching bolts from the shaft
(Fig. 48).
Fig. 46 Camshaft End Play
Fig. 47 Rocker Arm Shaft Tightening Sequence
9 - 34 2.0L SOHC ENGINEPL
REMOVAL AND INSTALLATION (Continued)
Page 758 of 1285
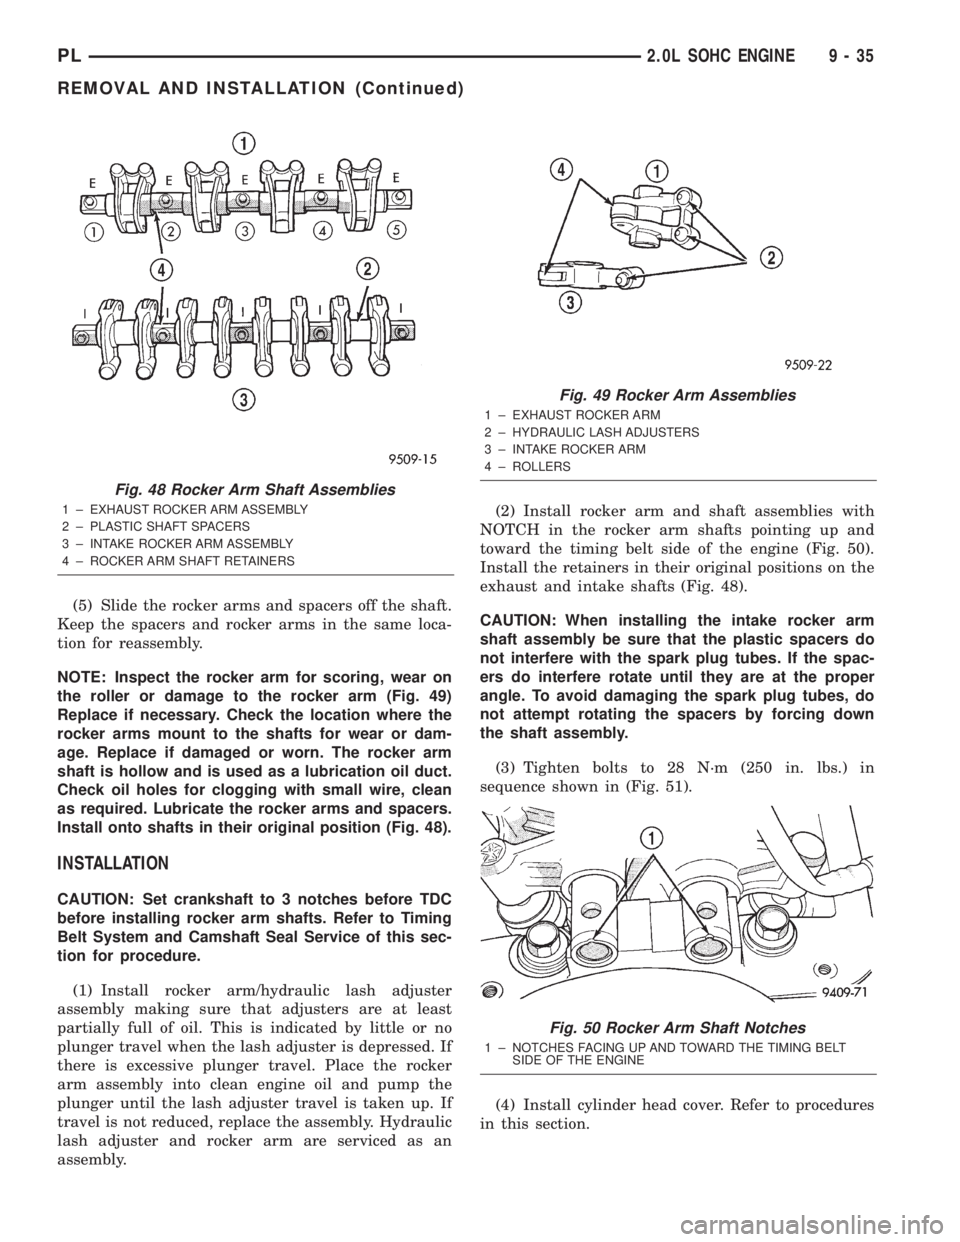
(5) Slide the rocker arms and spacers off the shaft.
Keep the spacers and rocker arms in the same loca-
tion for reassembly.
NOTE: Inspect the rocker arm for scoring, wear on
the roller or damage to the rocker arm (Fig. 49)
Replace if necessary. Check the location where the
rocker arms mount to the shafts for wear or dam-
age. Replace if damaged or worn. The rocker arm
shaft is hollow and is used as a lubrication oil duct.
Check oil holes for clogging with small wire, clean
as required. Lubricate the rocker arms and spacers.
Install onto shafts in their original position (Fig. 48).
INSTALLATION
CAUTION: Set crankshaft to 3 notches before TDC
before installing rocker arm shafts. Refer to Timing
Belt System and Camshaft Seal Service of this sec-
tion for procedure.
(1) Install rocker arm/hydraulic lash adjuster
assembly making sure that adjusters are at least
partially full of oil. This is indicated by little or no
plunger travel when the lash adjuster is depressed. If
there is excessive plunger travel. Place the rocker
arm assembly into clean engine oil and pump the
plunger until the lash adjuster travel is taken up. If
travel is not reduced, replace the assembly. Hydraulic
lash adjuster and rocker arm are serviced as an
assembly.(2) Install rocker arm and shaft assemblies with
NOTCH in the rocker arm shafts pointing up and
toward the timing belt side of the engine (Fig. 50).
Install the retainers in their original positions on the
exhaust and intake shafts (Fig. 48).
CAUTION: When installing the intake rocker arm
shaft assembly be sure that the plastic spacers do
not interfere with the spark plug tubes. If the spac-
ers do interfere rotate until they are at the proper
angle. To avoid damaging the spark plug tubes, do
not attempt rotating the spacers by forcing down
the shaft assembly.
(3) Tighten bolts to 28 N´m (250 in. lbs.) in
sequence shown in (Fig. 51).
(4) Install cylinder head cover. Refer to procedures
in this section.
Fig. 48 Rocker Arm Shaft Assemblies
1 ± EXHAUST ROCKER ARM ASSEMBLY
2 ± PLASTIC SHAFT SPACERS
3 ± INTAKE ROCKER ARM ASSEMBLY
4 ± ROCKER ARM SHAFT RETAINERS
Fig. 49 Rocker Arm Assemblies
1 ± EXHAUST ROCKER ARM
2 ± HYDRAULIC LASH ADJUSTERS
3 ± INTAKE ROCKER ARM
4 ± ROLLERS
Fig. 50 Rocker Arm Shaft Notches
1 ± NOTCHES FACING UP AND TOWARD THE TIMING BELT
SIDE OF THE ENGINE
PL2.0L SOHC ENGINE 9 - 35
REMOVAL AND INSTALLATION (Continued)
Page 761 of 1285
NOTE: Inspect camshaft bearing journals for scor-
ing. Cylinder head must be flat within 0.1 mm (0.004
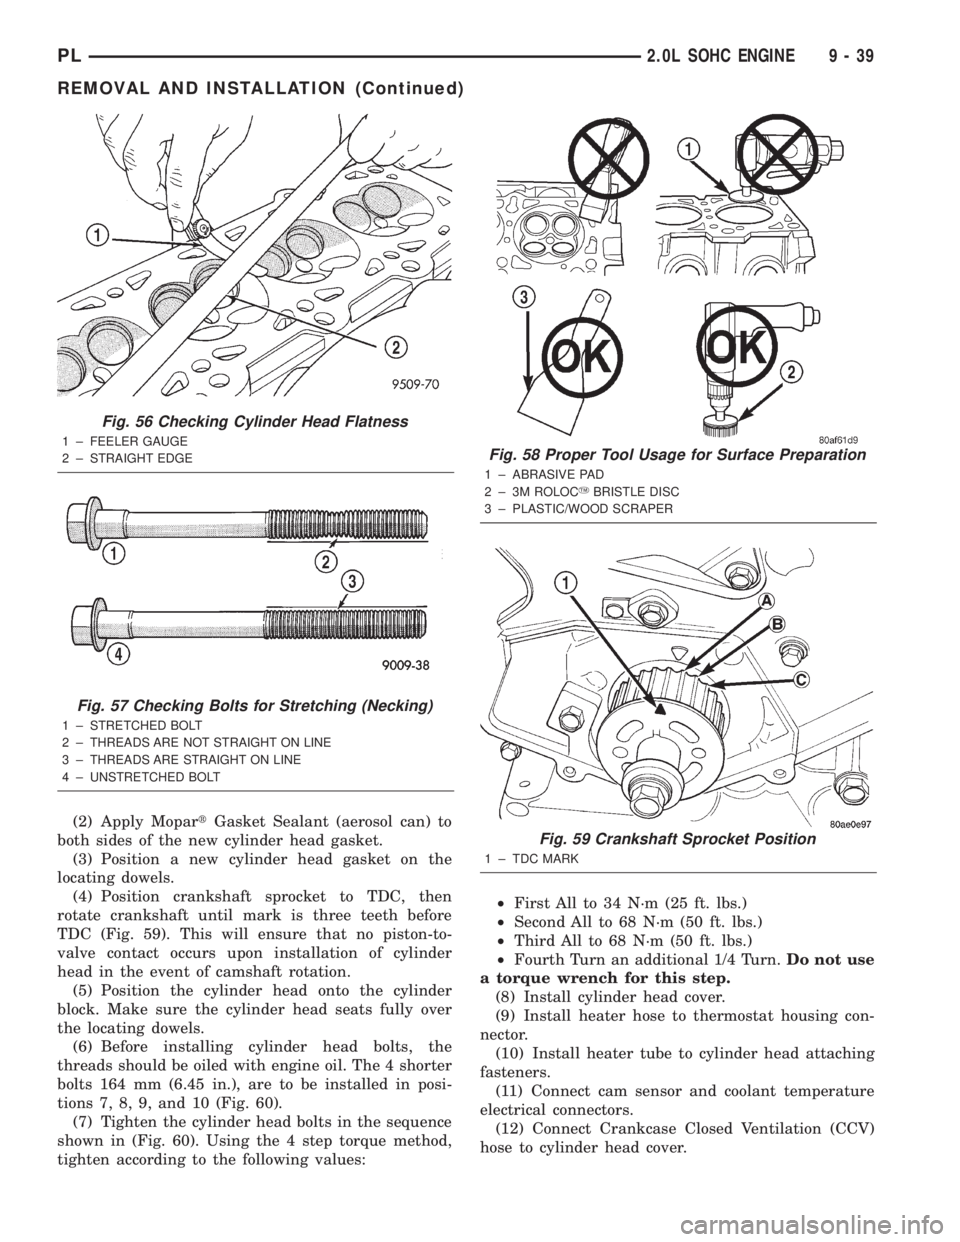
inch) (Fig. 56).
INSTALLATION
EXAMINING CYLINDER HEAD BOLTS
NOTE: The cylinder head bolts should be examined
BEFORE reuse. If the threads are necked down, the
bolt(s) should be replaced (Fig. 57).
Necking can be checked by holding a scale or
straight edge against the threads. If all the threads
do not contact the scale, the bolt(s) should be
replaced.CLEANING CYLINDER HEAD SEALING SURFACES
CAUTION: When cleaning cylinder head and cylin-
der block surfaces, DO NOT use a metal scraper.
Sealing surfaces could be cut or ground, resulting
in gasket leaks. Use only the cleaning methods
shown in (Fig. 58). If required, use a white (120 grit)
3M RolocYbristle disk on aluminum surfaces. A
yellow (80 grit) bristle disk can be used on cast iron
surfaces with care.
(1) Clean the cylinder head and cylinder block
sealing surfaces using a wood/plastic scraper. Apply
solvent or a commercially available gasket remover
to help soften the gasket residue. If additional clean-
ing is required, use a white (120 grit) 3M Rolocy
bristle disk and a drill motor to remove gasket resi-
due.
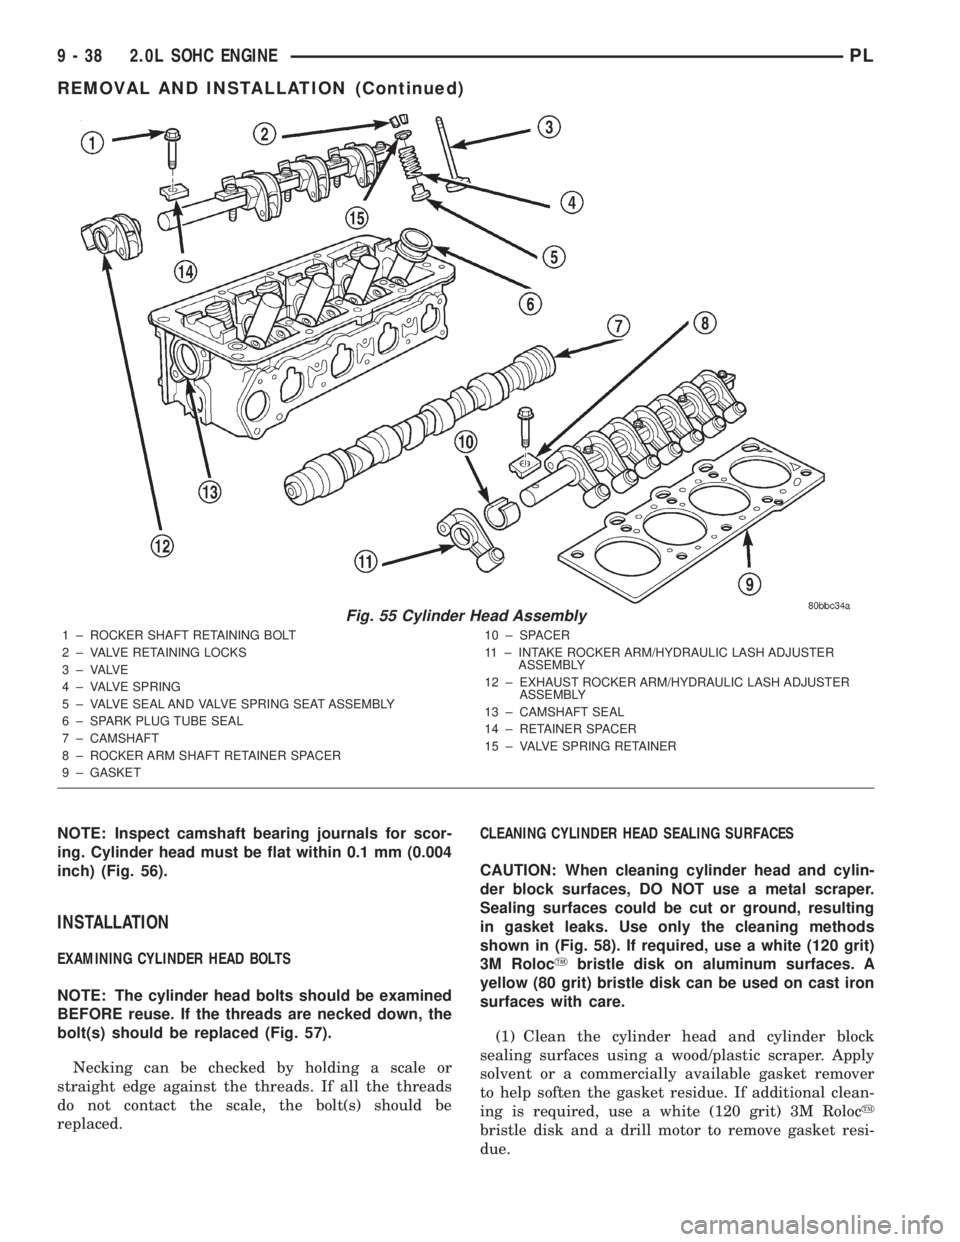
Fig. 55 Cylinder Head Assembly
1 ± ROCKER SHAFT RETAINING BOLT
2 ± VALVE RETAINING LOCKS
3 ± VALVE
4 ± VALVE SPRING
5 ± VALVE SEAL AND VALVE SPRING SEAT ASSEMBLY
6 ± SPARK PLUG TUBE SEAL
7 ± CAMSHAFT
8 ± ROCKER ARM SHAFT RETAINER SPACER
9 ± GASKET10 ± SPACER
11 ± INTAKE ROCKER ARM/HYDRAULIC LASH ADJUSTER
ASSEMBLY
12 ± EXHAUST ROCKER ARM/HYDRAULIC LASH ADJUSTER
ASSEMBLY
13 ± CAMSHAFT SEAL
14 ± RETAINER SPACER
15 ± VALVE SPRING RETAINER
9 - 38 2.0L SOHC ENGINEPL
REMOVAL AND INSTALLATION (Continued)
Page 762 of 1285
(2) Apply MopartGasket Sealant (aerosol can) to
both sides of the new cylinder head gasket.
(3) Position a new cylinder head gasket on the
locating dowels.
(4) Position crankshaft sprocket to TDC, then
rotate crankshaft until mark is three teeth before
TDC (Fig. 59). This will ensure that no piston-to-
valve contact occurs upon installation of cylinder
head in the event of camshaft rotation.
(5) Position the cylinder head onto the cylinder
block. Make sure the cylinder head seats fully over
the locating dowels.
(6) Before installing cylinder head bolts, the
threads should be oiled with engine oil. The 4 shorter
bolts 164 mm (6.45 in.), are to be installed in posi-
tions 7, 8, 9, and 10 (Fig. 60).
(7) Tighten the cylinder head bolts in the sequence
shown in (Fig. 60). Using the 4 step torque method,
tighten according to the following values:²First All to 34 N´m (25 ft. lbs.)
²Second All to 68 N´m (50 ft. lbs.)
²Third All to 68 N´m (50 ft. lbs.)
²Fourth Turn an additional 1/4 Turn.Do not use
a torque wrench for this step.
(8) Install cylinder head cover.
(9) Install heater hose to thermostat housing con-
nector.
(10) Install heater tube to cylinder head attaching
fasteners.
(11) Connect cam sensor and coolant temperature
electrical connectors.
(12) Connect Crankcase Closed Ventilation (CCV)
hose to cylinder head cover.
Fig. 56 Checking Cylinder Head Flatness
1 ± FEELER GAUGE
2 ± STRAIGHT EDGE
Fig. 57 Checking Bolts for Stretching (Necking)
1 ± STRETCHED BOLT
2 ± THREADS ARE NOT STRAIGHT ON LINE
3 ± THREADS ARE STRAIGHT ON LINE
4 ± UNSTRETCHED BOLT
Fig. 58 Proper Tool Usage for Surface Preparation
1 ± ABRASIVE PAD
2 ± 3M ROLOCYBRISTLE DISC
3 ± PLASTIC/WOOD SCRAPER
Fig. 59 Crankshaft Sprocket Position
1 ± TDC MARK
PL2.0L SOHC ENGINE 9 - 39
REMOVAL AND INSTALLATION (Continued)