One DODGE RAM 1500 1998 2.G Repair Manual
[x] Cancel search | Manufacturer: DODGE, Model Year: 1998, Model line: RAM 1500, Model: DODGE RAM 1500 1998 2.GPages: 2627
Page 177 of 2627
(8) Remove pinion seal with pry tool or slide-ham-
mer mounted screw.
INSTALLATION
(1) Apply a light coating of gear lubricant on the
lip of pinion seal.
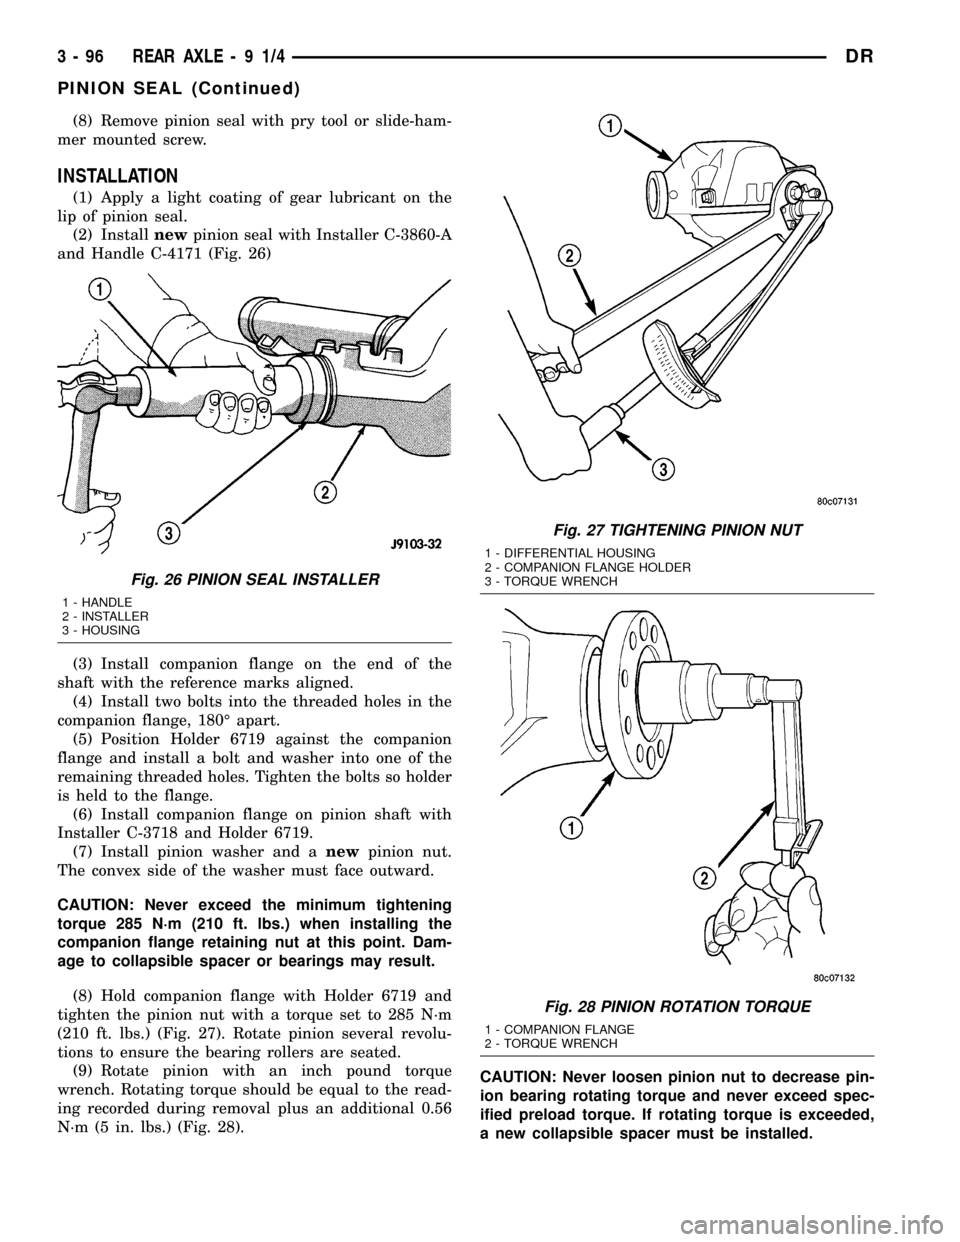
(2) Installnewpinion seal with Installer C-3860-A
and Handle C-4171 (Fig. 26)
(3) Install companion flange on the end of the
shaft with the reference marks aligned.
(4) Install two bolts into the threaded holes in the
companion flange, 180É apart.
(5) Position Holder 6719 against the companion
flange and install a bolt and washer into one of the
remaining threaded holes. Tighten the bolts so holder
is held to the flange.
(6) Install companion flange on pinion shaft with
Installer C-3718 and Holder 6719.
(7) Install pinion washer and anewpinion nut.
The convex side of the washer must face outward.
CAUTION: Never exceed the minimum tightening
torque 285 N´m (210 ft. lbs.) when installing the
companion flange retaining nut at this point. Dam-
age to collapsible spacer or bearings may result.
(8) Hold companion flange with Holder 6719 and
tighten the pinion nut with a torque set to 285 N´m
(210 ft. lbs.) (Fig. 27). Rotate pinion several revolu-
tions to ensure the bearing rollers are seated.
(9) Rotate pinion with an inch pound torque
wrench. Rotating torque should be equal to the read-
ing recorded during removal plus an additional 0.56
N´m (5 in. lbs.) (Fig. 28).CAUTION: Never loosen pinion nut to decrease pin-
ion bearing rotating torque and never exceed spec-
ified preload torque. If rotating torque is exceeded,
a new collapsible spacer must be installed.
Fig. 26 PINION SEAL INSTALLER
1 - HANDLE
2 - INSTALLER
3 - HOUSING
Fig. 27 TIGHTENING PINION NUT
1 - DIFFERENTIAL HOUSING
2 - COMPANION FLANGE HOLDER
3 - TORQUE WRENCH
Fig. 28 PINION ROTATION TORQUE
1 - COMPANION FLANGE
2 - TORQUE WRENCH
3 - 96 REAR AXLE-91/4DR
PINION SEAL (Continued)
Page 178 of 2627
(10) If rotating torque is low, use Holder 6719 to
hold the companion flange and tighten pinion nut in
6.8 N´m (5 ft. lbs.) increments until proper rotating
torque is achieved.
NOTE: The bearing rotating torque should be con-
stant during a complete revolution of the pinion. If
the rotating torque varies, this indicates a binding
condition.
NOTE: The seal replacement is unacceptable if the
final pinion nut torque is less than 285 N´m (210 ft.
lbs.).
(11) Install propeller shaft with the installation
reference marks aligned.
(12) Tighten the companion flange bolts to 108
N´m (80 ft. lbs.).
(13) Install brake rotors.
(14) Check the differential lubricant level.
DIFFERENTIAL COVER
REMOVAL
(1) With vehicle in neutral, position vehicle on
hoist.
(2) Remove drain plug.
(3) Remove cover bolts.
(4) Remove cover and drain lubricant.
INSTALLATION
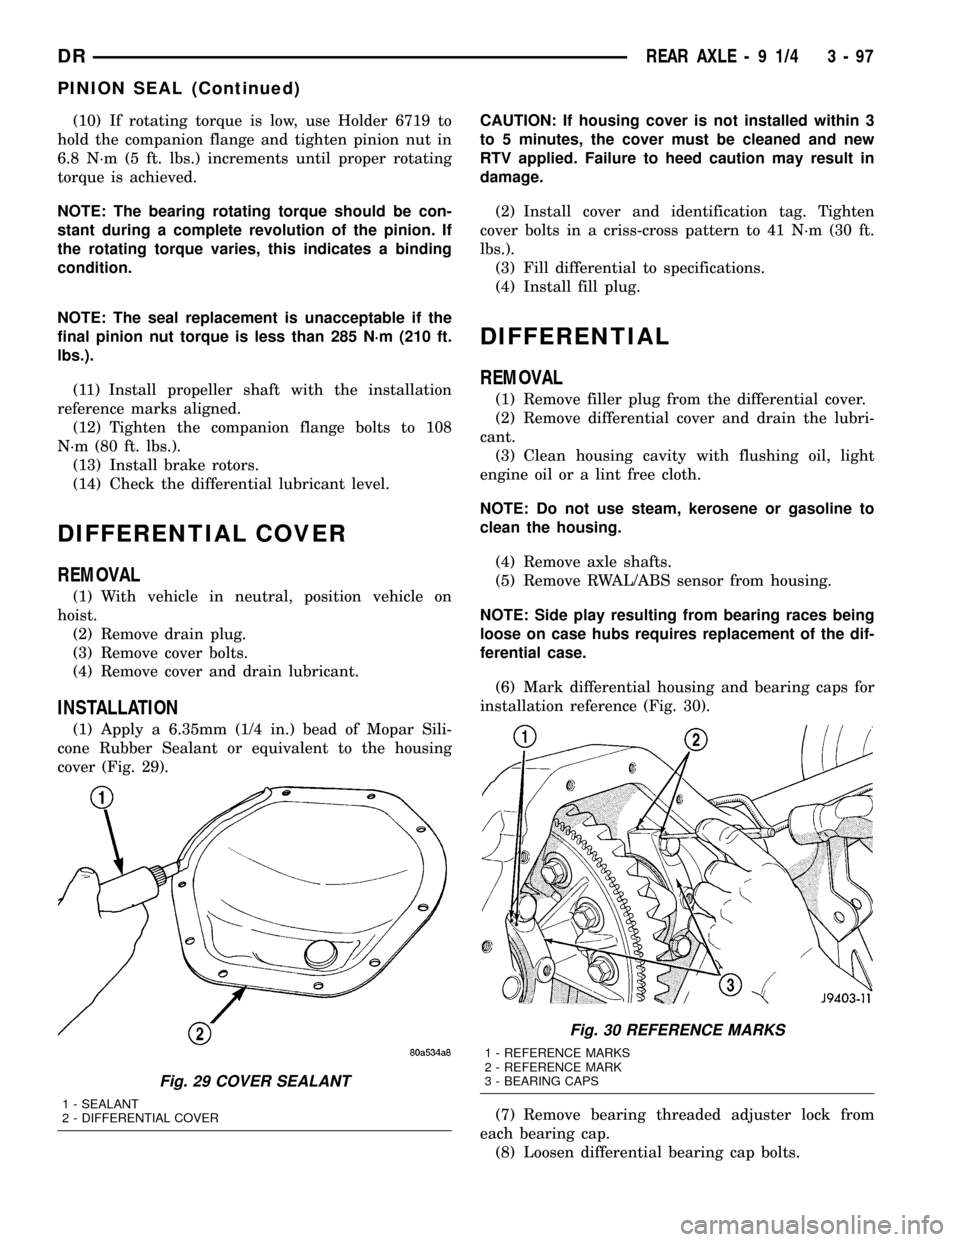
(1) Apply a 6.35mm (1/4 in.) bead of Mopar Sili-
cone Rubber Sealant or equivalent to the housing
cover (Fig. 29).CAUTION: If housing cover is not installed within 3
to 5 minutes, the cover must be cleaned and new
RTV applied. Failure to heed caution may result in
damage.
(2) Install cover and identification tag. Tighten
cover bolts in a criss-cross pattern to 41 N´m (30 ft.
lbs.).
(3) Fill differential to specifications.
(4) Install fill plug.
DIFFERENTIAL
REMOVAL
(1) Remove filler plug from the differential cover.
(2) Remove differential cover and drain the lubri-
cant.
(3) Clean housing cavity with flushing oil, light
engine oil or a lint free cloth.
NOTE: Do not use steam, kerosene or gasoline to
clean the housing.
(4) Remove axle shafts.
(5) Remove RWAL/ABS sensor from housing.
NOTE: Side play resulting from bearing races being
loose on case hubs requires replacement of the dif-
ferential case.
(6) Mark differential housing and bearing caps for
installation reference (Fig. 30).
(7) Remove bearing threaded adjuster lock from
each bearing cap.
(8) Loosen differential bearing cap bolts.
Fig. 29 COVER SEALANT
1 - SEALANT
2 - DIFFERENTIAL COVER
Fig. 30 REFERENCE MARKS
1 - REFERENCE MARKS
2 - REFERENCE MARK
3 - BEARING CAPS
DRREAR AXLE - 9 1/4 3 - 97
PINION SEAL (Continued)
Page 179 of 2627
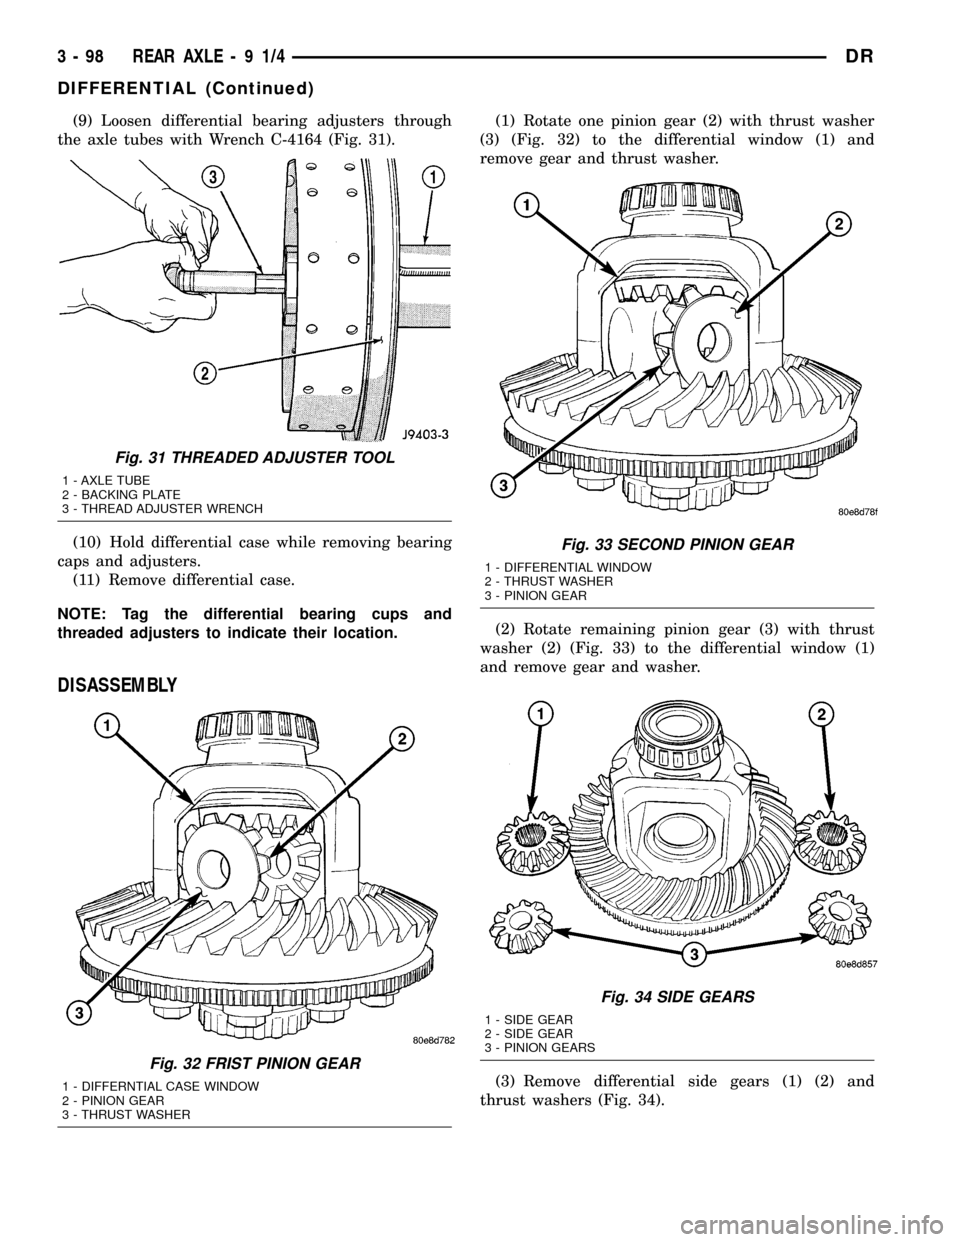
(9) Loosen differential bearing adjusters through
the axle tubes with Wrench C-4164 (Fig. 31).
(10) Hold differential case while removing bearing
caps and adjusters.
(11) Remove differential case.
NOTE: Tag the differential bearing cups and
threaded adjusters to indicate their location.
DISASSEMBLY
(1) Rotate one pinion gear (2) with thrust washer
(3) (Fig. 32) to the differential window (1) and
remove gear and thrust washer.
(2) Rotate remaining pinion gear (3) with thrust
washer (2) (Fig. 33) to the differential window (1)
and remove gear and washer.
(3) Remove differential side gears (1) (2) and
thrust washers (Fig. 34).
Fig. 31 THREADED ADJUSTER TOOL
1 - AXLE TUBE
2 - BACKING PLATE
3 - THREAD ADJUSTER WRENCH
Fig. 32 FRIST PINION GEAR
1 - DIFFERNTIAL CASE WINDOW
2 - PINION GEAR
3 - THRUST WASHER
Fig. 33 SECOND PINION GEAR
1 - DIFFERENTIAL WINDOW
2 - THRUST WASHER
3 - PINION GEAR
Fig. 34 SIDE GEARS
1 - SIDE GEAR
2 - SIDE GEAR
3 - PINION GEARS
3 - 98 REAR AXLE-91/4DR
DIFFERENTIAL (Continued)
Page 180 of 2627
ASSEMBLY
NOTE: If same gears and thrust washers are being
used, install them into their original locations.
(1) Lubricate all differential components with axle
lubricant.
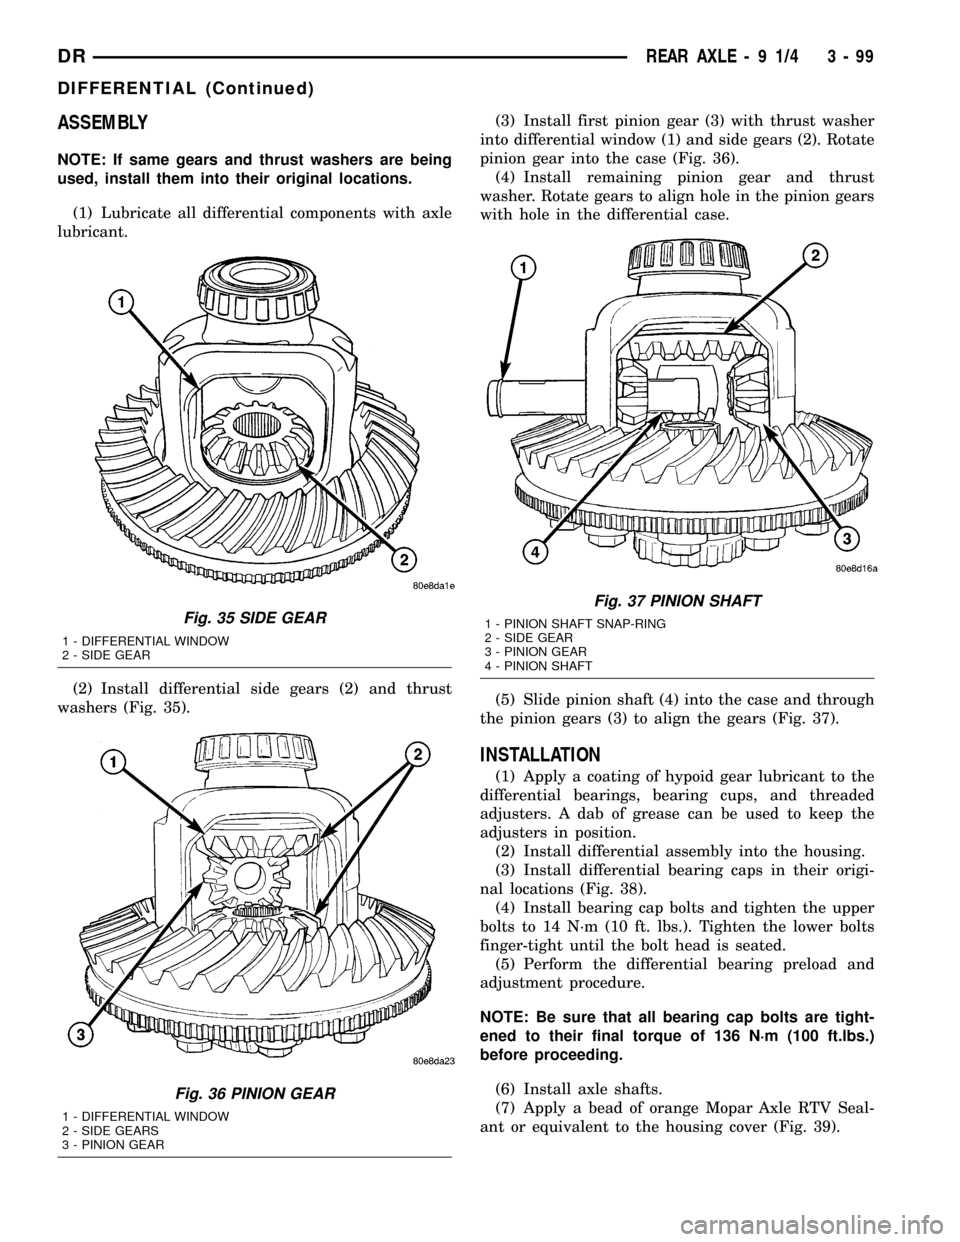
(2) Install differential side gears (2) and thrust
washers (Fig. 35).(3) Install first pinion gear (3) with thrust washer
into differential window (1) and side gears (2). Rotate
pinion gear into the case (Fig. 36).
(4) Install remaining pinion gear and thrust
washer. Rotate gears to align hole in the pinion gears
with hole in the differential case.
(5) Slide pinion shaft (4) into the case and through
the pinion gears (3) to align the gears (Fig. 37).
INSTALLATION
(1) Apply a coating of hypoid gear lubricant to the
differential bearings, bearing cups, and threaded
adjusters. A dab of grease can be used to keep the
adjusters in position.
(2) Install differential assembly into the housing.
(3) Install differential bearing caps in their origi-
nal locations (Fig. 38).
(4) Install bearing cap bolts and tighten the upper
bolts to 14 N´m (10 ft. lbs.). Tighten the lower bolts
finger-tight until the bolt head is seated.
(5) Perform the differential bearing preload and
adjustment procedure.
NOTE: Be sure that all bearing cap bolts are tight-
ened to their final torque of 136 N´m (100 ft.lbs.)
before proceeding.
(6) Install axle shafts.
(7) Apply a bead of orange Mopar Axle RTV Seal-
ant or equivalent to the housing cover (Fig. 39).
Fig. 35 SIDE GEAR
1 - DIFFERENTIAL WINDOW
2 - SIDE GEAR
Fig. 36 PINION GEAR
1 - DIFFERENTIAL WINDOW
2 - SIDE GEARS
3 - PINION GEAR
Fig. 37 PINION SHAFT
1 - PINION SHAFT SNAP-RING
2 - SIDE GEAR
3 - PINION GEAR
4 - PINION SHAFT
DRREAR AXLE - 9 1/4 3 - 99
DIFFERENTIAL (Continued)
Page 181 of 2627
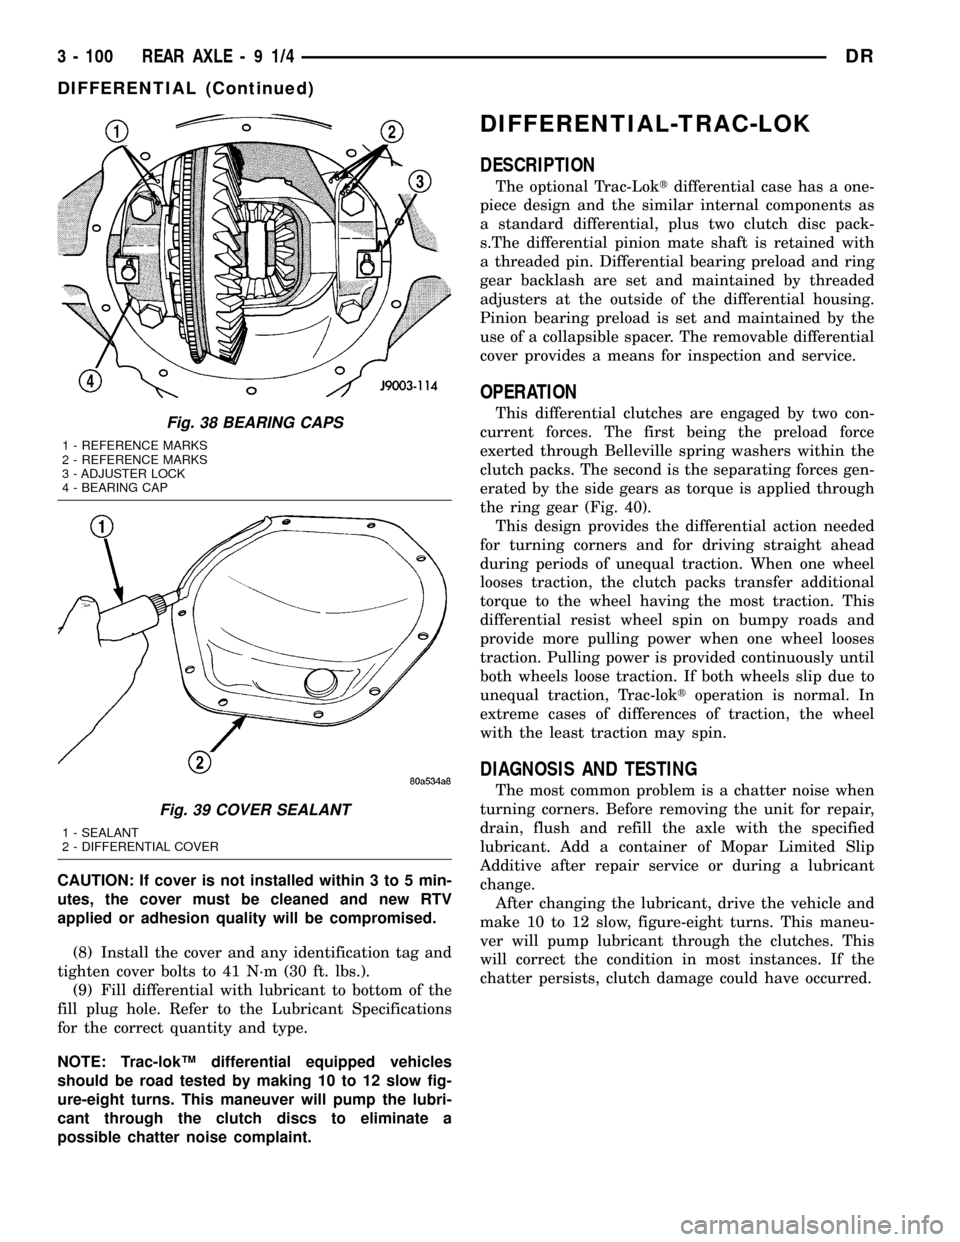
CAUTION: If cover is not installed within 3 to 5 min-
utes, the cover must be cleaned and new RTV
applied or adhesion quality will be compromised.
(8) Install the cover and any identification tag and
tighten cover bolts to 41 N´m (30 ft. lbs.).
(9) Fill differential with lubricant to bottom of the
fill plug hole. Refer to the Lubricant Specifications
for the correct quantity and type.
NOTE: Trac-lokŸ differential equipped vehicles
should be road tested by making 10 to 12 slow fig-
ure-eight turns. This maneuver will pump the lubri-
cant through the clutch discs to eliminate a
possible chatter noise complaint.
DIFFERENTIAL-TRAC-LOK
DESCRIPTION
The optional Trac-Loktdifferential case has a one-
piece design and the similar internal components as
a standard differential, plus two clutch disc pack-
s.The differential pinion mate shaft is retained with
a threaded pin. Differential bearing preload and ring
gear backlash are set and maintained by threaded
adjusters at the outside of the differential housing.
Pinion bearing preload is set and maintained by the
use of a collapsible spacer. The removable differential
cover provides a means for inspection and service.
OPERATION
This differential clutches are engaged by two con-
current forces. The first being the preload force
exerted through Belleville spring washers within the
clutch packs. The second is the separating forces gen-
erated by the side gears as torque is applied through
the ring gear (Fig. 40).
This design provides the differential action needed
for turning corners and for driving straight ahead
during periods of unequal traction. When one wheel
looses traction, the clutch packs transfer additional
torque to the wheel having the most traction. This
differential resist wheel spin on bumpy roads and
provide more pulling power when one wheel looses
traction. Pulling power is provided continuously until
both wheels loose traction. If both wheels slip due to
unequal traction, Trac-loktoperation is normal. In
extreme cases of differences of traction, the wheel
with the least traction may spin.
DIAGNOSIS AND TESTING
The most common problem is a chatter noise when
turning corners. Before removing the unit for repair,
drain, flush and refill the axle with the specified
lubricant. Add a container of Mopar Limited Slip
Additive after repair service or during a lubricant
change.
After changing the lubricant, drive the vehicle and
make 10 to 12 slow, figure-eight turns. This maneu-
ver will pump lubricant through the clutches. This
will correct the condition in most instances. If the
chatter persists, clutch damage could have occurred.
Fig. 38 BEARING CAPS
1 - REFERENCE MARKS
2 - REFERENCE MARKS
3 - ADJUSTER LOCK
4 - BEARING CAP
Fig. 39 COVER SEALANT
1 - SEALANT
2 - DIFFERENTIAL COVER
3 - 100 REAR AXLE-91/4DR
DIFFERENTIAL (Continued)
Page 182 of 2627
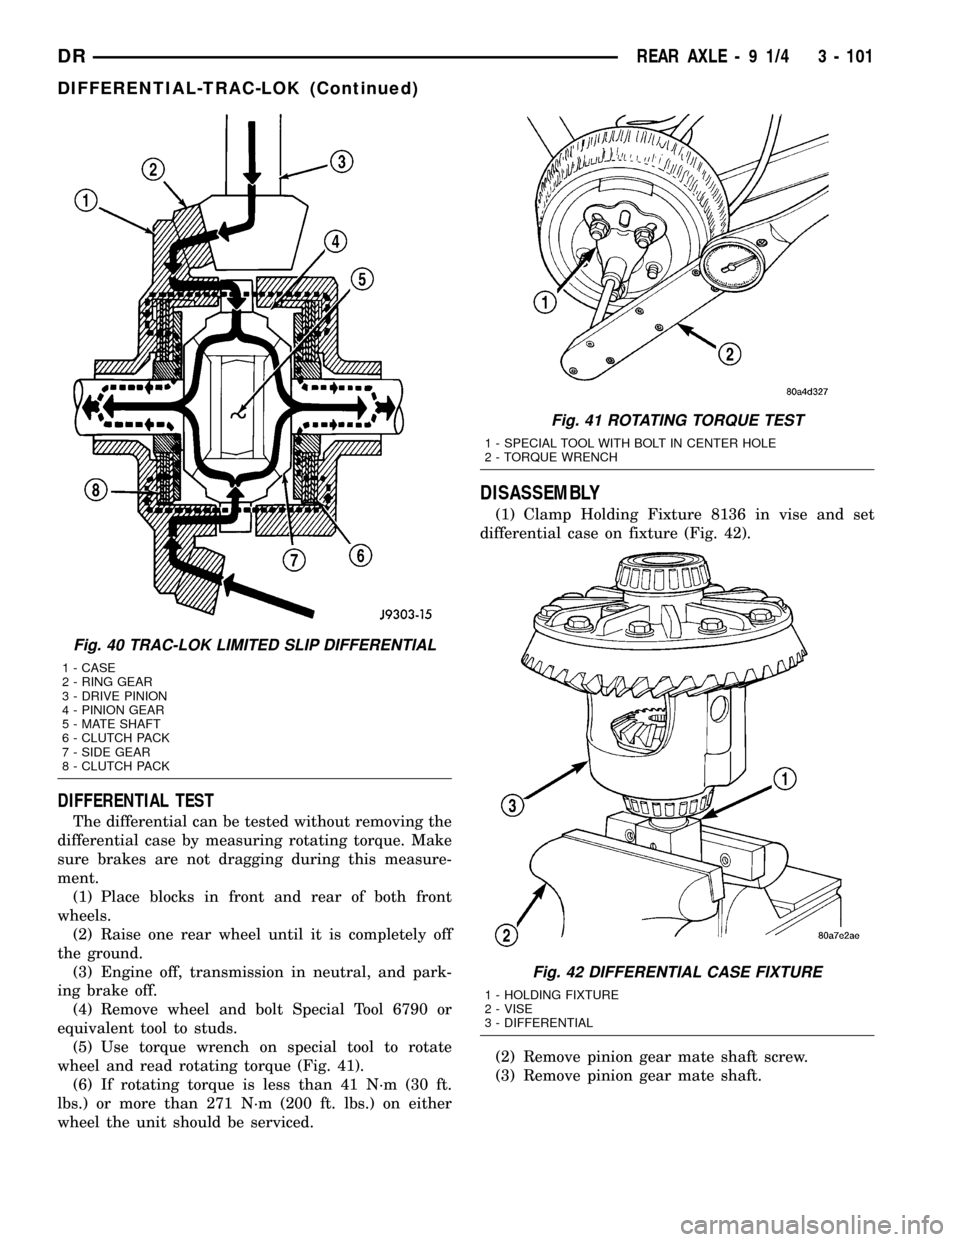
DIFFERENTIAL TEST
The differential can be tested without removing the
differential case by measuring rotating torque. Make
sure brakes are not dragging during this measure-
ment.
(1) Place blocks in front and rear of both front
wheels.
(2) Raise one rear wheel until it is completely off
the ground.
(3) Engine off, transmission in neutral, and park-
ing brake off.
(4) Remove wheel and bolt Special Tool 6790 or
equivalent tool to studs.
(5) Use torque wrench on special tool to rotate
wheel and read rotating torque (Fig. 41).
(6) If rotating torque is less than 41 N´m (30 ft.
lbs.) or more than 271 N´m (200 ft. lbs.) on either
wheel the unit should be serviced.
DISASSEMBLY
(1) Clamp Holding Fixture 8136 in vise and set
differential case on fixture (Fig. 42).
(2) Remove pinion gear mate shaft screw.
(3) Remove pinion gear mate shaft.
Fig. 40 TRAC-LOK LIMITED SLIP DIFFERENTIAL
1 - CASE
2 - RING GEAR
3 - DRIVE PINION
4 - PINION GEAR
5 - MATE SHAFT
6 - CLUTCH PACK
7 - SIDE GEAR
8 - CLUTCH PACK
Fig. 41 ROTATING TORQUE TEST
1 - SPECIAL TOOL WITH BOLT IN CENTER HOLE
2 - TORQUE WRENCH
Fig. 42 DIFFERENTIAL CASE FIXTURE
1 - HOLDING FIXTURE
2 - VISE
3 - DIFFERENTIAL
DRREAR AXLE - 9 1/4 3 - 101
DIFFERENTIAL-TRAC-LOK (Continued)
Page 184 of 2627
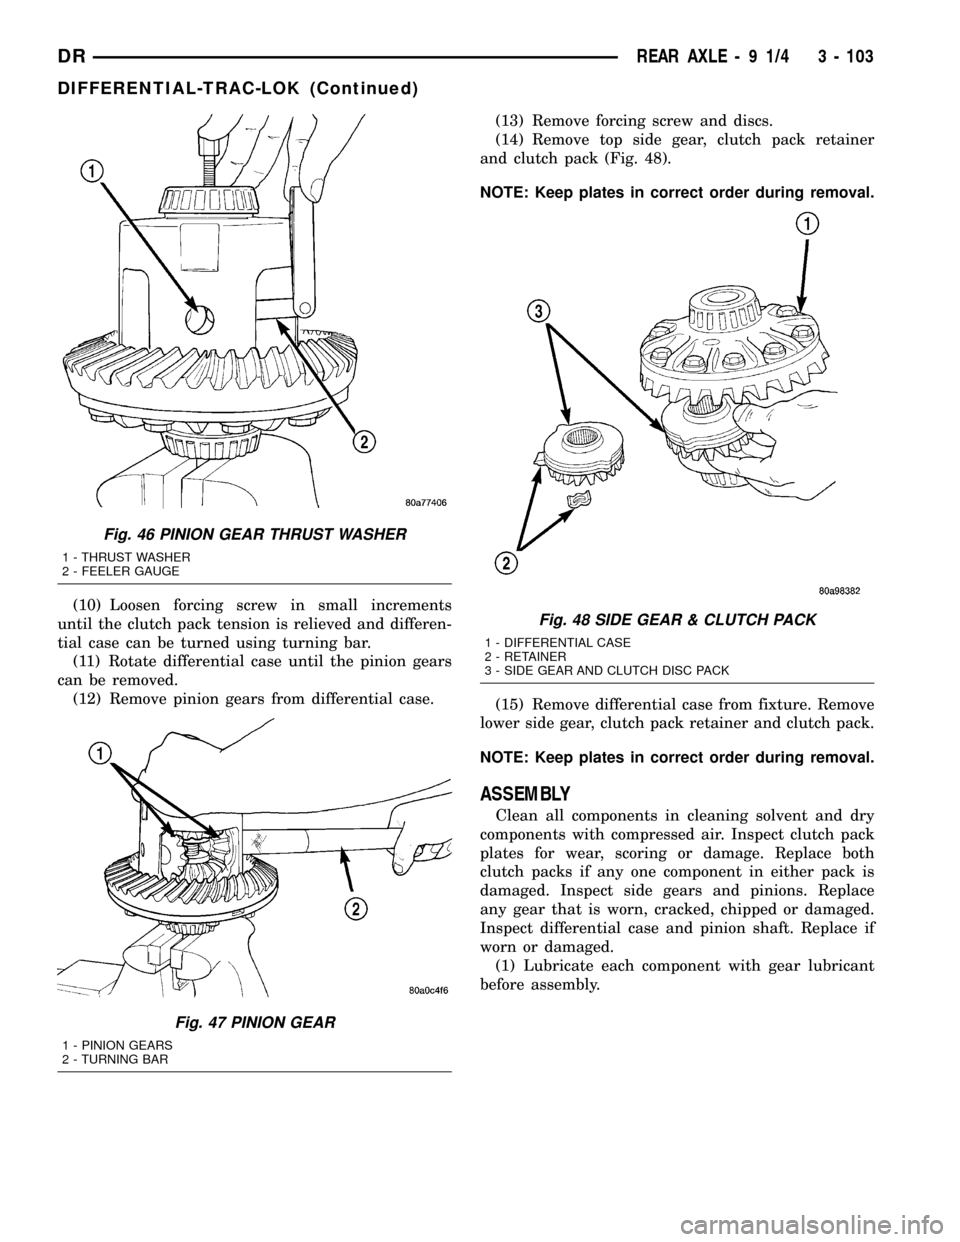
(10) Loosen forcing screw in small increments
until the clutch pack tension is relieved and differen-
tial case can be turned using turning bar.
(11) Rotate differential case until the pinion gears
can be removed.
(12) Remove pinion gears from differential case.(13) Remove forcing screw and discs.
(14) Remove top side gear, clutch pack retainer
and clutch pack (Fig. 48).
NOTE: Keep plates in correct order during removal.
(15) Remove differential case from fixture. Remove
lower side gear, clutch pack retainer and clutch pack.
NOTE: Keep plates in correct order during removal.
ASSEMBLY
Clean all components in cleaning solvent and dry
components with compressed air. Inspect clutch pack
plates for wear, scoring or damage. Replace both
clutch packs if any one component in either pack is
damaged. Inspect side gears and pinions. Replace
any gear that is worn, cracked, chipped or damaged.
Inspect differential case and pinion shaft. Replace if
worn or damaged.
(1) Lubricate each component with gear lubricant
before assembly.
Fig. 46 PINION GEAR THRUST WASHER
1 - THRUST WASHER
2 - FEELER GAUGE
Fig. 47 PINION GEAR
1 - PINION GEARS
2 - TURNING BAR
Fig. 48 SIDE GEAR & CLUTCH PACK
1 - DIFFERENTIAL CASE
2 - RETAINER
3 - SIDE GEAR AND CLUTCH DISC PACK
DRREAR AXLE - 9 1/4 3 - 103
DIFFERENTIAL-TRAC-LOK (Continued)
Page 186 of 2627
(10) Place pinion gears in position in side gears
and verify that the pinion mate shaft hole is aligned.
(11) Rotate case with turning bar until pinion
mate shaft holes in pinion gears align with holes in
case.
NOTE: It may be necessary to slightly tighten the
forcing screw in order to install the pinion gears.
(12) Tighten forcing screw to 122 N´m (90 ft. lbs.)
maximum to compress the Belleville springs.
(13) Lubricate and install thrust washers behind
pinion gears and align washers with a small screw
driver. Insert mate shaft into each pinion gear to ver-
ify alignment.
(14) Remove Forcing Screw, Discs and Threaded
Adapter.
(15) Install pinion gear mate shaft and align holes
in shaft and case.
(16) Install pinion mate shaft screw.
(17) Lubricate all differential components with
hypoid gear lubricant.
DIFFERENTIAL CASE
BEARINGS
REMOVAL
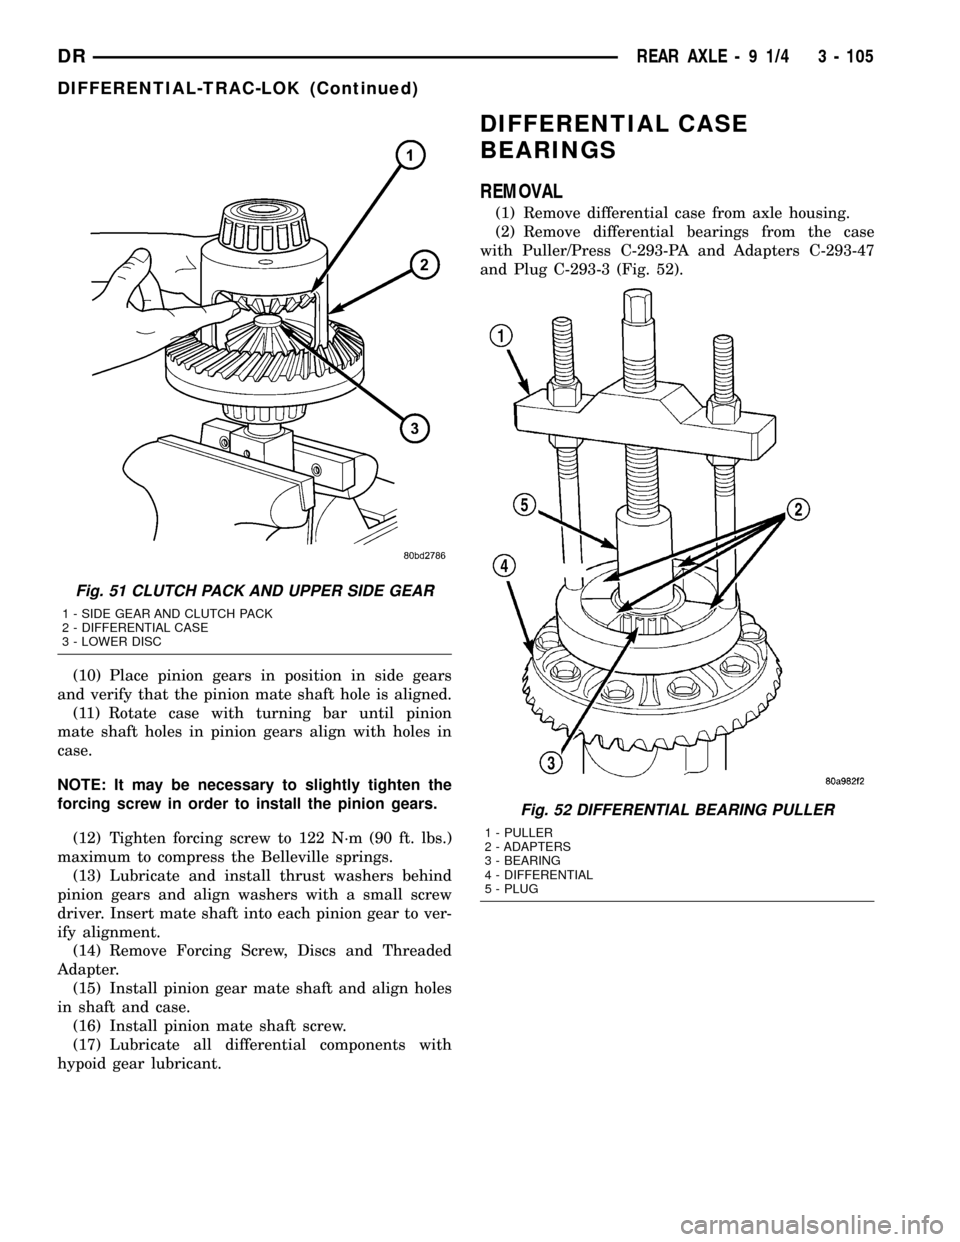
(1) Remove differential case from axle housing.
(2) Remove differential bearings from the case
with Puller/Press C-293-PA and Adapters C-293-47
and Plug C-293-3 (Fig. 52).
Fig. 51 CLUTCH PACK AND UPPER SIDE GEAR
1 - SIDE GEAR AND CLUTCH PACK
2 - DIFFERENTIAL CASE
3 - LOWER DISC
Fig. 52 DIFFERENTIAL BEARING PULLER
1 - PULLER
2 - ADAPTERS
3 - BEARING
4 - DIFFERENTIAL
5 - PLUG
DRREAR AXLE - 9 1/4 3 - 105
DIFFERENTIAL-TRAC-LOK (Continued)
Page 187 of 2627
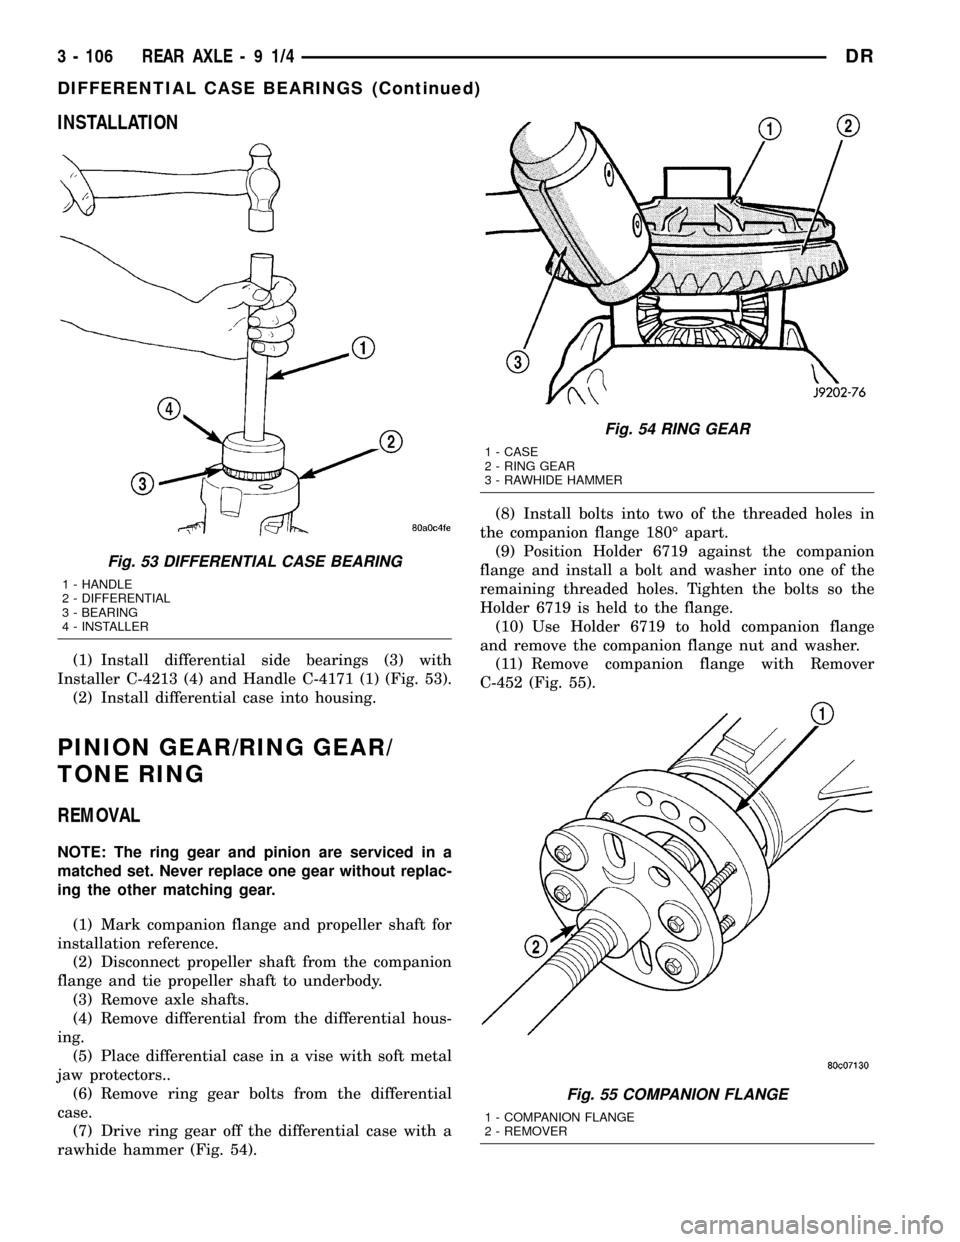
INSTALLATION
(1) Install differential side bearings (3) with
Installer C-4213 (4) and Handle C-4171 (1) (Fig. 53).
(2) Install differential case into housing.
PINION GEAR/RING GEAR/
TONE RING
REMOVAL
NOTE: The ring gear and pinion are serviced in a
matched set. Never replace one gear without replac-
ing the other matching gear.
(1) Mark companion flange and propeller shaft for
installation reference.
(2) Disconnect propeller shaft from the companion
flange and tie propeller shaft to underbody.
(3) Remove axle shafts.
(4) Remove differential from the differential hous-
ing.
(5) Place differential case in a vise with soft metal
jaw protectors..
(6) Remove ring gear bolts from the differential
case.
(7) Drive ring gear off the differential case with a
rawhide hammer (Fig. 54).(8) Install bolts into two of the threaded holes in
the companion flange 180É apart.
(9) Position Holder 6719 against the companion
flange and install a bolt and washer into one of the
remaining threaded holes. Tighten the bolts so the
Holder 6719 is held to the flange.
(10) Use Holder 6719 to hold companion flange
and remove the companion flange nut and washer.
(11) Remove companion flange with Remover
C-452 (Fig. 55).
Fig. 53 DIFFERENTIAL CASE BEARING
1 - HANDLE
2 - DIFFERENTIAL
3 - BEARING
4 - INSTALLER
Fig. 54 RING GEAR
1 - CASE
2 - RING GEAR
3 - RAWHIDE HAMMER
Fig. 55 COMPANION FLANGE
1 - COMPANION FLANGE
2 - REMOVER
3 - 106 REAR AXLE-91/4DR
DIFFERENTIAL CASE BEARINGS (Continued)
Page 188 of 2627
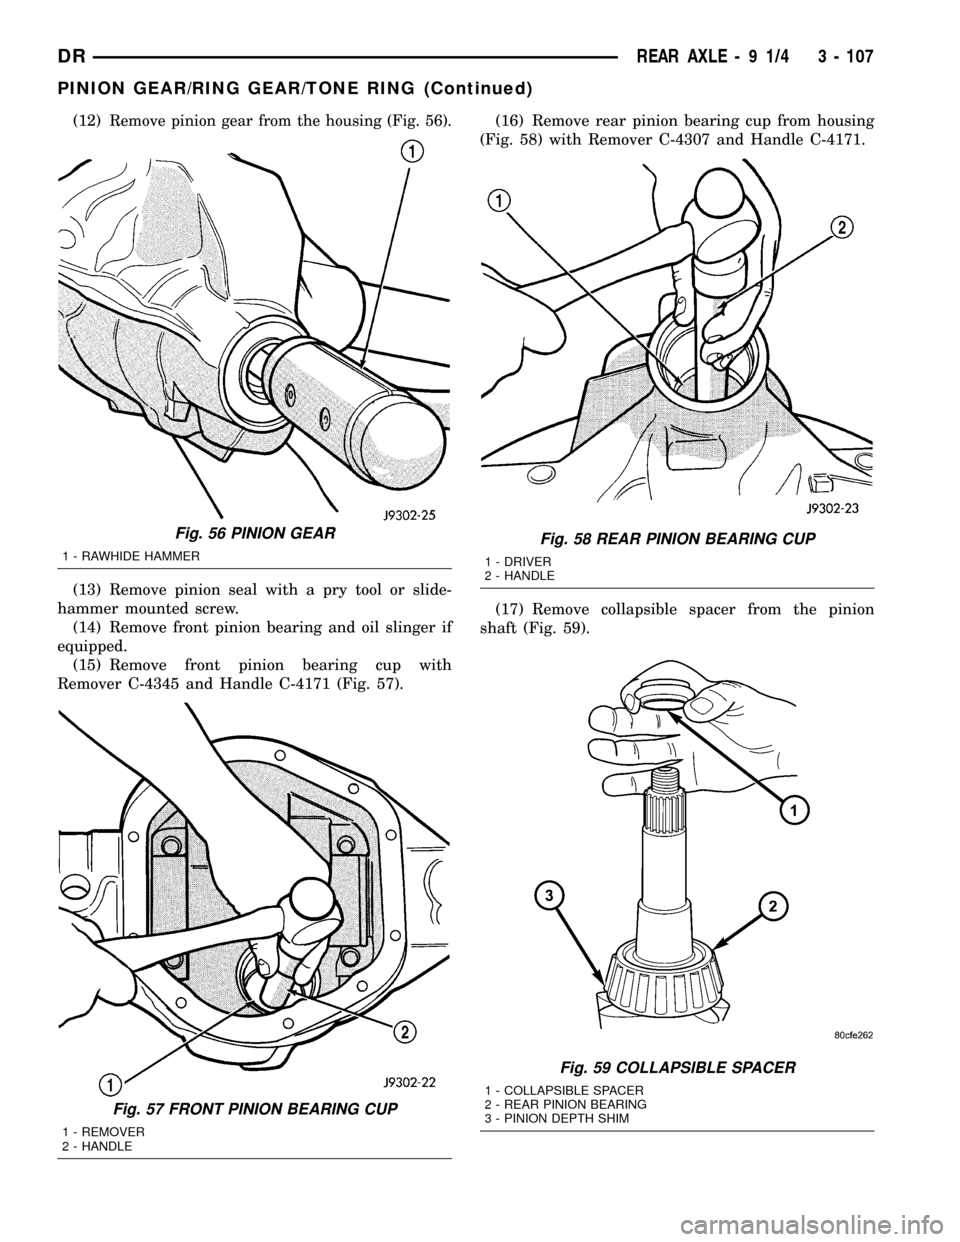
(12)Remove pinion gear from the housing (Fig. 56).
(13) Remove pinion seal with a pry tool or slide-
hammer mounted screw.
(14) Remove front pinion bearing and oil slinger if
equipped.
(15) Remove front pinion bearing cup with
Remover C-4345 and Handle C-4171 (Fig. 57).(16) Remove rear pinion bearing cup from housing
(Fig. 58) with Remover C-4307 and Handle C-4171.
(17) Remove collapsible spacer from the pinion
shaft (Fig. 59).
Fig. 56 PINION GEAR
1 - RAWHIDE HAMMER
Fig. 57 FRONT PINION BEARING CUP
1 - REMOVER
2 - HANDLE
Fig. 58 REAR PINION BEARING CUP
1 - DRIVER
2 - HANDLE
Fig. 59 COLLAPSIBLE SPACER
1 - COLLAPSIBLE SPACER
2 - REAR PINION BEARING
3 - PINION DEPTH SHIM
DRREAR AXLE - 9 1/4 3 - 107
PINION GEAR/RING GEAR/TONE RING (Continued)