warning DODGE VIPER 2010 ZB II / 2.G Owner's Manual
[x] Cancel search | Manufacturer: DODGE, Model Year: 2010, Model line: VIPER, Model: DODGE VIPER 2010 ZB II / 2.GPages: 80, PDF Size: 8.08 MB
Page 34 of 80
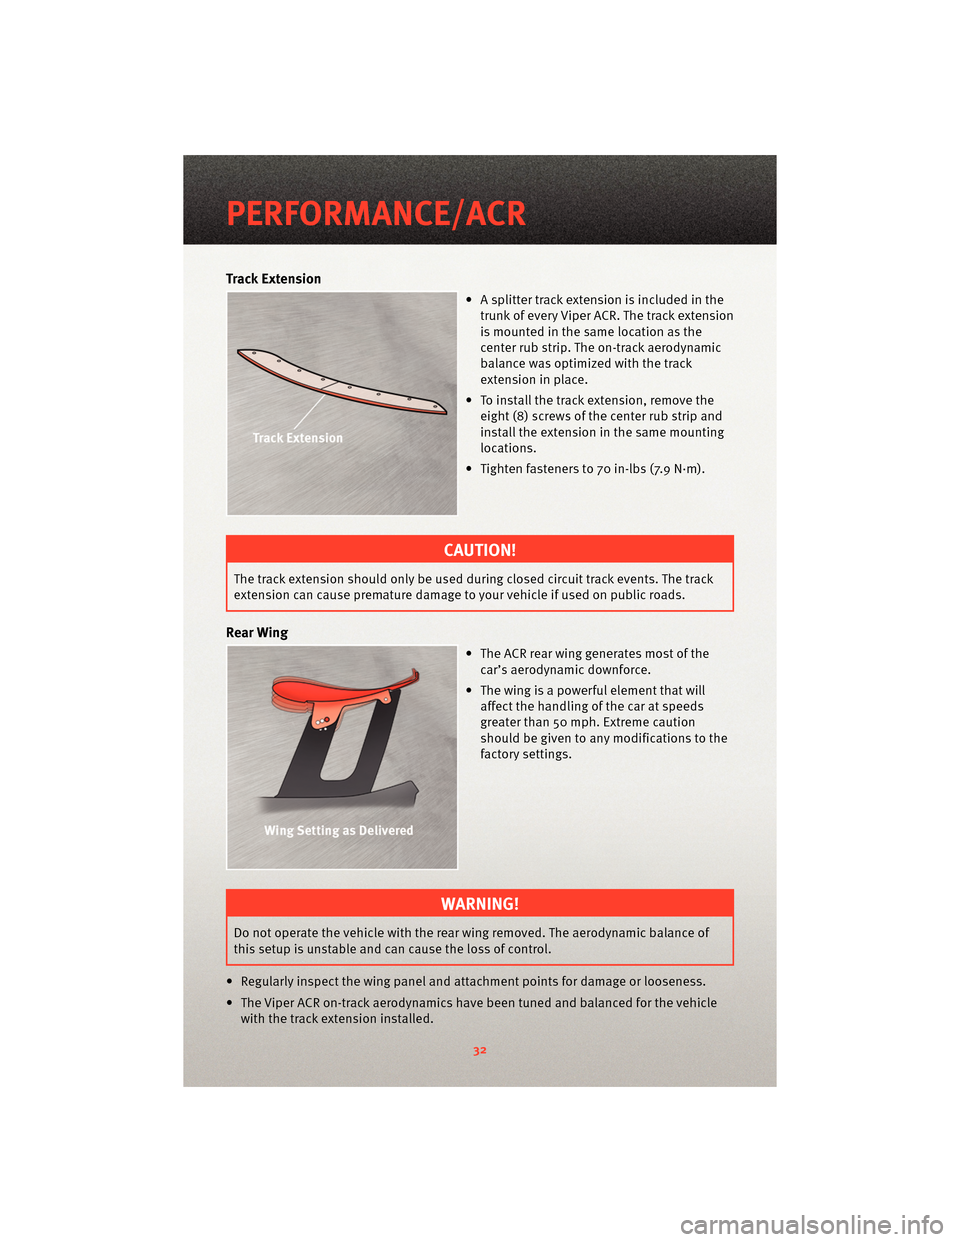
Track Extension
• A splitter track extension is included in thetrunk of every Viper ACR. The track extension
is mounted in the same location as the
center rub strip. The on-track aerodynamic
balance was optimized with the track
extension in place.
• To install the track extension, remove the eight (8) screws of the center rub strip and
install the extension in the same mounting
locations.
• Tighten fasteners to 70 in-lbs (7.9 N·m).
CAUTION!
The track extension should only be used during closed circuit track events. The track
extension can cause prem ature damage to your vehicle if used on public roads.
Rear Wing
• The ACR rear wing generates most of the
car’s aerodynamic downforce.
• The wing is a powerful element that will affect the handling of the car at speeds
greater than 50 mph. Extreme caution
should be given to any modifications to the
factory settings.
WARNING!
Do not operate the vehicle with the rear wing removed. The aerodynamic balance of
this setup is unstable and can cause the loss of control.
• Regularly inspect the wing panel and attachment points for damage or looseness.
• The Viper ACR on-track aerodynamics have been tuned and balanced for the vehicle with the track extension installed.
PERFORMANCE/ACR
32
Page 38 of 80
CAUTION!
Do not come to a complete stop when the system is hot and leave your foot on the
pedal. Pad material will immediately transfer to the rotor causing a vibration during
future use.
• After the final stop, drive as much as possible without using the brakes to cool off the system. Ideally, the brakes should be allowed to cool to ambient temperature
before using them again.
• After the first break in cycle, the brakes will still not be operating at optimum capacity. A second or third heat cycle is typically necessary before the brakes start
to work optimally. This will occur during everyday use.
Care and Maintenance
• Your brake calipers have a painted finish. Immedi ately clean off any spilled brake
fluid, wiping it off with a soft, clean terry-cloth towel.
• Do not use any harsh chemicals when cleaning your calipers. Wash your calipers with soap and rinse with water.
• Do not use any harsh chemicals when cleaning your rotor hats (the anodized center part of the rotor assembly). Wash your rotor hats with soap and rinse with water.
• Breaking-in rotors and pads is critical to the optimum performance of your new brakes. When breaking-in new parts, you are not only heat-cycling the pads, you are
also depositing a layer of pad material onto the rotor face. If not broken-in properly, an
uneven layer of pad material will be deposited onto the rotor, causing vibration.
• If you experience brake pedal pulsation, steering vibration, or repeatable brake noise, perform the break-in procedure again as soon as possible. This will re-condition the
rotor surface and remove irregular brake pad deposits. If concerns continue, please
visit y our local dealer fo r further diagnosis.
PILOT SPORT CUP TIRES
• Your Viper ACR comes equipped with Michelin Pilot Sport Cup competition oriented
tires that are DOT approved for street use. The Pilot Sport Cup tire uses a special tread
and compound which provides considerably more dry grip than normal street tires.
• Due to the special tread and compound of your Pilot Sport Cup Tires, the minimum tread depth can be reached earlier dependin g on your driving style, resulting in
reduced tire life. The special Pilot S port Cup tread and compound may lead to
performance degradation in cold climates, heavy rain or in conditions with standing
water.
WARNING!
Use extreme caution and drive slowly in wet situations to reduce the risk of
hydroplaning. Avoid driving in any conditions of heavy rain or standing water. These
conditions can cause loss of control or accident.
PERFORMANCE/ACR
36
Page 39 of 80
WARNING!
The Pilot Sport Cup tires were NOT intended to be driven on snow or ice. The Pilot
Sport Cup is a summer season tire and has diminished capability on cold road
surfaces (below 50°F). DO NOT OPERATE THE VEHICLE DURING THESE CONDITIONS.
Snow, ice and cold road surfaces can cause a loss of control or accident.
ADJUSTABLE DAMPERS
• The Viper ACR suspension includes a set of adjustable coil-over racing dampers built
by KW Suspensions. These dampers hav e been tuned by SRT handling engineers to
provide the maximum handling performance without sacrificing reasonable road
manners.
• The two-way adjustable dampers inc lude adjustments for compression (bump) and
rebound damping.
NOTE: Keep your damper settings at the street positions when operating your vehicle on
the street.
WARNING!
Only experienced track drivers should ma ke adjustments to the suspension settings.
Improper suspension adjustment can disrupt the balance of the vehicle and lead to a
loss of control or accident.
CAUTION!
Do not make any adjustments or modifications to the nitrogen pressure of the damper
canisters. This will void the warranty.
• The ACR suspension was designed and tuned with an uncompromising focus on handling. The ride response to road conditions m ay be harsher than expected from a
typical sports car.
37
PERFORMANCE/ACR
Page 49 of 80
24-HOUR TOWING ASSISTANCE - U.S. ONLY
• Dial toll-free 1-800-521-2779 or 1-800-363-4869 for Canadian residents.
• Provide your name, vehicle identification number and license plate number.
• Provide your location, including telephone number, from which you are calling.
• Briefly describe the nature of the problem and answer a few simple questions.
• You will be given the name of the service provider and an estimated time of arrival. Ifyou feel you are in an “unsafe situation”, please let us know. With your consent, we
will contact local police or safety authorities.
INSTRUMENT CLUSTER WARNING LIGHTS
- Tire Pressure Monitoring System (TPMS) Light
• Each tire, including the spare (if provided), should be checked monthly, when coldand inflated to the inflation pressure recommended by the vehicle manufacturer on
the vehicle placard or tire inflation pressure label. (If your vehicle has tires of a
different size than the size indicated on the v ehicle placard or tire inflation pressure
label, you should determine the proper tire inflation pressure for those tires.)
• As an added safety feature, your vehicle has been equipped with a Tire Pressure Monitoring System (TPMS) that illuminates a low tire pressure telltale when one or
more of your tires is significantly under-inflat ed. Accordingly, when the low tire
pressure telltale illuminates, you should stop and check your tires as soon as
possible, and inflate them to the proper pressure. Driving on a significantly
under-inflated tire causes the tire to overheat and can lead to tire failure.
Under-inflation also reduces fuel efficiency and tire tread life, and may affect the
vehicle’s handling and stopping ability.
• Please note that the TPMS is not a subs titute for proper tire maintenance, and it is the
driver’s responsibility to maintain correct tire pressure, even if under-inflation has not
reached the level to trigger illumination of the TPMS low tire pressure telltale.
• Your vehicle has also been equipped with a TPMS malfunction indicator to indicate
when the system is not operating properly. The TPMS malfunction indicator is
combined with the low tire pressure telltale. When the system detects a malfunction,
the telltale will flash for approximately one minute and then remain continuously
illuminated. This sequence will continue upon subsequent vehicle start-ups as long as
the malfunction exists.
• When the malfunction indicator is illuminated, the system may not be able to detect or signal low tire pressure as intended. TPMS malfunctions may occur for a variety of
reasons, including the installation of replacement or alternate tires or wheels on the
vehicle that prevent the TPMS from functioning properly. Always check the TPMS
malfunction telltale after replacing one or more tires or wheels on your vehicle, to
ensure that the replacement or alternate tires and wheels allow the TPMS to continue
to function properly.
47
WHAT TO DO IN EMERGENCIES
Page 50 of 80
CAUTION!
The TPMS has been optimized for the original equipment tires and wheels. TPMS
pressures and warning have been established for the tire size equipped on your
vehicle. Undesirable system operation or sensor damage may result when using
replacement equipment that is not of the same size, type, and/or style. Aftermarket
wheels can cause sensor damage. Do not use tire sealant from a can, or balance
beads if your vehicle is equipped with a TPMS, as damage to the sensors may result.
- Engine Temperature Warning Light
• This light warns of an overheated engine condition.
• If the light turns on and a warning chime sounds while driving, safely pull over andstop the vehicle. If the A/C system is on, t urn it off. Also, shiftthe transmission into
NEUTRAL and idle the vehicle. If the temperat ure reading does not return to normal,
turn the engine off immediately.
• We recommend that you do not operate the vehicle or engine damage will occur. Have the vehicle serviced immediately.
WARNING!
A hot engine cooling system is dangero us. You or others could be badly burned by
steam or boiling coolant. You may want to call an authorized service center for service
if your vehicle overheats.
- Brake Warning Light
• The Brake Warning light illuminates when there is either a system malfunction or the parking brake is applied. If the light is on and the parking brake is not applied, it
indicates a possible brake hydraulic malfunction, brake booster problem or an
Anti-Lock Brake System problem.
• We recommend you drive to the nearest service center and have the vehicle serviced immediately.
WARNING!
Driving a vehicle with the red brake light on is dangerous. Part of the brake system
may have failed. It will take longer to stop the vehicle. You could have an accident.
Have the vehicle checked immediately.
WHAT TO DO IN EMERGENCIES
48
Page 51 of 80
- Malfunction Indicator Light (MIL)
• Certain conditions, such as a loose or missing gas cap,poor fuel quality, etc., may
illuminate the MIL after engine start. The vehicle should be serviced if the light stays
on through several typical driving cycles. In most situations, the vehicle will drive
normally and not require towing.
• If the MIL flashes when the engine is running, serious conditions may exist that could lead to immediate loss of power or severe catalytic converter damage. We recommend
you do not operate the vehicle. Hav e the vehicle serviced immediately.
- Charging System Light
• This light shows the status of the electrical ch arging system. If the charging system
light remains on, it means that the vehicle is experiencing a problem with the charging
system.
• We recommend you do not continue driving if the charging system light is on. Have the vehicle serviced immediately.
- Oil Pressure Warning Light
• This light indicates low engine oil pressure. If the light turns on while driving, stop thevehicle and shut off the engine as soon as possible. A chime will sound for four
minutes when this light turns on.
• We recommend you do not operate the vehicle or engine damage will occur. Have the vehicle serviced immediately.
- Anti-Lock Brake (ABS) Light
• This light monitors the Anti-Lock Brake System (ABS).
• If the light is not on during starting, stays on, or turns on while driving, we recommendyou drive to the nearest service center and have the vehicle serviced immediately.
- Electronic Throttle Control (ETC) Light
• This light informs you of a problem with the Electronic Throttle Control (ETC) system.
• If a problem is detected, the light will come on while the engine is running. Cycle theignition when the vehicle has completely stopped and the shift lever is placed in the
PARK position; the light should turn off.
• If the light remains lit with the engine running, your vehicle will usually be drivable; however, see an authorized service center immediately. If the light is flashing when
the engine is running, immediate service is required and you may experience reduced
performance, an elevated/rough idle or en gine stall and your vehicle may require
towing.
- Airbag Warning Light
• If the light is not on during starting, stays on, or turns on while driving, have the vehicle serviced by an authorized service center immediately.
49
WHAT TO DO IN EMERGENCIES
Page 52 of 80
IF YOUR ENGINE OVERHEATS
• In any of the following situations, you can reduce the potential for overheating by
taking the appropriate action.
• On the highways — slow down.
• In city traffic — while stopped, shift tran smission intoNEUTRAL, but do not increase
engine idle speed.
• In city traffic — while moving, shift into the highest gear possible to reduce engine RPM.
NOTE: There are steps that you can take to slow down an impending overheat
condition:
• If your air conditioner (A/C) is on, turn it off. The A/C system adds heat to the engine cooling system and turning the A/C off can help remove this heat.
• You can also turn the Temperature Control to maximum heat, the Mode Control to floor and the Fan Control to high. This allows the heater core to act as a supplement to the
radiator and aids in removing heat from the engine cooling system.
• If the temperature reading does not re turn to normal, turn the engine off immediately.
• We recommend that you do not operate the vehicle or engine damage will occur. Have the vehicle serviced immediately.
CAUTION!
Driving with a hot cooling system could dama ge your vehicle. If the temperature gauge
reads HOT (H), pull over and stop the vehicle. Idle the vehicle with the air conditioner
turned off until the pointer drops back into the normal range. If the pointer remains on
HOT (H), and you hear continuous chimes, t urn the engine off immediately and call for
service.
WARNING!
You or others can be badly burned by hot engine coolant (antifreeze) or steam from
your radiator. If you see or hear steam coming from under the hood, do not open the
hood until the radiator has had time to co ol. Never try to open a cooling system
pressure cap when the radiator or coolant bottle is hot.
WHAT TO DO IN EMERGENCIES
50
Page 53 of 80
TIREFIT TIRE REPAIR
WARNING!
• Do not attempt to seal a tire on the side of the vehicle close to moving traffic. Pullfar enough off the road to avoid the danger of being hit while using the TIREFIT kit.
• Replace (or repair) the original tire at the first opportunity and reinstall it on your vehicle. Failure to do so could result in loss of vehicle control.
• A loose TIREFIT kit thrown forward in an accident or hard stop, could endanger the occupants of the vehicle. Always stow the TIREFIT kit in the place provided.
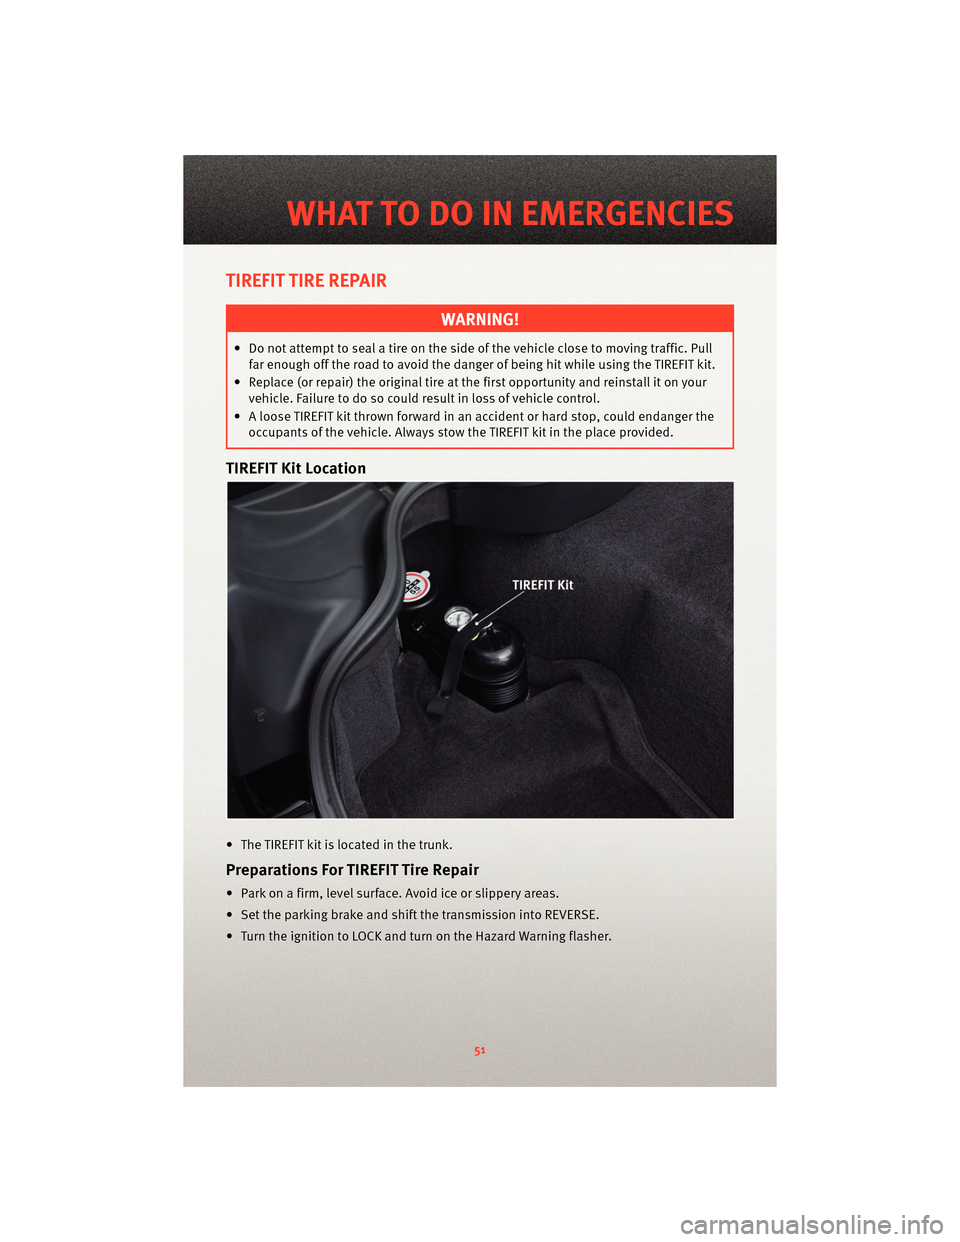
TIREFIT Kit Location
• The TIREFIT kit is located in the trunk.
Preparations For TIREFIT Tire Repair
• Park on a firm, level surface. Avoid ice or slippery areas.
• Set the parking brake and shif t the transmission into REVERSE.
• Turn the ignition to LOCK and turn on the Hazard Warning flasher.
51
WHAT TO DO IN EMERGENCIES
Page 55 of 80
CAUTION!
• The metal end fitting from the Power Plug and Cable may get hot after use andshould be handled carefully.
• Failure to reinstall the Yellow Cap on the fitting at the end of the Clear Sealant Hose can result in sealant contacting your skin, clothing, and the vehicle’s interior. It can
also result in sealant contacting internal TIREFIT kit components which may cause
permanent damage to the kit.
• Immediately after injecting sealant and infl ating the tire, drive the vehicle 5 mi (8 km)
or 10 minutes to ensure distribution of the TIREFIT Sealant within the tire. Do not
exceed 55 mph (88 km/h).
• Pull over and repeat Preparations for Jacking or Tire Repair.
• Turn the Mode Select knob to the Air Mode position
.
• Connect the Black Air Pump Hose to the valve stem.
• Check the pressure in the tire by reading the Pressure Gauge.
NOTE: If tire pressure is less than 19 psi, the tire is too badly damaged. Do not attempt
to drive the vehicle fur ther. Call forassistance.
• If the tire pressure is 19 psi or higher, press the Power button
and inflate the tire
to the pressure indicated on the Tire and Loading Information label on the driver's
side door opening.
• Disconnect the TIREFIT kit from the valve stem and then reinstall the valve stem cap.
• Place the TIREFIT kit in its proper storage area in the vehicle.
• Have the tire inspected and repaired or replaced at the earliest opportunity at an authorized service center.
NOTE: When having the tire serviced, advise the authorized dealer or service center
that the tire has been sealed using the TIREFIT service kit.
• Refer to the Owner's Manual on the DVD for Sealant Bottle and Hose Replacement.
WARNING!
Do not use TIREFIT or drive the vehicle under the following circumstances:
• If the cut or puncture in the tire tread is approximately 0.24 in (6 mm) or larger.
• If the tire has any sidewall damage.
• If the tire has any damage from driv ing with extremely low tire pressure.
• If the tire has any damage from driving on a flat tire.
• If the wheel has any damage.
• If you are unsure of the condition of the tire or the wheel.
53
WHAT TO DO IN EMERGENCIES
Page 56 of 80
WARNING!
• Keep TIREFIT away from any open flames or heat sources.
• TIREFIT is not a permanent flat tire repair.Have the tire inspected and repaired or
replaced after using TIREFIT. Do not exceed 55 mph (90 km/h) until having the tire
repaired or replaced.
• Take care not to allow the contents of TIREFIT to come in contact with hair, eyes, or clothing. TIREFIT is harmful if inhaled, sw allowed, or absorbed through the skin; it
causes skin, eye, and respiratory irrit ation. Flush immediately with plenty of water
if there is any contact with eyes or skin. Change clothing as soon as possible if
there is any contact with clothing.
• TIREFIT Sealant solution contains latex. In case of allergic reaction or rash, consult a physician immediately. Keep TIREFIT out of the reach of children. If swallowed, rinse
mouth immediately with plenty of water and drink plenty of water. Do not induce
vomiting! Consult a physician immediately.
• Use the gloves provided in the Accessory Storage Compartment when operating the TIREFIT kit.
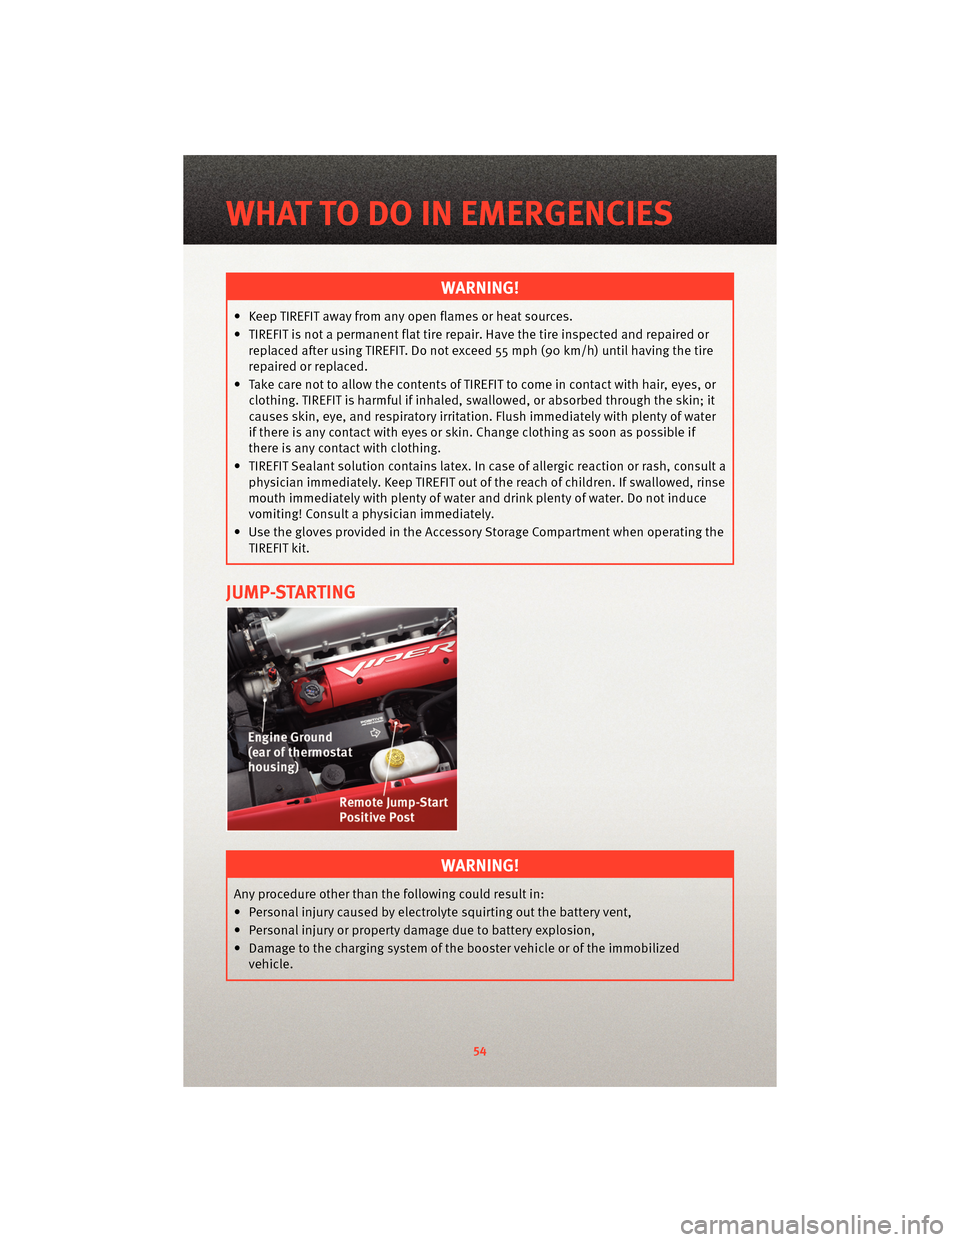
JUMP-STARTING
WARNING!
Any procedure other than the following could result in:
• Personal injury caused by electro lyte squirting out the battery vent,
• Personal injury or property dama ge due to battery explosion,
• Damage to the charging system of the booster vehicle or of the immobilized vehicle.
WHAT TO DO IN EMERGENCIES
54