traction FIAT 124 SPIDER ABARTH 2017 2.G Owners Manual
[x] Cancel search | Manufacturer: FIAT, Model Year: 2017, Model line: 124 SPIDER ABARTH, Model: FIAT 124 SPIDER ABARTH 2017 2.GPages: 292, PDF Size: 121.25 MB
Page 113 of 292
SAFETY SYSTEMS
Safety Systems
The vehicle has the following safety
systems:
Anti-lock Braking System (ABS)
Traction Contol System (TCS)
Dynamic Stability Control (DSC)
For the operation of the systems, see
the following pages.
ABS System (Anti-lock
Braking System)
The ABS control unit continuously
monitors the speed of each wheel. If
one wheel is about to lock up, the ABS
responds by automatically releasing
and reapplying that wheel's brake. The
driver will feel a slight vibration in the
brake pedal and may hear a chattering
noise from the brake system. This is
normal ABS system operation.
Continue to depress the brake pedal
without pumping the brakes. The
warning light turns on when the system
has a malfunction. Refer to “Warning
Lights And Messages” paragraph in
“Getting To Know Your Instrument
Panel” chapter. Note:
Braking distances may be longer on
loose surfaces (snow or gravel, for
example) which usually have a hard
foundation. A vehicle with a normal
braking system may require less
distance to stop under these
conditions because the tires will build
up a wedge of surface layer when the
wheels skid.
The sound of the ABS operating
may be heard when starting the engine
or immediately after starting the
vehicle, however, it does not indicate a
malfunction
Warning!
The ABS contains sophisticated
electronic equipment that may be
susceptible to interference caused by
improperly installed or high output radio
transmitting equipment. This interference
can cause possible loss of anti-lock
braking capability. Installation of such
equipment should be performed by
qualified professionals.
Pumping of the Anti-Lock Brakes will
diminish their effectiveness and may lead
to a collision. Pumping makes the stopping
distance longer. Just press firmly on your
brake pedal when you need to slow down
or stop.
The ABS cannot prevent the natural
laws of physics from acting on the vehicle,
nor can it increase braking or steering
efficiency beyond that afforded by the
condition of the vehicle brakes and tires or
the traction afforded.
The ABS cannot prevent collisions,
including those resulting from excessive
speed in turns, following another vehicle
too closely, or hydroplaning.
The capabilities of an ABS equipped
vehicle must never be exploited in a
reckless or dangerous manner that could
jeopardize the user’s safety or the safety of
others.
TCS System (Traction
Control System)
Warning!
The capability of the TCS must never be
tested irresponsibly and dangerously, in
such a way as to compromise personal
safety and the safety of others.
The Traction Control System (TCS)
enhances traction and safety by
controlling engine torque and braking.
When the TCS detects driving wheel
slippage, it lowers engine torque and
operates the brakes to prevent loss of
traction. This means that on a slick
surface, the engine adjusts
automatically to provide optimum
111
Page 114 of 292
power to the drive wheels, limiting
wheel spin and loss of traction.
The indicator light turns on when the
system has a malfunction. Refer to
“Warning Lights And Messages”
paragraph in “Getting To Know Your
Instrument Panel” chapter.
TCS / DSC Indicator Light
The
indicator light stays on for a few
seconds when the ignition is placed in
the ON mode.
If the TCS or DSC is operating, the
indicator light flashes.
If the
indicator light stays on, the
TCS, DSC or the brake assist system
may have a malfunction and they may
not operate correctly. Contact an
Authorized Dealer.
Note:
In addition to the indicator light
flashing, a slight sound will come from
the engine. This indicates that the
TCS/DSC is operating properly.
On slippery surfaces, such as fresh
snow, it will be impossible to achieve
high rpm when the TCS is on.
DSC System (Dynamic
Stability Control)
The Dynamic Stability Control (DSC)
automatically controls braking and
engine torque in conjunction with
systems such as ABS and TCS to help control side slip when driving on
slippery surfaces, or during sudden or
evasive maneuvering, enhancing vehicle
safety. Refer to “ABS System (Antilock
Brake System)” and “TCS System
(Traction Control System)”.
DSC operation is possible at speeds
greater than 12 mph (20 km/h).
The indicator light turns on when the
system has a malfunction. Refer to
“Warning Lights And Messages”
paragraph in “Getting To Know Your
Instrument Panel” chapter.
Note:
The DSC may not operate correctly
unless the following are observed:
Use tires of the correct size
specified for your vehicle on all four
wheels.
Use tires of the same manufacturer,
brand and tread pattern on all four
wheels.
Do not mix worn tires.
Note:
The DSC may not operate correctly
when tire chains are used.
TCS / DSC Indicator Light
The
indicator light stays on for a few
seconds when the ignition is placed in
the ON mode. It also illuminates when
the DSC OFF switch is pressed and
TCS/DSC is switched off. If the light stays on, the TCS, DSC or
the brake assist system may have a
malfunction and they may not operate
correctly. Take your vehicle to an
Authorized Dealer.
DSC OFF Indicator Light
The
indicator light stays on for a few
seconds when the ignition is placed in
the ON mode. It also illuminates when
the DSC OFF switch is pressed and
TCS/DSC is switched off.
If the light remains illuminated and the
TCS/DSC is not switched off, contact
an Authorized Dealer. The DSC may
have a malfunction.
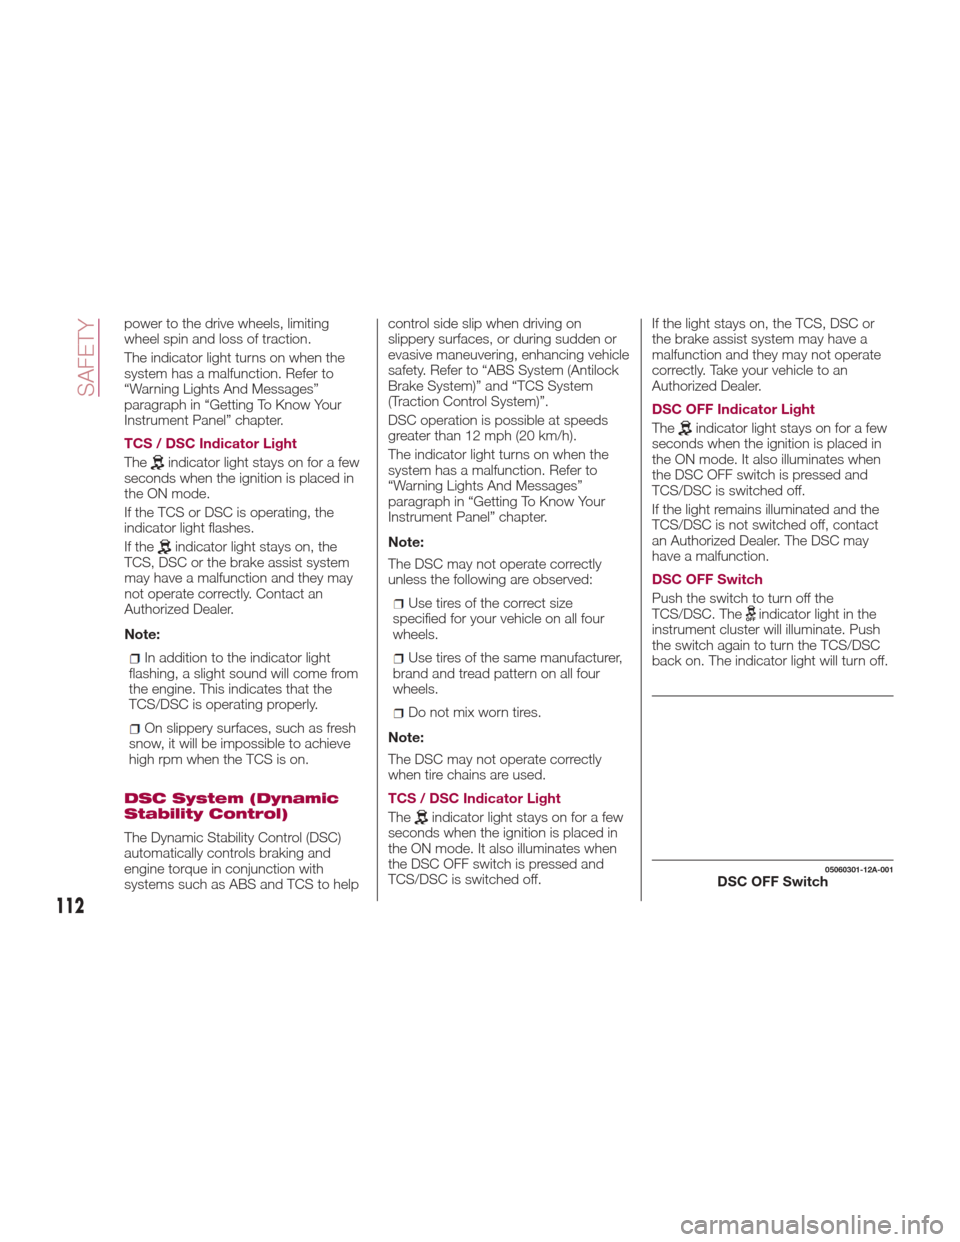
DSC OFF Switch
Pushtheswitchtoturnoffthe
TCS/DSC. The
indicator light in the
instrument cluster will illuminate. Push
the switch again to turn the TCS/DSC
back on. The indicator light will turn off.
05060301-12A-001DSC OFF Switch
112
SAFETY
Page 115 of 292
Note:
When DSC is on and you attempt
to free the vehicle when it is stuck, or
drive it out of freshly fallen snow, the
TCS (part of the DSC system) will
activate. Depressing the accelerator
will not increase engine power and
freeing the vehicle may be difficult.
When this happens, turn off the
TCS/DSC.
If the TCS/DSC is off when the
engine is turned off, it automatically
activates when the ignition is placed in
the ON mode.
If the switch is pressed and held for
10 seconds or more, the switch
malfunction detection function
operates and the DSC system
activates automatically. The indicator
light turns off while the DSC system is
operative.
Warning!
Dynamic Stability Control (DSC) cannot
prevent the natural laws of physics from
acting on the vehicle, nor can it increase
the traction afforded by prevailing road
conditions. DSC cannot prevent accidents,
including those resulting from excessive
speed in turns, driving on very slippery
surfaces, or hydroplaning. DSC also
cannot prevent accidents resulting from
loss of vehicle control due to inappropriate
driver input for the conditions. Only a safe,
attentive, and skillful driver can prevent
accidents. The capabilities of an DSC
equipped vehicle must never be exploited
in a reckless or dangerous manner which
could jeopardize the user’s safety or the
safety of others.
Vehicle modifications, or failure to
properly maintain your vehicle, may change
the handling characteristics of your vehicle,
and may negatively affect the performance
of the DSC system. Changes to the
steering system, suspension, braking
system, tire type and size or wheel size
may adversely affect DSC performance.
Improperly inflated and unevenly worn tires
may also degrade DSC performance. Any
vehicle modification or poor vehicle
maintenance that reduces the effectiveness
of the DSC system can increase the risk of
loss of vehicle control, vehicle rollover,
personal injury and death.
AUXILIARY DRIVING
SYSTEMS
Blind Spot Monitoring
(BSM) System
The Blind Spot Monitoring (BSM)
system is designed to assist the driver
in checking the area to the rear of the
vehicle on both sides during lane
changes by alerting the driver to the
presence of vehicles approaching from
the rear in an adjacent lane.
The system detects vehicles
approaching from the rear while
traveling in the forward direction at a
speed of 18 mph (30 km/h) or faster
and turns on the warning lights
equipped on the door mirrors
depending on the conditions.
If the turn signal lever is operated to
signal a lane change in the direction in
which the warning light is illuminated,
the system warns the driver of a vehicle
in the detection area by flashing the
warning light and activating a beep
sound.
113
Page 125 of 292
SEAT BELT
SYSTEMS
Buckle up even though you are an
excellent driver, even on short trips.
Someone on the road may be a poor
driver and could cause a collision that
includes you. This can happen far away
from home or on your own street.
Research has shown that seat belts
save lives, and they can reduce the
seriousness of injuries in a collision.
Some of the worst injuries happen
when people are thrown from the
vehicle. Seat belts reduce the possibility
of ejection and the risk of injury caused
by striking the inside of the vehicle.
Everyone in a motor vehicle should be
belted at all times.
Seat Belt Precautions
Seat belts help to decrease the
possibility of severe injury during
accidents and sudden stops. FCA
recommends that the driver and
passengers always wear seat belts.
Mexico
All the seats have lap/shoulder belts.
These belts have retractors with inertia
locks that keep them out of the way
when not in use.
The locks allow the belts to remain
comfortable on users, but they will lock
in position during a collision.Except Mexico
All of the seat belt retractors are
designed to keep the lap/shoulder belts
out of the way when not in use.
The driver's seat belt has no provisions
for child-restraint systems and has only
an emergency locking mode.
The driver may wear it comfortably, and
it will lock during a collision.
However, the passenger's seat
lap/shoulder belt retractor operates in
two modes: emergency locking mode,
and for child-restraint systems,
automatic locking mode. If you must
use the passenger seat for a child, slide
the passenger seat as far back as
possible and make sure any child
restraint system is secured properly.
Belt retraction may become difficult if
the belts and seat belt guides are
soiled, so try to keep them clean. Refer
to “Cleaning the lap/shoulder belt
webbing” in “Maintenance and care” for
further information.
Warning!
Relying on the air bags alone could lead
to more severe injuries in a collision. The air
bags work with your seat belt to restrain
you properly. In some collisions, the air
bags won’t deploy at all. Always wear your
seat belt even though you have air bags.
In a collision, you and your passengers
can suffer much greater injuries if you are
not properly buckled up. You can strike the
interior of your vehicle or other passengers,
or you can be thrown out of the vehicle.
Always be sure you and others in your
vehicle are buckled up properly.
It is dangerous to ride in a cargo area,
inside or outside of a vehicle. In a collision,
people riding in these areas are more likely
to be seriously injured or killed.
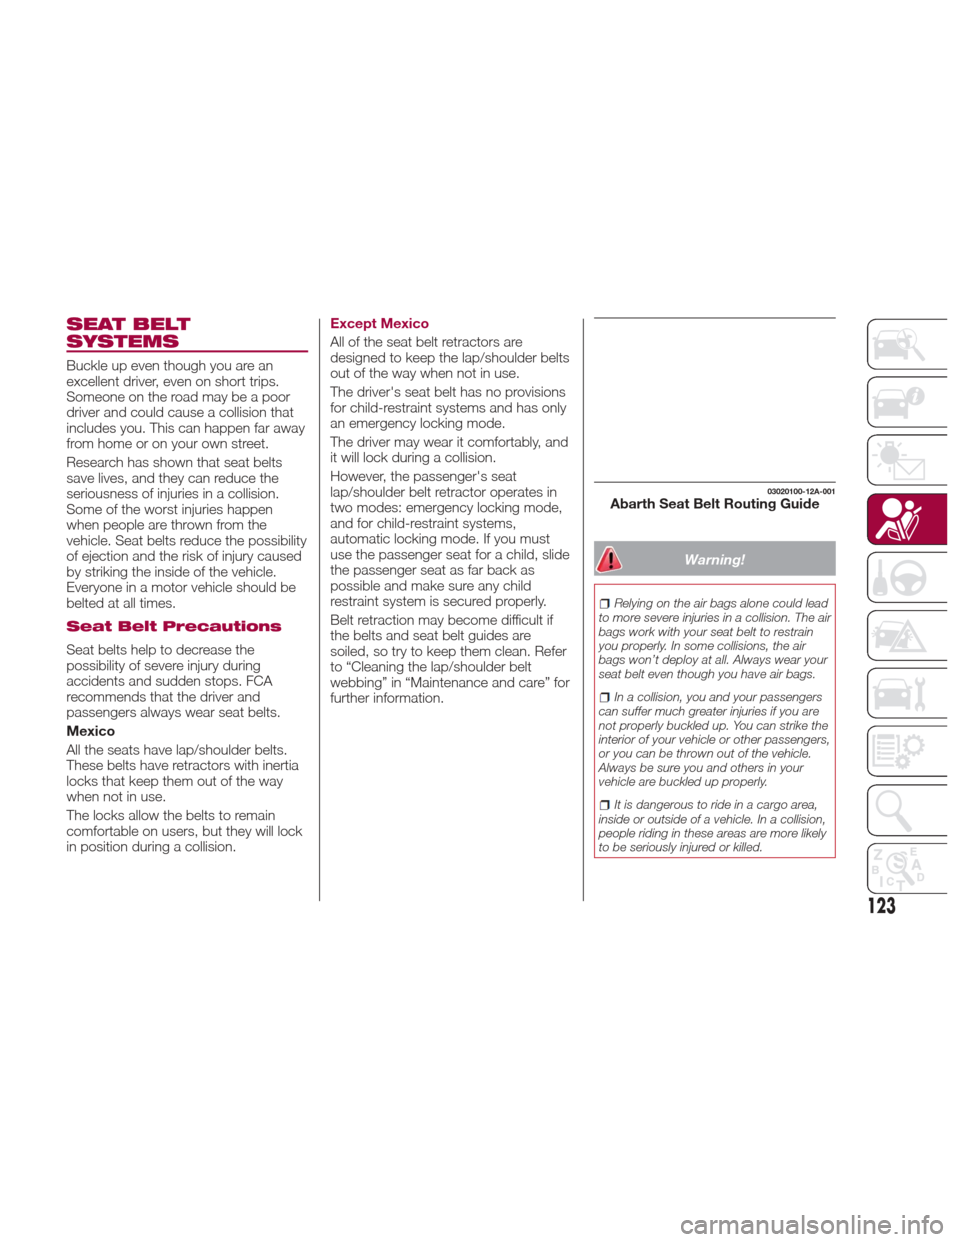
03020100-12A-001Abarth Seat Belt Routing Guide
123
Page 133 of 292
Place the child-restraint system on
the seat without putting your weight on
the seat and secure the child-restraint
system with the lap portion of the
lap/shoulder belt. See the
manufacturer's instructions on the
child-restraint system for belt routing
instructions;
To get the retractor into the
automatic locking mode, pull the
shoulder belt portion of the seat belt
until the entire length of the belt is out of
the retractor;
Push the child-restraint system firmly
into the vehicle seat. Be sure the belt
retracts as snugly as possible. A
clicking noise from the retractor will be
heard during retraction if the system is
in automatic locking mode. If the belt
does not lock the seat down tight,
repeat the previous step and also this
one;
Seat your child safely in the
child-restraint system and secure the
child according to the instructions from
the child-restraint system manufacturer;
Note: Inspect this function before
each use of the child restraint system.
You should not be able to pull the
shoulder belt out of the retractor while
the system is in the automatic locking
mode. When you remove the
child-restraint system, be sure the belt
fully retracts to return the system to emergency locking mode before
occupants use the seat belts.
Place the ignition in the ON position
and make sure the passenger air bag
deactivation indicator light illuminates
after installing a child restraint system
on the passenger seat. If the passenger
air bag deactivation indicator light does
not illuminate, remove the child restraint
system, place the ignition in the OFF
position, and then reinstall the child
restraint system.
Warning!
Never place a rear-facing child restraint
in front of an air bag. A deploying
passenger Advanced Front Air Bag can
cause death or serious injury to a child
12 years or younger, including a child in a
rear-facing child restraint.
Only use a rear-facing child restraint in a
vehicle with a rear seat.
An incorrectly anchored tether strap
could lead to increased head motion and
possibly injury to the child. Use only the
anchorage position directly behind the
child seat to secure a child restraint top
tether strap.
GUID-06070400567567Passenger Air Bag Deactivation Light
131
Page 179 of 292
DRIVING TIPS
Engine Break-In
Recommendation
No special break-in is necessary, but a
few precautions in the first 620 miles
(1000 km) may add to the performance,
economy, and life of the vehicle:
Do not race the engine.
Do not maintain one constant speed,
either slow or fast, for a long period of
time.
Do not drive constantly at full-throttle
or high engine rpm for extended
periods of time.
Avoid unnecessary hard stops.
Avoid full-throttle starts.
Saving Fuel And
Protection Of The
Environment
How you operate your vehicle
determines how far it will travel on a
tankoffuel.
Use these suggestions to help save fuel
and reduce CO
2:
Avoid long warm-ups. Once the
engine runs smoothly, begin driving.
Avoid fast starts.
Drive at lower speeds.
Anticipate when to apply the brakes
(avoid sudden braking).
Follow the maintenance schedule
and contact your Authorized Dealer.
Use the air conditioner only when
necessary.
Slow down on rough roads.
Keep the tires properly inflated.
Do not carry unnecessary weight.
Do not rest your foot on the brake
pedal while driving.
Keep the wheels in correct
alignment.
Keep windows closed at high
speeds.
Slow down when driving in
crosswinds and headwinds.
Hazardous Driving
When driving on ice or in water, snow,
mud, sand, or similar hazards:
Be cautious and allow extra distance
for braking.
Avoid sudden braking and sudden
maneuvering.
Do not pump the brakes. Continue to
press down on the brake pedal.
If you get stuck, select a lower gear
and accelerate slowly. Do not spin the
rear wheels.
For more traction in starting on
slippery surfaces such as ice or packed
snow, use sand, rock salt, chains, carpeting, or other nonslip material
under the rear wheels.
Note:
Use snow chains only on the
rear wheels.
Floor Mat Safety
Information
Always use floor mats designed to fit
the footwell of your vehicle. Use only
floor mats that leave the pedal area
unobstructed and that are firmly
secured so that they cannot slip out of
position and interfere with the pedals or
impair safe operation of your vehicle in
other ways.
04090400-USA-001Floor Mat Retention Post Location
177
Page 182 of 292
Caution!
To avoid damage to your vehicle or tires,
observe the following precautions:
Because of restricted traction device
clearance between tires and other
suspension components, it is important
that only traction devices in good condition
are used. Broken devices can cause
serious damage. Stop the vehicle
immediately if noise occurs that could
indicate device breakage. Remove the
damaged parts of the device before further
use.
Install device as tightly as possible and
then retighten after driving about ½ mile
(0.8 km).
Do not exceed 30 mph (48 km/h).
Drive cautiously and avoid severe turns
and large bumps, especially with a loaded
vehicle.
Do not drive for a prolonged period on
dry pavement.
Observe the traction device
manufacturer’s instructions on the method
of installation, operating speed, and
conditions for use. Always use the
suggested operating speed of the device
manufacturer’s if it is less than 30 mph
(48 km/h).
Do not use traction devices on a
compact spare tire.
Driving In Flooded Area
Note: Do not drive the vehicle on
flooded roads as it could cause short
circuit of electrical/electronic parts, or
water enters the engine and causes it
to lock up (hydro-lock) and stall. If the
vehicle has been immersed in water
contact your Authorized Dealer.
Although your vehicle is capable of
driving through shallow standing water,
consider the following Cautions and
Warnings before doing so.
Warning!
Driving through standing water limits
your vehicle’s traction capabilities. Do not
exceed 5 mph (8 km/h) when driving
through standing water.
Driving through standing water limits
your vehicle’s braking capabilities, which
increases stopping distances. Therefore,
after driving through standing water, drive
slowly and lightly press on the brake pedal
several times to dry the brakes.
Failure to follow these warnings may
result in injuries that are serious or fatal to
you, your passengers, and others around
you.
Caution!
Always check the depth of the standing
water before driving through it. Never drive
through standing water that is deeper than
the bottom of the tire rims mounted on the
vehicle.
Determine the condition of the road or
the path that is under water and if there are
any obstacles in the way before driving
through the standing water.
Do not exceed 5 mph (8 km/h) when
driving through standing water. This will
minimize wave effects.
Driving through standing water may
cause damage to your vehicle’s drivetrain
components. Always inspect your vehicle’s
fluids (i.e., engine oil, transmission, axle,
etc.) for signs of contamination (i.e., fluid
that is milky or foamy in appearance) after
driving through standing water. Do not
continue to operate the vehicle if any fluid
appears contaminated, as this may result
in further damage. Such damage is not
covered by the New Vehicle Limited
Warranty.
Getting water inside your vehicle’s
engine can cause it to lock up and stall out,
and cause serious internal damage to the
engine. Such damage is not covered by
the New Vehicle Limited Warranty.
180
STARTING AND OPERATING
Page 239 of 292
RAISING THE
VEHICLE
If the vehicle needs to be raised, see an
authorized dealer which is equipped
with arm hoists or workshop lifts.
The vehicle’s lifting points are marked
on the side skirts with the
symbols.
WHEELS AND TIRES
Tire Safety Information
Tire safety information will cover
aspects of the following information:
Tire Markings, Tire Identification
Numbers, Tire Terminology and
Definitions, Tire Pressures and Tire
Loading.
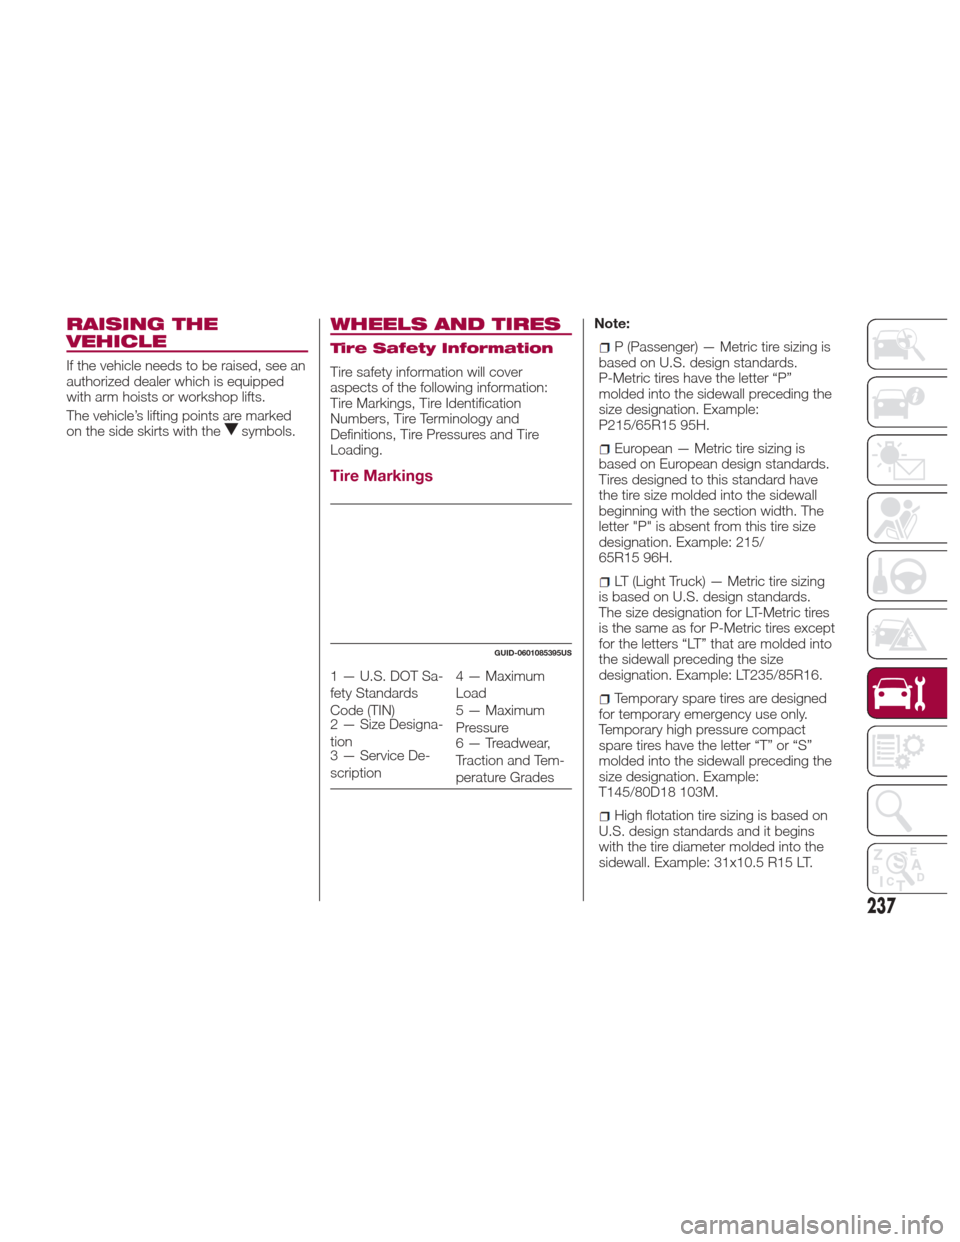
Tire Markings
Note:
P (Passenger) — Metric tire sizing is
based on U.S. design standards.
P-Metric tires have the letter “P”
molded into the sidewall preceding the
size designation. Example:
P215/65R15 95H.
European — Metric tire sizing is
based on European design standards.
Tires designed to this standard have
the tire size molded into the sidewall
beginning with the section width. The
letter "P" is absent from this tire size
designation. Example: 215/
65R15 96H.
LT (Light Truck) — Metric tire sizing
is based on U.S. design standards.
The size designation for LT-Metric tires
is the same as for P-Metric tires except
for the letters “LT” that are molded into
the sidewall preceding the size
designation. Example: LT235/85R16.
Temporary spare tires are designed
for temporary emergency use only.
Temporary high pressure compact
spare tires have the letter “T” or “S”
molded into the sidewall preceding the
size designation. Example:
T145/80D18 103M.
High flotation tire sizing is based on
U.S. design standards and it begins
with the tire diameter molded into the
sidewall. Example: 31x10.5 R15 LT.
GUID-0601085395US
1 — U.S. DOT Sa-
fety Standards
Code (TIN) 4 — Maximum
Load
2 — Size Designa-
tion 5 — Maximum
Pressure
3 — Service De-
scription 6 — Treadwear,
Traction and Tem-
perature Grades
237
Page 248 of 292
Replacement Tires
The tires on your new vehicle provide a
balance of many characteristics. They
should be inspected regularly for wear
and correct cold tire inflation pressures.
The manufacturer strongly recommends
that you use tires equivalent to the
originals in size, quality and
performance when replacement is
needed. Refer to the paragraph on
“Tread Wear Indicator”. Refer to the Tire
and Loading Information placard or the
Vehicle Certification Label for the size
designation of your tire. The Load Index
and Speed Symbol for your tire will be
found on the original equipment tire
sidewall. See the Tire Sizing Chart
example found in the “Tire Safety
Information” section of this manual for
more information relating to the Load
Index and Speed Symbol of a tire.
It is recommended to replace the two
front tires or two rear tires as a pair.
Replacing just one tire can seriously
affect your vehicle’s handling. If you
ever replace a wheel, make sure that
the wheel’s specifications match those
of the original wheels.
It is recommended you contact your
authorized tire dealer or original
equipment dealer with any questions
you may have on tire specifications or
capability. Failure to use equivalent
replacement tires may adversely affect
the safety, handling, and ride of your
vehicle.Warning!
Do not use a tire, wheel size, load rating,
or speed rating other than that specified for
your vehicle. Some combinations of
unapproved tires and wheels may change
suspension dimensions and performance
characteristics, resulting in changes to
steering, handling, and braking of your
vehicle. This can cause unpredictable
handling and stress to steering and
suspension components. You could lose
control and have a collision resulting in
serious injury or death. Use only the tire
and wheel sizes with load ratings approved
for your vehicle.
Never use a tire with a smaller load
index or capacity, other than what was
originally equipped on your vehicle. Using a
tire with a smaller load index could result in
tire overloading and failure. You could lose
control and have a collision.
Failure to equip your vehicle with tires
having adequate speed capability can
result in sudden tire failure and loss of
vehicle control.
Caution!
Replacing original tires with tires of a
different size may result in false
speedometer and odometer readings.
Tire Types
All Season Tires — If Equipped
All Season tires provide traction for all
seasons (Spring, Summer, Fall and
Winter). Traction levels may vary
between different all season tires. All
season tires can be identified by the
M+S, M&S, M/S or MS designation on
the tire sidewall. Use all season tires
only in sets of four; failure to do so may
adversely affect the safety and handling
of your vehicle.
Summer Or Three Season Tires
— If Equipped
Summer tires provide traction in both
wet and dry conditions, and are not
intended to be driven in snow or on ice.
If your vehicle is equipped with Summer
tires, be aware these tires are not
designed for Winter or cold driving
conditions. Install Winter tires on your
vehicle when ambient temperatures are
less than 40°F (5°C) or if roads are
covered with ice or snow. For more
information, contact an authorized
dealer.
Summer tires do not contain the all
season designation or mountain/
snowflake symbol on the tire sidewall.
Use Summer tires only in sets of four;
failure to do so may adversely affect the
safety and handling of your vehicle.
246
SERVICING AND MAINTENANCE
Page 249 of 292
Warning!
Do not use Summer tires in snow/ice
conditions. You could lose vehicle control,
resulting in severe injury or death. Driving
too fast for conditions also creates the
possibility of loss of vehicle control.
Snow Tires
Some areas of the country require the
use of snow tires during the Winter.
Snow tires can be identified by a
“mountain/snowflake” symbol on the
tire sidewall.If you need snow tires,
select tires equivalent
in size and type to the
original equipment
tires. Use snow tires
only in sets of four;
failure to do so may
adversely affect the safety and handling
of your vehicle.
Snow tires generally have lower speed
ratings than what was originally
equipped with your vehicle and should
not be operated at sustained speeds
over 75 mph (120 km/h). For speeds
above 75 mph (120 km/h) refer to
original equipment or an authorized tire
dealer for recommended safe operating
speeds, loading and cold tire inflation
pressures. While studded tires improve
performance on ice, skid and traction
capability on wet or dry surfaces may
be poorer than that of non-studded
tires. Some states prohibit studded
tires; therefore, local laws should be
checked before using these tire types.
Spare Tires — If
Equipped
Note:
For vehicles equipped with Tire Service
Kit instead of a spare tire, please refer
to “Tire Service Kit” in “In Case Of
Emergency” for further information.
Caution!
Because of the reduced ground clearance,
do not take your vehicle through an
automatic car wash with a compact or
limited use temporary spare installed.
Damage to the vehicle may result.
Spare Tire Matching Original
Equipped Tire And Wheel — If
Equipped
Your vehicle may be equipped with a
spare tire and wheel equivalent in look
and function to the original equipment
tire and wheel found on the front or rear
axle of your vehicle. This spare tire may
be used in the tire rotation for your
vehicle. If your vehicle has this option,refer to an authorized tire dealer for the
recommended tire rotation pattern.
Compact Spare Tire — If
Equipped
The compact spare is for temporary
emergency use only. You can identify if
your vehicle is equipped with a
compact spare by looking at the spare
tire description on the Tire and Loading
Information Placard located on the
driver’s side door opening or on the
sidewall of the tire. Compact spare tire
descriptions begin with the letter “T” or
“S” preceding the size designation.
Example: T145/80D18 103M.
T,S=Tempo
rary Spare Tire
Since this tire has limited tread life, the
original equipment tire should be
repaired (or replaced) and reinstalled on
your vehicle at the first opportunity.
Do not install a wheel cover or attempt
to mount a conventional tire on the
compact spare wheel, since the wheel
is designed specifically for the compact
spare tire. Do not install more than one
compact spare tire and wheel on the
vehicle at any given time.
247