CD player FIAT 500E 2014 2.G User Guide
[x] Cancel search | Manufacturer: FIAT, Model Year: 2014, Model line: 500E, Model: FIAT 500E 2014 2.GPages: 92, PDF Size: 3.24 MB
Page 3 of 92
INTRODUCTION/WELCOMEWELCOME FROM FIAT...............2
IMPORTANT VEHICLE INFORMATION......4
CONTROLS AT A GLANCEDRIVER COCKPIT..................6
INSTRUMENT CLUSTER..............8
GETTING STARTEDELECTRIC VEHICLE FEATURES..........10
ELECTRIC SYSTEM OPERATION.........13
CHARGING THE HIGH VOLTAGE BATTERY...16
STARTING YOUR 500e...............19
KEY FOB......................20
VEHICLE SECURITY ALARM...........21
POWER DOOR LOCKS..............21
SEAT BELT......................21
SUPPLEMENTAL RESTRAINT SYSTEM (SRS) —
AIR BAGS......................22
CHILD RESTRAINTS................23
FRONT SEATS....................28
REAR SEATS.....................30
HEATED SEATS...................31
TILT STEERING...................32
OPERATING YOUR VEHICLEEXTENDING YOUR DRIVING RANGE
PER CHARGE....................33
TURN SIGNAL/LIGHTS/HIGH BEAM LEVER...34
WIPER/WASHER LEVER..............36
SPEED CONTROL..................37
POWER WINDOWS................39
AUTOMATIC TEMPERATURE
CONTROLS (ATC).................39
REAR PARK ASSIST.................40
POWER SUNROOF.................40
WIND BUFFETING.................41
ELECTRONICSYOUR VEHICLE'S SOUND SYSTEM........42
AM/FM RADIO WITH CD PLAYER AND
SiriusXM SATELLITE RADIO............44
BLUE&ME™ HANDS-FREE OPERATION.....45
iPod®/USB/MP3 CONTROL............51
ELECTRONIC VEHICLE INFORMATION
CENTER (EVIC)...................51
PROGRAMMABLE FEATURES...........52
TRIP BUTTON....................53
POWER OUTLET..................54
UTILITY
TRAILER TOWING WEIGHTS
(MAXIMUM TRAILER WEIGHT RATINGS)....55
RECREATIONAL TOWING
(BEHIND MOTORHOME, ETC.).........55
WHAT TO DO IN EMERGENCIES
24-HOUR ROADSIDE ASSISTANCE........56INSTRUMENT CLUSTER WARNING LIGHTS...56
TIREFIT KIT......................59
JUMP-STARTING PROCEDURE —
12 VOLT BATTERY.................65
MANUAL PARK RELEASE.............68
TOWING A DISABLED VEHICLE.........69
ENHANCED ACCIDENT RESPONSE
SYSTEM.......................70
FREEING A STUCK VEHICLE............70
EVENT DATA RECORDER (EDR).........71
MAINTAINING YOUR VEHICLE
OPENING THE HOOD..............72
UNDERHOOD COMPARTMENT........73
FLUIDS AND CAPACITIES.............74
MAINTENANCE SCHEDULE...........75
FUSES.........................77
TIRE PRESSURES..................79
TIRE ROTATION RECOMMENDATIONS....80
WHEEL AND WHEEL TRIM CARE........81
EXTERIOR BULBS.................81
CUSTOMER ASSISTANCE
FIAT CUSTOMER CENTER.............82
ASSISTANCE FOR THE HEARING IMPAIRED..82
PUBLICATIONS ORDERING...........82
REPORTING SAFETY DEFECTS IN THE
UNITED STATES...................83
MOPAR® ACCESSORIES
AUTHENTIC ACCESSORIES BY MOPAR®...84
FREQUENTLY ASKED QUESTIONS
FAQ ’s.........................85
INDEX.......................86
TABLE OF CONTENTS
1
Page 4 of 92
WELCOME FROM FIAT
Congratulations on selecting your new FIAT 500e.Be assured that your 500e represents
an elegant marriage of technology and Italian styling that is as good for the environment
as is fun to drive!
Your new 500e has characteristics to enhance the driver's control under some driving
conditions.These are to assist the driver and are never a substitute for attentive driving.
They can never take the driver's place.Always drive carefully.
Your new vehicle has many features for the comfort and convenience of you and your
passengers.Some of these should not be used when driving because they take your eyes
from the road or your attention from driving.Never text while driving or take your
eyes more than momentarily off the road.
This guide illustrates and describes the operation of features and equipment that are
either standard or optional on this vehicle.This guide may also include a description of
features and equipment that are no longer available or were not ordered on this vehicle.
Please disregard any features and equipment described in this guide that are not available
on this vehicle.Chrysler Group LLC reserves the right to make changes in design and
specifications and/or make additions to or improvements to its products without imposing
any obligation upon itself to install them on products previously manufactured.
This User Guide has been prepared to help you quickly become acquainted with the
important features of your vehicle.It contains most things you will need to operate and
maintain the vehicle, including emergency information.
The DVD includes a computer application containing detailed owner's information which
can be viewed on a personal computer or MAC computer.The multimedia DVD also
includes videos which can be played on any standard DVD player.Additional DVD
operational information is located on the back of the DVD sleeve.
For complete owner information, refer to your Owner's Manual on the DVD in the
owner’s kit provided at the time of new vehicle purchase.For your convenience, the
information contained on the DVD may also be printed and saved for future reference.
We are committed to protecting our environment and natural resources.By converting
from paper to electronic delivery for the majority of the user information for your
vehicle, together we greatly reduce the demand for tree-based products and lessen the
stress on our environment.
INTRODUCTION/WELCOME
2
Page 5 of 92
WARNING!
•Pedals that cannot move freely can cause loss of vehicle control and increase the
risk of serious personal injury.
•Always make sure that objects cannot fall into the driver foot well while the ve-
hicle is moving.Objects can become trapped under the brake pedal and accelera-
tor pedal causing a loss of vehicle control.
•Failure to properly follow floor mat installation or mounting can cause interference
with the brake pedal and accelerator pedal operation causing loss of control of
the vehicle.
•Never leave children alone in a vehicle, or with access to an unlocked vehicle.Al-
lowing children to be in a vehicle unattended is dangerous for a number of rea-
sons.A child or others could be seriously or fatally injured.Children should be
warned not to touch the parking brake, brake pedal or the shift lever.
•Never use the ‘PARK’ position as a substitute for the parking brake.Always apply
the parking brake fully when parked to guard against vehicle movement and pos-
sible injury or damage.
•Refer to your Owner's Manual on the DVD for further details.
USE OF AFTERMARKET PRODUCTS (ELECTRONICS)
The use of aftermarket devices including cell phones, MP3 players, GPS systems, or char-
gers may affect the performance of on-board wireless features.If you are experiencing
difficulties with any of your wireless features, try disconnecting your aftermarket devices
to see if the situation improves.If your symptoms persist, please see an authorized dealer.
CHRYSLER, DODGE, JEEP, RAM TRUCK, SRT, ATF+4, MOPAR and Uconnect are regis-
tered trademarks of Chrysler Group LLC.
COPYRIGHT ©2013 CHRYSLER GROUP LLC
INTRODUCTION/WELCOME
3
Page 45 of 92
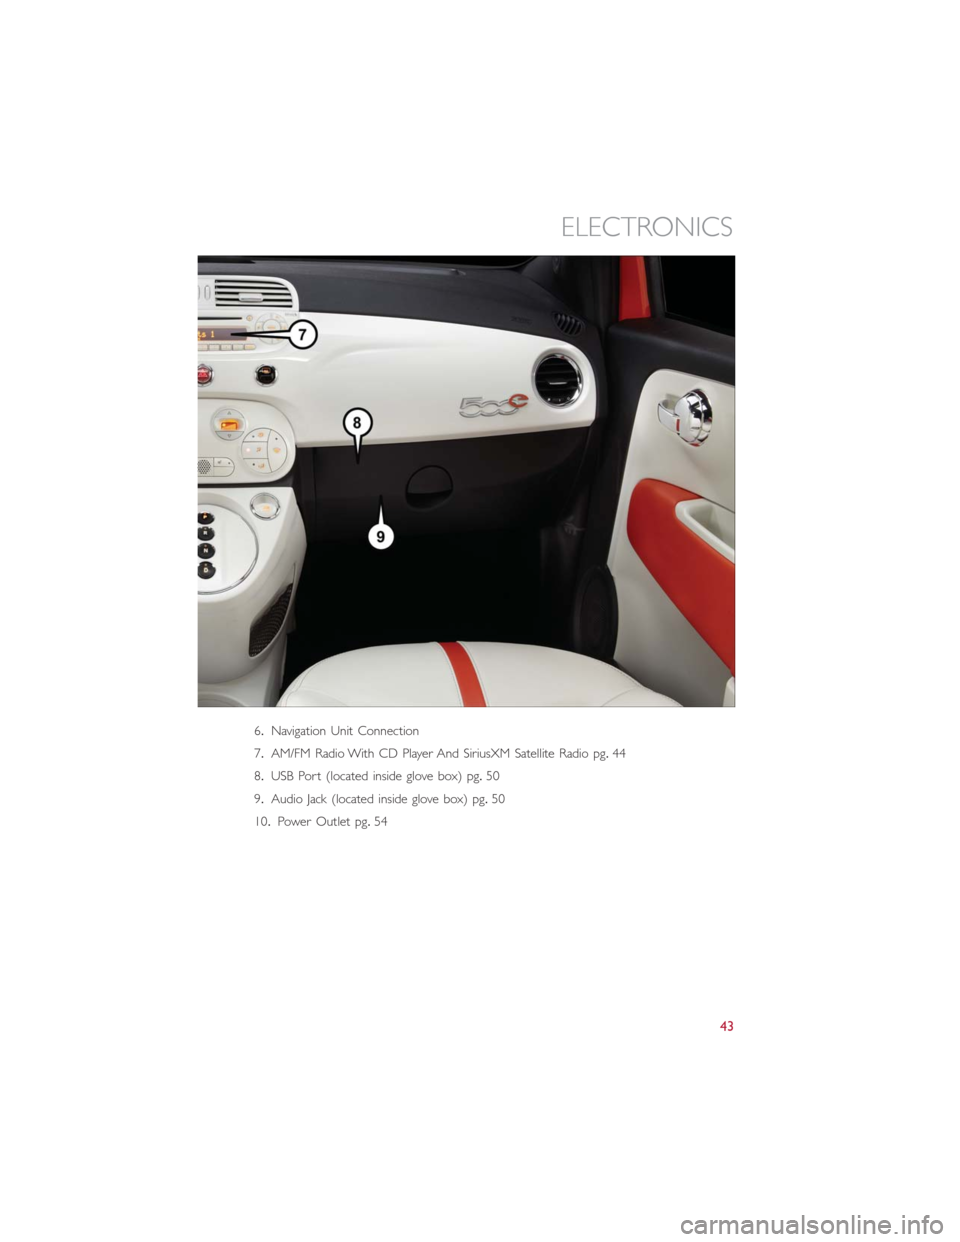
6.Navigation Unit Connection
7.AM/FM Radio With CD Player And SiriusXM Satellite Radio pg.44
8.USB Port (located inside glove box) pg.50
9.Audio Jack (located inside glove box) pg.50
10.Power Outlet pg.54
ELECTRONICS
43
Page 46 of 92
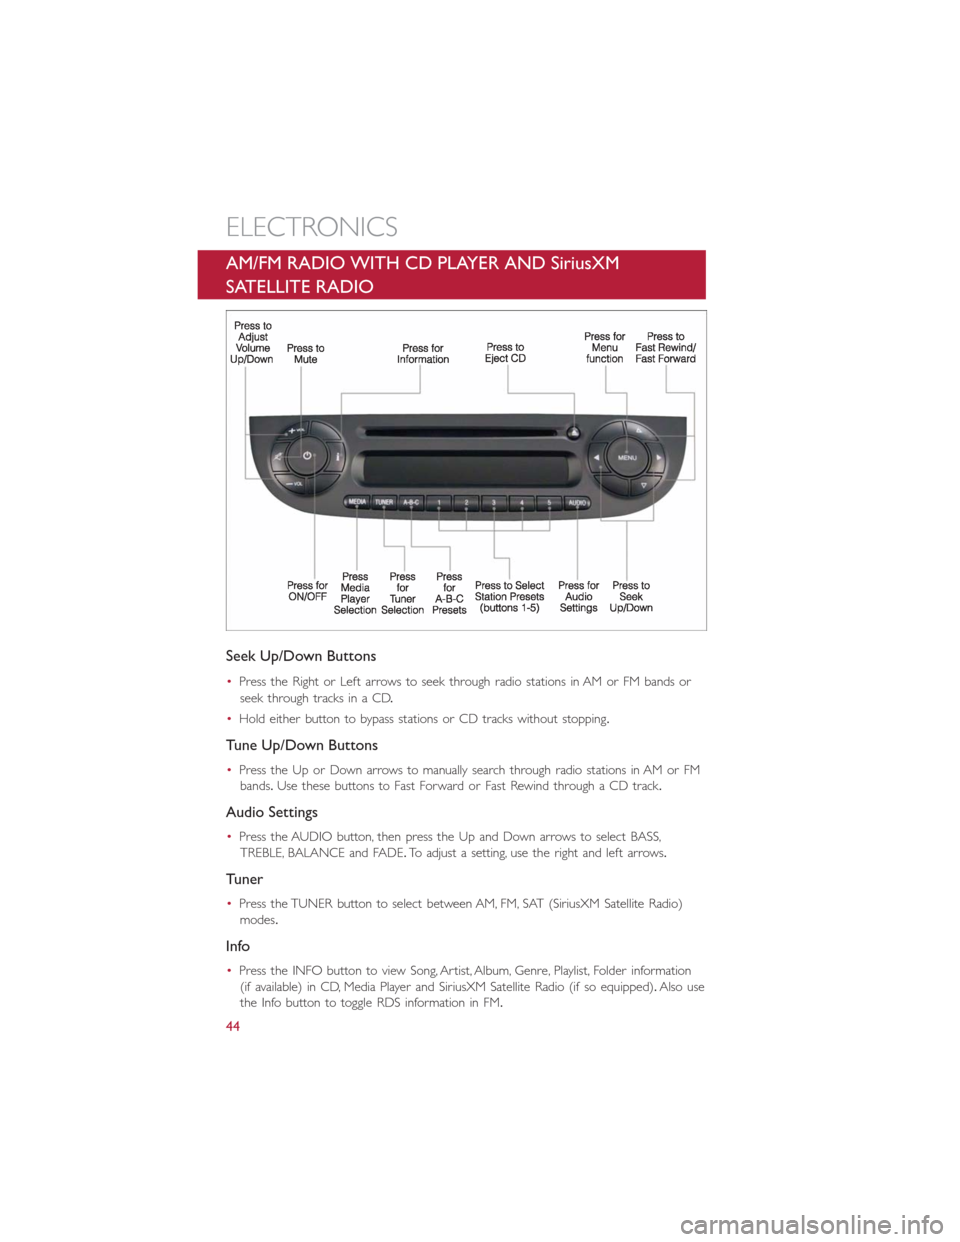
AM/FM RADIO WITH CD PLAYER AND SiriusXM
SATELLITE RADIO
Seek Up/Down Buttons
•Press the Right or Left arrows to seek through radio stations in AM or FM bands or
seek through tracks in a CD.
•Hold either button to bypass stations or CD tracks without stopping.
Tune Up/Down Buttons
•Press the Up or Down arrows to manually search through radio stations in AM or FM
bands.Use these buttons to Fast Forward or Fast Rewind through a CD track.
Audio Settings
•Press the AUDIO button, then press the Up and Down arrows to select BASS,
TREBLE, BALANCE and FADE.To adjust a setting, use the right and left arrows.
Tuner
•Press the TUNER button to select between AM, FM, SAT (SiriusXM Satellite Radio)
modes.
Info
•Press the INFO button to view Song, Artist, Album, Genre, Playlist, Folder information
(if available) in CD, Media Player and SiriusXM Satellite Radio (if so equipped).Also use
the Info button to toggle RDS information in FM.
ELECTRONICS
44
Page 47 of 92
Menu
•Press the MENU button and one of the following options will appear on the Radio
display.Use the Up and Down arrows to scroll through the options; use the Left and
Right arrows to change a selection setting.
•Speech Volume•SiriusXM Telephone Number
•Aux Audio Offset•System Reset
•Radio Off•Speed Volume
•Sat ID•On Volume Limit
Station Presets
•To store a tuned station, find the station to store by either pressing the Right and Left
arrow (Seek) buttons or by pressing Up or Down arrow (Manual Tune) buttons.
•Once the station is found, press and hold one of the PRESET buttons, until you hear a
confirmation beep (Preset Saved will be shown in the radio display).A total of 15 FM,
10 AM and 15 SiriusXM Satellite Radio stations can be preset by pressing the A-B-C
button.
A-B-C Button
•Press the A-B-C button to choose between the presets stored in the AM, FM or SAT
modes.The mode (AM, FM, SAT), station preset (A, B, C) and preset button number
(P 1-5) will be displayed in the middle of the radio display.
BLUE&ME™ HANDS-FREE OPERATION
•FIAT’s Windows Mobile™ based BLUE&ME™ Hands-Free Communication is a personal
telematics system that incorporates communication and entertainment applications that
are specifically designed for use in your car.
•The BLUE&ME™ Hands-Free Communication package installed in your car is equipped
with integral hands-free functionality, message reader, and media player.BLUE&ME™ is
designed to support the future installation of additional services.
•The BLUE&ME™ Hands-Free Communication package features integrated voice recog-
nition, steering wheel controls and a multifunction electronic display that allows you to
use your Bluetooth® enabled wireless technology enabled mobile phone without
having to take your eyes off the road.You can even keep your phone in a pocket or a
bag.You are not required to train the voice recognition system to recognize your
voice.The system is “speaker independent” and performs equally well for different
users.
ELECTRONICS
45
Page 49 of 92
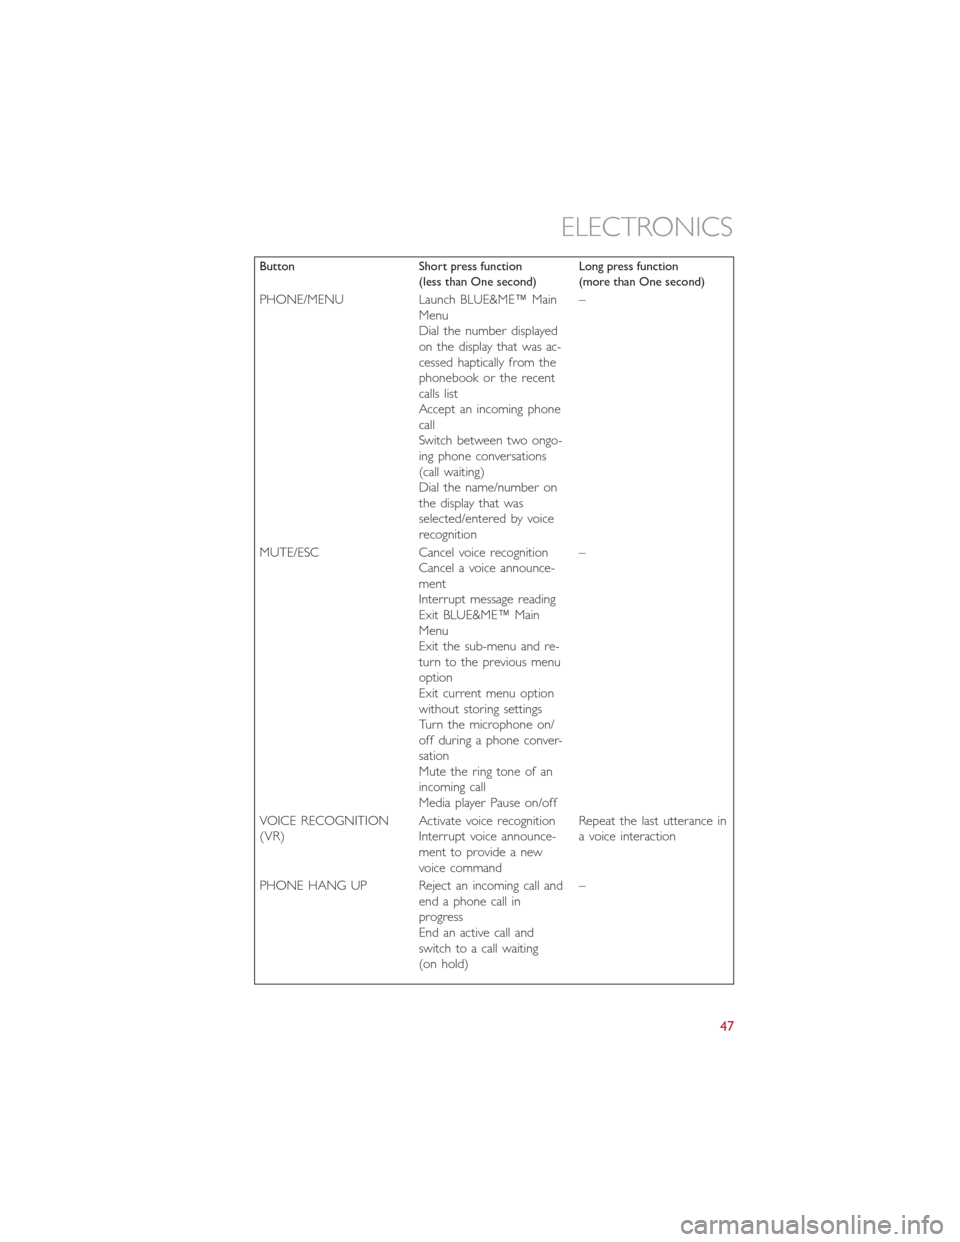
Button Short press function
(less than One second)Long press function
(more than One second)
PHONE/MENU Launch BLUE&ME™ Main
Menu
Dial the number displayed
on the display that was ac-
cessed haptically from the
phonebook or the recent
calls list
Accept an incoming phone
call
Switch between two ongo-
ing phone conversations
(call waiting)
Dial the name/number on
the display that was
selected/entered by voice
recognition–
MUTE/ESC Cancel voice recognition
Cancel a voice announce-
ment
Interrupt message reading
Exit BLUE&ME™ Main
Menu
Exit the sub-menu and re-
turn to the previous menu
option
Exit current menu option
without storing settings
Turn the microphone on/
off during a phone conver-
sation
Mute the ring tone of an
incoming call
Media player Pause on/off–
VOICE RECOGNITION
(VR)Activate voice recognition
Interrupt voice announce-
ment to provide a new
voice commandRepeat the last utterance in
a voice interaction
PHONE HANG UP Reject an incoming call and
end a phone call in
progress
End an active call and
switch to a call waiting
(on hold)–
ELECTRONICS
47
Page 50 of 92
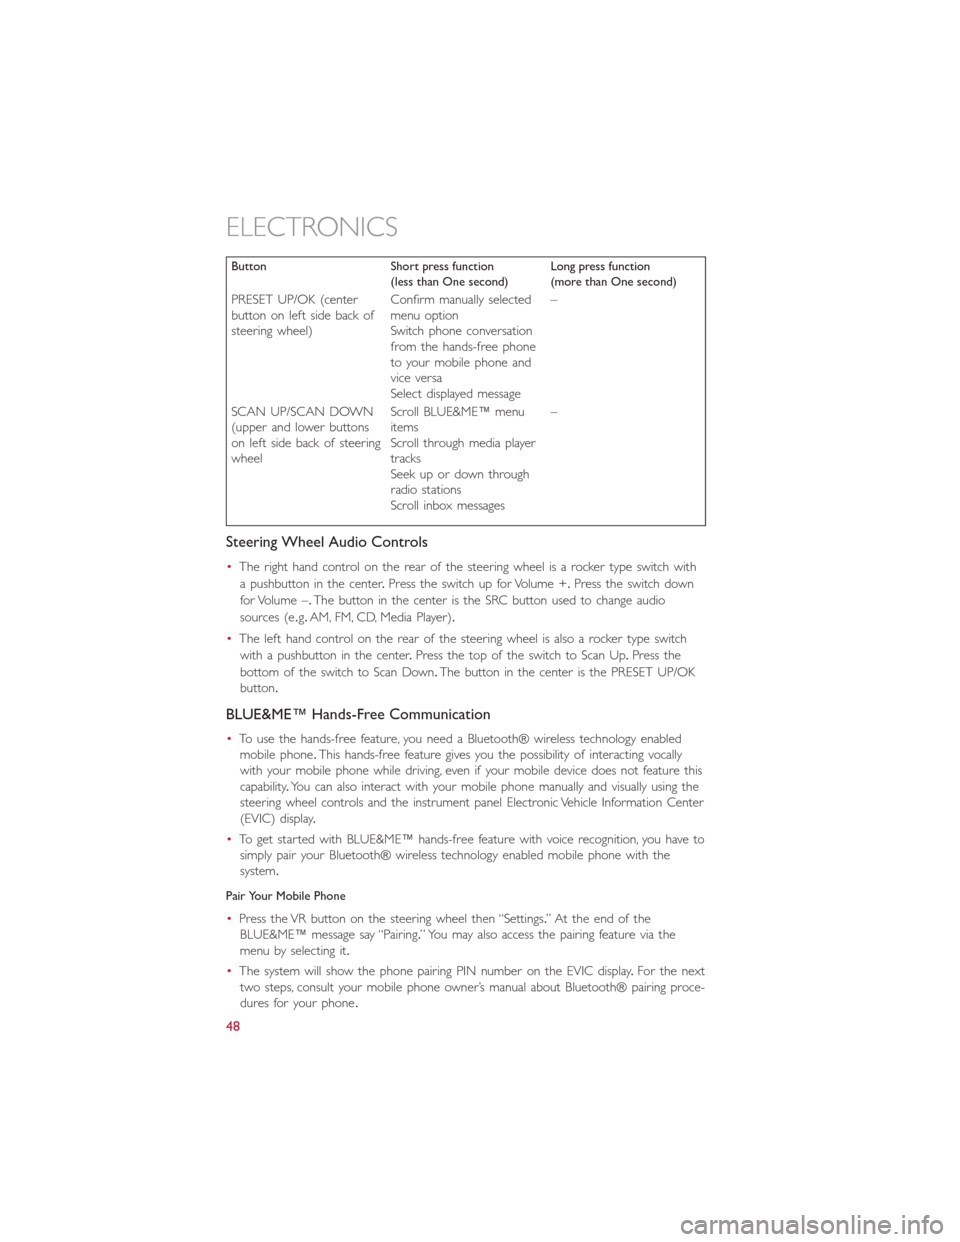
Button Short press function
(less than One second)Long press function
(more than One second)
PRESET UP/OK (center
button on left side back of
steering wheel)Confirm manually selected
menu option
Switch phone conversation
from the hands-free phone
to your mobile phone and
vice versa
Select displayed message–
SCAN UP/SCAN DOWN
(upper and lower buttons
on left side back of steering
wheelScroll BLUE&ME™ menu
items
Scroll through media player
tracks
Seek up or down through
radio stations
Scroll inbox messages–
Steering Wheel Audio Controls
•The right hand control on the rear of the steering wheel is a rocker type switch with
a pushbutton in the center.Press the switch up for Volume +.Press the switch down
for Volume –.The button in the center is the SRC button used to change audio
sources (e.g.AM, FM, CD, Media Player).
•The left hand control on the rear of the steering wheel is also a rocker type switch
with a pushbutton in the center.Press the top of the switch to Scan Up.Press the
bottom of the switch to Scan Down.The button in the center is the PRESET UP/OK
button.
BLUE&ME™ Hands-Free Communication
•To use the hands-free feature, you need a Bluetooth® wireless technology enabled
mobile phone.This hands-free feature gives you the possibility of interacting vocally
with your mobile phone while driving, even if your mobile device does not feature this
capability.You can also interact with your mobile phone manually and visually using the
steering wheel controls and the instrument panel Electronic Vehicle Information Center
(EVIC) display.
•To get started with BLUE&ME™ hands-free feature with voice recognition, you have to
simply pair your Bluetooth® wireless technology enabled mobile phone with the
system.
Pair Your Mobile Phone
•Press the VR button on the steering wheel then “Settings.” At the end of the
BLUE&ME™ message say “Pairing.” You may also access the pairing feature via the
menu by selecting it.
•The system will show the phone pairing PIN number on the EVIC display.For the next
two steps, consult your mobile phone owner’s manual about Bluetooth® pairing proce-
dures for your phone.
ELECTRONICS
48
Page 52 of 92
3.If John Smith has several phone numbers but the “location” (e.g.: the type of phone
number like work, home, etc.) is missing, the system will display the selected contact
and a list of related phone numbers on the instrument cluster display.The hands-free
phone system will ask if you would like to call the phone number displayed.To r e -
spond with “Yes,” pronounce “Yes,” otherwise say “No.” If this is the correct contact
but the wrong number, say “Forward” or “Backward” to navigate to the phone num-
ber you’d like to call.To call the displayed phone number, pronounce “Call.” You can
also scroll through the phone number list manually by pressing the buttons on the
back of the steering wheel until you find the required number.Then, press PRESET
UP/OK button on the rear of the steering wheel to start the call.
4.To end the phone call, press the PHONE HANG UP button on the steering wheel.
Media Player
•With the BLUE&ME™ media player you can play, via the car sound system, the digital
audio files stored on a USB device by simply connecting it to the USB port located in
the glove compartment of the car.
•The MEDIA PLAYER menu enables the following:
– Display tracks stored on your USB stick/iPod®.
– Play audio files stored on your USB stick/iPod® (BLUE&ME™ recognizes.wma,.mp3
and.wav,.aac formats for audio files and.wpl and.m3u for playlists).
How To Connect The USB Stick/iPod® To BLUE&ME™
•To connect your USB stick/iPod® to BLUE&ME™, proceed as follows:
•USB devices without USB wire: just connect the USB stick/iPod® (directly or by an
extension lead) to the USB port on the car.
•USB stick/iPod® with USB wire: use the wire to connect the USB stick/iPod® to
the USB port on the car.
•Turn the ignition key to ON.BLUE&ME™ will start automatically to play your digital
tracks selecting them from the library built at the moment the USB stick/iPod® is
connected.
•If AUTOPLAY is set to “ON,” BLUE&ME™ will start playback automatically.
•Refer to the iPod®/USB/MP3 CONTROL section in this manual and the BLUE&ME™
User's Manual on the DVD for more details.
WARNING!
Driving while distracted can result in loss of vehicle control, accident and injury.It is
strongly recommended that you use extreme caution when using any device or feature
that may take your focus off the road or your hands off the steering wheel.Your pri-
mary responsibility is the safe operation of your vehicle.
ELECTRONICS
50
Page 87 of 92
FAQ’s
GETTING STARTED
•How do I charge my vehicle? pg.16
•How do I install my LATCH Equipped Child Seat? pg.24
•How do I fold down my rear seat? pg.30
ELECTRONICS
•What Sound System do I have? pg.42
•How do I set the general settings? pg.51
•How do I set the presets on my radio? pg.45
•How do I connect my portable media player/iPod/MP3? pg.51
•How do I pair my cell phone via Bluetooth® with the BLUE&ME™ Hands-Free
Communication System? pg.48
WHAT TO DO IN EMERGENCIES
•What do I do if my TPMS warning light is blinking? pg.57
•How do I Jump-Start my vehicle? pg.65
MAINTAINING YOUR VEHICLE
•Where is my underhood fuse block located? pg.77
•Where is my interior fuse block located? pg.77
•What should my tire pressure be set at? pg.79
FREQUENTLY ASKED QUESTIONS
85