ESP FIAT 500L 2018 Owner handbook (in English)
[x] Cancel search | Manufacturer: FIAT, Model Year: 2018, Model line: 500L, Model: FIAT 500L 2018Pages: 268, PDF Size: 4.87 MB
Page 81 of 268
WARNING
64)The system is an aid for the driver, who
must always pay full attention while
driving. The responsibility always rests with
the driver, who must take into account
the traffic conditions in order to drive
in complete safety. The driver must always
maintain a safe distance from the vehicle
in front.
65)If the driver depresses the brake pedal
fully or carries out a fast steering during
system operation, the automatic braking
function may stop (e.g. to allow a possible
manoeuvre to avoid the obstacle).
66)The laser beam is not visible at the
naked eye. Do not look directly, or with
optical instruments (e.g. lenses), at the
laser beam from a distance lower than 10
cm: this may cause damage to the sight.
The laser beam is also present when
the key is at MAR but its operation is off,
not available or manually deactivated
with the display Setup Menu.
67)The system intervenes on vehicles
travelling in the same lane. Small sized
vehicles (e.g. bicycles or motorbikes)
or people, animals and things (e.g.
pushchairs) and more in general all those
obstacles with a low reflection of the light
emitted by the laser (e.g. vehicles soiled
with mud) are not taken into consideration.68)If the car must be placed on a roller
bench (at a speed within 5 and 30 km/h)
for maintenance interventions or if it is
washed in an automatic roller washing
tunnel with an obstacle in the front part
(e.g. another car, a wall or another
obstacle), the system may detect its
presence and activate. In this case the
system must be deactivated through the
display Setup Menu.
WARNING
35)The laser sensor may have limited or
absent operation due to weather
conditions such as: heavy rain, hail, thick
fog, heavy snow, formation of ice layers on
the windscreen.
36)Sensor operation may also be
compromised by the presence of dust,
condensation, dirt or ice on the
windscreen, by traffic conditions (e.g.
vehicles that are driving not aligned with
your car, vehicle driving in a transverse or
opposite way on the same lane, bend with
a small radius of curvature), by road
surface conditions and by driving
conditions (e.g. off-road driving). Make sure
the windscreen is always clean. Use
specific detergents and clean cloths to
avoid scratching the windscreen. The
sensor operation may also be limited or
absent in some driving, traffic and road
surface conditions.
37)Projecting loads on the roof of the car
may interfere with the correct operation
of the sensor. Before starting make sure
the load is correctly positioned, in order not
to cover the sensor operating range.38)If the windscreen must be replaced
due to scratches, chipping or breakage,
contact exclusively a Fiat Dealership.
Do not replace the windscreen on your
own, risk of malfunction! It is advisable to
replace the windscreen if it is damaged
in the laser sensor area.
39)Do not tamper nor operate on the laser
sensor. Do not close the openings in the
aesthetic cover located under the interior
rear view mirror. In the event of a sensor
failure, contact a Fiat Dealership.
40)If you are driving on roads close to
trees with protruding branches it is
advisable to deactivate the system to
prevent the branches at the height of the
bonnet or the windscreen from interfering
with the system.
41)Do not cover the operating range of the
sensor with stickers or other objects. Also
pay attention to other objects on the
bonnet (e.g. a layer of snow) and make
sure they do not interfere with the light
emitted by the laser.
42)If a trailer or a vehicle is towed the
system must be deactivated with the
display Setup Menu.
43)If the system signals a loss of pressure
on a specific tyre, it is recommended to
check the pressure on all four tyres.
44)The iTPMS does not relieve the driver
from the obligation to check the tyre
pressure every month; it is not even to be
considered a replacement system for
maintenance or a safety system.
79
Page 82 of 268
45)The iTPMS cannot indicate sudden tyre
pressure drops (for example when a tyre
bursts). In this case, stop the vehicle,
braking with caution and avoiding abrupt
steering.
46)The iTPMS system only warns that the
tyre pressure is low: it cannot inflate
them.
47)Insufficient tyre inflation increases fuel
consumption, reduces the tread duration
and may affect the capacity to drive safely.OCCUPANT
PROTECTION
SYSTEMS
Some of the most important safety
equipment of the car comprise the
following protection systems:
seat belts;
SBR (Seat Belt Reminder) system;
head restraints;
child restraint systems;
Front airbags and side bags.
Read the information given the
following pages with the utmost care. It
is of fundamental importance that the
protection systems are used in the
correct way to guarantee the maximum
possible safety level for the driver and
the passengers.
For the description of the head restraint
adjustment see the "Head restraints"
paragraph in the "Knowing your car"
chapter.
SEAT BELTS
69) 70)
All vehicle seats are equipped with seat
belts with three anchor points and a
retractor.
The reel mechanism operates locking
the belt in the event of sharp braking or
strong deceleration due to an impact.
This allows the seat belt strap to slide
freely and to adapt to the body of
the occupant. In the event of an
accident, the seat belt will lock reducing
the risk of impact inside the passenger
compartment and of being projected
outside the car.
The driver is responsible for respecting,
and ensuring that all the other
occupants of the vehicle also respect,
the local laws in force in relation to
the use of the seat belts.
Always fasten the seat belts before
setting off.
USING THE SEAT BELTS
The seat belt should be worn keeping
the chest straight and rested against
the backrest.
To fasten the seat belts, hold the
tongue A fig. 69 and insert it into the
buckle B, until it clicks into place.
If the belt jams while being removed, let
it rewind for a short stretch, then pull
it out again without jerking.
80
SAFETY
Page 106 of 268
WARNING
102)It is dangerous to run the engine in
enclosed areas. The engine consumes
oxygen and engine exhaust contains
carbon dioxide, carbon monoxide and
other toxic gasses.
103)Remember that the brake servo and
electrical power steering system are not
operational until the engine is started,
therefore a greater effort will be required to
press the brake pedal or turn the steering
wheel.
104)If the engine fails to start with a gear
engaged, the potentially dangerous
situation due to the fact that the
transmission is automatically placed in
neutral will be signalled by an acoustic
warning.
WARNING
49)The flashing of the warning lightfor
60 seconds after starting or during
prolonged cranking of the engine indicates
a fault with the glow plug heating system.
You can use the vehicle as usual if the
engine starts but you should contact a Fiat
Dealership as soon as possible.
50)It is advisable not to demand maximum
performance from your car (e.g. excessive
acceleration, long distances at maximum
rpm, excessively intense braking, etc.)
when it is first used.51)When the engine is switched off never
leave the key turned to MAR-ON to prevent
useless current absorption from draining
the battery.
52)Never, under any circumstances, jump
start the engine by pushing, towing or
coasting downhill. This could cause fuel to
flow into the catalytic converter and
damage it beyond repair.
53)A quick burst on the accelerator before
turning off the engine serves absolutely
no practical purpose, it wastes fuel and is
especially damaging to turbocharged
engines.
WHEN PARKED
Always remove the ignition key when
leaving the car.
When parking and leaving the car,
proceed as follows:
engage a gear (1stgear if facing
uphill or reverse if facing downhill) and
leave the wheels turned;
stop the engine and engage the
handbrake.
Block the wheels with a wedge or a
stone if the car is parked on a steep
slope.
On versions with Dualogic gearbox, 1
st
gear or reverse must be engaged
with the foot on the brake pedal and, if
on a slope, the handbrake must be
operated in order to park safely.
IMPORTANT NEVER leave the car with
the gearbox in neutral (on versions
equipped with Dualogic transmission,
this is indicated by the letter N on
the display).
104
STARTING AND DRIVING
Page 108 of 268
1.6 16V Multijet version: to engage
reverse gear R from the neutral
position, lift up ring A located under the
knob and simultaneously move the
lever to the left and then forwards.
To engage 6
thgear (for versions/
markets, where provided), push firmly
to the right when operating the lever
in order to avoid selecting 4
thgear by
mistake. The same applies to the shift
from 6
thto 5thgear.
IMPORTANT Reverse can only be
engaged when the car is completely
stationary. With the engine running, wait
for at least 2 seconds with the clutch
pedal fully pressed before engaging
reverse to prevent damage to the gears
and grating.
IMPORTANT The clutch pedal should
be used only for gear changes. Do
not drive with your foot resting on the
clutch pedal, however lightly. For
versions/markets where provided, the
electronic clutch control could cut
in, interpreting the incorrect driving style
as a fault.
WARNING
107)Depress the clutch pedal fully to
change gear correctly. It is therefore
essential that there is nothing under the
pedals: make sure the mats are lying
flat and do not get in the way of the
pedals.
WARNING
54)Do not drive with your hand resting on
the gear lever as the force exerted, even
if slight, could lead over time to premature
wear of the gearbox internal components.
USING THE
DUALOGIC
GEARBOX
(for versions/markets, where provided)
108)55)
GEAR LEVER
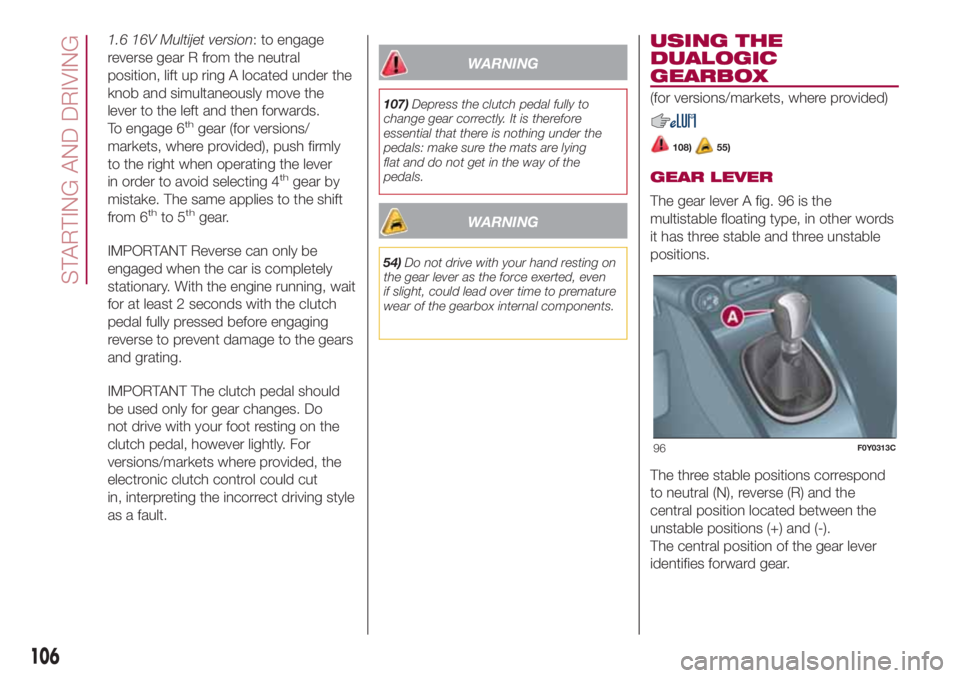
The gear lever A fig. 96 is the
multistable floating type, in other words
it has three stable and three unstable
positions.
The three stable positions correspond
to neutral (N), reverse (R) and the
central position located between the
unstable positions (+) and (-).
The central position of the gear lever
identifies forward gear.
96F0Y0313C
106
STARTING AND DRIVING
Page 114 of 268
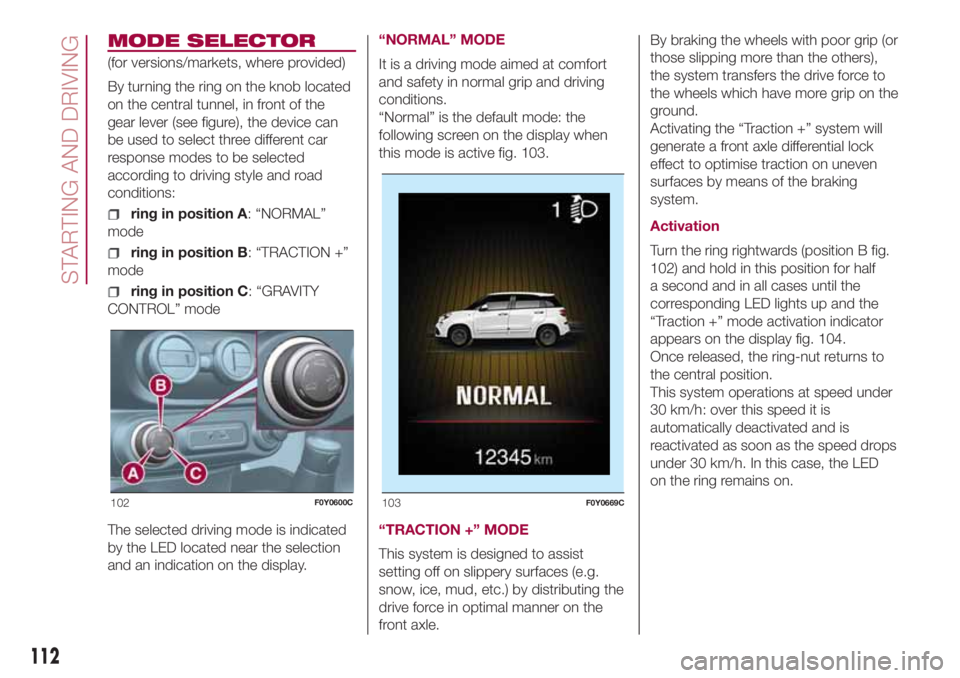
MODE SELECTOR
(for versions/markets, where provided)
By turning the ring on the knob located
on the central tunnel, in front of the
gear lever (see figure), the device can
be used to select three different car
response modes to be selected
according to driving style and road
conditions:
ring in position A: “NORMAL”
mode
ring in position B: “TRACTION +”
mode
ring in position C: “GRAVITY
CONTROL” mode
The selected driving mode is indicated
by the LED located near the selection
and an indication on the display.“NORMAL” MODE
It is a driving mode aimed at comfort
and safety in normal grip and driving
conditions.
“Normal” is the default mode: the
following screen on the display when
this mode is active fig. 103.
“TRACTION +” MODE
This system is designed to assist
setting off on slippery surfaces (e.g.
snow, ice, mud, etc.) by distributing the
drive force in optimal manner on the
front axle.By braking the wheels with poor grip (or
those slipping more than the others),
the system transfers the drive force to
the wheels which have more grip on the
ground.
Activating the “Traction +” system will
generate a front axle differential lock
effect to optimise traction on uneven
surfaces by means of the braking
system.
Activation
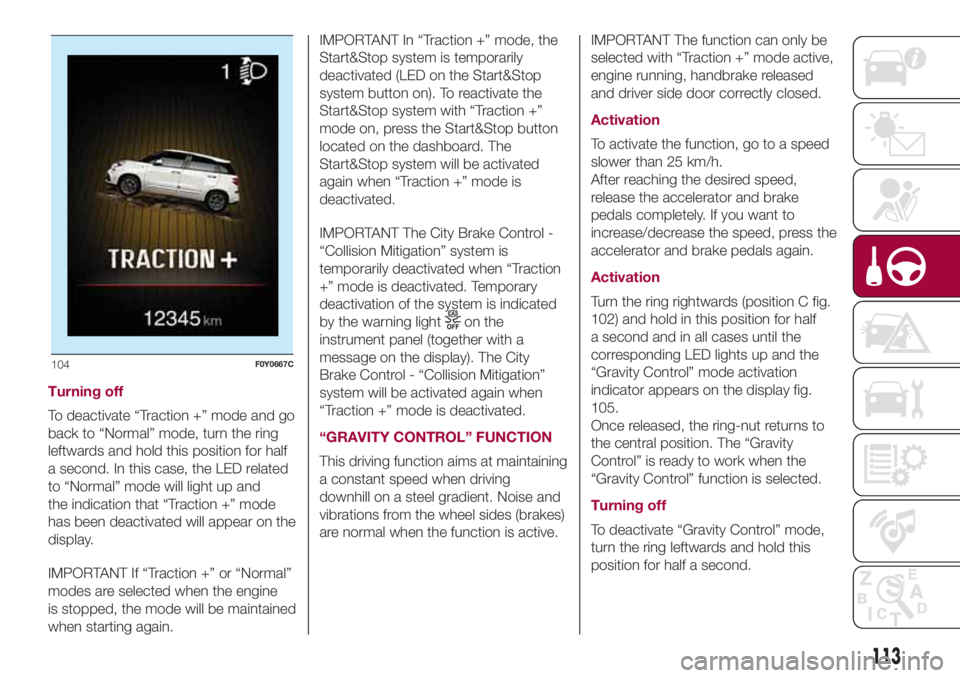
Turn the ring rightwards (position B fig.
102) and hold in this position for half
a second and in all cases until the
corresponding LED lights up and the
“Traction +” mode activation indicator
appears on the display fig. 104.
Once released, the ring-nut returns to
the central position.
This system operations at speed under
30 km/h: over this speed it is
automatically deactivated and is
reactivated as soon as the speed drops
under 30 km/h. In this case, the LED
on the ring remains on.
102F0Y0600C103F0Y0669C
112
STARTING AND DRIVING
Page 115 of 268
Turning off
To deactivate “Traction +” mode and go
back to “Normal” mode, turn the ring
leftwards and hold this position for half
a second. In this case, the LED related
to “Normal” mode will light up and
the indication that “Traction +” mode
has been deactivated will appear on the
display.
IMPORTANT If “Traction +” or “Normal”
modes are selected when the engine
is stopped, the mode will be maintained
when starting again.IMPORTANT In “Traction +” mode, the
Start&Stop system is temporarily
deactivated (LED on the Start&Stop
system button on). To reactivate the
Start&Stop system with “Traction +”
mode on, press the Start&Stop button
located on the dashboard. The
Start&Stop system will be activated
again when “Traction +” mode is
deactivated.
IMPORTANT The City Brake Control -
“Collision Mitigation” system is
temporarily deactivated when “Traction
+” mode is deactivated. Temporary
deactivation of the system is indicated
by the warning light
on the
instrument panel (together with a
message on the display). The City
Brake Control - “Collision Mitigation”
system will be activated again when
“Traction +” mode is deactivated.
“GRAVITY CONTROL” FUNCTION
This driving function aims at maintaining
a constant speed when driving
downhill on a steel gradient. Noise and
vibrations from the wheel sides (brakes)
are normal when the function is active.IMPORTANT The function can only be
selected with “Traction +” mode active,
engine running, handbrake released
and driver side door correctly closed.
Activation
To activate the function, go to a speed
slower than 25 km/h.
After reaching the desired speed,
release the accelerator and brake
pedals completely. If you want to
increase/decrease the speed, press the
accelerator and brake pedals again.
Activation
Turn the ring rightwards (position C fig.
102) and hold in this position for half
a second and in all cases until the
corresponding LED lights up and the
“Gravity Control” mode activation
indicator appears on the display fig.
105.
Once released, the ring-nut returns to
the central position. The “Gravity
Control” is ready to work when the
“Gravity Control” function is selected.
Turning off
To deactivate “Gravity Control” mode,
turn the ring leftwards and hold this
position for half a second.
104F0Y0667C
113
Page 118 of 268
IMPORTANT NOTES
When parking, take the utmost care
over obstacles that may be above
or under the sensor.
Under certain circumstances, objects
close to the car are not detected by the
system and could therefore cause
damage to the car or be damaged
themselves.
Some conditions may influence the
performance of the parking sensors:
the presence of ice, snow, mud
or think paint on the sensor surface
may cause reduced sensitivity of the
sensor itself and therefore reduce
the system performance;
mechanical interference (e.g.
washing the car, rain, strong wind, hail)
may cause the sensor to detect a
non-existent obstacle ("echo
interference");
the presence of ultrasonic systems
(e.g. pneumatic brake systems of
trucks or pneumatic drills) near the car
could alter the signals sent by the
sensor;
the variation in sensor position,
caused by variation in ride (due
to suspension component wear),
changing tyres, overloaded car, or
tuning that lowers the car, for example,
may affect parking sensor system
performance.
WARNING
114)Parking and other dangerous
manoeuvres are, however, always the
driver’s responsibility. While carrying out
these manoeuvres, always make sure that
no people (especially children) or animals
are in the area concerned. The parking
sensors are an aid for the driver, but the
driver must never allow their attention
to lapse during potentially dangerous
manoeuvres, even those executed at low
speeds.
WARNING
58)For correct operation of the system,
sensors must always be clean from mud,
dirt, snow or ice. Be careful not to scratch
or damage the sensors while cleaning
them. Avoid using dry, rough or hard
cloths. The sensors should be washed
using clean water with the addition of car
shampoo if necessary. When using special
washing equipment such as high pressure
jets or steam cleaning, clean the sensors
very quickly keeping the jet more than
10 cm away. Also, do not apply stickers to
the sensors.
REAR BACKUP
CAMERA
(PARKVIEW® REAR
BACKUP CAMERA)
115)59)
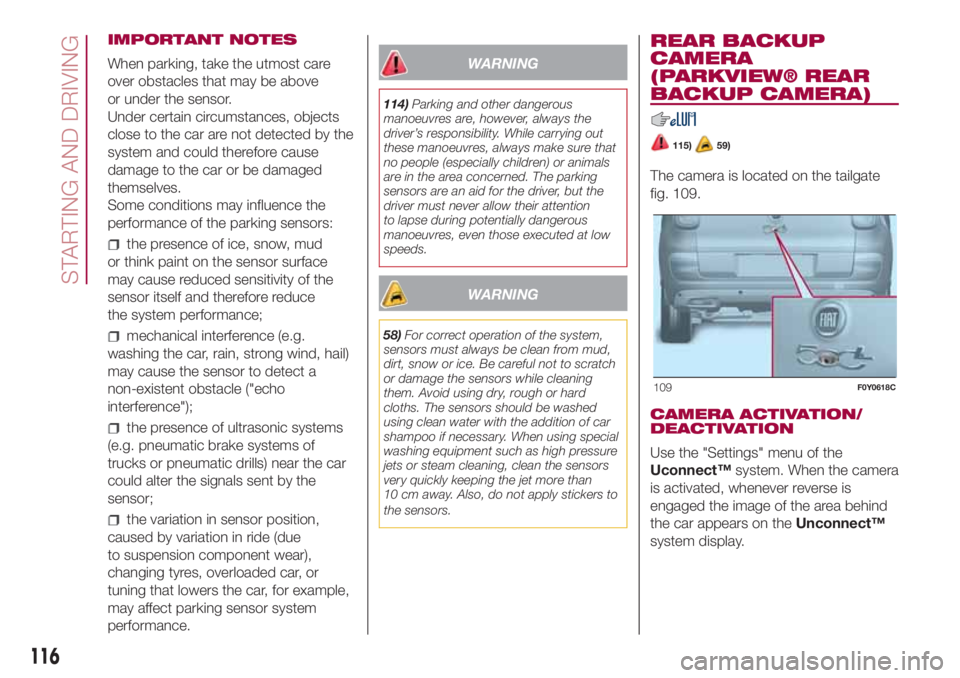
The camera is located on the tailgate
fig. 109.
CAMERA ACTIVATION/
DEACTIVATION
Use the "Settings" menu of the
Uconnect™system. When the camera
is activated, whenever reverse is
engaged the image of the area behind
the car appears on theUnconnect™
system display.
109F0Y0618C
116
STARTING AND DRIVING
Page 119 of 268
SYMBOLS AND
MESSAGES ON THE
DISPLAY
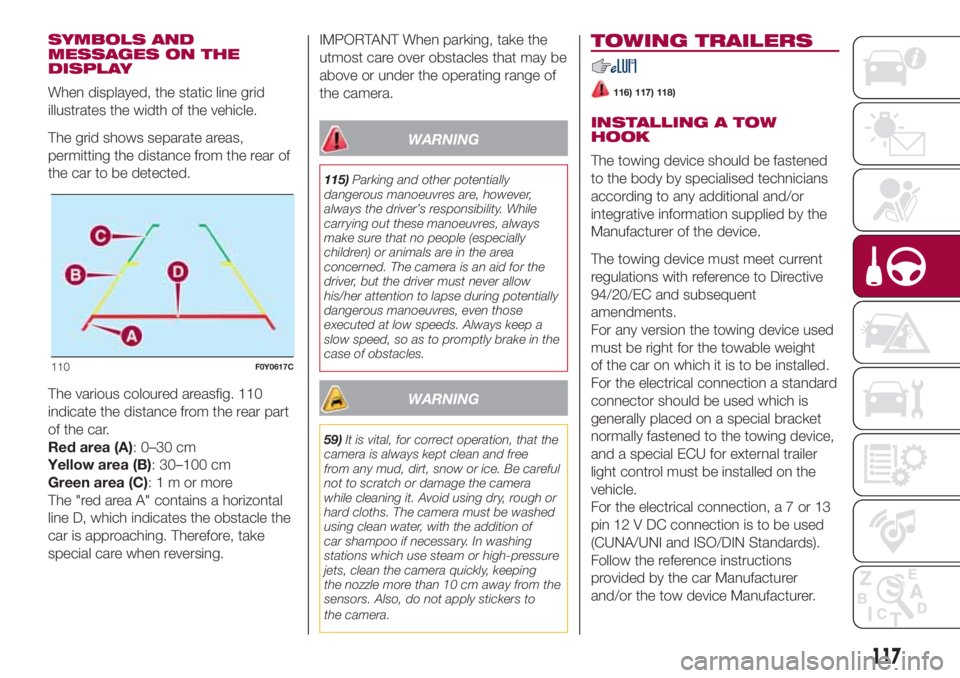
When displayed, the static line grid
illustrates the width of the vehicle.
The grid shows separate areas,
permitting the distance from the rear of
the car to be detected.
The various coloured areasfig. 110
indicate the distance from the rear part
of the car.
Red area (A): 0–30 cm
Yellow area (B): 30–100 cm
Green area (C):1mormore
The "red area A" contains a horizontal
line D, which indicates the obstacle the
car is approaching. Therefore, take
special care when reversing.IMPORTANT When parking, take the
utmost care over obstacles that may be
above or under the operating range of
the camera.
WARNING
115)Parking and other potentially
dangerous manoeuvres are, however,
always the driver’s responsibility. While
carrying out these manoeuvres, always
make sure that no people (especially
children) or animals are in the area
concerned. The camera is an aid for the
driver, but the driver must never allow
his/her attention to lapse during potentially
dangerous manoeuvres, even those
executed at low speeds. Always keep a
slow speed, so as to promptly brake in the
case of obstacles.
WARNING
59)It is vital, for correct operation, that the
camera is always kept clean and free
from any mud, dirt, snow or ice. Be careful
not to scratch or damage the camera
while cleaning it. Avoid using dry, rough or
hard cloths. The camera must be washed
using clean water, with the addition of
car shampoo if necessary. In washing
stations which use steam or high-pressure
jets, clean the camera quickly, keeping
the nozzle more than 10 cm away from the
sensors. Also, do not apply stickers to
the camera.
TOWING TRAILERS
116) 117) 118)
INSTALLING A TOW
HOOK
The towing device should be fastened
to the body by specialised technicians
according to any additional and/or
integrative information supplied by the
Manufacturer of the device.
The towing device must meet current
regulations with reference to Directive
94/20/EC and subsequent
amendments.
For any version the towing device used
must be right for the towable weight
of the car on which it is to be installed.
For the electrical connection a standard
connector should be used which is
generally placed on a special bracket
normally fastened to the towing device,
and a special ECU for external trailer
light control must be installed on the
vehicle.
For the electrical connection,a7or13
pin 12 V DC connection is to be used
(CUNA/UNI and ISO/DIN Standards).
Follow the reference instructions
provided by the car Manufacturer
and/or the tow device Manufacturer.
110F0Y0617C
117
Page 128 of 268
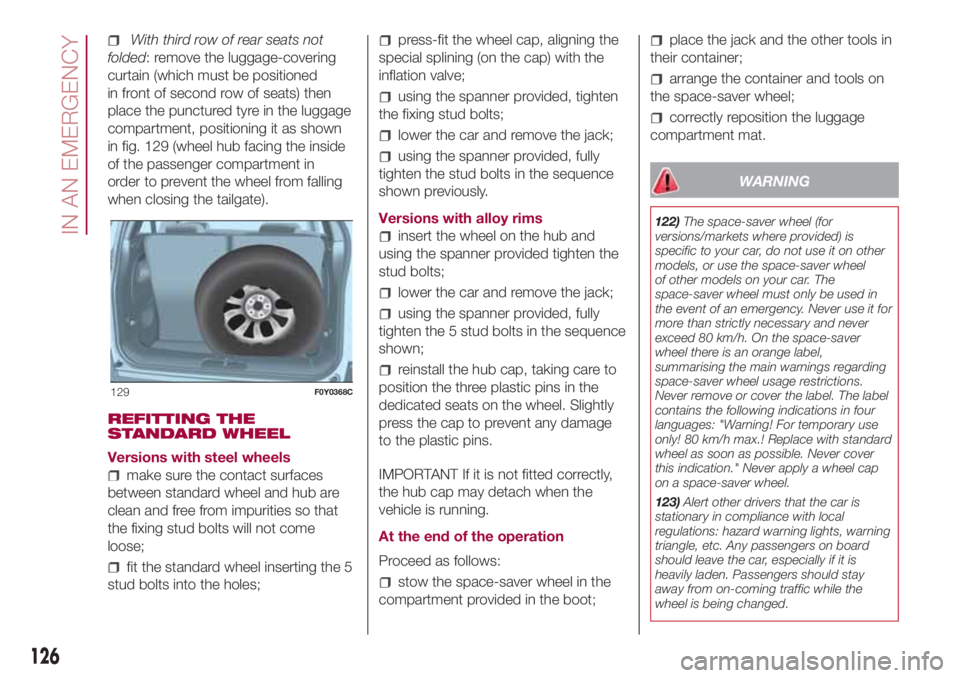
With third row of rear seats not
folded: remove the luggage-covering
curtain (which must be positioned
in front of second row of seats) then
place the punctured tyre in the luggage
compartment, positioning it as shown
in fig. 129 (wheel hub facing the inside
of the passenger compartment in
order to prevent the wheel from falling
when closing the tailgate).
REFITTING THE
STANDARD WHEEL
Versions with steel wheels
make sure the contact surfaces
between standard wheel and hub are
clean and free from impurities so that
the fixing stud bolts will not come
loose;
fit the standard wheel inserting the 5
stud bolts into the holes;
press-fit the wheel cap, aligning the
special splining (on the cap) with the
inflation valve;
using the spanner provided, tighten
the fixing stud bolts;
lower the car and remove the jack;
using the spanner provided, fully
tighten the stud bolts in the sequence
shown previously.
Versions with alloy rims
insert the wheel on the hub and
using the spanner provided tighten the
stud bolts;
lower the car and remove the jack;
using the spanner provided, fully
tighten the 5 stud bolts in the sequence
shown;
reinstall the hub cap, taking care to
position the three plastic pins in the
dedicated seats on the wheel. Slightly
press the cap to prevent any damage
to the plastic pins.
IMPORTANT If it is not fitted correctly,
the hub cap may detach when the
vehicle is running.
At the end of the operation
Proceed as follows:
stow the space-saver wheel in the
compartment provided in the boot;
place the jack and the other tools in
their container;
arrange the container and tools on
the space-saver wheel;
correctly reposition the luggage
compartment mat.
WARNING
122)The space-saver wheel (for
versions/markets where provided) is
specific to your car, do not use it on other
models, or use the space-saver wheel
of other models on your car. The
space-saver wheel must only be used in
the event of an emergency. Never use it for
more than strictly necessary and never
exceed 80 km/h. On the space-saver
wheel there is an orange label,
summarising the main warnings regarding
space-saver wheel usage restrictions.
Never remove or cover the label. The label
contains the following indications in four
languages: "Warning! For temporary use
only! 80 km/h max.! Replace with standard
wheel as soon as possible. Never cover
this indication." Never apply a wheel cap
on a space-saver wheel.
123)Alert other drivers that the car is
stationary in compliance with local
regulations: hazard warning lights, warning
triangle, etc. Any passengers on board
should leave the car, especially if it is
heavily laden. Passengers should stay
away from on-coming traffic while the
wheel is being changed.
129F0Y0368C
126
IN AN EMERGENCY
Page 132 of 268
WARNING
63)The sealant is effective with external
temperatures of between -40°C and
+55°C. The sealant has an expiry date. It is
possible to repair tyres which have been
damaged on tread up to a diameter of
6 mm. Show the cartridge and the label to
the personnel charged with handling the
tyre treated with the tyre repair kit.
WARNING
2)Dispose of the bottle and the sealant
liquid properly. Have the sealing fluid and
the bottle disposed of in compliance
with national and local regulations.
REPLACING A BULB
132) 133)64) 65)
GENERAL
INSTRUCTIONS
Before replacing a bulb check the
contacts for oxidation.
Burnt bulbs must be replaced by
others of the same type and power.
After replacing a headlight bulb,
always check that alignment of the light
beam is correct.
when a light is not working, check
that the corresponding fuse is intact
before replacing a bulb. For the location
of fuses, refer to the paragraph
"Replacing fuses" in this chapter.IMPORTANT When the weather is cold
or damp or after heavy rain or washing,
the surface of headlights or rear lights
may steam up and/or form drops of
condensation on the inside. This is
a natural phenomenon due to the
difference in temperature and humidity
between the inside and the outside
of the glass which does not indicate a
fault and does not compromise the
normal operation of lighting devices.
The mist disappears quickly when the
lights are turned on, starting from
the centre of the diffuser, extending
progressively towards the edges.
130
IN AN EMERGENCY