reset FIAT 500X 2017 Owner handbook (in English)
[x] Cancel search | Manufacturer: FIAT, Model Year: 2017, Model line: 500X, Model: FIAT 500X 2017Pages: 284, PDF Size: 11.14 MB
Page 87 of 284
 IMPORTANT When returning the rear
seat from the tilted position to the
normal operating position, take care to
refit the seat belt correctly, in order to
guarantee prompt availability every
time.
ADJU")
IMPORTANT When returning the rear
seat from the tilted position to the
normal operating position, take care to
refit the seat belt correctly, in order to
guarantee prompt availability every
time.
ADJUSTING THE SEAT
BELT HEIGHT
70) 71)
Five different adjustments in height are
possible.
To carry out window height adjustment,
from the top to the bottom, buttons A
fig. 67 (located on both sides of handle
B) must be pressed simultaneously
(towards each other), and the handle
must be slid downwards.
To carry out window height adjustment,
from the top to the bottom, handle B
must be slid (without pressing
anything).Always adjust the height of the seat
belts to fit the person wearing it: this
precaution could greatly reduce the risk
of injury in the event of collision.
Correct adjustment is obtained when
the belt passes approximately half way
between the shoulder and the neck.WARNING
68)Never press button C when travelling.
69)Remember that, in the event of an
accident, the rear seat passengers not
wearing seat belts are exposed to a very
serious risk and also represent a serious
danger for the front seat occupants.
70)Make height adjustment of the seat
belts when the car is stationary.71)After the height adjustment, always
check that the grip is locked in one of the
preset positions. To do this, with button A
released, exert further pressure
downwards to allow the locking device to
click if the grip has not been released in
one of the possible positions.
66F1B0382C67F1B0103C
85
Page 128 of 284
 There are two operating modes:
“Adaptive Cruise Control”mode
to maintain an adequate distance
between vehicles (the message
“Adaptive Cruise Control” is shown on
the instrument panel display);")
There are two operating modes:
“Adaptive Cruise Control”mode
to maintain an adequate distance
between vehicles (the message
“Adaptive Cruise Control” is shown on
the instrument panel display);
electronic “Cruise Control” mode
to hold the vehicle at a constant
preset speed.
To change the operating mode, use the
button on the steering wheel (see that
described on the following pages).
ADAPTIVE CRUISE
CONTROL ACTIVATION/
DEACTIVATION
Activation
To activate the device, press and
release the
button (see figure).
IMPORTANT It is dangerous to leave
the device activated when it is not
used. There is a risk of inadvertently
activating it and losing control of the car
due to unexpected excessive speed.
Deactivation
With the device active, to deactivate it
press and release the
button. The
display will show a dedicated message.
SETTING THE DESIRED
SPEED
The device can only be set with the
speed over 30 km/h (or equivalent
in mph) and under 160 km/h (or
equivalent in mph).
When the vehicle reaches the desired
speed, press and release the button
SET + or SET to set the speed to the
current speed. The display will show the
set speed. Then take your foot off the
accelerator pedal.When the system has been set, the
dedicated icon on the display (see
paragraph above) is grey on models
with a monochrome display, and green
on versions with a colour display.
IMPORTANT Press the accelerator
pedal to make the car go faster than
the set speed.
While the accelerator pedal is pressed:
a dedicated message is displayed for
a few seconds;
the device will not be able to control
the distance between the vehicle and
the one ahead. In this case the speed
will be determined only by the position
of the accelerator pedal.
The device will return to normal
operation as soon as the accelerator
pedal is released.
The systemcannotbe set
when pressing the brake pedal;
when the brakes are overheated;
when the electric parking brake is
engaged;
when the shift lever is in the P (park),
R (reverse) or N (neutral) positions
(versions with automatic transmission or
automatic transmission with double
clutch);
when the shift lever is in the R
(reverse), neutral or in 1st(first gear
engaged) positions (versions with
manual transmission);
101F1B0096C102J0A0917C
126
STARTING AND DRIVING
Page 139 of 284
 Do not exceed the speed limits specific
to each country you are driving in, in the
case of vehicles towing trailers. In any
case, the top speed must not exceed
100 km/h.
Any electric brake must be pow")
Do not exceed the speed limits specific
to each country you are driving in, in the
case of vehicles towing trailers. In any
case, the top speed must not exceed
100 km/h.
Any electric brake must be powered
directly by the battery through a cable
with a cross-section of no less than
2.5 mm
2. In addition to the electrical
branches, the vehicle electrical system
can only be connected to the supply
cable for an electric brake and to the
cable for an internal light for the trailer,
not exceeding 15 W. For connections,
use the preset control unit with a
battery cable with section not less than
2.5 mm
2. The use of auxiliary loads
other than external lights (e.g. electric
brake) must take place with engine
running.
INSTALLING A TOW
HOOK
The towing device should be fastened
to the body by specialised personnel
according to any additional and/or
integrative information supplied by the
Manufacturer of the device. It must also
meet current regulations with reference
to Directive 94/20/EC and subsequent
amendments.
For any version the towing device used
must be right for the towable weight of
the vehicle on which it is to be installed.
For the electrical connection a standard
connector should be used which is
generally placed on a special bracket
normally fastened to the towing device,
and a special ECU for external trailer
light control must be installed on the
vehicle. 7 or 13-pin 12 V DC
connections should be used
(CUNA/UNI and ISO/DIN Standards).
Follow any instructions provided by the
vehicle manufacturer and/or the towing
device manufacturer.
137
Page 166 of 284
 FUEL CUT-OFF SYSTEM
RESET
165)
To restore correct operation of the car,
carry out the following procedure (this
procedure must be started and
completed within less than 1 minute):
with direction indic")
FUEL CUT-OFF SYSTEM
RESET
165)
To restore correct operation of the car,
carry out the following procedure (this
procedure must be started and
completed within less than 1 minute):
with direction indicator lever in
neutral position, turn the ignition device
to STOP;
turn the ignition device to MAR;
activate the right direction indicator
and then the left one;
activate the right direction indicator
and then the left one again;
deactivate the left direction indicator;
turn the ignition device to STOP and
then to MAR.
WARNING
165)If, after an impact, you smell fuel or
notice leaks from the fuel system, do not
reactivate the system to avoid the risk of
fire.
AUTOMATIC
TRANSMISSION -
LEVER UNLOCK
In the event of a fault, to move the gear
lever from P (Park), proceed as follows:
stop the engine;
engage the electric parking brake;
working carefully in the point
indicated by the arrow, remove the trim
A fig. 141 (complete with gaiter) lifting it
upwards (see also fig. 142 );
fully depress the brake pedal and
hold it down;
insert the screwdriver supplied
perpendicularly in hole B fig. 143 and
adjust the release lever;
place the gear lever in N (Neutral)
position;
refit the gear lever gaiter and trim
correctly;
start the engine.
141F1B0028C
142F1B0055C
143F1B0056C
164
IN AN EMERGENCY
Page 233 of 284
 Button Functions Mode
Switching on/off
Brief button press
Volume adjustment
Knob clockwise/anticlockwise turning
Volume activation/deactivation (Mute/Pause) Brief button press
Exit the selection/retur")
Button Functions Mode
Switching on/off
Brief button press
Volume adjustment
Knob clockwise/anticlockwise turning
Volume activation/deactivation (Mute/Pause) Brief button press
Exit the selection/return to previous screen Brief button press
BROWSE ENTERScrolling the list or tuning to a radio station or select
previous/next trackKnob clockwise/anticlockwise turning
Confirmation of the option displayed Brief button press
INFODisplay mode selection (Radio, Media Player) Brief button press
AUDIOAccess to the sound setting and adjustment functions Brief button press
MENUAccess to the Settings menu Brief button press
MEDIASource selection: USB/iPod or AUX Brief button press
RADIOAccess to the Radio mode Brief button press
1-2-3-4-5-6Store current radio station Long button press
Stored radio station recall Brief button press
A-B-CSelection of the group of radio presets or selection of
the desired letter in each listBrief button press
Search for previous radio station or selection of
USB/iPod previous trackBrief button press
Scan of lower frequencies until released/Fast rewind of
USB/iPod trackLong button press
Search for next radio station or selection of USB/iPod
next trackBrief button press
Scan of higher frequencies until released/Fast forward
of USB/iPod trackLong button press
231
Page 237 of 284
 SWITCHING THE SYSTEM
ON/OFF
The system is switched on/off by
pressing the
button/knob.
Turn the button/knob clockwise to
increase the radio volume or
anticlockwise to decrease it.
RADIO (TUNER) MODE
T")
SWITCHING THE SYSTEM
ON/OFF
The system is switched on/off by
pressing the
button/knob.
Turn the button/knob clockwise to
increase the radio volume or
anticlockwise to decrease it.
RADIO (TUNER) MODE
The system features the following
tuners: AM, FM.
RADIO MODE SELECTION
Press the RADIO button on the front
panel to activate radio mode.
FREQUENCY BAND
SELECTION
The different tuning modes can be
selected by pressing the RADIO button
on the front panel.
DISPLAYED
INFORMATION
After the desired radio station is
selected on the display, the following
information is shown (INFO mode
activated):
In the upper part: the preset station, the
time and the other active radio settings
are highlighted.
In the central part: the name of the
current station, the frequency and the
radio text information (if any) are
highlighted.
FM station list
Press the BROWSE ENTER
button/knob to display the complete list
of the FM stations that can be received.
SETTING THE PRESETS
The preset stations are available in all
system modes and are selected by
touching one of the presetting buttons
1-2-3-4-5-6on the front panel.
If you are tuned to a radio station that
you wish to store, hold down the button
on the display which corresponds to
the desired preset until an acoustic
confirmation signal is emitted.
RADIO STATION
SELECTION
To search for the desired radio station
press the
orbutton or use
the wheel of the steering wheel controls
, or turn the "BROWSE ENTER"
knob.
PREVIOUS/NEXT RADIO
STATION SEARCH
Press briefly theorbutton
or use the wheel of the steering wheel
controls
: when the button is
released the previous or next radio
station is displayed.
PREVIOUS/NEXT RADIO
STATION FAST SEARCH
Hold down theorbutton to
start the fast search: when the button is
released, the first tunable radio is
played.
MEDIA MODE
Interaction modes for AUX, USB/iPod
operation.
TRACK CHANGE
(previous/next)
Briefly press thebutton or turn
the BROWSE ENTER button/knob
clockwise to play the next track.
Briefly press the
button or turn
the BROWSE ENTER button/knob
anticlockwise to return to the beginning
of the selected track or to the beginning
of the previous track (if this has been
played for less than 3 seconds).
TRACK FAST FORWARD/
REWIND
Hold down thebutton to fast
forward the selected track.
Hold down the
button to fast
rewind the track.
235
Page 239 of 284
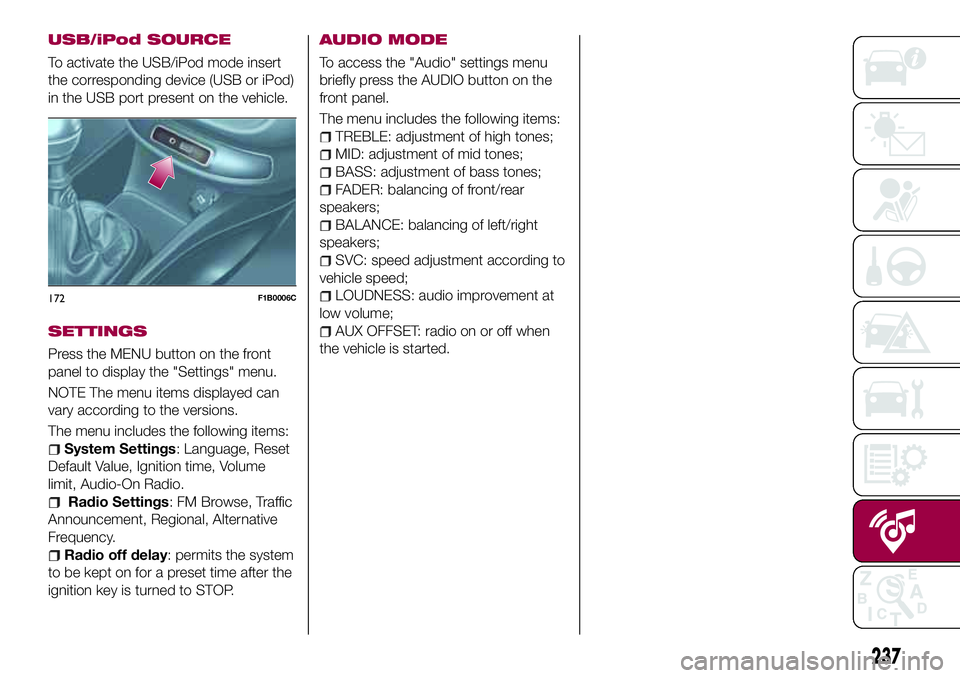
USB/iPod SOURCE
To activate the USB/iPod mode insert
the corresponding device (USB or iPod)
in the USB port present on the vehicle.
SETTINGS
Press the MENU button on the front
panel to display the "Settings" menu.
NOTE The menu items displayed can
vary according to the versions.
The menu includes the following items:
System Settings: Language, Reset
Default Value, Ignition time, Volume
limit, Audio-On Radio.
Radio Settings: FM Browse, Traffic
Announcement, Regional, Alternative
Frequency.
Radio off delay: permits the system
to be kept on for a preset time after the
ignition key is turned to STOP.
AUDIO MODE
To access the "Audio" settings menu
briefly press the AUDIO button on the
front panel.
The menu includes the following items:
TREBLE: adjustment of high tones;
MID: adjustment of mid tones;
BASS: adjustment of bass tones;
FADER: balancing of front/rear
speakers;
BALANCE: balancing of left/right
speakers;
SVC: speed adjustment according to
vehicle speed;
LOUDNESS: audio improvement at
low volume;
AUX OFFSET: radio on or off when
the vehicle is started.
172F1B0006C
237
Page 244 of 284
 SWITCHING THE SYSTEM
ON/OFF
The system is switched on/off by
pressing the
(ON/OFF) button/knob.
Turn the button/knob clockwise to
increase the radio volume or
anticlockwise to decrease it.
USB/iPod SO")
SWITCHING THE SYSTEM
ON/OFF
The system is switched on/off by
pressing the
(ON/OFF) button/knob.
Turn the button/knob clockwise to
increase the radio volume or
anticlockwise to decrease it.
USB/iPod SOURCE
The vehicle is equipped with USB port
and AUX socket. Some versions are
equipped with an SD-SDHC reader
able to read/manage cards with SPI
technology.
Some versions are also equipped with
another USB port, located in the front
armrest compartment.
RADIO (TUNER) MODE
After the desired radio station is
selected, the following information is
shown on the display:
At the top: the list of radio stations
stored (preset) is displayed; the station
being listened to is highlighted.
In the middle: the name of the radio
station being listened to and the
buttons to select the previous or the
next radio station are displayed.
At the bottom: display of the following
buttons:
"Browse": list of the radio stations
available;
"AM/FM", "AM/DAB", "FM/DAB":
selection of the desired frequency band
(button reconfigurable according to the
band selected: AM, FM or DAB);
"Tune" : manual radio station tuning
(not available for DAB radios);
"Info": additional information on the
source being listened to;
"Audio": access to the "Audio
settings" screen.
Audio menu
The following adjustments can be
carried out using the "Audio" menu:
"Equaliser" (where provided);
"Balance/Fader" (left/right and
front/rear sound balance adjustment);
"Speed/Volume" (speed-dependent
automatic volume control);
"Loudness" (where provided);
"Radio Auto-On";
"Radio Off Delay".
To exit the "Audio" menu, press the
/Done button.
MEDIA MODE
Audio source selection
Press the "choose source" button to
select the desired audio source among
those available: AUX, USB / iPod, SD
(where provided) or
Bluetooth®.
NoteApplications used on portable
devices may be not compatible with the
Uconnect™system.Track selection (Browse)
With Media mode active, briefly press
the
/buttons to play the
previous/next track or keep the
/
buttons pressed to fast
rewind/forward the track.
NoteFor languages not supported by
the system which feature special
characters (e.g. Greek), the keyboard is
not available. In these cases this
function will be limited.
Bluetooth SOURCE
Pairing aBluetooth® audio device
To pair a
Bluetooth®audio device,
proceed as follows:
activate theBluetooth®function on
the device;
Press the MEDIA button on the front
panel;
if the "Media" source is active, press
the "Source" button;
select theBluetooth®Media
source;
press the "Add Device" button;
search forUconnect™on the
Bluetooth®audio device (during the
pairing stage a screen is displayed
showing the progress of the operation);
when requested by the audio device,
enter the PIN code shown on the
system display or confirm on the device
the PIN displayed;
if the pairing procedure is completed
successfully, a screen is displayed.
242
MULTIMEDIA
Page 258 of 284
 SWITCHING THE SYSTEM
ON/OFF
The system is switched on/off by
pressing the
(ON/OFF) button/knob.
Turn the button/knob clockwise to
increase the radio volume or
anticlockwise to decrease it.
RADIO (TUNE")
SWITCHING THE SYSTEM
ON/OFF
The system is switched on/off by
pressing the
(ON/OFF) button/knob.
Turn the button/knob clockwise to
increase the radio volume or
anticlockwise to decrease it.
RADIO (TUNER) MODE
The system has the following tuners:
AM, FM and DAB (where provided).
RADIO MODE SELECTION
Press the RADIO button on the front
panel to activate radio mode.
The different tuning modes can be
selected with the corresponding button
on the display.
Up to 12 favourite radio stations can be
stored in each mode.
FREQUENCY BAND
SELECTION
Press one of the buttons at the left of
the display to select the frequency
band: AM, FM and DAB (where
provided).
DISPLAYED
INFORMATION
After the desired radio station is
selected, the following information is
shown on the display:
At the top: display of the stored radiostation (preset) list. If the current station
is in the list of presets, it will be
highlighted on the display.
In the middle: the name of the radio
station being listened to and the
buttons to select the previous or the
next radio station are displayed.
At the bottom: display of the following
buttons:
"browse": search available radio
stations
"tune" : manual radio station tuning
(not available for DAB radios);
"audio": access to the "Audio
settings" screen
and: permit searching
for the desired radio station.
Select previous/next
radio station
The previous/next radio station can be
selected using the following methods:
turning the BROWSE ENTER
button/knob, briefly pressing the
orbutton on the display,
pressing of the buttons behind the
steering wheel.
Holding down the
or
buttons on the display activates
rapid scrolling through the active
frequency band.
PREVIOUS/NEXT RADIO
STATION FAST SEARCH
To start the fast search press the
orbutton on the display, or
use the corresponding steering wheel
controls.
AM/FM RADIO STATION
TUNING
Press the "tune" button, then select the
first digit of the desired radio station.
Press the
button to delete a wrong
number (and enter the correct station
number).
After entering the last digit of the station
the system will tune to the selected
one.
The screen disappears automatically
after 5 seconds or manually by pressing
the OK button.
DAB RADIO
Once DAB radio mode is selected, the
information on the current station is
displayed and the following functions.
The "browse" button is used to display:
the list of all DAB stations;
the list of all the favourites;
the list of stations filtered by
"Ensembles" (broadcast group).
Within each list, the "ABC" button
allows the user to skip to the desired
letter in the list.
256
MULTIMEDIA
Page 259 of 284
 The \"Refresh\" button requests an
update of the DAB radio station list: the
update may last from a few seconds to
about two minutes.
SETTING THE PRESETS
Presets are available in all system
mode")
The "Refresh" button requests an
update of the DAB radio station list: the
update may last from a few seconds to
about two minutes.
SETTING THE PRESETS
Presets are available in all system
modes and are activated by touching
one of the preset buttons located in the
upper area of the display.
The system can store up to 12 radio
stations in each mode: 4 of these are
displayed in the upper area.
Press the "browse" button on the
display to show all the radio stations
stored in the selected frequency band.
AUDIO
The Audio Settings menu, which can be
accessed by pressing the "audio"
button at the bottom of the display, can
be used to change the following
settings:
"Balance/Fader" (left/right and
front/rear audio balance adjustment);
"Equaliser" (where provided);
"Speed/Volume" (speed-dependent
automatic volume control);
"Surround Sound" (where provided);
"AUX Volume comp.";
"Loudness" (where provided);
"Auto-On radio" (allows you to set
the automatic switching on of the radio
when the engine is started).To exit the "audio" menu, press the
/Done button.
MEDIA MODE
Audio source selection
Press the "choose source" button to
select the desired audio source among
those available: AUX, USB / iPod, SD
(where provided) or
Bluetooth®.
Note: Applications used on portable
devices may be not compatible with the
Uconnect™system.
Track change (next/
previous)
Briefly press thebutton or turn
the BROWSE ENTER button/knob
clockwise to play the next track.
Briefly press the
button or turn
the BROWSE ENTER button/knob
anticlockwise to return to the beginning
of the selected track or to the beginning
of the previous track (if this has been
played for less than 8 seconds).
TRACK FAST FORWARD/
REWIND
Hold down thebutton to fast
forward the selected track.
Hold down the
button to fast
rewind the track.
TRACK SELECTION
(Browse)
Use this function to scroll through and
select the tracks on the active device.
Within each list, the "ABC" button
allows the user to skip to the desired
letter in the list.
Press the "Browse" button to activate
this function on the source being
played.
Turn the BROWSE ENTER button/knob
to select the desired category and then
press the button/knob to confirm the
selection.
Press the "X" button to cancel the
function.
NOTE The "Browse" button may be
disabled for some
Apple®devices.
NOTE The "Browse" button does not
allow any operation on an AUX device.
NOTE Not all
Bluetooth®devices
enable you to scroll the information on
the tracks.
TRACK INFORMATION
DISPLAY
Press the "Info" button to show the
information on the track being listened
to on the display.
Press the "X" button to exit the screen.
257