clock FIAT DOBLO COMBI 2015 2.G Owners Manual
[x] Cancel search | Manufacturer: FIAT, Model Year: 2015, Model line: DOBLO COMBI, Model: FIAT DOBLO COMBI 2015 2.GPages: 323, PDF Size: 46.77 MB
Page 23 of 323
IMPORTANT Each key has its own
code which must be stored by
the system's control unit. Contact a
Fiat Dealership to have new keys
(up to 8) stored with a code.
Activation of
warning light while
driving
❒If the warning lightswitches
on, this means that the system is
running a self-diagnosis (for
example due to a voltage drop).
❒If the warning lightstays on,
contact a Fiat Dealership.
IMPORTANT
1) The electronic components inside
the key may be damaged if the
key is subjected to strong shocks.
In order to ensure complete
efficiency of the electronic
devices inside the key, it should
never be exposed to direct
sunlight.
DOORS
DOOR CENTRAL
LOCKING/UNLOCKING
Locking doors from
the outside
The doors will only be locked if all
doors are shut. If one or more of the
doors is open after button
is
pressed on the remote control, the
direction indicators will flash quickly
for around three seconds.
You can lock all the doors by turning
the key clockwise in the driver's
door. Pressing button
on the
remote control twice in quick
succession activates the dead lock
device (see "Dead lock").
Door unlocking from
the outside
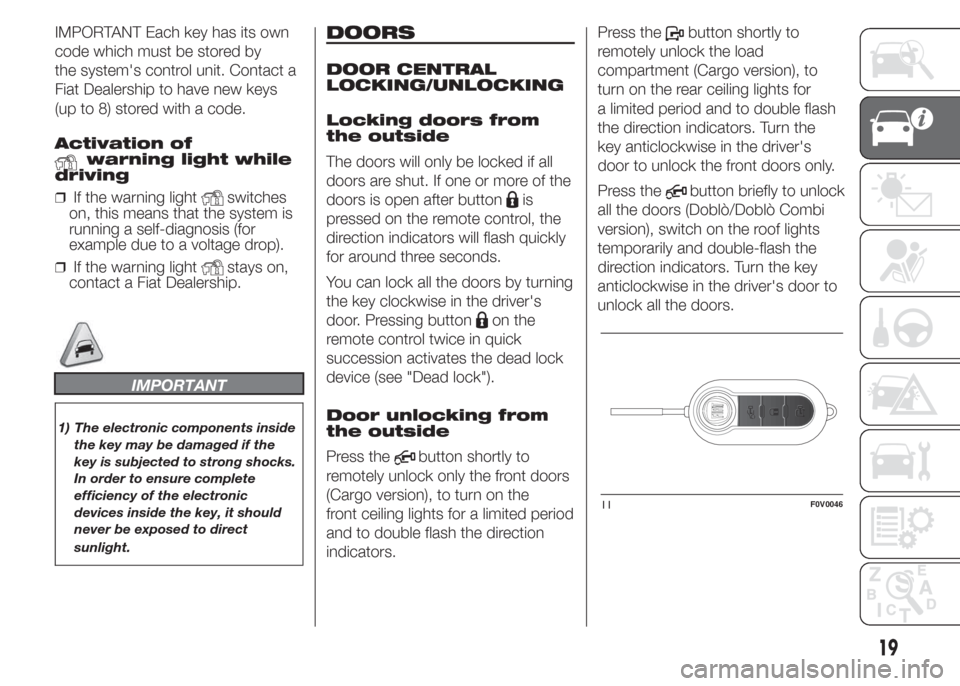
Press the
button shortly to
remotely unlock only the front doors
(Cargo version), to turn on the
front ceiling lights for a limited period
and to double flash the direction
indicators.Press the
button shortly to
remotely unlock the load
compartment (Cargo version), to
turn on the rear ceiling lights for
a limited period and to double flash
the direction indicators. Turn the
key anticlockwise in the driver's
door to unlock the front doors only.
Press the
button briefly to unlock
all the doors (Doblò/Doblò Combi
version), switch on the roof lights
temporarily and double-flash the
direction indicators. Turn the key
anticlockwise in the driver's door to
unlock all the doors.
11F0V0046
19
Page 25 of 323
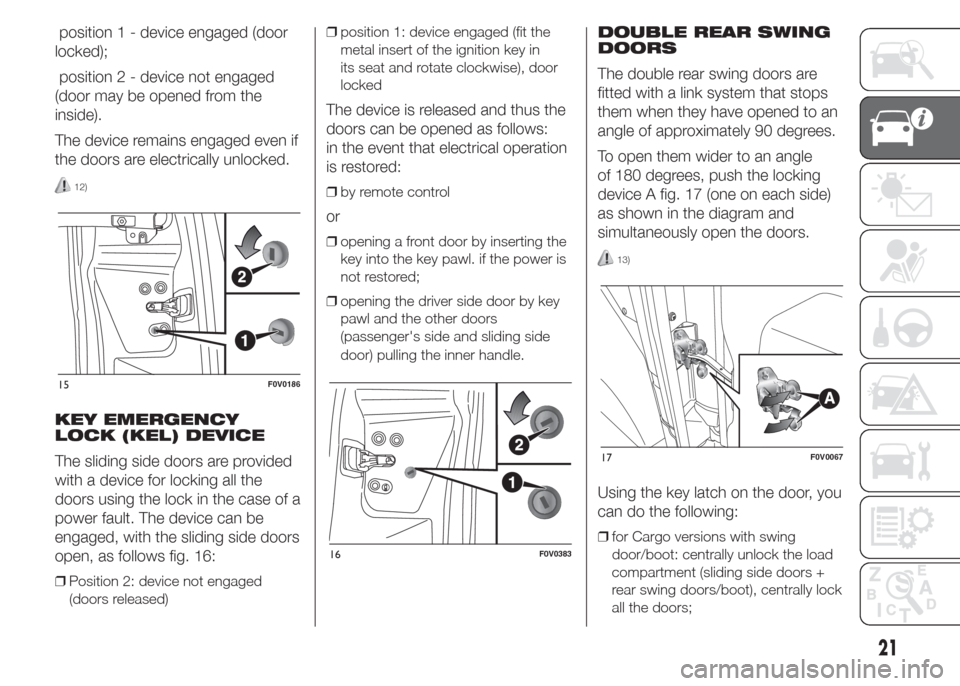
position 1 - device engaged (door
locked);
position 2 - device not engaged
(door may be opened from the
inside).
The device remains engaged even if
the doors are electrically unlocked.
12)
KEY EMERGENCY
LOCK (KEL) DEVICE
The sliding side doors are provided
with a device for locking all the
doors using the lock in the case of a
power fault. The device can be
engaged, with the sliding side doors
open, as follows fig. 16:
❒Position 2: device not engaged
(doors released)❒position 1: device engaged (fit the
metal insert of the ignition key in
its seat and rotate clockwise), door
locked
The device is released and thus the
doors can be opened as follows:
in the event that electrical operation
is restored:
❒by remote control
or
❒opening a front door by inserting the
key into the key pawl. if the power is
not restored;
❒opening the driver side door by key
pawl and the other doors
(passenger's side and sliding side
door) pulling the inner handle.
DOUBLE REAR SWING
DOORS
The double rear swing doors are
fitted with a link system that stops
them when they have opened to an
angle of approximately 90 degrees.
To open them wider to an angle
of 180 degrees, push the locking
device A fig. 17 (one on each side)
as shown in the diagram and
simultaneously open the doors.
13)
Using the key latch on the door, you
can do the following:
❒for Cargo versions with swing
door/boot: centrally unlock the load
compartment (sliding side doors +
rear swing doors/boot), centrally lock
all the doors;
15F0V0186
16F0V0383
17F0V0067
21
Page 56 of 323
❒air recirculation, to keep the
function always either on or off;
❒
to speed up demisting/defrosting
of windscreen, rear window and
external rear view mirrors.
During fully automatic system
operation, you can change the set
temperature, air distribution and fan
speed at any time by using the
relevant buttons or knobs: the
system will automatically change its
settings to adjust to the new
requirements.During fully automatic operation
(FULL AUTO), the word FULL will
disappear if the air distribution
and/or flow rate and/or engagement
of the compressor and/or
recirculation settings are changed. In
this way, the functions will switch
from automatic to manual control
until the AUTO button is pressed
again. With one or more functions
turned on manually, the adjustment
of the intake air temperature
continues to be managed
automatically, except with the
compressor switched off: if this is
the case, the temperature of the air
sent into the passenger
compartment cannot be lower than
that of the outside air.
CONTROLS
Air temperature
adjustment knob (I)
Turn the knob either clockwise or
anticlockwise to increase or lower
the requested temperature in the
passenger compartment.
The set temperature is shown on
the display.Turn the knob either fully to the right
or fully to the left to the extreme HI
or LO position to turn the maximum
heating or maximum cooling
functions on:❒HI function (maximum heating):
select by turning the temperature
knob clockwise beyond the
maximum value (32°C).
This function may be used to heat
up the passenger compartment
exploiting the system potential to
the maximum. In this condition, the
system stops controlling the
temperature automatically and sets
the air mixing to maximum heating.
The air speed and distribution are
fixed.
In particular, if the heating fluid is not
sufficiently hot, the maximum fan
speed does not come on straight
away in order to limit the intake
of insufficiently hot air to the
passenger compartment.
All manual settings will be allowed
when this function is on.
To switch the function off, simply
turn the temperature knob
anticlockwise and set the required
temperature.
52
KNOW YOUR VEHICLE
Page 57 of 323
❒LO function (maximum cooling):
select by turning the temperature
knob anticlockwise beyond the
minimum value (16°C).
This function may be used to cool
down the passenger compartment
by exploiting the system's potential
to the full. In this condition, the
system stops controlling the
temperature automatically and sets
the air mixing to maximum cooling.
The air speed and distribution are
fixed. All manual settings will be
allowed when this function is on.
To switch the function off, simply
turn the temperature knob
clockwise and set the required
temperature.
Air distribution
buttons (B)
By pressing these buttons, it is
possible to set one of the 5 possible
air distributions manually:
Air flow to the windscreen and
front side window vents to demist
or defrost them.
Air flow at central and side
dashboard vents to ventilate the
chest and the face during the hot
season.
Air flow to the front and rear
footwell vents. Thanks to the
natural tendency of hot air to rise,
this distribution pattern allows
the passenger compartment to
warm up as quickly as possible,
providing an immediate feeling of
warmth.
Air flow distributed between
footwell diffusers (hotter air)
and central and side
dashboard vents (cooler air).
This distribution mode is
particularly useful in spring and
autumn on sunny days.
Air flow distributed between
the footwell vents and the
windscreen and front
side window defrosting/
demisting vents. This allows an
adequate warming of the
passenger compartment and
prevents the windows from
misting up.
The distribution set is shown by the
corresponding LEDs in the selected
buttons coming on.To restore automatic control of the
air distribution after a manual
selection, press the AUTO button.
Fan speed adjustment
buttons (H)
Press the H button at its ends to
increase or to decrease the fan
speed and therefore the amount of
air sent into the passenger
compartment, though the required
temperature remains set.
The fan speed is shown by the lit
bars on the display:
❒Maximum fan speed = all the bars lit
up
❒Minimum fan speed = one bar lit up.
The fan can only be excluded if
the climate control system
compressor has been switched off
by pressing the F button fig. 69.
IMPORTANT To restore automatic
fan speed control after a manual
adjustment, press the AUTO button.
53
Page 68 of 323
38) Never exceed the maximum
allowed load in the boot (see
the "Technical specifications"
chapter). Also make sure that the
objects you place in the boot
have been properly secured, to
avoid them from being thrown
forward consequent to sudden
braking and injuring your
passengers.
39) You must not use the folded
rear seat to carry luggage. The
load could be thrown forward into
the backrest of the front seats,
seriously injuring the occupants.
40) Make sure that the objects are
positioned carefully and fixed to
the hooks on the floor to prevent
them being flung forwards in
the event of sharp braking and
causing injury to the passengers.
IMPORTANT
7) To close the tailgate use handle B
fig. 77. Do not try to close the
tailgate by pressing on the side
shock absorbers C fig. 77. Also be
careful not to knock the side
shock absorbers when you load
the boot, to avoid damaging them.
INTERIOR FITTINGS
DRIVER SIDE ARMREST
(for versions/markets, where
provided)
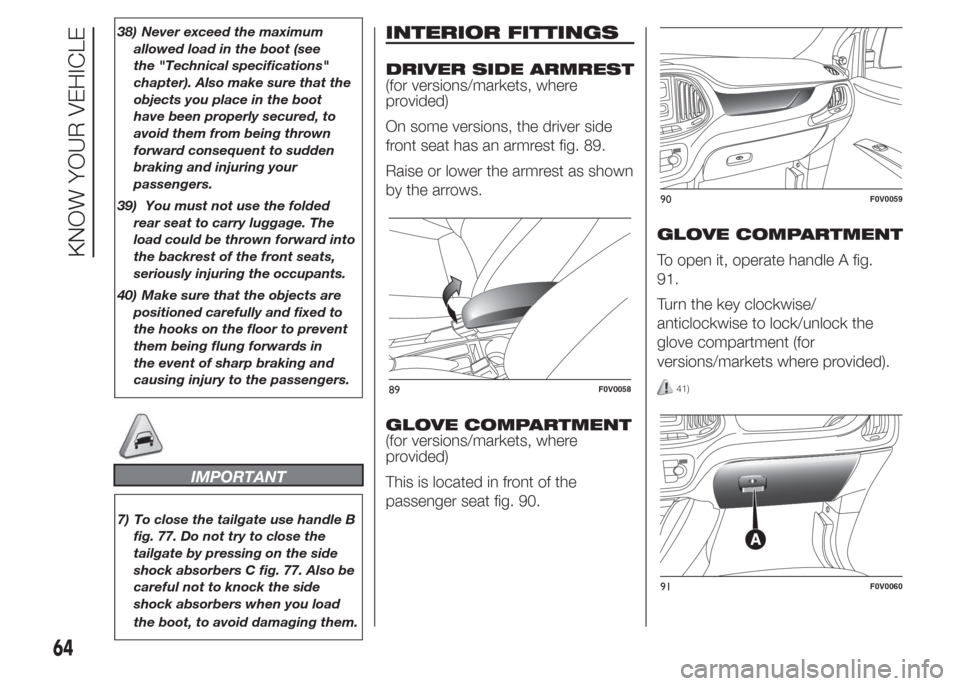
On some versions, the driver side
front seat has an armrest fig. 89.
Raise or lower the armrest as shown
by the arrows.
GLOVE COMPARTMENT
(for versions/markets, where
provided)
This is located in front of the
passenger seat fig. 90.GLOVE COMPARTMENT
To open it, operate handle A fig.
91.
Turn the key clockwise/
anticlockwise to lock/unlock the
glove compartment (for
versions/markets where provided).
41)89F0V0058
90F0V0059
91F0V0060
64
KNOW YOUR VEHICLE
Page 82 of 323
❒SPEED
❒HOUR
❒UNIT
❒BUZZ
❒BAG P
❒DRL
Selecting a menu option
– briefly press theMENU
button to select the menu
option to set;
– press buttons
and(with
single presses) to select the new
setting;
– press briefly theMENU
button to store the new setting
and go back to the previous menu
option.
Selecting “Set Clock”
– briefly press buttonMENU
to
select the first value to change
(hours);
– press buttons
and(with
single presses) to select the new
setting;– briefly press theMENU
button to store the new setting
and go to the next setup menu
option (minutes);
– after setting the values with the
same procedure, go back to the
previous menu item.
Hold down theMENU
button
– to quit the setup menu if you are in
the menu;
– to quit to the menu if you are
setting an option;
– to save only the settings already
stored (and confirmed by pressing
theMENU
button).
The environment of the Set Up
menu is timed; when the menu is
exited due to expiry of the time
allowed, only the changes already
stored by the user (confirmed
beforehand by a brief press of the
MENU
button) will be saved.Adjusting the vehicle
interior lighting (ILLU)
This function is available, with the
dipped headlamps on and at night,
to adjust the brightness of the
instrument panel, buttons, sound
system display and automatic
climate control display.
During the daytime, and with the
dipped headlamps on, the
instrument panel, buttons and
sound system and automatic
climate control displays are set to
maximum brightness.
❒press theMENUbutton briefly:
the display will show the wording
ILLU;
❒press button
andto set the
required brightness level;
❒press theMENU
button briefly
to return to the menu screen or hold
the button down to return to the
standard screen without storing.
78
KNOWING THE INSTRUMENT PANEL
Page 83 of 323
Setting a speed limit
(SPEEd)
This function is used to set a speed
limit (km/h or mph); the driver is
alerted when this limit is exceeded
(see “Warning lights and
messages”).
To set the desired speed limit,
proceed as follows:
- press theMENU
button
briefly: the display will show the
wording (SPEED) and the unit (km/h)
or (mph) previously set;
- press
orto select speed limit
activation (On) or deactivation (Off);
- if the function is on, press
or
to select the required speed limit
and then pressMENU
to
confirm;NOTE The speed may be set in the
range from 30 to 200 km/h, or
from 20 to 125 mph according to
the previously chosen unit (see
“Setting the distance unit”)
described below. The setting will
increase/decrease by five units each
time the
/button is pressed.
Hold down the
/button to
automatically increase/decrease the
setting rapidly. Complete the
adjustment with single presses of
the button when you approach the
desired value.
- press theMENU
button briefly
to return to the menu screen or
hold the button down to return to
the standard screen without storing.
To cancel the setting, proceed as
follows:
- briefly the pressMENU
button; (On) will flash on the
display;
- press the
button; (Off) will flash
on the display;
- press theMENU
button briefly
to return to the menu screen or
hold the button down to return to
the standard screen without storing.Setting the clock
(Hour)
With this function, it is possible to
set the time.
To adjust, proceed as follows:
- briefly press theMENU
button; the “hours” will flash on
the display;
- press the
orbutton to adjust;
- briefly press theMENU ESC
button; the “minutes” will flash
on the display;
- press the
orbutton to adjust;
- press theMENU
button
briefly to return to the menu screen
or hold the button down to return
to the standard screen without
storing.
Setting the distance
unit (Unit)
With this function it is possible to set
the unit.
To adjust, proceed as follows:
- press theMENU
button
briefly: the display will show the
wording (Unit) and the previously set
unit (km) or (mi);
79
Page 86 of 323
SET-UP MENU
The menu comprises a series of
functions arranged in a circular way,
which can be selected through the
andbuttons to access the
different selection operations and
settings (setup) given in the following
paragraphs. A submenu is provided
for some items (Clock and Unit of
measurement).
The setup menu is activated by
pressing briefly theMENU
button. Single presses on the
andbuttons will scroll through
the setup menu options. Operating
modes are different according to the
characteristics of the option
selected.
The menu includes the following
functions:
❒LIGHTING
❒SPEED BUZZER
❒TRIP B DATA
❒SET TIME
❒SET DATE
❒SEE RADIO (if present)
❒AUTOCLOSE
❒MEASUREMENT UNIT❒LANGUAGE
❒BUZZER VOLUME
❒BUTTON VOLUME
❒SEAT BELT BUZZER (only if
previously disabled)
❒SERVICE
❒PASSENGER AIRBAG
❒DAYTIME RUNNING LIGHTS
❒EXIT MENU
Selecting an option from the main
menu without a submenu:
– briefly press theMENU
button to select the main menu
option to be set;
– press the
orbuttons (with
single presses) to select the new
setting;
– briefly press theMENU
button to store the new setting
and to go back to the same main
menu option selected previously.Selecting an option from the main
menu with a submenu:
– briefly press theMENU
button to display the first
submenu option;
– press buttons
or(with single
presses) to scroll through all the
submenu options;
– briefly press theMENU
button to select the displayed
submenu option and to open the
relevant setup menu;
– press buttons
or(with single
presses) to select the new setting
for this submenu option;
– briefly press theMENU
button to store the new setting
and to go back to the same
submenu option selected previously.
Adjusting the vehicle
interior lighting
This function is available, with the
dipped headlamps on and at night,
to adjust the brightness of the
instrument panel, buttons, sound
system display and automatic
climate control display.
82
KNOWING THE INSTRUMENT PANEL
Page 88 of 323
– press theMENUbutton
briefly to return to the menu screen
or hold the button down to return
to the standard screen without
storing.
Set Time (Setting the
clock)
This function enables the clock to
be set through two submenus:
"Time" and "Format".
To carry out the adjustment,
proceed as follows:
– briefly pressMENU
; the
display will show the two sub-
menus “Time” and “Mode”;
– press the
orbutton to switch
between the two submenus;
– select the required option and
then pressMENU
briefly;
– if selecting the “Time” submenu,
briefly pressMENU
, the
“hours” will flash on the display;
– press the
orbutton to make
the adjustment;
– briefly press theMENU
button; the “minutes” will flash
on the display;– press the
orbutton for
setting.
NOTE The setting will increase or
decrease by one unit each time the
orbutton is pressed. Hold
down the button to increase/
decrease the setting rapidly and
automatically. Complete the
adjustment with single presses of
the button when you approach the
desired value.
– when you select “Mode”, pressing
theMENU
button makes the
mode flash on the display;
– press the
orbutton to select
"24h" or "12h".
When you have made the required
settings, press theMENU
button briefly to go back to the
submenu screen or hold the button
down to go back to the main menu
screen without saving.
– hold theMENU
button down
again to return to the standard
screen or to the main menu
according to where you are in the
menu.Set Date (Setting the
date)
Using this function you can update
the date (day - month - year).
Proceed as follows to update:
– briefly press theMENU
button: “year” will flash on the
display;
– press the
orbutton to make
the adjustment;
– briefly press theMENU
button: "month" will flash on the
display;
– press the
orbutton to make
the adjustment;
– briefly press theMENU
button: “day” will flash on the
display;
– press the
orbutton for
setting.
NOTE The setting will increase or
decrease by one unit each time the
orbutton is pressed. Hold
down the button to increase/
decrease the setting rapidly and
automatically. Complete the
adjustment with single presses of
the button when you approach the
desired value.
84
KNOWING THE INSTRUMENT PANEL
Page 157 of 323
In order to avoid these problems,
different types of diesel are
distributed according to the season:
summer type, winter type and
arctic type (cold/mountain areas). If
refuelling with diesel fuel whose
specifications are not suitable for the
current temperature, it is advisable
to mix TUTELA DIESEL ART additive
in the proportions shown on the
container. Pour the additive into the
tank before the diesel fuel.
When using or parking the vehicle
for a long time in the mountains
or cold areas, it is advisable to refuel
using locally available diesel fuel.
In this case, it is also advisable
to keep the tank over 50% full.
22)
FILLING THE TANK
To fill the tank completely, top up
twice after the first click of the fuel
supply gun. Further top ups could
cause faults in the fuel supply
system.FUEL TANK PLUG
Opening
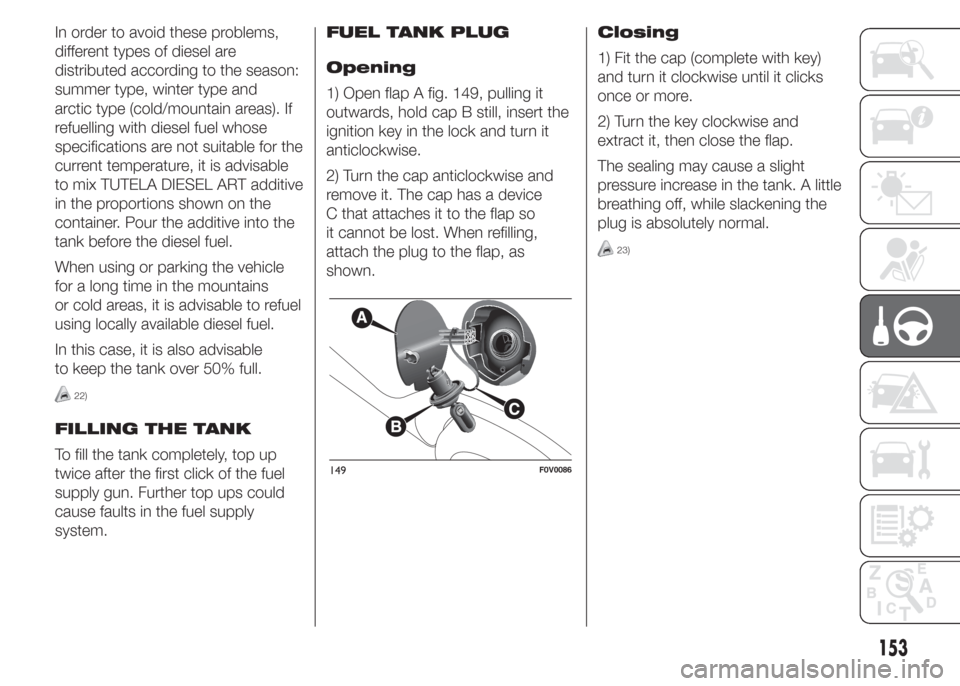
1) Open flap A fig. 149, pulling it
outwards, hold cap B still, insert the
ignition key in the lock and turn it
anticlockwise.
2) Turn the cap anticlockwise and
remove it. The cap has a device
C that attaches it to the flap so
it cannot be lost. When refilling,
attach the plug to the flap, as
shown.Closing
1) Fit the cap (complete with key)
and turn it clockwise until it clicks
once or more.
2) Turn the key clockwise and
extract it, then close the flap.
The sealing may cause a slight
pressure increase in the tank. A little
breathing off, while slackening the
plug is absolutely normal.
23)
149F0V0086
153