warning FIAT DUCATO 2015 Owner handbook (in English)
[x] Cancel search | Manufacturer: FIAT, Model Year: 2015, Model line: DUCATO, Model: FIAT DUCATO 2015Pages: 367, PDF Size: 19.73 MB
Page 191 of 367
TOWING TRAILERS
IMPORTANT
INFORMATION
The vehicle must be provided with
a type-approved tow hook and
adequate electrical system to tow
caravans or trailers. Installation
should be carried out by
specialised personnel who will issue
the required papers for travelling
on roads.
Install any specific and/or additional
door mirrors as specified by the
Highway Code.
Remember that when towing a
trailer, steep hills are harder to
climb, the braking spaces increase
and overtaking takes longer
depending on the overall weight.
Engage a low gear when driving
downhill, rather than constantly
using the brake.The weight of the trailer on the
vehicle tow hook will reduce the
loading capacity of the vehicle by
the same amount. Consider the
weight of the trailer fully laden,
including accessories and luggage,
to make sure you do not exceed
the maximum towable weight
(shown on the vehicle registration
document).
Do not exceed the speed limits
specific to each country you are
driving in, in the case of vehicles
towing trailers. In any case, the top
speed must not exceed 100 km/h.
You are advised to fit a suitable
stabiliser to the trailer drawbar.
In the vehicles equipped with
parking sensors, after fitting the tow
hook malfunctioning warnings
may be displayed, as some parts
(tow bar, ball tow hook) may be
within the sensor detection range.
In this case the detection range
must be adjusted or the parking
assistance function must be
deactivated.
135) 136)
INSTALLING THE TOW
HOOK
The towing device should be
fastened to the body by specialised
personnel according to any
additional and/or integrative
information supplied by the
Manufacturer of the device.
The towing device must meet
current regulations with reference to
Directive 94/20/EC and subsequent
amendments.
For any version the towing device
used must match the towable
weight of the vehicle on which it is
to be installed.
For the electric connection a
standard connector should be used
which is generally placed on a
special bracket normally fastened
to the towing device, and a special
ECU for external trailer light control
must be installed on the vehicle.
For the electrical connection, 7 or
13 pin 12 V DC connections are to
be used (CUNA/UNI and ISO/DIN
Standards). Follow the instructions
provided by the vehicle
manufacturer and/or the tow hitch
manufacturer.
187
Page 193 of 367

136) Never modify the braking
system of the vehicle to control
the trailer brake. The trailer
braking system must be fully
independent from the hydraulic
system of the vehicle.
137) After fitting, fixing screw holes
must be sealed to prevent an
exhaust gas inlet.
138) After fitting, fixing screw holes
must be sealed to prevent an
exhaust gas inlet.
189
WARNING
135) The ABS device with which the
vehicle may be equipped will not
control the braking system of
the trailer. Particular caution is
required on slippery roads.
Installation diagram
for Truck and Chassis
Cab versions fig. 174
Another tow hook specific to Truck
and Chassis Cab versions in shown
in fig. 174.
The structure Ø must be fixed in the
points indicated using a total of 6
M10x1.25 screws and 4 M12
screws.
MAX LOAD ON BALL: 100/120 kg
according to the payload (see
“Weights” table in the “Technical
data” section).
138)
Page 199 of 367
SNOW TYRES
A Fiat Dealership will be happy to
provide advice concerning the most
suitable type of tyre for the
customer's requirements.
The performance of these tyres is
considerably reduced when the
tread depth is less than 4 mm.
Replace them in this case.
Due to the specific characteristics
of snow tyres, in normal weather
conditions or on long motorway
journeys, the performance of these
tyres is lower than that of standard
tyres. Their usage should therefore
be restricted in accordance with
their type approval.
IMPORTANT When using snow
tyres with a maximum speed index
below the one that can be reached
by the vehicle (increased by 5%),
place a notice in the passenger
compartment, plainly in view, which
states the maximum speed allowed
by the snow tyres (as per EC
Directive).All four tyres should be the same
(brand and track) to ensure greater
safety when driving and braking
as well as a good manoeuvrability.
Remember that you should not
change the rotation direction of the
tyres.
139)
WARNING
139) The maximum speed for snow
tyres marked "Q" is 160 km/h,
while it is 190 km/h for "T" tyres
and 210 km/h for "H" tyres. You
should, however, always comply
with the speed limits of the
highway code.
SNOW CHAINS
The use of snow chains should be
in compliance with local regulations
of each country.
Snow chains can be fitted to the
tyres of the front wheels (drive
wheels) only.
Use of Lineaccessori Fiat snow
chains is recommended. Check the
tension of the snow chains after
the first few metres have been
driven.
43)
IMPORTANT With snow chains,
use the accelerator with extreme
care to prevent, or to limit as much
as possible, slipping of the drive
wheels that could cause chain
breakage, resulting in damage to
the car body or mechanical
components.
IMPORTANT For versions fitted with
225/75 R16 tyre, use snow chains
with max. thickness 16 mm.
195
When travelling on snowy roads
with snow chains, it may be helpful
to turn the ASR off: in fact, in these
conditions, the driving wheels
skidding when moving off gives you
better traction.
Page 202 of 367
STARTING THE
ENGINE
Go to a Fiat Dealership immediately
if warning light
stays on
constantly on the instrument panel.
JUMP STARTING
If the battery is flat, it is possible to
start the engine using an auxiliary
battery with the same capacity or a
little higher than the flat one.
It is advisable to contact a Fiat
Dealership to check/replace the
battery.
140)
Proceed as follows to start the
vehicle:
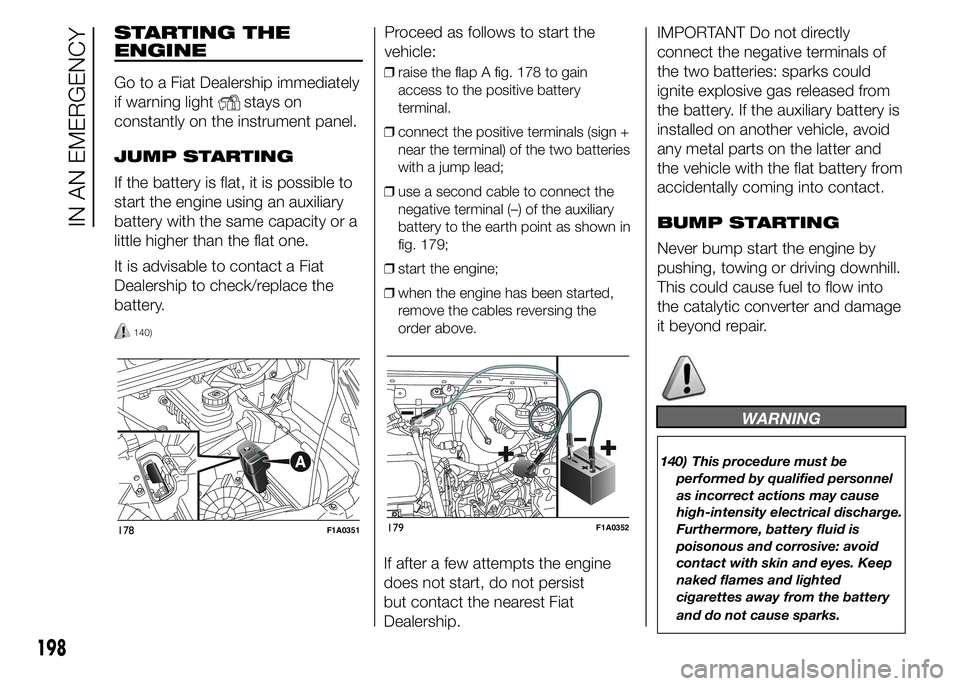
❒raise the flap A fig. 178 to gain
access to the positive battery
terminal.
❒connect the positive terminals (sign +
near the terminal) of the two batteries
with a jump lead;
❒use a second cable to connect the
negative terminal (–) of the auxiliary
battery to the earth point as shown in
fig. 179;
❒start the engine;
❒when the engine has been started,
remove the cables reversing the
order above.
If after a few attempts the engine
does not start, do not persist
but contact the nearest Fiat
Dealership.IMPORTANT Do not directly
connect the negative terminals of
the two batteries: sparks could
ignite explosive gas released from
the battery. If the auxiliary battery is
installed on another vehicle, avoid
any metal parts on the latter and
the vehicle with the flat battery from
accidentally coming into contact.
BUMP STARTING
Never bump start the engine by
pushing, towing or driving downhill.
This could cause fuel to flow into
the catalytic converter and damage
it beyond repair.
WARNING
140) This procedure must be
performed by qualified personnel
as incorrect actions may cause
high-intensity electrical discharge.
Furthermore, battery fluid is
poisonous and corrosive: avoid
contact with skin and eyes. Keep
naked flames and lighted
cigarettes away from the battery
and do not cause sparks.
178F1A0351179F1A0352
198
IN AN EMERGENCY
Page 203 of 367
REPLACING A
WHEEL
GENERAL
INSTRUCTIONS
Wheel replacement and correct use
of the jack and spare wheel (for
versions/markets, where provided)
call for some precautions, which
are listed below.
141) 142) 143) 144) 145)
Please note that:
❒the jack weight is 4.5 kg;
❒the jack requires no adjustment;
❒the jack cannot be repaired: in the
event of a fault it must be replaced by
another original one;
❒no tool other than its cranking device
may be fitted on the jack.
146)
To change a wheel,
proceed as follows:
❒stop the vehicle in a position that is
not dangerous for oncoming traffic
where you can change the wheel
safely. The ground should be flat
if possible, and sufficiently firm;❒stop the engine and pull the
handbrake;
❒engage first gear or reverse;
❒put on the reflective safety jacket
(compulsory by law in certain
countries) before getting out of the
vehicle;
❒indicate that the vehicle has broken
down using the devices required by
the law in the current country (e.g.
warning triangle, hazard lights, etc.);
❒In the event of a wheel change on a
slope or on unsurfaced roads, put
any object as stop under the wheels;
❒take the tool bag under the
passenger seat (see “Compartment
under front passenger seat” in the
“Know your vehicle” section);
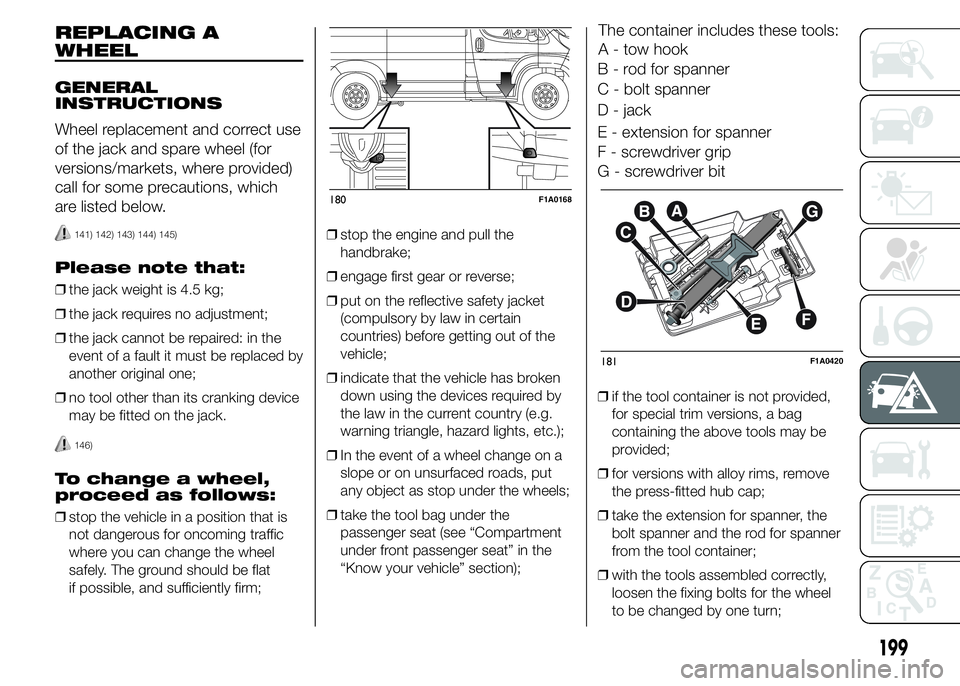
The container includes these tools:
A - tow hook
B - rod for spanner
C - bolt spanner
D - jack
E - extension for spanner
F - screwdriver grip
G - screwdriver bit
❒if the tool container is not provided,
for special trim versions, a bag
containing the above tools may be
provided;
❒for versions with alloy rims, remove
the press-fitted hub cap;
❒take the extension for spanner, the
bolt spanner and the rod for spanner
from the tool container;
❒with the tools assembled correctly,
loosen the fixing bolts for the wheel
to be changed by one turn;
180F1A0168
181F1A0420
199
Page 207 of 367
WARNING
141) Use your hazard lights, warning
triangle, etc. to show that your
vehicle is stationary according to
the regulations in force.
Passengers should get out of the
vehicle, particularly if it is heavily
loaded, and wait for the wheel
to be changed away from the
traffic. Apply the handbrake. in
the event of a wheel change on a
slope or on unsurfaced roads,
put any object as stop under the
wheels.
142) The spare wheel supplied (for
versions/markets, where
provided) is specific for your
vehicle. Therefore, it must not be
used on other models. Do not
use spare wheels of other models
on your vehicle. The wheel bolts
are specific for your vehicle: do
not use them on different models
and do not use bolts from other
models on your car.143) Have the wheel repaired and
refitted as soon as possible. Do
not apply grease to the bolt
threads before fitting: they could
come unscrewed.
144) Use the jack only to replace
wheels on the vehicle with which
it is supplied or on other vehicles
of the same model. Never use
the jack for other purposes, such
as lifting other car models. Never
use the jack to carry out repairs
under the vehicle. Incorrect
positioning of the jack may cause
the lifted vehicle to fall. Do not
use the jack for loads higher than
those shown on the label.
145) Never tamper with the inflation
valve. Never introduce tools of any
kind between rim and tyre. Check
tyre and spare wheel pressure
regularly, referring to the values
shown in the "Technical
specifications" section.
146) No tools other than the crank
provided should be used with
the spare wheel lifting device; it
should be operated by hand only.147) On versions equipped with
self-levelling air suspension, never
introduce the head or hands in
the wheel arch: the vehicle could
raise or lower automatically
depending on possible load or
temperature changes.
148) The device should only be
operated by hand, without using
any type of tool other than the
crank provided, like pneumatic or
electrical screwers.
149) The moving components of the
jack (screw and joints) can also
cause injuries: do not touch them.
If you come into contact with
lubricating grease, clean yourself
thoroughly.
150) At the end of the operation of
raising/locking the spare wheel,
after having checked the correct
positioning of the wheel under the
platform (yellow notch inside the
window on the device), the
spanner must be extracted, taking
care not to turn it in the wrong
direction (as in fig. 189) to
facilitate the extraction of the
spanner itself, to prevent the
attachment device from being
released and the wheel assembly
not being securely retained.
203
Page 211 of 367
WARNING
153) Give the instruction booklet to
the tyre repair workshop
personnel.
154) Punctures on the sides of the
tyre cannot be repaired. Do not
use the quick tyre repair kit if the
damage is due to running with flat
tyre.
155) If the wheel rim has been
damaged (bent so as to cause air
to leak), the wheel cannot be
repaired. Do not remove the
foreign body (screws or nails)
from the tyre.
156) Do not use the compressor for
more than 20 consecutive
minutes. Risk of overheating.
Tyres repaired with the quick tyre
repair kit must only be used
temporarily, as the kit is not
suitable for a definitive repair.157) The bottle contains ethylene
glycol. It contains latex that might
cause allergic reactions. It is
harmful if swallowed. It is irritant
for the eyes. It may cause
sensitisation if inhaled or on
contact. Avoid contact with eyes,
skin and clothes. In the event of
contact, wash immediately with
plenty of water. Do not induce
vomiting if swallowed. Rinse your
mouth and drink plenty of water.
Call a doctor immediately. Keep
out of the reach of children. The
product must not be used by
asthmatics. Do not breathe in the
vapours during insertion and
suction. Call a doctor immediately
if allergic reactions are noted.
Store the bottle in its proper
compartment, away from sources
of heat. The sealant has an expiry
date. Replace the bottle if the
sealant has expired.
158) Wear the protective gloves
provided together with the quick
tyre repair kit.
159) affix the adhesive label in an
easy-to-see position for the driver
as a reminder that the tyre has
been treated with the quick tyre
repair kit. Drive carefully,
particularly on bends. Do not
exceed 80 km/h. Do not
accelerate or brake suddenly.160) If the pressure falls below 3
bars, do not drive any further: the
Fix & Go automatic quick tyre
repair kit cannot guarantee proper
hold because the tyre is too much
damaged. Contact a Fiat
Dealership.
161) You must inform the dealership
that the tyre has been repaired
using the quick tyre repair kit.
Give the booklet to the personnel
who will be handling the tyre
treated with the repair kit.
162) If different tyres from the ones
supplied with the vehicle are
used, it may not be possible to
carry out the repair. If the tyres
are replaced, it is advisable to use
those approved by the
manufacturer. Consult a Fiat
Dealership.
IMPORTANT
44) Punctures caused by foreign
bodies can be repaired if the
damage does not exceed 4 mm on
the tread and on the shoulder of
the tyre.
207
Page 212 of 367
IMPORTANT
2) Replace the bottle containing the
sealant after the expiry date.
Dispose of the bottle and
the sealant properly. Have the
sealing fluid and the bottle
disposed of in compliance with
national and local regulations.
CHANGING A BULB
GENERAL
INSTRUCTIONS
45)
163) 164)
❒When a light is not working, check
that the corresponding fuse is intact
before changing a bulb. For the
location of fuses, refer to the
paragraph "Replacing fuses" in this
chapter.
❒before changing a bulb check the
contacts for oxidation;
❒burnt bulbs must be replaced by
others of the same type and power;
❒always check the headlight beam
direction after changing a bulb;
IMPORTANT A slight misting may
appear on the internal surface
of the headlight: this does
not indicate a fault and is caused
by low temperature and the degree
of humidity in the air. Misting will
rapidly disappear when the
headlights are switched on. The
presence of drops inside the
headlights indicates infiltration of
water. Contact a Fiat Dealership.
IMPORTANT
45) Halogen bulbs must be handled
by holding the metallic part only.
Touching the transparent part
of the bulb with your fingers may
reduce the intensity of the
emitted light and even reduce the
lifespan of the bulb. In the event
of accidental contact, wipe the
bulb with a cloth moistened with
alcohol and let the bulb dry.
WARNING
163) Modifications or repairs to the
electric system that are not
carried out properly or do not take
the system technical
specifications into account can
cause malfunctions leading to the
risk of fire.
164) Halogen bulbs contain
pressurised gas; in the case of
breakage they may burst.
208
IN AN EMERGENCY
Page 224 of 367
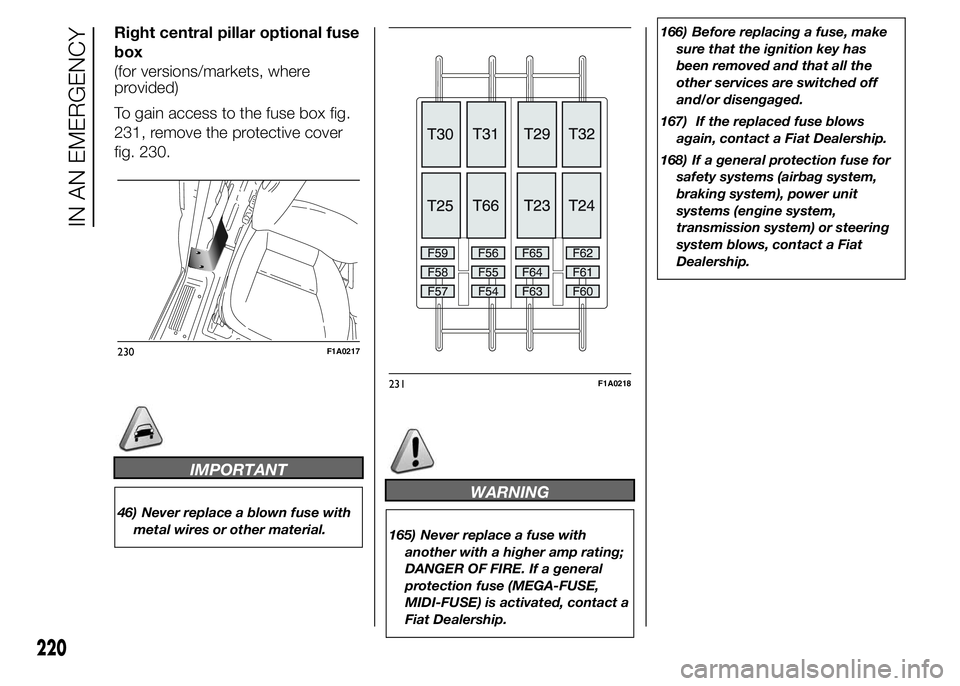
Right central pillar optional fuse
box
(for versions/markets, where
provided)
To gain access to the fuse box fig.
231, remove the protective cover
fig. 230.
IMPORTANT
46) Never replace a blown fuse with
metal wires or other material.
WARNING
165) Never replace a fuse with
another with a higher amp rating;
DANGER OF FIRE. If a general
protection fuse (MEGA-FUSE,
MIDI-FUSE) is activated, contact a
Fiat Dealership.166) Before replacing a fuse, make
sure that the ignition key has
been removed and that all the
other services are switched off
and/or disengaged.
167) If the replaced fuse blows
again, contact a Fiat Dealership.
168) If a general protection fuse for
safety systems (airbag system,
braking system), power unit
systems (engine system,
transmission system) or steering
system blows, contact a Fiat
Dealership.
230F1A0217
231F1A0218
220
IN AN EMERGENCY
Page 229 of 367
BATTERY
RECHARGING
IMPORTANT The battery
recharging procedure is given as
information only. You are advised to
contact a Fiat Dealership to have
this operation carried out.
IMPORTANT After turning the
ignition key to STOP and having
closed the driver side door, wait at
least one minute before
disconnecting the electrical supply
from the battery. When
reconnecting the electrical supply
to the battery, make sure that
the ignition key is in the STOP
position and the driver side door is
closed.
Charging should be slow at a low
ampere rating for approximately 24
hours. Charging for a longer time
may damage the battery.
169) 170)
IN THE ABSENCE OF
START&STOP SYSTEM
To recharge, proceed as follows:
❒disconnect the negative battery
terminal;
❒connect the charger cables to the
battery terminals, observing the
polarity;
❒turn on the charger;
❒when it is recharged, turn the charger
off before disconnecting it from the
battery;
❒reconnect the negative battery
terminal.
WITH START&STOP
SYSTEM
To recharge, proceed as follows:
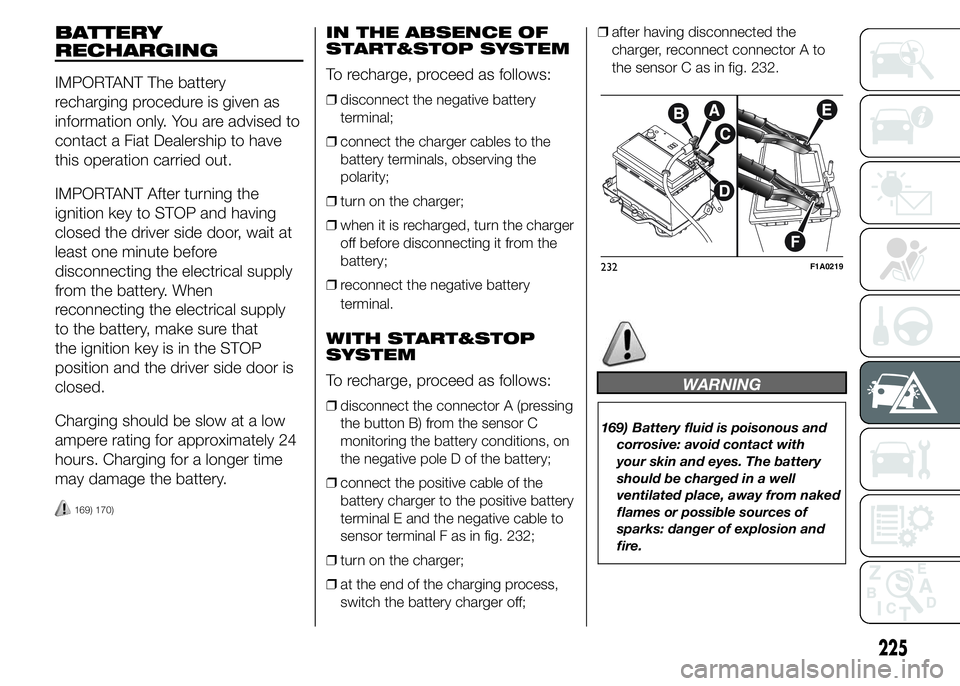
❒disconnect the connector A (pressing
the button B) from the sensor C
monitoring the battery conditions, on
the negative pole D of the battery;
❒connect the positive cable of the
battery charger to the positive battery
terminal E and the negative cable to
sensor terminal F as in fig. 232;
❒turn on the charger;
❒at the end of the charging process,
switch the battery charger off;❒after having disconnected the
charger, reconnect connector A to
the sensor C as in fig. 232.
WARNING
169) Battery fluid is poisonous and
corrosive: avoid contact with
your skin and eyes. The battery
should be charged in a well
ventilated place, away from naked
flames or possible sources of
sparks: danger of explosion and
fire.
232F1A0219
225