ignition FIAT DUCATO 244 2002 3.G Connect NavPlus Manual
[x] Cancel search | Manufacturer: FIAT, Model Year: 2002, Model line: DUCATO 244, Model: FIAT DUCATO 244 2002 3.GPages: 246, PDF Size: 3.39 MB
Page 16 of 246
CONNECT Nav
15
GENERAL
INFORMATION
IMPORTANT NOTES FOR
USE AND ROAD SAFETY
The CONNECT system makes it
possible to easily control the main
functions of the vehicle.
To avoid creating dangerous situa-
tions for yourself and others in use of
the system, please pay attention to the
following points:
– the system must be used keeping
full control of the vehicle; in the case
of doubt in the use of the functions,
it is necessary to stop before per-
forming the various operations;
– use of the cell phone is prohibited
near explosive substances.
The navigation system allows you to
reach your destination, indicating each
route change stored on the navigation
CD-ROM. In fact, in calculating the
route, the system takes into account
of all the information stored concern-
ing the roads, advising the best route.
However it cannot take account of the
traffic, sudden interruptions or any
other inconvenience.In carrying out any manoeuvre it is
always necessary to follow the rules of
the road, regardless of the advice giv-
en by the navigation system. If you
leave the suggested route, the naviga-
tion system will calculate a new one
and suggest it to you.SYSTEM POWER ON
The system can be switched on ac-
cording to two different methods:
automatic switching onwith ig-
nition key to MAR;
manual switching on:
– by pressing knob 16-fig. 1;
– with direct access to SOS menu by
pressing button
•25-fig. 1.
Automatic switching on
Turning the ignition key to MARwill
turn the system on automatically, thus
activating or making available all the
functions described in this manual.
The navigation system
helps the driver while dri-
ving by suggesting, vocally and
graphically, the best route to be fol-
lowed to reach the preset destina-
tion. The suggestions given by the
navigation system do not exempt
the driver from full responsibility
due to driving behaviour and com-
pliance with road and other traffic
regulations. The responsibility for
road safety always and anyway lies
with the vehicle’s driver.
WARNING
Page 17 of 246
CONNECT Nav
16
Manual switching on
With ignition key at STOPpress
knob 16-fig. 1, to switch the system
on, thus making available the following
modules:
– MAIN,
– AUDIO,
– NAV,
– TEL,
– Targasys
•.
IMPORTANTIn this mode, the
SETUP and TRIP modules can be ac-
tivated; however, it will not be possi-
ble to validate any operation con-
cerning parameter change, language
change, units change and any other
type of adjustment provided by the
system. These limitations are normal
when switching the system on manu-
ally by the knob 16-fig. 1, since with
engine off (key at STOP) the vehicle
data transmission devices are not op-
erating.
Turning the ignition key to MAR, will
make all system functions active.SYSTEM POWER OFF
The CONNECT system can be
switched off according to two differ-
ent modes:
– deactivation independentof ig-
nition key
– deactivation dependenton ig-
nition key
To choose the power-off mode, see
the Power OFF submenu in the SET-
UP menu.
Deactivation independent
of ignition key
With this mode active, the system
can be turned off by pressing the knob
16-fig. 1.
The display will show the message
“PLEASE WAIT WHILE SYSTEM
TURNS OFF”.
IMPORTANTWith ignition key at
STOP, deactivation is delayed and will
take place after 20 minutes if the sys-
tem has a destination set or a phone
call is in progress.Deactivation dependent
on ignition key
With this mode active, the system
can be switched off by turning the ig-
nition key to STOPor pressing the
knob 16-fig. 1.
IMPORTANTDeactivation with
ignition key to STOPis delayed and
will take place after 20 minutes if the
system has a destination set or a
phone call is in progress.
Page 18 of 246
CONNECT Nav
17
With ignition key at MAR, if au-
thentication fails, system starts work-
ing as usual, but the user is asked to
enter the 4-digit “Master Code” to al-
low access to the standard functions.
Master code is unique for each sys-
tem, and is stored in its memory and
can not be reset.
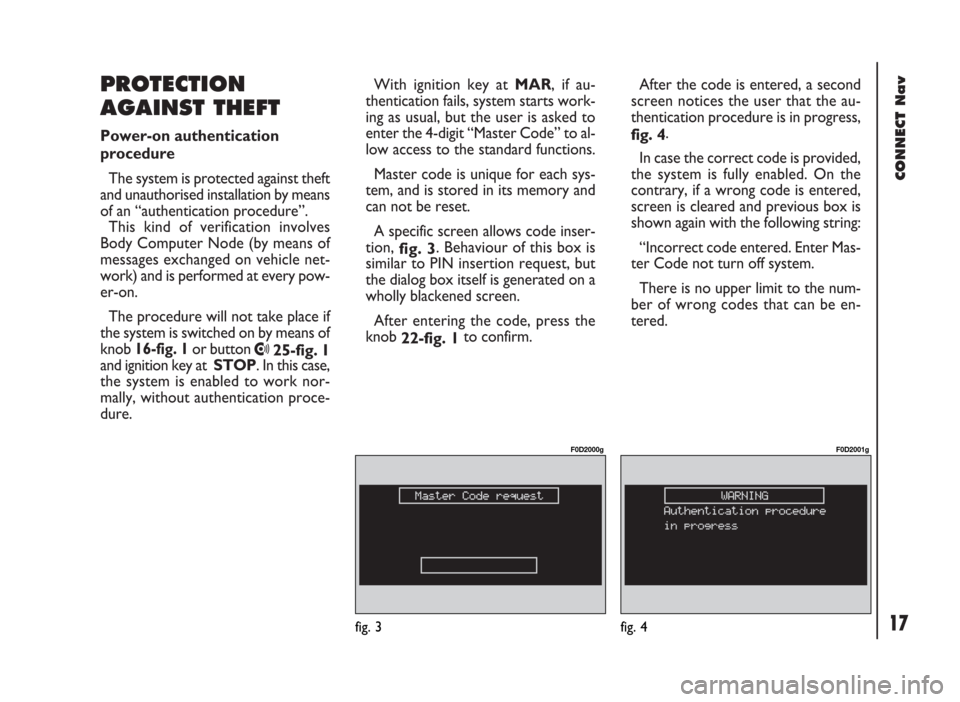
A specific screen allows code inser-
tion,
fig. 3. Behaviour of this box is
similar to PIN insertion request, but
the dialog box itself is generated on a
wholly blackened screen.
After entering the code, press the
knob
22-fig. 1to confirm.
PROTECTION
AGAINST THEFT
Power-on authentication
procedure
The system is protected against theft
and unauthorised installation by means
of an “authentication procedure”.
This kind of verification involves
Body Computer Node (by means of
messages exchanged on vehicle net-
work) and is performed at every pow-
er-on.
The procedure will not take place if
the system is switched on by means of
knob 16-fig. 1or button
•25-fig. 1
and ignition key at STOP. In this case,
the system is enabled to work nor-
mally, without authentication proce-
dure.After the code is entered, a second
screen notices the user that the au-
thentication procedure is in progress,
fig. 4.
In case the correct code is provided,
the system is fully enabled. On the
contrary, if a wrong code is entered,
screen is cleared and previous box is
shown again with the following string:
“Incorrect code entered. Enter Mas-
ter Code not turn off system.
There is no upper limit to the num-
ber of wrong codes that can be en-
tered.
fig. 3
F0D2000g
fig. 4
F0D2001g
Page 20 of 246
CONNECT Nav
19
“SETUP” FUNCTION
The SETUP mode enables to set dif-
ferent vehicle and CONNECT system
operating modes and parameters.
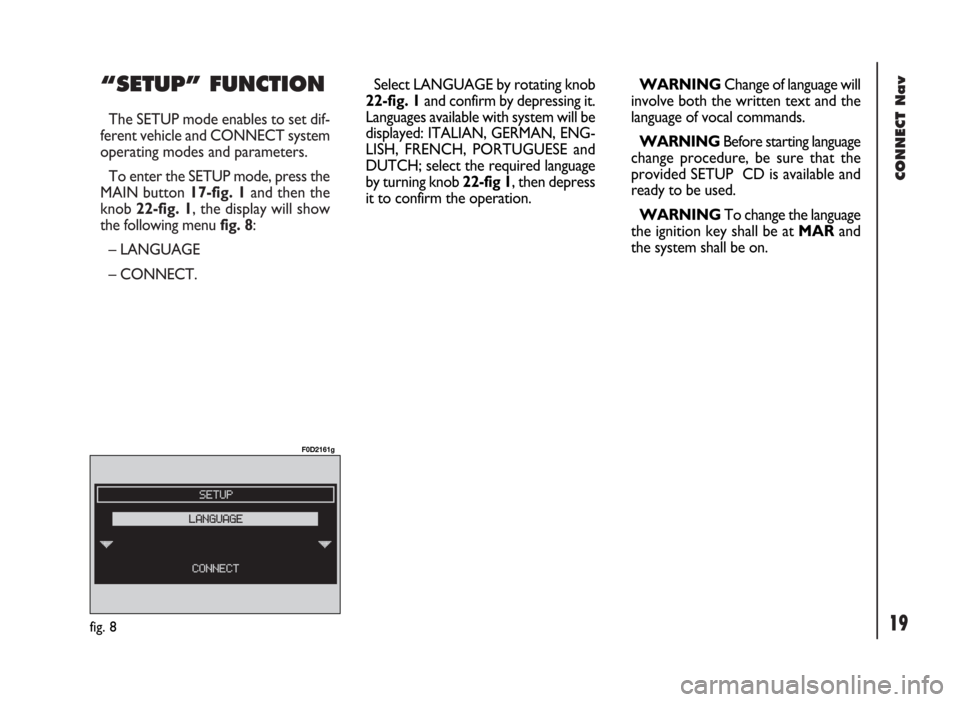
To enter the SETUP mode, press the
MAIN button 17-fig. 1and then the
knob 22-fig. 1, the display will show
the following menu fig. 8:
– LANGUAGE
– CONNECT.
fig. 8
F0D2161g
Select LANGUAGE by rotating knob
22-fig. 1and confirm by depressing it.
Languages available with system will be
displayed: ITALIAN, GERMAN, ENG-
LISH, FRENCH, PORTUGUESE and
DUTCH; select the required language
by turning knob 22-fig 1, then depress
it to confirm the operation.WARNINGChange of language will
involve both the written text and the
language of vocal commands.
WARNINGBefore starting language
change procedure, be sure that the
provided SETUP CD is available and
ready to be used.
WARNINGTo change the language
the ignition key shall be at MARand
the system shall be on.
Page 22 of 246
CONNECT Nav
21
3)“NIGHTTIME BRIGHTNESS”:
enables to adjust the display brightness
in night mode. To perform the ad-
justment, select and confirm this op-
tion by rotating and pressing the knob
22-fig. 1. Rotate the knob 22-fig. 1
clockwise to increase brightness and
counterclockwise to decrease it.
4)“NIGHTTIME CONTRAST”: to
adjust contrast in nighttime brightness
mode. To perform the adjustment, se-
lect and confirm this option by rotat-
ing and pressing the knob 22-fig. 1.
Rotate the knob 22-fig. 1clockwise
to increase contrast and counter-
clockwise to decrease it.5)“MODE, DIMMING, CON-
TRAST”: selecting and confirming this
option by rotating and pressing the
knob 22-fig. 1, the following settings
are possible:
“AUTOMATIC”: enables to adjust
automatically the day/night mode de-
pending on vehicle lights switching
on/off.
“DAY”: activates day mode.
“NIGHT”: activates night mode.
After selecting the required setting,
press the knob 22-fig. 1to confirm.
If the automatic mode is “DAY” on-
ly day adjustment is displayed and the
night one is deactivated.
If the automatic mode is “NIGHT”
only night adjustment is displayed and
the day one is deactivated.POWER OFF
Select and confirm “POWER OFF”
by rotating and pressing the knob 22-
fig. 1to access the type of setting that
determines CONNECT switching off
(dependent on or independent of ig-
nition key).
Possible settings, only with ignition
key at MAR, are the following:
– “key-dependent auto-off”
– “key-independent auto-off”
Current activated setting will be high-
lighted.
Select and confirm the required set-
ting by rotating and pressing the knob
22-fig. 1.
Page 52 of 246
51
CONNECT Nav
– turn and press the knob 22-fig. 1
to select and confirm “BALANCE”,
the function that changes the sound
distribution in the passenger com-
partment between the right and left
speakers, the display will show the
screen in fig. 36.
– turn the knob 22-fig. 1to change
the sound distribution in the passenger
compartment between the right and
left speakers (cursor moving along the
horizontal axis), then press the knob
to confirm.
In the same way, choose and confirm
the “FADER” function to change the
sound distribution between the front
and rear speakers (cursor moving
along the vertical axis).
After adjustment, select “OK” with
the knob 22-fig. 1and then press it to
confirm the setting and to go back to
the previous screen.
If “ESC” 23-fig. 1is pressedyou go
back to the previous screen with the
settings stored previously.AUTOCLIP DETECT
(dynamic distortion limiter)
With the “AUTOCLIP DETECT”
function the radio output level is re-
duced automatically when excessive
distortion level (that could damage the
speakers) is detected.
To turn this function on and off, se-
lect “AUTOCLIP DETECT” with the
knob 22-fig. 1, then press it to con-
firm. The function status (on or off) is
shown on the display by wording
“YES” or “NO”.MAX. VOL. AT ON
The “MAX. VOL. AT ON” function
clips radio volume (at level 10) at pow-
er on. If the radio was switched off
with a volume setting higher than 10,
when activating this function (ignition
key at STOP, at power on the vol-
ume is reset to the above limit.
To turn this function on and off, se-
lect and confirm “MAX. VOL. AT
ON” rotating and pressing the knob
22-fig. 1.
“OK”
At the end, select “OK” with the
knob 22-fig. 1and then press it to
confirm and go back to the main “AU-
DIO SETUP” menu.
Page 61 of 246
CONNECT Nav
60
– manual number dialling
– DTMF setting (Dual Tone Multi
Frequency) to repeat dialling and in-
hibit the own identification number
transmission
– selection of network provider
– setting ringer volume and tone
– display of remaining credit in case
of prepaid SIM card (if available by net-
work provider)
– display of signal field intensity and
other status warnings with symbols
and words.PRELIMINARY
OPERATIONS
ENTERING AND EXITING
THE TELEPHONE MODE
To enter the telephone mode
proceed as follows:
– short push on ”TEL” button 19-
fig. 1on front panel.
(If the Connect is off, switch it on by
turning the ignition key to MAR).
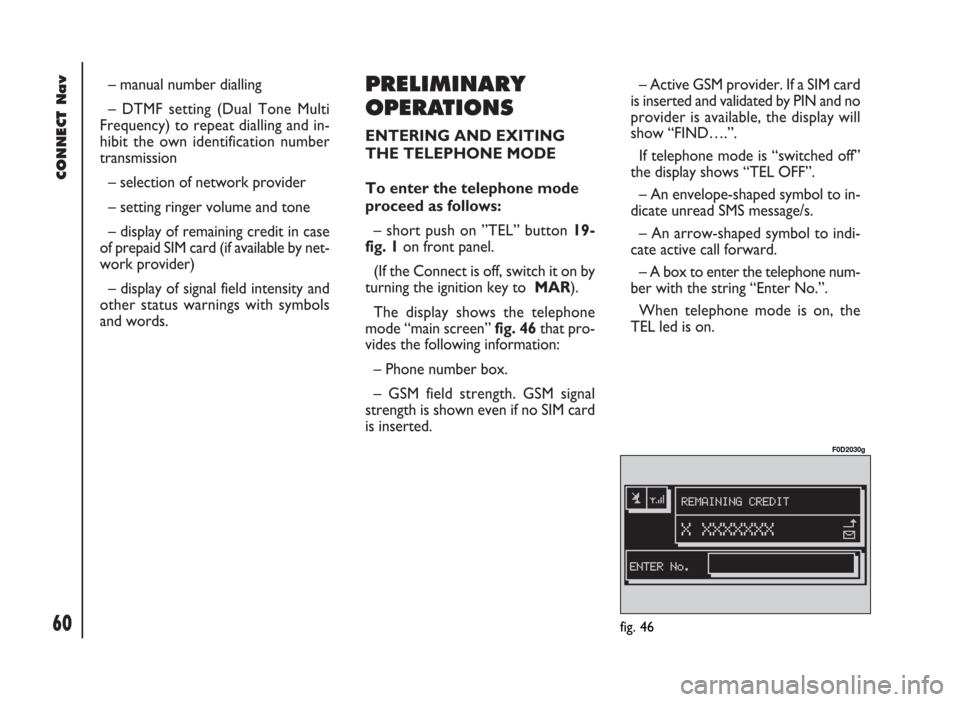
The display shows the telephone
mode “main screen”fig. 46that pro-
vides the following information:
– Phone number box.
– GSM field strength. GSM signal
strength is shown even if no SIM card
is inserted.– Active GSM provider. If a SIM card
is inserted and validated by PIN and no
provider is available, the display will
show “FIND….”.
If telephone mode is “switched off”
the display shows “TEL OFF”.
– An envelope-shaped symbol to in-
dicate unread SMS message/s.
– An arrow-shaped symbol to indi-
cate active call forward.
– A box to enter the telephone num-
ber with the string “Enter No.”.
When telephone mode is on, the
TEL led is on.
fig. 46
F0D2030g
Page 92 of 246
91
CONNECT Nav
IMPORTANT NOTES
– Accurate self-adjustment of the nav-
igation system requires approx. 100
km of travel the first time and when
tyres are changed; during this stage the
calculated position could be less accu-
rate.
– Continuous lack of grip at the
wheels (for example skidding on ice),
makes the system temporarily detect
an incorrect position.The navigation system is completely
managed by the telematic system,
therefore the only operations that may
be required are replacement of the
CD-ROM to set the map of another
area or an updated map.
Access to the navigation main func-
tions is gained by short push on
“NAV” 20-fig. 1.
A long push on the “NAV” key 20-
fig. 1turns the NAV MUTE function
on and therefore voice instructions will
be muted. To turn the NAV MUTE
function off, press again the “NAV” key
20-fig. 1at length.Each time you start the engine and se-
lect the navigation function, the display
will show the cautions for using the sys-
tem; the text displayed is as follows:
“The FIAT navigation system guides
you in traffic and helps you reach your
destination. Local traffic regulations
must take precedence over the ma-
noeuvres indicated by the navigation
system. The driver is responsible for
operating the vehicle and observing all
traffic regulations”.
This page will not be displayed as long
as the ignition key is to MAR.
Page 110 of 246
CONNECT Nav
109
GENERAL
INFORMATION
The on-board computer provides a
series of helpful data relevant to cur-
rent travel (e.g.: times, distances,
speed, fuel consumption). Certain in-
formation depends on set navigation
route.
IMPORTANTCertain informa-
tion/operations hereafter described
are available/possible only with ignition
key turned to MAR.
TRIP menu allows to set the desired
distance and fuel consumption mea-
sure unit.
TRIP menu also allows to input a
number of events (e.g. Tyre replace-
ment..., Birthday …) that can be trig-
gered both on set date or mileage.
O O
N N
- -
B B
O O
A A
R R
D D
C C
O O
M M
P P
U U
T T
E E
R R
( (
T T
R R
I I
P P
) )
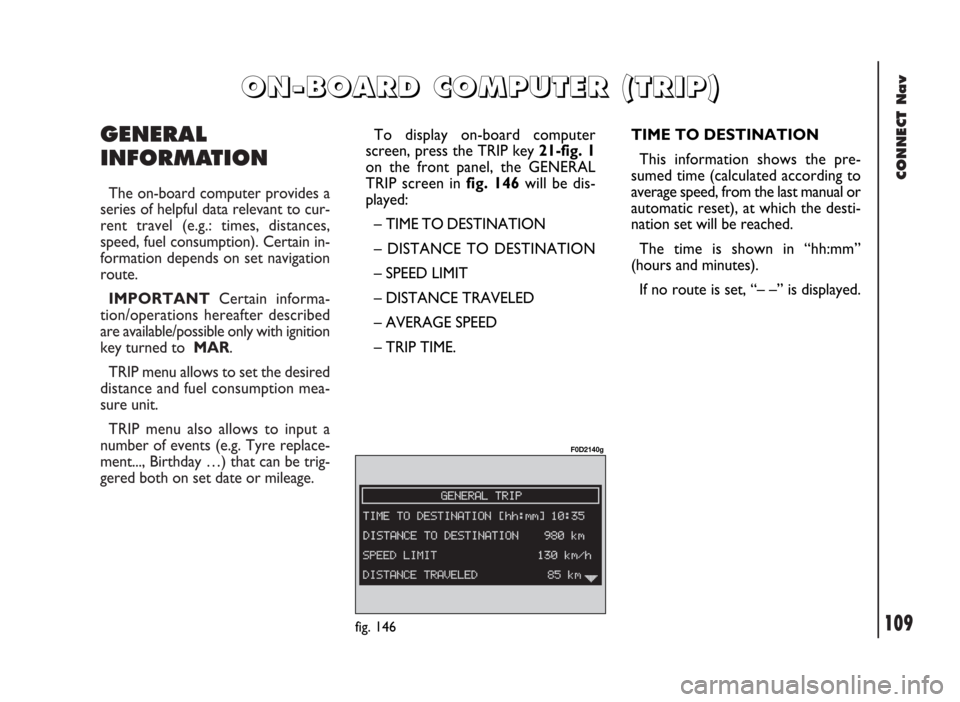
TIME TO DESTINATION
This information shows the pre-
sumed time (calculated according to
average speed, from the last manual or
automatic reset), at which the desti-
nation set will be reached.
The time is shown in “hh:mm”
(hours and minutes).
If no route is set, “– –” is displayed.
fig. 146
F0D2140g
To display on-board computer
screen, press the TRIP key 21-fig. 1
on the front panel, the GENERAL
TRIP screen in fig. 146will be dis-
played:
– TIME TO DESTINATION
– DISTANCE TO DESTINATION
– SPEED LIMIT
– DISTANCE TRAVELED
– AVERAGE SPEED
– TRIP TIME.
Page 155 of 246

CONNECT Nav+
154
SYSTEM SWITCHING ON/OFF
AND STAND-BY
The system may be in one of the fol-
lowing conditions:
– off, with all functions disabled;
– normal status, with all functions ac-
tive or activatable;
– stand-by, with functions partially
active and screen darkened.
Switching the system on
The system is turned on automati-
cally turning the ignition key to MAR.
When the ignition key is at STOP
or removed, the system is turned on
pressing the knob 16-fig. 1or key
•
25-fig. 1for the “Emergency call” (to
use the phone it is necessary to en-
ter the PIN code).Switching the system off
The system is turned off automati-
cally when the ignition key is moved
to STOP. The conditions and func-
tions active before turning off are
memorised and brought back the next
time the engine is started.
Turning off is delayed if a phone call,
an “Emergency call” or a voice com-
mand language change is in progress,
and it will take place after about 20
minutes if the call is over or, if not at
the end of it.
If the system was turned on with the
knob 16-fig. 1or key
•25-fig. 1,
with the ignition key at STOPor re-
moved, it is turned off pressing the
knob again 16-fig. 1or automatically
after 20 minutes, to preserve the bat-
tery.Stand-by (Dark)
During operation with the ignition
key engaged, the system may be set to
stand-by with a prolonged press on
the “MAIN” key 17-fig. 1. This oper-
ating condition (Dark) corresponds to
a dark screen with the volume off, but
the system continues working invisi-
bly, therefore the phone is ready to
receive.
If during stand-by the limit of an ac-
tive function is exceeded, the corre-
sponding warning will be shown.
To bring the system back to the nor-
mal operating condition, briefly press
the “MAIN” key 17-fig. 1or key
•
25-fig. 1for the “Emergency call” (to
use the phone it is necessary to en-
ter the PIN code).