Set time FIAT PUNTO EVO 2010 1.G Owners Manual
[x] Cancel search | Manufacturer: FIAT, Model Year: 2010, Model line: PUNTO EVO, Model: FIAT PUNTO EVO 2010 1.GPages: 270, PDF Size: 8.34 MB
Page 6 of 270
THE KEYS
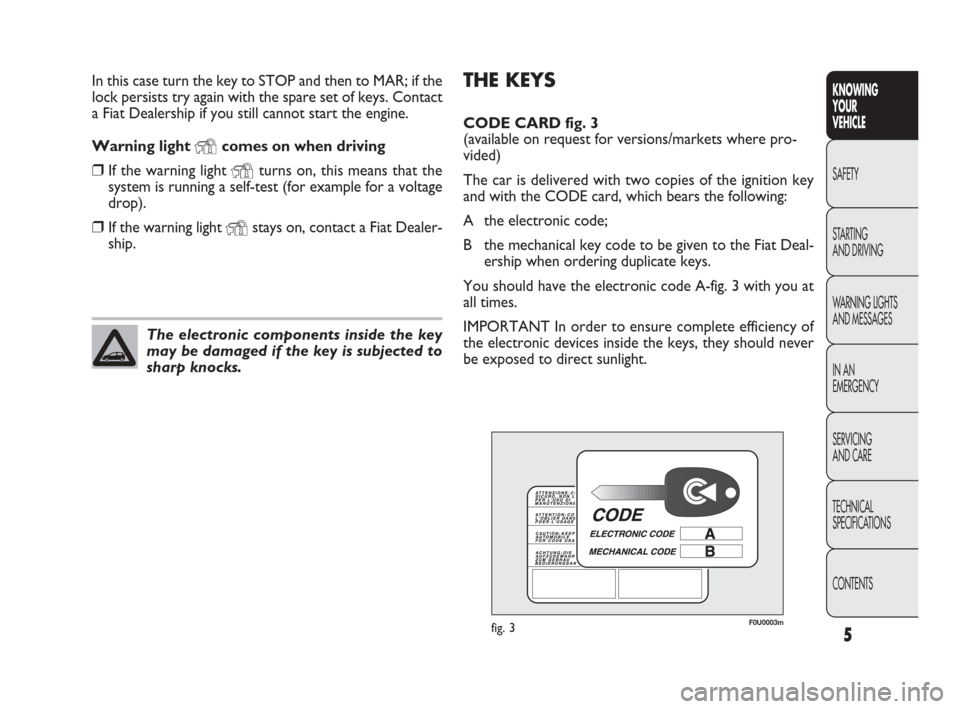
CODE CARD fig. 3
(available on request for versions/markets where pro-
vided)
The car is delivered with two copies of the ignition key
and with the CODE card, which bears the following:
A the electronic code;
B the mechanical key code to be given to the Fiat Deal-
ership when ordering duplicate keys.
You should have the electronic code A-fig. 3 with you at
all times.
IMPORTANT In order to ensure complete efficiency of
the electronic devices inside the keys, they should never
be exposed to direct sunlight. In this case turn the key to STOP and then to MAR; if the
lock persists try again with the spare set of keys. Contact
a Fiat Dealership if you still cannot start the engine.
Warning light
Ycomes on when driving
❒If the warning light Yturns on, this means that the
system is running a self-test (for example for a voltage
drop).
❒If the warning light Ystays on, contact a Fiat Dealer-
ship.
The electronic components inside the key
may be damaged if the key is subjected to
sharp knocks.
F0U0003mfig. 3
CONTENTS TECHNICAL
SPECIFICATIONS SERVICING
AND CARE IN AN
EMERGENCY WARNING LIGHTS
AND MESSAGES STARTING
AND DRIVING SAFETY
KNOWING
YOUR
VEHICLE
5
001-036 PUNTO FL EN 4ed 18-01-2010 12:21 Pagina 5
Page 7 of 270
6
KNOWING
YOUR
VEHICLE
SAFETY
STARTING
AND DRIVING
WARNING LIGHTS
AND MESSAGES
IN AN
EMERGENCY
SERVICING
AND CARE
TECHNICAL
SPECIFICATIONS
CONTENTS
F0U0004mfig. 4
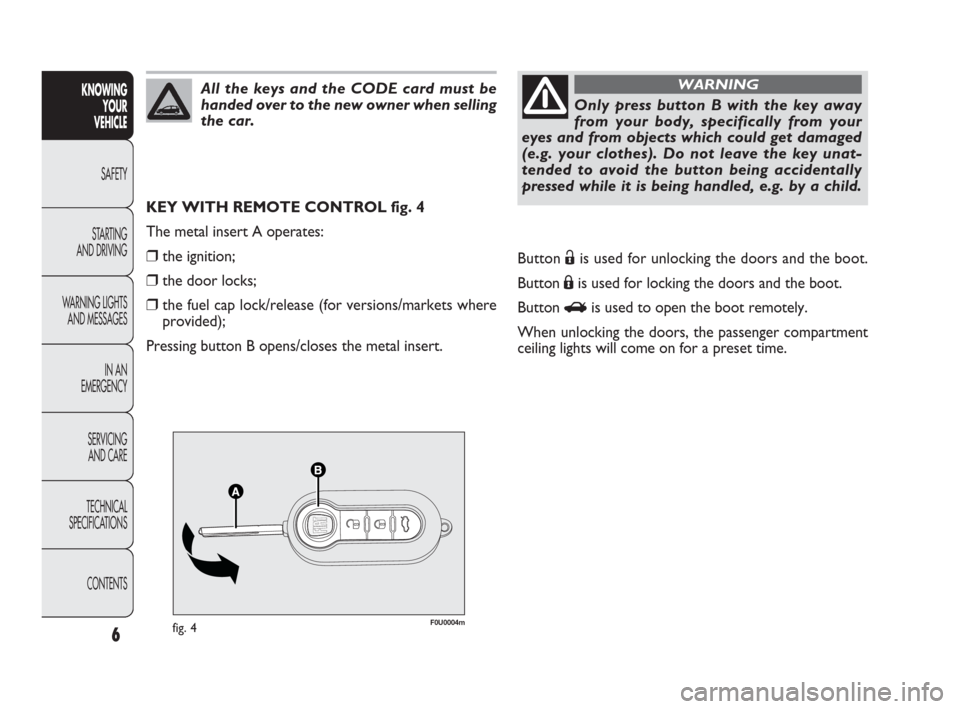
KEY WITH REMOTE CONTROL fig. 4
The metal insert A operates:
❒the ignition;
❒the door locks;
❒the fuel cap lock/release (for versions/markets where
provided);
Pressing button B opens/closes the metal insert.
All the keys and the CODE card must be
handed over to the new owner when selling
the car.
Only press button B with the key away
from your body, specifically from your
eyes and from objects which could get damaged
(e.g. your clothes). Do not leave the key unat-
tended to avoid the button being accidentally
pressed while it is being handled, e.g. by a child.
WARNING
Button Ëis used for unlocking the doors and the boot.
Button Áis used for locking the doors and the boot.
Button
Ris used to open the boot remotely.
When unlocking the doors, the passenger compartment
ceiling lights will come on for a preset time.
001-036 PUNTO FL EN 4ed 18-01-2010 12:21 Pagina 6
Page 20 of 270
Selecting “Set Clock”
– briefly press the MENU ESC button to select the first
value to change (hours);
– press the +and –buttons (with single presses) to se-
lect the new setting;
– briefly press the MENU ESC button to store the new
setting and go to the next setup menu option (minutes);
– after setting the values with the same procedure, go back
to the previous menu item.
Hold down the MENU ESC button:
– to quit the setup menu if you are in the menu;
– to quit to the menu if you are setting an option;
– to save only the settings already stored (and confirmed
by pressing the MENU ESC button).
The setup menu environment is timed; when quitting the
menu due to timing expiry, only the settings stored by the
user are saved (having been confirmed by briefly pressing
button MENU ESC).
CONTENTS TECHNICAL
SPECIFICATIONS SERVICING
AND CARE IN AN
EMERGENCY WARNING LIGHTS
AND MESSAGES STARTING
AND DRIVING SAFETY
KNOWING
YOUR
VEHICLE
19
Briefly press button MENU ESC to start browsing from
the standard screen. Press +or –to browse within the
menu.
NBFor safety reasons, only the short menu may be ac-
cessed while the car is moving (“SPEEd” setting). Stop the
car to access the full menu.
The menu includes the following items:
– SPEEd
– CornEr (for versions/markets where provided)
– Hour
–bUZZ
– Unit
– BAG P
– drl (for versions/markets where provided)
001-036 PUNTO FL EN 4ed 18-01-2010 12:21 Pagina 19
Page 21 of 270
SPEEd
(Setting the speed limit)
With this function, it is possible to set the car speed lim-
it (km/h or mph). When this limit is exceeded, the driver
is immediately alerted (see section “Warning lights and
messages”).
To set the desired speed limit, proceed as follows:
– briefly press MENU ESC. The message (SPEEd) and the
previously set unit (km/h or mph) will appear on the dis-
play;
– press +or –to select speed limit activation (On) or
deactivation (Off);
– if the function is on, press +or –to select the required
speed limit and then press MENU ESC to confirm;
NBThe speed may be set in the range from 30 to 200
km/h, or from 20 to 125 mph according to the previous-
ly chosen unit (see “Setting the distance unit (Unit)” be-
low). The setting will increase/decrease by five units each
time +/–is pressed. Hold down +/–to increase/decrease
the setting rapidly. When you get close to the desired val-
ue, finish the setting with single presses.– briefly press MENU ESC to return to the menu screen
or hold the button down to return to the standard screen
without saving.
To cancel the setting, proceed as follows:
– press the MENU ESC button briefly to make the dis-
play flash (On);
– press –: (Off) will flash on the display;
– briefly press the MENU ESC button to go back to the
menu screen or hold the button down to go back to the
standard screen without saving.
CornEr
(activate/deactivate cornering lights)
(for versions/markets where provided)
This function activates/deactivates the corner lights. To ac-
tivate/deactivate (ON/OFF) the lights, proceed as follows:
- press the MENU ESC button briefly: the display will show
“On” or “Off” flashing depending on the previous setting;
– press +or –to make your choice;
– briefly press the MENU ESC button to go back to the
menu screen or hold the button down to go back to the
standard screen without saving.
CONTENTS TECHNICAL
SPECIFICATIONSSERVICING
AND CAREIN AN
EMERGENCY WARNING LIGHTS
AND MESSAGESSTARTING
AND DRIVINGSAFETY
KNOWING
YOUR
VEHICLE
20
001-036 PUNTO FL EN 4ed 18-01-2010 12:21 Pagina 20
Page 22 of 270
Hour
(Setting the clock)
With this function, it is possible to set the time.
To do so, proceed as follows:
– briefly press MENU ESC: the “hours” will flash on the
display;
– press +or –to set the value;
– briefly press MENU ESC: the “minutes” will flash on the
display;
– press +or –to set the value;
– briefly press the MENU ESC button to go back to the
menu screen or hold the button down to go back to the
standard screen without saving.
bUZZ
(Adjusting the buzzer volume)
This function is used to adjust the volume of the audible
signal (buzzer) that sounds in the event of failure/warning
indications and when the MENU ESC, +and –buttons are
pressed.
To set the desired volume, proceed as follows:
– briefly press MENU ESC: the display will show the word-
ing (bUZZ);
– press +or –to select the required volume (adjustable
over 8 levels).
– briefly press the MENU ESC button to go back to the
menu screen or hold the button down to go back to the
standard screen without saving.Unit
(Setting the distance unit)
With this function, it is possible to set the distance unit.
To do so, proceed as follows:
– briefly press MENU ESC: the display will show the word-
ing (Unit) and the previously set unit (km or mi);
– press +or –to select the required distance unit.
– briefly press the MENU ESC button to go back to the
menu screen or hold the button down to go back to the
standard screen without saving.
CONTENTS TECHNICAL
SPECIFICATIONS SERVICING
AND CARE IN AN
EMERGENCY WARNING LIGHTS
AND MESSAGES STARTING
AND DRIVING SAFETY
KNOWING
YOUR
VEHICLE
21
001-036 PUNTO FL EN 4ed 18-01-2010 12:21 Pagina 21
Page 23 of 270
CONTENTS TECHNICAL
SPECIFICATIONSSERVICING
AND CAREIN AN
EMERGENCY WARNING LIGHTS
AND MESSAGESSTARTING
AND DRIVINGSAFETY
KNOWING
YOUR
VEHICLEBag P
(Passenger front and side airbag activation/
deactivation)
(for versions/markets where available)
This function is used to activate/deactivate the front pas-
senger’s air bag.
Proceed as follows:
❒press MENU ESC and, after the message BAG P OFF
(to deactivate) or BAG P On (to activate) is displayed
by pressing buttons +or –, press MENU ESC again;
❒the confirmation request message will be displayed;
❒press +or –to select YES (confirming activa-
tion/deactivation) or no (to abort);
❒briefly press MENU ESC to confirm setting and go back
to the menu screen or hold the button down to go back
to the standard screen without saving.drl
(activate/deactivate daytime running lights)
(for versions/markets where provided)
This function allows you to activate/deactivate the daytime
running lights.
Proceed as follows to switch this function on or off:
– press the MENU ESC button briefly: the display will show
a submenu;
– press the MENU ESC button briefly, the display will show
On or Off flashing depending on the previous setting;
– press +or –to change the setting;
– briefly press the MENU ESC button to go back to the
submenu screen or hold the button down to go back to
the main menu screen without saving;
– hold down MENU ESC again to go back to the standard
screen or main menu, depending on which point in the
menu you have reached.
22
001-036 PUNTO FL EN 4ed 18-01-2010 12:21 Pagina 22
Page 24 of 270
MULTIFUNCTION DISPLAY
(for versions/markets where provided)
The car can be equipped with the multifunction display
that, depending on previous settings, shows useful infor-
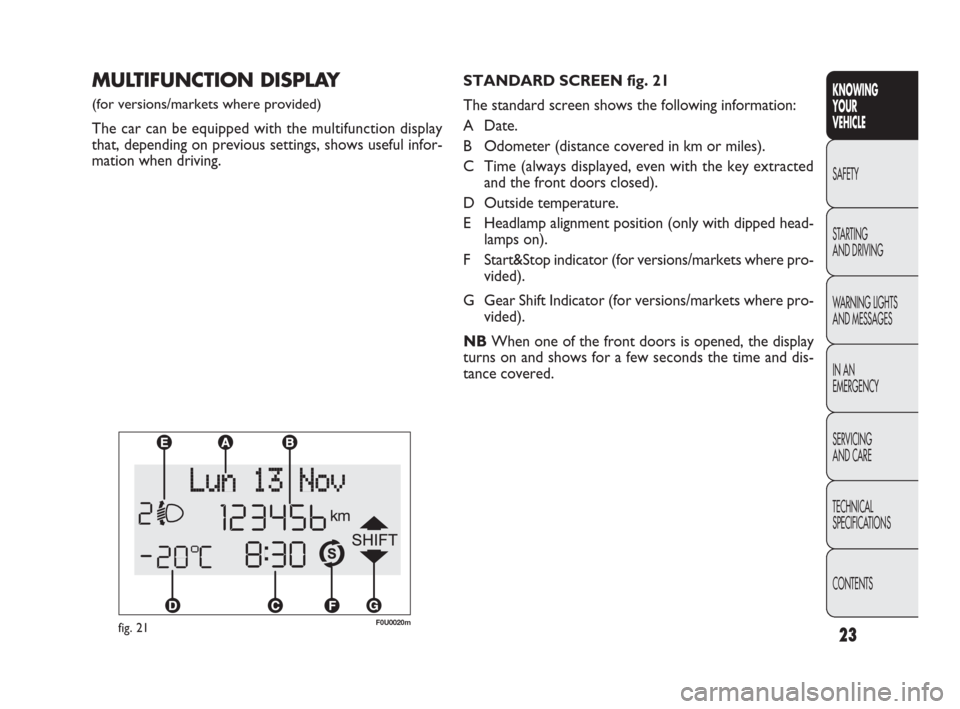
mation when driving.STANDARD SCREEN fig. 21
The standard screen shows the following information:
A Date.
B Odometer (distance covered in km or miles).
C Time (always displayed, even with the key extracted
and the front doors closed).
D Outside temperature.
E Headlamp alignment position (only with dipped head-
lamps on).
F Start&Stop indicator (for versions/markets where pro-
vided).
G Gear Shift Indicator (for versions/markets where pro-
vided).
NBWhen one of the front doors is opened, the display
turns on and shows for a few seconds the time and dis-
tance covered.
fig. 21F0U0020m
CONTENTS TECHNICAL
SPECIFICATIONS SERVICING
AND CARE IN AN
EMERGENCY WARNING LIGHTS
AND MESSAGES STARTING
AND DRIVING SAFETY
KNOWING
YOUR
VEHICLE
23
001-036 PUNTO FL EN 4ed 18-01-2010 12:21 Pagina 23
Page 25 of 270
24
KNOWING
YOUR
VEHICLE
SAFETY
STARTING
AND DRIVING
WARNING LIGHTS
AND MESSAGES
IN AN
EMERGENCY
SERVICING
AND CARE
TECHNICAL
SPECIFICATIONS
CONTENTS
fig. 24F0U2050g
RECONFIGURABLE
MULTIFUNCTION DISPLAY
(for versions/markets where provided)
The car may be equipped with a reconfigurable multi-
function display that, according to previous settings, will
show useful driving information.
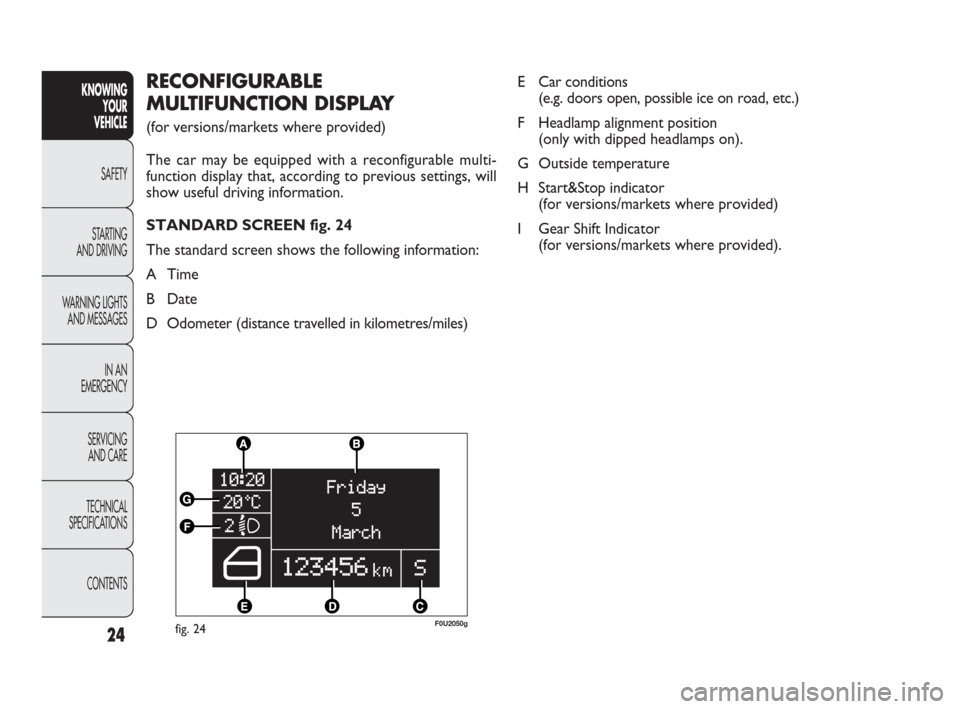
STANDARD SCREEN fig. 24
The standard screen shows the following information:
A Time
B Date
D Odometer (distance travelled in kilometres/miles)E Car conditions
(e.g. doors open, possible ice on road, etc.)
F Headlamp alignment position
(only with dipped headlamps on).
G Outside temperature
H Start&Stop indicator
(for versions/markets where provided)
I Gear Shift Indicator
(for versions/markets where provided).
001-036 PUNTO FL EN 4ed 18-01-2010 12:21 Pagina 24
Page 27 of 270
CONTENTS TECHNICAL
SPECIFICATIONSSERVICING
AND CAREIN AN
EMERGENCY WARNING LIGHTS
AND MESSAGESSTARTING
AND DRIVINGSAFETY
KNOWING
YOUR
VEHICLE
26
SETUP MENU
(multifunction display/
reconfigurable multifunction display)
The menu comprises a series of functions arranged in a
circle which can be selected through the +and –buttons
to access the different operations and settings described
in the following paragraphs. A submenu is provided for
some items (clock and unit setting).
The setup menu can be activated by pressing the MENU
ESC button briefly.
Press buttons +and – to scroll the setup menu options.
Management modes differ from each other according to
the option selected.
Selecting an option from the main menu without a submenu
– Briefly press MENU ESC to select the main menu option
you wish to set;
– Press +or –(with single presses) to select the new set-
ting;
– briefly press the MENU ESC button to store the new
setting and to go back to the main menu option selected
previously.Selecting an option from the main menu with a submenu:
– Briefly press the MENU ESC button to display the first
submenu option;
– Press +or –(with single presses) to scroll all the sub-
menu options;
– Briefly press the MENU ESC button to select the dis-
played submenu option and to open the relevant setup
menu;
– Press +or –(with single presses) to select the new set-
ting for this submenu option;
– Briefly press the MENU ESC button to store the new
setting and go back to the previous menu option.
Selecting “Date” and “Set time”:
– Briefly press MENU ESC to select the first value to
change (e.g. hours/minutes or year/month/day);
– Press +or –(with single presses) to select the new set-
ting;
– Briefly press MENU ESC to store the new setting and
go to the next setup menu option; if this is the last one
you will go back to the previous menu option.
001-036 PUNTO FL EN 4ed 18-01-2010 12:21 Pagina 26
Page 28 of 270
CONTENTS TECHNICAL
SPECIFICATIONS SERVICING
AND CARE IN AN
EMERGENCY WARNING LIGHTS
AND MESSAGES STARTING
AND DRIVING SAFETY
KNOWING
YOUR
VEHICLE
27
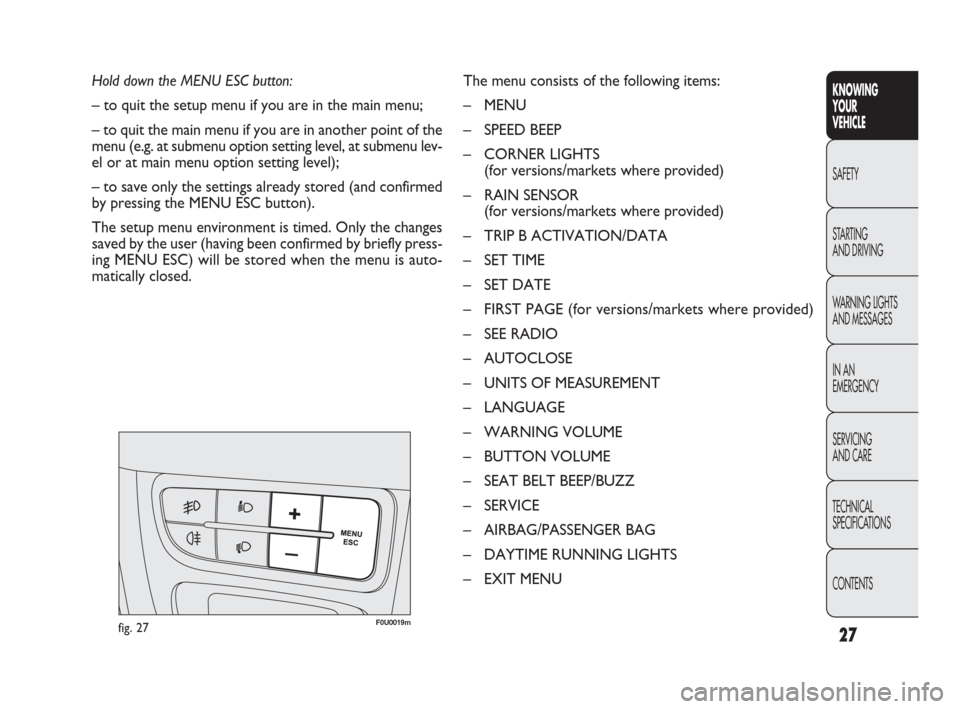
Hold down the MENU ESC button:
– to quit the setup menu if you are in the main menu;
– to quit the main menu if you are in another point of the
menu (e.g. at submenu option setting level, at submenu lev-
el or at main menu option setting level);
– to save only the settings already stored (and confirmed
by pressing the MENU ESC button).
The setup menu environment is timed. Only the changes
saved by the user (having been confirmed by briefly press-
ing MENU ESC) will be stored when the menu is auto-
matically closed.The menu consists of the following items:
– MENU
– SPEED BEEP
– CORNER LIGHTS
(for versions/markets where provided)
– RAIN SENSOR
(for versions/markets where provided)
– TRIP B ACTIVATION/DATA
– SET TIME
– SET DATE
– FIRST PAGE (for versions/markets where provided)
– SEE RADIO
– AUTOCLOSE
– UNITS OF MEASUREMENT
– LANGUAGE
– WARNING VOLUME
– BUTTON VOLUME
– SEAT BELT BEEP/BUZZ
– SERVICE
– AIRBAG/PASSENGER BAG
– DAYTIME RUNNING LIGHTS
– EXIT MENU
fig. 27F0U0019m
001-036 PUNTO FL EN 4ed 18-01-2010 12:21 Pagina 27