technical specifications FIAT STILO 2006 1.G Manual Online
[x] Cancel search | Manufacturer: FIAT, Model Year: 2006, Model line: STILO, Model: FIAT STILO 2006 1.GPages: 274, PDF Size: 4.76 MB
Page 85 of 274
84
SAFETY
DEVICES
CORRECT USE
OF THE CAR
WARNING
LIGHTS AND
MESSAGES
IN AN
EMERGENCY
CAR
MAINTENANCE
TECHNICAL
SPECIFICATIONS
INDEX
DASHBOARD
AND CONTROLS
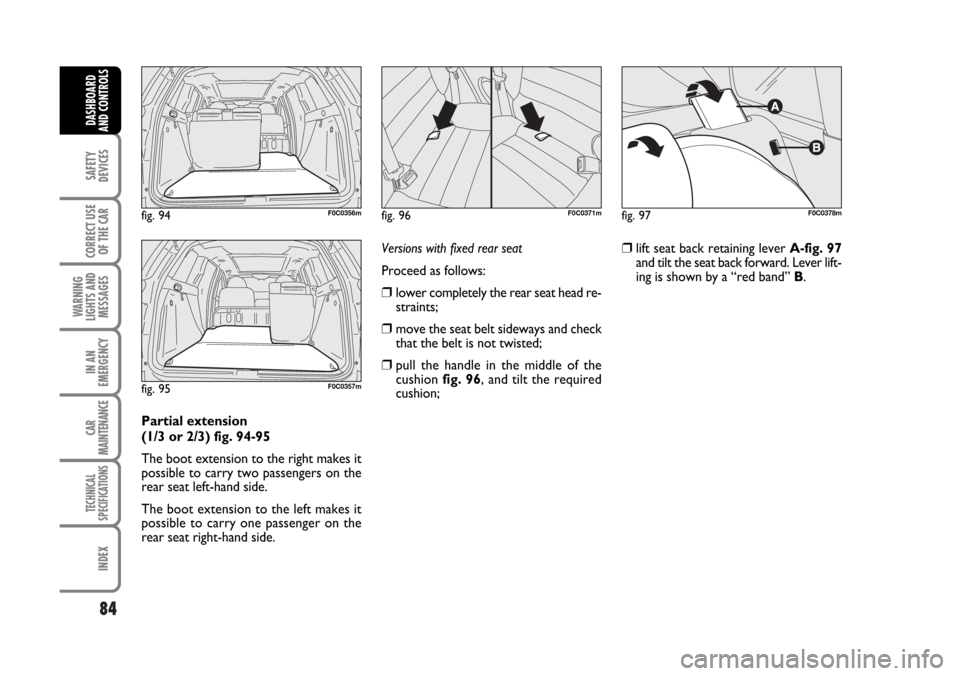
Partial extension
(1/3 or 2/3) fig. 94-95
The boot extension to the right makes it
possible to carry two passengers on the
rear seat left-hand side.
The boot extension to the left makes it
possible to carry one passenger on the
rear seat right-hand side.Versions with fixed rear seat
Proceed as follows:
❒lower completely the rear seat head re-
straints;
❒move the seat belt sideways and check
that the belt is not twisted;
❒pull the handle in the middle of the
cushion fig. 96, and tilt the required
cushion;
❒lift seat back retaining lever A-fig. 97
and tilt the seat back forward. Lever lift-
ing is shown by a “red band” B.
fig. 94F0C0356m
fig. 95F0C0357m
fig. 96F0C0371mfig. 97F0C0378m
Page 86 of 274
85
SAFETY
DEVICES
CORRECT USE
OF THE CAR
WARNING
LIGHTS AND
MESSAGES
IN AN
EMERGENCY
CAR
MAINTENANCE
TECHNICAL
SPECIFICATIONS
INDEX
DASHBOARD
AND CONTROLS
Versions with rear sliding seat
(where provided)
Proceed as follows:
❒lower completely the rear seat head re-
straints;
❒move the seat belt sideways and check
that the belt is not twisted;
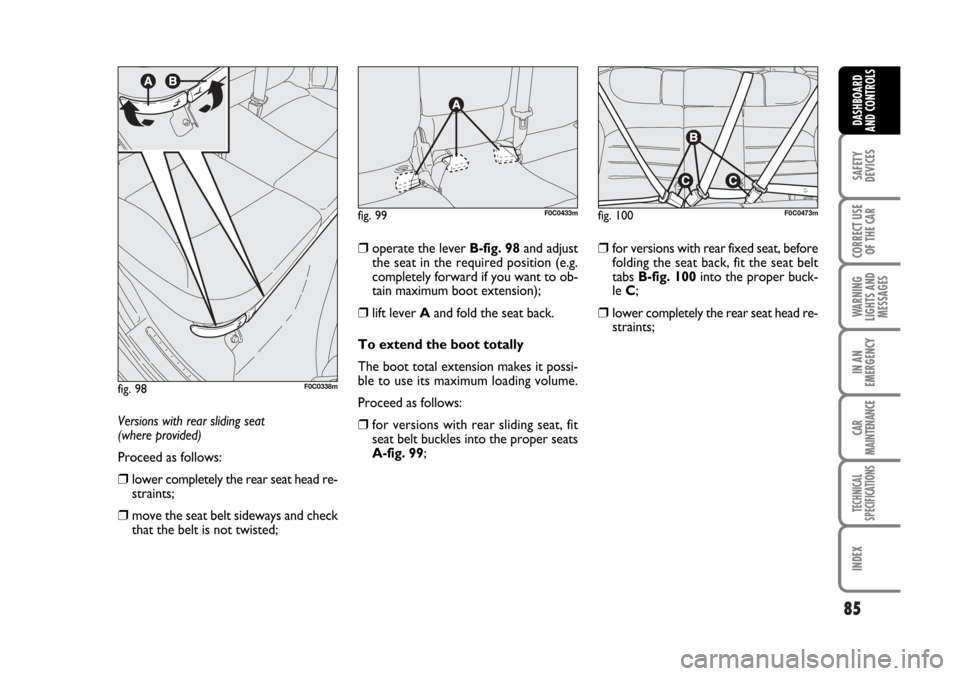
❒operate the lever B-fig. 98and adjust
the seat in the required position (e.g.
completely forward if you want to ob-
tain maximum boot extension);
❒lift lever Aand fold the seat back.
To extend the boot totally
The boot total extension makes it possi-
ble to use its maximum loading volume.
Proceed as follows:
❒for versions with rear sliding seat, fit
seat belt buckles into the proper seats
A-fig. 99;
❒for versions with rear fixed seat, before
folding the seat back, fit the seat belt
tabs B-fig. 100into the proper buck-
le C;
❒lower completely the rear seat head re-
straints;
fig. 98F0C0338m
fig. 99F0C0433mfig. 100F0C0473m
Page 87 of 274
86
SAFETY
DEVICES
CORRECT USE
OF THE CAR
WARNING
LIGHTS AND
MESSAGES
IN AN
EMERGENCY
CAR
MAINTENANCE
TECHNICAL
SPECIFICATIONS
INDEX
DASHBOARD
AND CONTROLS
fig. 104F0C0390m
❒move the seat belt sideways and check
that the belt is not twisted;
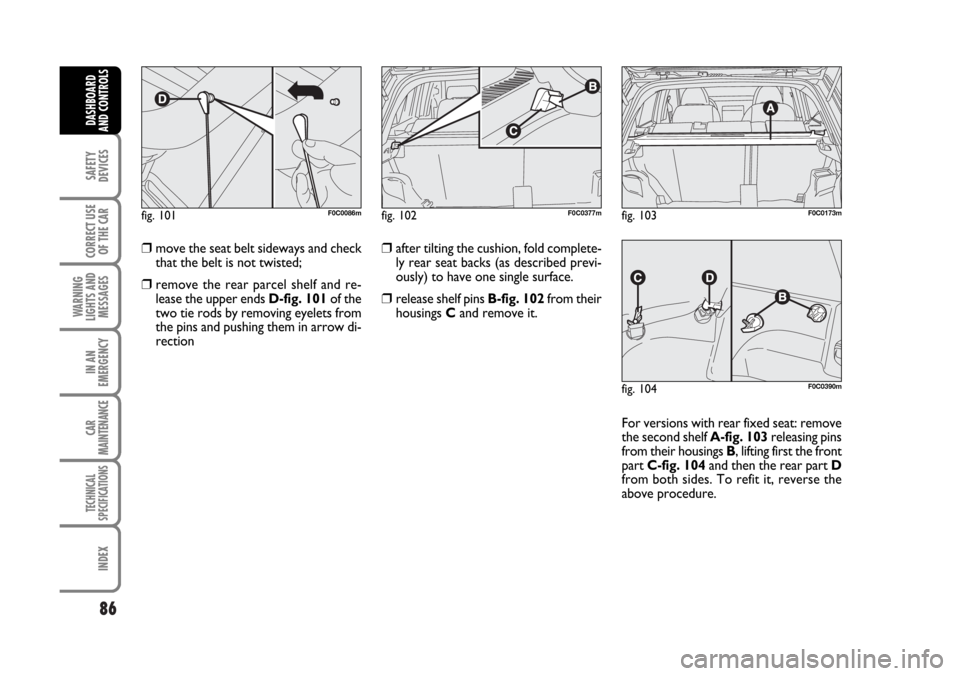
❒remove the rear parcel shelf and re-
lease the upper ends D-fig. 101of the
two tie rods by removing eyelets from
the pins and pushing them in arrow di-
rection
For versions with rear fixed seat: remove
the second shelf A-fig. 103releasing pins
from their housings B, lifting first the front
part C-fig. 104and then the rear part D
from both sides. To refit it, reverse the
above procedure.
fig. 101F0C0086mfig. 102F0C0377mfig. 103F0C0173m
❒after tilting the cushion, fold complete-
ly rear seat backs (as described previ-
ously) to have one single surface.
❒release shelf pins B-fig. 102from their
housings Cand remove it.
Page 88 of 274
87
SAFETY
DEVICES
CORRECT USE
OF THE CAR
WARNING
LIGHTS AND
MESSAGES
IN AN
EMERGENCY
CAR
MAINTENANCE
TECHNICAL
SPECIFICATIONS
INDEX
DASHBOARD
AND CONTROLS
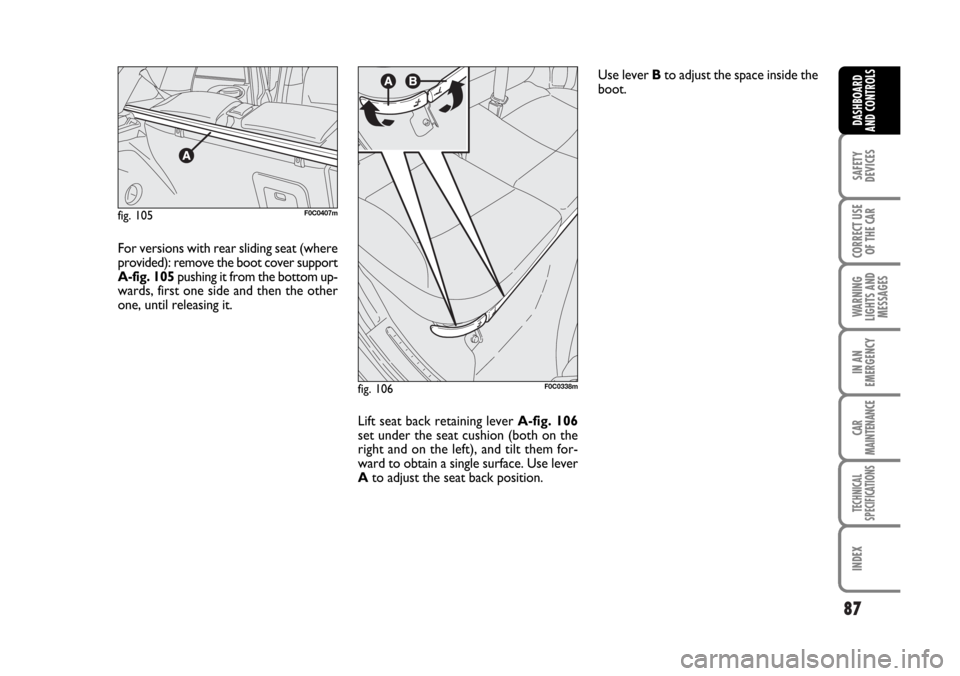
For versions with rear sliding seat (where
provided): remove the boot cover support
A-fig. 105pushing it from the bottom up-
wards, first one side and then the other
one, until releasing it.
Lift seat back retaining lever A-fig. 106
set under the seat cushion (both on the
right and on the left), and tilt them for-
ward to obtain a single surface. Use lever
Ato adjust the seat back position. Use lever Bto adjust the space inside the
boot.
fig. 105F0C0407m
fig. 106F0C0338m
Page 89 of 274
88
SAFETY
DEVICES
CORRECT USE
OF THE CAR
WARNING
LIGHTS AND
MESSAGES
IN AN
EMERGENCY
CAR
MAINTENANCE
TECHNICAL
SPECIFICATIONS
INDEX
DASHBOARD
AND CONTROLS
fig. 110F0C0354m
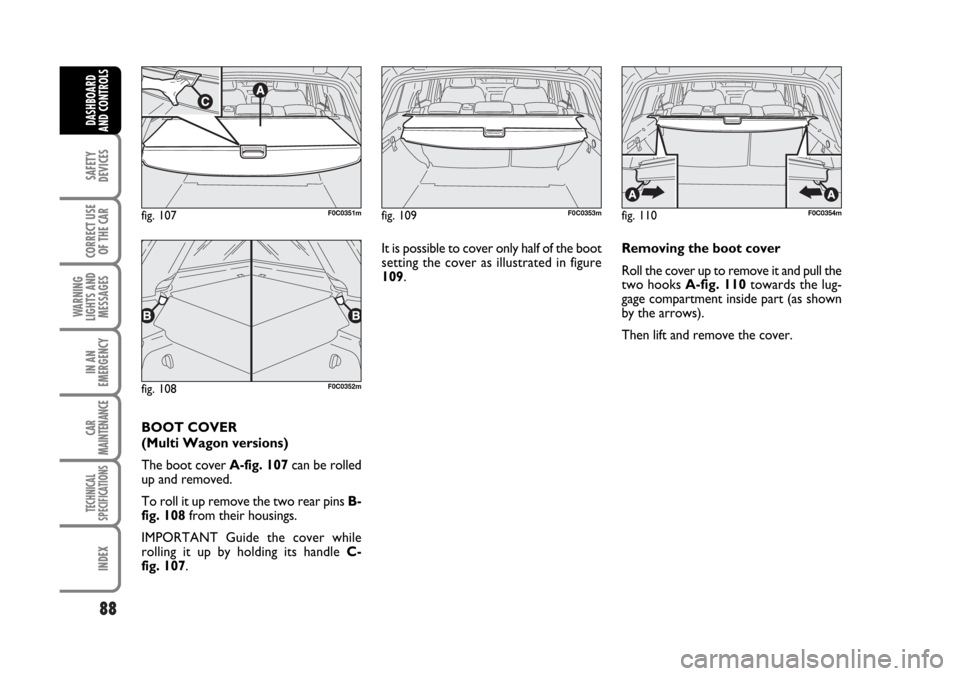
BOOT COVER
(Multi Wagon versions)
The boot cover A-fig. 107can be rolled
up and removed.
To roll it up remove the two rear pins B-
fig. 108from their housings.
IMPORTANT Guide the cover while
rolling it up by holding its handle C-
fig. 107. It is possible to cover only half of the boot
setting the cover as illustrated in figure
109.
fig. 109F0C0353m
fig. 108F0C0352m
fig. 107F0C0351m
Removing the boot cover
Roll the cover up to remove it and pull the
two hooks A-fig. 110towards the lug-
gage compartment inside part (as shown
by the arrows).
Then lift and remove the cover.
Page 90 of 274
89
SAFETY
DEVICES
CORRECT USE
OF THE CAR
WARNING
LIGHTS AND
MESSAGES
IN AN
EMERGENCY
CAR
MAINTENANCE
TECHNICAL
SPECIFICATIONS
INDEX
DASHBOARD
AND CONTROLS
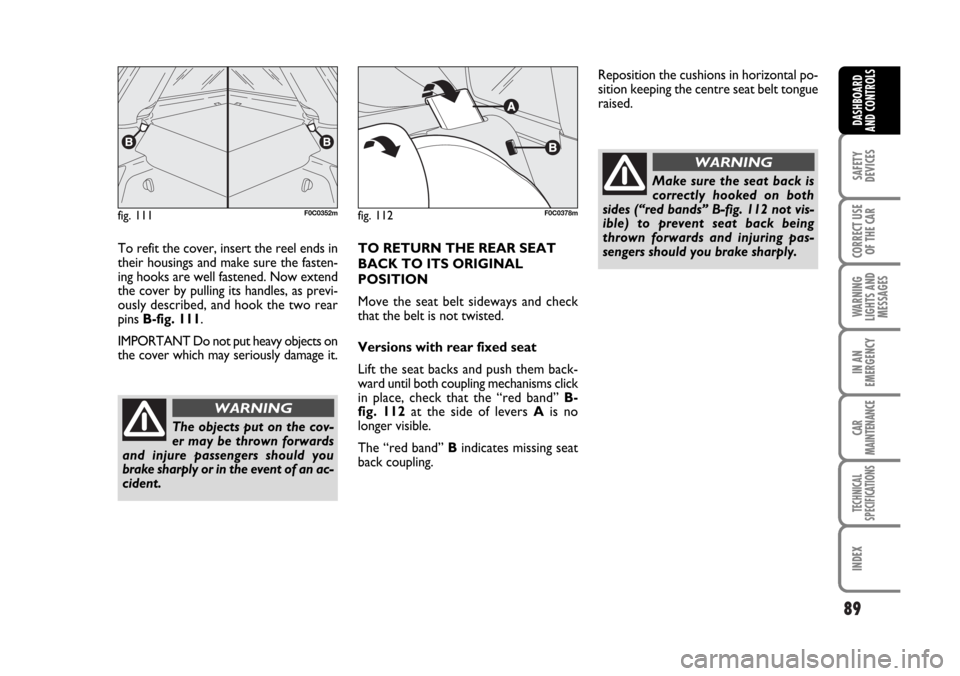
To refit the cover, insert the reel ends in
their housings and make sure the fasten-
ing hooks are well fastened. Now extend
the cover by pulling its handles, as previ-
ously described, and hook the two rear
pins B-fig. 111.
IMPORTANT Do not put heavy objects on
the cover which may seriously damage it.TO RETURN THE REAR SEAT
BACK TO ITS ORIGINAL
POSITION
Move the seat belt sideways and check
that the belt is not twisted.
Versions with rear fixed seat
Lift the seat backs and push them back-
ward until both coupling mechanisms click
in place, check that the “red band” B-
fig. 112at the side of levers Ais no
longer visible.
The “red band” Bindicates missing seat
back coupling.Reposition the cushions in horizontal po-
sition keeping the centre seat belt tongue
raised.
fig. 111F0C0352mfig. 112F0C0378m
The objects put on the cov-
er may be thrown forwards
and injure passengers should you
brake sharply or in the event of an ac-
cident.
WARNING
Make sure the seat back is
correctly hooked on both
sides (“red bands” B-fig. 112 not vis-
ible) to prevent seat back being
thrown forwards and injuring pas-
sengers should you brake sharply.
WARNING
Page 91 of 274
90
SAFETY
DEVICES
CORRECT USE
OF THE CAR
WARNING
LIGHTS AND
MESSAGES
IN AN
EMERGENCY
CAR
MAINTENANCE
TECHNICAL
SPECIFICATIONS
INDEX
DASHBOARD
AND CONTROLS
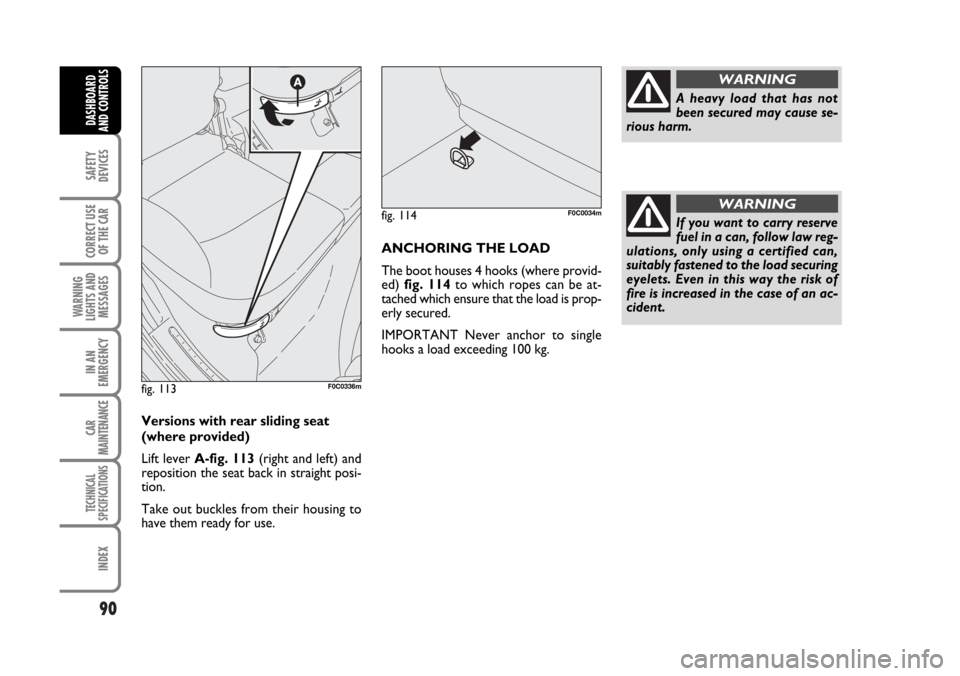
Versions with rear sliding seat
(where provided)
Lift lever A-fig. 113(right and left) and
reposition the seat back in straight posi-
tion.
Take out buckles from their housing to
have them ready for use.ANCHORING THE LOAD
The boot houses 4 hooks (where provid-
ed) fig. 114to which ropes can be at-
tached which ensure that the load is prop-
erly secured.
IMPORTANT Never anchor to single
hooks a load exceeding 100 kg.
fig. 113F0C0336m
fig. 114F0C0034m
A heavy load that has not
been secured may cause se-
rious harm.
WARNING
If you want to carry reserve
fuel in a can, follow law reg-
ulations, only using a certified can,
suitably fastened to the load securing
eyelets. Even in this way the risk of
fire is increased in the case of an ac-
cident.
WARNING
Page 92 of 274
91
SAFETY
DEVICES
CORRECT USE
OF THE CAR
WARNING
LIGHTS AND
MESSAGES
IN AN
EMERGENCY
CAR
MAINTENANCE
TECHNICAL
SPECIFICATIONS
INDEX
DASHBOARD
AND CONTROLS
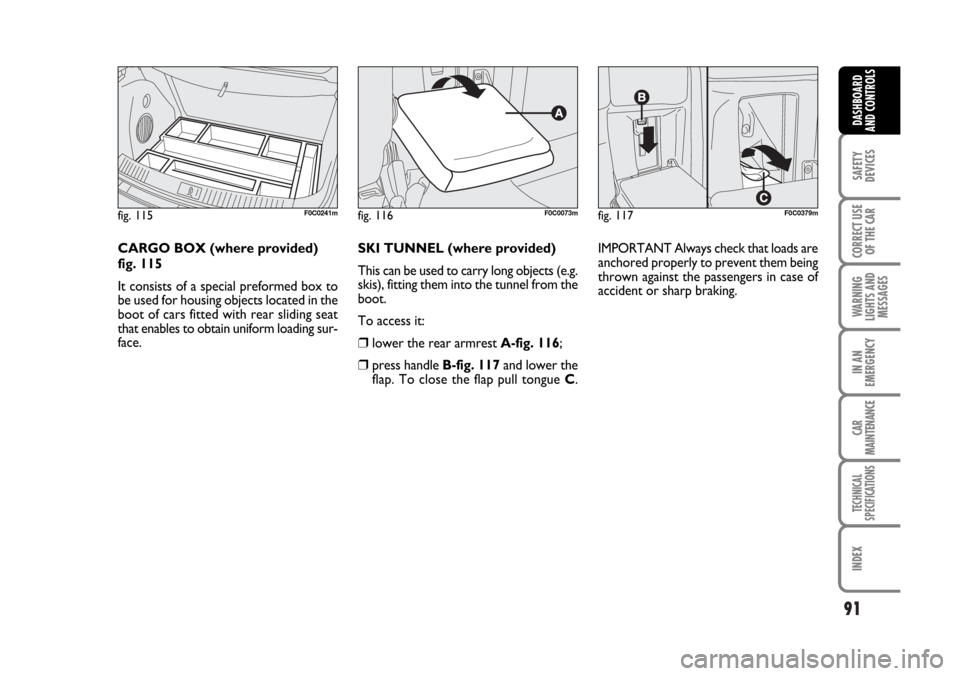
SKI TUNNEL (where provided)
This can be used to carry long objects (e.g.
skis), fitting them into the tunnel from the
boot.
To access it:
❒lower the rear armrest A-fig. 116;
❒press handle B-fig. 117and lower the
flap. To close the flap pull tongue C.IMPORTANT Always check that loads are
anchored properly to prevent them being
thrown against the passengers in case of
accident or sharp braking.
fig. 116F0C0073mfig. 117F0C0379mfig. 115F0C0241m
CARGO BOX (where provided)
fig. 115
It consists of a special preformed box to
be used for housing objects located in the
boot of cars fitted with rear sliding seat
that enables to obtain uniform loading sur-
face.
Page 93 of 274
92
SAFETY
DEVICES
CORRECT USE
OF THE CAR
WARNING
LIGHTS AND
MESSAGES
IN AN
EMERGENCY
CAR
MAINTENANCE
TECHNICAL
SPECIFICATIONS
INDEX
DASHBOARD
AND CONTROLS
BONNET
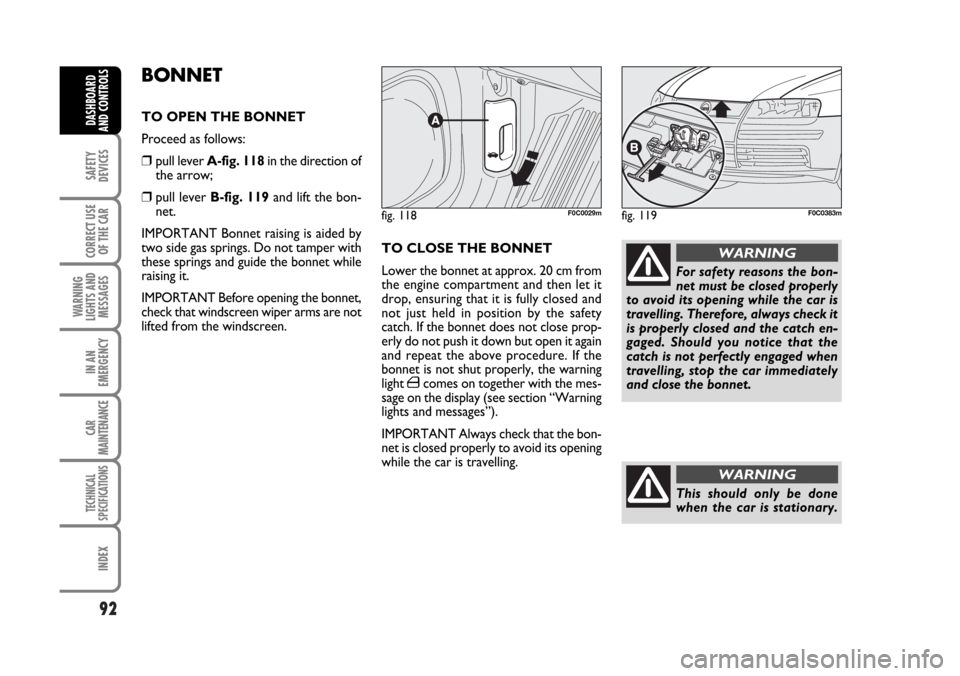
TO OPEN THE BONNET
Proceed as follows:
❒pull lever A-fig. 118in the direction of
the arrow;
❒pull lever B-fig. 119and lift the bon-
net.
IMPORTANT Bonnet raising is aided by
two side gas springs. Do not tamper with
these springs and guide the bonnet while
raising it.
IMPORTANT Before opening the bonnet,
check that windscreen wiper arms are not
lifted from the windscreen.TO CLOSE THE BONNET
Lower the bonnet at approx. 20 cm from
the engine compartment and then let it
drop, ensuring that it is fully closed and
not just held in position by the safety
catch. If the bonnet does not close prop-
erly do not push it down but open it again
and repeat the above procedure. If the
bonnet is not shut properly, the warning
light
´comes on together with the mes-
sage on the display (see section “Warning
lights and messages”).
IMPORTANT Always check that the bon-
net is closed properly to avoid its opening
while the car is travelling.
fig. 118F0C0029mfig. 119F0C0383m
For safety reasons the bon-
net must be closed properly
to avoid its opening while the car is
travelling. Therefore, always check it
is properly closed and the catch en-
gaged. Should you notice that the
catch is not perfectly engaged when
travelling, stop the car immediately
and close the bonnet.
WARNING
This should only be done
when the car is stationary.
WARNING
Page 94 of 274
93
SAFETY
DEVICES
CORRECT USE
OF THE CAR
WARNING
LIGHTS AND
MESSAGES
IN AN
EMERGENCY
CAR
MAINTENANCE
TECHNICAL
SPECIFICATIONS
INDEX
DASHBOARD
AND CONTROLS
ROOF RACK/
SKI RACK
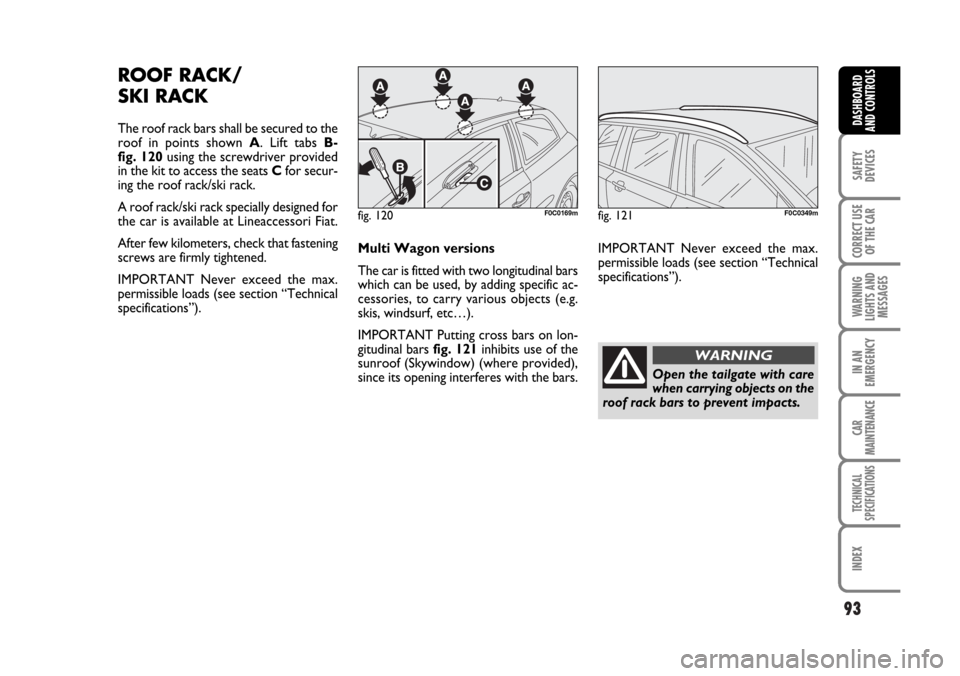
The roof rack bars shall be secured to the
roof in points shown A. Lift tabs B-
fig. 120using the screwdriver provided
in the kit to access the seats Cfor secur-
ing the roof rack/ski rack.
A roof rack/ski rack specially designed for
the car is available at Lineaccessori Fiat.
After few kilometers, check that fastening
screws are firmly tightened.
IMPORTANT Never exceed the max.
permissible loads (see section “Technical
specifications”).Multi Wagon versions
The car is fitted with two longitudinal bars
which can be used, by adding specific ac-
cessories, to carry various objects (e.g.
skis, windsurf, etc…).
IMPORTANT Putting cross bars on lon-
gitudinal bars fig. 121inhibits use of the
sunroof (Skywindow) (where provided),
since its opening interferes with the bars.
fig. 120F0C0169mfig. 121F0C0349m
Open the tailgate with care
when carrying objects on the
roof rack bars to prevent impacts.
WARNING
IMPORTANT Never exceed the max.
permissible loads (see section “Technical
specifications”).