warning light FORD EDGE 2018 Workshop Manual
[x] Cancel search | Manufacturer: FORD, Model Year: 2018, Model line: EDGE, Model: FORD EDGE 2018Pages: 557, PDF Size: 7.02 MB
Page 242 of 557
RV & Trailer Towing Guide Online
http://www.fleet.ford.com/towing-guides/
Website
TRAILER SWAY CONTROL (If
Equipped) WARNING:
Turning off trailer sway
control increases the risk of loss of vehicle
control, serious injury or death. Ford does
not recommend disabling this feature
except in situations where speed reduction
may be detrimental (such as hill climbing),
the driver has significant trailer towing
experience, and can control trailer sway
and maintain safe operation.
Note: This feature does not prevent trailer
sway, but reduces it once it begins.
Note: This feature cannot stop all trailers
from swaying.
Note: In some cases, if vehicle speed is too
high, the system may activate multiple
times, gradually reducing vehicle speed.
This feature applies your vehicle brakes at
individual wheels and, if necessary, reduces
engine power. If the trailer begins to sway,
the stability control light flashes and the
message
TRAILER SWAY REDUCE
SPEED appears in the information display.
The first thing to do is slow your vehicle
down, then pull safely to the side of the
road and check for proper tongue load and
trailer load distribution. See
Load
Carrying (page 231). RECOMMENDED TOWING
WEIGHTS
Note:
Do not exceed the trailer
weight for your vehicle
configuration listed in the chart
below.
Note: Make sure to take into
consideration trailer frontal area.
Do not exceed 20 ft² (1.86 m²) for
vehicles without towing package,
or 30 ft² (2.79 m²) for vehicles with
towing package.
Note: For high altitude operation,
reduce the gross combined weight
by 2% per 1,000 ft (305 m) starting
at the
1,000 ft (305 m) elevation
point.
Note: Certain states require
separate trailer brakes for trailers
over a specified weight. Check
state regulations for this specified
weight. The maximum trailer
weights listed may be limited to
this specified weight, as your
vehicle ’s electrical system may not
include the wiring connector
needed to activate electric trailer
brakes.
239
Edge (CDQ) Canada/United States of America, enUSA, Edition date: 201706, Third-Printing- Towing
Page 244 of 557
ESSENTIAL TOWING CHECKS
Follow these guidelines for safe towing:
•
Do not tow a trailer until you drive your
vehicle at least 1,000 mi (1,600 km).
• Consult your local motor vehicle laws
for towing a trailer.
• See the instructions included with
towing accessories for the proper
installation and adjustment
specifications.
• Service your vehicle more frequently if
you tow a trailer. See your scheduled
maintenance information.
• If you use a rental trailer, follow the
instructions the rental agency gives
you.
You can find information on load
specification terms found on the tire label
and Safety Compliance label as well as
instructions on calculating your vehicle's
load in the Load Carrying chapter. See
Load Limit
(page 232).
Remember to account for the trailer
tongue weight as part of your vehicle load
when calculating the total vehicle weight.
Hitches
Do not use a hitch that either clamps onto
the bumper or attaches to the axle.
Distribute the trailer load so 10-15% of the
total trailer weight is on the tongue.
Safety Chains
Note: Never attach safety chains to the
bumper.
Always connect the safety chains to the
hook retainers of your vehicle hitch.
To connect the safety chains, cross them
under the trailer tongue and allow enough
slack for turning tight corners. Do not allow
the chains to drag on the ground. Trailer Brakes WARNING: Do not connect a trailer's
hydraulic brake system directly to your
vehicle's brake system. Your vehicle may
not have enough braking power and your
chances of having a collision greatly
increase.
Electric brakes and manual, automatic or
surge-type trailer brakes are safe if you
install them properly and adjust them to
the manufacturer's specifications. The
trailer brakes must meet local and federal
regulations.
The rating for the tow vehicle's braking
system operation is at the gross vehicle
weight rating, not the gross combined
weight rating.
Separate functioning brake systems
are required for safe control of towed
vehicles and trailers weighing more
than 1500 lb (680 kg) when load.
Trailer Lamps WARNING: Never connect any trailer
lamp wiring to the vehicle's tail lamp
wiring; this may damage the electrical
system resulting in fire. Contact your
authorized dealer as soon as possible for
assistance in proper trailer tow wiring
installation. Additional electrical
equipment may be required.
Trailer lamps are required on most towed
vehicles. Make sure all running lights, brake
lights, turn signals and hazard lights are
working.
241
Edge (CDQ) Canada/United States of America, enUSA, Edition date: 201706, Third-Printing- Towing
Page 249 of 557
BREAKING-IN
You need to break in new tires for
approximately 300 mi (480 km). During
this time, your vehicle may exhibit some
unusual driving characteristics.
Avoid driving too fast during the first
1,000 mi (1,600 km)
. Vary your speed
frequently and change up through the
gears early. Do not labor the engine.
Do not tow during the first
1,000 mi
(1,600 km).
ECONOMICAL DRIVING
Fuel economy is affected by several things
such as how you drive, the conditions you
drive under and how you maintain your
vehicle.
There are some things to keep in mind that
may improve your fuel economy:
• Accelerate and slow down in a smooth,
moderate fashion.
• Drive at steady speeds.
• Anticipate stops; slowing down may
eliminate the need to stop.
• Combine errands and minimize
stop-and-go driving (When running
errands, go to the furthest destination
first and then work your way back
home).
• Close the windows for high-speed
driving.
• Drive at reasonable speeds.
• Keep the tires properly inflated and use
only the recommended size.
• Use the recommended engine oil.
• Perform all regularly scheduled
maintenance. There are also some things you may want
to avoid doing because they reduce your
fuel economy:
•
Avoid sudden or hard accelerations.
• Avoid revving the engine before turning
off the car.
• Avoid long idle periods.
• Do not warm up your vehicle on cold
mornings.
• Reduce the use of air conditioning and
heat.
• Avoid using speed control in hilly
terrain.
• Do not rest your foot on the brake
pedal while driving.
• Avoid carrying unnecessary weight.
• Avoid adding particular accessories to
your vehicle (e.g. bug deflectors,
rollbars/light bars, running boards, ski
racks).
• Avoid driving with the wheels out of
alignment.
COLD WEATHER
PRECAUTIONS
The functional operation of some
components and systems can be affected
at temperatures below
-13°F (-25°C).
DRIVING THROUGH WATER WARNING:
Do not drive through
flowing or deep water as you may lose
control of your vehicle.
Note: Driving through standing water can
cause vehicle damage.
Note: Engine damage can occur if water
enters the air filter.
246
Edge (CDQ) Canada/United States of America, enUSA, Edition date: 201706, Third-Printing- Driving Hints
Page 250 of 557
Before driving through standing water,
check the depth. Never drive through water
that is higher than the bottom of the front
rocker area of your vehicle.
When driving through standing water, drive
very slowly and do not stop your vehicle.
Your brake performance and traction may
be limited. After driving through water and
as soon as it is safe to do so:
•
Lightly press the brake pedal to dry the
brakes and to check that they work.
• Check that the horn works.
• Check that the exterior lights work.
• Turn the steering wheel to check that
the steering power assist works.
FLOOR MATS WARNING: Use a floor mat designed
to fit the footwell of your vehicle that does
not obstruct the pedal area. Failure to
follow this instruction could result in the
loss of control of your vehicle, personal
injury or death. WARNING: Pedals that cannot
move freely can cause loss of vehicle
control and increase the risk of serious
personal injury. WARNING:
Secure the floor mat to
both retention devices so that it cannot
slip out of position and interfere with the
pedals. Failure to follow this instruction
could result in the loss of control of your
vehicle, personal injury or death. WARNING:
Do not place additional
floor mats or any other covering on top of
the original floor mats. This could result in
the floor mat interfering with the operation
of the pedals. Failure to follow this
instruction could result in the loss of
control of your vehicle, personal injury or
death. WARNING:
Always make sure that
objects cannot fall into the driver foot well
while your vehicle is moving. Objects that
are loose can become trapped under the
pedals causing a loss of vehicle control. To install the floor mats, position the floor
mat eyelet over the retention post and
press down to lock in position.
To remove the floor mat, reverse the
installation procedure.
Note:
Regularly check the floor mats to
make sure they are secure.
247
Edge (CDQ) Canada/United States of America, enUSA, Edition date: 201706, Third-Printing- Driving HintsE266447 E142666
Page 253 of 557
1. Press START/STOP to switch off your
vehicle.
2. Press the brake pedal and START/STOP
to switch on your
vehicle.
3. Remove your foot from the brake pedal
and press
START/STOP to switch off
your vehicle.
4. You can attempt to start the vehicle by pressing the brake pedal and
START/STOP
, or press START/STOP
without pressing the brake pedal.
JUMP STARTING THE VEHICLE WARNING:
Keep batteries out of
reach of children. Batteries contain sulfuric
acid. Avoid contact with skin, eyes or
clothing. Shield your eyes when working
near the battery to protect against possible
splashing of acid solution. In case of acid
contact with skin or eyes, flush
immediately with water for a minimum of
15 minutes and get prompt medical
attention. If acid is swallowed, call a
physician immediately. WARNING:
Batteries normally
produce explosive gases which can cause
personal injury. Therefore, do not allow
flames, sparks or lighted substances to
come near the battery. When working near
the battery, always shield your face and
protect your eyes. Always provide correct
ventilation. WARNING:
Use only the specified
jacking points. If you use other positions,
you may damage the body, steering,
suspension, engine, braking system or the
fuel lines. WARNING:
Use only adequately
sized cables with insulated clamps. Note:
Do not disconnect the battery of the
disabled vehicle as this could damage the
vehicle's electrical system.
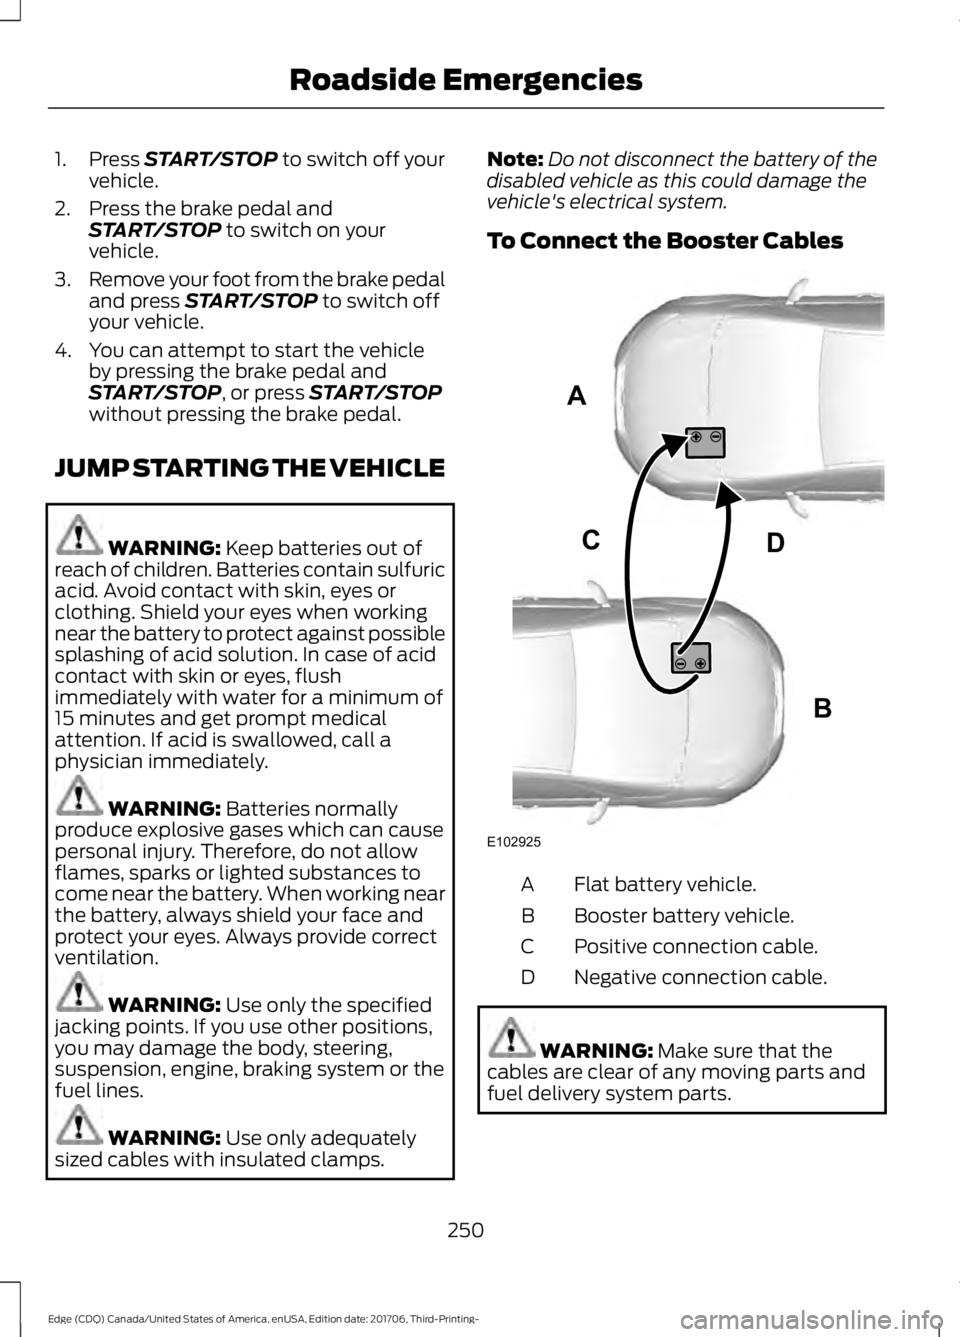
To Connect the Booster Cables Flat battery vehicle.
A
Booster battery vehicle.
B
Positive connection cable.
C
Negative connection cable.
D WARNING:
Make sure that the
cables are clear of any moving parts and
fuel delivery system parts.
250
Edge (CDQ) Canada/United States of America, enUSA, Edition date: 201706, Third-Printing- Roadside EmergenciesA
B
CD
E102925
Page 282 of 557
Note:
Make sure you install the oil filler cap
correctly.
Note: Soak up any spillage with an
absorbent cloth immediately.
OIL CHANGE INDICATOR
RESET
Use the information display controls on
the steering wheel to reset the oil change
indicator.
From the main menu scroll to: Action and description
Message
Press the right arrow button,
then from this menu scroll
to the following message.
Settings
Press the right arrow button,
then from this menu scroll
to the following message.
Vehicle
Press the right arrow button,
then from this menu scroll
to the following message.
Oil Life
Press and hold the OK
button until the instrument
cluster displays the
following message.
Hold OK to
Reset
Reset Successful
When the oil change indic-
ator resets the instrument
cluster displays 100%.
Remaining Life
{00}% Action and description
Message
If the instrument cluster
displays one of the following
messages, repeat the
process.
Not Reset
Reset Cancelled
ENGINE COOLANT CHECK WARNING:
Do not remove the
coolant reservoir cap when the engine is
on or the cooling system is hot. Wait 10
minutes for the cooling system to cool
down. Cover the coolant reservoir cap with
a thick cloth to prevent the possibility of
scalding and slowly remove the cap.
Failure to follow this instruction could
result in personal injury. WARNING: Do not put coolant in the
windshield washer reservoir. If sprayed on
the windshield, coolant could make it
difficult to see through the windshield. WARNING:
To reduce the risk of
personal injury, make sure the engine is
cool before unscrewing the coolant
pressure relief cap. The cooling system is
under pressure. Steam and hot liquid can
come out forcefully when you loosen the
cap slightly. WARNING:
Do not add coolant
further than the MAX mark.
When the engine is cold, check the
concentration and level of the coolant at
the intervals listed in the scheduled
maintenance information. See Scheduled
Maintenance
(page 496).
279
Edge (CDQ) Canada/United States of America, enUSA, Edition date: 201706, Third-Printing- Maintenance
Page 288 of 557
Correct Fluid Level
If the fluid level is within the hash mark
area (between points A and B) do not add
any fluid.
High Fluid Level
If the fluid level is above the maximum
range (above point B) fluid may need to
be removed. High fluid levels may be
caused by a overheating condition. If you
have operated your vehicle at high speeds,
towing a trailer or in city traffic during hot
weather, allow your vehicle to cool for a
minimum of 30 minutes before rechecking
the level.
Note:
An overfill condition can damage the
transmission.
Adding Transmission Fluid*
1. Rotate the automatic transmission fluid cap in a counterclockwise
direction. *
2. Remove the cap and dipstick and wipe
it with a clean, lint-free cloth.
3. Add fluid that meets the Ford specifications. See Capacities and
Specifications (page 351). Pour the
fluid directly into the automatic
transmission fluid cap and dipstick
hole.
4. Replace the cap and dipstick and remove it again to check the fluid level.
5. Make sure that the fluid level is between the MIN and the MAX marks.
6. Replace the automatic transmission fluid cap and dipstick. Turn it clockwise
until you feel a strong resistance. *
Vehicles With 2.7L Turbocharger WARNING:
Do not start the engine
with the air filter removed. This can cause
damage not covered by the vehicle
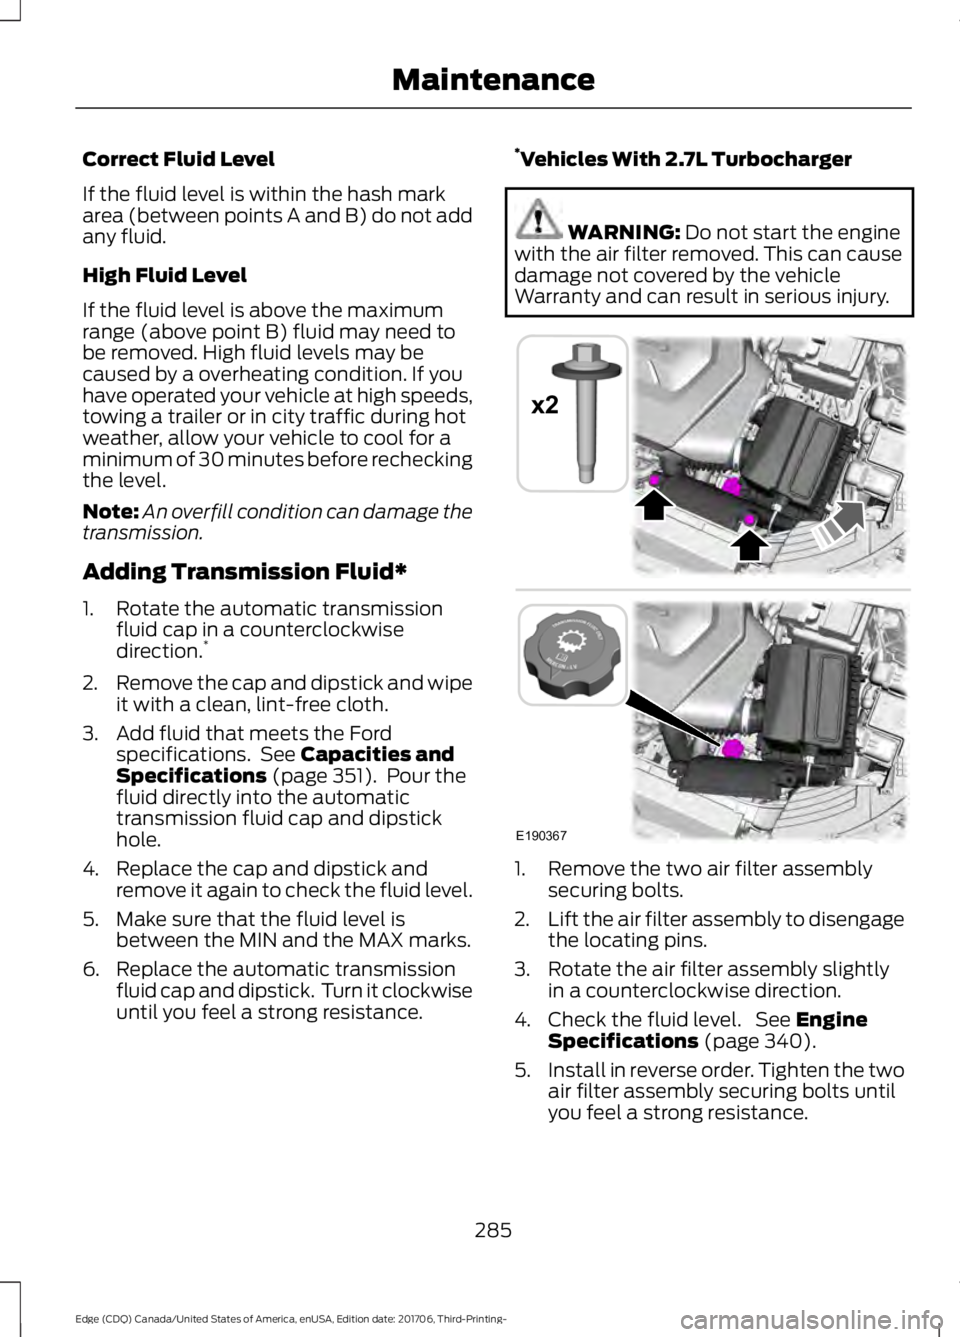
Warranty and can result in serious injury. 1. Remove the two air filter assembly
securing bolts.
2. Lift the air filter assembly to disengage
the locating pins.
3. Rotate the air filter assembly slightly in a counterclockwise direction.
4. Check the fluid level. See
Engine
Specifications (page 340).
5. Install in reverse order. Tighten the two
air filter assembly securing bolts until
you feel a strong resistance.
285
Edge (CDQ) Canada/United States of America, enUSA, Edition date: 201706, Third-Printing- MaintenanceE190367
x2
Page 290 of 557
Add fluid to fill the reservoir if the level is
low. Only use a washer fluid that meets
Ford specifications. See Capacities and
Specifications (page 340).
State or local regulations on volatile
organic compounds may restrict the use
of methanol, a common windshield washer
antifreeze additive. Washer fluids
containing non-methanol antifreeze
agents should be used only if they provide
cold weather protection without damaging
the vehicle ’s paint finish, wiper blades or
washer system.
FUEL FILTER
Your vehicle is equipped with a lifetime
fuel filter that is integrated with the fuel
tank. Regular maintenance or replacement
is not needed.
CHANGING THE 12V BATTERY WARNING:
Batteries normally
produce explosive gases which can cause
personal injury. Therefore, do not allow
flames, sparks or lighted substances to
come near the battery. When working near
the battery, always shield your face and
protect your eyes. Always provide correct
ventilation. WARNING:
When lifting a
plastic-cased battery, excessive pressure
on the end walls could cause acid to flow
through the vent caps, resulting in personal
injury and damage to the vehicle or battery.
Lift the battery with a battery carrier or
with your hands on opposite corners. WARNING:
Keep batteries out of
reach of children. Batteries contain sulfuric
acid. Avoid contact with skin, eyes or
clothing. Shield your eyes when working
near the battery to protect against possible
splashing of acid solution. In case of acid
contact with skin or eyes, flush
immediately with water for a minimum of
15 minutes and get prompt medical
attention. If acid is swallowed, call a
physician immediately. WARNING: Battery posts, terminals
and related accessories contain lead and
lead compounds, chemicals known to the
State of California to cause cancer and
reproductive harm. Wash your hands
after handling
.
Your vehicle has a Motorcraft®
maintenance-free battery which normally
does not require additional water during
its life of service.
Note: If your vehicle's battery has a cover
or shield, make sure it is reinstalled after the
battery has been cleaned or replaced.
Note: See an authorized dealer for low
voltage battery access, testing, or
replacement.
When a low voltage battery replacement
is necessary, see an authorized dealer to
replace the low voltage battery with a Ford
recommended replacement low voltage
battery that matches the electrical
requirements of the vehicle.
To ensure proper operation of the battery
management system (BMS), do not allow
a technician to connect any electrical
device ground connection directly to the
low voltage battery negative post. A
connection at the low voltage battery
negative post can cause inaccurate
measurements of the battery condition
and potential incorrect system operation.
287
Edge (CDQ) Canada/United States of America, enUSA, Edition date: 201706, Third-Printing- Maintenance
Page 294 of 557
5. Locate the vertical adjuster on each
headlamp. Using a Phillips #2
screwdriver, turn the adjuster either
clockwise or counterclockwise in order
to adjust the vertical aim of the
headlamp. The horizontal edge of the
brighter light should touch the
horizontal reference line.
6. Close the hood and turn off the lamps.
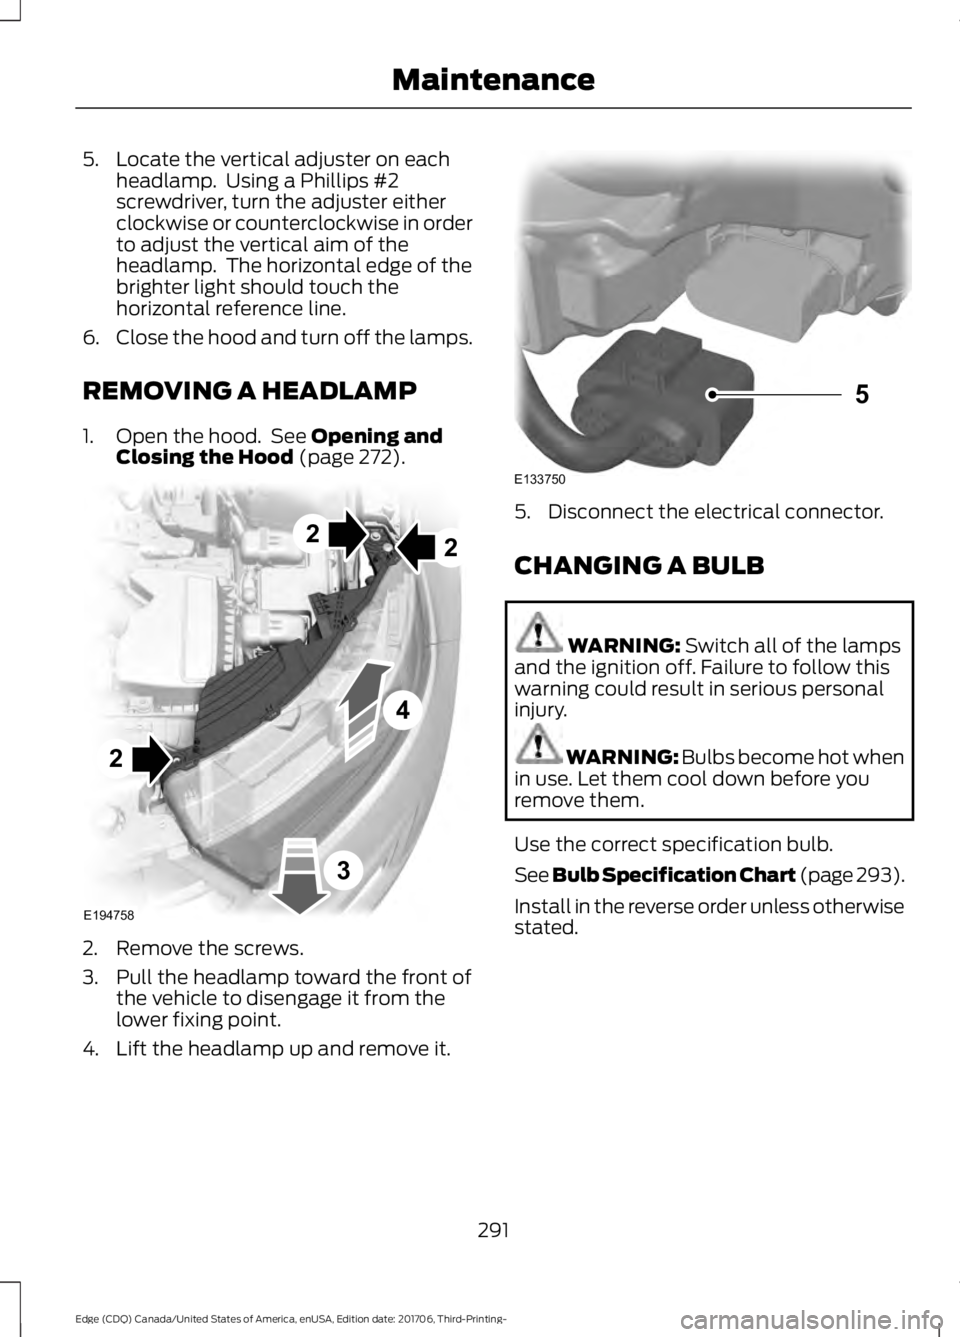
REMOVING A HEADLAMP
1. Open the hood. See Opening and
Closing the Hood (page 272). 2. Remove the screws.
3. Pull the headlamp toward the front of
the vehicle to disengage it from the
lower fixing point.
4. Lift the headlamp up and remove it. 5. Disconnect the electrical connector.
CHANGING A BULB
WARNING:
Switch all of the lamps
and the ignition off. Failure to follow this
warning could result in serious personal
injury. WARNING: Bulbs become hot when
in use. Let them cool down before you
remove them.
Use the correct specification bulb.
See Bulb Specification Chart (page 293).
Install in the reverse order unless otherwise
stated.
291
Edge (CDQ) Canada/United States of America, enUSA, Edition date: 201706, Third-Printing- Maintenance2
2
E194758
2
4
3 E133750
5
Page 302 of 557
To clean the windshield and wiper blades:
•
Clean the windshield with a
non-abrasive glass cleaner. When
cleaning the interior of the windshield,
avoid getting any glass cleaner on the
instrument panel or door panels. Wipe
any glass cleaner off these surfaces
immediately.
• For windshields contaminated with
tree sap, chemicals, wax or bugs, clean
the entire windshield using steel wool
(no greater than 0000 grade) in a
circular motion and rinse with water.
• Clean the wiper blades with isopropyl
rubbing alcohol or windshield washer
concentrate.
Note: Do not use razor blades or other
sharp objects to clean or remove decals
from the inside of the heated rear window.
The vehicle warranty does not cover
damage caused to the heated rear window
grid lines.
CLEANING THE INTERIOR WARNING: Do not use cleaning
solvents, bleach or dye on the vehicle's
seatbelts, as these actions may weaken
the belt webbing. WARNING:
On vehicles equipped
with seat-mounted airbags, do not use
chemical solvents or strong detergents.
Such products could contaminate the side
airbag system and affect performance of
the side airbag in a crash. For fabric, carpets, cloth seats and seats
equipped with side airbags:
•
Remove dust and loose dirt with a
vacuum cleaner.
• Remove light stains and soil with
Motorcraft Professional Strength
Carpet & Upholstery Cleaner.
• If grease or tar is present on the
material, spot-clean the area first with
Motorcraft Spot and Stain Remover. In
Canada, use Motorcraft Multi-Purpose
Cleaner.
• If a ring forms on the fabric after spot
cleaning, clean the entire area
immediately (but do not oversaturate)
or the ring will set.
• Do not use household cleaning
products or glass cleaners, which can
stain and discolor the fabric and affect
the flame retardant abilities of the seat
materials.
Mirrors
Do not clean the housing or glass of any
mirror with harsh abrasives, fuel or other
petroleum or ammonia-based cleaning
products.
CLEANING THE INSTRUMENT
PANEL AND INSTRUMENT
CLUSTER LENS WARNING:
Do not use chemical
solvents or strong detergents when
cleaning the steering wheel or instrument
panel to avoid contamination of the airbag
system.
Note: Follow the same procedure as
cleaning leather seats for cleaning leather
instrument panels and leather interior trim
surfaces. See
Cleaning Leather Seats
(page 300).
299
Edge (CDQ) Canada/United States of America, enUSA, Edition date: 201706, Third-Printing- Vehicle Care