FORD EDGE 2021 Owners Manual
Manufacturer: FORD, Model Year: 2021, Model line: EDGE, Model: FORD EDGE 2021Pages: 500, PDF Size: 8.52 MB
Page 301 of 500
WARNING: Do not remove the
coolant reservoir cap when the engine is
on or the cooling system is hot. Wait 10
minutes for the cooling system to cool
down. Cover the coolant reservoir cap
with a thick cloth to prevent the
possibility of scalding and slowly remove
the cap. Failure to follow this instruction
could result in personal injury.
Your vehicle has limited engine power
when in the fail-safe mode, drive your
vehicle with caution. Your vehicle does not
maintain high-speed operation and the
engine could operate poorly.
Remember that the engine is capable of
automatically shutting down to prevent
engine damage. In this situation:
1. Pull off the road as soon as safely possible and switch the engine off.
2. If you are a member of a roadside assistance program, we recommend
that you contact your roadside
assistance service provider.
3. If this is not possible, wait for a short period of time for the engine to cool.
4. Check the coolant level. If the coolant level is at or below the minimum mark,
add prediluted coolant immediately.
5. When the engine temperature cools, you can re-start the engine. Have your
vehicle checked as soon as possible to
minimize engine damage.
Note: Driving your vehicle without repair
increases the chance of engine damage. Engine Coolant Temperature
Management (If Equipped) WARNING:
To reduce the risk of
crash and injury, be prepared that the
vehicle speed may reduce and the
vehicle may not be able to accelerate
with full power until the coolant
temperature reduces.
If you tow a trailer with your vehicle, the
engine may temporarily reach a higher
temperature during severe operating
conditions, for example ascending a long
or steep grade in high ambient
temperatures.
At this time, you may notice the coolant
temperature gauge moves toward the red
zone and a message may appear in the
information display.
You may notice a reduction in vehicle
speed caused by reduced engine power in
order to manage the engine coolant
temperature. Your vehicle may enter this
mode if certain high-temperature and
high-load conditions take place. The
amount of speed reduction depends on
vehicle loading, grade and ambient
temperature. If this occurs, there is no
need to stop your vehicle. You can
continue to drive.
The air conditioning may automatically
turn on and off during severe operating
conditions to protect the engine from
overheating. When the coolant
temperature decreases to the normal
operating temperature, the air conditioning
turns on.
If the coolant temperature gauge moves
fully into the red zone, or if the coolant
temperature warning or service engine
soon messages appear in your information
display, do the following:
297
2021 Edge (CDQ) Canada/United States of America, enUSA, Edition date: 202011, First-Printing Maintenance
Page 302 of 500
1. Stop your vehicle as soon as it is safe
to do so. Fully apply the parking brake,
shift into park (P) or neutral (N).
2. Leave the engine running until the coolant temperature gauge needle
returns to the normal position. If the
temperature does not drop after
several minutes, follow the remaining
steps.
3. Switch the engine off and wait for it to
cool. Check the coolant level.
4. If the coolant level is at or below the minimum mark, add prediluted coolant
immediately.
5. If the coolant level is normal, restart the engine and continue.
CHANGING THE ENGINE AIR
FILTER WARNING: To reduce the risk of
vehicle damage and personal burn
injuries, do not start your engine with the
air cleaner removed and do not remove
it while the engine is running.
When changing the air filter element, use
only the air filter element listed. See
Capacities and Specifications
(page
349).
For turbocharged equipped vehicles: When
servicing the air cleaner, it is important that
no foreign material enter the air induction
system. The engine and turbocharger are
susceptible to damage from even small
particles.
Change the air filter element at the proper
interval. See
Scheduled Maintenance
(page 391). Note:
Failure to use the correct air filter
element may result in severe engine
damage. The customer warranty may be
void for any damage to the engine if the
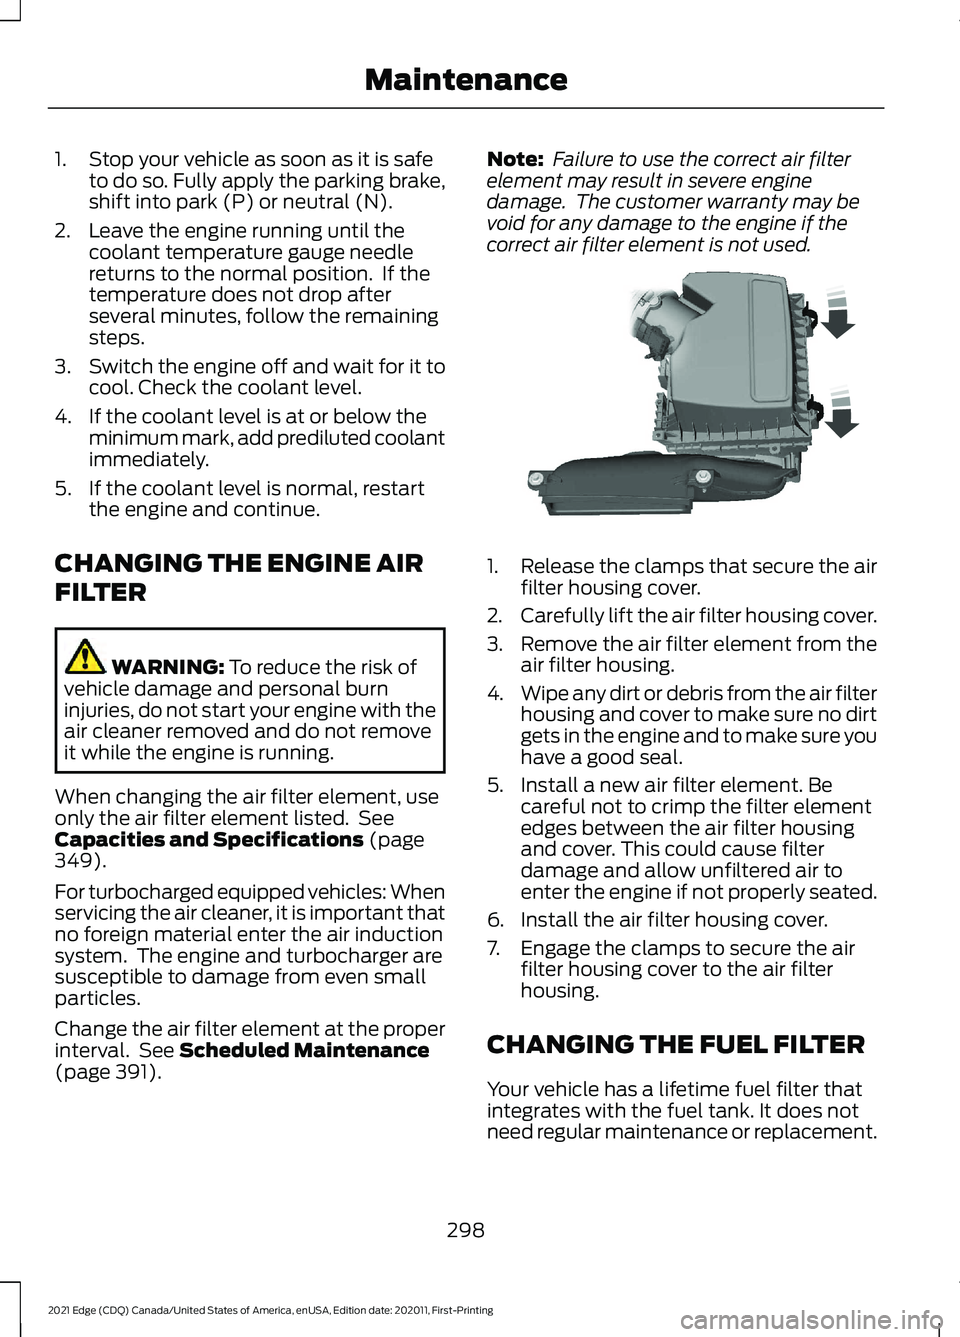
correct air filter element is not used. 1.
Release the clamps that secure the air
filter housing cover.
2. Carefully lift the air filter housing cover.
3. Remove the air filter element from the
air filter housing.
4. Wipe any dirt or debris from the air filter
housing and cover to make sure no dirt
gets in the engine and to make sure you
have a good seal.
5. Install a new air filter element. Be careful not to crimp the filter element
edges between the air filter housing
and cover. This could cause filter
damage and allow unfiltered air to
enter the engine if not properly seated.
6. Install the air filter housing cover.
7. Engage the clamps to secure the air filter housing cover to the air filter
housing.
CHANGING THE FUEL FILTER
Your vehicle has a lifetime fuel filter that
integrates with the fuel tank. It does not
need regular maintenance or replacement.
298
2021 Edge (CDQ) Canada/United States of America, enUSA, Edition date: 202011, First-Printing MaintenanceE144365
Page 303 of 500
DRIVE BELT ROUTING
OVERVIEW - 2.0L
ECOBOOST™
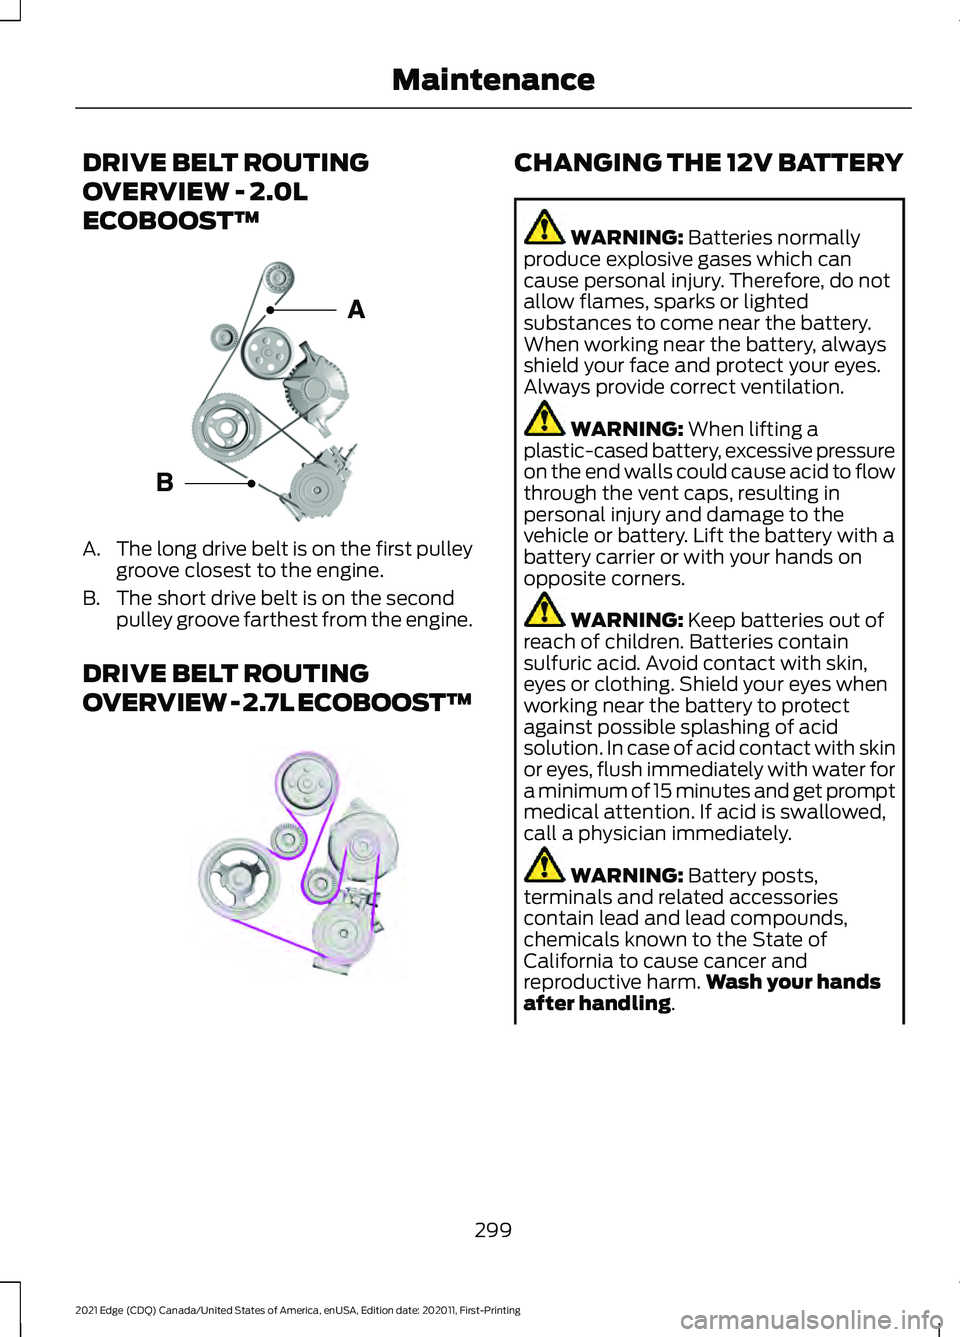
A.
The long drive belt is on the first pulley
groove closest to the engine.
B. The short drive belt is on the second pulley groove farthest from the engine.
DRIVE BELT ROUTING
OVERVIEW - 2.7L ECOBOOST™ CHANGING THE 12V BATTERY
WARNING: Batteries normally
produce explosive gases which can
cause personal injury. Therefore, do not
allow flames, sparks or lighted
substances to come near the battery.
When working near the battery, always
shield your face and protect your eyes.
Always provide correct ventilation. WARNING:
When lifting a
plastic-cased battery, excessive pressure
on the end walls could cause acid to flow
through the vent caps, resulting in
personal injury and damage to the
vehicle or battery. Lift the battery with a
battery carrier or with your hands on
opposite corners. WARNING:
Keep batteries out of
reach of children. Batteries contain
sulfuric acid. Avoid contact with skin,
eyes or clothing. Shield your eyes when
working near the battery to protect
against possible splashing of acid
solution. In case of acid contact with skin
or eyes, flush immediately with water for
a minimum of 15 minutes and get prompt
medical attention. If acid is swallowed,
call a physician immediately. WARNING:
Battery posts,
terminals and related accessories
contain lead and lead compounds,
chemicals known to the State of
California to cause cancer and
reproductive harm. Wash your hands
after handling
.
299
2021 Edge (CDQ) Canada/United States of America, enUSA, Edition date: 202011, First-Printing Maintenance E161383 E191903
Page 304 of 500
WARNING: This vehicle may have
more than one battery. Removing the
battery cables from only one battery
does not disconnect your vehicle
electrical system. Make sure you
disconnect the battery cables from all
batteries when disconnecting power.
Failure to do so may cause serious
personal injury or property damage.
The battery is in the engine compartment.
See
Under Hood Overview (page 292).
Your vehicle has a maintenance-free
battery. It does not require additional
water during service.
For longer, trouble-free operation, keep the
top of the battery clean and dry and the
battery cables tightly fastened to the
battery terminals. If any corrosion is
present on the battery or terminals, remove
the cables from the terminals and clean
with a wire brush. You can neutralize the
acid with a solution of baking soda and
water.
We recommend that you disconnect the
negative battery cable terminal from the
battery if you plan to store your vehicle for
an extended period.
Note: If you only disconnect the negative
battery cable terminal, make sure it is
isolated or placed away from the battery
terminal to avoid unintended connection or
arcing.
To maintain correct operation of the
battery management system, if you add
any electrical devices to your vehicle, do
not connect the ground connection directly
to the negative battery terminal. A
connection at the negative battery terminal
can cause inaccurate measurements of
the battery condition and potential
incorrect system operation. Note:
If you add electrical accessories or
components to your vehicle this may
adversely affect battery performance,
durability and the performance of other
electrical systems on your vehicle.
If you replace the battery make sure it
matches the electrical requirements of
your vehicle.
If you disconnect or replace the battery
and your vehicle has an automatic
transmission, it must relearn its adaptive
strategy. Because of this, the transmission
may shift firmly when first driven. This is
normal operation while the transmission
fully updates its operation to optimum
shift feel.
Remove and Reinstall the Battery
To disconnect or remove the battery, do
the following:
1. Apply the parking brake and switch the
ignition off.
2. Switch all electrical equipment off, for
example lights and radio.
3. Wait a minimum of two minutes before
disconnecting the battery.
Note: The engine management system has
a power hold function and remains powered
for a period of time after you switch the
ignition off. This is to allow diagnostic and
adaptive tables to be stored. Disconnecting
the battery without waiting can cause
damage not covered by the vehicle
Warranty.
4. Disconnect the negative battery cable terminal.
5. Disconnect the positive battery cable terminal.
6. Remove the battery securing clamp.
7. Remove the battery.
8. To install, reverse the removal procedure.
300
2021 Edge (CDQ) Canada/United States of America, enUSA, Edition date: 202011, First-Printing Maintenance
Page 305 of 500
Note:
Before reconnecting the battery,
make sure the ignition remains switched off.
Note: Make sure the battery cable terminals
are fully tightened.
Note: After cleaning or replacing the
battery, make sure you reinstall the battery
cover or shield.
If you disconnect or replace the vehicle
battery, you must reset the following
features:
• Window bounce-back. See Windows
(page 108).
• Clock Settings.
• Pre-set radio stations.
• Steering Angle Sensor.
Note: To calibrate the steering angle
sensor, drive the vehicle above
30 mph
(50 km/h) for a minimum of 1.2 mi (2 km).
Make sure to drive straight ahead for a
minimum of 30 seconds. Several vehicle
functions are disabled and a warning light
could appear until the sensor is calibrated.
Battery Management System
The battery management system monitors
battery conditions and takes actions to
extend battery life. If excessive battery
drain is detected, the system temporarily
disables some of the following features:
• Heated rear window.
• Heated seats.
• Climate control.
• Heated steering wheel.
• Audio unit.
• Navigation system.
A message may appear in the information
display to alert you that battery protection
actions are active. After battery replacement, or in some
cases after charging the battery with an
external charger, the battery management
system requires eight hours of vehicle sleep
time to relearn the battery state of charge.
During this time your vehicle must remain
fully locked with the ignition off.
Note:
If you add electrical accessories or
components to the vehicle, it may adversely
affect battery performance and durability.
This may also affect the performance of
other electrical systems in the vehicle.
Battery Disposal Make sure that you dispose of
old batteries in an
environmentally friendly way.
Seek advice from your local authority
about recycling old batteries.
ADJUSTING THE HEADLAMPS
Vertical Aim Adjustment
The headlamps on your vehicle are
properly aimed at the assembly plant. If
your vehicle has been involved in a crash,
have the aim of the headlamp beam
checked by an authorized dealer.
301
2021 Edge (CDQ) Canada/United States of America, enUSA, Edition date: 202011, First-Printing MaintenanceE107998
Page 306 of 500
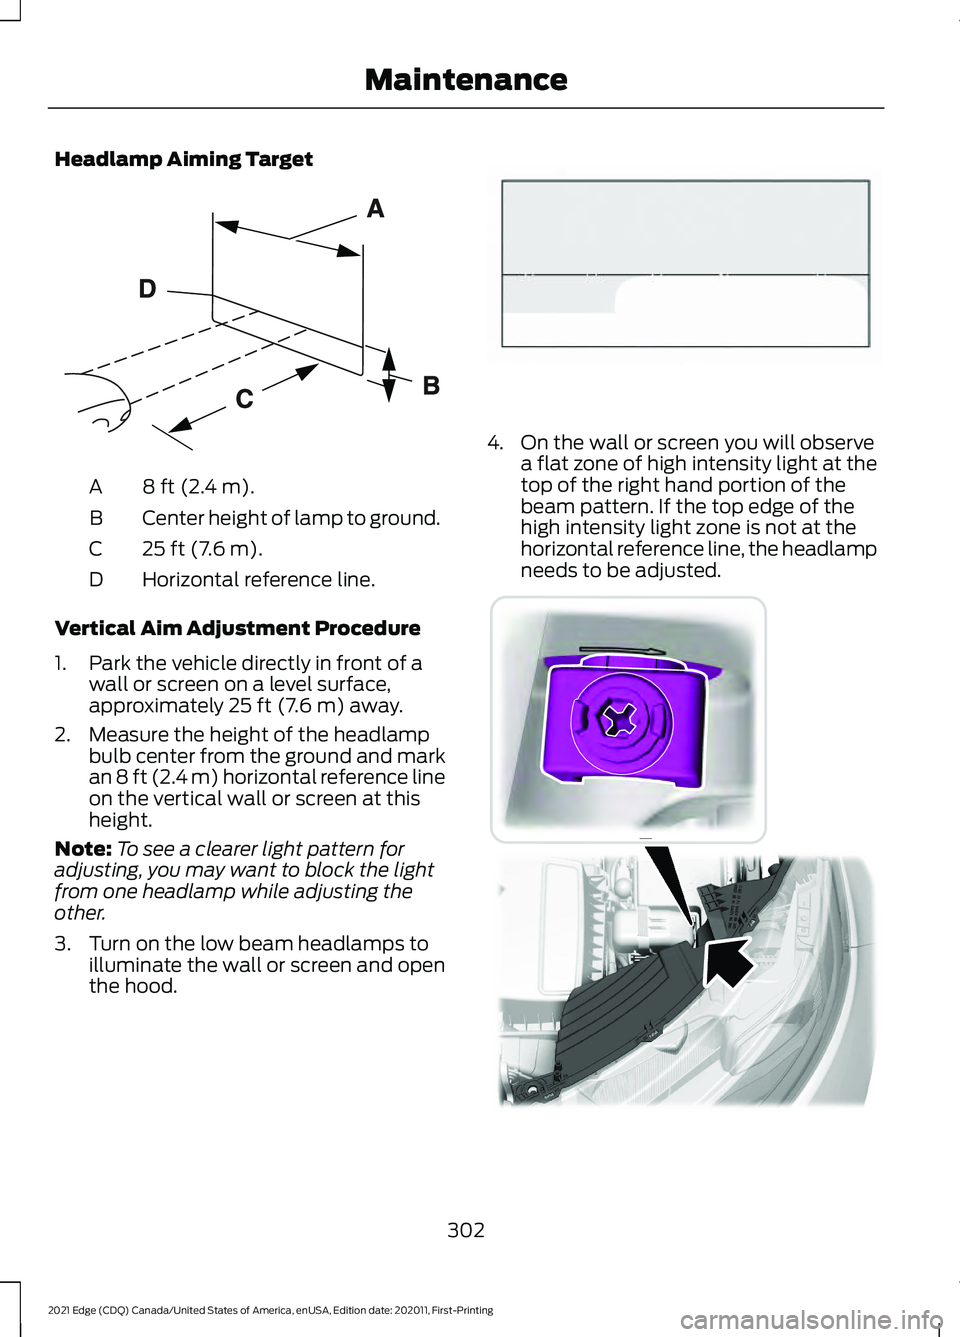
Headlamp Aiming Target
8 ft (2.4 m).
A
Center height of lamp to ground.
B
25 ft (7.6 m).
C
Horizontal reference line.
D
Vertical Aim Adjustment Procedure
1. Park the vehicle directly in front of a wall or screen on a level surface,
approximately 25 ft (7.6 m) away.
2. Measure the height of the headlamp bulb center from the ground and mark
an
8 ft (2.4 m) horizontal reference line
on the vertical wall or screen at this
height.
Note: To see a clearer light pattern for
adjusting, you may want to block the light
from one headlamp while adjusting the
other.
3. Turn on the low beam headlamps to illuminate the wall or screen and open
the hood. 4. On the wall or screen you will observe
a flat zone of high intensity light at the
top of the right hand portion of the
beam pattern. If the top edge of the
high intensity light zone is not at the
horizontal reference line, the headlamp
needs to be adjusted. 302
2021 Edge (CDQ) Canada/United States of America, enUSA, Edition date: 202011, First-Printing MaintenanceE142592 E142465 E194757
Page 307 of 500
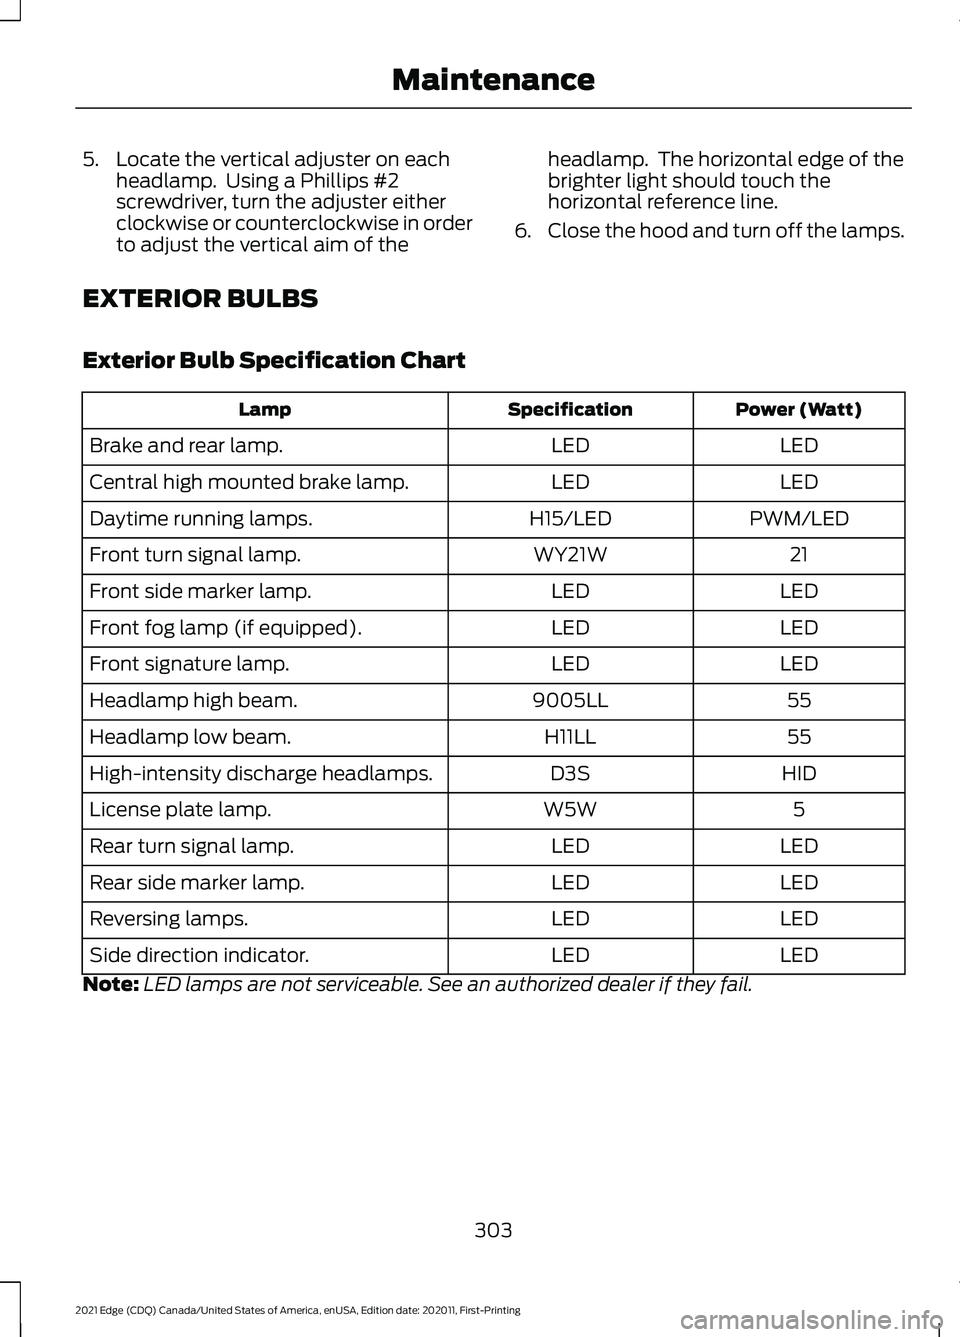
5. Locate the vertical adjuster on each
headlamp. Using a Phillips #2
screwdriver, turn the adjuster either
clockwise or counterclockwise in order
to adjust the vertical aim of the headlamp. The horizontal edge of the
brighter light should touch the
horizontal reference line.
6. Close the hood and turn off the lamps.
EXTERIOR BULBS
Exterior Bulb Specification Chart Power (Watt)
Specification
Lamp
LED
LED
Brake and rear lamp.
LED
LED
Central high mounted brake lamp.
PWM/LED
H15/LED
Daytime running lamps.
21
WY21W
Front turn signal lamp.
LED
LED
Front side marker lamp.
LED
LED
Front fog lamp (if equipped).
LED
LED
Front signature lamp.
55
9005LL
Headlamp high beam.
55
H11LL
Headlamp low beam.
HID
D3S
High-intensity discharge headlamps.
5
W5W
License plate lamp.
LED
LED
Rear turn signal lamp.
LED
LED
Rear side marker lamp.
LED
LED
Reversing lamps.
LED
LED
Side direction indicator.
Note: LED lamps are not serviceable. See an authorized dealer if they fail.
303
2021 Edge (CDQ) Canada/United States of America, enUSA, Edition date: 202011, First-Printing Maintenance
Page 308 of 500
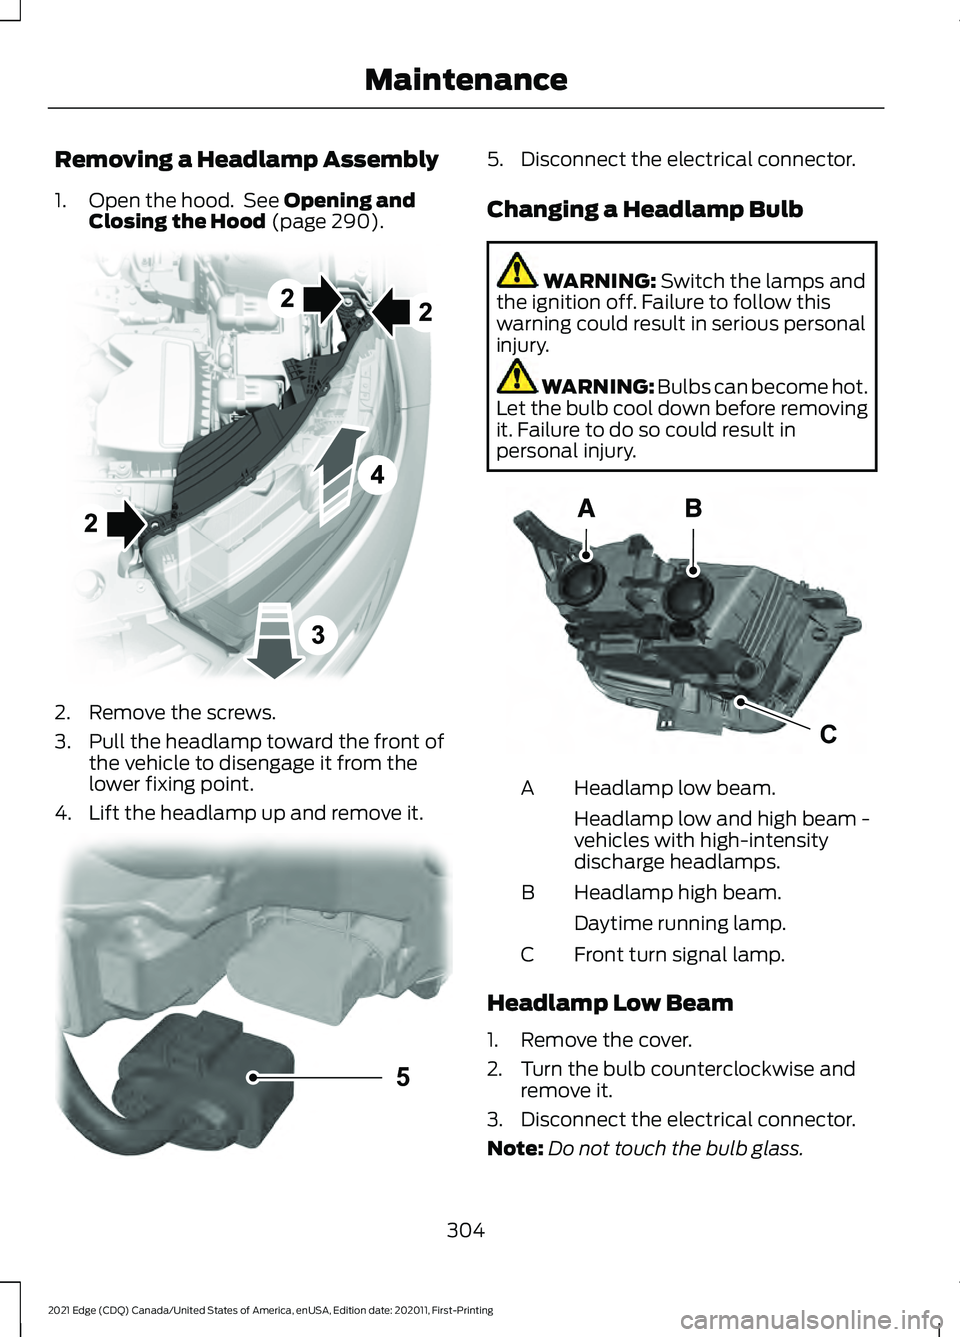
Removing a Headlamp Assembly
1. Open the hood. See Opening and
Closing the Hood (page 290). 2. Remove the screws.
3. Pull the headlamp toward the front of
the vehicle to disengage it from the
lower fixing point.
4. Lift the headlamp up and remove it. 5. Disconnect the electrical connector.
Changing a Headlamp Bulb
WARNING:
Switch the lamps and
the ignition off. Failure to follow this
warning could result in serious personal
injury. WARNING: Bulbs can become hot.
Let the bulb cool down before removing
it. Failure to do so could result in
personal injury. Headlamp low beam.
A
Headlamp low and high beam -
vehicles with high-intensity
discharge headlamps.
Headlamp high beam.
B
Daytime running lamp.
Front turn signal lamp.
C
Headlamp Low Beam
1. Remove the cover.
2. Turn the bulb counterclockwise and remove it.
3. Disconnect the electrical connector.
Note: Do not touch the bulb glass.
304
2021 Edge (CDQ) Canada/United States of America, enUSA, Edition date: 202011, First-Printing Maintenance E194758 5E133750 CE188959
Page 309 of 500
Note:
You cannot separate the bulb from
the bulb holder.
Headlamp High Beam
1. Remove the cover.
2. Turn the bulb counterclockwise and remove it.
3. Disconnect the electrical connector.
Note: Do not touch the bulb glass.
Note: You cannot separate the bulb from
the bulb holder.
High-Intensity Discharge
Headlamps
These lamps operate at a high voltage.
See an authorized dealer if they fail.
Daytime Running Lamp
1. Remove the cover.
2. Turn the bulb counterclockwise and remove it.
3. Disconnect the electrical connector.
Note: Do not touch the bulb glass.
Note: You cannot separate the bulb from
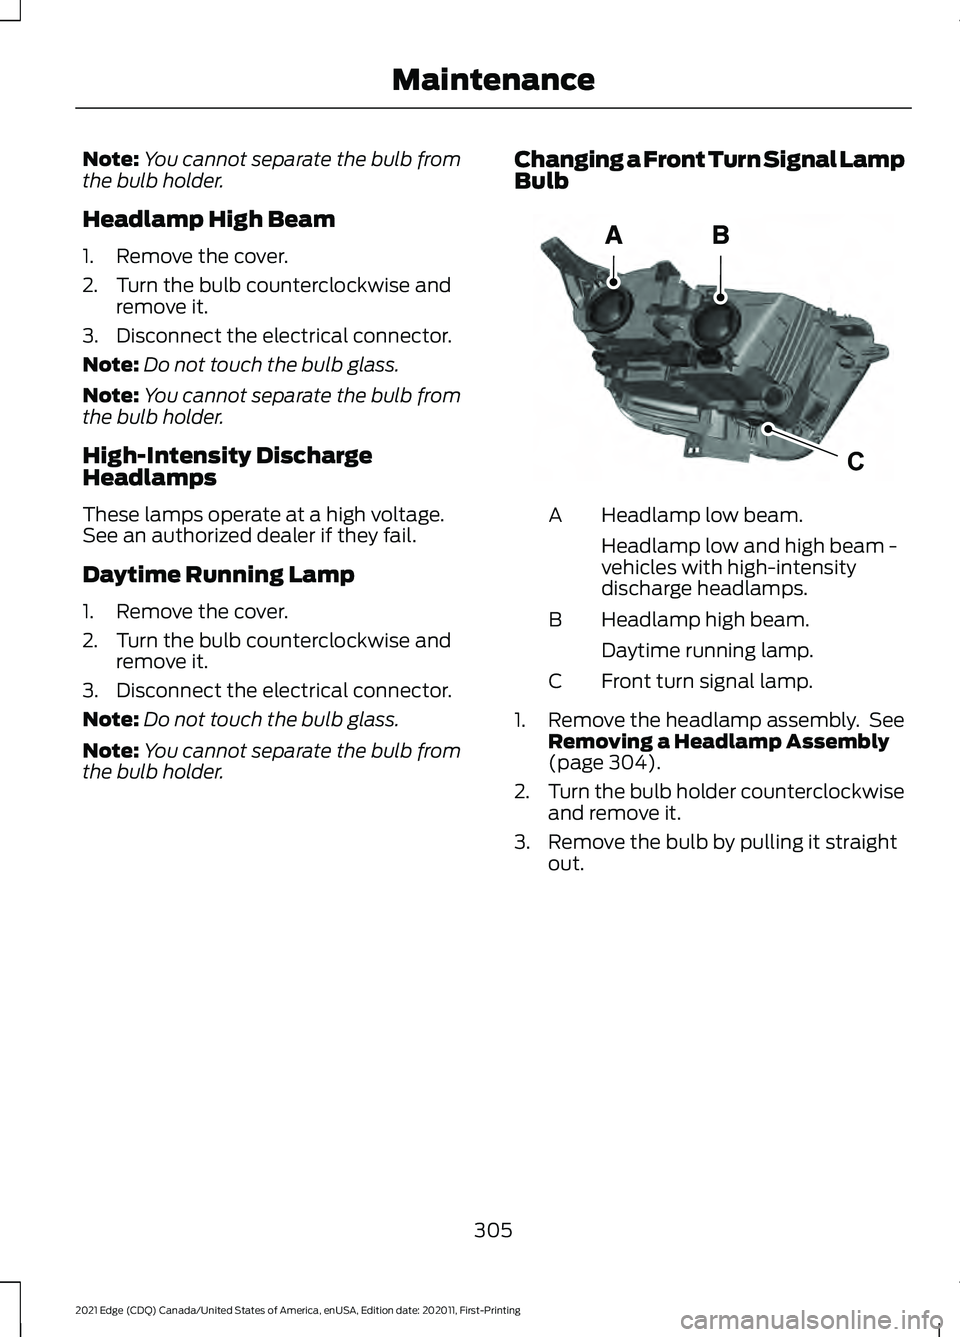
the bulb holder. Changing a Front Turn Signal Lamp
Bulb Headlamp low beam.
A
Headlamp low and high beam -
vehicles with high-intensity
discharge headlamps.
Headlamp high beam.
B
Daytime running lamp.
Front turn signal lamp.
C
1. Remove the headlamp assembly. See
Removing a Headlamp Assembly
(page 304).
2. Turn the bulb holder counterclockwise
and remove it.
3. Remove the bulb by pulling it straight out.
305
2021 Edge (CDQ) Canada/United States of America, enUSA, Edition date: 202011, First-Printing MaintenanceCE188959
Page 310 of 500
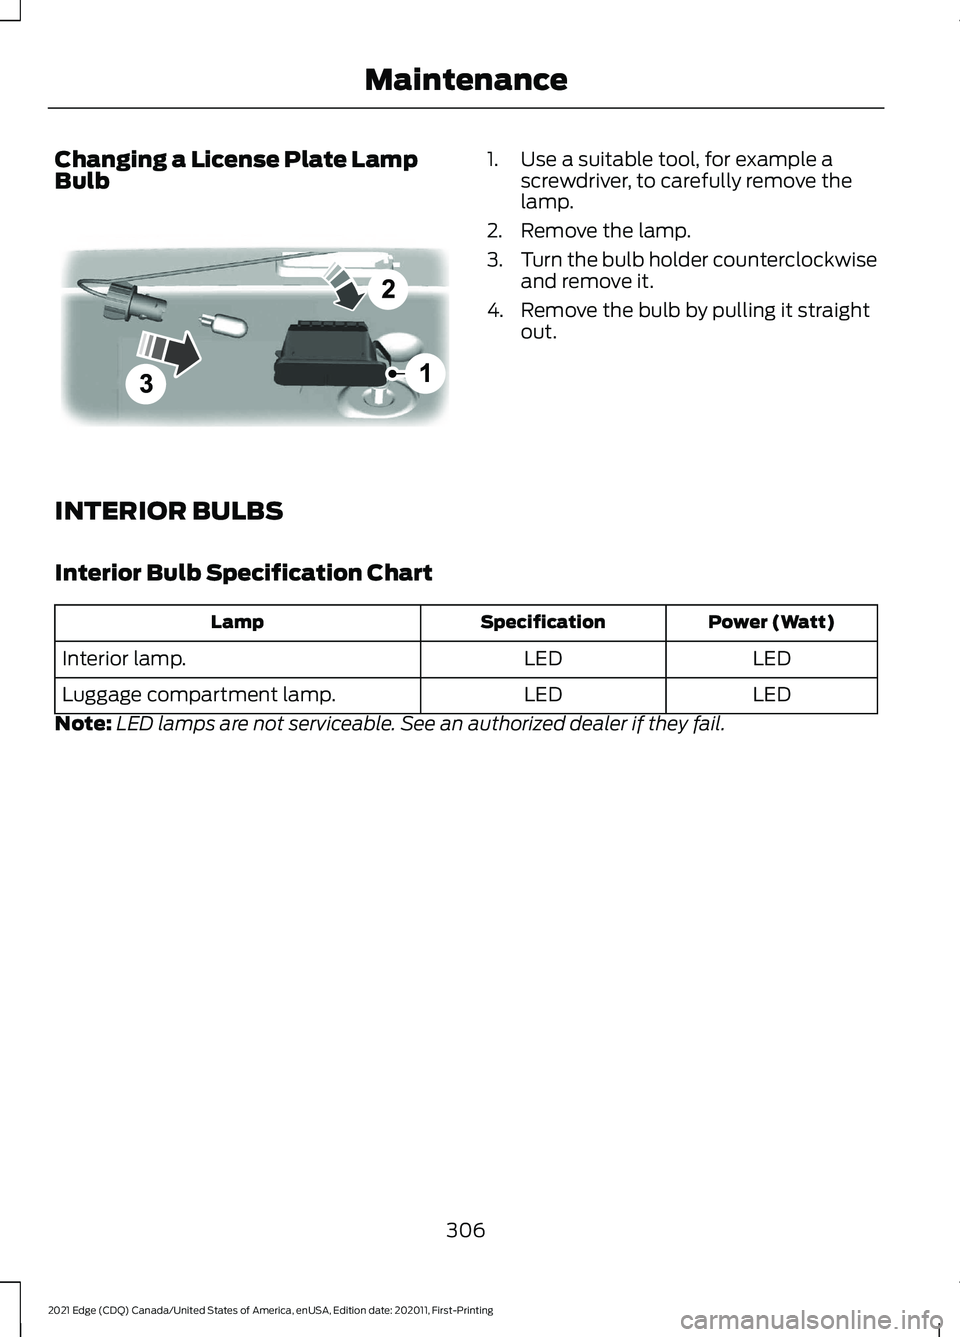
Changing a License Plate Lamp
Bulb 1. Use a suitable tool, for example a
screwdriver, to carefully remove the
lamp.
2. Remove the lamp.
3. Turn the bulb holder counterclockwise
and remove it.
4. Remove the bulb by pulling it straight out.
INTERIOR BULBS
Interior Bulb Specification Chart Power (Watt)
Specification
Lamp
LED
LED
Interior lamp.
LED
LED
Luggage compartment lamp.
Note: LED lamps are not serviceable. See an authorized dealer if they fail.
306
2021 Edge (CDQ) Canada/United States of America, enUSA, Edition date: 202011, First-Printing Maintenance E72789