weight FORD EXCURSION 2003 1.G Owners Manual
[x] Cancel search | Manufacturer: FORD, Model Year: 2003, Model line: EXCURSION, Model: FORD EXCURSION 2003 1.GPages: 240, PDF Size: 2.2 MB
Page 7 of 240
Notice to owners of diesel-powered vehicles
Read the 7.3 Liter Power Stroke Direct Injection Turbo Diesel Owner’s
Guide Supplement for information regarding correct operation and
maintenance of your diesel-powered light truck.
Notice to owners of pickup trucks and utility type vehicles
Utility vehicles have a significantly higher rollover rate than
other types of vehicles.
Before you drive your vehicle, please read this Owner’s Guide carefully.
Your vehicle is not a passenger car. As with other vehicles of this type,
failure to operate this vehicle correctly may result in loss of vehicle
control, vehicle rollover, personal injury or death.
Be sure to readDriving off roadin theDrivingchapter.
Snowplowing
The Excursion is not recommended for snowplow installation. Ford
makes no representation as to the suitability of the Excursion for
snowplowing, in particular regarding the potential for exceeding vehicle
weight limits, airbag (SRS) deployment sensitivity, vehicle crash integrity,
or powertrain durability. The Snowplow Package Option is not available.
Middle East/North Africa vehicle specific information
For your particular global region, your vehicle may be equipped with
features and options that are different from the ones that are described
in this Owner Guide; therefore, a supplement has been supplied that
complements this book. By referring to the pages in the provided
supplement, you can properly identify those features, recommendations
and specifications that are unique to your vehicle.Refer to this Owner
Guide for all other required information and warnings.
Introduction
7
Page 72 of 240
CENTER CONSOLE
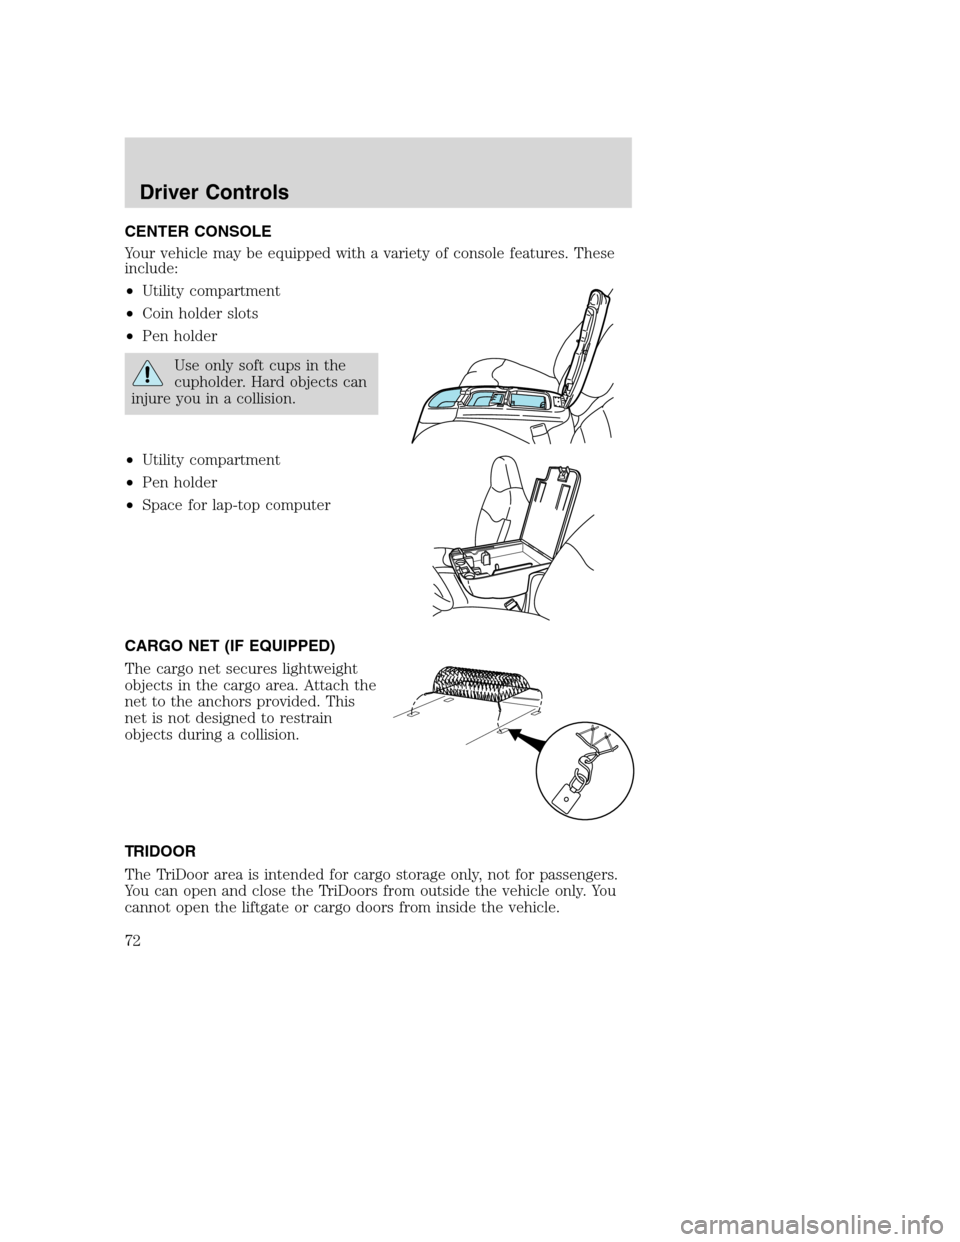
Your vehicle may be equipped with a variety of console features. These
include:
•Utility compartment
•Coin holder slots
•Pen holder
Use only soft cups in the
cupholder. Hard objects can
injure you in a collision.
•Utility compartment
•Pen holder
•Space for lap-top computer
CARGO NET (IF EQUIPPED)
The cargo net secures lightweight
objects in the cargo area. Attach the
net to the anchors provided. This
net is not designed to restrain
objects during a collision.
TRIDOOR
The TriDoor area is intended for cargo storage only, not for passengers.
You can open and close the TriDoors from outside the vehicle only. You
cannot open the liftgate or cargo doors from inside the vehicle.
Driver Controls
72
Page 116 of 240
The shoulder belt should cross the chest, resting snugly on the center of
the shoulder. The lap belt should rest low and snug across the hips,
never up high across the stomach.
If the booster seat slides on the vehicle seat, placing a rubberized mesh
sold as shelf or carpet liner under the booster seat may improve this
condition.
The importance of shoulder belts
Using a booster without a shoulder belt increases the risk of a child’s
head hitting a hard surface in a collision. For this reason, you should
never use a booster seat with a lap belt only. It is best to use a booster
seat with lap/shoulder belts in the back seat- the safest place for children
to ride.
Follow all instructions provided by the manufacturer of the
booster seat.
Never put the shoulder belt under a child’s arm or behind the
back because it eliminates the protection for the upper part of
the body and may increase the risk of injury or death in a collision.
Never use pillows, books, or towels to boost a child. They can
slide around and increase the likelihood of injury or death in a
collision.
SAFETY SEATS FOR CHILDREN
Child and infant or child safety seats
Use a safety seat that is recommended for the size and weight of the
child. Carefully follow all of the manufacturer’s instructions with the
Seating and Safety Restraints
116
Page 129 of 240
Parking brake
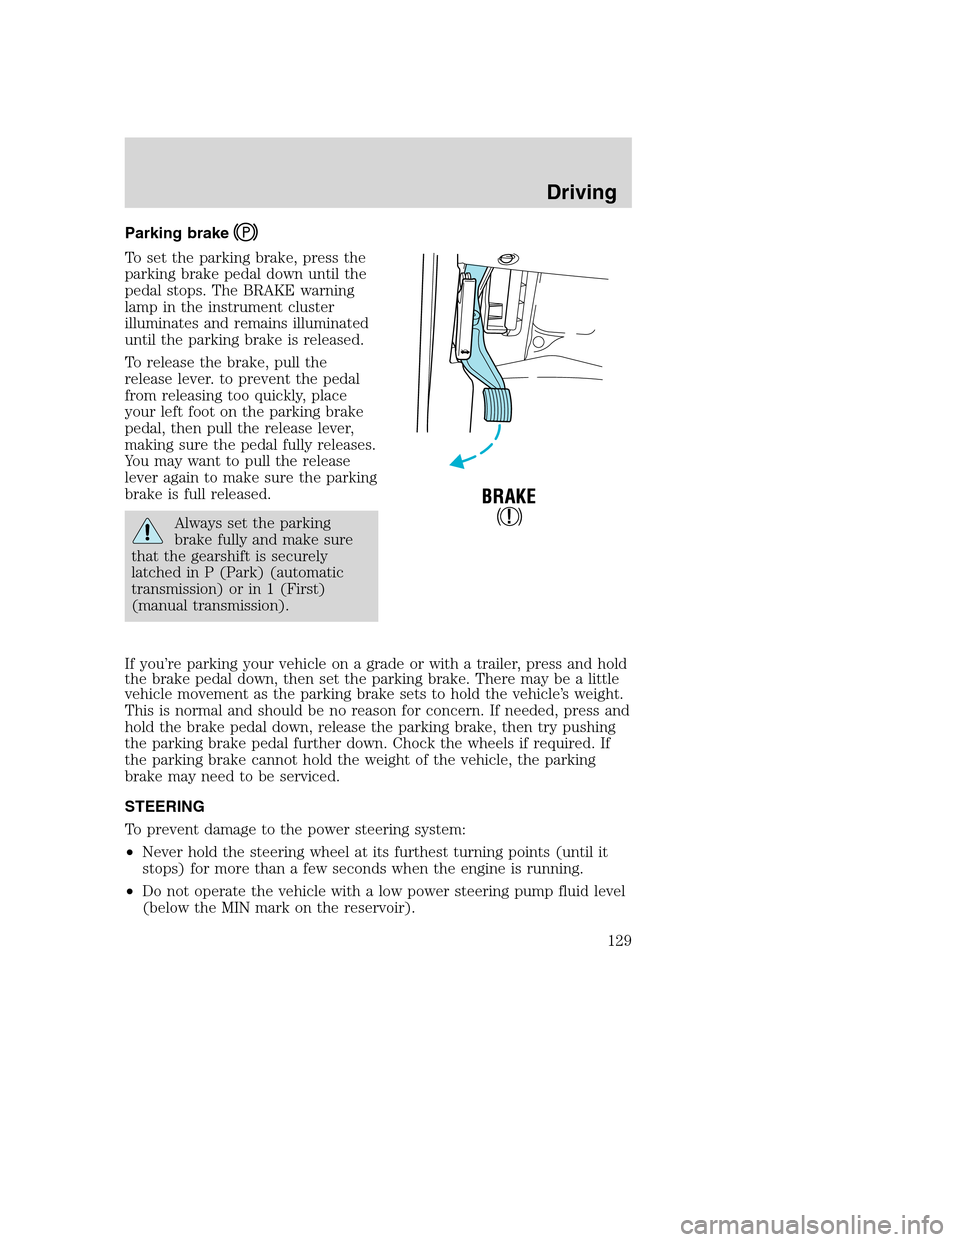
To set the parking brake, press the
parking brake pedal down until the
pedal stops. The BRAKE warning
lamp in the instrument cluster
illuminates and remains illuminated
until the parking brake is released.
To release the brake, pull the
release lever. to prevent the pedal
from releasing too quickly, place
your left foot on the parking brake
pedal, then pull the release lever,
making sure the pedal fully releases.
You may want to pull the release
lever again to make sure the parking
brake is full released.
Always set the parking
brake fully and make sure
that the gearshift is securely
latched in P (Park) (automatic
transmission) or in 1 (First)
(manual transmission).
If you’re parking your vehicle on a grade or with a trailer, press and hold
the brake pedal down, then set the parking brake. There may be a little
vehicle movement as the parking brake sets to hold the vehicle’s weight.
This is normal and should be no reason for concern. If needed, press and
hold the brake pedal down, release the parking brake, then try pushing
the parking brake pedal further down. Chock the wheels if required. If
the parking brake cannot hold the weight of the vehicle, the parking
brake may need to be serviced.
STEERING
To prevent damage to the power steering system:
•Never hold the steering wheel at its furthest turning points (until it
stops) for more than a few seconds when the engine is running.
•Do not operate the vehicle with a low power steering pump fluid level
(below the MIN mark on the reservoir).
Driving
129
Page 147 of 240
that is higher than the bottom of the hubs (for trucks) or the bottom of
the wheel rims (for cars). Traction or brake capability may be limited
and your vehicle may stall. Water may also enter your engine’s air intake
and severely damage your engine.
Once through the water, always dry the brakes by moving your vehicle
slowly while applying light pressure on the brake pedal. Wet brakes do
not stop the vehicle as quickly as dry brakes.Driving through deep
water where the transmission vent tube is submerged may allow
water into the transmission and cause internal transmission
damage.
VEHICLE LOADING
Before loading a vehicle, familiarize yourself with the following terms:
•Base Curb Weight:Weight of the vehicle including any standard
equipment, fluids, lubricants, etc. It does not include occupants or
aftermarket equipment.
•Payload:Combined maximum allowable weight of cargo, occupants
and optional equipment. The payload equals the gross vehicle weight
rating minus base curb weight.
•GVW (Gross Vehicle Weight):Base curb weight plus payload
weight.
•GVWR (Gross Vehicle Weight Rating):Maximum allowable total
weight of the base vehicle, occupants, optional equipment and cargo.
The GVWR is specific to each vehicle and is listed on the Safety
Certification Label on the driver’s door pillar.
•GAWR (Gross Axle Weight Rating):Carrying capacity for each axle
system. The GAWR is specific to each vehicle and is listed on the
Safety Certification Label on the driver’s door pillar.
•GCW (Gross Combined Weight):The combined weight of the
towing vehicle (including occupants and cargo) and the loaded trailer.
•GCWR (Gross Combined Weight Rating):Maximum allowable
combined weight of towing vehicle (including occupants and cargo)
and the loaded trailer.
•Maximum Trailer Weight Rating:Maximum weight of a trailer the
vehicle is permitted to tow. The maximum trailer weight rating is
determined by subtracting the vehicle curb weight for each
engine/transmission combination, any required option weight for trailer
towing and the weight of the driver from the GCWR for the towing
vehicle.
Driving
147
Page 148 of 240
•Maximum Trailer Weight:Maximum weight of a trailer the loaded
vehicle, including occupants and cargo, is permitted to tow. It is
determined by subtracting the weight of the loaded trailer towing
vehicle from the GCWR for the towing vehicle.
•Trailer Weight Range:Specified range of trailer weight from zero to
the maximum trailer weight rating.
Remember to figure in the tongue load of your loaded trailer when
figuring the total weight.
The Safety Certification Label, located on the driver’s door pillar, lists
vehicle weight rating limitations. Before adding any additional equipment,
refer to these limitations.
Always ensure that the weight of occupants, cargo and equipment is
within the weight limitations, including both gross vehicle weight and
front and rear gross axle weight rating limits.
Note:Do not exceed the GVWR or the GAWR specified on the
certification label.
Exceeding any vehicle weight rating limitation could result in
serious damage to the vehicle, loss of vehicle control, vehicle
rollover, and/or personal injury.
Do not use replacement tires with lower load carrying capacities than the
originals because they may lower the vehicle’s GVWR and GAWR
limitations. Replacement tires with a higher limit than the originals do
not increase the GVWR and GAWR limitations.
Special loading instructions for owners of pickup trucks and
utility-type vehicles
For important information regarding safe operation of this type
of vehicle, see thePreparing to drive your vehiclesection in
this chapter.
Loaded vehicles may handle differently than unloaded vehicles.
Extra precautions, such as slower speeds and increased stopping
distance, should be taken when driving a heavily loaded vehicle.
Your vehicle can haul more cargo and people than most passenger cars.
Depending upon the type and placement of the load, hauling cargo and
people may raise the center of gravity of the vehicle.
Driving
148
Page 149 of 240
Calculating the load your vehicle can carry/tow
1. Use the appropriate maximum GCWR chart (in theTrailer Towing
section in this chapter) for your type of engine and rear axle ratio.
2. Weigh your vehicle without cargo. To obtain correct weights, take your
vehicle to a shipping company or an inspection station for trucks.
3. Subtract your loaded weight from the maximum GCWR in the chart.
This is the maximum trailer weight your vehicle can tow. It must be
below the maximum trailer weight shown in the chart.
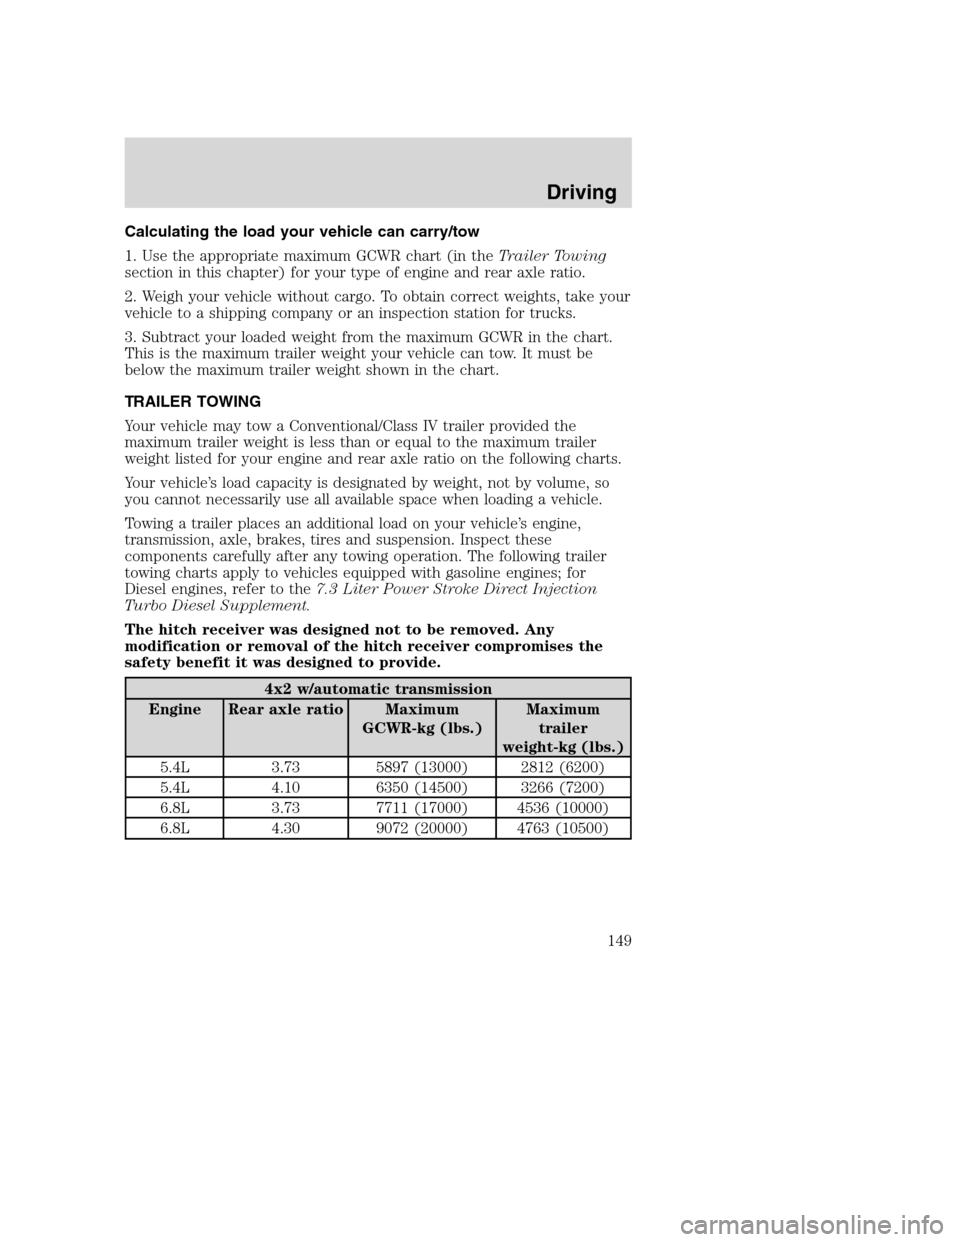
TRAILER TOWING
Your vehicle may tow a Conventional/Class IV trailer provided the
maximum trailer weight is less than or equal to the maximum trailer
weight listed for your engine and rear axle ratio on the following charts.
Your vehicle’s load capacity is designated by weight, not by volume, so
you cannot necessarily use all available space when loading a vehicle.
Towing a trailer places an additional load on your vehicle’s engine,
transmission, axle, brakes, tires and suspension. Inspect these
components carefully after any towing operation. The following trailer
towing charts apply to vehicles equipped with gasoline engines; for
Diesel engines, refer to the7.3 Liter Power Stroke Direct Injection
Turbo Diesel Supplement.
The hitch receiver was designed not to be removed. Any
modification or removal of the hitch receiver compromises the
safety benefit it was designed to provide.
4x2 w/automatic transmission
Engine Rear axle ratio Maximum
GCWR-kg (lbs.)Maximum
trailer
weight-kg (lbs.)
5.4L 3.73 5897 (13000) 2812 (6200)
5.4L 4.10 6350 (14500) 3266 (7200)
6.8L 3.73 7711 (17000) 4536 (10000)
6.8L 4.30 9072 (20000) 4763 (10500)
Driving
149
Page 150 of 240
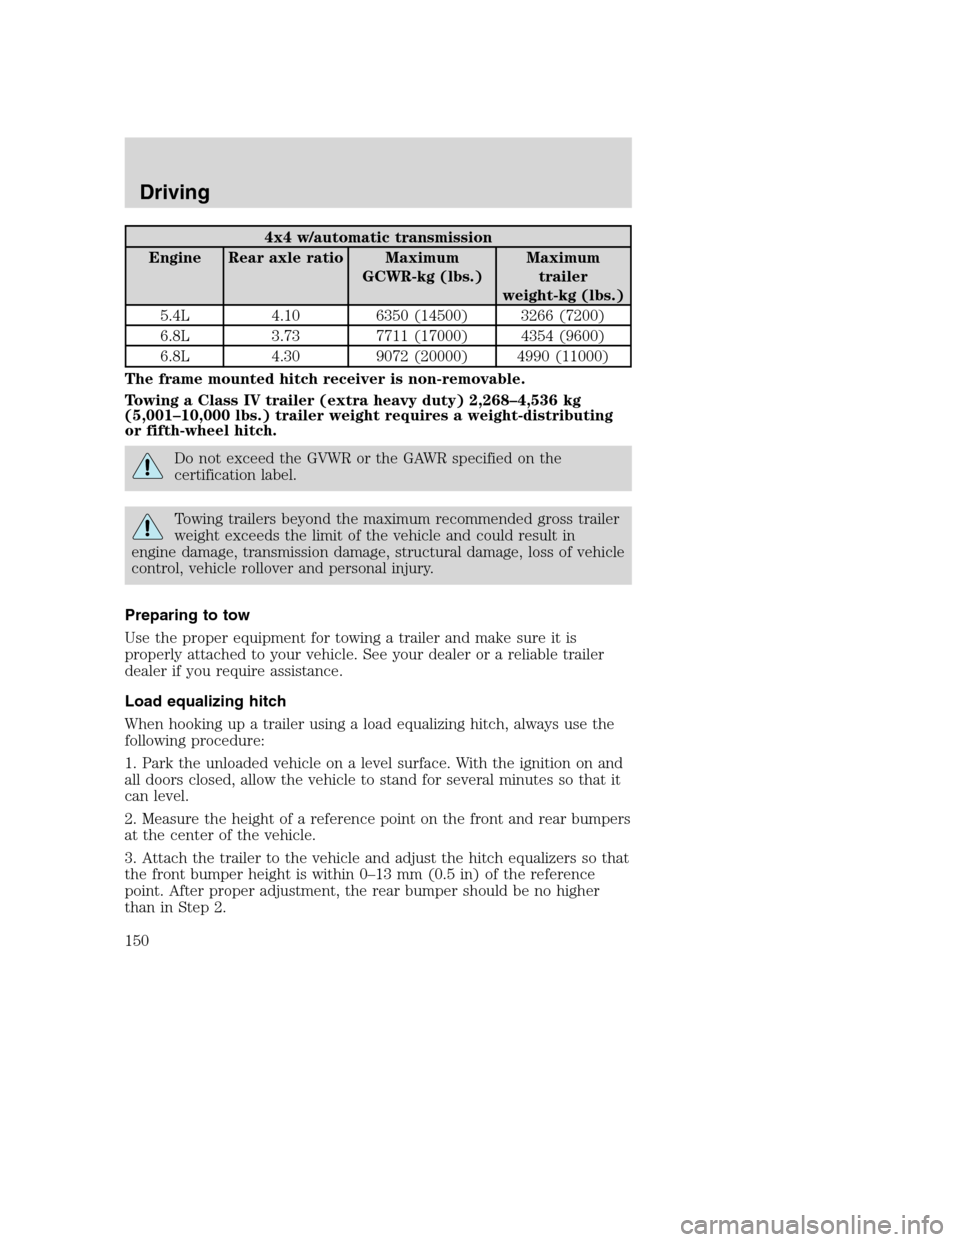
4x4 w/automatic transmission
Engine Rear axle ratio Maximum
GCWR-kg (lbs.)Maximum
trailer
weight-kg (lbs.)
5.4L 4.10 6350 (14500) 3266 (7200)
6.8L 3.73 7711 (17000) 4354 (9600)
6.8L 4.30 9072 (20000) 4990 (11000)
The frame mounted hitch receiver is non-removable.
Towing a Class IV trailer (extra heavy duty) 2,268–4,536 kg
(5,001–10,000 lbs.) trailer weight requires a weight-distributing
or fifth-wheel hitch.
Do not exceed the GVWR or the GAWR specified on the
certification label.
Towing trailers beyond the maximum recommended gross trailer
weight exceeds the limit of the vehicle and could result in
engine damage, transmission damage, structural damage, loss of vehicle
control, vehicle rollover and personal injury.
Preparing to tow
Use the proper equipment for towing a trailer and make sure it is
properly attached to your vehicle. See your dealer or a reliable trailer
dealer if you require assistance.
Load equalizing hitch
When hooking up a trailer using a load equalizing hitch, always use the
following procedure:
1. Park the unloaded vehicle on a level surface. With the ignition on and
all doors closed, allow the vehicle to stand for several minutes so that it
can level.
2. Measure the height of a reference point on the front and rear bumpers
at the center of the vehicle.
3. Attach the trailer to the vehicle and adjust the hitch equalizers so that
the front bumper height is within 0–13 mm (0.5 in) of the reference
point. After proper adjustment, the rear bumper should be no higher
than in Step 2.
Driving
150
Page 151 of 240
Note:Adjusting an equalizing hitch so the rear bumper of the vehicle is
higher than it was unloaded will defeat the function of the load
equalizing hitch and may cause unpredictable handling.
Safety chains
Always connect the trailer’s safety chains to the frame or hook retainers
of the vehicle hitch. To connect the trailer’s safety chains, cross the
chains under the trailer tongue and allow slack for turning corners.
If you use a rental trailer, follow the instructions that the rental agency
gives to you.
Do not attach safety chains to the bumper.
Trailer brakes
Electric brakes and manual, automatic or surge-type trailer brakes are
safe if installed properly and adjusted to the manufacturer’s
specifications. The trailer brakes must meet local and Federal
regulations.
Do not connect a trailer’s hydraulic brake system directly to your
vehicle’s brake system. Your vehicle may not have enough
braking power and your chances of having a collision greatly increase.
The braking system of the tow vehicle is rated for operation at the
GVWR not GCWR.
Trailer lamps
Trailer lamps are required on most towed vehicles. Make sure your
trailer lamps conform to local and Federal regulations. See your dealer or
trailer rental agency for proper instructions and equipment for hooking
up trailer lamps.
Using a step bumper (if equipped)
The rear bumper is equipped with an integral hitch and only requires a
ball with a 25.4 mm (one inch) shank diameter. The bumper has a 2,270 kg
(5,000 lb.) trailer weight and 227 kg (500 lb.) tongue weight capacity.
If it is necessary to relocate the trailer hitch ball position, a
frame-mounted trailer hitch must be installed.
Driving
151
Page 152 of 240
Driving while you tow
When towing a trailer:
•Turn off the speed control. The speed control may shut off
automatically when you are towing on long, steep grades.
•Consult your local motor vehicle speed regulations for towing a trailer.
•To eliminate excessive shifting, use a lower gear. This will also assist
in transmission cooling. (For additional information, refer to the
Understanding the positions of the 4–speed automatic
transmissionsection in this chapter.
•Anticipate stops and brake gradually.
•Do not exceed the GCWR rating or transmission damage may occur.
Servicing after towing
If you tow a trailer for long distances, your vehicle will require more
frequent service intervals. Refer to your scheduled maintenance guide for
more information.
Trailer towing tips
•Practice turning, stopping and backing up before starting on a trip to
get the feel of the vehicle trailer combination. When turning, make
wider turns so the trailer wheels will clear curbs and other obstacles.
•Allow more distance for stopping with a trailer attached.
•If you are driving down a long or steep hill, shift to a lower gear. Do
not apply the brakes continuously, as they may overheat and become
less effective.
•The trailer tongue weight should be 10–15% of the loaded trailer
weight.
•After you have traveled 80 km (50 miles), thoroughly check your
hitch, electrical connections and trailer wheel lug nuts.
•To aid in engine/transmission cooling and A/C efficiency during hot
weather while stopped in traffic, place the gearshift lever in P (Park).
•Vehicles with trailers should not be parked on a grade. If you must
park on a grade, place wheel chocks under the trailer’s wheels.
Launching or retrieving a boat
When backing down a ramp during boat launching or retrieval,
•Do not allow the static water level to rise above the bottom edge of
the rear bumper.
Driving
152