weight FORD FESTIVA 1991 Service Manual
[x] Cancel search | Manufacturer: FORD, Model Year: 1991, Model line: FESTIVA, Model: FORD FESTIVA 1991Pages: 454, PDF Size: 9.53 MB
Page 113 of 454
replace hydraulic lash adjuster. Adjustment on valve lash adjusters is NOT possible or necessary.
PISTON & ROD ASSEMBLY
1. Remove cylinder head assembly. Remove oil pan. Mark connecting rod caps for reassembly reference. Remove rod nuts. Remove lower
rod cap and bearing. Tap piston out top of cylinder block. DO NOT scratch crank journal or cylinder walls during removal.
2. Repeat procedure for remaining pistons. Keep removed parts in order to ensure installation to original position. Position piston assembly
in correct cylinder bore. Align piston mark "F" (1.3L), or notch (1.6L) located at piston pin bore area, and connecting rod oil gr o o ve
toward engine front. To complete installation, reverse removal procedure. Tighten all bolts and nuts to specification. See TORQUE
SPECIFICATIONS table at end of article.
FITTING PISTONS
1. With piston assembly removed, remove piston rings and clean piston. Measure piston outer diameter in thrust direction, below oil ring
groove. Diameter is 2.793-2.794" (70.954-70.974 mm) for 1.3L engines and 3.0690-3.0698 (77.954-77.974) for 1.6L engines.
2. Place piston upside down in cylinder from which it was removed. Using a feeler gauge, measure clearance between piston and cylinder
bore. If clearance is not within specification, bore cylinder and replace piston as necessary. See CYLINDER BLOCK
table in ENGINE
SPECIFICATIONS at end of article.
PISTON RINGS
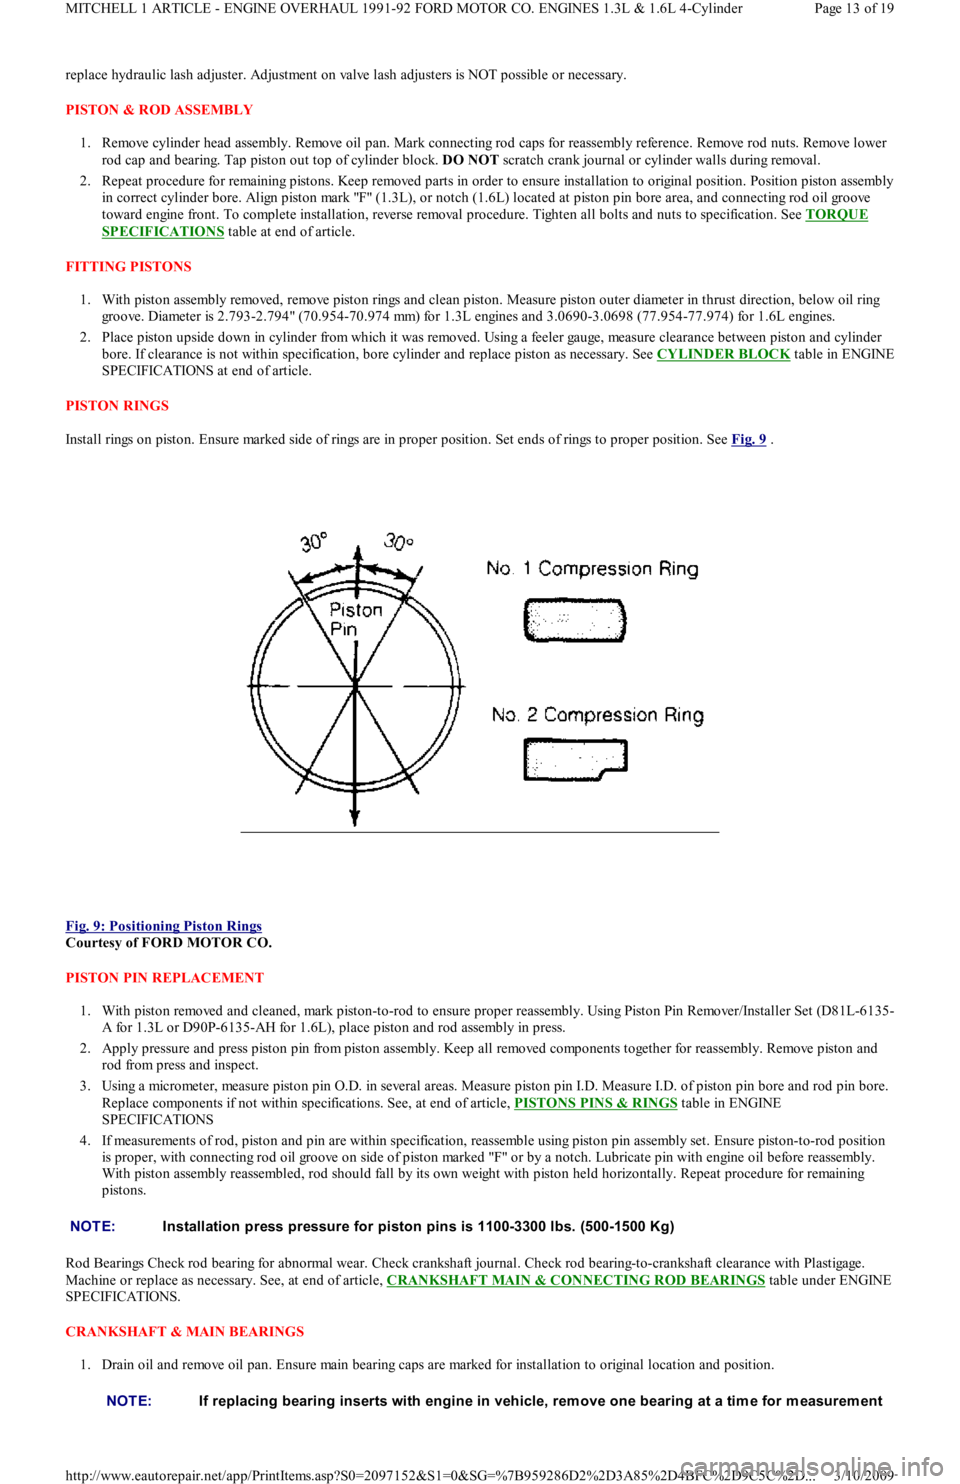
Install rings on piston. Ensure marked side of rings are in proper position. Set ends of rings to proper position. See Fig. 9
.
Fig. 9: Positioning Piston Rings
Courtesy of FORD MOTOR CO.
PISTON PIN REPLACEMENT
1. With piston removed and cleaned, mark piston-to-rod to ensure proper reassembly. Using Piston Pin Remover/Installer Set (D81L-6135-
A for 1.3L or D90P-6135-AH for 1.6L), place piston and rod assembly in press.
2. Apply pressure and press piston pin from piston assembly. Keep all removed components together for reassembly. Remove piston and
rod from press and inspect.
3. Using a micrometer, measure piston pin O.D. in several areas. Measure piston pin I.D. Measure I.D. of piston pin bore and rod pin bore.
Replace components if not within specifications. See, at end of article, PISTONS PINS & RINGS
table in ENGINE
SPECIFICATIONS
4. If measurements of rod, piston and pin are within specification, reassemble using piston pin assembly set. Ensure piston-to-rod position
is proper, with connecting rod oil groove on side of piston marked "F" or by a notch. Lubricate pin with engine oil before reassembly.
With piston assembly reassembled, rod should fall by its own weight with piston held horizontally. Repeat procedure for remaining
pistons.
Rod Bearings Check rod bearing for abnormal wear. Check crankshaft journal. Check rod bearing-to-crankshaft clearance with Plastigage.
Machine or replace as necessary. See, at end of article, CRANKSHAFT MAIN & CONNECTING ROD BEARINGS
table under ENGINE
SPECIFICATIONS.
CRANKSHAFT & MAIN BEARINGS
1. Drain oil and remove oil pan. Ensure main bearing caps are marked for installation to original location and position.
NOTE:Installation press pressure for piston pins is 1100-3300 lbs. (500-1500 Kg)
NOTE:If replacing bearing inserts with engine in vehicle, rem ove one bearing at a tim e for m easurem ent
Page 13 of 19 MITCHELL 1 ARTICLE - ENGINE OVERHAUL 1991-92 FORD MOTOR CO. ENGINES 1.3L & 1.6L 4-Cylinder
3/10/2009 http://www.eautorepair.net/app/PrintItems.asp?S0=2097152&S1=0&SG=%7B959286D2%2D3A85%2D4BFC%2D9C5C%2D
...
Page 166 of 454
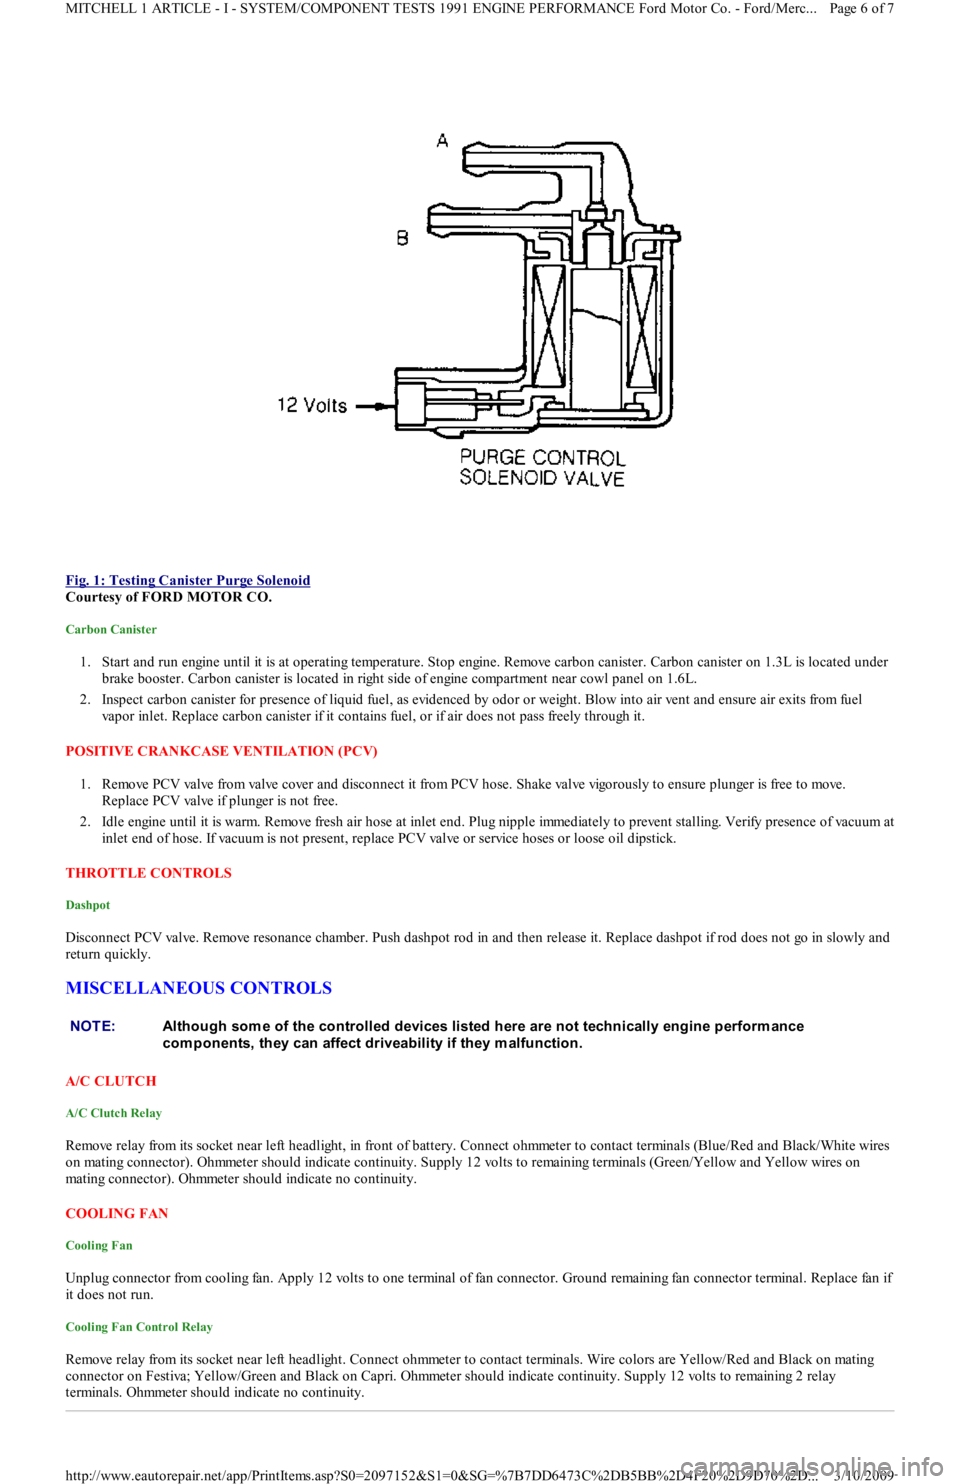
Fig. 1: Testing Canister Purge Solenoid
Courtesy of FORD MOTOR CO.
Carbon Canister
1. Start and run engine until it is at operating temperature. Stop engine. Remove carbon canister. Carbon canister on 1.3L is located under
brake booster. Carbon canister is located in right side of engine compartment near cowl panel on 1.6L.
2. Inspect carbon canister for presence of liquid fuel, as evidenced by odor or weight. Blow into air vent and ensure air exits fro m fu el
vapor inlet. Replace carbon canister if it contains fuel, or if air does not pass freely through it.
POSITIVE CRANKCASE VENTILATION (PCV)
1. Remove PCV valve from valve cover and disconnect it from PCV h o se . S h a ke va l ve vigo r o u sl y t o e n su r e p l u n ge r is fr e e t o mo ve .
Replace PCV valve if plunger is not free.
2. Idle engine until it is warm. Remove fresh air hose at inlet end. Plug nipple immediately to prevent stalling. Verify presence of vacuum at
inlet end of hose. If vacuum is not present, replace PCV valve or service hoses or loose oil dipstick.
THROTTLE CONTROLS
Dashpot
Disconnect PCV valve. Remove resonance chamber. Push dashpot rod in and then release it. Replace dashpot if rod does not go in slowly and
return quickly.
MISCELLANEOUS CONTROLS
A/C CLUTCH
A/C Clutch Relay
Remove relay from its socket near left headlight, in front of battery. Connect ohmmeter to contact terminals (Blue/Red and Black/White wires
on mating connector). Ohmmeter should indicate continuity. Supply 12 volts to remaining terminals (Green/Yellow and Yellow wires on
mating connector). Ohmmeter should indicate no continuity.
COOLING FAN
Cooling Fan
Unplug connector from cooling fan. Apply 12 volts to one terminal of fan connector. Ground remaining fan connector terminal. Replace fan if
it does not run.
Cooling Fan Control Relay
Remove relay from its socket near left headlight. Connect ohmmeter to contact terminals. Wire colors are Yellow/Red and Black on mating
connector on Festiva; Yellow/Green and Black on Capri. Ohmmeter should indicate continuity. Supply 12 volts to remaining 2 relay
terminals. Ohmmeter should indicate no continuity.
NOTE:Although som e of the controlled devices listed here are not technically engine perform ance
com ponents, they can affect driveability if they m alfunction.
Page 6 of 7 MITCHELL 1 ARTICLE - I - SYSTEM/COMPONENT TESTS 1991 ENGINE PERFORMANCE Ford Motor Co. - Ford/Merc
...
3/10/2009 http://www.eautorepair.net/app/PrintItems.asp?S0=2097152&S1=0&SG=%7B7DD6473C%2DB5BB%2D4F20%2D9D70%2D
...
Page 207 of 454
"J"
J/B
Junction Block
"K"
KAPWR
Keep Alive Power
k/ohms
kilo-ohms (1000 ohms)
kg
Kilograms (weight)
kg/cm
2
Kilograms Per Square Centimeter
KM/H
Kilometers Per Hour
KOEO
Key On, Engine Off
KOER
Ke y On , E n gin e R u n n in g
KS
Knock Sensor
kW
Kilowatt
kV
Kilovolt
"L"
L
Liter
lbs. (Lbs. when used in table)
Pounds
LCD
Liquid Crystal Display
L/D
Light Duty
LDP
Leak Detection Pump (Part of EVAP system.)
LED
Light Emitting Diode
LH
Left Hand
"M"
Page 9 of 15 MITCHELL 1 ARTICLE - GENERAL INFORMATION Commonly Used Abbreviations
3/10/2009 http://www.eautorepair.net/app/PrintItems.asp?S0=2097152&S1=0&SG=%7B9B990D68%2D660A%2D45E9%2D8F46%2DE
...
Page 303 of 454
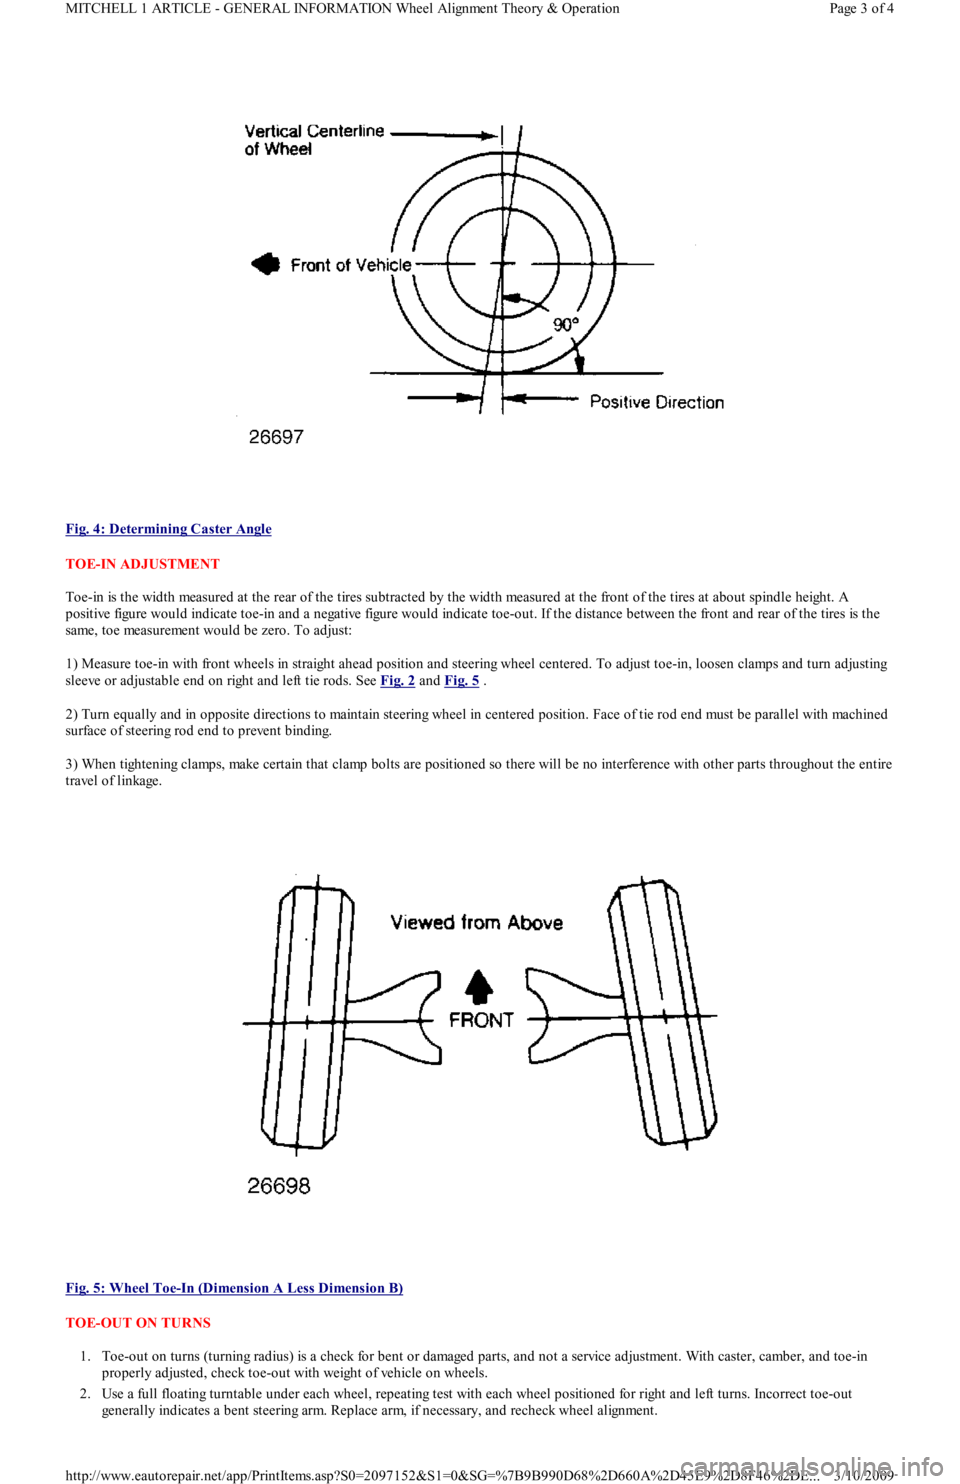
Fig. 4: Determining Caster Angle
TOE-IN ADJUSTMENT
Toe-in is the width measured at the rear of the tires subtracted by the width measured at the front of the tires at about spindle height. A
positive figure would indicate toe-in and a negative figure would indicate toe-out. If the distance between the front and rear of the tires is the
same, toe measurement would be zero. To adjust:
1) Measure toe-in with front wheels in straight ahead position and steering wheel centered. To adjust toe-in, loosen clamps and turn adjusting
sleeve or adjustable end on right and left tie rods. See Fig. 2
and Fig. 5 .
2) Turn equally and in opposite directions to maintain steering wheel in centered position. Face of tie rod end must be parallel with machined
surface of steering rod end to prevent binding.
3) When tightening clamps, make certain that clamp bolts are positioned so there will be no interference with other parts throughout the entire
travel of linkage.
Fig. 5: Wheel Toe
-In (Dimension A Less Dimension B)
TOE-OUT ON TURNS
1. Toe-out on turns (turning radius) is a check for bent or damaged parts, and not a service adjustment. With caster, camber, and toe-in
properly adjusted, check toe-out with weight of vehicle on wheels.
2. Use a full floating turntable under each wheel, repeating test with each wheel positioned for right and left turns. Incorrect toe-out
generally indicates a bent steering arm. Replace arm, if necessary, and recheck wheel alignment.
Page 3 of 4 MITCHELL 1 ARTICLE - GENERAL INFORMATION Wheel Alignment Theory & Operation
3/10/2009 http://www.eautorepair.net/app/PrintItems.asp?S0=2097152&S1=0&SG=%7B9B990D68%2D660A%2D45E9%2D8F46%2DE
...
Page 335 of 454
Back To Article
1991-92 AIR CONDIT IONING & HEAT ING
A/C System General Servicing
HANDLING/SAFETY PRECAUTIONS
1. Always work in a well-ventilated, clean area. Refrigerant R-134a is colorless and is invisible as a gas. Refrigerant (R-12 or R-134a) is
heavier than oxygen and will displace oxygen in a confined area. Avoid breathing refrigerant vapors. Exposure may irritate eyes, nose
and throat.
2. The system's high pressure can cause severe injury to eyes and skin if a hose were to burst. Always wear eye protection when working
around A/C system and refrigerant. If necessary, wear rubber gloves or other protective clothing.
3. Refrigerant evaporates quickly when exposed to atmosphere, freezing anything it contacts. If liquid refrigerant contacts eyes or skin, DO
NOT rub eyes or skin. Immediately flush affected area with cool water for 15 minutes and consult a doctor or hospital.
4. Never use R-134a in combination with compressed air for leak testing. Pressurized R-134a in the presence of oxygen (air concentrations
greater than 60% by volume) may form a combustible mixture. DO NOT introduce compressed air into R-134a containers (full or
empty), A/C system components or service equipment.
5. DO NOT expose A/C system components to high temperatures, steam cleaning for example, as excessive heat will cause
refrigerant/system pressure to increase. Never expose refrigerant directly to open flame. If refrigerant needs to be warmed, place bottom
of refrigerant tank in warm water. Water temperature MUST NOT exceed 125°F (52°C).
6. Use care when handling refrigerant containers. DO NOT drop, strike, puncture or incinerate containers. Use Department Of
Transportation (DOT) approved, DOT 4BW or DOT 4BA, refrigerant containers.
7. Never overfill refrigerant containers. The safe filling level of a refrigerant container MUST NOT exceed 60% of the container's gross
weight rating. Store refrigerant containers at temperature less than 125°F (52°C).
8. R-12 refrigerant (Freon) will be sold and stored in White containers, while R-134a refrigerant will be sold and stored in 30- or 50-
pound Light Blue containers.
9. R-12 and R-134a refrigerants must never be mixed, as their desiccants and lubricants are not compatible. If the refrigerants are mixed,
system cross-contamination or A/C system component failure may occur. Always use separate servicing and refrigerant
recovery/recycling equipment.
10. Follow equipment manufacturer instructions of all service equipment to be used. The Material Safety Data Sheet (MSDS), provided by
refrigerant manufacturer/suppliers, contains valuable information regarding the safe handling of R-12 or R-134a refrigerants.
IDENTIFYING R-134A SYSTEMS & COMPONENTS
To prevent refrigerant cross-contamination, use following methods to identify R-134a based systems and components.
Fittings & "O" Rings
All R-134a based A/C systems use 1/2" - 16 ACME threaded fittings (identifiable by square threads) and quick-connect service couplings. See
Fig. 1
. Besides the use of these fittings, most manufacturers will use Green colored "O" rings in R-134a systems. CAUT ION: When discharging air conditioning system , use only approved refrigerant recovery/recycling
equipm ent. Make every attem pt to avoid discharging refrigerant into the atm osphere.
Page 1 of 6 MITCHELL 1 ARTICLE - 1991-92 AIR CONDITIONING & HEATING A/C System General Servicing
3/10/2009 http://www.eautorepair.net/app/PrintItems.asp?S0=2097152&S1=0&SG=%7B9B990D68%2D660A%2D45E9%2D8F46%2DE
...
Page 338 of 454
compressor label before adding refrigerant oil to A/C compressor/system. See Fig. 2 . The following R-134a refrigerant oils are currently
available.
Lexus
PAG Refrigerant Oil (ND-OIL 8) with 10P/10PA swashplate (piston) compressor. Synthetic Refrigerant Oil (ND-OIL 9) with through-va n e
(rotary vane) compressor.
Mercedes-Benz
PAG Refrigerant Oil (001 989 08 03).
Nissan
PAG Refrigerant Oil (KLH00-PAGR0) with rotary vane compressor. PAG Refrigerant Oil (KLH00-PAGS0) with piston (swashplate)
compressor.
Saab
PAG Refrigerant Oil (40 74 787).
SERVICE EQUIPMENT
Because R-134a is not interchangeable with R-12, separate sets of hoses, manifold gauge set and recovery/recycling equipment are required to
service vehicles. This is necessary to avoid cross-contaminating and damaging system.
All equipment used to service systems using R-134a must meet SAE standard J1991. The service hoses on the manifold gauge set must have
manual (turn wheel) or automatic back-flow valves at the service port connector ends. This will prevent refrigerant from being released into
the atmosphere.
For identification purposes, R-134a service hoses must have a Black stripe along its length and be clearly labeled SAE J2196/R-134a. The low
pressure test hose is Blue with a Black stripe. The high pressure test hose is Red with a Black stripe, and the center test hose is Yellow with a
Black stripe.
R-134a manifold gauge sets can be identified by one or all of the following.
Labeled FOR USE WITH R-134a on set
Labeled HFC-134 or R-134a on gauge face
Light Blue color on gauge face
In addition, pressure/temperature scales on R-134a gauge sets are different from R-12 manifold gauge sets.
SYSTEM SERVICE VALVES
SCHRADER-TYPE VALVES
Schrader valve is similar in construction and operation to a tire valve. When a test gauge hose with built-in valve core depressor is attached,
Schrader stem is pushed inward to the open position and allows system pressure to reach gauge.
If test hose does not have a built-in core depressor, an adapter must be used. Never attach hose or adapter to Schrader valve unless it is first
connected to manifold gauge set.
Refrigerant R-12 Schrader-type valve cores have TV5 thread size. Refrigerant R-134a Schrader-type valve cores use M6 (Metric) threads. R-
134a valve cores can be easily identified by use of "O" rings and external spring. See Fig. 1
.
SERVICE VALVE LOCATIONS
SERVICE VALVE LOCATIONS NOTE:Synthetic/PAG oils absorb m oisture very rapidly, 2.3-5.6% by weight, as com pared to a m ineral oil
absorption rate of .005% by weight.
NOTE:Refrigerant R-12 service hoses will ONLY be labeled SAE J2196.
NOTE:Although sim ilar in construction and operation to a tire valve, NEVER replace a Schrader-type valve
with a tire valve.
VehicleHighLow
Audi(14) (15)
Acura(2) (3)
BMW(4) (5)
Chrysler, Eagle & Mitsubishi
Colt, Mirage & Summit(10) (11)
Colt Vista & Summit Wagon(10) (11)
Diamante(1) (1)
Eclipse & Expo(10) (11)
Galant(10) (11)
Page 4 of 6 MITCHELL 1 ARTICLE - 1991-92 AIR CONDITIONING & HEATING A/C System General Servicing
3/10/2009 http://www.eautorepair.net/app/PrintItems.asp?S0=2097152&S1=0&SG=%7B9B990D68%2D660A%2D45E9%2D8F46%2DE
...
Page 392 of 454
WHEEL BEARINGS
Wheel bearing preload is maintained by a selective spacer in the steering knuckle, between the inner and outer hub bearings. For adjustment
procedures and inspection, see WHEEL BEARING under REMOVAL & INSTALLATION.
BALL JOINT CHECKING
Raise and support vehicle until tire is just off ground. Move wheel vertically and check for play. If play is noticed between steering knuckle
and control arm, control arm assembly should be replaced. If play is present but ball joint is okay, wheel bearings should be checked for wear
and replaced if necessary.
REMOVAL & INSTALLATION
STABILIZER BAR
Removal & Installation (Festiva)
1. Remove stabilizer mounting bracket nuts and brackets. Remove split bushings from stabilizer bar. Remove stabilizer bushing nuts at
lower control arms. Remove rear dished washers and bushings.
2. To loosen stabilizer bar, pull forward from control arms. Remove front bushings and washers. Install control arm bushing washers on
ends of stabilizer and install control arm front bushings. Insert ends of stabilizer bar into control arm bushings and install rear bushings
and washers on stabilizer bar ends.
3. Install retaining nuts finger tight. Install split bushings on stabilizer cross bar with split side forward. Position split bushings next to
White locating marks on bar. Install stabilizer mounting brackets. Tighten all bolts and nuts to specification.
STRUT ASSEMBLY & COIL SPRING
Removal
1. Raise and support front of vehicle so struts are fully extended. Remove front wheels. Remove brake line clip from strut lower mounting
bracket and remove brake line.
2. Remove 2 bolts retaining strut lower bracket to steering knuckle. Working inside engine compartment, remove 2 nuts retaining strut
mounting block in strut tower. Disengage strut lower bracket from steering knuckle and lower strut from vehicle.
Disassembly & Reassembly
1. Using spring compressor, compress spring to unload strut. Pry out mounting block cap and remove strut upper nut and lock washer.
2. Remove strut mounting block and spacer plate. Remove washer, bearing seal and bearing from strut rod. Remove spring upper seat, seat
insulator and coil spring. Remove jounce bumper and dust shield from strut. Reverse disassembly procedure to install coil spring a n d
reassemble strut.
Installation
1. Position strut, with spacer plate installed, in strut tower with White alignment mark facing outward. Install and tighten nuts on upper
mounting block studs.
2. Install steering knuckle in strut lower bracket. To complete installation, reverse removal procedure. Tighten all bolts and nuts to
specification.
HUB & KNUCKLE ASSEMBLY
Removal
1. Raise and support vehicle. Remove wheel. Straighten staked edge of drive axle lock nut flange. DO NOT damage groove or threads in
end of drive axle. Apply brakes to prevent hub assembly from turning. Remove and discard drive axle lock nut.
2. Remove clip which secures brake hose to strut bracket. Remove cotter pin and tie rod end attaching nut. Using Tie Rod End Separator
(T85M-3395A), remove tie rod end from steering knuckle.
3. Remove brake caliper attaching bolts and remove assembly from steering knuckle. Do not allow caliper to hang by brake hose. Remove
clamp bolt and nut where lower control arm ball joint connects to steering knuckle.
4. Using a pry bar, pull down on lower control arm and release ball joint from steering knuckle. Remove 2 bolts which attach steering
knuckle between flanges of MacPherson strut bracket. Slide hub/knuckle assembly off end of drive axle. If binding is present or drive
hub is rusted to half-shaft, use a hub puller to push axle from drive hub.
Installation
1. Apply a thin coat of SAE 30 weight oil to drive axle splines. Slide steering knuckle/rotor/hub assembly onto drive axle. Stop at area
where uppermost arm of steering knuckle seats into MacPherson strut bracket.
2. To complete installation, reverse removal procedure. Install NEW drive axle lock nut. Tighten all bolts and nuts to specification. Stake
axle lock nut into shaft groove.
WHEEL BEARING NOTE:Inform ation for stabilizer bar rem oval and installation on Capri is not available from m anufacturer.
NOTE:Always use a new drive axle lock nut when servicing drive hub or drive axle.
CAUT ION: DO NOT use a pointed tool to stake nut. If lock nut flange cracks, even slightly, during staking process,
it m ust be replaced.
Page 2 of 5 MITCHELL 1 ARTICLE - SUSPENSION - FRONT 1991-92 SUSPENSION Front
3/10/2009 http://www.eautorepair.net/app/PrintItems.asp?S0=2097152&S1=0&SG=%7B9B990D68%2D660A%2D45E9%2D8F46%2DE
...