FORD FREESTAR 2006 1.G Owners Manual
Manufacturer: FORD, Model Year: 2006, Model line: FREESTAR, Model: FORD FREESTAR 2006 1.GPages: 320, PDF Size: 3.59 MB
Page 171 of 320
Installing child safety seats with combination lap and shoulder
belts
Airbags can kill or injure a child in a child seat.NEVERplace a
rear-facing child seat in front of an active airbag. If you must use
a forward-facing child seat in the front seat, move the seat all the way
back.
Children 12 and under should be properly restrained in the rear
seat whenever possible.
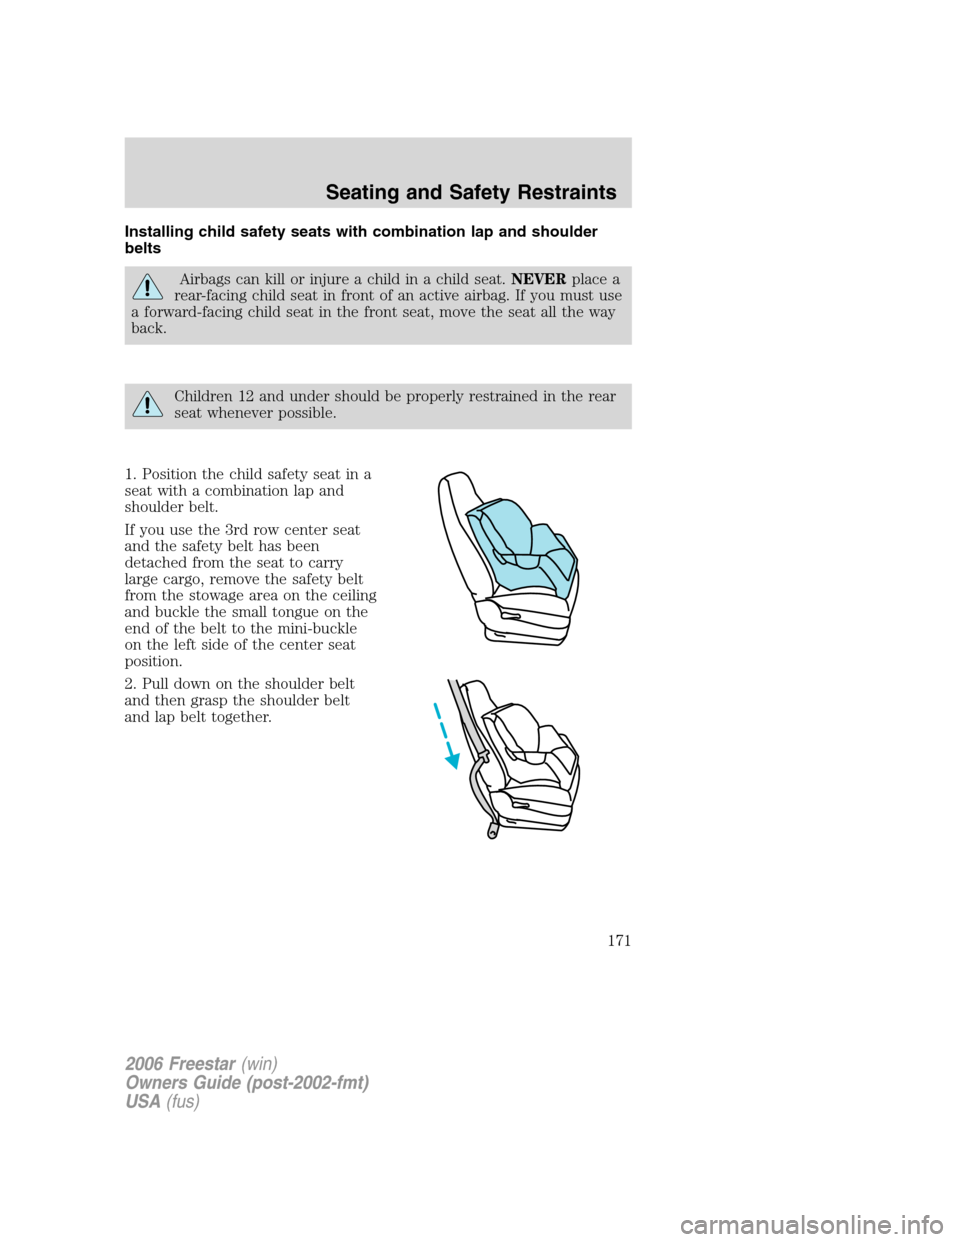
1. Position the child safety seat in a
seat with a combination lap and
shoulder belt.
If you use the 3rd row center seat
and the safety belt has been
detached from the seat to carry
large cargo, remove the safety belt
from the stowage area on the ceiling
and buckle the small tongue on the
end of the belt to the mini-buckle
on the left side of the center seat
position.
2. Pull down on the shoulder belt
and then grasp the shoulder belt
and lap belt together.
2006 Freestar(win)
Owners Guide (post-2002-fmt)
USA(fus)
Seating and Safety Restraints
171
Page 172 of 320
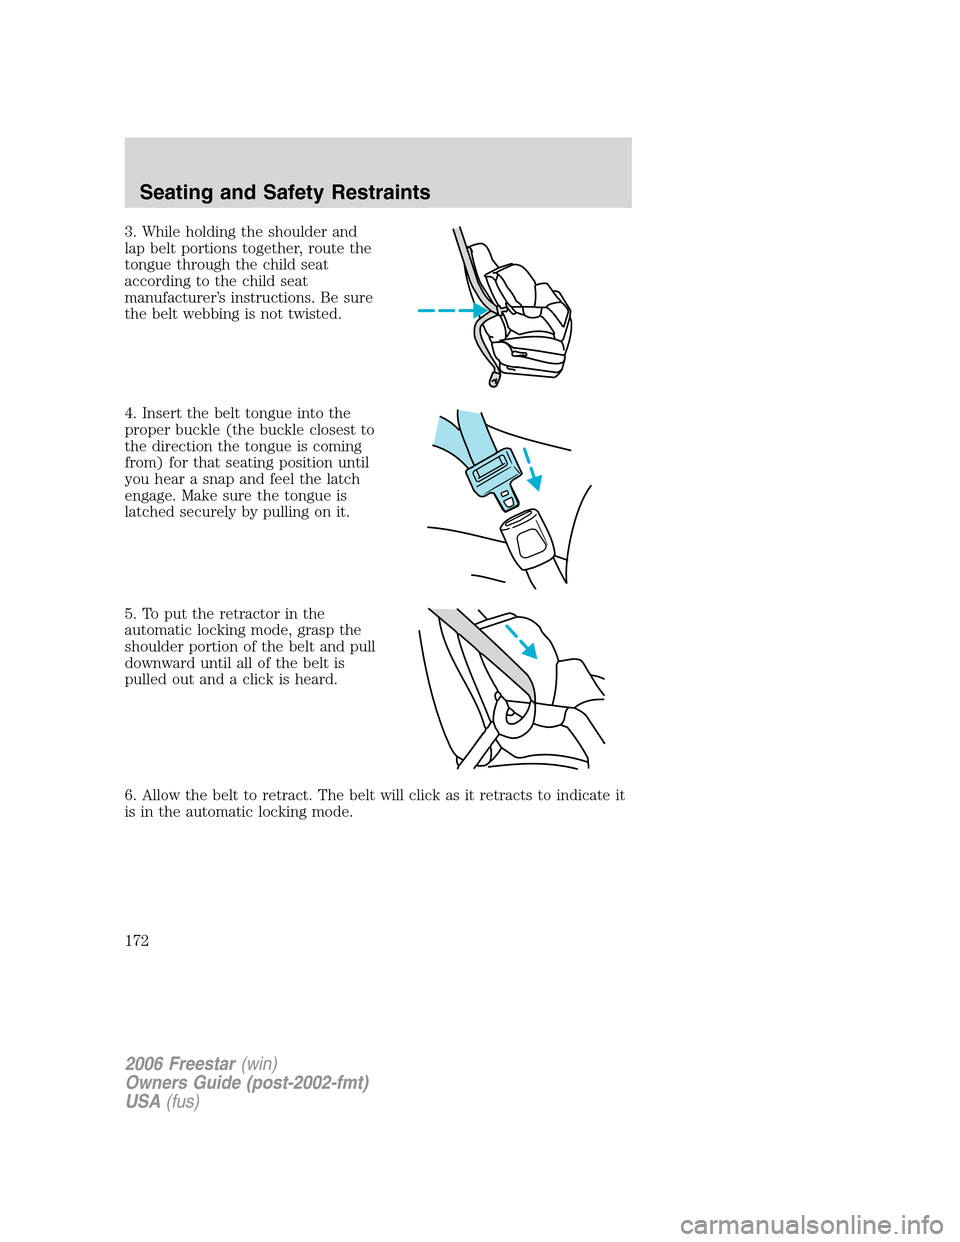
3. While holding the shoulder and
lap belt portions together, route the
tongue through the child seat
according to the child seat
manufacturer’s instructions. Be sure
the belt webbing is not twisted.
4. Insert the belt tongue into the
proper buckle (the buckle closest to
the direction the tongue is coming
from) for that seating position until
you hear a snap and feel the latch
engage. Make sure the tongue is
latched securely by pulling on it.
5. To put the retractor in the
automatic locking mode, grasp the
shoulder portion of the belt and pull
downward until all of the belt is
pulled out and a click is heard.
6. Allow the belt to retract. The belt will click as it retracts to indicate it
is in the automatic locking mode.
2006 Freestar(win)
Owners Guide (post-2002-fmt)
USA(fus)
Seating and Safety Restraints
172
Page 173 of 320
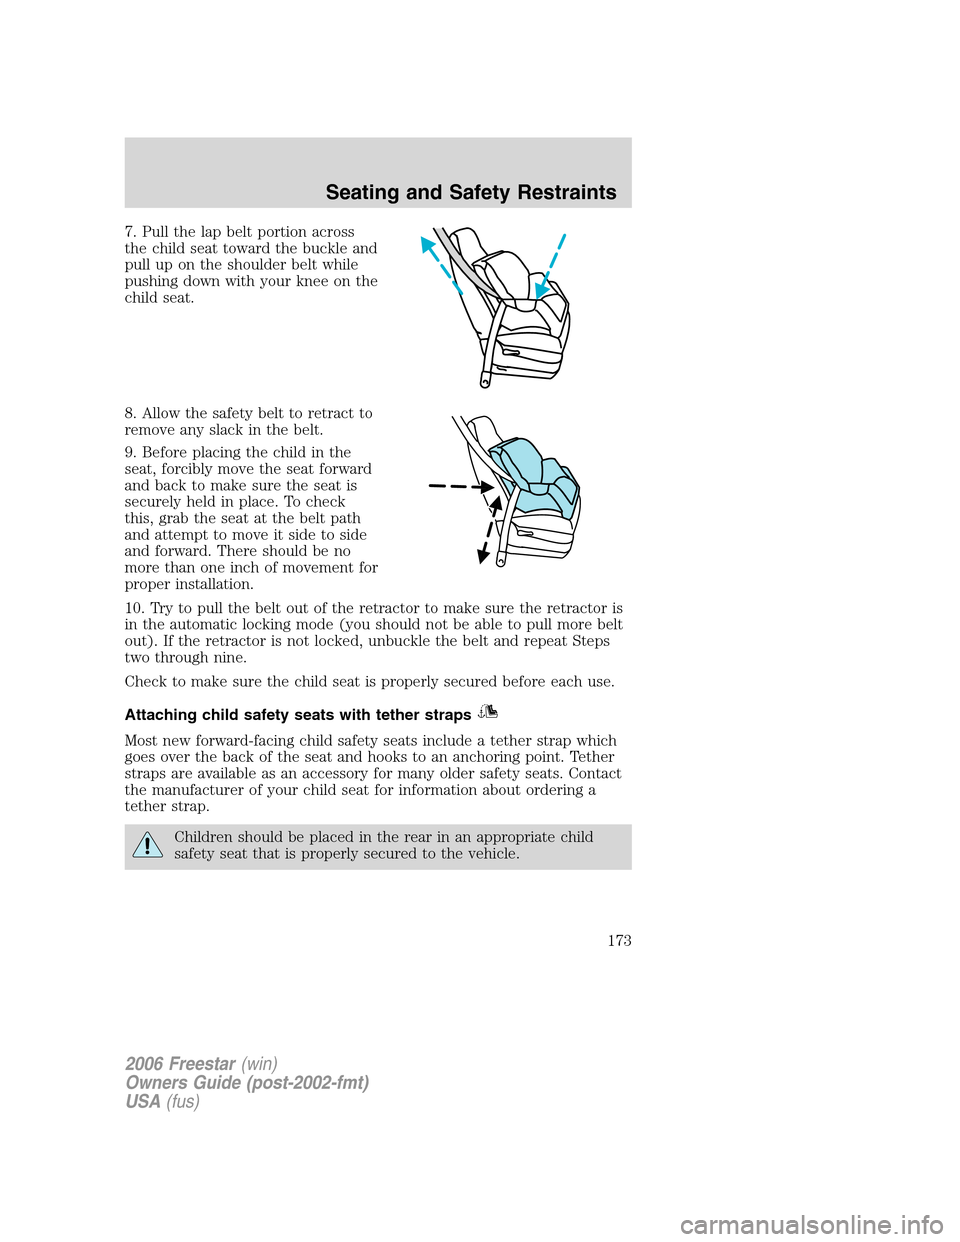
7. Pull the lap belt portion across
the child seat toward the buckle and
pull up on the shoulder belt while
pushing down with your knee on the
child seat.
8. Allow the safety belt to retract to
remove any slack in the belt.
9. Before placing the child in the
seat, forcibly move the seat forward
and back to make sure the seat is
securely held in place. To check
this, grab the seat at the belt path
and attempt to move it side to side
and forward. There should be no
more than one inch of movement for
proper installation.
10. Try to pull the belt out of the retractor to make sure the retractor is
in the automatic locking mode (you should not be able to pull more belt
out). If the retractor is not locked, unbuckle the belt and repeat Steps
two through nine.
Check to make sure the child seat is properly secured before each use.
Attaching child safety seats with tether straps
Most new forward-facing child safety seats include a tether strap which
goes over the back of the seat and hooks to an anchoring point. Tether
straps are available as an accessory for many older safety seats. Contact
the manufacturer of your child seat for information about ordering a
tether strap.
Children should be placed in the rear in an appropriate child
safety seat that is properly secured to the vehicle.
2006 Freestar(win)
Owners Guide (post-2002-fmt)
USA(fus)
Seating and Safety Restraints
173
Page 174 of 320
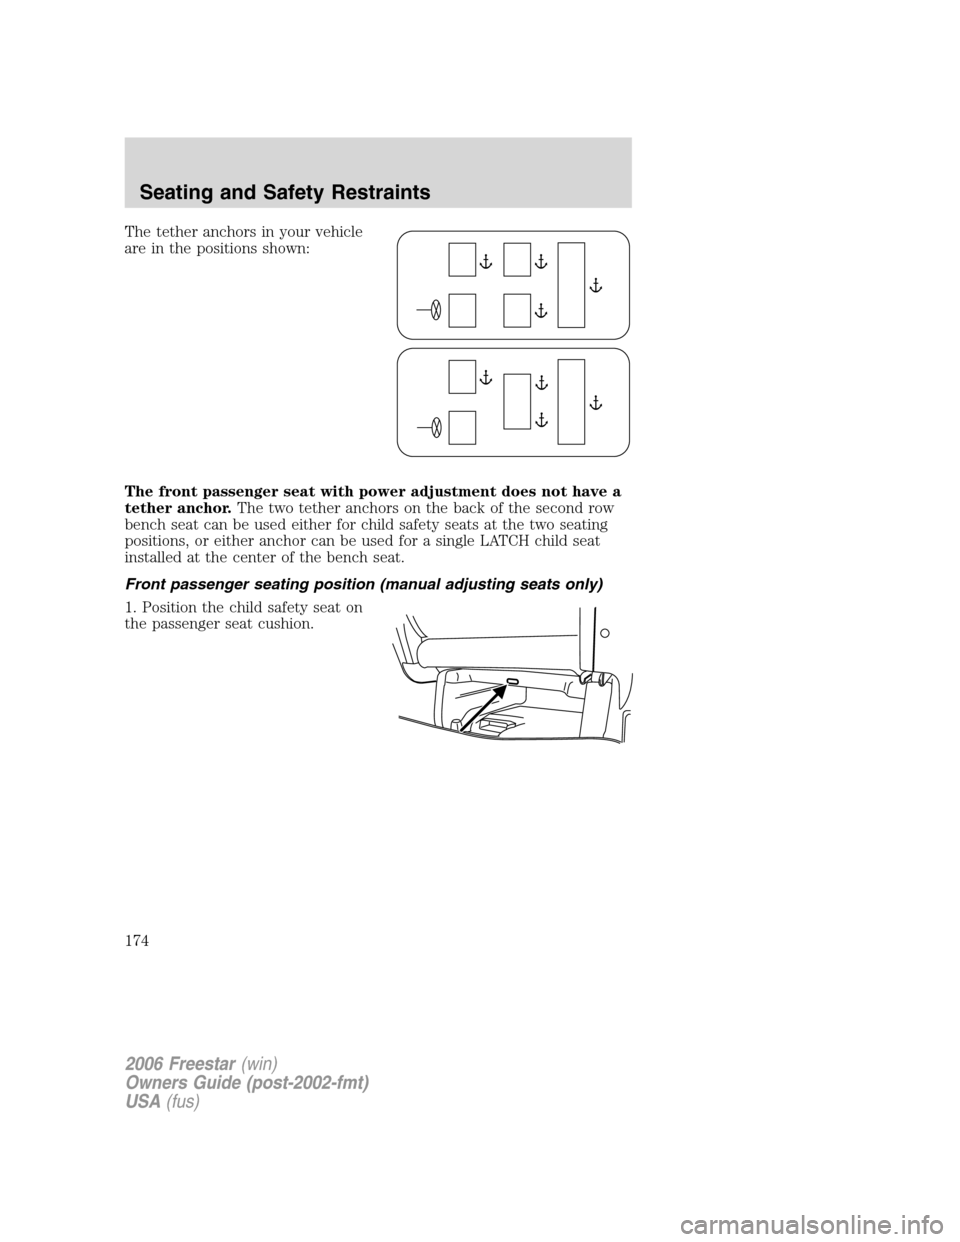
The tether anchors in your vehicle
are in the positions shown:
The front passenger seat with power adjustment does not have a
tether anchor.The two tether anchors on the back of the second row
bench seat can be used either for child safety seats at the two seating
positions, or either anchor can be used for a single LATCH child seat
installed at the center of the bench seat.
Front passenger seating position (manual adjusting seats only)
1. Position the child safety seat on
the passenger seat cushion.
2006 Freestar(win)
Owners Guide (post-2002-fmt)
USA(fus)
Seating and Safety Restraints
174
Page 175 of 320
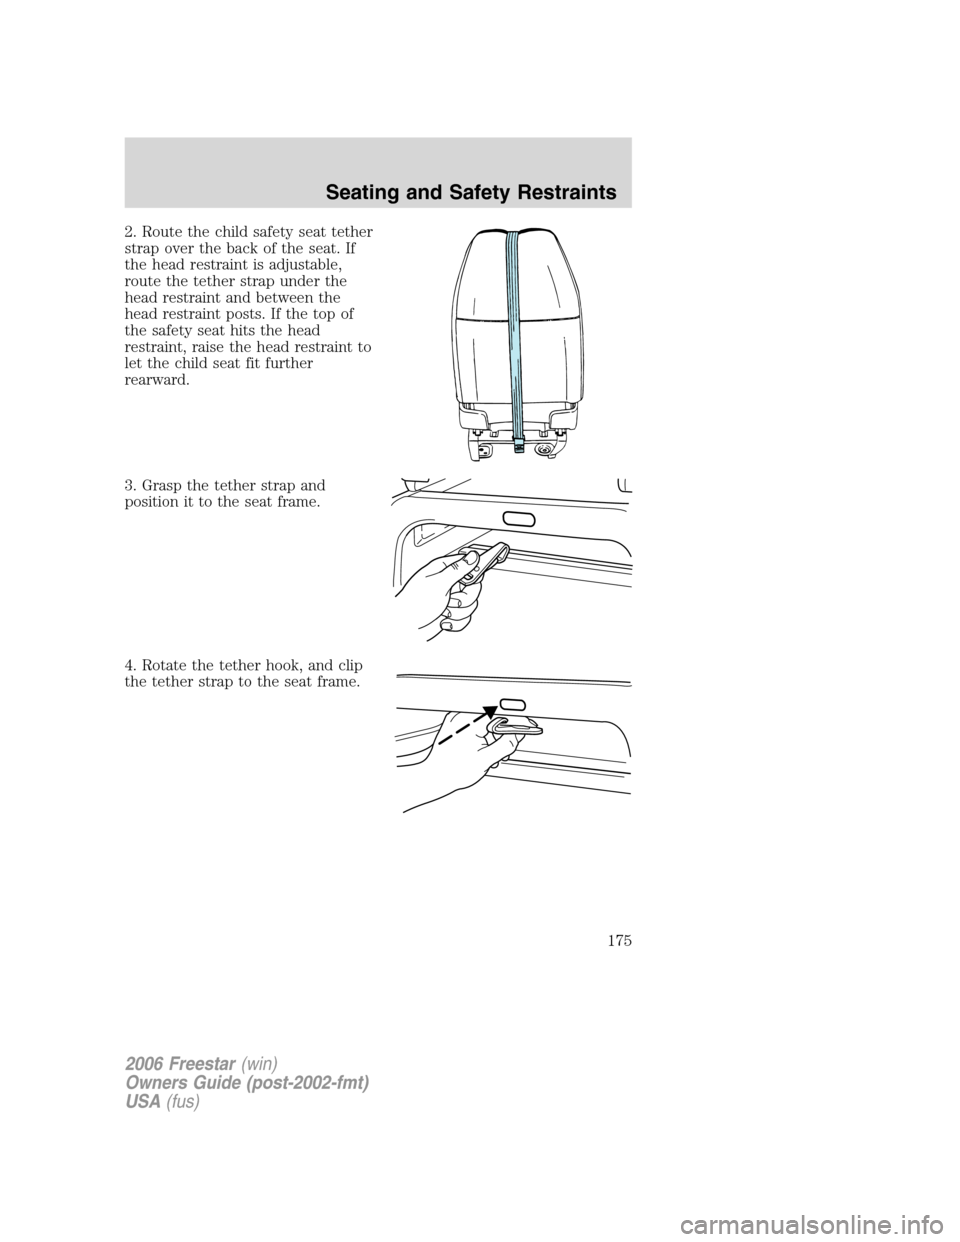
2. Route the child safety seat tether
strap over the back of the seat. If
the head restraint is adjustable,
route the tether strap under the
head restraint and between the
head restraint posts. If the top of
the safety seat hits the head
restraint, raise the head restraint to
let the child seat fit further
rearward.
3. Grasp the tether strap and
position it to the seat frame.
4. Rotate the tether hook, and clip
the tether strap to the seat frame.
2006 Freestar(win)
Owners Guide (post-2002-fmt)
USA(fus)
Seating and Safety Restraints
175
Page 176 of 320
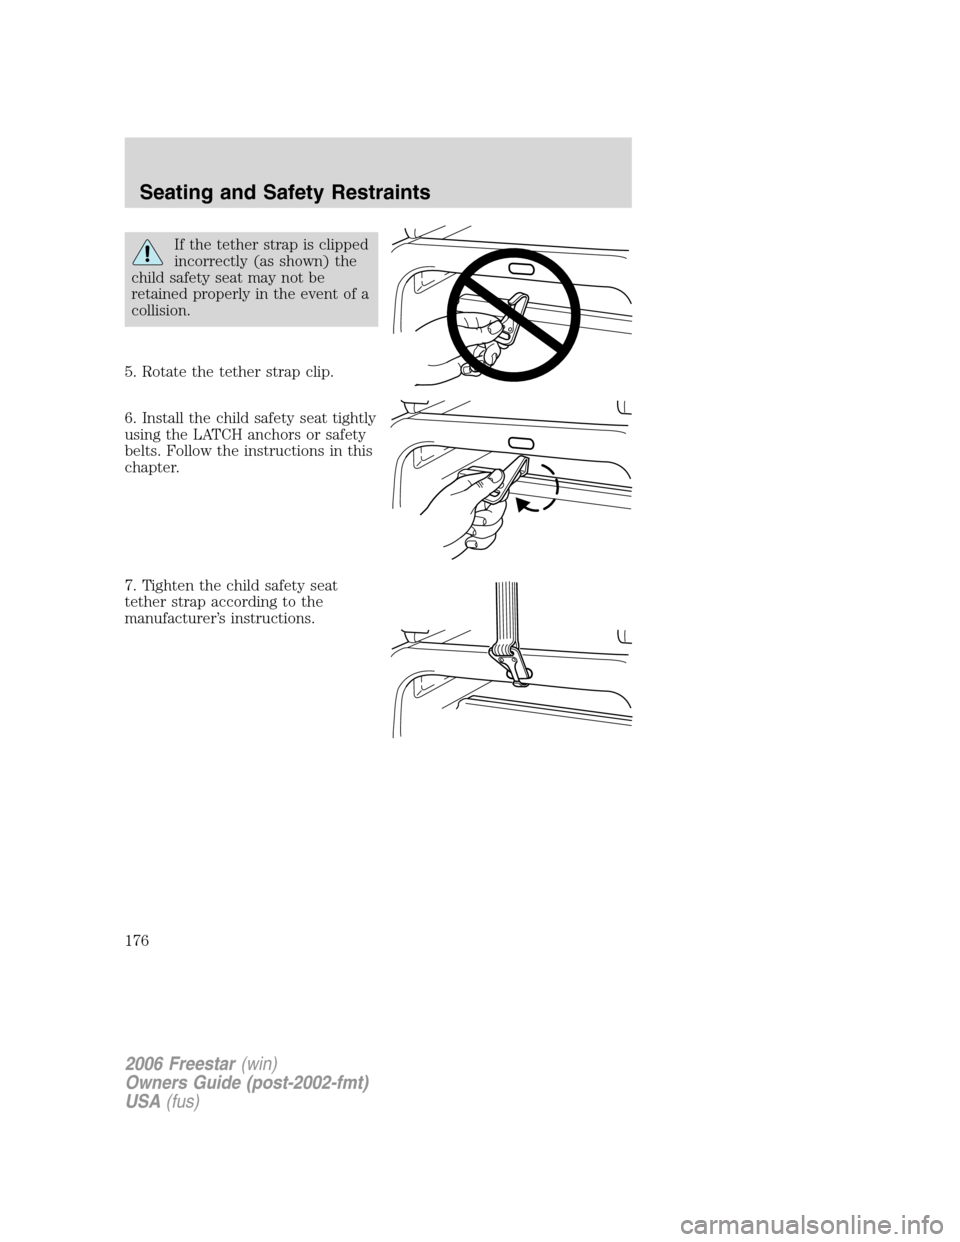
If the tether strap is clipped
incorrectly (as shown) the
child safety seat may not be
retained properly in the event of a
collision.
5. Rotate the tether strap clip.
6. Install the child safety seat tightly
using the LATCH anchors or safety
belts. Follow the instructions in this
chapter.
7. Tighten the child safety seat
tether strap according to the
manufacturer’s instructions.
2006 Freestar(win)
Owners Guide (post-2002-fmt)
USA(fus)
Seating and Safety Restraints
176
Page 177 of 320
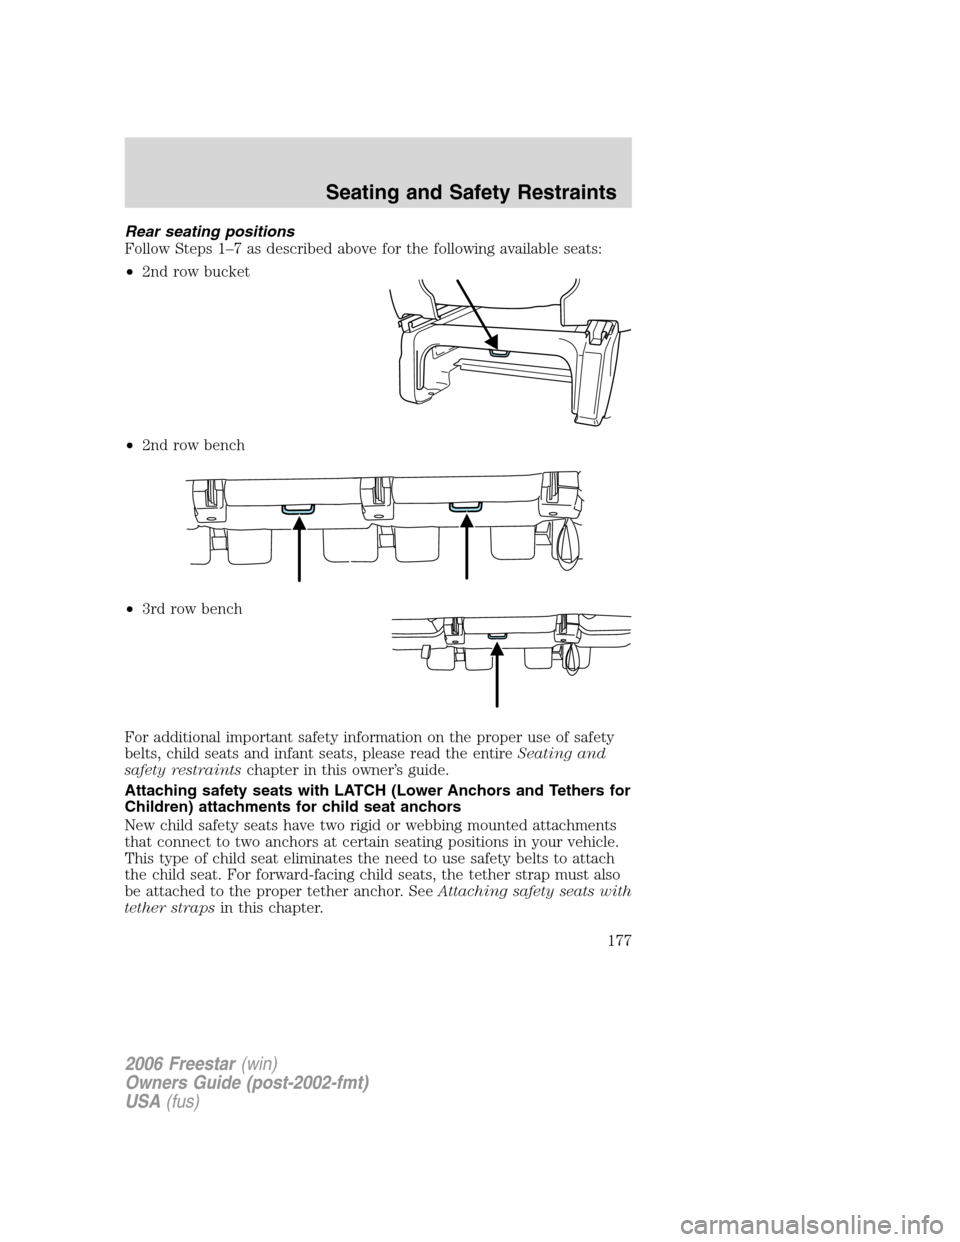
Rear seating positions
Follow Steps 1–7 as described above for the following available seats:
•2nd row bucket
•2nd row bench
•3rd row bench
For additional important safety information on the proper use of safety
belts, child seats and infant seats, please read the entireSeating and
safety restraintschapter in this owner’s guide.
Attaching safety seats with LATCH (Lower Anchors and Tethers for
Children) attachments for child seat anchors
New child safety seats have two rigid or webbing mounted attachments
that connect to two anchors at certain seating positions in your vehicle.
This type of child seat eliminates the need to use safety belts to attach
the child seat. For forward-facing child seats, the tether strap must also
be attached to the proper tether anchor. SeeAttaching safety seats with
tether strapsin this chapter.
2006 Freestar(win)
Owners Guide (post-2002-fmt)
USA(fus)
Seating and Safety Restraints
177
Page 178 of 320
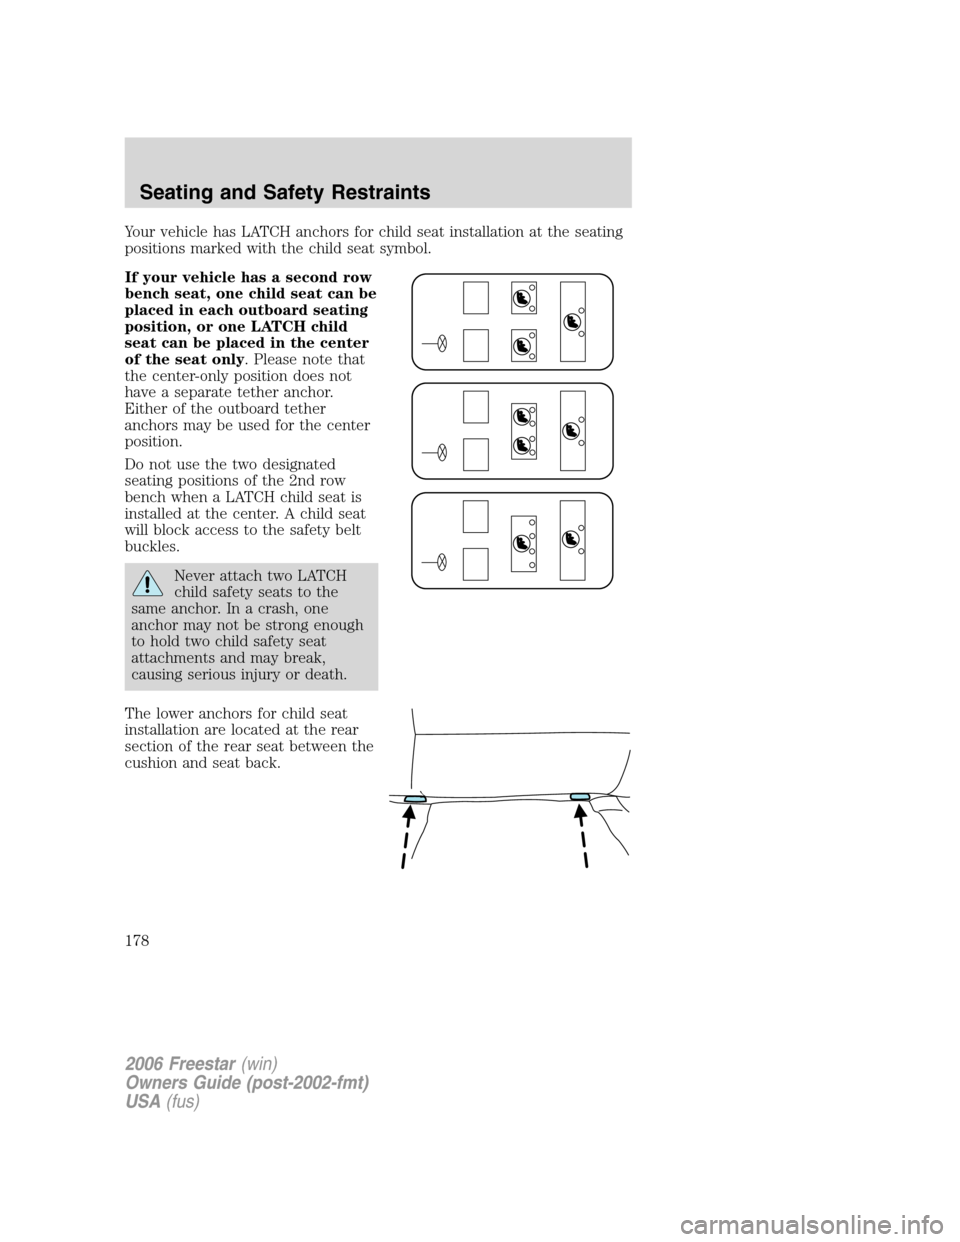
Your vehicle has LATCH anchors for child seat installation at the seating
positions marked with the child seat symbol.
If your vehicle has a second row
bench seat, one child seat can be
placed in each outboard seating
position, or one LATCH child
seat can be placed in the center
of the seat only. Please note that
the center-only position does not
have a separate tether anchor.
Either of the outboard tether
anchors may be used for the center
position.
Do not use the two designated
seating positions of the 2nd row
bench when a LATCH child seat is
installed at the center. A child seat
will block access to the safety belt
buckles.
Never attach two LATCH
child safety seats to the
same anchor. In a crash, one
anchor may not be strong enough
to hold two child safety seat
attachments and may break,
causing serious injury or death.
The lower anchors for child seat
installation are located at the rear
section of the rear seat between the
cushion and seat back.
2006 Freestar(win)
Owners Guide (post-2002-fmt)
USA(fus)
Seating and Safety Restraints
178
Page 179 of 320
Follow the child seat manufacturer’s instructions to properly install a
child seat with LATCH attachments.
Attach LATCH lower attachments of the child seat only to the
anchors shown.
If you install a child seat with rigid LATCH attachments, do not tighten
the tether strap enough to lift the child seat off the vehicle seat cushion
when the child is seated in it. Keep the tether strap just snug without
lifting the front of the child seat. Keeping the child seat just touching the
vehicle seat gives the best protection in a severe crash. Adjusting the
seat back angle may allow the tether strap to be tight without lifting the
child seat.
Each time you use the safety seat, check that the seat is properly
attached to the lower anchors and tether anchor. Try to tilt the child
seat from side to side. Also try to tug the seat forward. Check to see if
the anchors hold the seat in place.
If the safety seat is not anchored properly, the risk of a child
being injured in a crash greatly increases.
2006 Freestar(win)
Owners Guide (post-2002-fmt)
USA(fus)
Seating and Safety Restraints
179
Page 180 of 320
INFORMATION ABOUT UNIFORM TIRE QUALITY GRADING
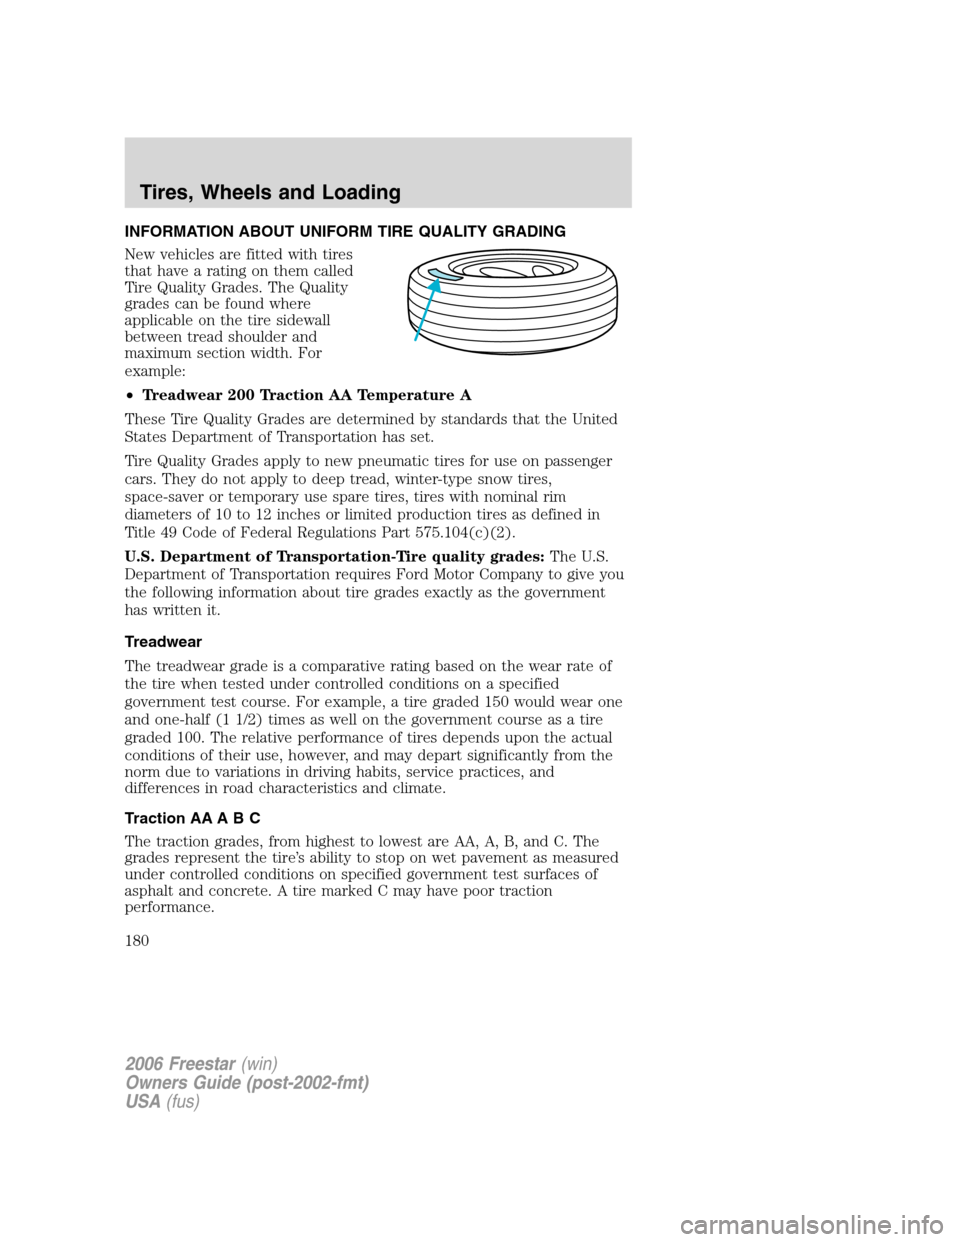
New vehicles are fitted with tires
that have a rating on them called
Tire Quality Grades. The Quality
grades can be found where
applicable on the tire sidewall
between tread shoulder and
maximum section width. For
example:
•Treadwear 200 Traction AA Temperature A
These Tire Quality Grades are determined by standards that the United
States Department of Transportation has set.
Tire Quality Grades apply to new pneumatic tires for use on passenger
cars. They do not apply to deep tread, winter-type snow tires,
space-saver or temporary use spare tires, tires with nominal rim
diameters of 10 to 12 inches or limited production tires as defined in
Title 49 Code of Federal Regulations Part 575.104(c)(2).
U.S. Department of Transportation-Tire quality grades:The U.S.
Department of Transportation requires Ford Motor Company to give you
the following information about tire grades exactly as the government
has written it.
Treadwear
The treadwear grade is a comparative rating based on the wear rate of
the tire when tested under controlled conditions on a specified
government test course. For example, a tire graded 150 would wear one
and one-half (1 1/2) times as well on the government course as a tire
graded 100. The relative performance of tires depends upon the actual
conditions of their use, however, and may depart significantly from the
norm due to variations in driving habits, service practices, and
differences in road characteristics and climate.
Traction AA A B C
The traction grades, from highest to lowest are AA, A, B, and C. The
grades represent the tire’s ability to stop on wet pavement as measured
under controlled conditions on specified government test surfaces of
asphalt and concrete. A tire marked C may have poor traction
performance.
2006 Freestar(win)
Owners Guide (post-2002-fmt)
USA(fus)
Tires, Wheels and Loading
180