headlamp FORD FUSION (AMERICAS) 2014 2.G User Guide
[x] Cancel search | Manufacturer: FORD, Model Year: 2014, Model line: FUSION (AMERICAS), Model: FORD FUSION (AMERICAS) 2014 2.GPages: 458, PDF Size: 27.89 MB
Page 140 of 458
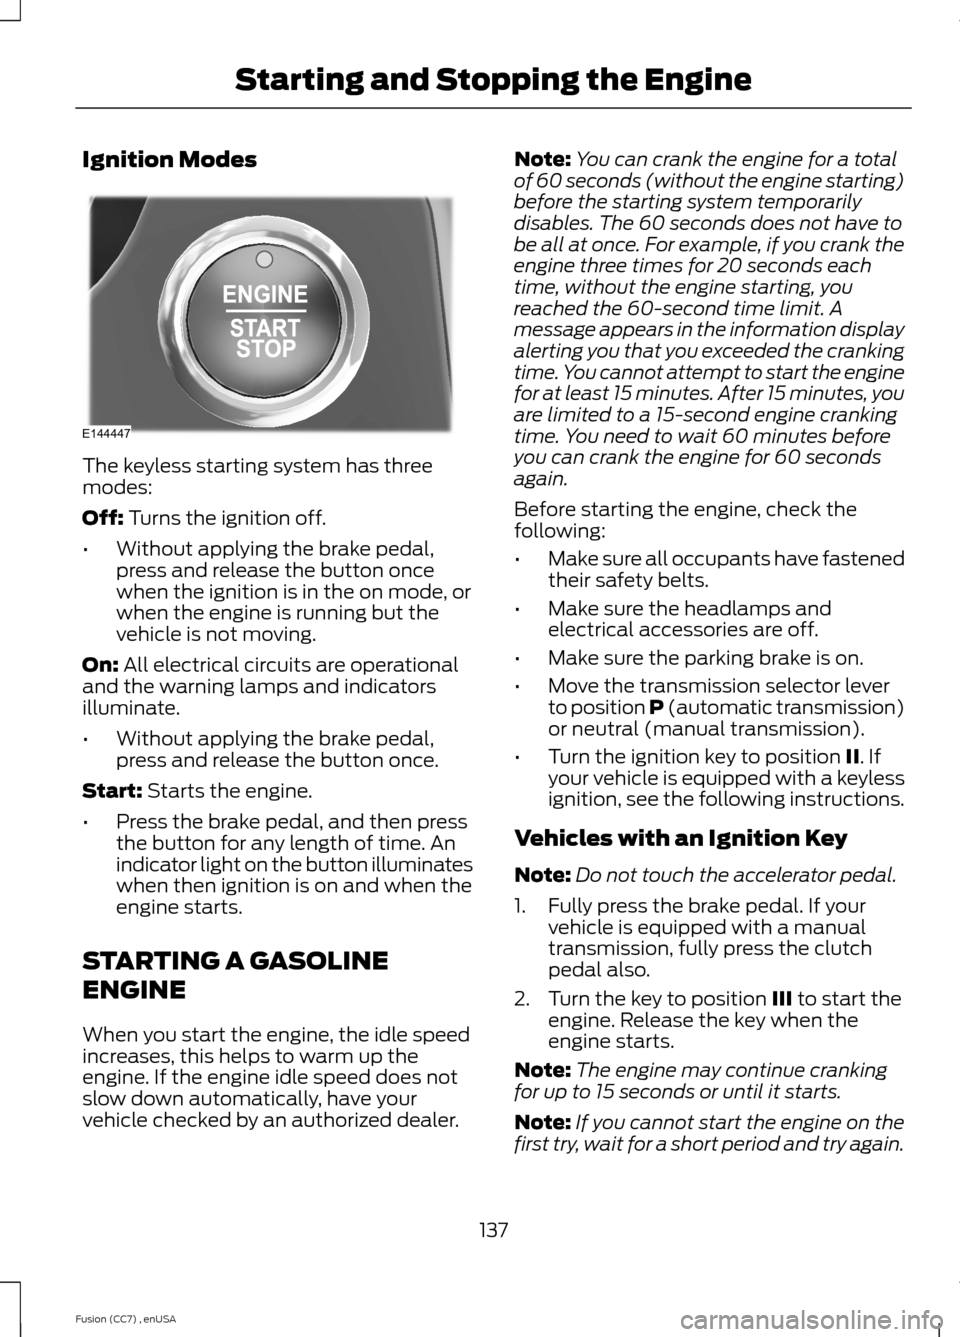
Ignition Modes
The keyless starting system has threemodes:
Off: Turns the ignition off.
•Without applying the brake pedal,press and release the button oncewhen the ignition is in the on mode, orwhen the engine is running but thevehicle is not moving.
On: All electrical circuits are operationaland the warning lamps and indicatorsilluminate.
•Without applying the brake pedal,press and release the button once.
Start: Starts the engine.
•Press the brake pedal, and then pressthe button for any length of time. Anindicator light on the button illuminateswhen then ignition is on and when theengine starts.
STARTING A GASOLINE
ENGINE
When you start the engine, the idle speedincreases, this helps to warm up theengine. If the engine idle speed does notslow down automatically, have yourvehicle checked by an authorized dealer.
Note:You can crank the engine for a totalof 60 seconds (without the engine starting)before the starting system temporarilydisables. The 60 seconds does not have tobe all at once. For example, if you crank theengine three times for 20 seconds eachtime, without the engine starting, youreached the 60-second time limit. Amessage appears in the information displayalerting you that you exceeded the crankingtime. You cannot attempt to start the enginefor at least 15 minutes. After 15 minutes, youare limited to a 15-second engine crankingtime. You need to wait 60 minutes beforeyou can crank the engine for 60 secondsagain.
Before starting the engine, check thefollowing:
•Make sure all occupants have fastenedtheir safety belts.
•Make sure the headlamps andelectrical accessories are off.
•Make sure the parking brake is on.
•Move the transmission selector leverto position P (automatic transmission)or neutral (manual transmission).
•Turn the ignition key to position II. Ifyour vehicle is equipped with a keylessignition, see the following instructions.
Vehicles with an Ignition Key
Note:Do not touch the accelerator pedal.
1.Fully press the brake pedal. If yourvehicle is equipped with a manualtransmission, fully press the clutchpedal also.
2.Turn the key to position III to start theengine. Release the key when theengine starts.
Note:The engine may continue crankingfor up to 15 seconds or until it starts.
Note:If you cannot start the engine on thefirst try, wait for a short period and try again.
137Fusion (CC7) , enUSAStarting and Stopping the EngineE144447
Page 192 of 458
•Low
•Medium
•High
System Display
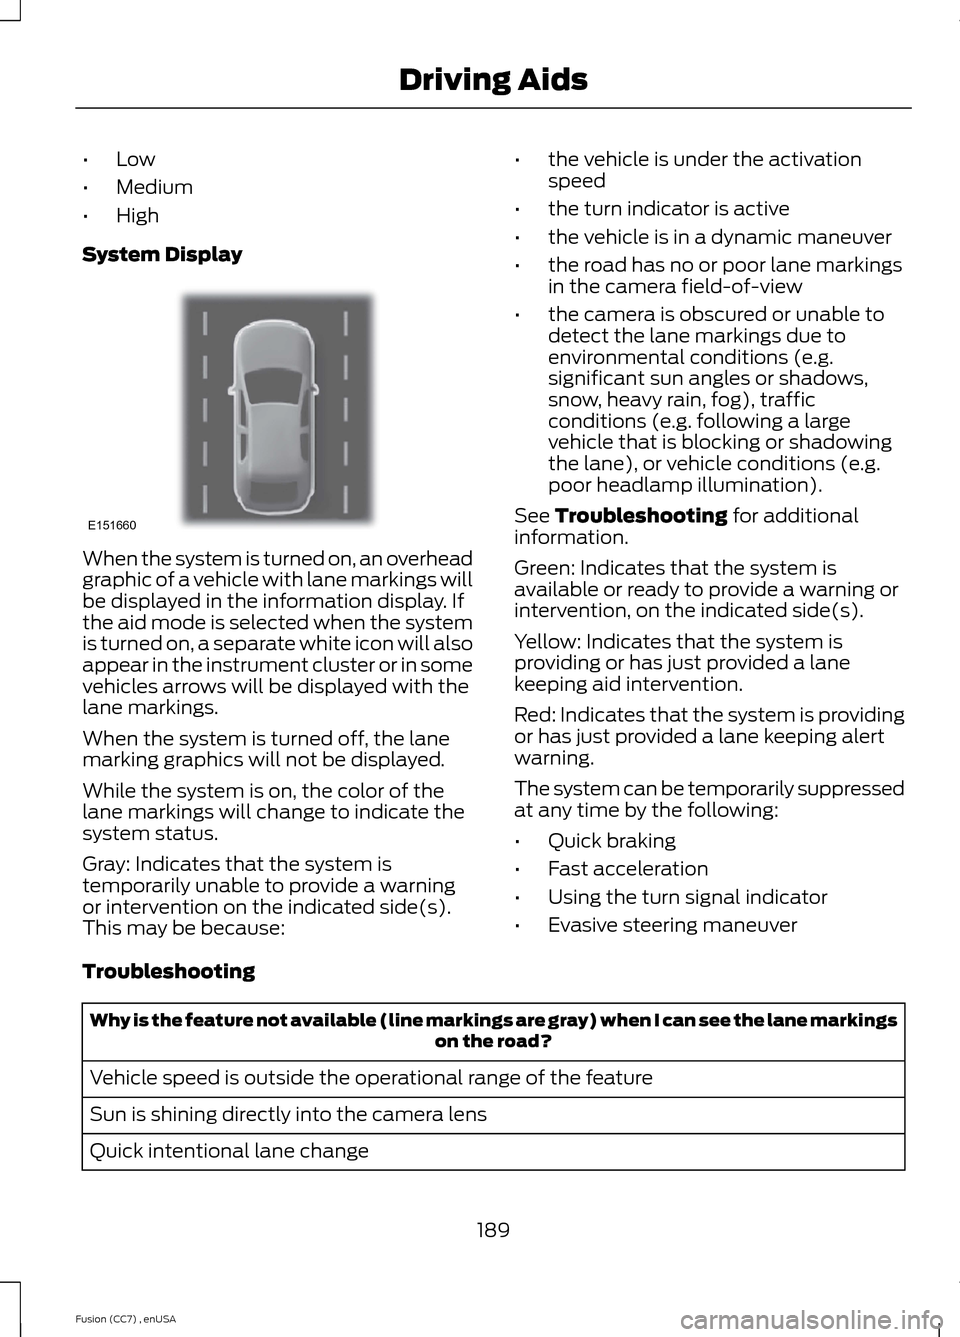
When the system is turned on, an overheadgraphic of a vehicle with lane markings willbe displayed in the information display. Ifthe aid mode is selected when the systemis turned on, a separate white icon will alsoappear in the instrument cluster or in somevehicles arrows will be displayed with thelane markings.
When the system is turned off, the lanemarking graphics will not be displayed.
While the system is on, the color of thelane markings will change to indicate thesystem status.
Gray: Indicates that the system istemporarily unable to provide a warningor intervention on the indicated side(s).This may be because:
•the vehicle is under the activationspeed
•the turn indicator is active
•the vehicle is in a dynamic maneuver
•the road has no or poor lane markingsin the camera field-of-view
•the camera is obscured or unable todetect the lane markings due toenvironmental conditions (e.g.significant sun angles or shadows,snow, heavy rain, fog), trafficconditions (e.g. following a largevehicle that is blocking or shadowingthe lane), or vehicle conditions (e.g.poor headlamp illumination).
See Troubleshooting for additionalinformation.
Green: Indicates that the system isavailable or ready to provide a warning orintervention, on the indicated side(s).
Yellow: Indicates that the system isproviding or has just provided a lanekeeping aid intervention.
Red: Indicates that the system is providingor has just provided a lane keeping alertwarning.
The system can be temporarily suppressedat any time by the following:
•Quick braking
•Fast acceleration
•Using the turn signal indicator
•Evasive steering maneuver
Troubleshooting
Why is the feature not available (line markings are gray) when I can see the lane markingson the road?
Vehicle speed is outside the operational range of the feature
Sun is shining directly into the camera lens
Quick intentional lane change
189Fusion (CC7) , enUSADriving AidsE151660
Page 201 of 458
ActionCause
Clean the grille surface in front of the radaror remove the object causing the obstruc-tion
The surface of the radar in the grille is dirtyor obstructed in some way
Wait a short time. It may take severalminutes for the radar to detect that it is nolonger obstructed
The surface of the radar in the grille is cleanbut the message remains in the display
The collision warning system is temporarilydisabled. Collision warning should automat-ically reactivate a short time after theweather conditions improve
Heavy rain, spray, snow, or fog is interferingwith the radar signals
The collision warning system is temporarilydisabled. Collision warning should automat-ically reactivate a short time after theweather conditions improve
Swirling water, or snow or ice on the surfaceof the road may interfere with the radarsignals
System Limitations
WARNING
The collision warning system’s brakesupport can only help reduce thespeed at which a collision occurs ifthe driver applies the vehicle’s brakes. Thebrake pedal must be pressed just like anytypical braking situation.
Due to the nature of radar technology,there may be certain instances wherevehicles do not provide a collision warning.These include:
•Stationary vehicles or vehicles movingbelow 6 mph (10 km/h).
•Pedestrians or objects in the roadway.
•Oncoming vehicles in the same lane.
•Severe weather conditions (seeblocked sensor section).
•Debris build-up on the grille near theheadlamps (see blocked sensorsection).
•Small distance to vehicle ahead.
•Steering wheel and pedal movementsare large (very active driving style).
•
If the front end of the vehicle is hit ordamaged, the radar sensing zone may bealtered causing missed or false collisionwarnings. See your authorized dealer tohave your collision warning radar checkedfor proper coverage and operation.
198Fusion (CC7) , enUSADriving Aids
Page 251 of 458
Note:Make sure that the wiper blade locksinto place. Lower the wiper arm and bladeback to the windshield. The wiper arms willautomatically return to their normal positionwhen the ignition is turned on.
Replace wiper blades at least once peryear for optimum performance.
Poor wiper quality can be improved bycleaning the wiper blades and thewindshield.
ADJUSTING THE HEADLAMPS
Vertical Aim Adjustment
The headlamps on your vehicle areproperly aimed at the assembly plant. Ifyour vehicle has been in an accident, thealignment of your headlamps should bechecked by your authorized dealer.
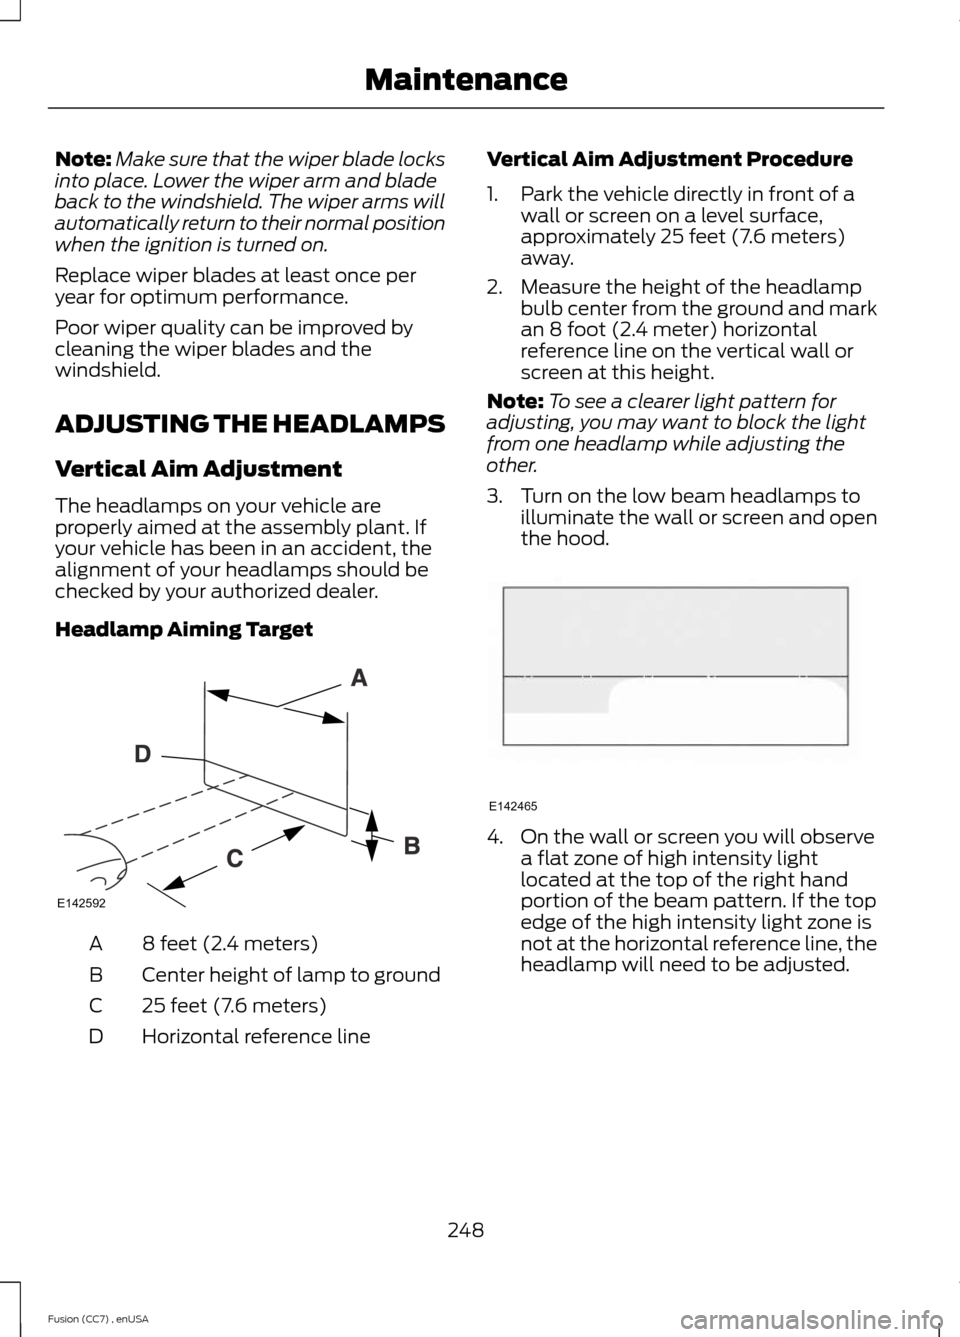
Headlamp Aiming Target
8 feet (2.4 meters)A
Center height of lamp to groundB
25 feet (7.6 meters)C
Horizontal reference lineD
Vertical Aim Adjustment Procedure
1.Park the vehicle directly in front of awall or screen on a level surface,approximately 25 feet (7.6 meters)away.
2.Measure the height of the headlampbulb center from the ground and markan 8 foot (2.4 meter) horizontalreference line on the vertical wall orscreen at this height.
Note:To see a clearer light pattern foradjusting, you may want to block the lightfrom one headlamp while adjusting theother.
3.Turn on the low beam headlamps toilluminate the wall or screen and openthe hood.
4.On the wall or screen you will observea flat zone of high intensity lightlocated at the top of the right handportion of the beam pattern. If the topedge of the high intensity light zone isnot at the horizontal reference line, theheadlamp will need to be adjusted.
248Fusion (CC7) , enUSAMaintenanceE142592 E142465
Page 252 of 458
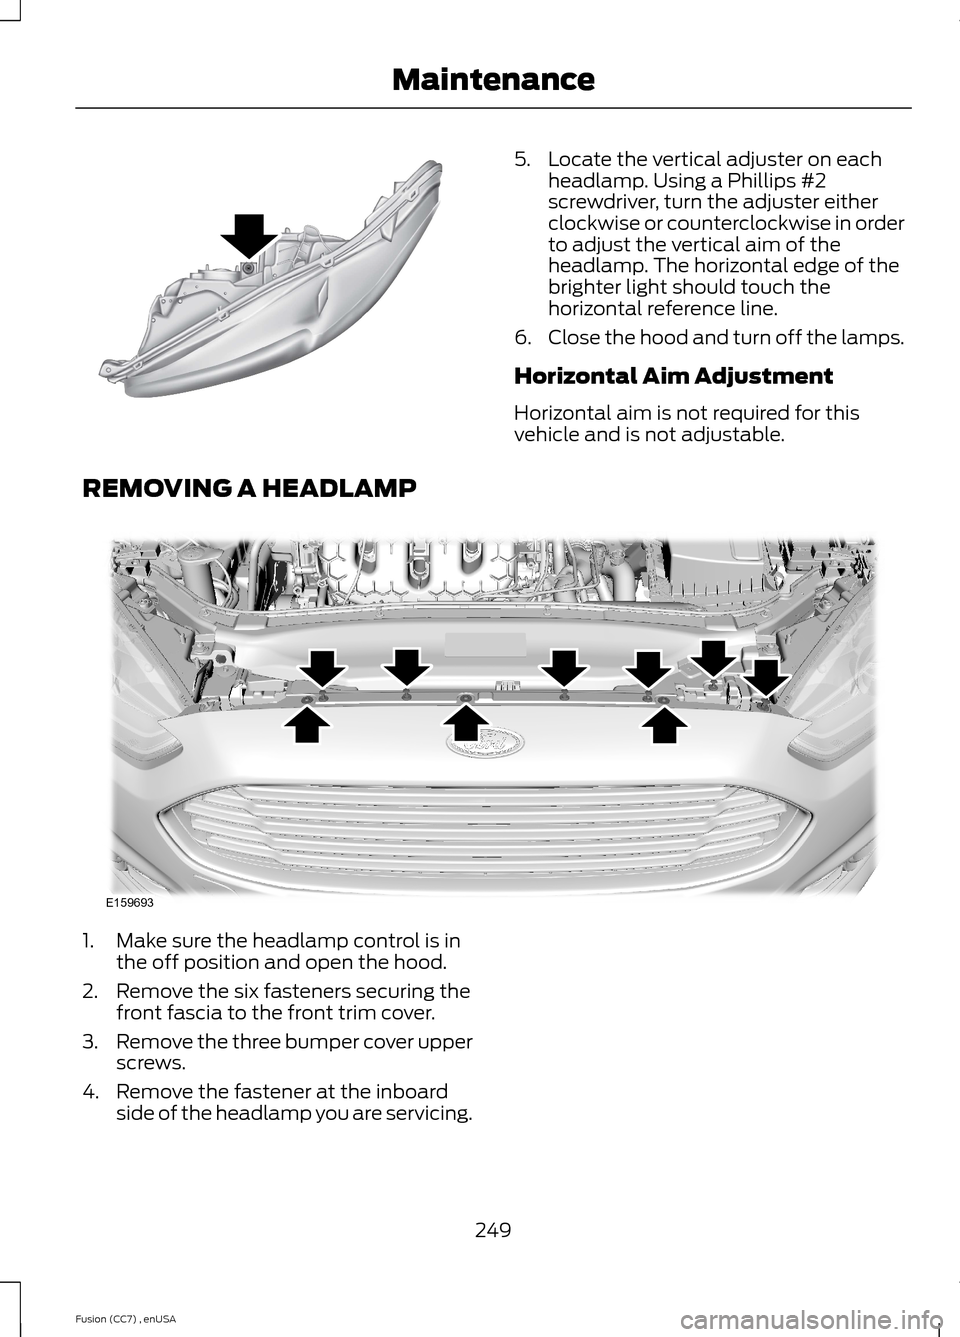
5.Locate the vertical adjuster on eachheadlamp. Using a Phillips #2screwdriver, turn the adjuster eitherclockwise or counterclockwise in orderto adjust the vertical aim of theheadlamp. The horizontal edge of thebrighter light should touch thehorizontal reference line.
6.Close the hood and turn off the lamps.
Horizontal Aim Adjustment
Horizontal aim is not required for thisvehicle and is not adjustable.
REMOVING A HEADLAMP
1.Make sure the headlamp control is inthe off position and open the hood.
2.Remove the six fasteners securing thefront fascia to the front trim cover.
3.Remove the three bumper cover upperscrews.
4.Remove the fastener at the inboardside of the headlamp you are servicing.
249Fusion (CC7) , enUSAMaintenanceE145594 E159693
Page 253 of 458
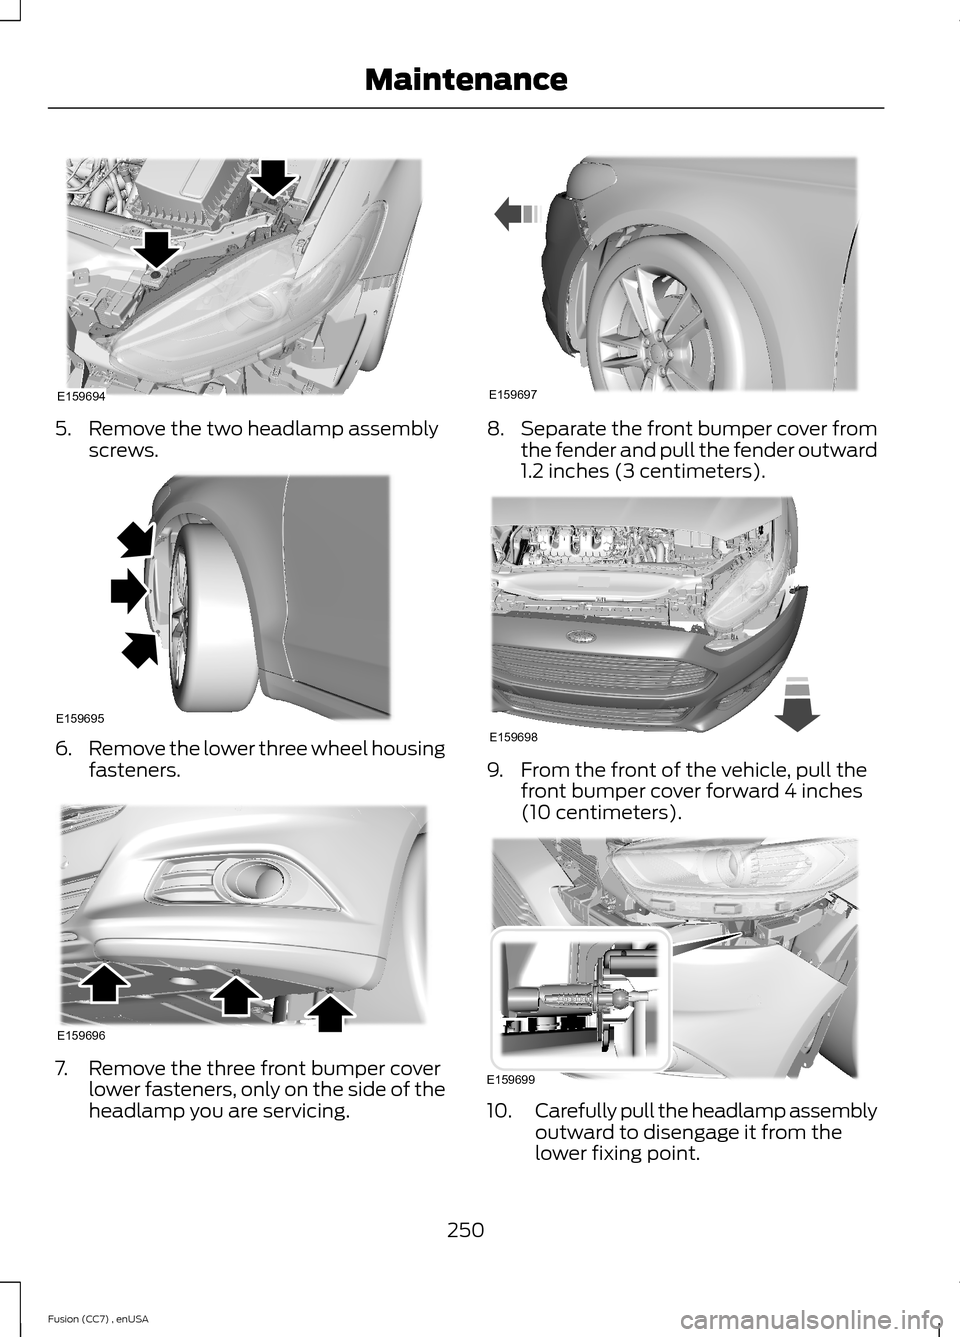
5.Remove the two headlamp assemblyscrews.
6.Remove the lower three wheel housingfasteners.
7.Remove the three front bumper coverlower fasteners, only on the side of theheadlamp you are servicing.
8.Separate the front bumper cover fromthe fender and pull the fender outward1.2 inches (3 centimeters).
9.From the front of the vehicle, pull thefront bumper cover forward 4 inches(10 centimeters).
10.Carefully pull the headlamp assemblyoutward to disengage it from thelower fixing point.
250Fusion (CC7) , enUSAMaintenanceE159694 E159695 E159696 E159697 E159698 E159699
Page 254 of 458
11.Carefully lift the headlamp andremove it from the vehicle.
12.Disconnect the electrical connector.
CHANGING A BULB
Lamp Assembly Condensation
Exterior lamps are vented toaccommodate normal changes in pressure.Condensation can be a natural by-productof this design. When moist air enters thelamp assembly through the vents, there isa possibility that condensation can occurwhen the temperature is cold. Whennormal condensation occurs, a thin film ofmist can form on the interior of the lens.The thin mist eventually clears and exitsthrough the vents during normal operation.Clearing time may take as long as 48 hoursunder dry weather conditions.
Examples of acceptable condensation are:
•Presence of thin mist (no streaks, dripmarks or droplets).
•Fine mist covers less than 50% of thelens.
Examples of unacceptable moisture(usually caused by a lamp water leak) are:
•Water puddle inside the lamp.
•Large water droplets, drip marks orstreaks present on the interior of thelens.
Take your vehicle to an authorized dealerfor service if any of the above conditionsof unacceptable moisture are present.
Replacing the Headlamp Bulbs
WARNING
Handle a halogen headlamp bulbcarefully and keep out of children’sreach. Grasp the bulb by only itsplastic base and do not touch the glass.The oil from your hand could cause thebulb to break the next time the headlampsare operated.
Note:If the bulb is accidentally touched, itshould be cleaned with rubbing alcoholbefore being used.
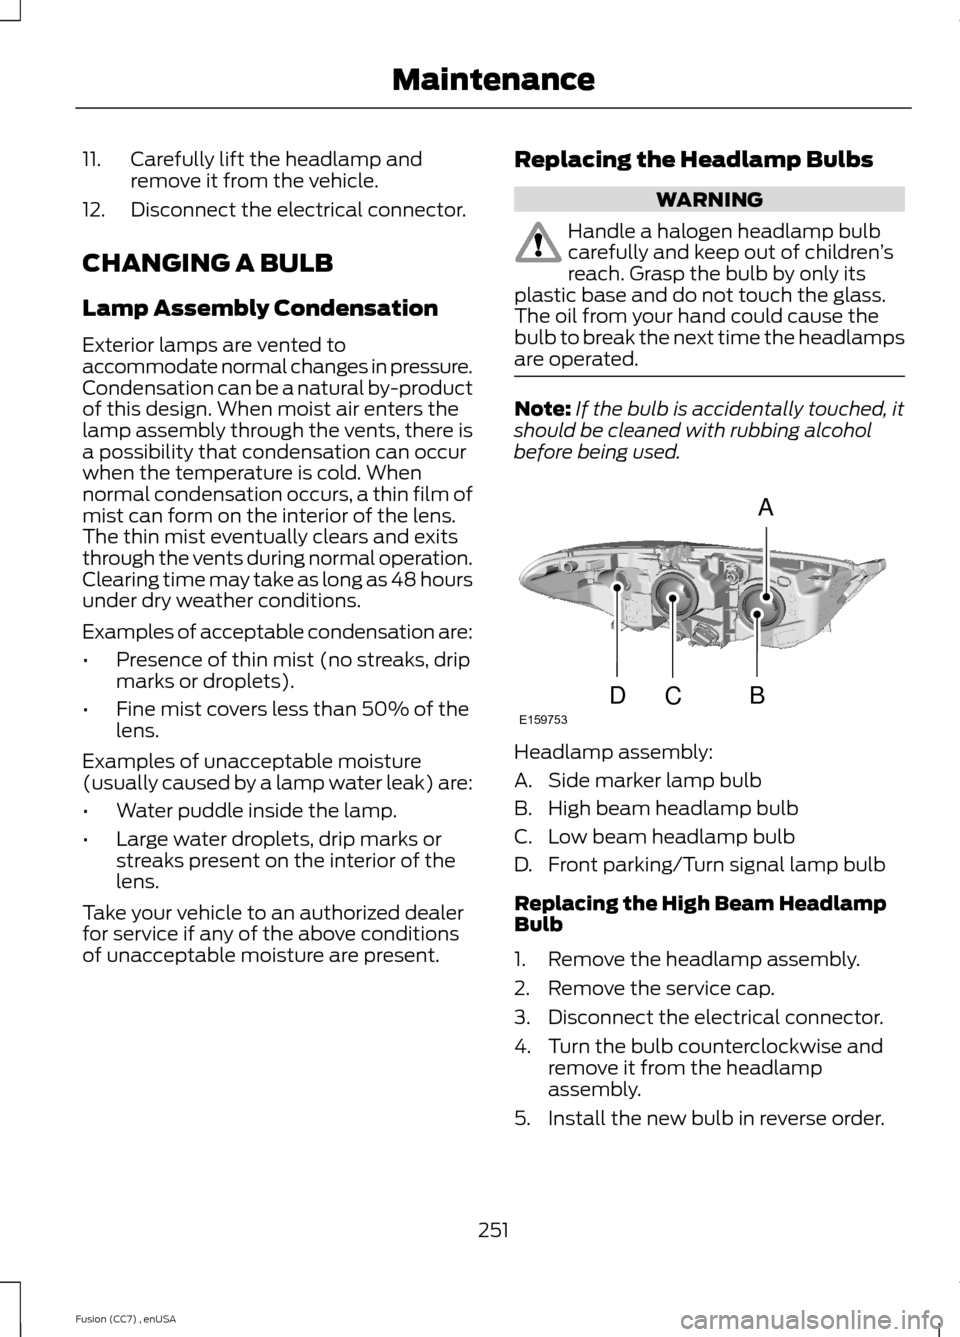
Headlamp assembly:
A.Side marker lamp bulb
B.High beam headlamp bulb
C.Low beam headlamp bulb
D.Front parking/Turn signal lamp bulb
Replacing the High Beam HeadlampBulb
1.Remove the headlamp assembly.
2.Remove the service cap.
3.Disconnect the electrical connector.
4.Turn the bulb counterclockwise andremove it from the headlampassembly.
5.Install the new bulb in reverse order.
251Fusion (CC7) , enUSAMaintenanceABCDE159753
Page 255 of 458
Replacing the Low Beam HeadlampBulb
1.Remove the headlamp assembly.
2.Remove the service cap.
3.Disconnect the electrical connector.
4.Release the retainer spring and removeit from the headlamp assembly.
5.Install the new bulb in reverse order.
Replacing the Front Parking/TurnSignal Lamp Bulb
1.Remove the headlamp assembly.
2.Turn the bulb assemblycounterclockwise and remove it fromthe headlamp assembly.
3.Separate the bulb from the bulbsocket.
4.Install the new bulb in reverse order.
Replacing the Side Marker Lamp Bulb
1.Remove the headlamp assembly.
2.Remove the service cap.
3.Depress the tabs on the socket andremove the socket and bulb together.
4.Separate the bulb from the bulbsocket.
5.Install the new bulb in reverse order.
Replacing the Tail, Brake, High-Mount Brake Lamp, and TurnSignal Lamp Bulbs
These lamps are designed with LED lightsources. For replacement, see yourauthorized dealer.
Replacing a Reverse Lamp Bulb
1.Make sure the lighting control is in theoff position.
2.Open the trunk deck lid.
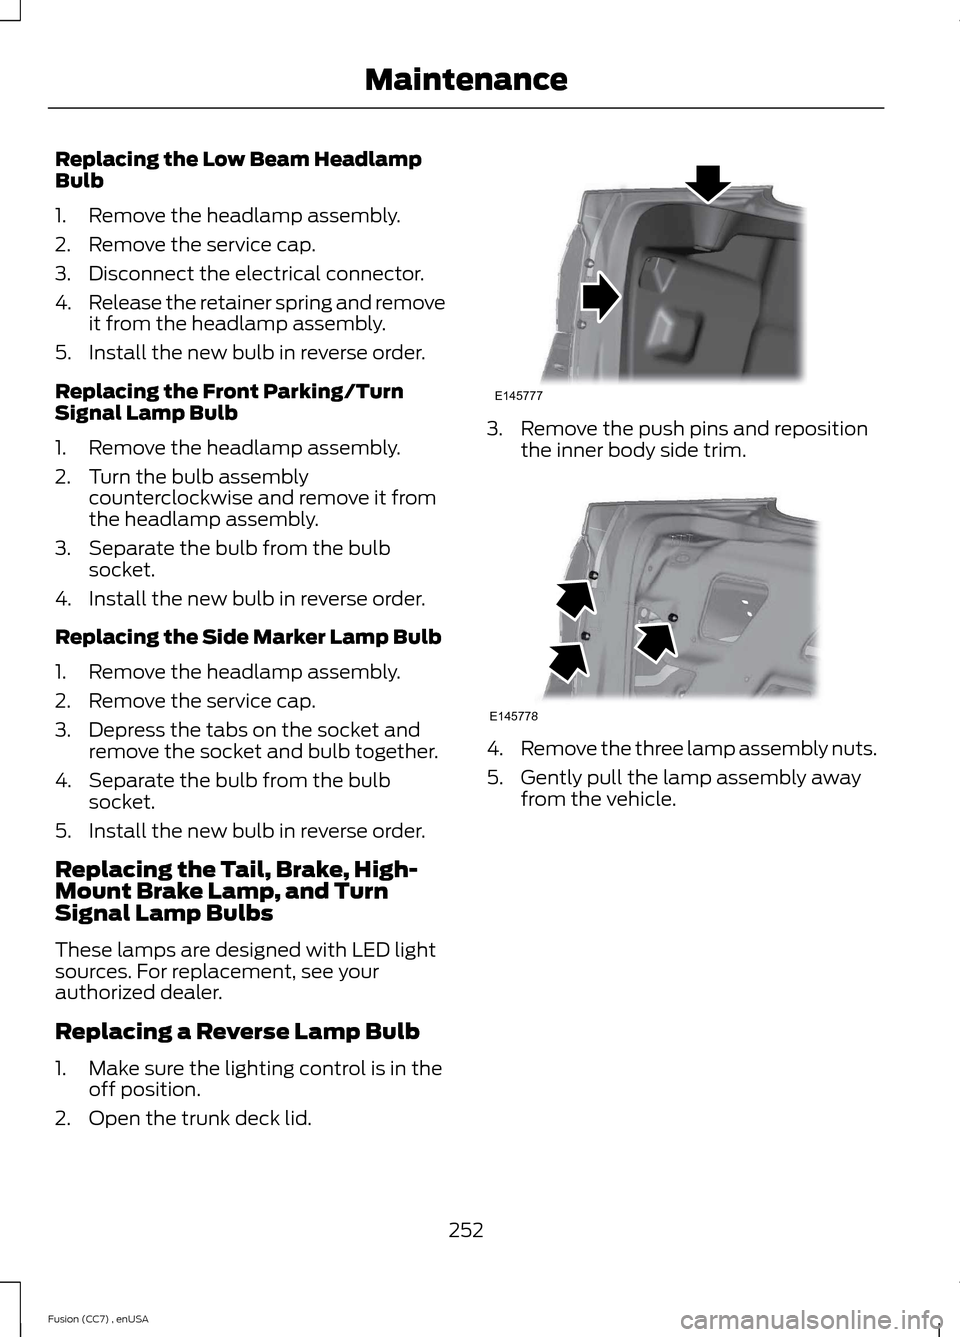
3.Remove the push pins and repositionthe inner body side trim.
4.Remove the three lamp assembly nuts.
5.Gently pull the lamp assembly awayfrom the vehicle.
252Fusion (CC7) , enUSAMaintenanceE145777 E145778
Page 256 of 458
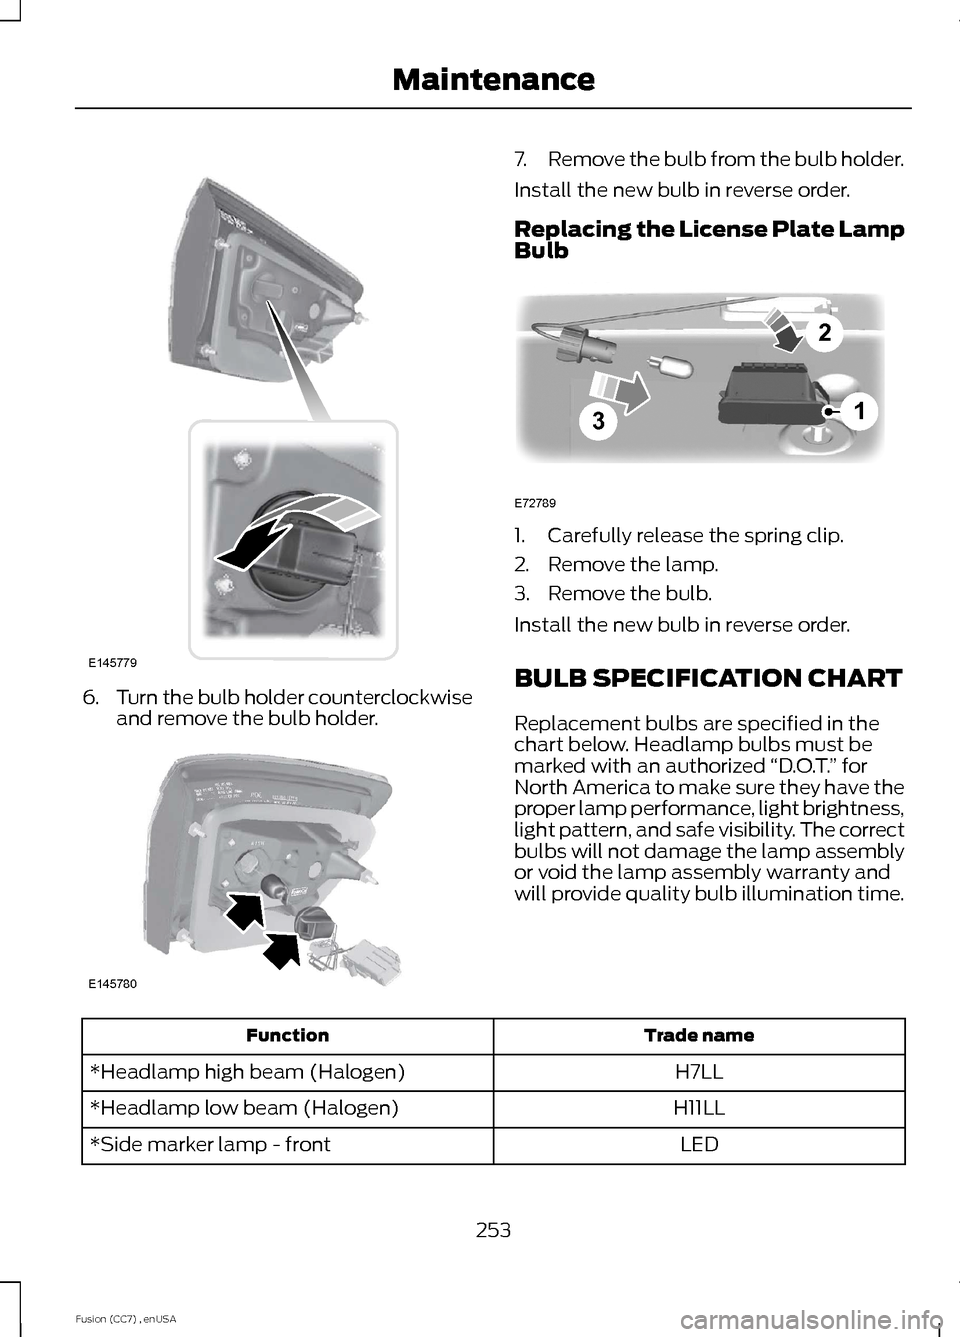
6.Turn the bulb holder counterclockwiseand remove the bulb holder.
7.Remove the bulb from the bulb holder.
Install the new bulb in reverse order.
Replacing the License Plate LampBulb
1.Carefully release the spring clip.
2.Remove the lamp.
3.Remove the bulb.
Install the new bulb in reverse order.
BULB SPECIFICATION CHART
Replacement bulbs are specified in thechart below. Headlamp bulbs must bemarked with an authorized “D.O.T.” forNorth America to make sure they have theproper lamp performance, light brightness,light pattern, and safe visibility. The correctbulbs will not damage the lamp assemblyor void the lamp assembly warranty andwill provide quality bulb illumination time.
Trade nameFunction
H7LL*Headlamp high beam (Halogen)
H11LL*Headlamp low beam (Halogen)
LED*Side marker lamp - front
253Fusion (CC7) , enUSAMaintenanceE145779 E145780 321E72789
Page 448 of 458
A
A/CSee: Climate Control..........................................110About This Manual...........................................7Protecting the Environment................................7ABSSee: Brakes............................................................163ABS driving hintsSee: Hints on Driving With Anti-LockBrakes................................................................163Accessories...................................................409Exterior style.......................................................409Interior style........................................................409Lifestyle................................................................409Peace of mind....................................................409AccessoriesSee: Replacement PartsRecommendation.............................................11ACCSee: Using Adaptive Cruise Control............180Active Park Assist..........................................172Automatic Steering into ParkingSpace..................................................................173Deactivating the Park Assist Feature..........174Troubleshooting the System..........................174Using Active Park Assist...................................172Adjusting the Headlamps........................248Horizontal Aim Adjustment...........................249Vertical Aim Adjustment................................248Adjusting the Steering Wheel...................64Airbag Disposal...............................................43Air ConditioningSee: Climate Control..........................................110AlarmSee: Anti-Theft Alarm........................................63All-Wheel Drive.............................................158Ambient Lighting............................................74Anti-Theft Alarm............................................63Arming the Alarm.................................................63Disarming the Alarm...........................................63Appendices......................................................411Audible Warnings and Indicators.............86Headlamps On Warning Chime.....................86Key in Ignition Warning Chime........................86Keyless Warning Alert........................................86Parking Brake On Warning Chime.................86
Audio Control..................................................64MEDIA.......................................................................64Seek, Next or Previous.......................................64Audio Input Jack...........................................307Audio System................................................294General Information.........................................294Audio unit - Vehicles With: AM/FM/CD/SYNC/Satellite Radio.............................295Audio unit - Vehicles With: Premium AM/FM/CD...........................................................297Audio unit - Vehicles With: Sony AM/FM/CD...................................................................299Menu Structure..................................................300Autolamps........................................................69Automatic Climate Control.........................111Automatic High Beam Control...................71Activating the System.........................................72Manually Overriding the System.....................72Automatic Transmission............................154Automatic Transmission AdaptiveLearning.............................................................157Brake-Shift Interlock.........................................156If Your Vehicle Gets Stuck In Mud orSnow...................................................................157SelectShift Automatic™Transmission...................................................155Understanding the Positions of YourAutomatic Transmission.............................154Automatic Transmission FluidCheck.............................................................245Auto-Start-Stop............................................142Disabling Auto StartStop................................143Enabling Auto StartStop..................................142Autowipers........................................................67Auxiliary Power Points................................133110 Volt AC Power Point....................................13312 Volt DC Power Point.....................................133Locations................................................................133AWDSee: All-Wheel Drive.........................................158
B
Blind Spot Information System...............191Blind Spot Information System (BLIS®)with Cross Traffic Alert.................................191Bonnet LockSee: Opening and Closing the Hood..........236
445Fusion (CC7) , enUSAIndex