automatic transmission fluid FORD MUSTANG 1969 Volume One Chassis
[x] Cancel search | Manufacturer: FORD, Model Year: 1969, Model line: MUSTANG, Model: FORD MUSTANG 1969Pages: 413, PDF Size: 75.81 MB
Page 331 of 413
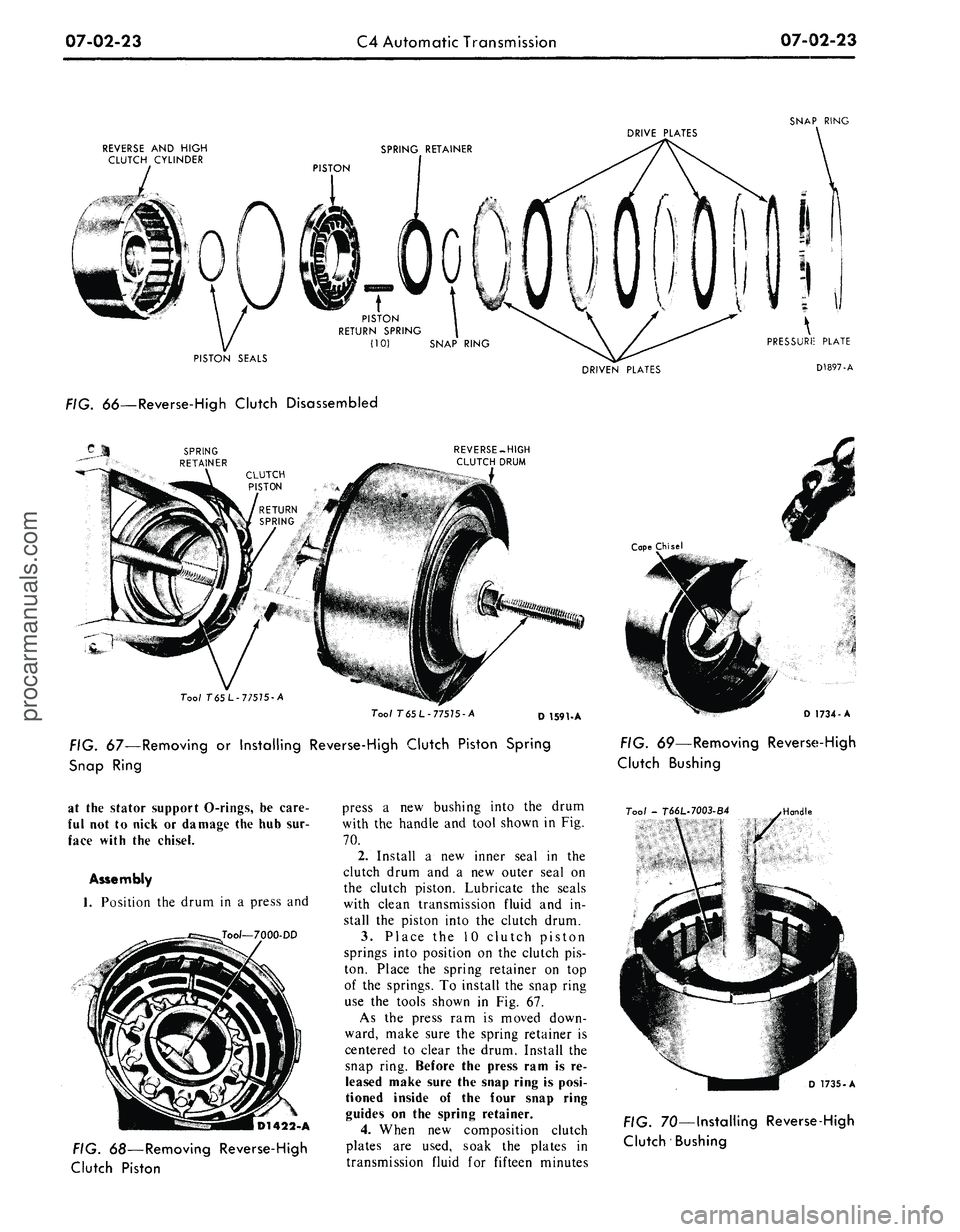
07-02-23
C4 Automatic Transmission
07-02-23
SNAP RING
DRIVE PLATES
REVERSE
AND
HIGH
CLUTCH CYLINDER
SPRING RETAINER
PISTON
PISTON SEALS
PISTON
RETURN SPRING
(10) SNAP RING
DRIVEN PLATES
PRESSURE PLATE
D1897-A
. oo—Reverse-High Clutch Disassembled
REVERSE-HIGH
CLUTCH DRUM
Tool T65L-77575-A
Tool T
65
L- 77575 -A
D 1591-A
FIG. 67—Removing
or
Installing Reverse-High Clutch Piston Spring
Snap Ring
Cape Chisel
D 1734-A
FIG. 69—Removing Reverse-High
Clutch Bushing
at
the
stator support O-rings,
be
care-
ful
not to
nick
or
damage
the
hub sur-
face with
the
chisel.
Assembly
1.
Position
the
drum
in a
press
and
Tool—7000-DD
D1422-A
FIG. 68—Removing Reverse-High
Clutch Piston
press
a new
bushing into
the
drum
with
the
handle
and
tool shown
in Fig.
70.
2.
Install
a new
inner seal
in the
clutch drum
and a new
outer seal
on
the clutch piston. Lubricate
the
seals
with clean transmission fluid
and in-
stall
the
piston into
the
clutch drum.
3.
Place
the 10
clutch piston
springs into position
on the
clutch
pis-
ton. Place
the
spring retainer
on top
of
the
springs.
To
install
the
snap ring
use
the
tools shown
in Fig. 67.
As
the
press
ram is
moved down-
ward, make sure
the
spring retainer
is
centered
to
clear
the
drum. Install
the
snap ring. Before
the
press ram
is re-
leased make sure the snap ring
is
posi-
tioned inside
of the
four snap ring
guides
on the
spring retainer.
4.
When
new
composition clutch
plates
are
used, soak
the
plates
in
transmission fluid
for
fifteen minutes
Tool -
T66L-7003-B4
Handle
D 1735-A
FIG. 70—Installing Reverse-High
Clutch Bushingprocarmanuals.com
Page 333 of 413
07-02-25
C4 Automatic Transmission
07-02-25
7oo/-
7000-
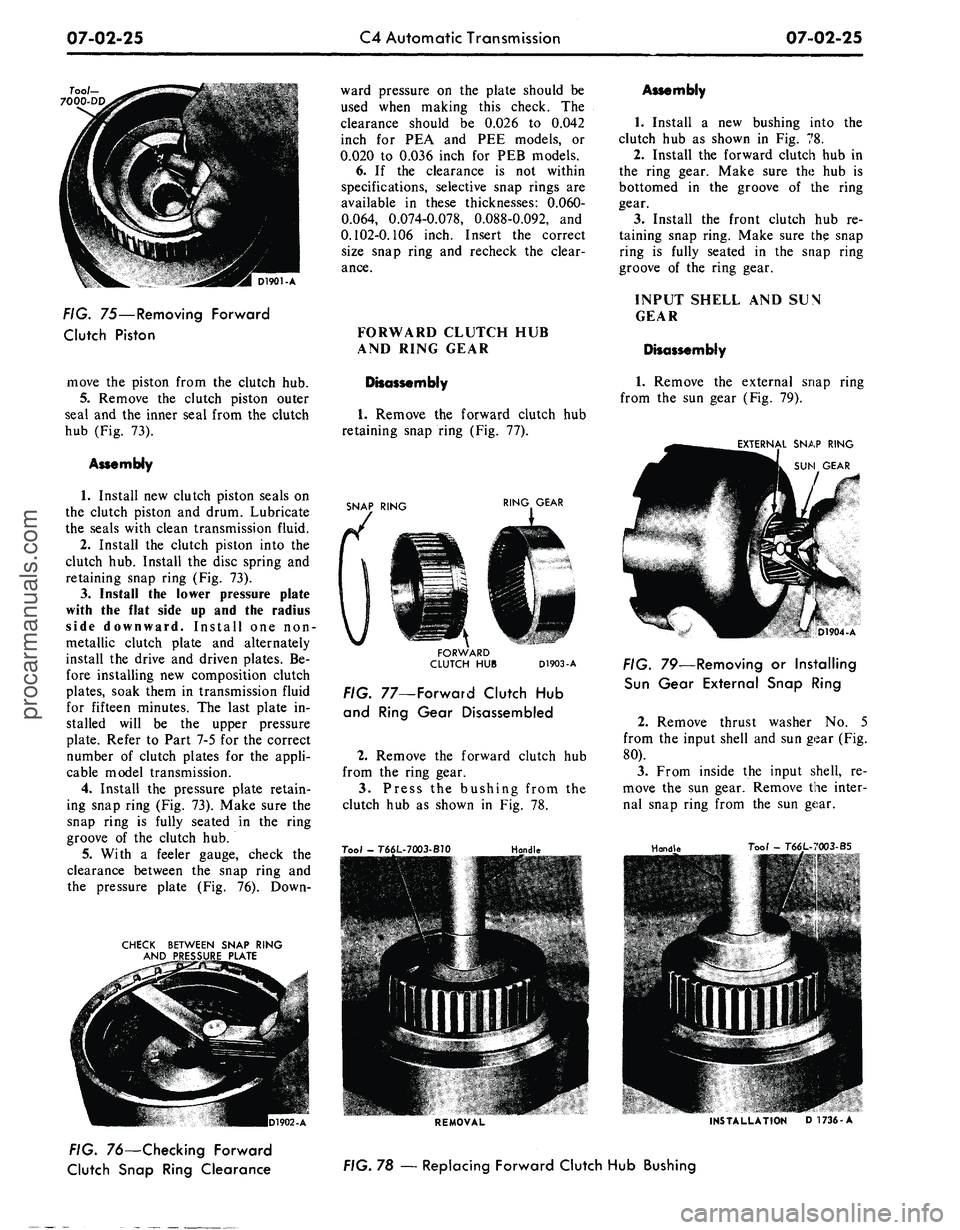
FIG. 75—Removing Forward
Clutch Piston
move the piston from the clutch hub.
5.
Remove the clutch piston outer
seal and the inner seal from the clutch
hub (Fig. 73).
Assembly
1.
Install new clutch piston seals on
the clutch piston and drum. Lubricate
the seals with clean transmission fluid.
2.
Install the clutch piston into the
clutch hub. Install the disc spring and
retaining snap ring (Fig. 73).
3.
Install the lower pressure plate
with the flat side up and the radius
side downward. Install one non-
metallic clutch plate and alternately
install the drive and driven plates. Be-
fore installing new composition clutch
plates,
soak them in transmission fluid
for fifteen minutes. The last plate in-
stalled will be the upper pressure
plate. Refer to Part 7-5 for the correct
number of clutch plates for the appli-
cable model transmission.
4.
Install the pressure plate retain-
ing snap ring (Fig. 73). Make sure the
snap ring is fully seated in the ring
groove of the clutch hub.
5.
With a feeler gauge, check the
clearance between the snap ring and
the pressure plate (Fig. 76). Down-
CHECK BETWEEN SNAP RING
AND PRESSURE PLATE
FIG. 76—Checking Forward
Clutch Snap Ring Clearance
ward pressure on the plate should be
used when making this check. The
clearance should be 0.026 to 0.042
inch for PEA and PEE models, or
0.020 to 0.036 inch for PEB models.
6. If the clearance is not within
specifications, selective snap rings are
available in these thicknesses: 0.060-
0.064, 0.074-0.078, 0.088-0.092, and
0.102-0.106 inch. Insert the correct
size snap ring and recheck the clear-
ance.
FORWARD CLUTCH HUB
AND RING GEAR
Disassembly
1.
Remove the forward clutch hub
retaining snap ring (Fig. 77).
SNAP RING
RING GEAR
FORWARD
CLUTCH HUB
D1903-A
FIG. 77—Forward Clutch Hub
and Ring Gear Disassembled
2.
Remove the forward clutch hub
from the ring gear.
3.
Press the bushing from the
clutch hub as shown in Fig. 78.
Tool - T66L-7003-B10
Handle
REMOVAL
Assembly
1.
Install a new bushing into the
clutch hub as shown in Fig. 78.
2.
Install the forward clutch hub in
the ring gear. Make sure the hub is
bottomed in the groove of the ring
gear.
3.
Install the front clutch hub re-
taining snap ring. Make sure the snap
ring is fully seated in the snap ring
groove of the ring gear.
INPUT SHELL AND SUN
GEAR
Disassembly
1.
Remove the external snap
from the sun gear (Fig. 79).
ring
EXTERNAL SNAP RING
SUN GEAR
D1904-A
FIG. 79—Removing or Installing
Sun Gear External Snap Ring
2.
Remove thrust washer No. 5
from the input shell and sun gear (Fig.
80).
3.
From inside the input shell, re-
move the sun gear. Remove the inter-
nal snap ring from the sun gear.
Handle
Tool - T66L-V003-B5
INSTALLATION D 1736-A
FIG. 78 — Replacing Forward Clutch Hub Bushingprocarmanuals.com
Page 335 of 413
07-02-27
C4 Automatic Transmission
07-02-27
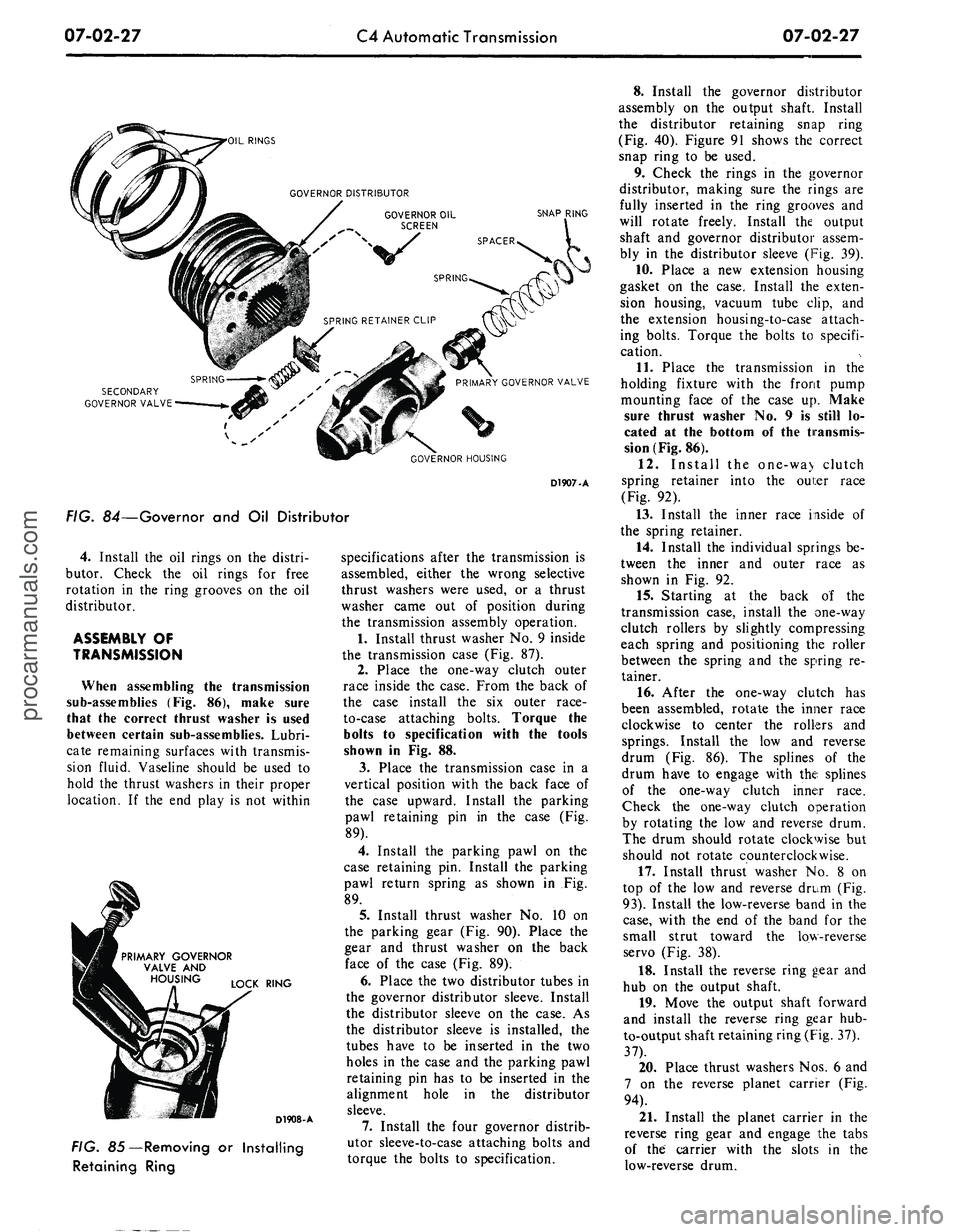
'OIL RINGS
SNAP RING
SECONDARY
GOVERNOR VALVE
1 v s
GOVERNOR HOUSING
D1907-A
FIG. 84—Governor and Oil Distributor
4.
Install the oil rings on the distri-
butor. Check the oil rings for free
rotation in the ring grooves on the oil
distributor.
ASSEMBLY OF
TRANSMISSION
When assembling the transmission
sub-assemblies (Fig. 86), make sure
that the correct thrust washer is used
between certain sub-assemblies. Lubri-
cate remaining surfaces with transmis-
sion fluid. Vaseline should be used to
hold the thrust washers in their proper
location. If the end play is not within
PRIMARY GOVERNOR
VALVE AND
LOCK RING
D1908-A
FIG. 85—Removing or Installing
Retaining Ring
specifications after the transmission is
assembled, either the wrong selective
thrust washers were used, or a thrust
washer came out of position during
the transmission assembly operation.
1.
Install thrust washer No. 9 inside
the transmission case (Fig. 87).
2.
Place the one-way clutch outer
race inside the case. From the back of
the case install the six outer race-
to-case attaching bolts. Torque the
bolts to specification with the tools
shown in Fig. 88.
3.
Place the transmission case in a
vertical position with the back face of
the case upward. Install the parking
pawl retaining pin in the case (Fig.
89).
4.
Install the parking pawl on the
case retaining pin. Install the parking
pawl return spring as shown in Fig.
89.
5.
Install thrust washer No. 10 on
the parking gear (Fig. 90). Place the
gear and thrust washer on the back
face of the case (Fig. 89).
6. Place the two distributor tubes in
the governor distributor sleeve. Install
the distributor sleeve on the case. As
the distributor sleeve is installed, the
tubes have to be inserted in the two
holes in the case and the parking pawl
retaining pin has to be inserted in the
alignment hole in the distributor
sleeve.
7.
Install the four governor distrib-
utor sleeve-to-case attaching bolts and
torque the bolts to specification.
8. Install the governor distributor
assembly on the output shaft. Install
the distributor retaining snap ring
(Fig. 40). Figure 91 shows the correct
snap ring to be used.
9. Check the rings in the governor
distributor, making sure the rings are
fully inserted in the ring grooves and
will rotate freely. Install the output
shaft and governor distributor assem-
bly in the distributor sleeve (Fig. 39).
10.
Place a new extension housing
gasket on the case. Install the exten-
sion housing, vacuum tube clip, and
the extension housing-to-case attach-
ing bolts. Torque the bolts to specifi-
cation.
11.
Place the transmission in the
holding fixture with the front pump
mounting face of the case up. Make
sure thrust washer No. 9 is still lo-
cated at the bottom of the transmis-
sion (Fig. 86).
12.
Install the one-wa> clutch
spring retainer into the oui:er race
(Fig. 92).
13.
Install the inner race inside of
the spring retainer.
14.
Install the individual springs be-
tween the inner and outer race as
shown in Fig. 92.
15.
Starting at the back of the
transmission case, install the one-way
clutch rollers by slightly compressing
each spring and positioning the roller
between the spring and the spring re-
tainer.
16.
After the one-way clutch has
been assembled, rotate the inner race
clockwise to center the rollers and
springs. Install the low and reverse
drum (Fig. 86). The splines of the
drum have to engage with the splines
of the one-way clutch inner race.
Check the one-way clutch operation
by rotating the low and reverse drum.
The drum should rotate clockwise but
should not rotate counterclockwise.
17.
Install thrust washer No. 8 on
top of the low and reverse drum (Fig.
93).
Install the low-reverse band in the
case,
with the end of the band for the
small strut toward the low-reverse
servo (Fig. 38).
18.
Install the reverse ring gear and
hub on the output shaft.
19.
Move the output shaft forward
and install the reverse ring gear hub-
to-output shaft retaining ring (Fig. 37).
37).
20.
Place thrust washers Nos. 6 and
7 on the reverse planet carrier (Fig.
94).
21.
Install the planet carrier in the
reverse ring gear and engage the tabs
of the carrier with the slots in the
low-reverse drum.procarmanuals.com
Page 337 of 413
07-02-29
C4 Automatic Transmission
07-02-29
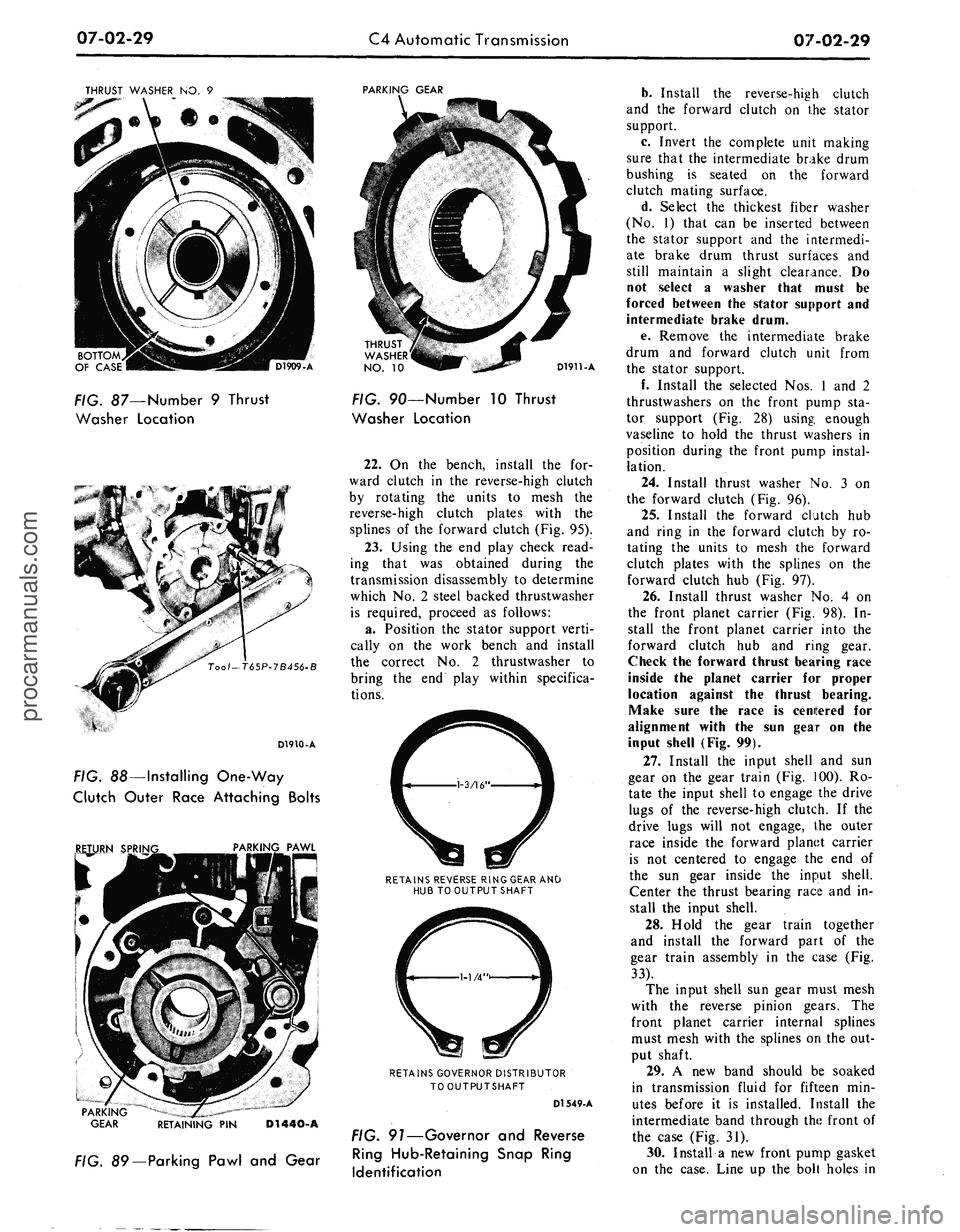
THRUST WASHER
NO. 9
PARKING GEAR
BOTTOM
OF CASE
FIG. 87—Number
9
Thrust
Washer Location
Tool-T65P-7B456-B
D1910-A
FIG. 88—Installing One-Way
Clutch Outer Race Attaching Bolts
REJURN
S
PAWL
PARKING
GEAR RETAINING
PIN
D1440-A
FIG. 89— Parking Pawl
and
Gear
THRUST
WASHER
NO.
10
D1911-A
FIG. 90—Number
10
Thrust
Washer Location
22.
On the
bench, install
the for-
ward clutch
in the
reverse-high clutch
by rotating
the
units
to
mesh
the
reverse-high clutch plates with
the
splines
of
the
forward clutch
(Fig. 95).
23.
Using
the end
play check read-
ing that
was
obtained during
the
transmission disassembly
to
determine
which
No.
2
steel backed thrustwasher
is required, proceed
as
follows:
a.
Position
the
stator support verti-
cally
on the
work bench
and
install
the correct
No. 2
thrustwasher
to
bring
the end
play within specifica-
tions.
RETAINS REVERSE RING GEAR
AND
HUB
TO
OUTPUT SHAFT
RETAINS GOVERNOR DISTRIBUTOR
TOOUTPUTSHAFT
D1549-A
FIG. 91—Governor
and
Reverse
Ring Hub-Retaining Snap Ring
Identification
b.
Install
the
reverse-high clutch
and
the
forward clutch
on the
stator
support.
c. Invert
the
complete unit making
sure that
the
intermediate brake drum
bushing
is
seated
on the
forward
clutch mating surface.
d.
Select
the
thickest fiber washer
(No.
1)
that
can be
inserted between
the stator support
and the
intermedi-
ate brake drum thrust surfaces
and
still maintain
a
slight clearance.
Do
not select
a
washer that must
be
forced between
the
stator support
and
intermediate brake drum.
e. Remove
the
intermediate brake
drum
and
forward clutch unit from
the stator support.
f.
Install
the
selected
Nos.
1 and 2
thrustwashers
on the
front pump
sta-
tor support
(Fig.
28)
using enough
vaseline
to
hold
the
thrust washers
in
position during
the
front pump instal-
lation.
24.
Install thrust washer
No.
3 on
the forward clutch
(Fig. 96).
25.
Install
the
forward clutch
hub
and ring
in the
forward clutch
by ro-
tating
the
units
to
mesh
the
forward
clutch plates with
the
splines
on the
forward clutch
hub (Fig. 97).
26.
Install thrust washer
No.
4 on
the front planet carrier
(Fig. 98).
In-
stall
the
front planet carrier into
the
forward clutch
hub and
ring gear.
Check
the
forward thrust bearing race
inside
the
planet carrier
for
proper
location against
the
thrust bearing.
Make sure
the
race
is
centered
for
alignment with
the sun
gear
on the
input shell
(Fig. 99).
27.
Install
the
input shell
and sun
gear
on
the
gear train
(Fig. 100). Ro-
tate
the
input shell
to
engage
the
drive
lugs
of the
reverse-high clutch.
If the
drive lugs will
not
engage,
the
outer
race inside
the
forward planet carrier
is
not
centered
to
engage
the end of
the
sun
gear inside
the
input shell.
Center
the
thrust bearing race
and
in-
stall
the
input shell.
28.
Hold
the
gear train together
and install
the
forward part
of the
gear train assembly
in the
case
(Fig.
33).
The input shell
sun
gear must mesh
with
the
reverse pinion gears.
The
front planet carrier internal splines
must mesh with
the
splines
on the out-
put shaft.
29.
A
new
band should
be
soaked
in transmission fluid
for
fifteen
min-
utes before
it is
installed. Install
the
intermediate band through
the
front
of
the case
(Fig. 31).
30.
Install
a
new
front pump gasket
on
the
case. Line
up
the
bolt holes
inprocarmanuals.com
Page 359 of 413
07-03-19
FMX Transmission
07-03-19
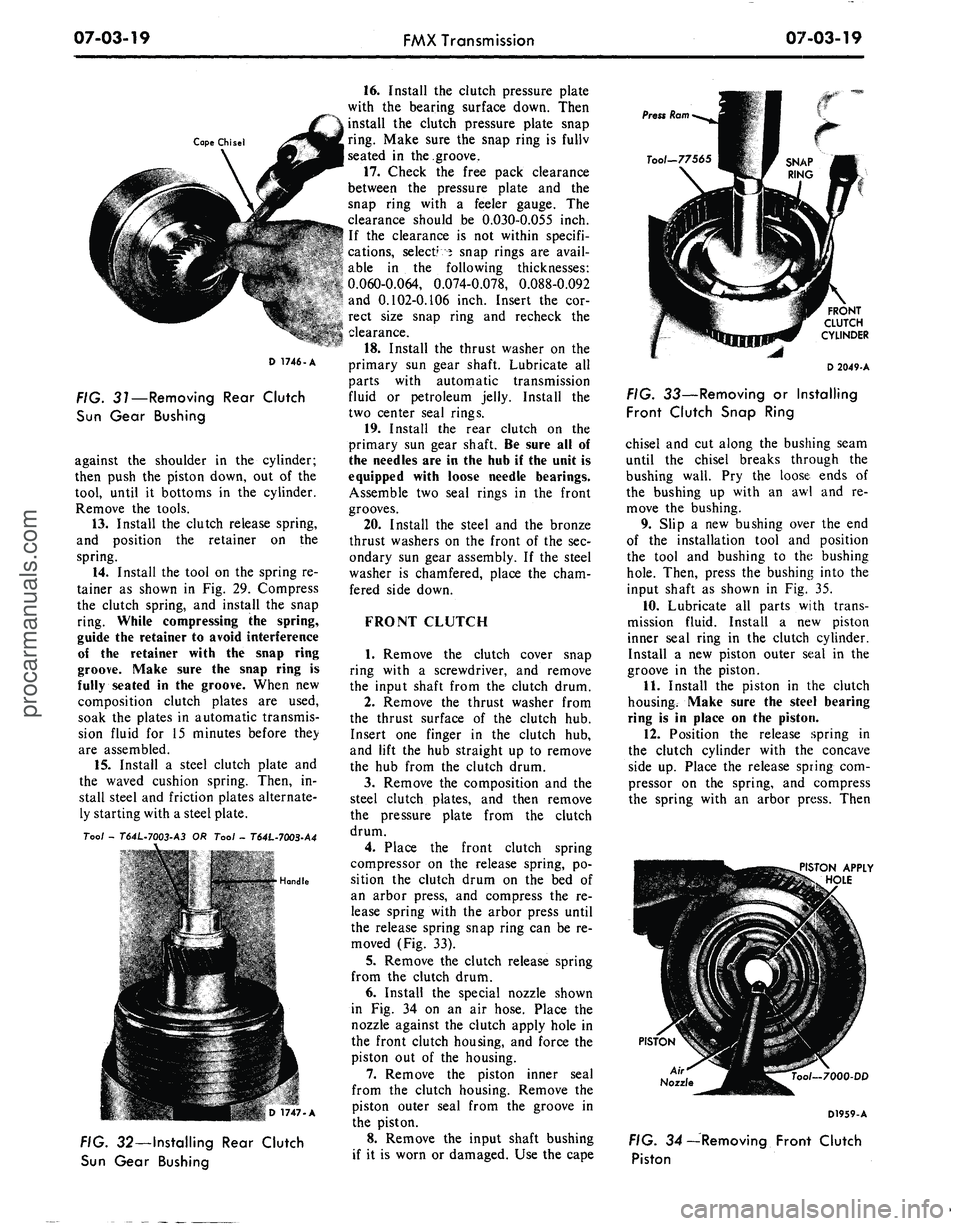
Cape Chisel
FIG. 31—Removing Rear Clutch
Sun Gear Bushing
against the shoulder in the cylinder;
then push the piston down, out of the
tool, until it bottoms in the cylinder.
Remove the tools.
13.
Install the clutch release spring,
and position the retainer on the
spring.
14.
Install the tool on the spring re-
tainer as shown in Fig. 29. Compress
the clutch spring, and install the snap
ring. While compressing the spring,
guide the retainer to avoid interference
of the retainer with the snap ring
groove. Make sure the snap ring is
fully seated in the groove. When new
composition clutch plates are used,
soak the plates in automatic transmis-
sion fluid for 15 minutes before they
are assembled.
15.
Install a steel clutch plate and
the waved cushion spring. Then, in-
stall steel and friction plates alternate-
ly starting with a steel plate.
Tool -
T64L-7003-A3
OR Tool -
T64L-7003-A4
• *'£- ' •
jRflg. >...•...!• Hondle
D 1747-A
FIG. 32—Installing Rear Clutch
Sun Gear Bushing
16.
Install the clutch pressure plate
with the bearing surface down. Then
install the clutch pressure plate snap
ring. Make sure the snap ring is fullv
seated in the groove,
17.
Check the free pack clearance
between the pressure plate and the
snap ring with a feeler gauge. The
clearance should be O.O3O-O.O55 inch.
If the clearance is not within specifi-
cations, select? 5 snap rings are avail-
able in the following thicknesses:
0.060-0.064, 0.074-0.078, 0.088-0.092
and 0.102-0.106 inch. Insert the cor-
rect size snap ring and recheck the
clearance.
18.
Install the thrust washer on the
primary sun gear shaft. Lubricate all
parts with automatic transmission
fluid or petroleum jelly. Install the
two center seal rings.
19.
Install the rear clutch on the
primary sun gear shaft. Be sure all of
the needles are in the hub if the unit is
equipped with loose needle bearings.
Assemble two seal rings in the front
grooves.
20.
Install the steel and the bronze
thrust washers on the front of the sec-
ondary sun gear assembly. If the steel
washer is chamfered, place the cham-
fered side down.
FRONT CLUTCH
1.
Remove the clutch cover snap
ring with a screwdriver, and remove
the input shaft from the clutch drum.
2.
Remove the thrust washer from
the thrust surface of the clutch hub.
Insert one finger in the clutch hub,
and lift the hub straight up to remove
the hub from the clutch drum.
3.
Remove the composition and the
steel clutch plates, and then remove
the pressure plate from the clutch
drum.
4.
Place the front clutch spring
compressor on the release spring, po-
sition the clutch drum on the bed of
an arbor press, and compress the re-
lease spring with the arbor press until
the release spring snap ring can be re-
moved (Fig. 33).
5.
Remove the clutch release spring
from the clutch drum.
6. Install the special nozzle shown
in Fig. 34 on an air hose. Place the
nozzle against the clutch apply hole in
the front clutch housing, and force the
piston out of the housing.
7.
Remove the piston inner seal
from the clutch housing. Remove the
piston outer seal from the groove in
the piston.
8. Remove the input shaft bushing
if it is worn or damaged. Use the cape
FRONT
CLUTCH
CYLINDER
D 2049-A
FIG. 33—Removing or Installing
Front Clutch Snap Ring
chisel and cut along the bushing seam
until the chisel breaks through the
bushing wall. Pry the loose ends of
the bushing up with an awl and re-
move the bushing.
9. Slip a new bushing over the end
of the installation tool and position
the tool and bushing to the bushing
hole.
Then, press the bushing into the
input shaft as shown in Fig. 35.
10.
Lubricate all parts with trans-
mission fluid. Install a new piston
inner seal ring in the clutch cylinder.
Install a new piston outer seal in the
groove in the piston.
11.
Install the piston in the clutch
housing. Make sure the steel bearing
ring is in place on the piston.
12.
Position the release spring in
the clutch cylinder with the concave
side up. Place the release spring com-
pressor on the spring, and compress
the spring with an arbor press. Then
PISTON APPLY
HOLE
PISTON
Air
Nozzle
ool-7000-DD
D1959-A
FIG. 34—Removing Front Clutch
Pistonprocarmanuals.com
Page 372 of 413
07-04-03
C-6 Automatic Transmission
07-04-03
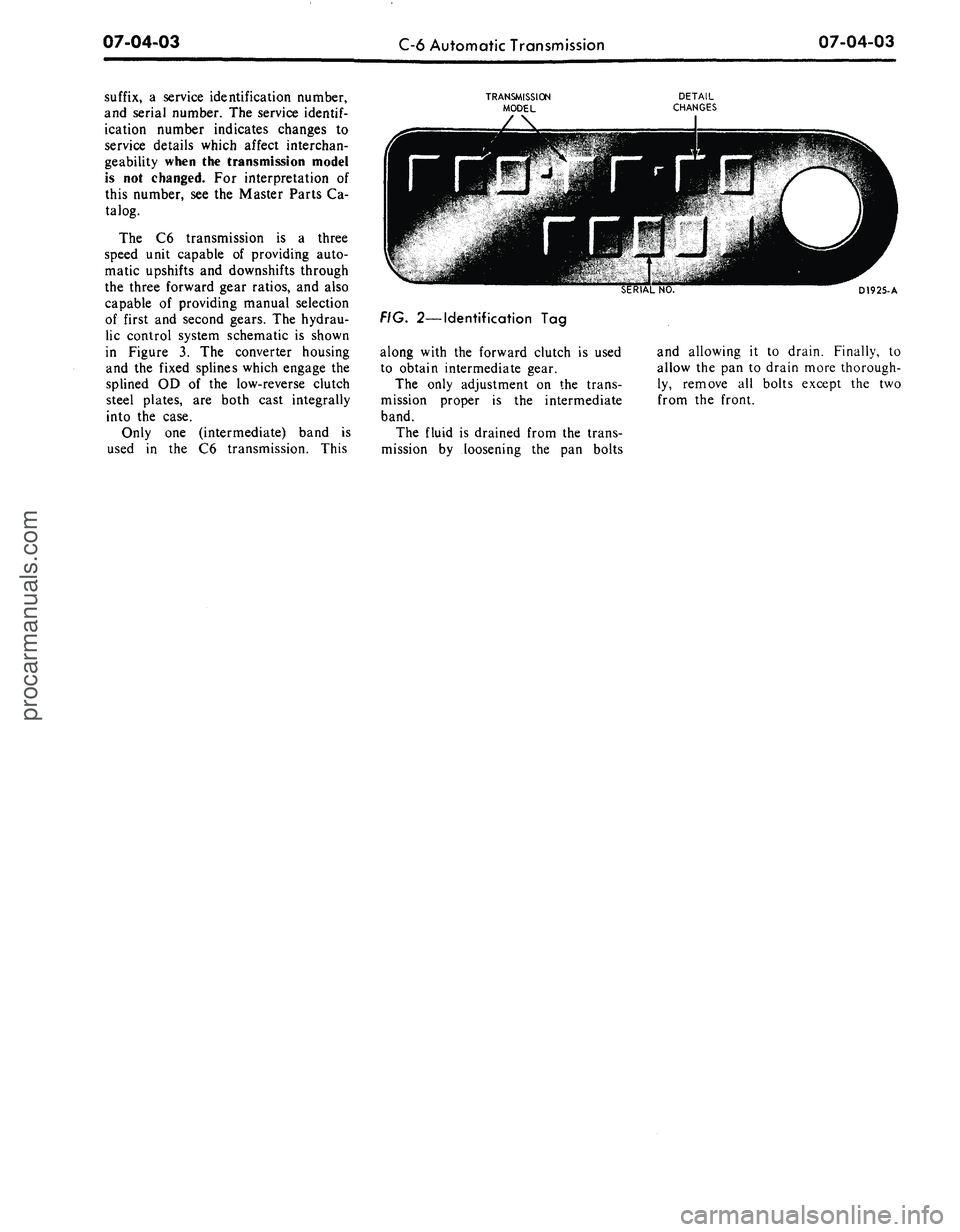
suffix, a service identification number,
and serial number. The service
identif-
ication number indicates changes to
service details which affect interchan-
geability when the transmission model
is not changed. For interpretation of
this number, see the Master Parts Ca-
talog.
The C6 transmission is a three
speed unit capable of providing auto-
matic upshifts and downshifts through
the three forward gear ratios, and also
capable of providing manual selection
of first and second gears. The hydrau-
lic control system schematic is shown
in Figure 3. The converter housing
and the fixed splines which engage the
splined OD of the low-reverse clutch
steel plates, are both cast integrally
into the case.
Only one (intermediate) band is
used in the C6 transmission. This
TRANSMISSION
MODEL
FIG. 2—Identification Tag
along with the forward clutch is used
to obtain intermediate gear.
The only adjustment on the trans-
mission proper is the intermediate
band.
The fluid is drained from the trans-
mission by loosening the pan bolts
D1925-A
and allowing it to drain. Finally, to
allow the pan to drain more thorough-
ly, remove all bolts except the two
from the front.procarmanuals.com
Page 380 of 413
07-04-11
C-6 Automatic Transmission
07-04-11
BAND ADJUSTMENT
INTERMEDIATE BAND
1.
Raise the vehicle on a hoist or
jack stands.
2.
Clean all the dirt from the band
adjusting screw area. Remove and dis-
card the lock nut.
3.
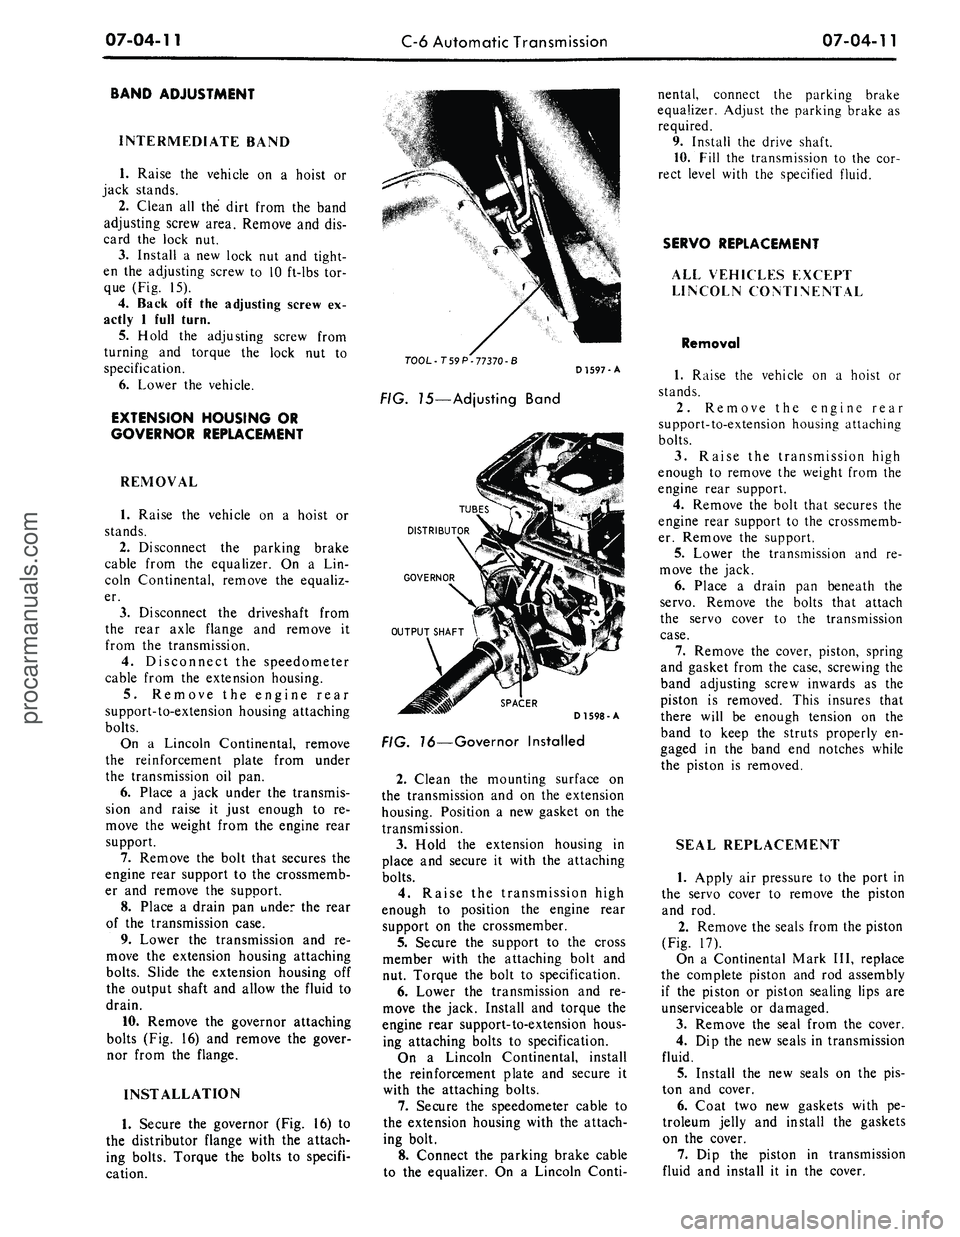
Install a new lock nut and tight-
en the adjusting screw to 10 ft-lbs tor-
que (Fig. 15).
4.
Back off the adjusting screw ex-
actly 1 full turn.
5.
Hold the adjusting screw from
turning and torque the lock nut to
specification.
6. Lower the vehicle.
EXTENSION HOUSING OR
GOVERNOR REPLACEMENT
REMOVAL
1.
Raise the vehicle on a hoist or
stands.
2.
Disconnect the parking brake
cable from the equalizer. On a Lin-
coln Continental, remove the equaliz-
er.
3.
Disconnect the driveshaft from
the rear axle flange and remove it
from the transmission.
4.
Disconnect the speedometer
cable from the extension housing.
5.
Remove the engine rear
support-to-extension housing attaching
bolts.
On a Lincoln Continental, remove
the reinforcement plate from under
the transmission oil pan.
6. Place a jack under the transmis-
sion and raise it just enough to re-
move the weight from the engine rear
support.
7.
Remove the bolt that secures the
engine rear support to the crossmemb-
er and remove the support.
8. Place a drain pan under the rear
of the transmission case.
9. Lower the transmission and re-
move the extension housing attaching
bolts.
Slide the extension housing off
the output shaft and allow the fluid to
drain.
10.
Remove the governor attaching
bolts (Fig. 16) and remove the gover-
nor from the flange.
INSTALLATION
1.
Secure the governor (Fig. 16) to
the distributor flange with the attach-
ing bolts. Torque the bolts to specifi-
cation.
TOOL-T59 P-77370-B
FIG. 75—Adjusting Band
D 1597-A
TUBES
DISTRIBUTOR
GOVERNOR
SPACER
D1598-A
FIG. 76—Governor Installed
2.
Clean the mounting surface on
the transmission and on the extension
housing. Position a new gasket on the
transmission.
3.
Hold the extension housing in
place and secure it with the attaching
bolts.
4.
Raise the transmission high
enough to position the engine rear
support on the crossmember.
5.
Secure the support to the cross
member with the attaching bolt and
nut. Torque the bolt to specification.
6. Lower the transmission and re-
move the jack. Install and torque the
engine rear support-to-extension hous-
ing attaching bolts to specification.
On a Lincoln Continental, install
the reinforcement plate and secure it
with the attaching bolts.
7.
Secure the speedometer cable to
the extension housing with the attach-
ing bolt.
8. Connect the parking brake cable
to the equalizer. On a Lincoln Conti-
nental, connect the parking brake
equalizer. Adjust the parking brake as
required.
9. Install the drive shaft.
10.
Fill the transmission to the cor-
rect level with the specified fluid.
SERVO REPLACEMENT
ALL VEHICLES EXCEPT
LINCOLN CONTINENTAL
Removal
1.
Raise the vehicle on a hoist or
stands.
2.
Remove the engine rear
support-to-extension housing attaching
bolts.
3.
Raise the transmission high
enough to remove the weight from the
engine rear support.
4.
Remove the bolt that secures the
engine rear support to the crossmemb-
er. Remove the support.
5.
Lower the transmission and re-
move the jack.
6. Place a drain pan beneath the
servo.
Remove the bolts that attach
the servo cover to the transmission
case.
7.
Remove the cover, piston, spring
and gasket from the case, screwing the
band adjusting screw inwards as the
piston is removed. This insures that
there will be enough tension on the
band to keep the struts properly en-
gaged in the band end notches while
the piston is removed.
SEAL REPLACEMENT
1.
Apply air pressure to the port in
the servo cover to remove the piston
and rod.
2.
Remove the seals from the piston
(Fig. 17).
On a Continental Mark III, replace
the complete piston and rod assembly
if the piston or piston sealing lips are
unserviceable or damaged.
3.
Remove the seal from the cover.
4.
Dip the new seals in transmission
fluid.
5.
Install the new seals on the pis-
ton and cover.
6. Coat two new gaskets with pe-
troleum jelly and install the gaskets
on the cover.
7.
Dip the piston in transmission
fluid and install it in the cover.procarmanuals.com
Page 381 of 413
07-04-12
C-6 Automatic Transmission
07-04-12
•TRANSMISSION
CASE SEAL-7D024
SEAL-7D025
COVER .7D027
D1599-B
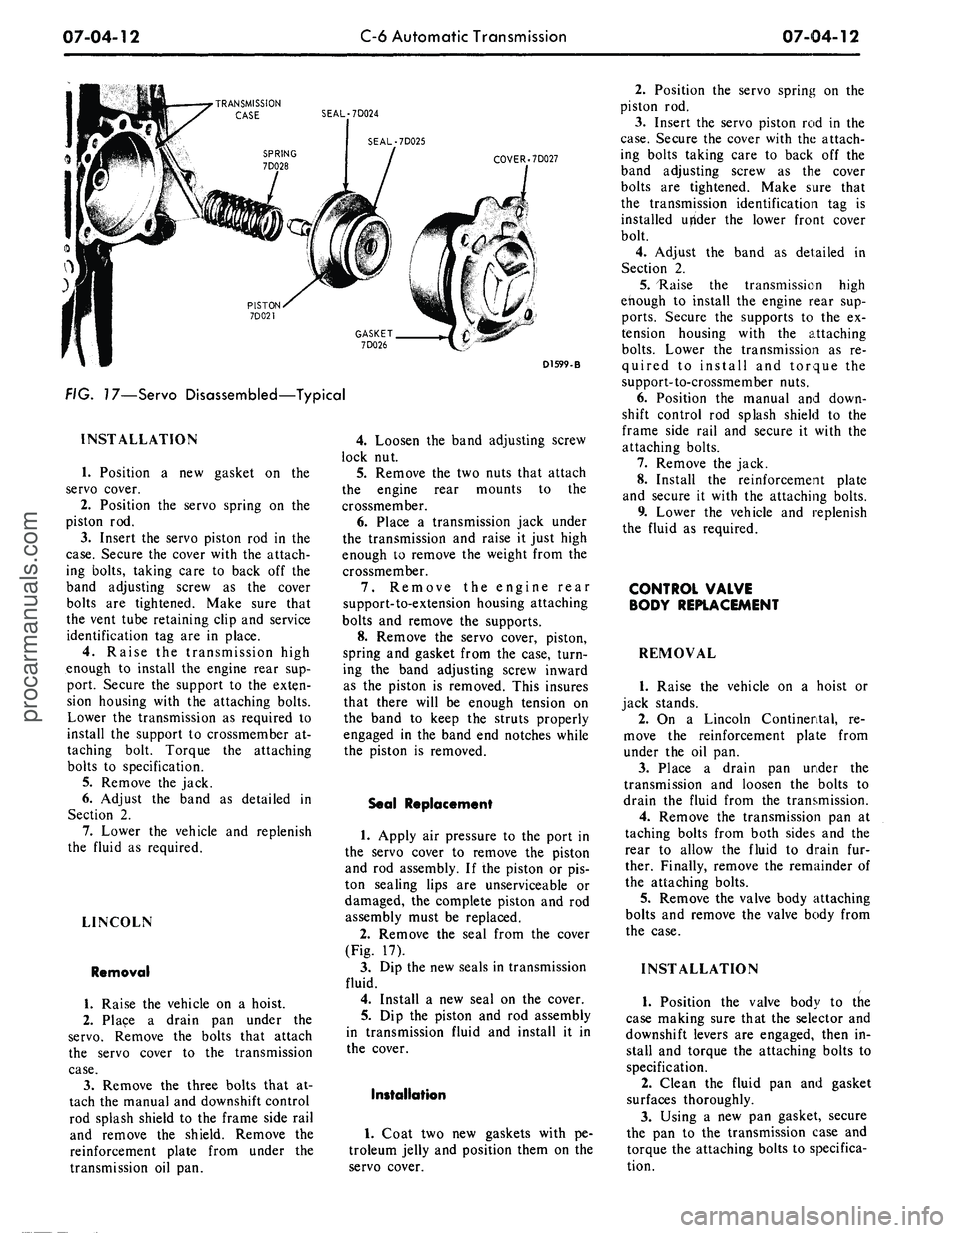
FIG. 17—Servo Disassembled—Typical
INSTALLATION
1.
Position a new gasket on the
servo cover.
2.
Position the servo spring on the
piston rod.
3.
Insert the servo piston rod in the
case.
Secure the cover with the attach-
ing bolts, taking care to back off the
band adjusting screw as the cover
bolts are tightened. Make sure that
the vent tube retaining clip and service
identification tag are in place.
4.
Raise the transmission high
enough to install the engine rear sup-
port. Secure the support to the exten-
sion housing with the attaching bolts.
Lower the transmission as required to
install the support to crossmember at-
taching bolt. Torque the attaching
bolts to specification.
5.
Remove the jack.
6. Adjust the band as detailed in
Section 2.
7.
Lower the vehicle and replenish
the fluid as required.
LINCOLN
Removal
1.
Raise the vehicle on a hoist.
2.
Place a drain pan under the
servo.
Remove the bolts that attach
the servo cover to the transmission
case.
3.
Remove the three bolts that at-
tach the manual and downshift control
rod splash shield to the frame side rail
and remove the shield. Remove the
reinforcement plate from under the
transmission oil pan.
4.
Loosen the band adjusting screw
lock nut.
5.
Remove the two nuts that attach
the engine rear mounts to the
crossmember.
6. Place a transmission jack under
the transmission and raise it just high
enough to remove the weight from the
crossmember.
7.
Remove the engine rear
support-to-extension housing attaching
bolts and remove the supports.
8. Remove the servo cover, piston,
spring and gasket from the case, turn-
ing the band adjusting screw inward
as the piston is removed. This insures
that there will be enough tension on
the band to keep the struts properly
engaged in the band end notches while
the piston is removed.
Seal Replacement
1.
Apply air pressure to the port in
the servo cover to remove the piston
and rod assembly. If the piston or pis-
ton sealing lips are unserviceable or
damaged, the complete piston and rod
assembly must be replaced.
2.
Remove the seal from the cover
(Fig. 17).
3.
Dip the new seals in transmission
fluid.
4.
Install a new seal on the cover.
5.
Dip the piston and rod assembly
in transmission fluid and install it in
the cover.
Installation
1.
Coat two new gaskets with pe-
troleum jelly and position them on the
servo cover.
2.
Position the servo spring on the
piston rod.
3.
Insert the servo piston rod in the
case.
Secure the cover with the attach-
ing bolts taking care to back off the
band adjusting screw as the cover
bolts are tightened. Make sure that
the transmission identification tag is
installed utfider the lower front cover
bolt.
4.
Adjust the band as detailed in
Section 2.
5.
"Raise the transmission high
enough to install the engine rear sup-
ports.
Secure the supports to the ex-
tension housing with the attaching
bolts.
Lower the transmission as re-
quired to install and torque the
support-to-crossmember nuts.
6. Position the manual and down-
shift control rod splash shield to the
frame side rail and secure it with the
attaching bolts.
7.
Remove the jack.
8. Install the reinforcement plate
and secure it with the attaching bolts.
9. Lower the vehicle and replenish
the fluid as required.
CONTROL VALVE
BODY REPLACEMENT
REMOVAL
1.
Raise the vehicle on a hoist or
jack stands.
2.
On a Lincoln Continental, re-
move the reinforcement plate from
under the oil pan.
3.
Place a drain pan under the
transmission and loosen the bolts to
drain the fluid from the transmission.
4.
Remove the transmission pan at
taching bolts from both sides and the
rear to allow the fluid to drain fur-
ther. Finally, remove the remainder of
the attaching bolts.
5.
Remove the valve body attaching
bolts and remove the valve body from
the case.
INSTALLATION
1.
Position the valve body to the
case making sure that the selector and
downshift levers are engaged, then in-
stall and torque the attaching bolts to
specification.
2.
Clean the fluid pan and gasket
surfaces thoroughly.
3.
Using a new pan gasket, secure
the pan to the transmission case and
torque the attaching bolts to specifica-
tion.procarmanuals.com
Page 382 of 413
07-04-13
C-6 Automatic Transmission
07-04-13
On a Lincoln Continental, install
the reinforcement plate and secure it
with the attaching bolts.
4.
Lower the vehicle and fill the
transmission to the correct level with
the specified fluid.
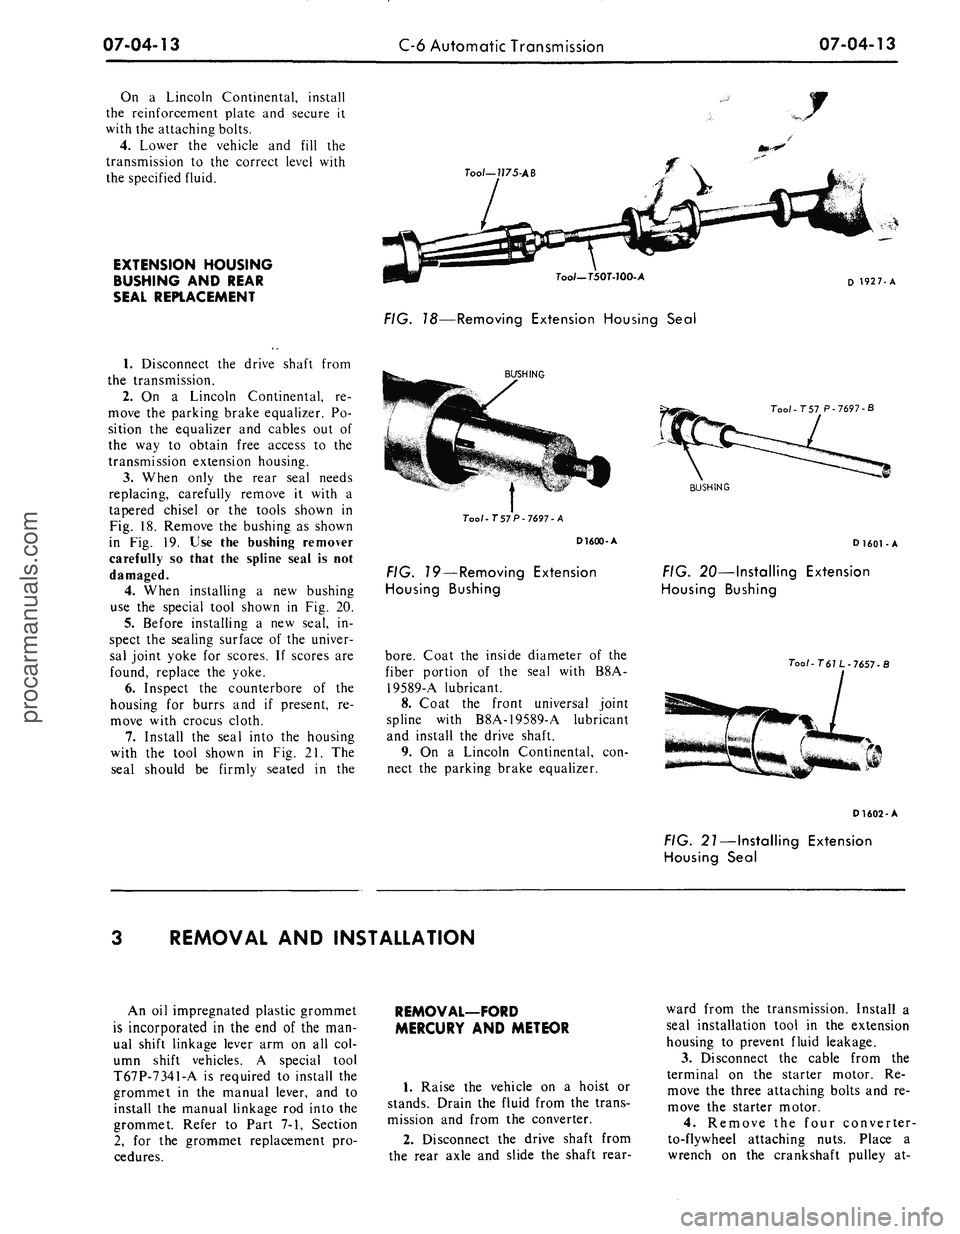
EXTENSION HOUSING
BUSHING AND REAR
SEAL REPLACEMENT
Too/—
1175-AB
Tool—750T-70O-A
D 1927-A
FIG. 18—Removing Extension Housing Seal
1.
Disconnect the drive shaft from
the transmission.
2.
On a Lincoln Continental, re-
move the parking brake equalizer. Po-
sition the equalizer and cables out of
the way to obtain free access to the
transmission extension housing.
3.
When only the rear seal needs
replacing, carefully remove it with a
tapered chisel or the tools shown in
Fig. 18. Remove the bushing as shown
in Fig. 19. Use the bushing remover
carefully so that the spline seal is not
damaged.
4.
When installing a new bushing
use the special tool shown in Fig. 20.
5.
Before installing a new seal, in-
spect the sealing surface of the univer-
sal joint yoke for scores. If scores are
found, replace the yoke.
6. Inspect the counterbore of the
housing for burrs and if present, re-
move with crocus cloth.
7.
Install the seal into the housing
with the tool shown in Fig. 21. The
seal should be firmly seated in the
BUSHING
Too/-757 P-7697-A
D1600-A
FIG. 19—Removing Extension
Housing Bushing
bore.
Coat the inside diameter of the
fiber portion of the seal with B8A-
19589-A lubricant.
8. Coat the front universal joint
spline with B8A-19589-A lubricant
and install the drive shaft.
9. On a Lincoln Continental, con-
nect the parking brake equalizer.
Tool-T 57 P-7697-B
BUSHING
D
1601
-A
FIG. 20—Installing Extension
Housing Bushing
Tool-
T61 L
-
7657-
B
D1602-A
FIG. 21—Installing Extension
Housing Seal
REMOVAL AND INSTALLATION
An oil impregnated plastic grommet
is incorporated in the end of the man-
ual shift linkage lever arm on all col-
umn shift vehicles. A special tool
T67P-7341-A is required to install the
grommet in the manual lever, and to
install the manual linkage rod into the
grommet. Refer to Part 7-1, Section
2,
for the grommet replacement pro-
cedures.
REMOVAL—FORD
MERCURY AND METEOR
1.
Raise the vehicle on a hoist or
stands. Drain the fluid from the trans-
mission and from the converter.
2.
Disconnect the drive shaft from
the rear axle and slide the shaft rear-
ward from the transmission. Install a
seal installation tool in the extension
housing to prevent fluid leakage.
3.
Disconnect the cable from the
terminal on the starter motor. Re-
move the three attaching bolts and re-
move the starter motor.
4.
Remove the four converter-
to-flywheel attaching nuts. Place a
wrench on the crankshaft pulley at-procarmanuals.com
Page 383 of 413
07-04-14
C-6 Automatic Transmission
07-04-14
taching bolt to turn the converter to
gain access to the nuts.
5.
Remove the rear mount to
crossmember attaching bolt.
6. Remove the two crossmember-
to-frame attaching bolts.
7.
Remove the two engine rear
support-to-extension housing attaching
bolts.
8. Disconnect the downshift rod
from the transmission downshift lever.
9. Disconnect the manual linkage
rod from the lever at the transmission.
On a column shift, use tool T67P-
7341-A to remove the rod.
10.
Remove the two bolts securing
the bellcrank bracket to the converter
housing.
11.
Raise the transmission with a
transmission jack to provide clearance
to remove the crossmember.
12.
Remove the rear mount from
the crossmember and remove the
crossmember from the side supports.
13.
Lower the transmission to gain
access to the oil cooler lines.
14.
Disconnect each oil line from
the fittings on the transmission.
15.
Disconnect the vacuum line
from the diaphragm located at the
right rear of the transmission. Remove
the metal line from the retaining clip
on the transmission.
16.
Disconnect the speedometer
cable from the extension housing.
17.
Remove the bolt that secures
the transmission fluid filler tube to the
cylinder block. Lift the filler tube and
the dipstick from the transmission.
18.
Secure the transmission to the
jack with the chain.
19.
Remove the converter housing-
to-cylinder block attaching bolts.
20.
Carefully move the transmission
away from the engine and, at the
same time, lower it to clear the und-
erside of the vehicle.
21.
Remove the converter and
mount the transmission in a holding
fixture.
INSTALLATION—FORD
MERCURY AND METEOR
1.
Torque the two converter drain
plugs to specification.
2.
Install the converter on the sta-
tor support.
3.
Secure the transmission to the
jack with the chain.
4.
Rotate the flywheel to place two
converter mounting stud holes that are
adjacent to the drain plug holes in a
vertical position.
5.
Rotate the converter so that the
studs and drain plugs are in alignment
with those in the flywheel.
6. Move the transmission toward
the cylinder block until they are in
contact. Install and torque the attach-
ing bolts to specification making sure
that the vacuum tube retaining clips
are properly positioned.
7.
Remove the transmission jack
chain from around the transmission.
8. Install a new Oring on the lower
end of the transmission filler tube. In-
sert the tube in the transmission case
and secure the tube to the engine with
the attaching bolt.
9. Connect the speedometer cable
to the extension housing.
10.
Connect the oil cooler lines to
the right side of transmission case.
11.
Connect the vacuum line to the
vacuum diaphragm making sure that
the metal tube is secured in the retain-
ing clip.
12.
Position the cross member on
the side supports. Position the rear
mount on the crossmember and install
the attaching bolt and nut.
13.
Secure the engine rear support
to the extension housing and torque
the bolts to specification.
14.
Lower the transmission and re-
move the jack.
15.
Secure the crossmember to the
side supports with the attaching bolts
and torque them to specification.
16.
Position the bellcrank bracket
to the converter housing and install
the two attaching bolts.
17.
Connect the downshift rod to
the transmission downshift lever.
18.
Connect the selector rod to the
manual lever at the transmission. On
a column shift, use tool T67P-7341-A
and install a new grommet in the
manual lever. Then, secure the manual
selector rod to the lever.
19.
Secure the converter-to-flywheel
attaching nuts and torque them to
specification. Use a wrench on the
crankshaft pulley attaching nut to ro-
tate the flywheel. Do not use a wrench
on the converter attaching nuts to ro-
tate it.
20.
Install the converter housing
dust shield and secure it with the at-
taching bolts.
21.
Secure the starter motor in
place with the attaching bolts. Con-
nect the cable to the terminal on the
starter.
22.
Install the driveshaft.
23.
Adjust the shift linkage as de-
tailed in Section 2.
24.
Lower the vehicle.
25.
Fill the transmission to the cor-
rect level with the specified lubricant.
Start the engine and shift the trans-
mission to all ranges, then recheck the
fluid level.
REMOVAL—FAIRLANE,
MONTEGO, MUSTANG
AND COUGAR
1.
On Mustang and Cougar, dis-
connect the neutral switch wires from
the harness connector and the retain-
ing clip on the dash.
2.
Remove the bolt that secures the
filler tube to the rear of the right
cylinder head.
3.
Raise the vehicle on a hoist or
jack stands.
4.
Remove the converter drain plug
access cover from the lower end of the
converter housing.
5.
Place a drain pan under nhe con-
verter housing and remove the two
converter drain plugs. Install the plugs
after the fluid has drained.
6. Place the drain pan under the
transmission fluid pan. Starting at the
rear of the pan and working toward
the front, loosen the attaching bolts
and allow the fluid to drain. Finally
remove all of the pan attaching bolts
except two at the front, to allow the
fluid to further drain. After the fluid
has drained, install two bolts on the
rear side of the pan to temporarily
hold it in place.
7.
Disconnect the drive shaft from
the rear axle flange and remove it
from the transmission. Install tool
T61L-7657-A in the rear of the exten-
sion housing to prevent the fluid from
leaking.
8. Disconnect the downshift rod
from the transmission downshift lever.
9. Disconnect the shift rod from the
manual lever. On a column shift, use
tool T67P-7341-A to remove the rod.
10.
Disconnect the speedometer
cable from the extension housing.
11.
Disconnect the rubber hose
from the vacuum diaphragm at the
rear of the transmission. Remove the
vacuum tube from the retaining clip at
the transmission.
12.
Disconnect the starter cable
from the terminal on the starter. Re-
move the starter attaching bolts and
remove it from the housing.
13.
Lift the fluid filler tube from
the transmission case.
14.
Remove the four converter-
to-flywheel attaching nuts.
15.
On a Mustang or Cougar, dis-
connect the complete exhaust system
and allow it to hang on the rear axle.
16.
Remove the two nuts that at-
tach the engine rear support to the
crossmember.
17.
Raise the transmission with a
jack just enough to remove the weight
from the crossmember.
18.
Remove the cotter pins from
the crossmember-to-frame side sup-procarmanuals.com