FORD MUSTANG 2018 Owners Manual
Manufacturer: FORD, Model Year: 2018, Model line: MUSTANG, Model: FORD MUSTANG 2018Pages: 506, PDF Size: 7.66 MB
Page 241 of 506
MANUAL TRANSMISSION
FLUID CHECK
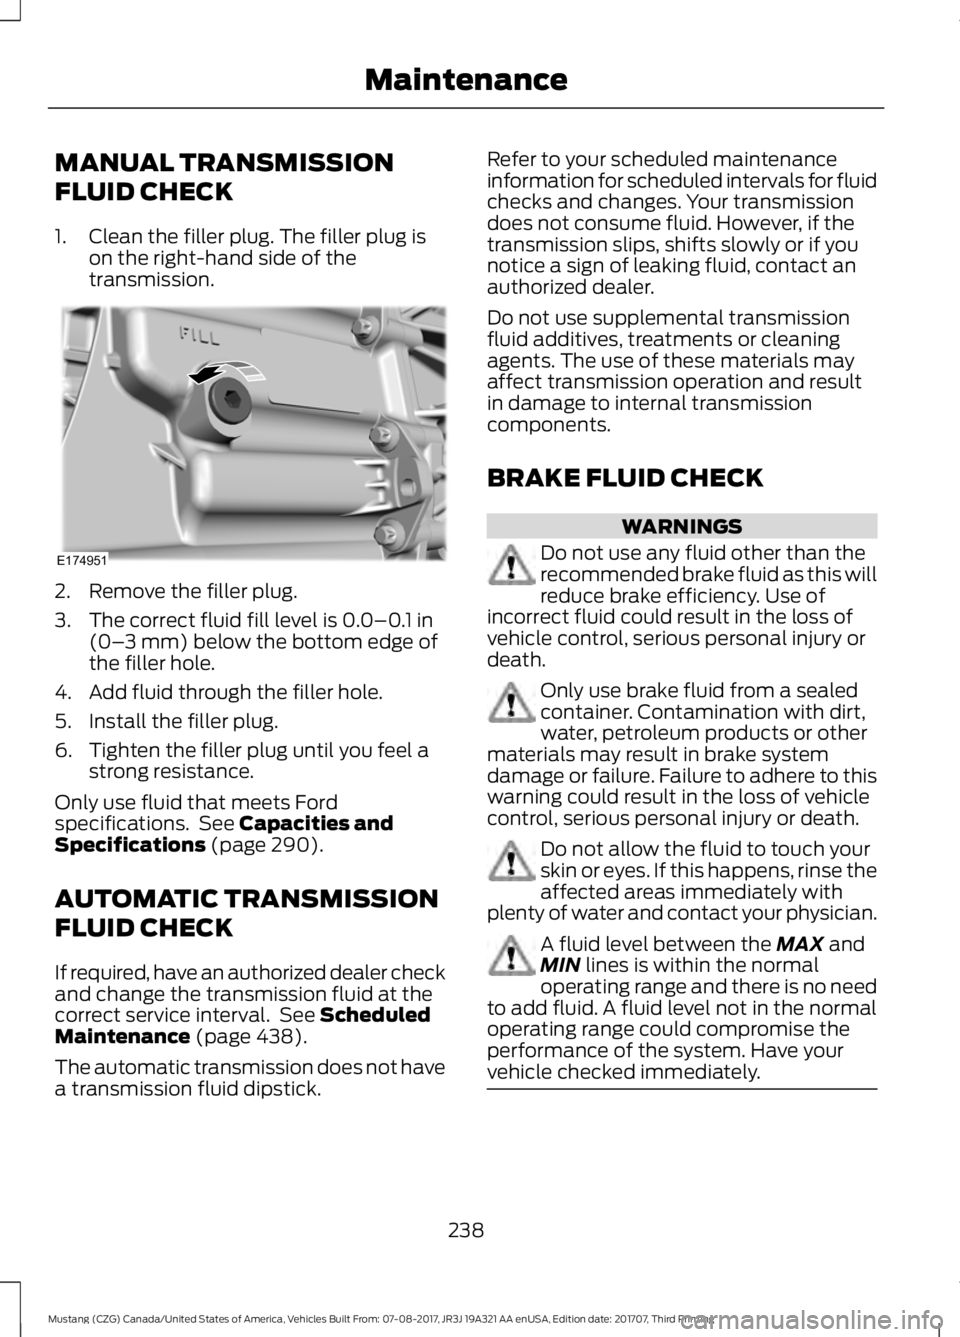
1. Clean the filler plug. The filler plug is
on the right-hand side of the
transmission. 2. Remove the filler plug.
3. The correct fluid fill level is 0.0–0.1 in
(0– 3 mm) below the bottom edge of
the filler hole.
4. Add fluid through the filler hole.
5. Install the filler plug.
6. Tighten the filler plug until you feel a strong resistance.
Only use fluid that meets Ford
specifications. See
Capacities and
Specifications (page 290).
AUTOMATIC TRANSMISSION
FLUID CHECK
If required, have an authorized dealer check
and change the transmission fluid at the
correct service interval. See
Scheduled
Maintenance (page 438).
The automatic transmission does not have
a transmission fluid dipstick. Refer to your scheduled maintenance
information for scheduled intervals for fluid
checks and changes. Your transmission
does not consume fluid. However, if the
transmission slips, shifts slowly or if you
notice a sign of leaking fluid, contact an
authorized dealer.
Do not use supplemental transmission
fluid additives, treatments or cleaning
agents. The use of these materials may
affect transmission operation and result
in damage to internal transmission
components.
BRAKE FLUID CHECK
WARNINGS
Do not use any fluid other than the
recommended brake fluid as this will
reduce brake efficiency. Use of
incorrect fluid could result in the loss of
vehicle control, serious personal injury or
death. Only use brake fluid from a sealed
container. Contamination with dirt,
water, petroleum products or other
materials may result in brake system
damage or failure. Failure to adhere to this
warning could result in the loss of vehicle
control, serious personal injury or death. Do not allow the fluid to touch your
skin or eyes. If this happens, rinse the
affected areas immediately with
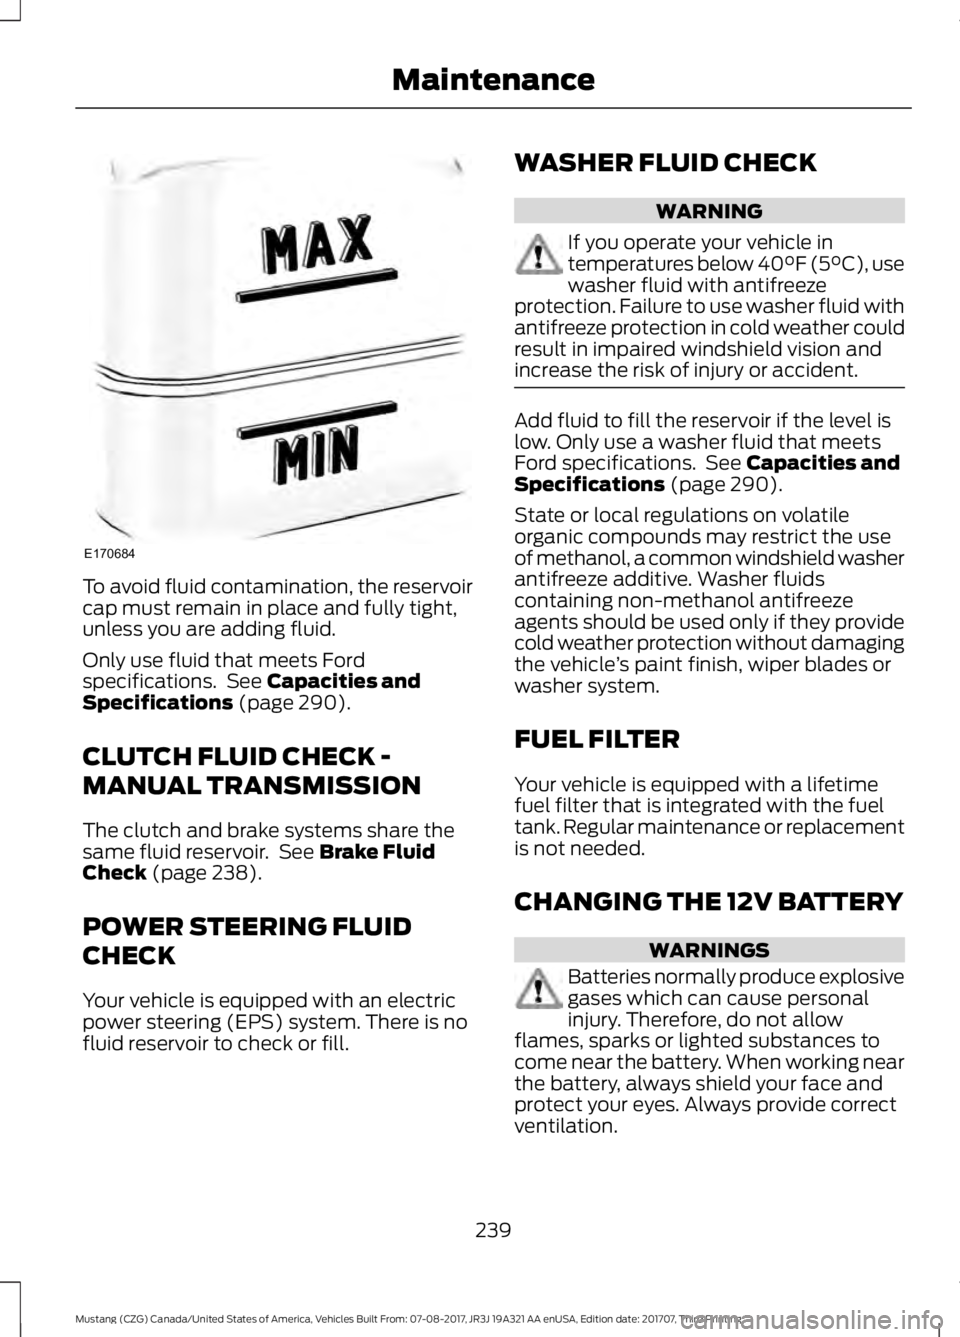
plenty of water and contact your physician. A fluid level between the
MAX and
MIN lines is within the normal
operating range and there is no need
to add fluid. A fluid level not in the normal
operating range could compromise the
performance of the system. Have your
vehicle checked immediately. 238
Mustang (CZG) Canada/United States of America, Vehicles Built From: 07-08-2017, JR3J 19A321 AA enUSA, Edition date: 201707, Third Printing MaintenanceE174951
Page 242 of 506
To avoid fluid contamination, the reservoir
cap must remain in place and fully tight,
unless you are adding fluid.
Only use fluid that meets Ford
specifications. See Capacities and
Specifications (page 290).
CLUTCH FLUID CHECK -
MANUAL TRANSMISSION
The clutch and brake systems share the
same fluid reservoir. See
Brake Fluid
Check (page 238).
POWER STEERING FLUID
CHECK
Your vehicle is equipped with an electric
power steering (EPS) system. There is no
fluid reservoir to check or fill. WASHER FLUID CHECK WARNING
If you operate your vehicle in
temperatures below 40°F (5°C), use
washer fluid with antifreeze
protection. Failure to use washer fluid with
antifreeze protection in cold weather could
result in impaired windshield vision and
increase the risk of injury or accident. Add fluid to fill the reservoir if the level is
low. Only use a washer fluid that meets
Ford specifications. See
Capacities and
Specifications (page 290).
State or local regulations on volatile
organic compounds may restrict the use
of methanol, a common windshield washer
antifreeze additive. Washer fluids
containing non-methanol antifreeze
agents should be used only if they provide
cold weather protection without damaging
the vehicle ’s paint finish, wiper blades or
washer system.
FUEL FILTER
Your vehicle is equipped with a lifetime
fuel filter that is integrated with the fuel
tank. Regular maintenance or replacement
is not needed.
CHANGING THE 12V BATTERY WARNINGS
Batteries normally produce explosive
gases which can cause personal
injury. Therefore, do not allow
flames, sparks or lighted substances to
come near the battery. When working near
the battery, always shield your face and
protect your eyes. Always provide correct
ventilation.
239
Mustang (CZG) Canada/United States of America, Vehicles Built From: 07-08-2017, JR3J 19A321 AA enUSA, Edition date: 201707, Third Printing MaintenanceE170684
Page 243 of 506
WARNINGS
When lifting a plastic-cased battery,
excessive pressure on the end walls
could cause acid to flow through the
vent caps, resulting in personal injury and
damage to the vehicle or battery. Lift the
battery with a battery carrier or with your
hands on opposite corners. Keep batteries out of reach of
children. Batteries contain sulfuric
acid. Avoid contact with skin, eyes or
clothing. Shield your eyes when working
near the battery to protect against possible
splashing of acid solution. In case of acid
contact with skin or eyes, flush
immediately with water for a minimum of
15 minutes and get prompt medical
attention. If acid is swallowed, call a
physician immediately. Battery posts, terminals and related
accessories contain lead and lead
compounds. Wash hands after
handling. This vehicle may have more than one
battery. Removing the battery cables
from only one battery does not
disconnect your vehicle electrical system.
Make sure you disconnect the battery
cables from all batteries when
disconnecting power. Failure to do so may
cause serious personal injury or property
damage. Your vehicle is fitted with a Motorcraft
maintenance-free battery which normally
does not require additional water.
When a battery replacement is required,
you must use a recommended
replacement battery that matches the
electrical requirements of the vehicle.
Note:
After cleaning or replacing the
battery, make sure you reinstall the battery
cover or shield. Note:
If you add electrical accessories or
components to the vehicle, it may adversely
affect the low voltage battery performance
and durability. This may also affect the
performance of other electrical systems in
the vehicle.
For longer, trouble-free operation, keep the
top of the battery clean and dry.
If you see any corrosion on the battery or
terminals, remove the cables from the
terminals and clean with a wire brush. You
can neutralize the acid with a solution of
baking soda and water.
Because your vehicle ’s engine is
electronically controlled by a computer,
some control conditions are maintained
by power from the battery. When the
battery is disconnected or a new battery
is installed, the engine must relearn its idle
and fuel trim strategy for optimum
driveability and performance. Flexible fuel
vehicles (FFV) must also relearn the
ethanol content of the fuel for optimum
driveability and performance.
To restore the settings, do the following:
1. Apply the parking brake.
2. Shift into park (P) or neutral (N).
3. Switch off all accessories.
4. Press the brake pedal and start your vehicle.
5. Run the engine until it reaches normal operating temperature. While the
engine is warming up, complete the
following: Reset the clock. Reset the
power windows bounce-back feature.
See Windows and Mirrors (page 77).
Reset the radio station presets. See
Audio System
(page 306).
6. Allow the engine to idle for at least one
minute.
7. Drive the vehicle at least 10 mi (16 km)
to completely relearn the idle trim and
fuel trim strategy.
240
Mustang (CZG) Canada/United States of America, Vehicles Built From: 07-08-2017, JR3J 19A321 AA enUSA, Edition date: 201707, Third Printing Maintenance
Page 244 of 506
Note:
If you do not allow the engine to
relearn the idle and fuel trim strategy, the
idle quality of your vehicle may be adversely
affected until the engine computer
eventually relearns the idle trim and fuel
trim strategy.
Note: For flexible fuel vehicles, if you are
operating on E85, you may experience poor
starts or an inability to start the engine and
driveability problems until the fuel trim and
ethanol content have been relearned.
Make sure that you dispose of old batteries
in an environmentally friendly way. Seek
advice from your local authority about
recycling old batteries.
If storing your vehicle for more than 30
days without recharging the battery, we
recommend that you disconnect the
battery cables to maintain battery charge
for quick starting.
Battery Management System (If
Equipped)
The battery management system monitors
battery conditions and takes actions to
extend battery life. If excessive battery
drain is detected, the system temporarily
disables some electrical systems to
protect the battery.
Systems included are:
• Heated rear window.
• Heated seats.
• Climate control.
• Heated steering wheel.
• Audio unit.
• Navigation system.
A message may appear in the information
displays to alert you that battery
protection actions are active. These
messages are only for notification that an
action is taking place, and not intended to
indicate an electrical problem or that the
battery requires replacement. After battery replacement, or in some
cases after charging the battery with an
external charger, the battery management
system requires eight hours of vehicle sleep
time to relearn the battery state of charge.
During this time your vehicle must remain
fully locked with the ignition switched off.
Note:
Prior to relearning the battery state
of charge, the battery management system
may temporarily disable some electrical
systems.
Electrical Accessory Installation
To make sure the battery management
system works correctly, do not connect an
electrical device ground connection
directly to the battery negative post. This
can cause inaccurate measurements of
the battery condition and potential
incorrect system operation.
Note: If you add electrical accessories or
components to the vehicle, it may adversely
affect battery performance and durability.
This may also affect the performance of
other electrical systems in the vehicle.
CHECKING THE WIPER
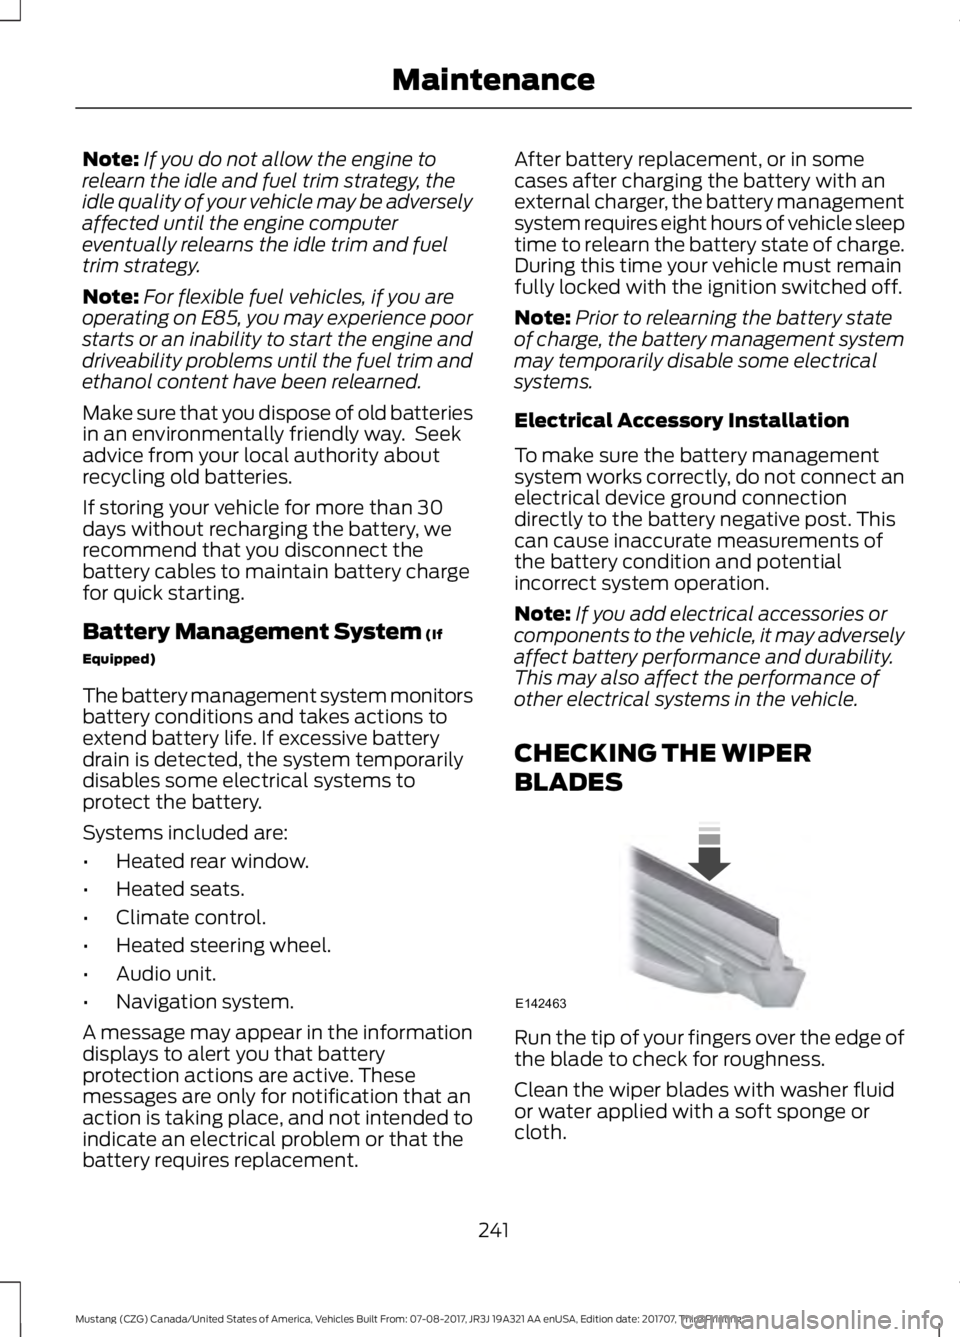
BLADES Run the tip of your fingers over the edge of
the blade to check for roughness.
Clean the wiper blades with washer fluid
or water applied with a soft sponge or
cloth.
241
Mustang (CZG) Canada/United States of America, Vehicles Built From: 07-08-2017, JR3J 19A321 AA enUSA, Edition date: 201707, Third Printing MaintenanceE142463
Page 245 of 506
CHANGING THE WIPER
BLADES
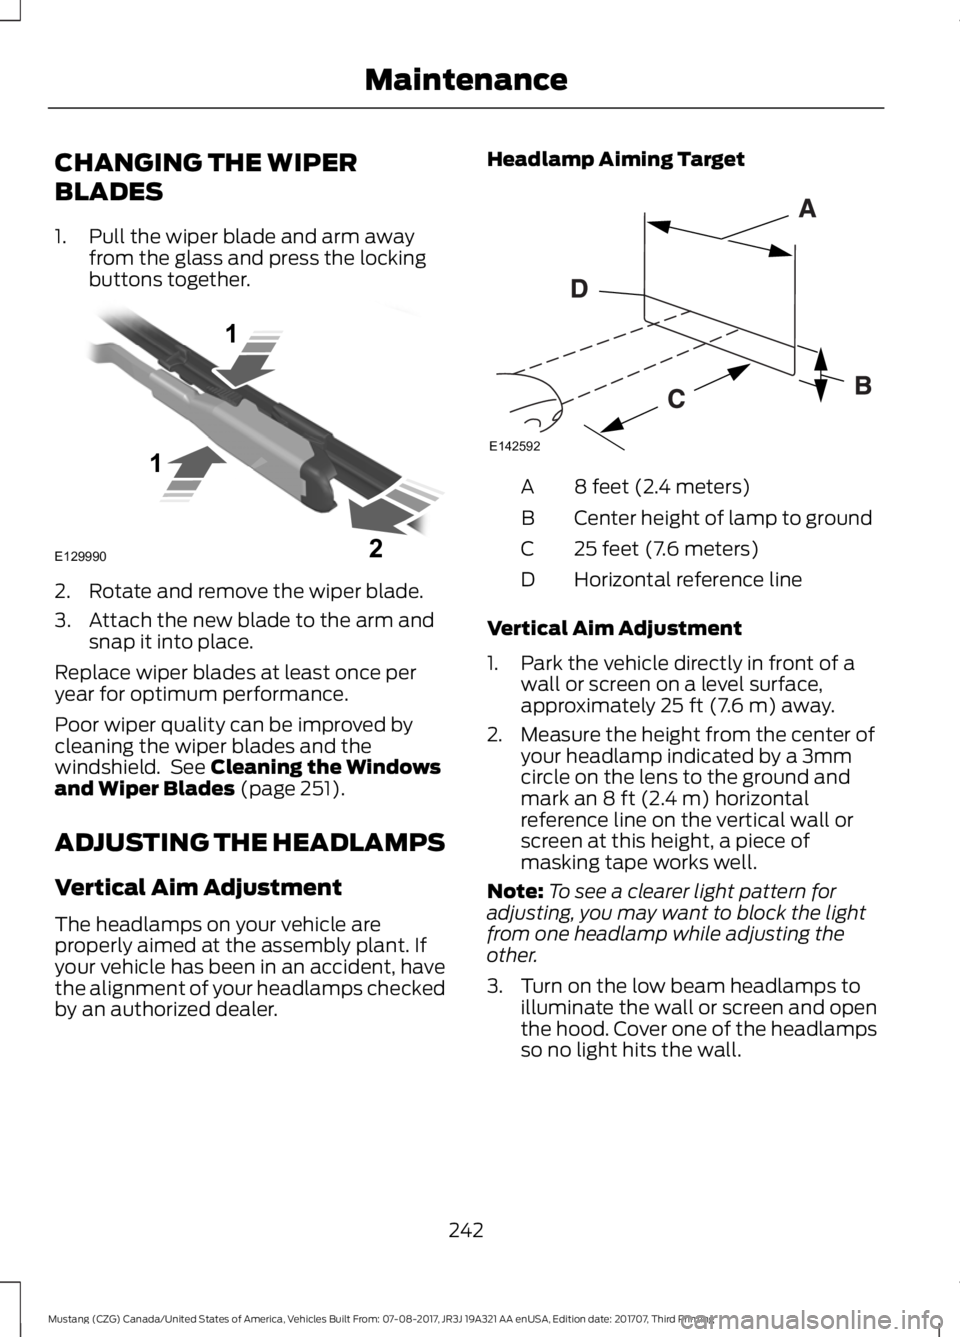
1. Pull the wiper blade and arm away
from the glass and press the locking
buttons together. 2. Rotate and remove the wiper blade.
3. Attach the new blade to the arm and
snap it into place.
Replace wiper blades at least once per
year for optimum performance.
Poor wiper quality can be improved by
cleaning the wiper blades and the
windshield. See Cleaning the Windows
and Wiper Blades (page 251).
ADJUSTING THE HEADLAMPS
Vertical Aim Adjustment
The headlamps on your vehicle are
properly aimed at the assembly plant. If
your vehicle has been in an accident, have
the alignment of your headlamps checked
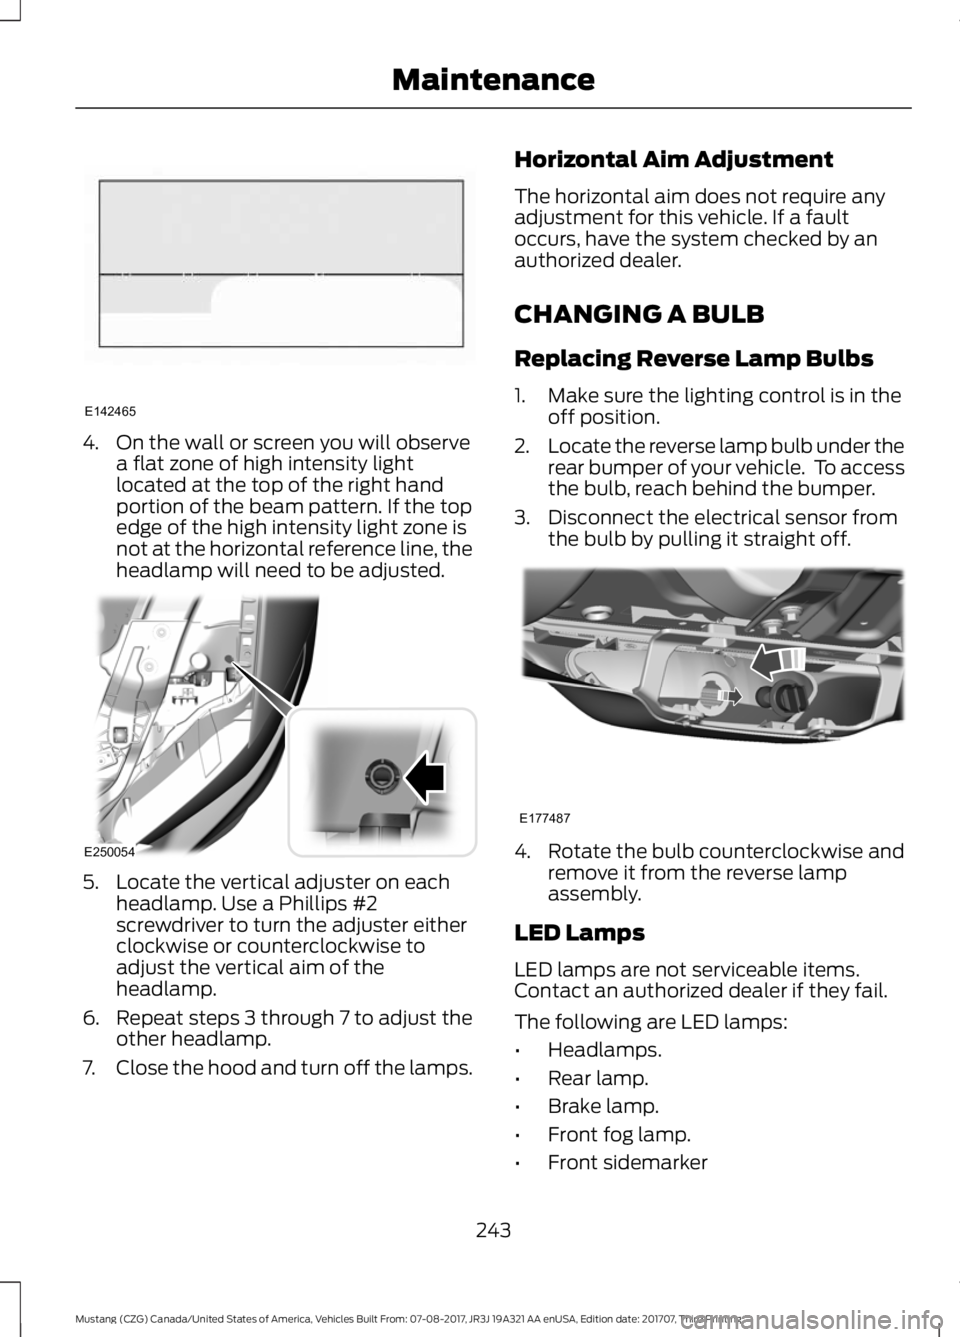
by an authorized dealer. Headlamp Aiming Target
8 feet (2.4 meters)
A
Center height of lamp to ground
B
25 feet (7.6 meters)
C
Horizontal reference line
D
Vertical Aim Adjustment
1. Park the vehicle directly in front of a wall or screen on a level surface,
approximately
25 ft (7.6 m) away.
2. Measure the height from the center of your headlamp indicated by a 3mm
circle on the lens to the ground and
mark an
8 ft (2.4 m) horizontal
reference line on the vertical wall or
screen at this height, a piece of
masking tape works well.
Note: To see a clearer light pattern for
adjusting, you may want to block the light
from one headlamp while adjusting the
other.
3. Turn on the low beam headlamps to illuminate the wall or screen and open
the hood. Cover one of the headlamps
so no light hits the wall.
242
Mustang (CZG) Canada/United States of America, Vehicles Built From: 07-08-2017, JR3J 19A321 AA enUSA, Edition date: 201707, Third Printing MaintenanceE129990
1
1 2 E142592
Page 246 of 506
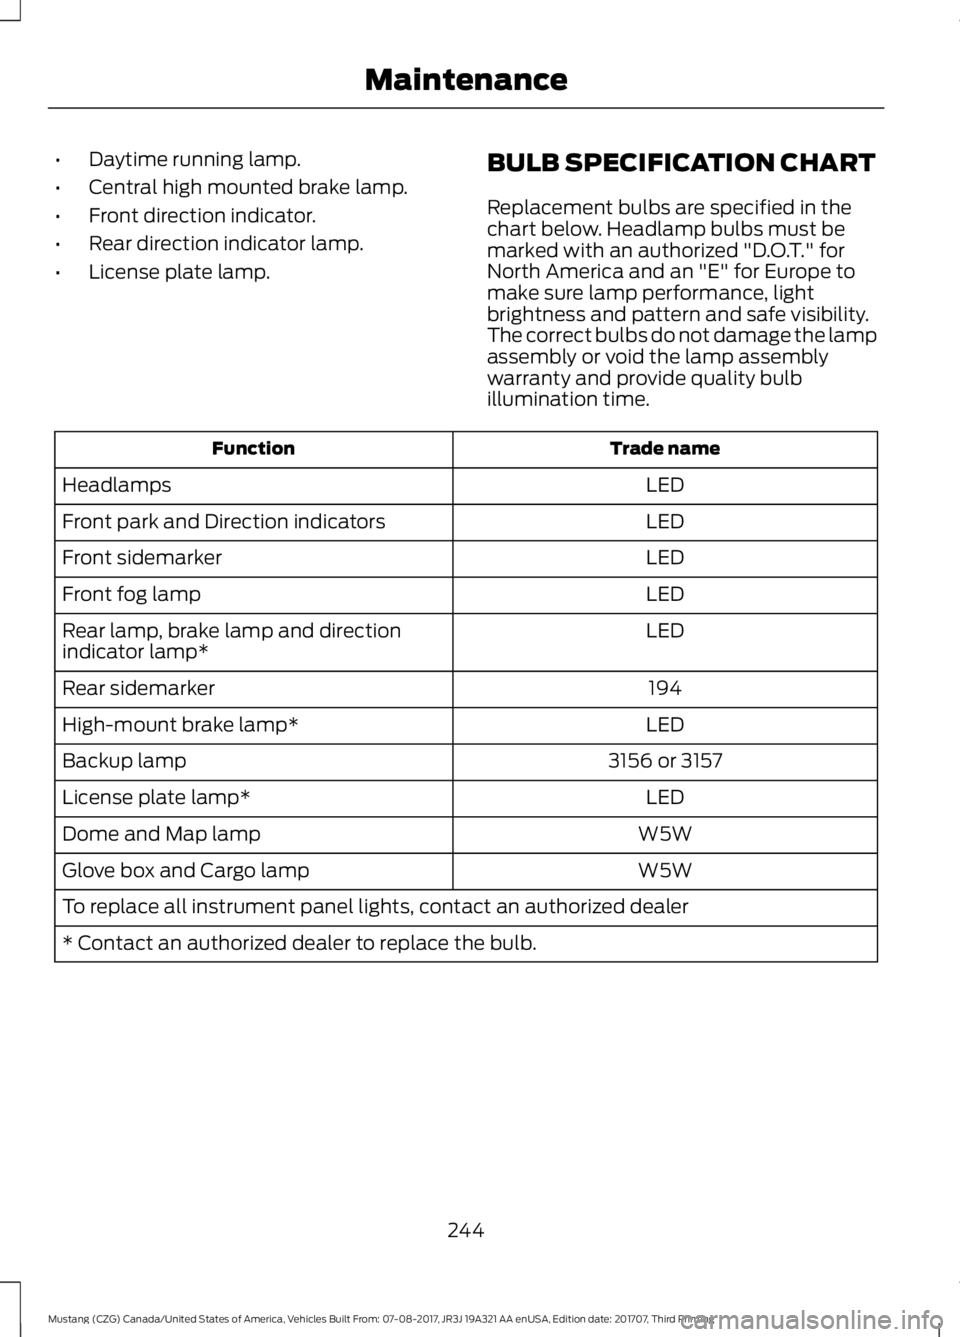
4. On the wall or screen you will observe
a flat zone of high intensity light
located at the top of the right hand
portion of the beam pattern. If the top
edge of the high intensity light zone is
not at the horizontal reference line, the
headlamp will need to be adjusted. 5. Locate the vertical adjuster on each
headlamp. Use a Phillips #2
screwdriver to turn the adjuster either
clockwise or counterclockwise to
adjust the vertical aim of the
headlamp.
6. Repeat steps 3 through 7 to adjust the other headlamp.
7. Close the hood and turn off the lamps. Horizontal Aim Adjustment
The horizontal aim does not require any
adjustment for this vehicle. If a fault
occurs, have the system checked by an
authorized dealer.
CHANGING A BULB
Replacing Reverse Lamp Bulbs
1. Make sure the lighting control is in the
off position.
2. Locate the reverse lamp bulb under the
rear bumper of your vehicle. To access
the bulb, reach behind the bumper.
3. Disconnect the electrical sensor from the bulb by pulling it straight off. 4. Rotate the bulb counterclockwise and
remove it from the reverse lamp
assembly.
LED Lamps
LED lamps are not serviceable items.
Contact an authorized dealer if they fail.
The following are LED lamps:
• Headlamps.
• Rear lamp.
• Brake lamp.
• Front fog lamp.
• Front sidemarker
243
Mustang (CZG) Canada/United States of America, Vehicles Built From: 07-08-2017, JR3J 19A321 AA enUSA, Edition date: 201707, Third Printing MaintenanceE142465 E250054 E177487
Page 247 of 506
•
Daytime running lamp.
• Central high mounted brake lamp.
• Front direction indicator.
• Rear direction indicator lamp.
• License plate lamp. BULB SPECIFICATION CHART
Replacement bulbs are specified in the
chart below. Headlamp bulbs must be
marked with an authorized "D.O.T." for
North America and an "E" for Europe to
make sure lamp performance, light
brightness and pattern and safe visibility.
The correct bulbs do not damage the lamp
assembly or void the lamp assembly
warranty and provide quality bulb
illumination time. Trade name
Function
LED
Headlamps
LED
Front park and Direction indicators
LED
Front sidemarker
LED
Front fog lamp
LED
Rear lamp, brake lamp and direction
indicator lamp*
194
Rear sidemarker
LED
High-mount brake lamp*
3156 or 3157
Backup lamp
LED
License plate lamp*
W5W
Dome and Map lamp
W5W
Glove box and Cargo lamp
To replace all instrument panel lights, contact an authorized dealer
* Contact an authorized dealer to replace the bulb.
244
Mustang (CZG) Canada/United States of America, Vehicles Built From: 07-08-2017, JR3J 19A321 AA enUSA, Edition date: 201707, Third Printing Maintenance
Page 248 of 506
CHANGING THE ENGINE AIR
FILTER
WARNING
To reduce the risk of vehicle damage
and personal burn injuries, do not
start your engine with the air cleaner
removed and do not remove it while the
engine is running. Note:
Failure to use the correct air filter
element may result in severe engine
damage. Your warranty may not cover
these damages.
Only use the specified replacement air
filter. See Motorcraft Parts (page 291).
For EcoBoost equipped vehicles: When
servicing the air cleaner, it is important that
no foreign material enter the air induction
system. The engine and turbocharger are
susceptible to damage from even small
particles.
Change the air filter element at the proper
intervals. See
Scheduled Maintenance
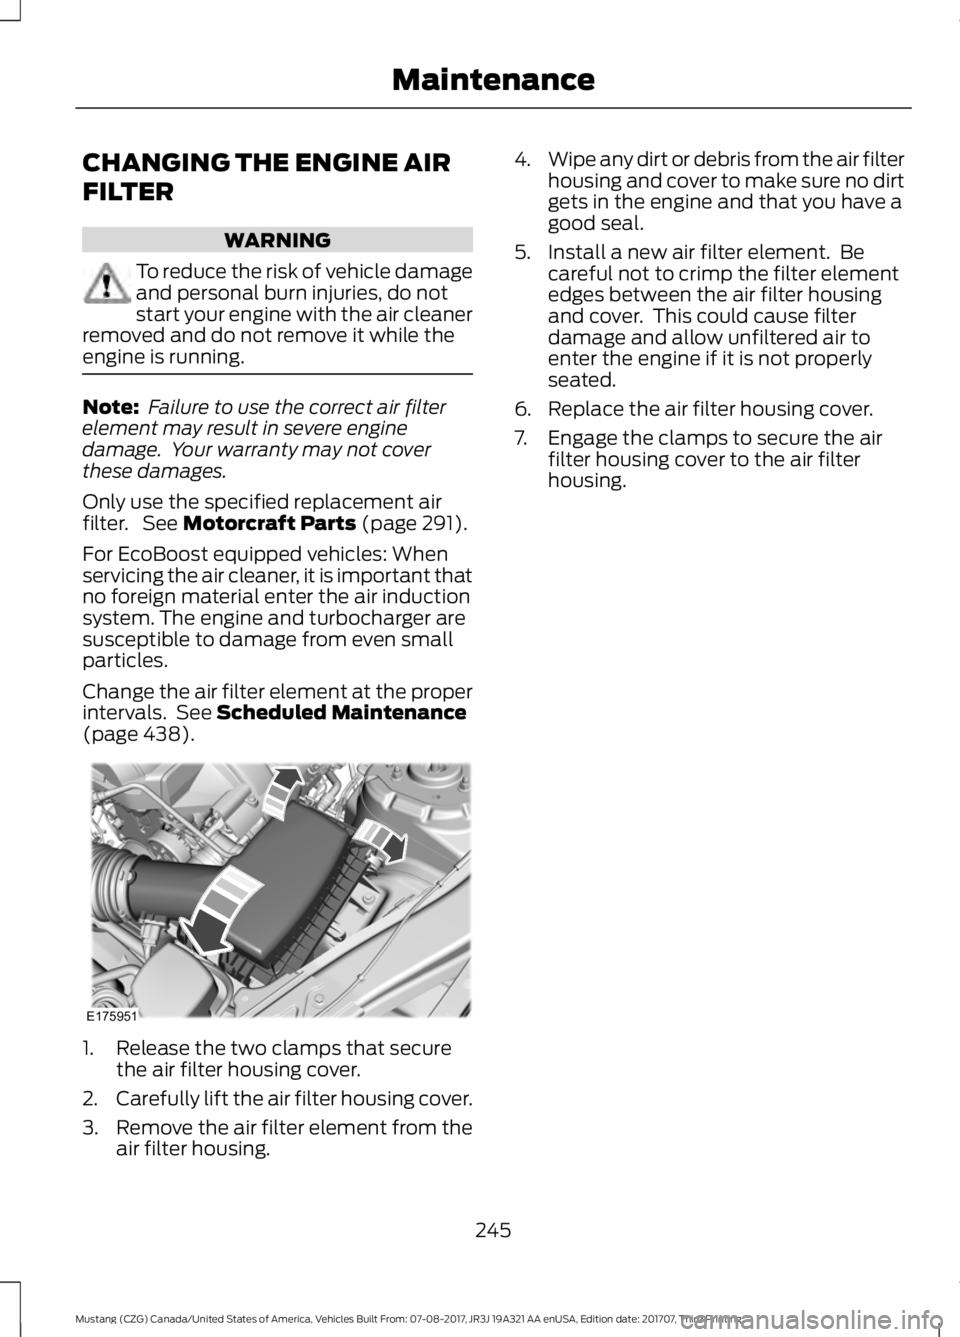
(page 438). 1. Release the two clamps that secure
the air filter housing cover.
2. Carefully lift the air filter housing cover.
3. Remove the air filter element from the
air filter housing. 4.
Wipe any dirt or debris from the air filter
housing and cover to make sure no dirt
gets in the engine and that you have a
good seal.
5. Install a new air filter element. Be careful not to crimp the filter element
edges between the air filter housing
and cover. This could cause filter
damage and allow unfiltered air to
enter the engine if it is not properly
seated.
6. Replace the air filter housing cover.
7. Engage the clamps to secure the air filter housing cover to the air filter
housing.
245
Mustang (CZG) Canada/United States of America, Vehicles Built From: 07-08-2017, JR3J 19A321 AA enUSA, Edition date: 201707, Third Printing MaintenanceE175951
Page 249 of 506
WARNING
Track Apps
™ is for track use only.
Remember that even advanced
technology cannot defy the laws of
physics. It is always possible to lose control
of a vehicle due to inappropriate driver
input for the conditions. Aggressive driving
on any road condition can cause you to
lose control of your vehicle increasing the
risk of personal injury or property damage. Appropriately change the engine oil for
racing and other track events:
•
2.3L: Prior to the track event, drain the
engine oil, replace the oil filter and
change the engine oil to 5W-50. After
the track event, drain the engine oil,
replace the oil filter and refill the engine
oil with 5W-30.
See Capacities and
Specifications (page 295).
• 5.0L: Prior to the track event, drain the
engine oil, replace the oil filter and
change the engine oil to 5W-30. After
the track event, drain the engine oil,
replace the oil filter and refill the engine
oil with 5W-20.
See Capacities and
Specifications (page 299).
Regularly check the engine oil level during
the event. Maintain the engine oil level at
or near the max mark on the engine oil
dipstick. See Engine Oil Check (page 232
).
Track Apps ™
This information display driven feature
provides a suite of menu options to record
and optimize your track performances.
See
General Information (page 88).
Note: Track Apps ™
are for track use only.
Do not use them under any other driving
conditions. Note:
You cannot view or clear your results
unless your vehicle is at a complete stop
with the right arrow on the display menu
inactive. If your vehicle does not reach
100 mph (160 km/h)
during the track run,
your display may not show your selected
interval's results.
Note: The pre-collision assist system turns
off when using
Track Apps ™ or when you
switch off your stability control system.
Acceleration Timer
Displays your vehicle's rate of acceleration
for a given speed or distance range.
Accelerometer
Displays your vehicle's rate of acceleration
or deceleration. A dot moves toward the
area of acceleration or deceleration.
LEFT Acceleration or Deceleration
When accelerating or decelerating left, the
dot moves to the right on the
accelerometer.
RIGHT Acceleration or Deceleration
When accelerating or decelerating right,
the dot moves to the left on the
accelerometer.
Brake Performance
Displays your vehicle's rate of deceleration
for a given speed range.
Exhaust Mode
Gives the driver the ability to choose the
vehicle's exhaust mode.
246
Mustang (CZG) Canada/United States of America, Vehicles Built From: 07-08-2017, JR3J 19A321 AA enUSA, Edition date: 201707, Third Printing Track Use
Page 250 of 506
Note:
The Track Exhaust Mode setting is
only for use at tracks and not for use on
public roadways. Use of this setting results
in increased exterior noise, which may not
meet state and local laws and regulations.
It is the obligation of the driver to operate
the vehicle in a manner that complies with
state and local requirements. Only use the
Track Exhaust Mode
setting at a
competition track or an off-road course
where elevated exterior vehicle noise is
acceptable.
Lap Timer
Gives you the ability to record lap times at
three separate tracks.
Launch Control (If Equipped)
Maximizes your vehicle's traction from a
standing start.
Use launch control, follow these steps:
1. Bring your vehicle to a complete stop.
2. Make sure launch control is enabled. The indicator illuminates in the
instrument display when launch control
is enabled.
See Warning Lamps and
Indicators (page 83).
3. Fully depress the clutch pedal.
4. Shift the transmission into 1st gear.
5. Fully depress the accelerator pedal and
allow the engine RPM to stabilize.
6. Release the clutch pedal.
Line Lock
Line lock is a feature intended for use at
tracks only and should not be used on
public roadways. Use of this feature may
result in significantly increased rear tire
wear. It is intended to condition the rear
tires to maximize traction prior to track use.
Line lock maintains brake force at the front
wheels, allowing the rear wheels to spin
with minimal vehicle movement. This feature is located in the
Track Apps
™
menu. Make selections through the 5-way
information display control and OK button
located on the steering wheel.
Using
Line Lock
There are three line lock stages:
• Initiated.
• Engaged.
• Off.
Initiating
Line Lock
The initiation stage verifies that the vehicle
is ready for line lock function, and confirms
driver intent. Follow the prompts in the
information display to initiate line lock.
The following conditions must be met to
initialize line lock:
• The vehicle is on a level surface.
• The engine is running.
• The vehicle is traveling less than
25 mph (40 km/h)
.
• Selectable drive mode is not in wet
mode (if equipped).
• There are no electronic stability control
faults.
If you want to cancel line lock once it is
initialized, press the left information
display control. Once initiated, line lock is
prepared for activation and remains
initiated up to 25 mph (40 km/h). If vehicle
speed exceeds 25 mph (40 km/h), line lock
automatically cancels.
247
Mustang (CZG) Canada/United States of America, Vehicles Built From: 07-08-2017, JR3J 19A321 AA enUSA, Edition date: 201707, Third Printing Track Use