warning FORD POLICE INTERCEPTOR UTILITY 2014 1.G Owners Manual
[x] Cancel search | Manufacturer: FORD, Model Year: 2014, Model line: POLICE INTERCEPTOR UTILITY, Model: FORD POLICE INTERCEPTOR UTILITY 2014 1.GPages: 406, PDF Size: 6.86 MB
Page 182 of 406
•Suppose your vehicle has a 1400 lb. (635 kg) cargo and luggage
capacity. You and one of your friends decide to pick up cement from
the local home improvement store to finish that patio you have been
planning for the past 2 years. Measuring the inside of the vehicle with
the rear seat folded down, you have room for 12-100 lb. (45 kg) bags
of cement. Do you have enough load capacity to transport the cement
to your home? If you and your friend each weigh 220 lb. (99 kg), the
calculation would be: 1,400 - (2 x 220) - (12 x 100) = 1,400 - 440 -
1,200 = - 240 lb. No, you do not have enough cargo capacity to carry
that much weight. In metric units, the calculation would be: 635 kg -
(2 x 99 kg) - (12 x 45 kg) = 635 - 198 - 540 = -103 kg. You will need
to reduce the load weight by at least 240 lb. (104 kg). If you remove
3-100 lb. (45 kg) cement bags, then the load calculation would be:
1,400 - (2 x 220) - (9 x 100) = 1,400 - 440 - 900 = 60 lb. Now you
have the load capacity to transport the cement and your friend home.
In metric units, the calculation would be: 635 kg - (2 x 99 kg) - (9 x
45 kg) = 635 - 198 - 405 = 32 kg.
The above calculations also assume that the loads are positioned in your
vehicle in a manner that does not overload the Front or the Rear Gross
Axle Weight Rating specified for your vehicle on the Safety Compliance
Certification Label. The label shall be affixed to either the door hinge
pillar, door-latch post, or the door edge that meets the door-latch post,
next to the driver’s seating position.
Special Loading Instructions for Owners of Pick-up Trucks and
Utility-type Vehicles
WARNING:Loaded vehicles may handle differently than
unloaded vehicles. Extra precautions, such as slower speeds and
increased stopping distance, should be taken when driving a heavily
loaded vehicle.
Your vehicle can haul more cargo and people than most passenger cars.
Depending upon the type and placement of the load, hauling cargo and
people may raise the center of gravity of the vehicle.
Load Carrying181
2014 Police(pol)
Owners Guide gf, 3rd Printing, September 2013
USA(fus)
Page 183 of 406
TOWING A TRAILER
WARNING:Do not exceed the GVWR or the GAWR specified on
the certification label.
WARNING:Towing trailers beyond the maximum recommended
gross trailer weight exceeds the limit of your vehicle and could
result in engine damage, transmission damage, structural damage, loss
of vehicle control, vehicle rollover and personal injury.
Note:For information on electrical items such as fuses or relays, see the
Fuseschapter.
The load capacity of your vehicle is designated by weight not volume.
You may not necessarily be able to use all available space when loading
your vehicle or trailer.
Towing a trailer places extra load on the engine, transmission, axle,
brakes, tires, and suspension. Inspect these components before, during
and after towing.
Load Placement
To help minimize how trailer movement affects your vehicle when
driving:
•Load the heaviest items closest to the trailer floor.
•Load the heaviest items centered between the left and right side
trailer tires.
•Load the heaviest items above the trailer axles or just slightly forward
toward the trailer tongue. Do not allow the final trailer tongue weight
to go above or below 10–15% of the loaded trailer weight.
•Select a tow bar with the correct rise or drop. When both the loaded
vehicle and trailer are connected, the trailer frame should be level, or
slightly angled down toward your vehicle, when viewed from the side.
When driving with a trailer or payload, a slight takeoff vibration or
shudder may be present due to the increased payload weight. You can
find more information about proper trailer loading and setting your
vehicle up for towing underLoad limitin theLoad Carryingchapter.
You can also find information in theRV and Trailer Towing Guide
available at your authorized dealer.
182Towing
2014 Police(pol)
Owners Guide gf, 3rd Printing, September 2013
USA(fus)
Page 185 of 406
ESSENTIAL TOWING CHECKS
Follow these guidelines for safe towing:
•Do not tow a trailer until you drive your vehicle at least 1000 miles
(1600 kilometers).
•Consult your local motor vehicle laws for towing a trailer.
•See the instructions included with towing accessories for the proper
installation and adjustment specifications.
•Service your vehicle more frequently if you tow a trailer. See your
scheduled maintenance information.
•If you use a rental trailer, follow the instructions the rental agency
gives you.
For load specification terms found on the tire label and Safety
Compliance label and for instructions on calculating your vehicle’s load,
refer toLoad limitin theLoad Carryingchapter.
Remember to account for the trailer tongue weight as part of your
vehicle load when calculating the total vehicle weight.
Hitches
Do not use a hitch that either clamps onto the bumper or attaches to the
axle.
Distribute the trailer load so 10-15% of the total trailer weight is on the
tongue.
Safety Chains
Note:Never attach safety chains to the bumper.
Always connect the safety chains to the hook retainers of your vehicle
hitch.
To connect the safety chains, cross them under the trailer tongue and
allow enough slack for turning tight corners. Do not allow the chains to
drag on the ground.
Trailer Brakes
WARNING:Do not connect a trailer’s hydraulic brake system
directly to your vehicle’s brake system. Your vehicle may not have
enough braking power and your chances of having a collision greatly
increase.
Electric brakes and manual, automatic or surge-type trailer brakes are
safe if you install them properly and adjust them to the manufacturer’s
specifications. The trailer brakes must meet local and federal regulations.
184Towing
2014 Police(pol)
Owners Guide gf, 3rd Printing, September 2013
USA(fus)
Page 186 of 406
The rating for the tow vehicle’s braking system operation is at
the gross vehicle weight rating, not the gross combined weight
rating.
Separate functioning brake systems are required for safe control
of towed vehicles and trailers weighing more than 1500 pounds
(680 kilograms) when loaded.
Trailer Lamps
WARNING:Never connect any trailer lamp wiring to the
vehicle’s tail lamp wiring; this may damage the electrical system
resulting in a fire. Contact an authorized dealer as soon as possible for
assistance in proper trailer tow wiring installation. Additional electrical
equipment may be required.
Trailer lamps are required on most towed vehicles. Make sure all running
lights, brake lights, turn signals and hazard lights are working.
Before Towing a Trailer
Practice turning, stopping and backing up to get the feel of your
vehicle-trailer combination before starting on a trip. When turning, make
wider turns so the trailer wheels clear curbs and other obstacles.
When Towing a Trailer
•Do not drive faster than 70 mph (113 km/h) during the first 500 miles
(800 kilometers).
•Do not make full-throttle starts.
•Check your hitch, electrical connections and trailer wheel lug nuts
thoroughly after you have traveled 50 miles (80 kilometers).
•When stopped in congested or heavy traffic during hot weather, place
the gearshift in positionPto aid engine and transmission cooling and
to help air conditioning performance.
•Turn off the speed control with heavy loads or in hilly terrain. The
speed control may turn off automatically when you are towing on
long, steep grades.
•Shift to a lower gear when driving down a long or steep hill. Do not
apply the brakes continuously, as they may overheat and become less
effective.
•If your transmission is equipped with a Grade Assist or Tow/Haul
feature, use this feature when towing. This provides engine braking
and helps eliminate excessive transmission shifting for optimum fuel
economy and transmission cooling.
Towing185
2014 Police(pol)
Owners Guide gf, 3rd Printing, September 2013
USA(fus)
Page 192 of 406
![FORD POLICE INTERCEPTOR UTILITY 2014 1.G Owners Manual •Drive a heavily loaded vehicle or tow a trailer.
•Carry unnecessary weight (approximately 1 mpg [0.4 km/L] is lost for
every 400 pounds [180 kilograms] of weight carried).
•Add particular acces FORD POLICE INTERCEPTOR UTILITY 2014 1.G Owners Manual •Drive a heavily loaded vehicle or tow a trailer.
•Carry unnecessary weight (approximately 1 mpg [0.4 km/L] is lost for
every 400 pounds [180 kilograms] of weight carried).
•Add particular acces](/img/11/5325/w960_5325-191.png)
•Drive a heavily loaded vehicle or tow a trailer.
•Carry unnecessary weight (approximately 1 mpg [0.4 km/L] is lost for
every 400 pounds [180 kilograms] of weight carried).
•Add particular accessories to your vehicle (e.g.; bug deflectors,
rollbars or light bars, running boards, ski racks).
•Drive with the wheels out of alignment.
DRIVING THROUGH WATER
WARNING:Drive through water in an emergency only, and not
as part of normal driving.
WARNING:Engine damage can occur if water enters the air
filter.
Note:Driving through deep water may allow water into the transmission
or air intake and can cause internal vehicle damage or cause it to stall.
Note:Once through the water, always dry the brakes by moving your
vehicle slowly while applying light pressure on the brake pedal.
If driving through deep or standing water is unavoidable, proceed very
slowly. Never drive through water that is higher than the bottom of the
wheel rims (for cars) or the bottom of the hubs (for trucks).
When driving through water,
traction or brake capability may be
limited. Also, water may enter your
engine’s air intake and severely
damage your engine or your vehicle
may stall.
Wet brakes do not stop the vehicle
as quickly as dry brakes.
Driving Hints191
2014 Police(pol)
Owners Guide gf, 3rd Printing, September 2013
USA(fus)
Page 193 of 406
FLOOR MATS (IF EQUIPPED)
WARNING:Always use floor mats that are designed to fit the
foot well of your vehicle. Only use floor mats that leave the pedal
area unobstructed. Only use floor mats that are firmly secured to
retention posts so that they cannot slip out of position and interfere
with the pedals or impair safe operation of your vehicle in other ways.
•Incorrectly fitted floor mats can cause the accelerator pedal to
become stuck in the open position. This can cause loss of vehicle
control.
•Always correctly install the floor mats to the retention posts so that
they cannot slip out of position or obstruct pedal operation.
•Do not place unsecured floor mats or any other covering in the foot
well.
•Do not place additional floor mats or any other covering on top of
the original floor mats. This will reduce the pedal clearance and
interfere with the pedal operation.
•Do not allow objects to fall or become trapped under the pedals of
your vehicle. This can cause loss of vehicle control.
•Carry out regular inspections to make sure the floor mats are secure.
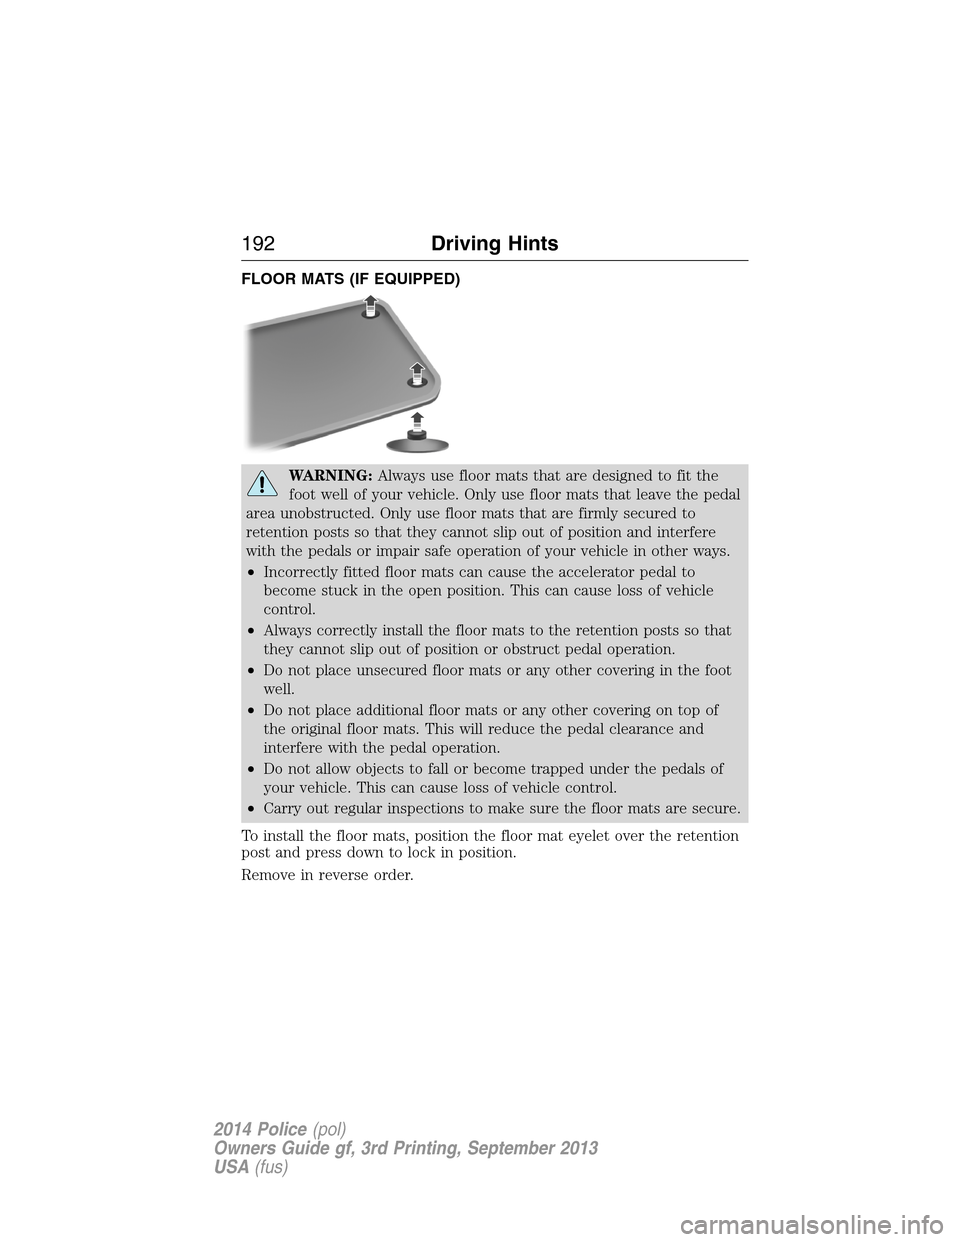
To install the floor mats, position the floor mat eyelet over the retention
post and press down to lock in position.
Remove in reverse order.
192Driving Hints
2014 Police(pol)
Owners Guide gf, 3rd Printing, September 2013
USA(fus)
Page 195 of 406
Vehicles Sold in the United States: Using Roadside Assistance
Complete the roadside assistance identification card and place it in your
wallet for quick reference. This card is found in the owner’s manual
portfolio in the glove compartment.
U.S. Ford vehicle customers who require Roadside Assistance, call
1-800-241-3673.
If you need to arrange roadside assistance for yourself, Ford Motor
Company will reimburse a reasonable amount for towing to the nearest
dealership within 35 miles (56.3 kilometers). To obtain reimbursement
information, U.S. Ford vehicle customers call 1-800-241-3673. Customers
will be asked to submit their original receipts.
Vehicles Sold in Canada: Getting Roadside Assistance
Canadian clients who require roadside assistance, call 1-800-665-2006.
Vehicles Sold in Canada: Using Roadside Assistance
For your convenience, you may complete the roadside assistance
identification card found in the centerfold of this warranty guide and
retain for future reference.
Canadian roadside coverage and benefits may differ from the U.S.
coverage. If you require more information, please refer to the coverage
section of your warranty guide, call us in Canada at 1-800-665-2006 or
visit our website at www.ford.ca.
HAZARD WARNING FLASHERS
The hazard flasher control is located on the instrument panel
by the radio. Use it when your vehicle is disabled and is
creating a safety hazard for other motorists.
•Press the flasher control and all front and rear direction signals will
flash.
•Press the flasher control again to turn them off.
Note:With extended use, the flashers may run down your 12–volt
battery.
194Roadside Emergencies
2014 Police(pol)
Owners Guide gf, 3rd Printing, September 2013
USA(fus)
Page 196 of 406
FUEL SHUTOFF
WARNING:Failure to inspect and if necessary repair fuel leaks
after a collision may increase the risk of fire and serious injury.
Ford Motor Company recommends that the fuel system be inspected by
an authorized dealer after any collision.
In the event of a moderate to severe collision, this vehicle is equipped
with a fuel pump shut-off feature that stops the flow of fuel to the
engine. Not every impact will cause a shut-off.
Should your vehicle shut off after a collision, you may restart your
vehicle by doing the following:
1. Switch off the ignition and wait 10 seconds.
2. Switch on the ignition.
3. Repeat steps 1 and 2 to re-enable fuel pump.
Note:When you try to restart your vehicle after a fuel shutoff, the
vehicle makes sure that various systems are safe to restart. One your
vehicle determines that the systems are safe, then the vehicle will allow
you to restart.
Note:In the event that your vehicle does not restart after your third
attempt, contact an authorized dealer.
JUMP-STARTING THE VEHICLE
WARNING:The gases around the battery can explode if exposed
to flames, sparks, or lit cigarettes. An explosion could result in
injury or vehicle damage.
WARNING:Batteries contain sulfuric acid which can burn skin,
eyes and clothing, if contacted.
Do not attempt to push-start your automatic transmission vehicle.
Automatic transmissions do not have push-start capability. Attempting to
push-start a vehicle with an automatic transmission may cause
transmission damage.
When the battery is disconnected or a new battery is installed, the
automatic transmission must relearn its shift strategy. As a result, the
transmission may exhibit a combination of firm and soft shifts. This
operation is considered normal and will not affect function or durability
of the transmission. Over time, the adaptive learning process will fully
update transmission operation.
Roadside Emergencies195
2014 Police(pol)
Owners Guide gf, 3rd Printing, September 2013
USA(fus)
Page 197 of 406
Preparing Your Vehicle
Note:Use only a 12–volt supply to start your vehicle.
Note:Do not disconnect the battery of the disabled vehicle as this could
damage the vehicle’s electrical system.
1. Park the booster vehicle close to the hood of the disabled vehicle
making sure the two vehicles do not touch. Set the parking brake on
both vehicles and stay clear of the engine cooling fan and other moving
parts.
2. Check all battery terminals. Remove the positive terminal cover
(if equipped) and any excessive corrosion before you attach the battery
cables. Ensure that vent caps are tight and level.
3. Turn the heater fan on in both vehicles to protect from any electrical
surges. Turn all other accessories off.
Connecting the Jumper Cables
WARNING:Do not connect the end of the second cable to the
negative (-) terminal of the battery to be jumped. A spark may
cause an explosion of the gases that surround the battery.
Note:Do not attach the negative (-) cable to fuel lines, engine rocker
covers, the intake manifold or electrical components as grounding points.
196Roadside Emergencies
2014 Police(pol)
Owners Guide gf, 3rd Printing, September 2013
USA(fus)
Page 208 of 406
CHANGING A FUSE
Fuses
WARNING:Always replace a fuse with one that has the
specified amperage rating. Using a fuse with a higher amperage
rating can cause severe wire damage and could start a fire.
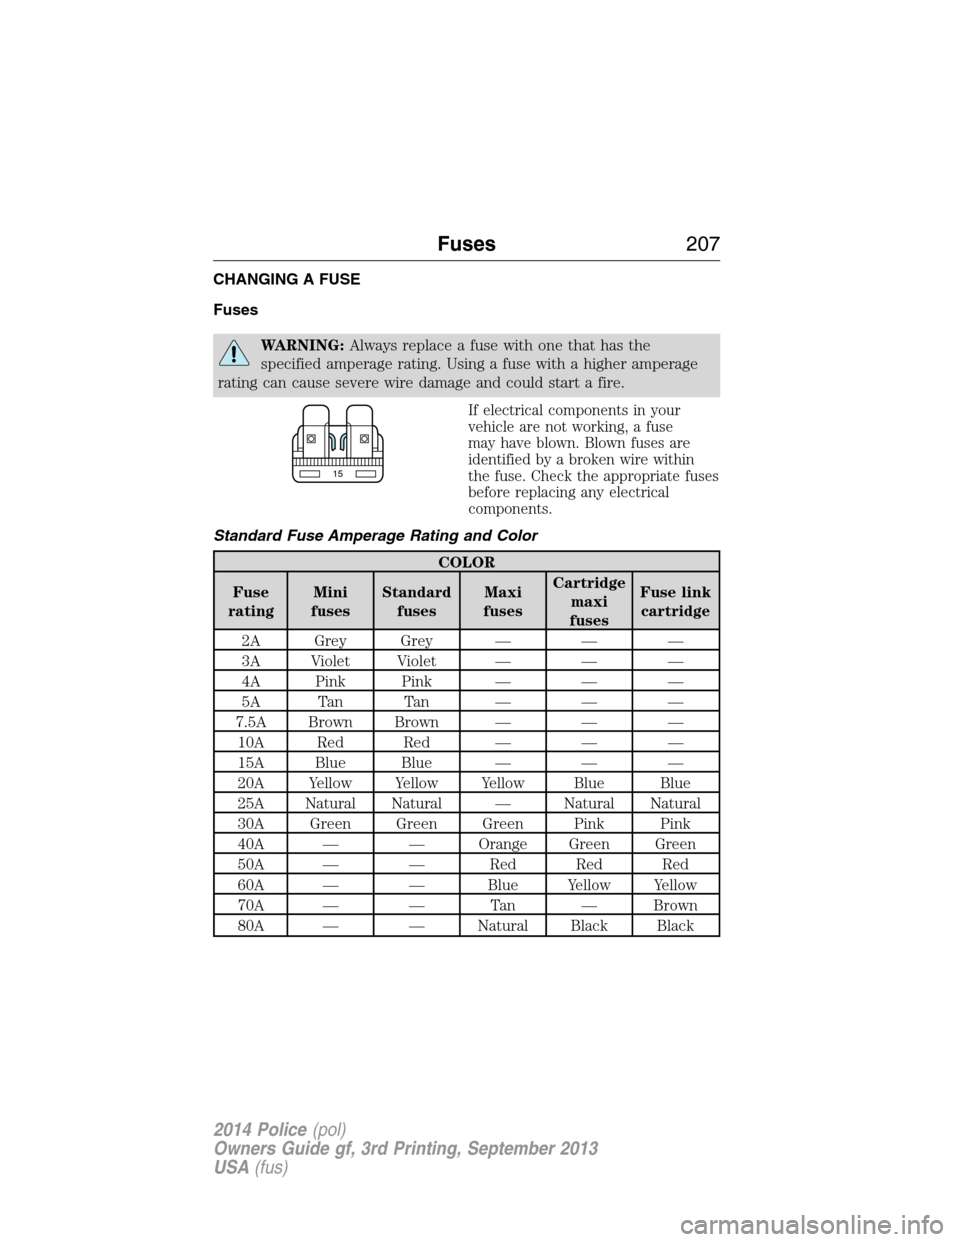
If electrical components in your
vehicle are not working, a fuse
may have blown. Blown fuses are
identified by a broken wire within
the fuse. Check the appropriate fuses
before replacing any electrical
components.
Standard Fuse Amperage Rating and Color
COLOR
Fuse
ratingMini
fusesStandard
fusesMaxi
fusesCartridge
maxi
fusesFuse link
cartridge
2A Grey Grey — — —
3A Violet Violet — — —
4A Pink Pink — — —
5A Tan Tan — — —
7.5A Brown Brown — — —
10A Red Red — — —
15A Blue Blue — — —
20A Yellow Yellow Yellow Blue Blue
25A Natural Natural — Natural Natural
30A Green Green Green Pink Pink
40A — — Orange Green Green
50A — — Red Red Red
60A — — Blue Yellow Yellow
70A — — Tan — Brown
80A — — Natural Black Black
15
Fuses207
2014 Police(pol)
Owners Guide gf, 3rd Printing, September 2013
USA(fus)