display FORD SUPER DUTY 2016 3.G Owners Manual
[x] Cancel search | Manufacturer: FORD, Model Year: 2016, Model line: SUPER DUTY, Model: FORD SUPER DUTY 2016 3.GPages: 510, PDF Size: 5.42 MB
Page 4 of 510
Introduction
About This Manual...........................................7
Symbols Glossary
.............................................7
Data Recording
..................................................9
California Proposition 65..............................11
Perchlorate.........................................................11
Ford Credit
..........................................................11
Replacement Parts Recommendation
........................................11
Special Notices................................................12
Mobile Communications Equipment.....................................................13
Export Unique Options..................................13
Environment
Protecting the Environment........................14
Child Safety
General Information
.......................................15
Installing Child Restraints
............................16
Booster Seats
..................................................24
Child Restraint Positioning
.........................26
Child Safety Locks..........................................27
Seatbelts
Principle of Operation
..................................28
Fastening the Seatbelts..............................29
Seatbelt Height Adjustment......................32
Seatbelt Warning Lamp and Indicator Chime
..............................................................32
Seatbelt Reminder
.........................................33
Child Restraint and Seatbelt Maintenance
................................................35
Supplementary Restraints System
Principle of Operation..................................36
Driver and Passenger Airbags....................37
Side Airbags.....................................................42
Safety Canopy ™
............................................43Crash Sensors and Airbag Indicator.......44
Airbag Disposal...............................................45
Keys and Remote Controls
General Information on Radio
Frequencies.................................................46
Remote Control
..............................................46
Replacing a Lost Key or Remote Control...........................................................49
MyKey ™
Principle of Operation..................................50
Creating a MyKey.............................................51
Clearing All MyKeys.......................................52
Checking MyKey System Status...............52
Using MyKey With Remote Start Systems.........................................................54
MyKey Troubleshooting
...............................54
Locks
Locking and Unlocking.................................55
Keyless Entry
...................................................56
Tailgate
Tailgate Lock....................................................59
Removing the Tailgate
.................................59
Tailgate Step...................................................60
Bed Extender
....................................................61
Security
Passive Anti-Theft System
.........................63
Anti-Theft Alarm
............................................64
Steering Wheel
Adjusting the Steering Wheel
...................65
Audio Control..................................................65
Voice Control...................................................66
Cruise Control
.................................................66
Information Display Control
......................66
Heated Steering Wheel................................67
1
Super Duty (TFA) Canada/United States of America, enUSA, Second Printing Table of Contents
Page 5 of 510
Pedals
Adjusting the Pedals....................................68
Wipers and Washers
Windshield Wipers
........................................69
Windshield Washers.....................................69
Lighting
General Information......................................70
Lighting Control..............................................70
Autolamps..........................................................71
Instrument Lighting Dimmer......................72
Daytime Running Lamps.............................72
Front Fog Lamps.............................................72
Direction Indicators
........................................73
Interior Lamps..................................................73
Windows and Mirrors
Power Windows
..............................................75
Global Opening
...............................................76
Exterior Mirrors
................................................76
Interior Mirror
....................................................78
Sliding Windows.............................................78
Sun Visors
.........................................................79
Moonroof...........................................................79
Instrument Cluster
Gauges................................................................81
Warning Lamps and Indicators.................83
Audible Warnings and Indicators
.............86
Information Displays
General Information
.....................................88
Information Messages
.................................99
Climate Control
Manual Climate Control
............................109
Automatic Climate Control.......................110 Hints on Controlling the Interior
Climate...........................................................111
Heated Windows and Mirrors...................114
Remote Start
...................................................114
Seats
Sitting in the Correct Position...................115
Head Restraints
..............................................115
Manual Seats
...................................................117
Power Seats
....................................................118
Memory Function
..........................................118
Rear Seats.......................................................120
Heated Seats
..................................................122
Climate Controlled Seats..........................123
Front Seat Armrest.......................................125
Rear Seat Armrest........................................126
Universal Garage Door Opener
Universal Garage Door Opener................127
Auxiliary Power Points
Auxiliary Power Points
................................135
Storage Compartments
Center Console...............................................137
Overhead Console
........................................137
Starting and Stopping the Engine
General Information....................................138
Ignition Switch
...............................................138
Starting a Gasoline Engine.......................139
Engine Block Heater....................................140
Fuel and Refueling
Safety Precautions
.......................................142
Fuel Quality
.....................................................143
Running Out of Fuel....................................144
Refueling..........................................................144
2
Super Duty (TFA) Canada/United States of America, enUSA, Second Printing Table of Contents
Page 7 of 510
Reporting Safety Defects (U.S.
Only)..............................................................221
Reporting Safety Defects (Canada Only)..............................................................221
Fuses
Fuse Specification Chart...........................223
Changing a Fuse............................................231
Maintenance
General Information
....................................232
Opening and Closing the Hood..............232
Under Hood Overview - 6.2L...................233
Under Hood Overview - 6.8L..................234
Engine Oil Dipstick......................................235
Engine Oil Check
..........................................235
Oil Change Indicator Reset......................236
Engine Coolant Check
...............................236
Automatic Transmission Fluid Check...........................................................240
Transfer Case Fluid Check........................243
Brake Fluid Check........................................244
Power Steering Fluid Check....................244
Washer Fluid Check
....................................244
Fuel Filter........................................................244
Changing the 12V Battery.........................245
Checking the Wiper Blades
......................247
Changing the Wiper Blades
.....................247
Adjusting the Headlamps.........................247
Removing a Headlamp.............................249
Changing a Bulb..........................................249
Bulb Specification Chart
...........................252
Changing the Engine Air Filter................254
Vehicle Care
General Information...................................256
Cleaning Products.......................................256
Cleaning the Exterior
..................................256
Waxing
..............................................................257
Cleaning the Engine....................................258 Cleaning the Windows and Wiper
Blades..........................................................258
Cleaning the Interior...................................259
Cleaning the Instrument Panel and Instrument Cluster Lens
.......................259
Cleaning Leather Seats.............................260
Repairing Minor Paint Damage...............261
Cleaning the Alloy Wheels........................261
Vehicle Storage
.............................................262
Wheels and Tires
General Information
...................................264
Tire Care..........................................................267
Using Snow Chains
.....................................284
Tire Pressure Monitoring System..........284
Changing a Road Wheel...........................290
Technical Specifications
............................301
Capacities and Specific- ations
Engine Specifications
................................303
Motorcraft Parts
..........................................304
Vehicle Identification Number...............305
Vehicle Certification Label
......................306
Transmission Code Designation...........306
Capacities and Specifications - 6.2L V8
..................................................................307
Capacities and Specifications - 6.8L Triton-30V - V10........................................311
Audio System
General Information
.....................................317
Audio Unit - Vehicles With: AM/FM.......318
Audio Unit - Vehicles With: AM/FM/CD/ SYNC.............................................................319
Audio Unit - Vehicles With: AM/FM/CD/ Touchscreen Display
..............................322
Digital Radio..................................................323
Satellite Radio
..............................................325
USB Port
.........................................................328
Media Hub
......................................................328
4
Super Duty (TFA) Canada/United States of America, enUSA, Second Printing Table of Contents
Page 51 of 510
Many states and provinces have
restrictions for the use of remote start.
Check your local and state or provincial
laws for specific requirements regarding
remote start systems.
The remote start system will not work if:
•
the ignition is on
• the alarm system is triggered
• you disable the feature
• the hood is open
• the transmission is not in P
• the vehicle battery voltage is too low
• the service engine soon indicator is on.
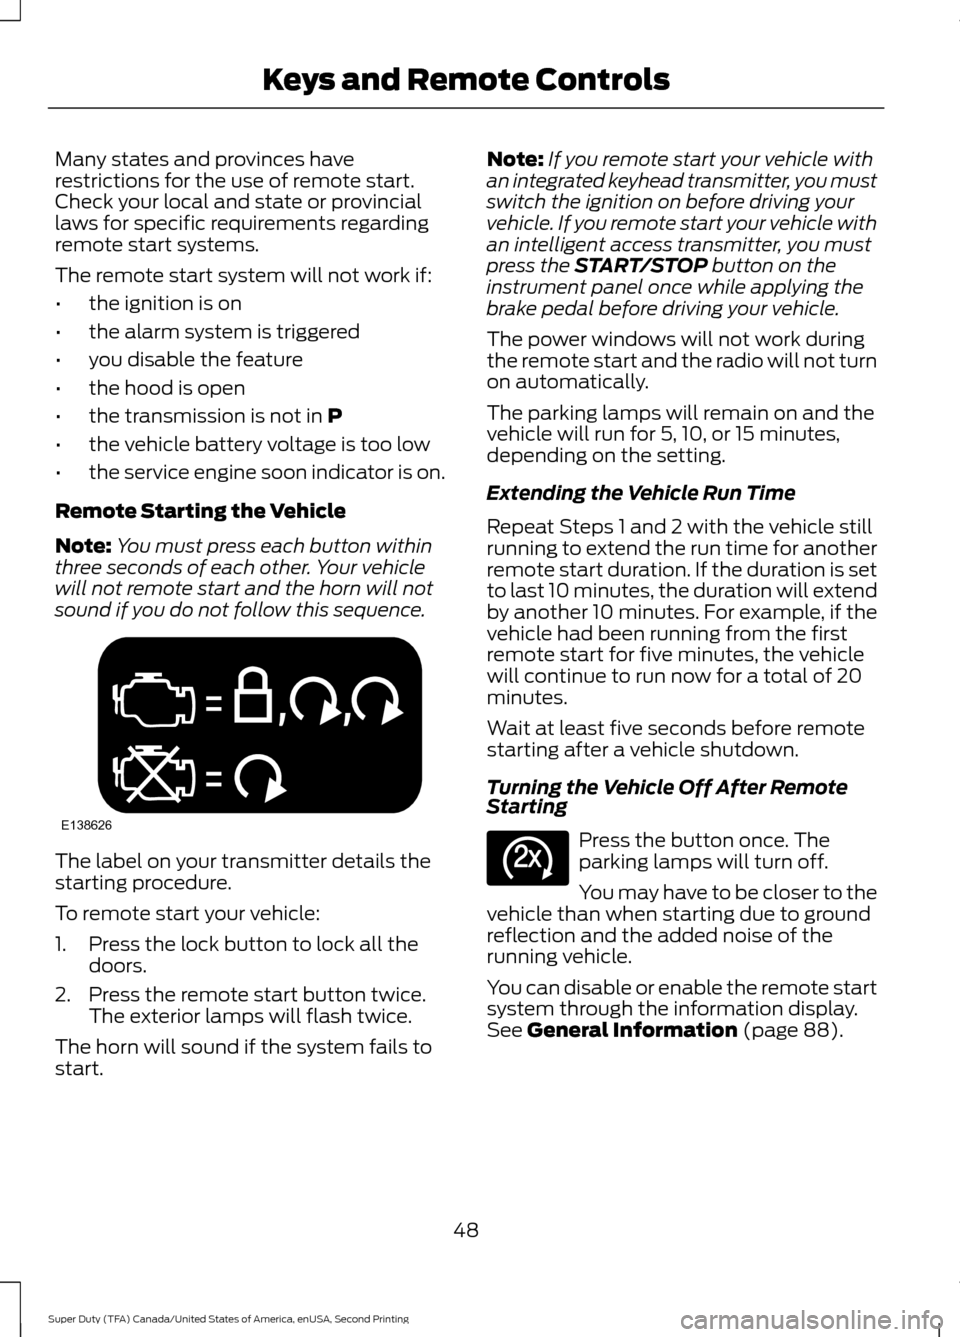
Remote Starting the Vehicle
Note: You must press each button within
three seconds of each other. Your vehicle
will not remote start and the horn will not
sound if you do not follow this sequence. The label on your transmitter details the
starting procedure.
To remote start your vehicle:
1. Press the lock button to lock all the
doors.
2. Press the remote start button twice. The exterior lamps will flash twice.
The horn will sound if the system fails to
start. Note:
If you remote start your vehicle with
an integrated keyhead transmitter, you must
switch the ignition on before driving your
vehicle. If you remote start your vehicle with
an intelligent access transmitter, you must
press the
START/STOP button on the
instrument panel once while applying the
brake pedal before driving your vehicle.
The power windows will not work during
the remote start and the radio will not turn
on automatically.
The parking lamps will remain on and the
vehicle will run for 5, 10, or 15 minutes,
depending on the setting.
Extending the Vehicle Run Time
Repeat Steps 1 and 2 with the vehicle still
running to extend the run time for another
remote start duration. If the duration is set
to last 10 minutes, the duration will extend
by another 10 minutes. For example, if the
vehicle had been running from the first
remote start for five minutes, the vehicle
will continue to run now for a total of 20
minutes.
Wait at least five seconds before remote
starting after a vehicle shutdown.
Turning the Vehicle Off After Remote
Starting Press the button once. The
parking lamps will turn off.
You may have to be closer to the
vehicle than when starting due to ground
reflection and the added noise of the
running vehicle.
You can disable or enable the remote start
system through the information display.
See
General Information (page 88).
48
Super Duty (TFA) Canada/United States of America, enUSA, Second Printing Keys and Remote ControlsE138626 E138625
Page 53 of 510
PRINCIPLE OF OPERATION
MyKey allows you to program keys with
restricted driving modes to promote good
driving habits. All but one of the keys
programmed to the vehicle can be
activated with these restricted modes.
Any keys that have not been programmed
are referred to as administrator keys or
admin keys. They can be used to:
•
create a MyKey
• program configurable MyKey settings
• clear all MyKey features.
When you have programmed a MyKey, you
can access the following information using
the information display:
• How many admin keys and MyKeys are
programmed to your vehicle.
• The total distance your vehicle has
traveled using a MyKey.
Note: All MyKeys are programmed to the
same settings. You cannot program them
individually.
Non-configurable Settings
The following settings cannot be changed
by an admin key user:
• Belt-Minder. You cannot disable this
feature. The audio system will mute
when the front seat occupants’ safety
belts are not fastened. Note: If your
vehicle is equipped with AM/FM radio
only, then the radio will not mute.
• Early low fuel. The low fuel warning is
activated earlier, giving the MyKey user
more time to refuel.
• Driver assist features, if equipped on
your vehicle, are forced on: parking aid,
blind spot information system (BLIS)
with cross traffic alert, lane departure
warning and forward collision warning
system. Configurable Settings
With an admin key, you can configure
certain MyKey settings when you first
create a MyKey and before you recycle the
key or restart the vehicle. You can also
change the settings afterward with an
admin key:
•
A vehicle speed limit can be set.
Warnings will be shown in the display
followed by an audible tone when your
vehicle reaches the set speed. You
cannot override the set speed by fully
depressing the accelerator pedal or by
setting cruise control. WARNING
Do not set MyKey maximum speed
limit to a limit that will prevent the
driver from maintaining a safe speed
considering posted speed limits and
prevailing road conditions. The driver is
always responsible to drive in accordance
with local laws and prevailing conditions.
Failure to do so could result in accident or
injury. •
Various vehicle speed minders can be
set. Once you select a speed, it will be
shown in the display, followed by an
audible tone when the preselected
vehicle speed is exceeded.
• Audio system maximum volume of
45%. A message will be shown in the
display when you attempt to exceed
the limited volume. Also, the
speed-sensitive or compensated
automatic volume control will be
disabled. Note:
If your vehicle is
equipped with AM/FM radio only, then
the radio volume will not be limited.
• Always on setting. When this is
selected, you will not be able to turn
off AdvanceTrac (if your vehicle is
equipped with this feature).
50
Super Duty (TFA) Canada/United States of America, enUSA, Second Printing MyKey
™
Page 54 of 510
CREATING A MYKEY
Use the information display to create a
MyKey. There are two types of information
displays, and their controls and messaging
vary. To determine which type of display
you have, you will need to reference
another chapter. See General
Information (page 88).
If You Have a Type 1 Information
Display:
1. Insert the key you want to program into
the ignition.
2. Switch the ignition on.
3. Access the main menu on the information display controls. Press
SETUP
using the information display
buttons until PRESS RESET TO
CREATE MYKEY is displayed.
4. Press and release the
RESET button.
You will see HOLD RESET TO
CONFIRM MYKEY in the display.
5. Press and hold the
RESET button for
two seconds until you see the message
MARK THIS AS RESTRICTED
in the
display. Wait until you see KEY
RESTRICTED AT NEXT START in the
display.
If You Have a Type 2 Information
Display:
1. Insert the key you want to program into
the ignition.
2. Switch the ignition on.
3. Access the main menu on the information display controls, and select
SETTINGS
, then MYKEY by pressing
OK or the > button.
4. Press
OK or the > button to select
CREATE A MYKEY.
5. When prompted, hold the
OK button
until you see KEY RESTRICTED AT
NEXT START in the display. The key
will be restricted at the next start. MyKey is successfully created. Make sure
you label it so you can distinguish it from
the admin keys.
You can also program configurable
settings for the key(s). Refer to
Programming/Changing Configurable
Settings
.
Programming/Changing
Configurable Settings
Use the information display to program or
change your configurable MyKey settings.
There are two types of information
displays, and their controls and messaging
vary. To determine which type of display
you have, you will need to reference
another chapter. See
General
Information (page 88).
If You Have a Type 1 Information
Display:
1. Switch the ignition on using an admin key.
2. Access the main menu on the information display controls, and press
SETUP
until RESET FOR MYKEY
SETTINGS displays.
3. Press and release the
RESET button
to display MyKey setup menus.
4. Press the SETUP button to enter your
choice. Once you make a selection, the
next configurable setting will be
displayed.
5. Repeat Steps 3 and 4 until you are done changing the configurable
settings.
If You Have a Type 2 Information
Display:
1. Switch the ignition on using an admin key.
2. Access the main menu on the information display controls, and select
SETTINGS
, then MYKEY by pressing
OK or the > button.
51
Super Duty (TFA) Canada/United States of America, enUSA, Second Printing MyKey
™
Page 55 of 510
3. Use the arrow buttons to get to a
configurable feature.
4. Press OK or > to make a selection.
Note: You can clear or change your MyKey
settings at any time during the same key
cycle as you created the MyKey. Once you
have switched the engine off, however, you
will need an admin key to change or clear
your MyKey settings.
CLEARING ALL MYKEYS
You can clear all MyKeys within the same
key cycle as you created the MyKey. If you
switch your ignition off, however, you will
need to use an admin key to clear your
MyKeys.
Note: When you clear your MyKeys, you
remove all restrictions and return all MyKeys
to their original admin key status at once.
To clear all MyKeys of all MyKey settings,
use the information display. There are two
types of information displays, and their
controls and messaging vary. To determine
which type of display you have, you will
need to reference another chapter. See
General Information
(page 88). If You Have a Type 1 Information
Display:
1.
Press
SETUP until PRESS RESET TO
CLEAR MYKEY displays.
2. Press and release the
RESET button.
The display will show HOLD RESET
TO CONFIRM CLEAR.
3. Press and hold the
RESET button for
two seconds until ALL MYKEYS
CLEARED displays.
If You Have a Type 2 Information
Display:
1. Access the main menu and select SETTINGS
, then MYKEY.
2. Scroll to CLEAR ALL and press the OK
button.
3. Hold the
OK button until ALL
MYKEYS CLEARED displays.
CHECKING MYKEY SYSTEM
STATUS
You can find information on programmed
MyKey(s) using the information display
control on the steering wheel. See
Information Displays
(page 88).
To find information on programmed MyKey(s), press the left arrow button to
access the main menu and scroll to: Description
Message
Press the
OK button.
Settings
Press the
OK button.
MyKey
Select one of the following:
52
Super Duty (TFA) Canada/United States of America, enUSA, Second Printing MyKey
™
Page 59 of 510
The autolock feature will unlock all the
doors when:
•
autolock has locked the doors
• you stop the vehicle and switch the
ignition off or to accessory mode, and
• you open the driver door within 10
minutes.
Note: The doors will not autounlock if you
have electronically locked them before
opening the driver door.
Enabling or Disabling
You can enable or disable these features
in the information display or your
authorized dealer can do it for you. See
General Information (page 88).
Note: You can enable or disable the
autolock and autounlock features
independently of each other.
Illuminated Entry
The interior lamps and select exterior
lamps will illuminate when you unlock the
doors with the remote entry system.
The illuminated entry system will turn off
the lights if:
• the ignition is on
• you press the remote control lock
button, or
• after 25 seconds of illumination.
The dome lamp will not turn on if the
control is set to the off position.
The lights will not turn off if:
• you turn them on with the dimmer
control, or
• any door is open. Battery Saver
The battery saver turns off the interior
lamps 30 minutes after you switch the
ignition off if a door is open and the dome
lamp switch is on. It turns off the interior
lamps after 10 minutes if the dome lamp
switch is off.
KEYLESS ENTRY
(If Equipped)
SECURICODE™ KEYLESS ENTRY
KEYPAD
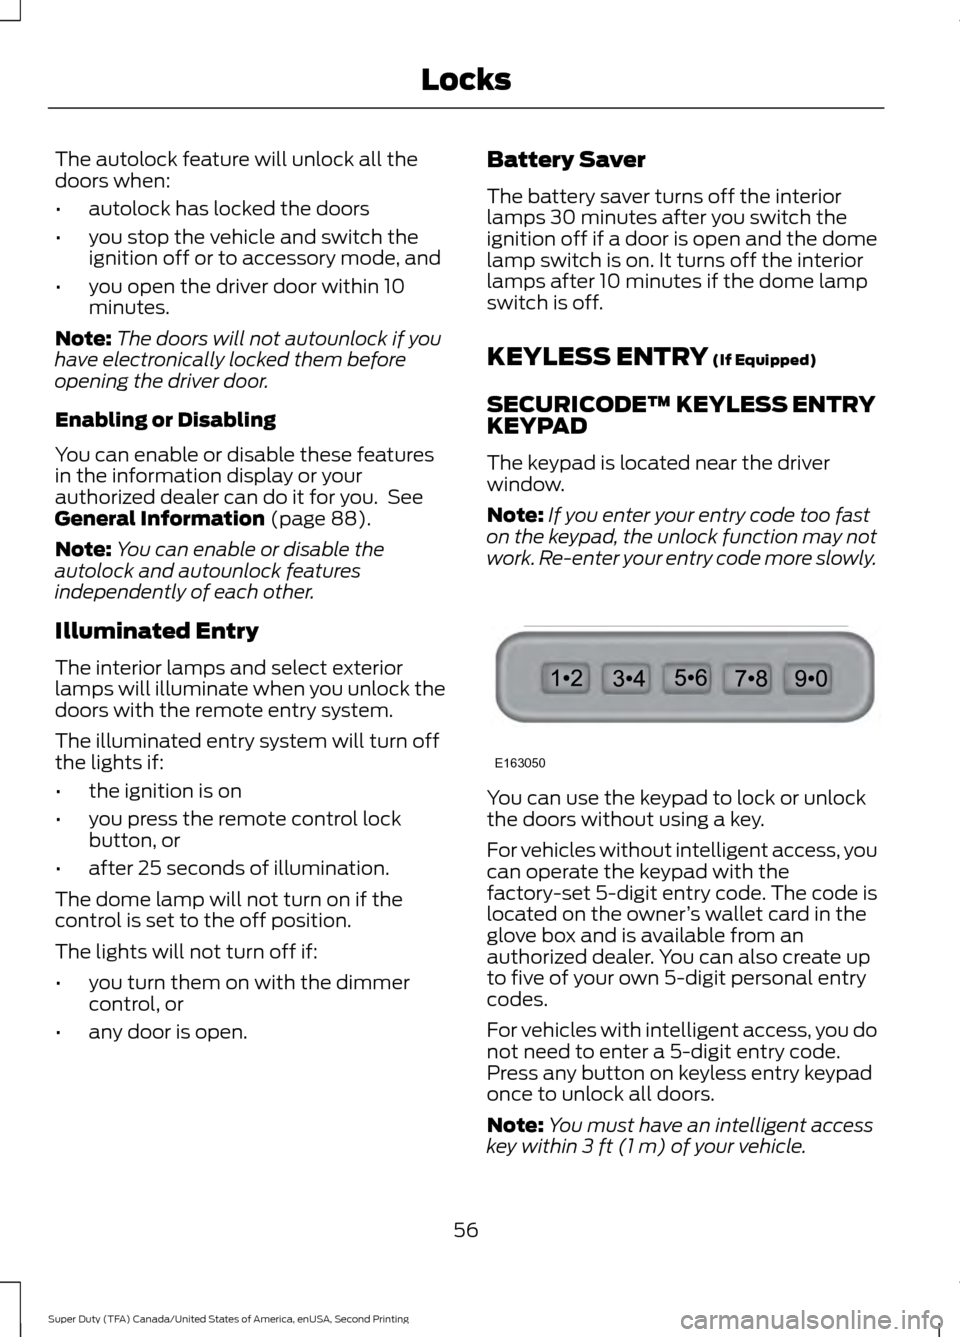
The keypad is located near the driver
window.
Note: If you enter your entry code too fast
on the keypad, the unlock function may not
work. Re-enter your entry code more slowly. You can use the keypad to lock or unlock
the doors without using a key.
For vehicles without intelligent access, you
can operate the keypad with the
factory-set 5-digit entry code. The code is
located on the owner
’s wallet card in the
glove box and is available from an
authorized dealer. You can also create up
to five of your own 5-digit personal entry
codes.
For vehicles with intelligent access, you do
not need to enter a 5-digit entry code.
Press any button on keyless entry keypad
once to unlock all doors.
Note: You must have an intelligent access
key within
3 ft (1 m) of your vehicle.
56
Super Duty (TFA) Canada/United States of America, enUSA, Second Printing LocksE163050
Page 60 of 510
Programming a Personal Entry Code
To create your own personal entry code:
1. Enter the factory-set code.
2. Press 1·2 on the keypad within five
seconds.
3. Enter your personal 5-digit code. You must enter each number within five
seconds of each other.
4. Press
1·2 on the keypad to save
personal code 1.
The doors will lock then unlock to confirm
that programming was successful.
To program additional personal entry
codes, repeat Steps 1-3, then for Step 4:
• press
3·4 to save personal code 2
• press
5·6 to save personal code 3
• press
7·8 to save personal code 4
• press
9·0 to save personal code 5.
You may also program a personal entry
code through the information display.
Tips:
• Do not set a code that uses five of the
same number.
• Do not use five numbers in sequential
order.
• The factory-set code will work even if
you have set your own personal code.
Recalling Memory Positions (If
Equipped)
The programmed entry codes will recall
driver memory positions as follows:
• Entry code 1 will recall driver 1 memory
positions.
• Entry code 2 will recall driver 2 memory
positions.
Note: Personal entry codes 3, 4 and 5 will
not recall memory positions. Erasing a Personal Code
1. Enter the factory-set 5-digit code.
2. Press and release
1·2 on the keypad
within five seconds.
3. Press and hold
1·2 for two seconds.
You must do this within five seconds
of completing Step 2.
All personal codes will erase and only the
factory-set 5-digit code will work.
Anti-Scan Feature
The keypad will go into an anti-scan mode
if you enter the wrong code seven times
(35 consecutive button presses). This
mode disables the keypad for one minute
and the keypad lamp will flash.
The anti-scan feature will turn off after:
• one minute of keypad inactivity
• pressing the unlock button on the
remote control
• switching the ignition on.
Displaying the Factory Set Code
Note: You will need to have two
programmed passive anti-theft keys for this
procedure.
To display the factory-set code in the
information display:
1. Insert a key into the ignition and switch
the ignition on for a few seconds.
2. Switch the ignition off and remove the
key.
3. Insert the second key into the ignition and switch the ignition on.
The factory-set code will display for a few
seconds.
Note: The code may not display until after
any other warning messages first display.
57
Super Duty (TFA) Canada/United States of America, enUSA, Second Printing Locks
Page 66 of 510
PASSIVE ANTI-THEFT
SYSTEM (If Equipped)
Note: The system is not compatible with
non-Ford aftermarket remote start systems.
Use of these systems may result in vehicle
starting problems and a loss of security
protection.
Note: Metallic objects, electronic devices
or a second coded key on the same key
chain may cause vehicle starting problems
if they are too close to the key when starting
the engine. Prevent these objects from
touching the coded key while starting the
engine. Switch the ignition off, move all
objects on the key chain away from the
coded key and restart the engine if a
problem occurs.
Note: Do not leave a duplicate coded key
in the vehicle. Always take your keys and
lock all doors when leaving the vehicle.
SecuriLock ™
The system is an engine immobilization
system. It helps prevent the engine from
starting unless you use a coded key
programmed to your vehicle. Using the
wrong key may prevent the engine from
starting. A message may appear in the
information display.
If you are unable to start the engine with a
correctly coded key, the system has
malfunctioned. A message may appear in
the information display.
Automatic Arming
The system arms immediately after you
switch the ignition off.
Automatic Disarming
Switching the ignition on with a coded key
disarms the system. Replacement Keys
Note:
Your vehicle may have two integrated
keyhead transmitters.
The integrated keyhead transmitter
functions as a programmed ignition key. It
operates all the locks, starts the vehicle
and acts as a remote control.
If your programmed transmitters or
standard SecuriLock coded keys are lost
or stolen and you do not have an extra
coded key, you will need to have your
vehicle towed to an authorized dealer. You
need to erase the key codes from your
vehicle and program new coded keys.
Store an extra programmed key away from
your vehicle in a safe place to help prevent
any inconveniences. See an authorized
dealer to purchase additional spare or
replacement keys.
Programming a Spare Key
Note: You can program a maximum of eight
coded keys to your vehicle. Only four of
these can be integrated keyhead
transmitters.
You can program your own integrated
keyhead transmitter or standard
SecuriLock coded keys to your vehicle. This
procedure will program both the engine
immobilizer keycode and the remote entry
portion of the remote control to your
vehicle.
Only use integrated keyhead transmitters
or standard SecuriLock keys.
You must have two previously
programmed coded keys and the new
unprogrammed key readily accessible. See
an authorized dealer to have the spare key
programmed if two previously
programmed coded keys are not available.
Read and understand the entire procedure
before you begin.
63
Super Duty (TFA) Canada/United States of America, enUSA, Second Printing Security