instrument cluster FORD TRANSIT CONNECT 2015 2.G User Guide
[x] Cancel search | Manufacturer: FORD, Model Year: 2015, Model line: TRANSIT CONNECT, Model: FORD TRANSIT CONNECT 2015 2.GPages: 428, PDF Size: 6.27 MB
Page 125 of 428
Easy Fuel
™ Capless Fuel System WARNING
The fuel system may be under
pressure. If you hear a hissing sound
near the fuel filler door, do not refuel
until the sound stops. Otherwise, fuel may
spray out, which could cause serious
personal injury. When fueling your vehicle:
1.
Put the vehicle in P (Park) and turn the
ignition off.
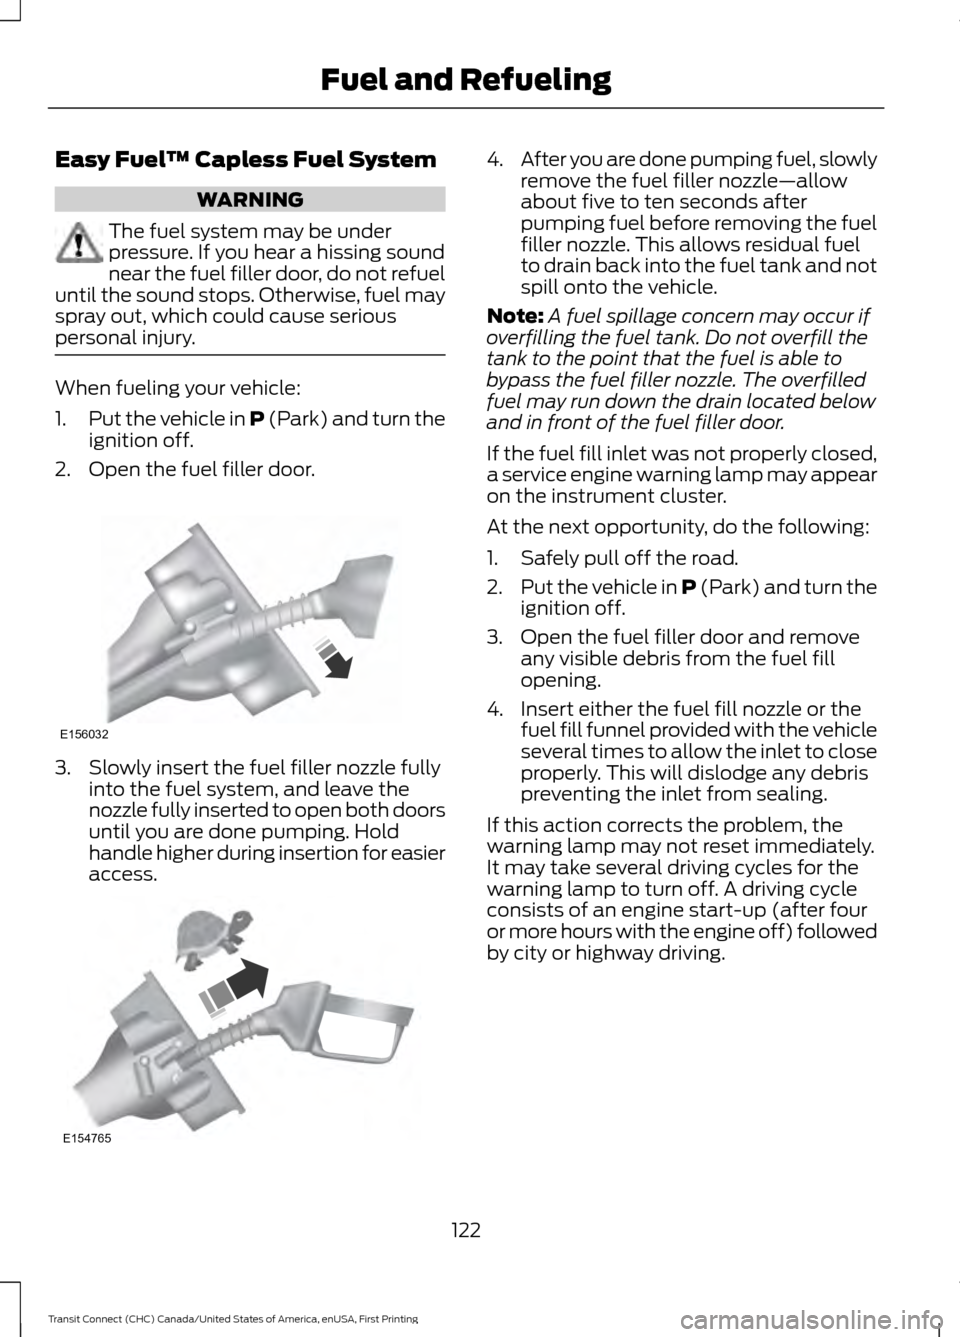
2. Open the fuel filler door. 3. Slowly insert the fuel filler nozzle fully
into the fuel system, and leave the
nozzle fully inserted to open both doors
until you are done pumping. Hold
handle higher during insertion for easier
access. 4.
After you are done pumping fuel, slowly
remove the fuel filler nozzle—allow
about five to ten seconds after
pumping fuel before removing the fuel
filler nozzle. This allows residual fuel
to drain back into the fuel tank and not
spill onto the vehicle.
Note: A fuel spillage concern may occur if
overfilling the fuel tank. Do not overfill the
tank to the point that the fuel is able to
bypass the fuel filler nozzle. The overfilled
fuel may run down the drain located below
and in front of the fuel filler door.
If the fuel fill inlet was not properly closed,
a service engine warning lamp may appear
on the instrument cluster.
At the next opportunity, do the following:
1. Safely pull off the road.
2. Put the vehicle in P (Park) and turn the
ignition off.
3. Open the fuel filler door and remove any visible debris from the fuel fill
opening.
4. Insert either the fuel fill nozzle or the fuel fill funnel provided with the vehicle
several times to allow the inlet to close
properly. This will dislodge any debris
preventing the inlet from sealing.
If this action corrects the problem, the
warning lamp may not reset immediately.
It may take several driving cycles for the
warning lamp to turn off. A driving cycle
consists of an engine start-up (after four
or more hours with the engine off) followed
by city or highway driving.
122
Transit Connect (CHC) Canada/United States of America, enUSA, First Printing Fuel and RefuelingE156032 E154765
Page 130 of 428
To use SelectShift, move the gearshift
lever into S (Sport). Use the +/- buttons
on the side of your gearshift lever to
manually change gears.
•
Press the (+) button to upshift.
• Press the (-) button to downshift.
Note: After you have assumed manual
control with SelectShift your vehicle will
remain in this mode until you return the
gearshift lever from (S) Sport, back to (D)
Drive.
Upshift to the recommended shift speeds
according to the following chart: Upshifts when accelerating (recom-
mended for best fuel economy)
Shift from:15 mph (24 km/h)
1 - 2
25 mph (40 km/h)
2 - 3
40 mph (64 km/h)
3 - 4
45 mph (72 km/h)
4 - 5
50 mph (80 km/h)
5 - 6
The instrument cluster will display the
selected gear that you are currently in and
a shift indicator arrow to assist in
optimizing shifting.
SelectShift will automatically make some
shifts for you in the event that your engine
speed is running at too high, or to low an
RPM.
Note: Engine damage may occur if
excessive engine revving is held without
shifting.
Brake-Shift Interlock WARNINGS
Do not drive your vehicle until you
verify that the brake lamps are
working. WARNINGS
When doing this procedure, you will
be taking the vehicle out of park
which means the vehicle can roll
freely. To avoid unwanted vehicle
movement, always fully set the parking
brake prior to doing this procedure. Use
wheel chocks if appropriate. If the parking brake is fully released,
but the brake warning lamp remains
illuminated, the brakes may not be
working properly. See your authorized
dealer. Use the brake shift interlock lever to move
the gearshift lever from the park position
in the event of an electrical malfunction or
if your vehicle has a dead battery.
Apply the parking brake and turn the
ignition off before performing this
procedure.
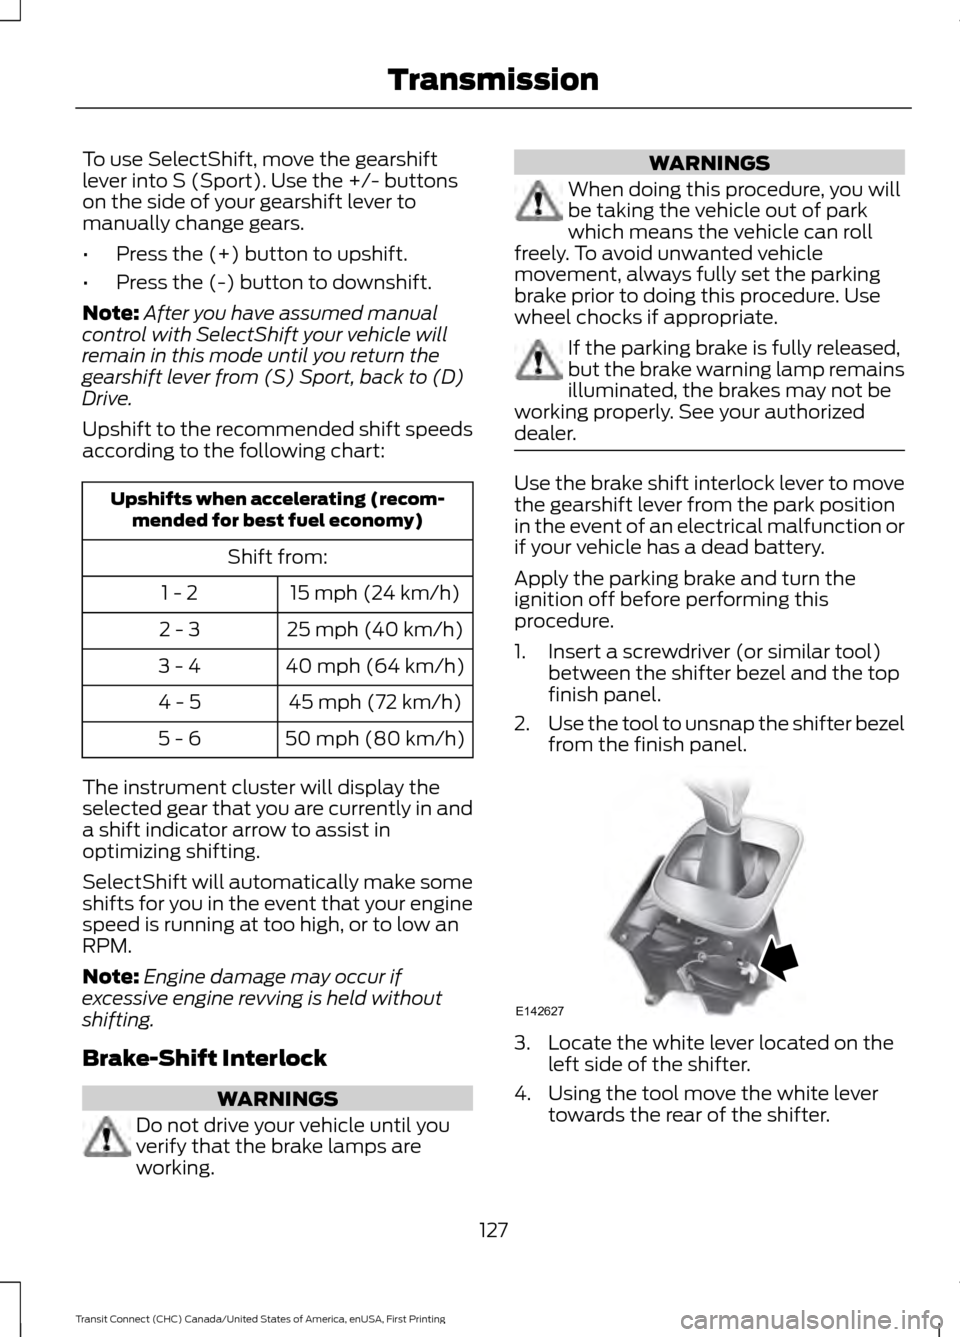
1. Insert a screwdriver (or similar tool)
between the shifter bezel and the top
finish panel.
2. Use the tool to unsnap the shifter bezel
from the finish panel. 3. Locate the white lever located on the
left side of the shifter.
4. Using the tool move the white lever towards the rear of the shifter.
127
Transit Connect (CHC) Canada/United States of America, enUSA, First Printing TransmissionE142627
Page 142 of 428
PRINCIPLE OF OPERATION
Cruise control lets you maintain a set
speed without keeping your foot on the
accelerator pedal. You can use cruise
control when your vehicle speed is greater
than 20 mph (30 km/h).
USING CRUISE CONTROL WARNINGS
Do not use cruise control in heavy
traffic, on winding roads or when the
road surface is slippery. This could
result in loss of vehicle control, serious
injury or death. When you are going downhill, your
vehicle speed may increase above
the set speed. The system will not
apply the brakes. Change down a gear to
assist the system in maintaining the set
speed. Failure to do so could result in loss
of vehicle control, serious injury or death. Note:
Cruise control will disengage if your
vehicle speed decreases more than 10 mph
(16 km/h) below your set speed while
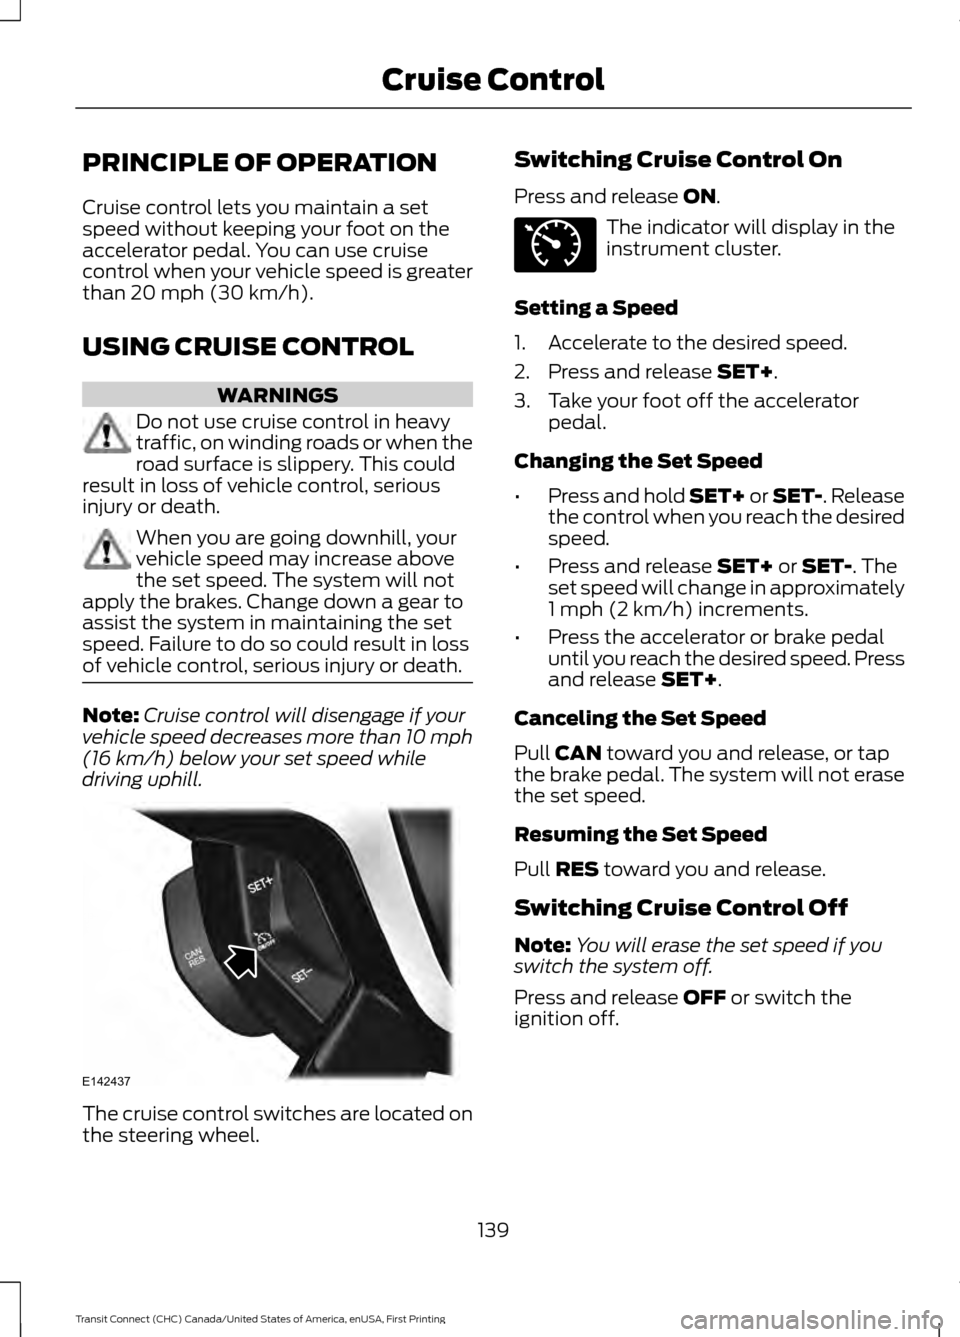
driving uphill. The cruise control switches are located on
the steering wheel. Switching Cruise Control On
Press and release
ON. The indicator will display in the
instrument cluster.
Setting a Speed
1. Accelerate to the desired speed.
2. Press and release
SET+.
3. Take your foot off the accelerator pedal.
Changing the Set Speed
• Press and hold SET+ or SET-. Release
the control when you reach the desired
speed.
• Press and release
SET+ or SET-. The
set speed will change in approximately
1 mph (2 km/h) increments.
• Press the accelerator or brake pedal
until you reach the desired speed. Press
and release
SET+.
Canceling the Set Speed
Pull
CAN toward you and release, or tap
the brake pedal. The system will not erase
the set speed.
Resuming the Set Speed
Pull
RES toward you and release.
Switching Cruise Control Off
Note: You will erase the set speed if you
switch the system off.
Press and release
OFF or switch the
ignition off.
139
Transit Connect (CHC) Canada/United States of America, enUSA, First Printing Cruise ControlE142437 E71340
Page 183 of 428
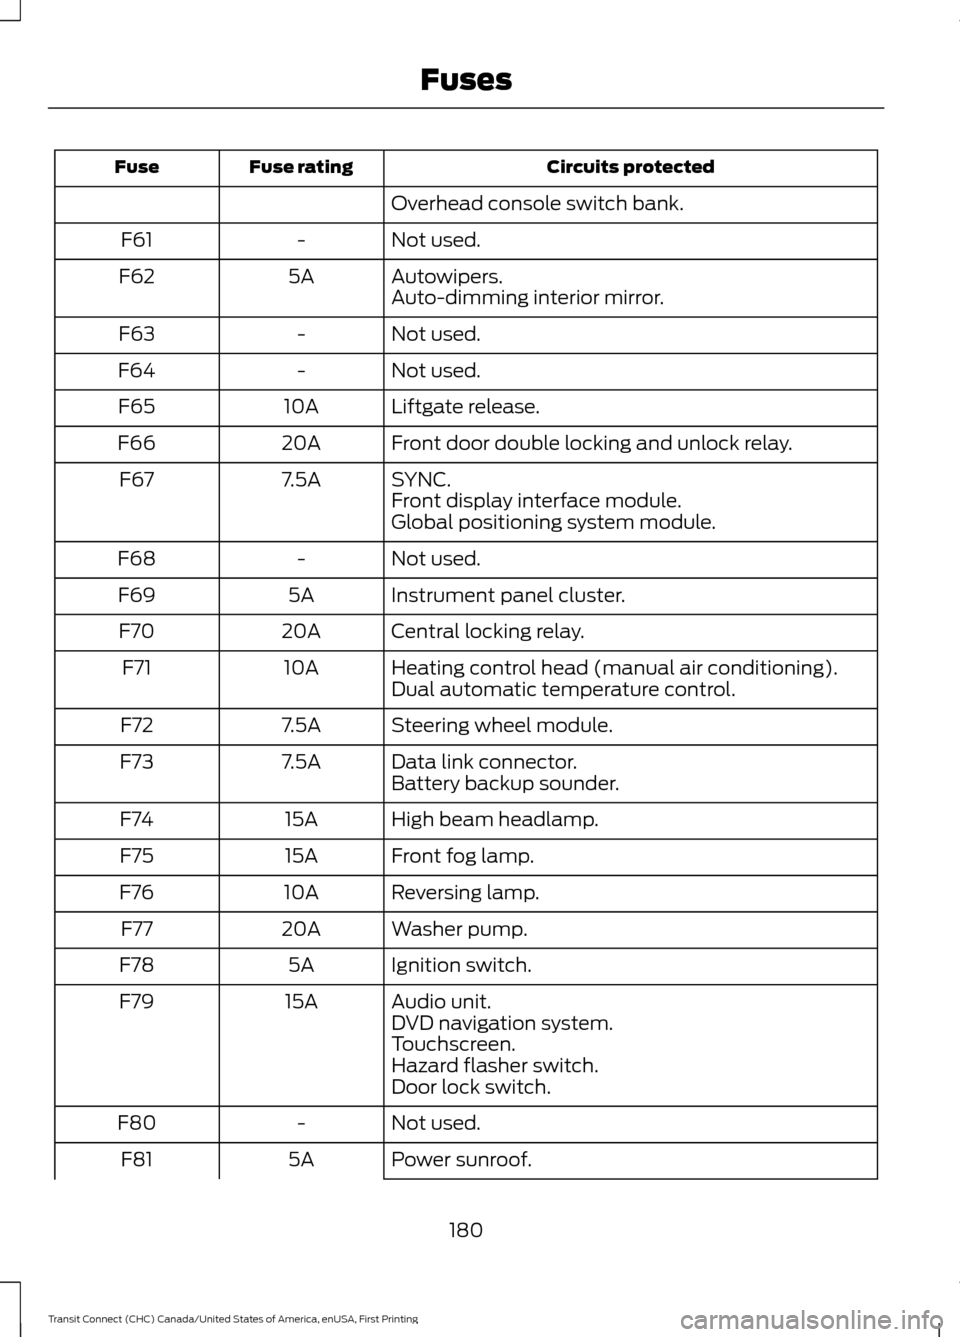
Circuits protected
Fuse rating
Fuse
Overhead console switch bank.
Not used.
-
F61
Autowipers.
5A
F62
Auto-dimming interior mirror.
Not used.
-
F63
Not used.
-
F64
Liftgate release.
10A
F65
Front door double locking and unlock relay.
20A
F66
SYNC.
7.5A
F67
Front display interface module.
Global positioning system module.
Not used.
-
F68
Instrument panel cluster.
5A
F69
Central locking relay.
20A
F70
Heating control head (manual air conditioning).
10A
F71
Dual automatic temperature control.
Steering wheel module.
7.5A
F72
Data link connector.
7.5A
F73
Battery backup sounder.
High beam headlamp.
15A
F74
Front fog lamp.
15A
F75
Reversing lamp.
10A
F76
Washer pump.
20A
F77
Ignition switch.
5A
F78
Audio unit.
15A
F79
DVD navigation system.
Touchscreen.
Hazard flasher switch.
Door lock switch.
Not used.
-
F80
Power sunroof.
5A
F81
180
Transit Connect (CHC) Canada/United States of America, enUSA, First Printing Fuses
Page 216 of 428
•
Never wash or rinse any ignition coil,
spark plug wire or spark plug well, or
the area in and around these locations.
• Cover the battery, power distribution
box, and air filter assembly to prevent
water damage when cleaning the
engine.
CLEANING THE WINDOWS AND
WIPER BLADES
Car wash chemicals and environmental
fallout can result in windshield and wiper
blade contamination. Dirty windshield and
wipers will result in poor windshield wiper
operation. Keep the windshield and wiper
blades clean to maintain windshield wiper
performance.
To clean the windshield and wiper blades:
• Clean the windshield with a
non-abrasive glass cleaner.
• For windshields contaminated with
tree sap, chemicals, wax or bugs, clean
the entire windshield using steel wool
(no greater than 0000 grade) in a
circular motion and rinse with water.
• Clean the wiper blades with isopropyl
rubbing alcohol or windshield washer
concentrate.
Note: Do not use razor blades or other
sharp objects to clean or remove decals
from the inside of the heated rear window.
The vehicle warranty does not cover
damage caused to the heated rear window
grid lines.
CLEANING THE INTERIOR WARNINGS
Do not use cleaning solvents, bleach
or dye on the vehicle
’s safety belts,
as these actions may weaken the
belt webbing. WARNINGS
On vehicles equipped with
seat-mounted airbags, do not use
chemical solvents or strong
detergents. Such products could
contaminate the side airbag system and
affect performance of the side airbag in a
collision. For fabric, carpets, cloth seats, safety belts
and seats equipped with side airbags:
•
Remove dust and loose dirt with a
vacuum cleaner.
• Remove light stains and soil with
Motorcraft Professional Strength
Carpet & Upholstery Cleaner.
• If grease or tar is present on the
material, spot-clean the area first with
Motorcraft Spot and Stain Remover. In
Canada, use Motorcraft Multi-Purpose
Cleaner.
• If a ring forms on the fabric after spot
cleaning, clean the entire area
immediately (but do not oversaturate)
or the ring will set.
• Do not use household cleaning
products or glass cleaners, which can
stain and discolor the fabric and affect
the flame retardant abilities of the seat
materials.
CLEANING THE INSTRUMENT
PANEL AND INSTRUMENT
CLUSTER LENS WARNING
Do not use chemical solvents or
strong detergents when cleaning the
steering wheel or instrument panel
to avoid contamination of the airbag
system. 213
Transit Connect (CHC) Canada/United States of America, enUSA, First Printing Vehicle Care
Page 217 of 428
Note:
Follow the same procedure as
cleaning leather seats for cleaning leather
instrument panels and leather interior trim
surfaces. See Cleaning Leather Seats
(page 214).
Clean the instrument panel and cluster
lens with a clean, damp and soft cloth,
then use a clean, dry and soft cloth to dry
these areas.
• Avoid cleaners or polishes that increase
the gloss of the upper portion of the
instrument panel. The dull finish in this
area helps protect you from
undesirable windshield reflection.
• Do not use any household cleaning
products or glass cleaners as these
may damage the finish of the
instrument panel, interior trim and
cluster lens.
• Wash or wipe your hands clean if you
have been in contact with certain
products such as insect repellent and
suntan lotion to avoid possible damage
to the interior painted surfaces.
• Do not allow air fresheners and hand
sanitizers to spill onto interior surfaces.
If a spill occurs, wipe off immediately.
Your warranty may not cover these
damages.
If a staining liquid like coffee or juice has
been spilled on the instrument panel or on
interior trim surfaces:
1. Wipe up spilled liquid using a clean, soft cloth as quickly as possible.
2. Use Motorcraft Premium Leather and Vinyl Cleaner or a commercially
available leather cleaning product for
automotive interiors. Test any cleaner
or stain remover on an inconspicuous
area.
3. Alternatively, wipe the surface with a clean, soft cloth and a mild soap and
water solution. Dry the area with a
clean, soft cloth. 4. If necessary, apply more soap and
water solution or cleaning product to
a clean, soft cloth and press it onto the
soiled area. Allow this to set at room
temperature for 30 minutes.
5. Remove the soaked cloth, then with a clean, damp cloth, use a rubbing
motion for 60 seconds on the soiled
area.
6. Dry the area with a clean, soft cloth.
CLEANING LEATHER SEATS
(If
Equipped)
Note: Follow the same procedure as
cleaning leather seats for cleaning leather
instrument panels and leather interior trim
surfaces.
For routine cleaning, wipe the surface with
a soft, damp cloth and a mild soap and
water solution. Dry the area with a clean,
soft cloth.
For cleaning and removing spots and stains
such as dye transfer, use Motorcraft
Premium Leather and Vinyl Cleaner or a
commercially available leather cleaning
product for automotive interiors.
Note: Test any cleaner or stain remover on
an inconspicuous area.
You should:
• Remove dust and loose dirt with a
vacuum cleaner.
• Clean and treat spills and stains as
soon as possible.
Do not use the following products as these
may damage the leather:
• Oil and petroleum or silicone-based
leather conditioners.
• Household cleaners.
214
Transit Connect (CHC) Canada/United States of America, enUSA, First Printing Vehicle Care
Page 419 of 428

California Proposition 65..............................11
Capacities and Specifications................246
Cargo Nets.......................................................142
Installing the Net................................................. 142
Removing the Net............................................... 143
Car Wash See: Cleaning the Exterior.................................211
Center Console...............................................114
Changing a Bulb............................................197 Central High Mounted Brake Lamp...........200
Front Fog Lamps............................................... 200
Headlamp............................................................. 198
Interior Lamps...................................................... 201
License Plate Lamp........................................... 201
Rear Lamps......................................................... 200
Side Direction Indicator................................... 199
Changing a Fuse...........................................184
Fuses....................................................................... 184
Changing a Road Wheel
...........................239
Changing a Road Wheel.................................. 241
Dissimilar Spare Wheel and Tire Assembly Information..................................................... 240
Stowing the Flat or Spare Tire...................... 243
Changing the 12V Battery..........................193
Changing the Engine Air Filter................204 2.5L Engine........................................................... 205
EcoBoost Engines............................................. 204
Changing the Wiper Blades......................194 Changing the Front Wiper Blades................195
Rear Window Wiper Blades............................ 195
Checking MyKey System Status...............52
Checking the Wiper Blades......................194
Child Restraint and Safety Belt Maintenance
.................................................36
Child Safety.......................................................18
General Information............................................. 18
Child Safety Locks
.........................................29
Left-Hand Side...................................................... 29
Right-Hand Side................................................... 29
Child Seat Positioning...................................27
Cigar Lighter
.....................................................113
Cleaning Leather Seats..............................214
Cleaning Products
.........................................211
Cleaning the Alloy Wheels........................215
Cleaning the Engine.....................................212 Cleaning the Exterior....................................211
Exterior Chrome Parts........................................ 211
Exterior Plastic Parts.......................................... 212
Stripes or Graphics............................................. 212
Underbody............................................................. 212
Cleaning the Instrument Panel and Instrument Cluster Lens..........................213
Cleaning the Interior....................................213
Cleaning the Windows and Wiper Blades
............................................................213
Clearing All MyKeys........................................51
Climate............................................................368 Climate Control Voice Commands.............369
Climate Control
..............................................95
Principle of Operation........................................ 95
Clock...................................................................88 Type 1........................................................................\
88
Type 2....................................................................... 88
Cold Weather Precautions.........................161
Coolant Check See: Engine Coolant Check............................ 190
Cornering Lamps............................................70
Crash Sensors and Airbag Indicator
........45
Creating a MyKey...........................................50
Programming/Changing Configurable
Settings............................................................... 50
Cruise Control
..................................................62
Principle of Operation....................................... 139
Cruise control See: Using Cruise Control................................ 139
Cup Holders
.....................................................114
Customer Assistance.................................168
D
Data Recording
..................................................9
Event Data Recording........................................... 9
Service Data Recording........................................ 9
Daytime Running Lamps............................69 Type 1 - Conventional
(Non-Configurable)....................................... 69
Type 2 - Configurable......................................... 69
Digital Radio
..................................................260
HD Radio Reception and Station
Troubleshooting............................................. 261
Direction Indicators
.........................................71
416
Transit Connect (CHC) Canada/United States of America, enUSA, First Printing Index
Page 422 of 428
Installing Child Seats.....................................19
Child Seats............................................................... 19
Using Lap and Shoulder Belts......................... 20
Using Lower Anchors and Tethers for Children (LATCH)............................................ 22
Using Tether Straps............................................. 24
Instrument Cluster
.........................................79
Instrument Lighting Dimmer.....................69
Instrument Panel Overview........................16
Interior Lamps - Vehicles With: Panoramic Roof Panel
...............................72
Center Mounted Lamp........................................ 72
Luggage Compartment Lamp......................... 72
Side Mounted Lamp............................................ 72
Interior Lamps - Vehicles Without: Panoramic Roof Panel................................71
Courtesy Lamp....................................................... 71
Luggage Compartment Lamp.......................... 71
Reading Lamps....................................................... 71
Interior Mirror....................................................77 Auto-Dimming Mirror........................................... 77
Introduction.........................................................7
J
Jump Starting the Vehicle
.........................164
Connecting the Jumper Cables..................... 165
Jump Starting...................................................... 166
Preparing Your Vehicle..................................... 165
Removing the Jumper Cables........................ 166
K
Keys and Remote Controls.........................47
L
Lighting Control...............................................67 Headlamp Flasher............................................... 68
High Beams............................................................ 67
Lighting...............................................................67 General Information............................................ 67
Load Carriers See: Roof Racks and Load Carriers..............143
Load Carrying
..................................................141 Load Limit
.......................................................144
Special Loading Instructions for Owners of
Pick-up Trucks and Utility-type
Vehicles.............................................................. 151
Vehicle Loading - with and without a Trailer................................................................. 144
Locking and Unlocking
.................................54
Auto lock and Auto unlock Feature...............56
Emergency Locking with the Key.................... 57
Locking and Unlocking the Doors From Inside.................................................................... 54
Locking and Unlocking the Doors with the Key........................................................................\
55
Opening the Double Rear Doors.................... 54
Rear Emergency Exit............................................ 57
Remote Control.................................................... 54
Smart Unlocks For Integrated Keyhead Transmitter........................................................ 55
Smart Unlocks For Intelligent Access Keys ........................................................................\
........ 56
Unlocking the Doors with the Interior Door Handles............................................................... 55
Locks...................................................................54
Luggage Anchor Points
...............................141
Lug Nuts See: Changing a Road Wheel....................... 239
M
Maintenance..................................................185 General Information.......................................... 185
Manual Climate Control..............................96
Manual Liftgate..............................................58 Opening and Closing the Liftgate.................. 58
Manual Seats
.................................................105
Adjusting the Height of the Driver
Seat.................................................................... 106
Adjusting the Lumbar Support .................... 105
Folding the Seatback....................................... 106
Moving the Seat Backward and Forward............................................................. 105
Recline Adjustment........................................... 106
Media Hub
......................................................265
Message Center See: Information Displays................................. 84
Mirrors See: Heated Windows and Mirrors...............101
See: Windows and Mirrors................................ 73
419
Transit Connect (CHC) Canada/United States of America, enUSA, First Printing Index