key FORD TRANSIT CONNECT 2018 Owner's Manual
[x] Cancel search | Manufacturer: FORD, Model Year: 2018, Model line: TRANSIT CONNECT, Model: FORD TRANSIT CONNECT 2018Pages: 449, PDF Size: 6.73 MB
Page 120 of 449
STARTING A GASOLINE
ENGINE
Before starting the engine check the
following:
•
Make sure all occupants have fastened
their safety belts.
• Make sure the headlamps and
electrical accessories are off.
• Make sure the parking brake is on.
• Make sure the transmission is in park
(P).
When you start the engine, the idle speed
increases, this helps to warm up the
engine. If the engine idle speed does not
slow down automatically, have your
vehicle checked by an authorized dealer.
Note: Do not touch the accelerator pedal.
1. Fully press the brake pedal.
2. Turn the key to the on position to switch the ignition on.
3. Turn the key to the start position to start your vehicle. Release the key
when the engine starts.
Note: You can only operate the starter for
a limited period of time, for example 10
seconds. The number of start attempts is
limited to approximately six. If you exceed
this limit, the system will not allow you to
try again until a period of time has elapsed,
for example 30 minutes.
Engine Idle Speed after Starting
The speed at which the engine idles
immediately after starting will adjust
automatically to minimize vehicle
emissions and maximize cabin comfort
and fuel economy. The idle speed will vary depending on
certain factors. These include vehicle
component and ambient temperatures as
well as electrical and climate system
demands.
Cold or Hot Engine
If the engine does not start within 10
seconds, wait for a short period and try
again.
If the engine does not start after three
attempts, wait 10 seconds and follow the
flooded engine procedure.
If you have difficulty starting the engine
when the temperature is below -13°F
(-25°C), press the accelerator pedal to the
mid-way point of its travel and try again.
Flooded Engine
1. Shift into park (P).
2. Fully depress the accelerator pedal and
hold it there.
3. Start the engine.
Note: If the engine does not start, repeat
the cold or hot engine procedure.
SWITCHING OFF THE ENGINE
Vehicles With a Turbocharger WARNING
Do not switch the engine off when it
is running at high speed. If you do, the
turbocharger will continue running
after the engine oil pressure has dropped
to zero. This will lead to premature
turbocharger bearing wear. Release the accelerator pedal. Wait until
the engine has reached idle speed and then
switch it off.
117
2018 Transit Connect (CHC) Canada/United States of America, CG3709en enUSA, Edition date: 201704, First Printing Starting and Stopping the Engine
Page 133 of 449
Your vehicle may not pass the I/M test if
the service engine soon indicator is on or
not working properly (bulb is burned out),
or if the OBD-II system has determined
that some of the emission control systems
have not been properly checked. In this
case, the vehicle is not ready for I/M
testing.
If the vehicle
’s engine or transmission has
just been serviced, or the battery has
recently run down or been replaced, the
OBD-II system may indicate that the
vehicle is not ready for I/M testing. To
determine if the vehicle is ready for I/M
testing, turn the ignition key to the on
position for 15 seconds without cranking
the engine. If the service engine soon
indicator blinks eight times, it means that
the vehicle is not ready for I/M testing; if
the service engine soon indicator stays on
solid, it means that your vehicle is ready
for I/M testing.
The OBD-II system checks the emission
control system during normal driving. A
complete check may take several days.
If the vehicle is not ready for I/M testing,
you can perform the following driving cycle
consisting of mixed city and highway
driving:
1. 15 minutes of steady driving on an expressway or highway followed by 20
minutes of stop-and-go driving with at
least four 30-second idle periods.
2. Allow your vehicle to sit for at least eight hours with the ignition off. Then,
start the vehicle and complete the
above driving cycle. The vehicle must
warm up to its normal operating
temperature. Once started, do not turn
off the vehicle until the above driving
cycle is complete.
If the vehicle is still not ready for I/M
testing, you need to repeat the above
driving cycle.
130
2018 Transit Connect (CHC) Canada/United States of America, CG3709en enUSA, Edition date: 201704, First Printing Engine Emission Control
Page 134 of 449
AUTOMATIC TRANSMISSION
WARNINGS
Always set the parking brake fully
and make sure the gearshift is
latched in P (Park). Turn the ignition
to the off position and remove the key
whenever you leave your vehicle. Do not apply the brake pedal and
accelerator pedal simultaneously.
Applying both pedals simultaneously
for more than three seconds will limit
engine rpm, which may result in difficulty
maintaining speed in traffic and could lead
to serious injury. Understanding the Positions of
Your Automatic Transmission
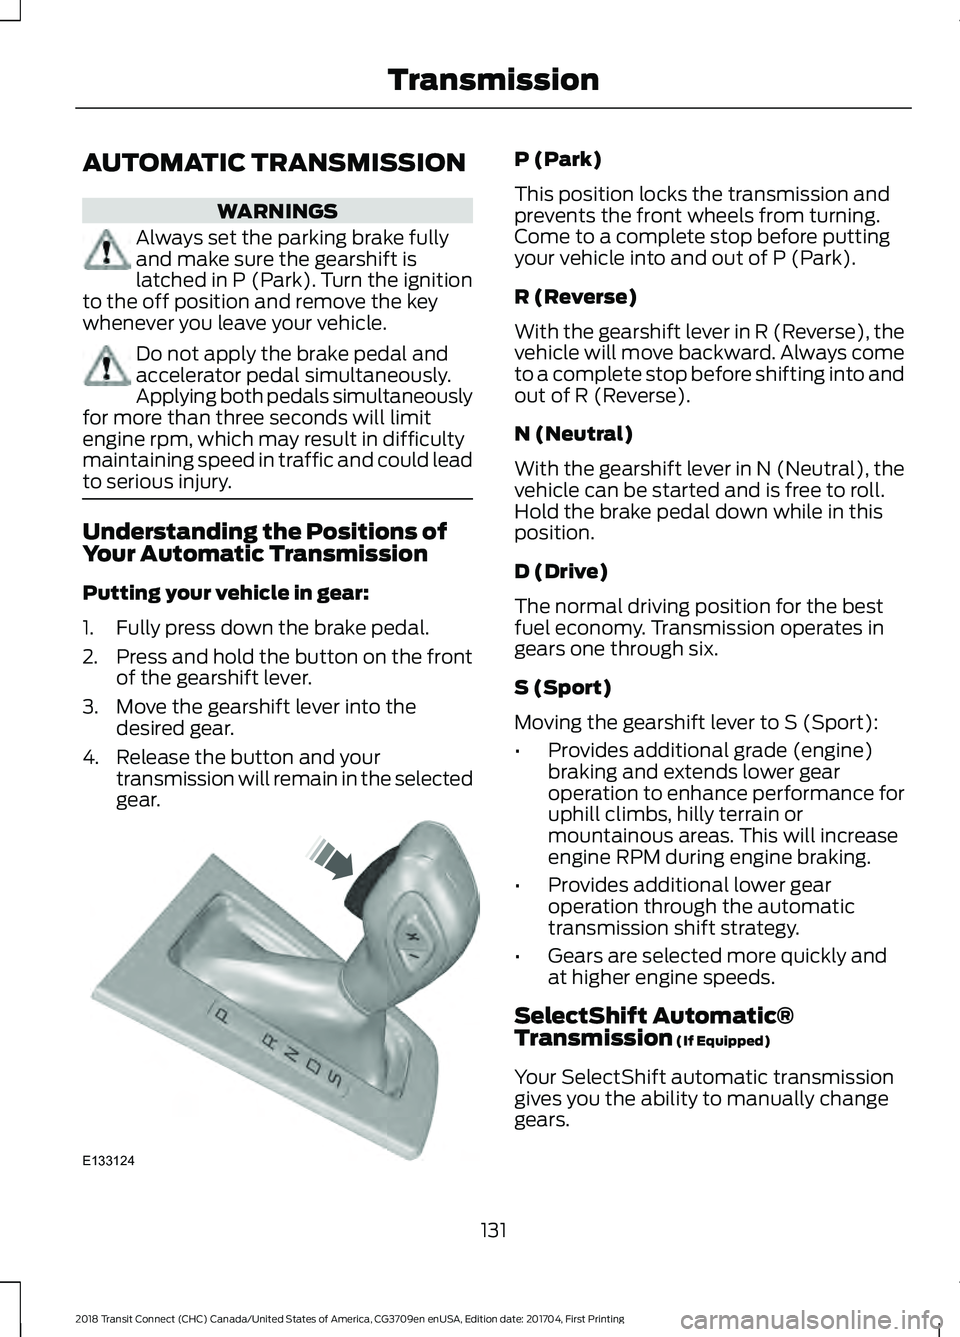
Putting your vehicle in gear:
1. Fully press down the brake pedal.
2.
Press and hold the button on the front
of the gearshift lever.
3. Move the gearshift lever into the desired gear.
4. Release the button and your transmission will remain in the selected
gear. P (Park)
This position locks the transmission and
prevents the front wheels from turning.
Come to a complete stop before putting
your vehicle into and out of P (Park).
R (Reverse)
With the gearshift lever in R (Reverse), the
vehicle will move backward. Always come
to a complete stop before shifting into and
out of R (Reverse).
N (Neutral)
With the gearshift lever in N (Neutral), the
vehicle can be started and is free to roll.
Hold the brake pedal down while in this
position.
D (Drive)
The normal driving position for the best
fuel economy. Transmission operates in
gears one through six.
S (Sport)
Moving the gearshift lever to S (Sport):
•
Provides additional grade (engine)
braking and extends lower gear
operation to enhance performance for
uphill climbs, hilly terrain or
mountainous areas. This will increase
engine RPM during engine braking.
• Provides additional lower gear
operation through the automatic
transmission shift strategy.
• Gears are selected more quickly and
at higher engine speeds.
SelectShift Automatic®
Transmission (If Equipped)
Your SelectShift automatic transmission
gives you the ability to manually change
gears.
131
2018 Transit Connect (CHC) Canada/United States of America, CG3709en enUSA, Edition date: 201704, First Printing TransmissionE133124
Page 138 of 449
PARKING BRAKE
WARNING
Always fully apply the parking brake
and make sure you shift into park (P).
Switch the ignition off and remove
the key whenever you leave your vehicle. To apply the parking brake:
1. Firmly press the brake pedal.
2. Pull the parking brake lever upward to
its fullest extent.
Note: Do not press the release button when
pulling the parking brake lever upward.
Note: If you park your vehicle on a hill and
facing uphill, shift into park (P) and turn the
steering wheel away from the curb.
Note: If you park your vehicle on a hill and
facing downhill, shift into park (P) and turn
the steering wheel toward the curb.
To release the parking brake:
1. Firmly press the brake pedal.
2. Slightly pull the parking brake lever upward.
3. Press the release button and push the parking brake lever downward.
HILL START ASSIST WARNINGS
The system does not replace the
parking brake. When you leave your
vehicle, always apply the parking
brake. Failure to leave your vehicle securely
parked may lead to a crash or injury. See
Parking Brake (page 135). You must remain in your vehicle once
the system activates. Failure to
follow this warning could result in
serious personal injury or death. WARNINGS
During all times, you are responsible
for controlling your vehicle,
supervising the system and
intervening, if required. Failure to take care
may result in the loss of control of your
vehicle, serious personal injury or death. The system will turn off if a
malfunction is apparent or if you rev
the engine excessively. Failure to
take care may result in the loss of control
of your vehicle, serious personal injury or
death. The system makes it easier to pull away
when your vehicle is on a slope without the
need to use the parking brake.
When the system is active, your vehicle will
remain stationary on the slope for two to
three seconds after you release the brake
pedal. This allows time to move your foot
from the brake to the accelerator pedal.
The brakes are released automatically
once the engine has developed sufficient
torque to prevent your vehicle from rolling
down the slope. This is an advantage when
pulling away on a slope, for example from
a car park ramp, traffic lights or when
reversing uphill into a parking space.
The system will turn on automatically on
any slope which can result in significant
vehicle rollback.
Using Hill Start Assist
1. Press the brake pedal to bring your
vehicle to a complete standstill. Keep
the brake pedal pressed. If equipped
with a manual transmission, also press
the clutch pedal.
2. If the sensors detect that your vehicle is on a slope, the system will activate
automatically.
135
2018 Transit Connect (CHC) Canada/United States of America, CG3709en enUSA, Edition date: 201704, First Printing Brakes
Page 143 of 449

PRINCIPLE OF OPERATION
WARNINGS
To help avoid personal injury, please
read and understand the limitations
of the system as contained in this
section. Sensing is only an aid for some
(generally large and fixed) objects when
moving on a flat surface at parking speeds.
Certain objects with surfaces that absorb
ultrasonic waves, surrounding vehicle's
parking aid systems, traffic control
systems, fluorescent lamps, inclement
weather, air brakes, and external motors
and fans may also affect the function of
the sensing system; this may include
reduced performance or a false activation. To help avoid personal injury, always
use caution when in reverse (R) and
when using the sensing system.
This system is not designed to
prevent contact with small or moving
objects. The system is designed to
provide a warning to assist the driver in
detecting large stationary objects to avoid
damaging your vehicle. The system may
not detect smaller objects, particularly
those close to the ground. Certain add-on devices such as large
trailer hitches, bike or surfboard racks
and any device that may block the
normal detection zone of the system, may
create false beeps. Note:
Keep the sensors, located on the
bumper or fascia, free from snow, ice and
large accumulations of dirt. If the sensors
are covered, the system ’s accuracy can be
affected. Do not clean the sensors with
sharp objects.
Note: If your vehicle sustains damage to
the bumper or fascia, leaving it misaligned
or bent, the sensing zone may be altered
causing inaccurate measurement of
obstacles or false alarms. Note:
The sensing system cannot be turned
off when a MyKey is present. See Principle
of Operation (page 48).
Note: If you attach certain add-on devices
such as a trailer or bike rack, the rear sensing
system may detect that add-on device and
therefore provide warnings. It is suggested
that you disable the rear sensing system
when you attach an add-on device to your
vehicle to prevent these warnings.
The sensing system warns the driver of
obstacles within a certain range of your
vehicle. The system turns on automatically
whenever you switch the ignition on. You can turn the system on or
off by pressing the parking aid
button. If your vehicle does not
have a parking aid button, the system can
be switched off through the information
display menu or from the pop-up message
that appears once you shift the
transmission into reverse (R). See General
Information
(page 84).
If a fault is present in the system, a warning
message appears in the information
display. See
Information Messages
(page 87).
REAR PARKING AID
The rear parking aid sensors automatically
turn on when you shift into reverse (R).
As your vehicle moves closer to the
obstacle, the rate of the audible warning
increases. When the obstacle is less than
12 in (30 cm)
away, the warning sounds
continuously. If the system detects an
object farther than
12 in (30 cm) from the
corners of the bumper, the tone sounds for
only three seconds. If the system detects
an approaching object the warning sounds
again.
140
2018 Transit Connect (CHC) Canada/United States of America, CG3709en enUSA, Edition date: 201704, First Printing Parking Aids
(If Equipped)E139213
Page 176 of 449
ROADSIDE ASSISTANCE
Vehicles Sold in the United States:
Getting Roadside Assistance
To fully assist you should you have a
vehicle concern, Ford Motor Company
offers a complimentary roadside
assistance program. This program is
separate from the New Vehicle Limited
Warranty.
The service is available:
•
24 hours a day, seven days a week.
• For the coverage period listed on the
Roadside Assistance Card included in
your Owner's Manual portfolio.
Roadside Assistance covers:
• A flat tire change with a good spare
(except vehicles supplied with a tire
inflation kit).
• Battery jump start.
• Lock-out assistance (key replacement
cost is the customer's responsibility).
• Fuel delivery — independent service
contractors, if not prohibited by state,
local or municipal law, shall deliver up
to 2 gal (8 L) of gasoline or 5 gal (20 L)
of diesel fuel to a disabled vehicle.
Roadside Assistance limits fuel delivery
service to two no-charge occurrences
within a 12-month period.
• Winch out — available within 100 ft
(30 m) of a paved or county
maintained road, no recoveries. •
Towing — independent service
contractors, if not prohibited by state,
local or municipal law, shall tow Ford
eligible vehicles to an authorized dealer
within
35 mi (56 km) of the
disablement location or to the nearest
authorized dealer. If a member
requests a tow to an authorized dealer
that is more than
35 mi (56 km) from
the disablement location, the member
shall be responsible for any mileage
costs in excess of
35 mi (56 km).
• Roadside Assistance includes up to
$200 for a towed trailer if the disabled
eligible vehicle requires service at the
nearest authorized dealer. If the towing
vehicle is operational but the trailer is
not, then the trailer does not qualify for
any roadside services.
Vehicles Sold in the United States:
Using Roadside Assistance
Complete the roadside assistance
identification card and place it in your
wallet for quick reference. This card is in
the owner's information portfolio in the
glove compartment.
United States vehicle customers who
require Roadside Assistance, call
1-800-241-3673.
If you need to arrange roadside assistance
for yourself, Ford Motor Company
reimburses a reasonable amount for
towing to the nearest dealership within
35 mi (56 km)
. To obtain reimbursement
information, United States vehicle
customers call 1-800-241-3673.
Customers need to submit their original
receipts.
173
2018 Transit Connect (CHC) Canada/United States of America, CG3709en enUSA, Edition date: 201704, First Printing Roadside Emergencies
Page 266 of 449
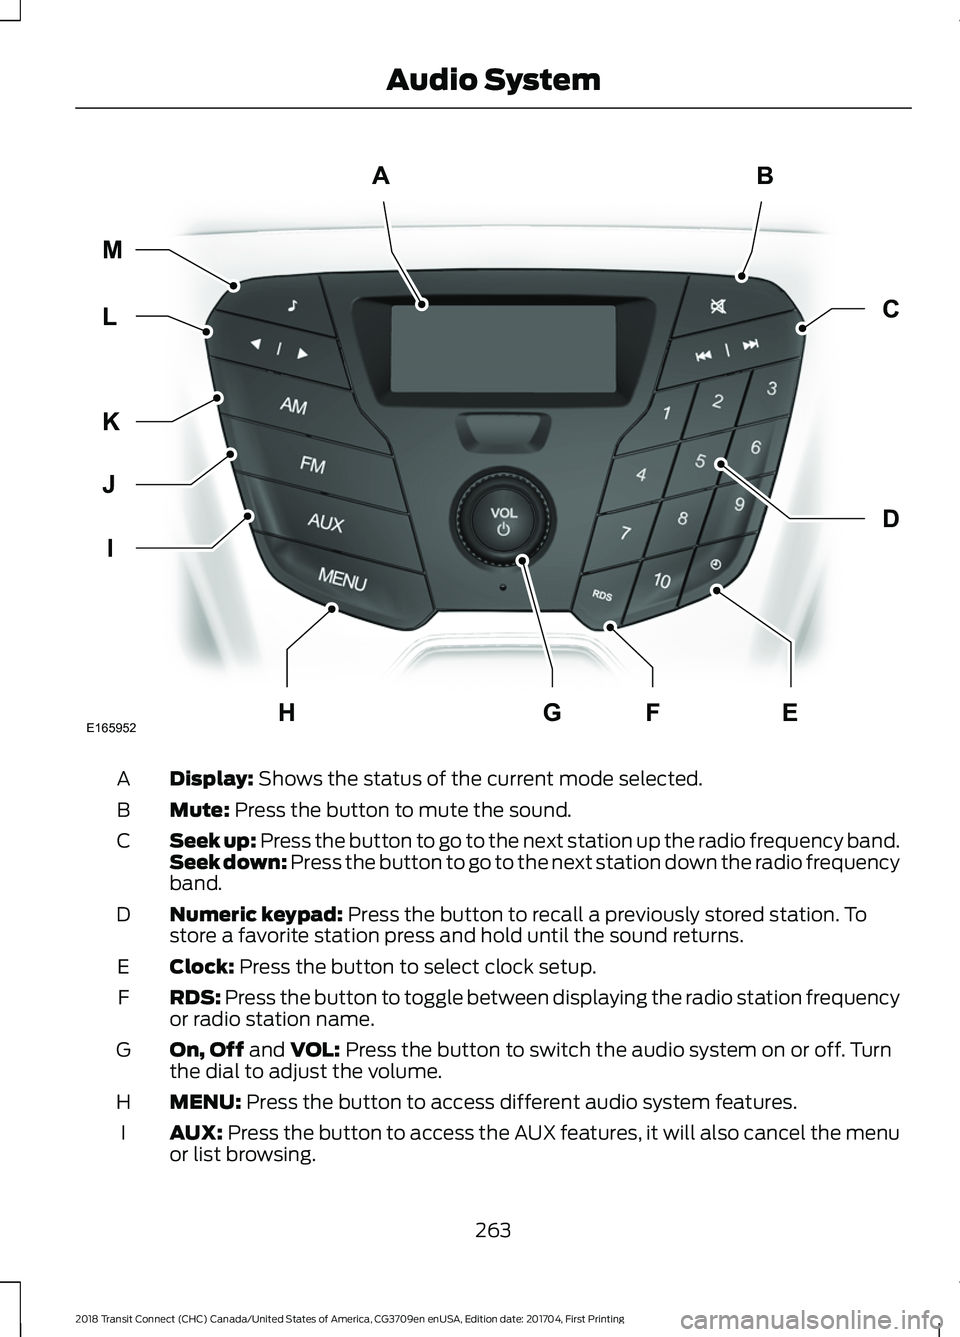
Display: Shows the status of the current mode selected.
A
Mute:
Press the button to mute the sound.
B
Seek up: Press the button to go to the next station up the radio frequency band.
Seek down: Press the button to go to the next station down the radio frequency
band.
C
Numeric keypad:
Press the button to recall a previously stored station. To
store a favorite station press and hold until the sound returns.
D
Clock:
Press the button to select clock setup.
E
RDS:
Press the button to toggle between displaying the radio station frequency
or radio station name.
F
On, Off
and VOL: Press the button to switch the audio system on or off. Turn
the dial to adjust the volume.
G
MENU:
Press the button to access different audio system features.
H
AUX:
Press the button to access the AUX features, it will also cancel the menu
or list browsing.
I
263
2018 Transit Connect (CHC) Canada/United States of America, CG3709en enUSA, Edition date: 201704, First Printing Audio SystemAB
D
C
I
J
K
L M
EHFGE165952
Page 277 of 449
SIRIUS satellite radio is a
subscription-based satellite radio service
that broadcasts a variety of music, sports,
news, weather, traffic and entertainment
programming. Your factory-installed
SIRIUS satellite radio system includes
hardware and a limited subscription term,
which begins on the date of sale or lease
of your vehicle. See an authorized dealer
for availability.
For more information on extended
subscription terms (a service fee is
required), the online media player and a
complete list of SIRIUS satellite radio
channels, and other features, please visit
www.siriusxm.com in the United States,
www.siriusxm.ca in Canada, or call SIRIUS
at 1-888-539-7474.
Satellite Radio Electronic Serial
Number (ESN)
You need your ESN to activate, modify or
track your satellite radio account. When in
satellite radio mode, tune to channel 0.
Troubleshooting Action
Condition
Message
No action required. This
message should disappear
shortly.
Radio requires more than
two seconds to produce
audio for the selected
channel.
Acquiring\b
If this message does not
clear shortly, or with an igni-
tion key cycle, your receiver
may have a fault. See an
authorized dealer for service.
There is an internal module
or system failure present.
Satellite antenna fault
SIRIUS system failure
Tune to another channel or
choose another preset.
The channel is no longer
available.
Invalid Channel
Contact SIRIUS at 1-888-
539-7474 to subscribe to
the channel, or tune to
another channel.
Your subscription does not
include this channel.
Unsubscribed Channel
The signal is blocked. When
you move into an open area,
the signal should return.
The signal is lost from the
SIRIUS satellite or SIRIUS
tower to your vehicle
antenna.
No Signal
No action required. The
process may take up to
three minutes.
Update of channel
programming in progress.
Updating\b
274
2018 Transit Connect (CHC) Canada/United States of America, CG3709en enUSA, Edition date: 201704, First Printing Audio System
Page 289 of 449
Description and action
Menu Item
Switch your vehicle's microphone off. To switch the
microphone on, select the option again.
Mic. off
Switch a call from an active hands-free environment to
your cellular phone for a more private conversation. When
selected, the audio display indicates the call is private.
Privacy
Put an active call on hold. When selected, the audio display
indicates the call is on hold.
Hold
Enter numbers using the audio system's numeric keypad
(for example, numbers for passwords).
Dial a number
Join two separate calls. The system supports a maximum
of three callers on a multiparty or conference call.
Join calls
1. Select the More option.
2. Access the desired contact through the system or use
voice commands to place the second call. Once actively
in the second call, select the
More option.
3. Scroll to the option to join calls and press the OK button.
Access your phonebook contacts.
Phonebook
1. Select the
More option.
2. Scroll to the option for phonebook and press the OK
button.
3. Scroll through your phonebook contacts.
4. Press the
OK button again when the desired contact
appears in the audio display.
5. Press the OK button or dial button to call the selection.
Access your call history log.
Call History
1. Select the
More option.
2. Scroll to the option for call history and press the OK
button.
3. Scroll through your call history options (incoming,
outgoing or missed).
4. Press the
OK button again when the desired selection
appears in the audio display.
5. Press the OK button or dial button to call the selection.
Accessing Features through the
Phone Menu
You can access your call history,
phonebook, sent text messages, as well
as access phone and system settings. 1. Press the
PHONE button to enter the
phone menu.
2. Select one of the options available.
286
2018 Transit Connect (CHC) Canada/United States of America, CG3709en enUSA, Edition date: 201704, First Printing SYNC™
Page 290 of 449
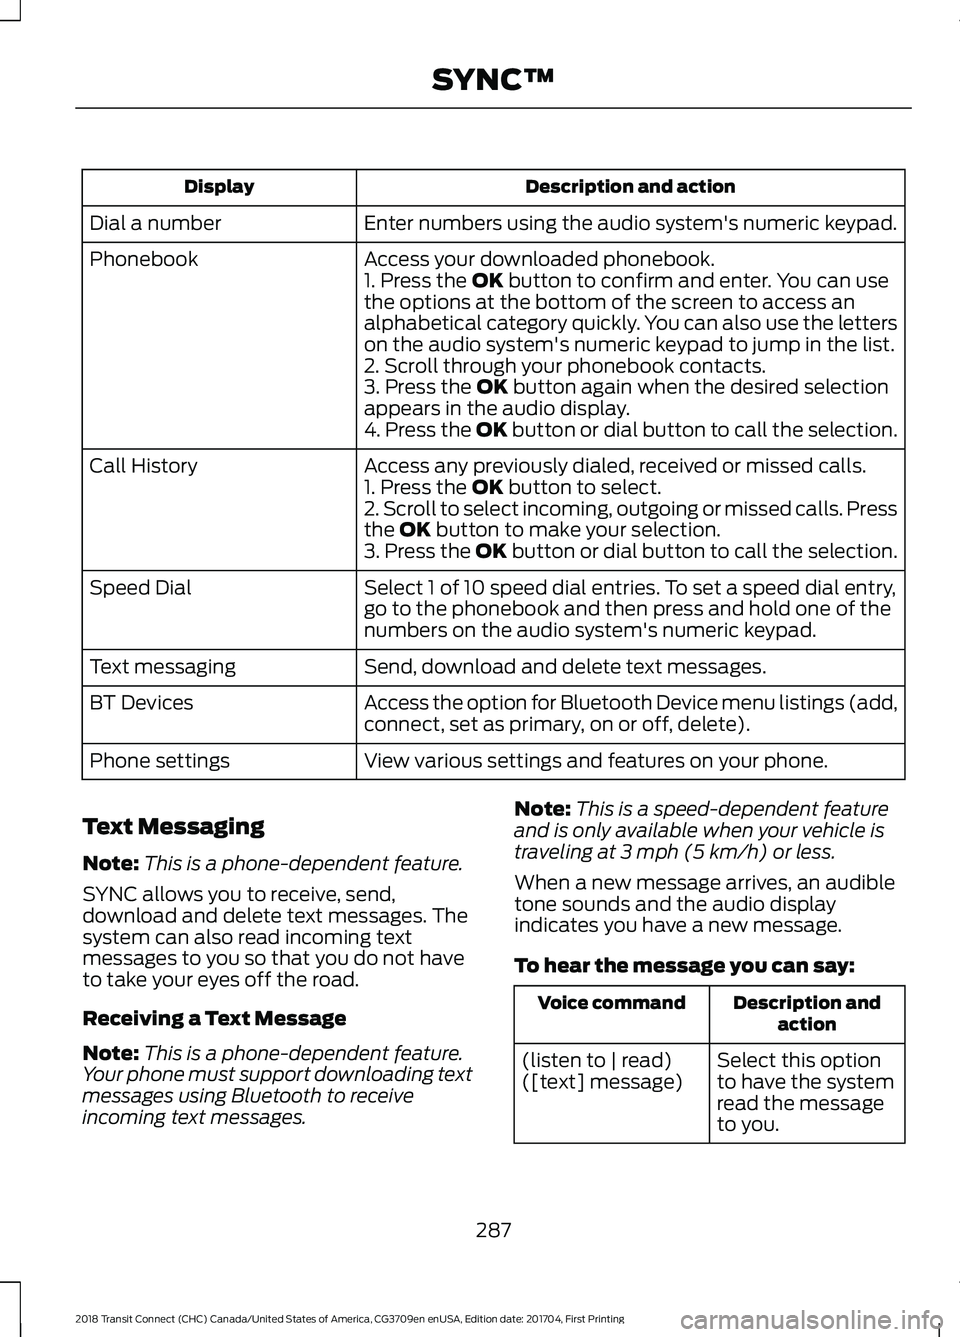
Description and action
Display
Enter numbers using the audio system's numeric keypad.
Dial a number
Access your downloaded phonebook.
Phonebook
1. Press the OK button to confirm and enter. You can use
the options at the bottom of the screen to access an
alphabetical category quickly. You can also use the letters
on the audio system's numeric keypad to jump in the list.
2. Scroll through your phonebook contacts.
3. Press the
OK button again when the desired selection
appears in the audio display.
4. Press the OK button or dial button to call the selection.
Access any previously dialed, received or missed calls.
Call History
1. Press the
OK button to select.
2. Scroll to select incoming, outgoing or missed calls. Press
the
OK button to make your selection.
3. Press the OK button or dial button to call the selection.
Select 1 of 10 speed dial entries. To set a speed dial entry,
go to the phonebook and then press and hold one of the
numbers on the audio system's numeric keypad.
Speed Dial
Send, download and delete text messages.
Text messaging
Access the option for Bluetooth Device menu listings (add,
connect, set as primary, on or off, delete).
BT Devices
View various settings and features on your phone.
Phone settings
Text Messaging
Note: This is a phone-dependent feature.
SYNC allows you to receive, send,
download and delete text messages. The
system can also read incoming text
messages to you so that you do not have
to take your eyes off the road.
Receiving a Text Message
Note: This is a phone-dependent feature.
Your phone must support downloading text
messages using Bluetooth to receive
incoming text messages. Note:
This is a speed-dependent feature
and is only available when your vehicle is
traveling at
3 mph (5 km/h) or less.
When a new message arrives, an audible
tone sounds and the audio display
indicates you have a new message.
To hear the message you can say: Description and
action
Voice command
Select this option
to have the system
read the message
to you.
(listen to | read)
([text] message)
287
2018 Transit Connect (CHC) Canada/United States of America, CG3709en enUSA, Edition date: 201704, First Printing SYNC™